
Cool Touch P800 TSA8044 - Uncategorized Teesa - Free user manual and instructions
Find the device manual for free Cool Touch P800 TSA8044 Teesa in PDF.


| Product Type | Air Cooler / Fan (evaporative) |
| Brand | Teesa |
| Model | Cool Touch P800 TSA8044 |
| Dimensions (H x W x D) | 76 x 32 x 23 cm |
| Weight | 4.8 kg |
| Power Supply | 220-240 V ~ 50-60 Hz |
| Power Consumption | 80 W |
| Airflow Rate | 300 m³/h |
| Maximum Air Speed | 8 m/s |
| Noise Level | <65 dB |
| Water Tank Capacity | 4 L |
| Maximum Room Size | 10 m² |
| Fan Speeds | 3 (Low, Medium, High) |
| Operation Modes | 3 (Normal, Nature, Sleep) |
| Timer | 0.5 to 7.5 hours |
| Oscillation | Yes (Swing function) |
| Cooling Function | Yes (water pump + paper filter) |
| Ice Boxes Included | 2 |
| Filters | Dust filter (washable) and paper filter (cleanable) |
| Control | Touchpad control panel and remote control |
| Remote Control Battery | CR2025 (coin cell) |
| Power Cord Length | 1.5 m |
| Color | White |
| Usage | Indoor only, home use |
Frequently Asked Questions - Cool Touch P800 TSA8044 Teesa
User questions about Cool Touch P800 TSA8044 Teesa
0 question about this device. Answer the ones you know or ask your own.
Ask a new question about this device
Download the instructions for your Uncategorized in PDF format for free! Find your manual Cool Touch P800 TSA8044 - Teesa and take your electronic device back in hand. On this page are published all the documents necessary for the use of your device. Cool Touch P800 TSA8044 by Teesa.
USER MANUAL Cool Touch P800 TSA8044 Teesa
natural_image
White teesa brand air purifier with circular vent and heat sink (no visible text or symbols on device body)Návod k obsluze
cs
Bedienungsanleitung
DE
Owner's manual
EN
Εγχειρίδιο χρήσης
GR
Instrukcja obsługi
PL
Manual de utilizare
RO
Návod na použitie
SK
Návod k obsluze
teesa
Thank you for purchasing TEESA appliance. Please read this operation instruction carefully before use, and keep it for future use. Distributor does not take responsibility for damages caused by inappropriate handling and use of the product.
SAFETY INSTRUCTIONS
In order to reduce the injuries or damages, follow basic safety precautions applied when using any electrical device, including the following:
- Read this instruction manual carefully, even if you are familiar with the appliance. Keep the manual for future reference.
-
Before connecting the device to power supply socket, make sure the voltage indicated on the appliance corresponds to the voltage in the power supply socket.
-
Place the device on flat, stable surface.
-
Protect this device from shock and being dropped.
-
Clean this device in accordance to instructions listed in "Cleaning and Maintenance" section.
-
ALWAYS turn off the device and disconnect it from the mains supply:
- if it's not operating correctly,
- if there's an uncommon voice when using,
• before disassembling the device,
• before cleaning,
- when not in use.
-
When you disconnect the power cord of the device, grasp and pull the plug, not the cord/cable.
-
This appliance may be used by children who are above 8 years old and by persons with reduced physical, sensory or mental capabilities, or lack of experience and knowledge, if they are supervised and guided by a person who is responsible for their safety in a cautious manner, and all the safety precautions are understood and followed. Children should not play with this device. Children should not perform cleaning and servicing of the device unsupervised.
-
Fixed power cable may only be replaced in an authorized service point.
-
Keep the device and its cord/cable away from heat, water, moisture, sharp edges and any other factor which may damage the appliance or its cord.
-
Do not place the appliance in water or any liquid; nor handle/use it with wet or moist hands.
-
Do not use the product for purposes different from displayed in this operating manual.
-
Do not use unauthorized accessories.
-
Appliance for home use; do not use it for commercial or industrial purposes. Device for indoor use only.
-
DO NOT use this device if the cord or the plug is damaged, or the appliance is broken.
-
Do not attempt to repair this appliance yourself. Only authorized and qualified personnel may repair this device. Never disassemble this device.
-
Do not insert your fingers or any other objects into the air inlet and outlet.
-
Do not block or cover air inlet and outlet.
-
Do not place anything on the top of the device.
-
Do not place the device on soft surfaces such as bed or sofa as this could cause the device to tip over.
-
Provide enough space around the device to allow free circulation (at least one meter from walls or furniture).
PRODUCT DESCRIPTION
FRONT
BACK
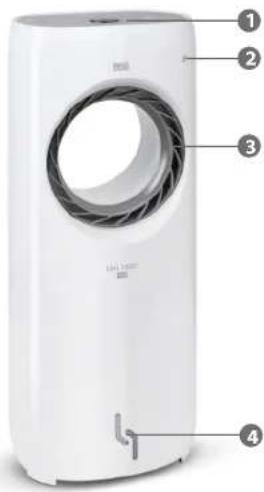
- Control panel
- IR sensor
- Air outlet
-
Water level indicator
-
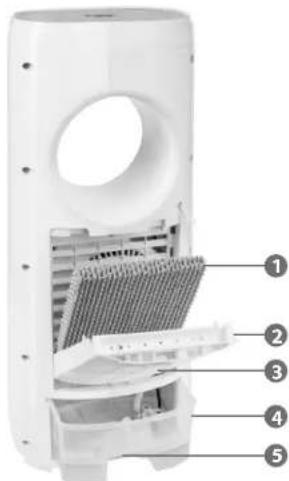
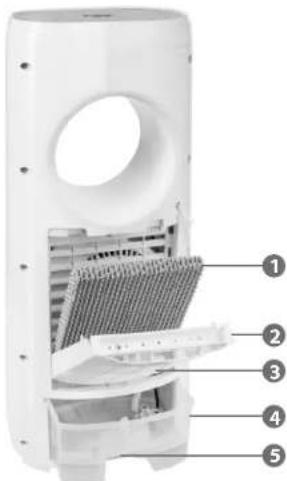
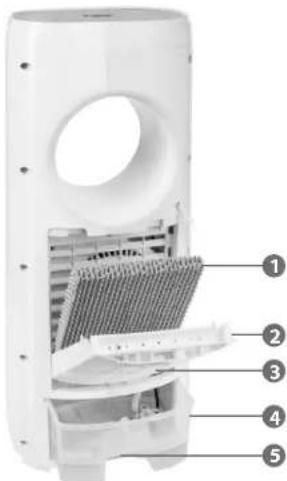
Paper filter
- Latches
- Dust filter
- Water tank
- Water tank lock
COOLING FUNCTION
This device can be used as a classic fan or as an air cooler. When cooling function is on, water pump will take the water from the water tank and pour it onto the paper filter. Paper filter absorbs the temperature of the water and the evaporated air is blown out with the help of fan.
Prior to use, make sure the filters are properly mounted, then fill the water tank with water and press the COOLER button.
Filling water tank
It is necessary to fill the water tank with water if you want to use cooler function. If water level is below the MIN marking or there is no water in the water tank it is forbidden to turn on the cooler function. Activating cooler function with insufficient amount of water may cause malfunction of the water pump.
- Turn the water tank lock to horizontal position and slide out the water tank.
- Pour only clean water to the water tank. When filling the water tank please keep observing water level indicator on the water tank. Make sure to pass MIN marking but do not fill in more than MAX marking.
- When water tank is filled with proper amount of water, slide the water tank back in and close the lock.
Important:
- When water tank is filled with water, make sure not to lean it or bump into it as to avoid leaks and damaging the device.
- Check water level in the water tank regularly when cooling function is on. If the water level is low and drops down to MIN marking, pour more water. Always make sure there is enough water inside the water tank.
- It is recommended to replace water at least once a week.
• Water tank must be filled only with clean water.
Ice boxes
In order to increase cooling effect, use ice boxes which are supplied with the unit.
- Prior to use, fill the ice boxes with water, screw the cap back on and shake the ice box. Then place the ice boxes in the freezing compartment of your refrigerator for a few hours. When they have frozen successfully, take them out of the refrigerator.
- Slide out the water tank and put ice boxes inside.
- Pour water into the water tank up to the MAX marking.
- Be sure to first put the ice boxes inside the water tank, and then fill in water.
CONTROL PANEL
OPERATION
Find proper location for the device: flat and stable surface, with enough space around to allow free circulation.
Connect the device to power mains. Device issues a beep and power indicator lights up. Device enters standby mode.
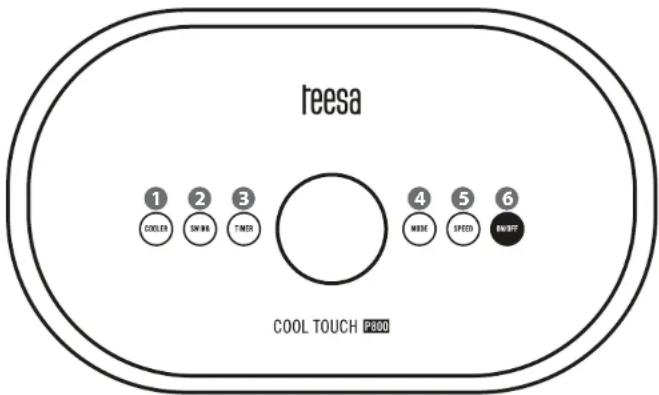
- COOLER button: Press this button to turn on cooling function (LED indicator lights up). Press this button again to turn off this function (LED goes off).
- SWING button: Press this button to turn on oscillation function (LED indicator lights up). Press again to turn off this function (LED goes off).
- TIMER button: Press this button to set the device to turn off automatically after preset time within the range from 0,5 to 7,5 hours. Timer increases by 0,5 hour with each pr of the button. Corresponding indicator will light up next to the selected setting. When time is up, the device will turn off automatically.
- MODE button: Press this button to switch between 3 available operation modes: normal nature and sleep. Corresponding indicator will light up next to the selected setting.
- SPEED button: Press this button to switch between 3 available fan speed settings: low, medium and high. Corresponding indicator will light up next to the selected setting.
- ON/OFF button: Press this button to turn on/off the device.
REMOTE CONTROL
You can operate the device with the control panel or the remote supplied with the unit. The remote control has the same functions as the control panel on top of the device.
Prior to use, install the battery according to the following instructions:
- Slide out the battery tray.
- Insert CR2025 battery with correct polarization.
- Slide the tray in so that it locks in place.
CLEANING AND MAINTENANCE
After operating for long time, the dust accumulated in the dust filter or paper filter may influence the airflow. Therefore it is recommended to clean device and filters regularly. Please follow the steps below to clean your device.
Turn off the unit and unplug the power cord before cleaning and maintenance.
- Do not use any abrasives or chemical agents to clean any parts of the device.
- Make sure all the parts of the device are dry before use.
Dust filter
Press both locks simultaneously and pull out the dust filter. Use a brush to clean the dust and dirt from the filter. If necessary clean it gently with a slightly damp cloth. Make sure to wipe it dry before refitting. Reassemble the filter so that it locks in place.
Paper filter
After removing the dust filter you can see the paper filter. Take it out of the device. Use a clean, soft brush to remove dust and dirt. Rinse with water if needed and leave it to dry in open air.
EN
Water tank
Turn the water tank lock to horizontal position and pull the water tank. Use soft cleaning agents for cleaning. Wash with water and rinse then place it to its housing by pushing gently. Turn the lock to vertical position.
Housing
Clean the housing with a soft, slightly damp cloth.
SPECIFICATION
Use it as a fan or air cooler
Cools and humidifies air
3 speed settings
3 operation modes
Timer
Oscillation function
Touchpad
Water level markings
TECHNICAL DATA
Maximum room size: 10^2 m
Airflow: 300 m³/h
Water tank capacity: 4 l
Max. speed: 8 m/s
Noise level: <65 dB
Power: 80 W
Power supply: 220 - 240 V; 50 - 60 Hz
Power cord length: 1,5 m
Weight: 4,8 kg
Dimensions: 76 x 32 x 23 cm
In set: 2 ice boxes, remote control, user's manual

It is forbidden to place equipment waste marked with the symbol of a crossed-out trash bin
together with other waste. This equipment is subject to collection and recycling. The

harmful substances it contains can cause environmental pollution and pose a threat to human health.
teesa
GR
TYL

Brand : Teesa
Model : Cool Touch P800 TSA8044
Category : Uncategorized