
EliteCook K70 WiFi Duo - Frying Pan TESLA - Free user manual and instructions
Find the device manual for free EliteCook K70 WiFi Duo TESLA in PDF.


| Product Type | Multifunction Pressure Cooker with Hot Air Lid |
| Model | EliteCook K70 WiFi Duo |
| Brand | TESLA |
| Capacity | Approx. 5 L (Stainless Steel Cooking Pot) |
| Pressure Settings | Low (30–45 kPa) and High (50–65 kPa) |
| Cooking Programs | Soup, Meat, Legumes, Rice, Steam, Slow Cook, Yogurt, Fry, Sous Vide, Manual |
| Hot Air Programs | Hot Air (80–200°C), Drying (30–80°C), Defrost (~50°C) |
| Connectivity | WiFi 2.4 GHz via Smart Life app (Android/iOS) |
| Control Panel | Touch buttons with LED display |
| Safety Features | Blue safety valve, pressure relief valve, silicone seal, automatic pressure release |
| Included Accessories | Stainless steel cooking pot, hot air lid, condensate pot, silicone seal, steam rack |
| Material | Stainless steel pot, plastic outer body, silicone seal |
| Power Supply | AC 220–240V, 50/60 Hz |
| Power Consumption | Approx. 1000W |
| Weight | Approx. 6 kg |
| Dimensions | Approx. 30 x 30 x 30 cm |
| Cleaning and Maintenance | Hand wash lid and seals; stainless steel pot dishwasher safe; wipe body with damp cloth |
| Warranty | Standard warranty through retailer |
Frequently Asked Questions - EliteCook K70 WiFi Duo TESLA
User questions about EliteCook K70 WiFi Duo TESLA
0 question about this device. Answer the ones you know or ask your own.
Ask a new question about this device
Download the instructions for your Frying Pan in PDF format for free! Find your manual EliteCook K70 WiFi Duo - TESLA and take your electronic device back in hand. On this page are published all the documents necessary for the use of your device. EliteCook K70 WiFi Duo by TESLA.
USER MANUAL EliteCook K70 WiFi Duo TESLA
natural_image
Technical line drawing of a mechanical component with labeled part 1 (no text or symbols beyond label)ANDROID
Zapnutie/Vypnutie WiFi
PRED PRVÝM POUŽITÍM
natural_image
Technical line drawing of a mechanical component with labeled part 1 (no text or symbols beyond label)PROGRAM TEPLOTA /ČAS
ANDROID
ANDROID
Dear customer, thank you for choosing the TESLA EliteCook K70 WiFi Duo.
Before using the pressure cooker, please read the safety instructions carefully and follow all normal safety rules.
IMPORTANT SAFETY INSTRUCTIONS
THIS DEVICE IS INTENDED FOR HOUSEHOLD USE ONLY.
Read and understand all instructions. Failure to follow the instructions below may result in electric shock, fire, or serious injury. The warnings, cautions, and instructions discussed in this manual cannot cover all possible conditions and situations that may occur.
This device is a complex electromechanical device, please pay attention to the following instructions:
- CAUTION! During cooking and when opening the top lid, strong vertical escape of hot steam may occur. The casing, pot and metal parts of the appliance become hot during operation! Be careful!
- This pressure cooker cooks under pressure. Improper use may result in scalding. Always ensure that the pressure cooker is properly closed before operation.
- Do not open the pressure cooker until all internal pressure has been released. The release valve must be turned to the „Venting“ position.
- Never place food or pour liquids into the base of the appliance. Only the Stainless Steel Cooking Pot is to be filled with food and liquids. If the Stainless Steel Cooking Pot is not inserted, the display will show POT.
- Do not put more food than the recommended amount. The appliance is not intended for cooking classic deep-fried foods (do not fill the bowl with oil). The healthy method of deep-frying is based on the principle of hot air circulation, which requires no or very little oil.
- Before each use, check the ventilation ducts and vents to ensure they are free of any blockages. Remove and clean any debris from the vent valve.
- To protect against electric shock, do not immerse cord, plug, or pressure cooker in water or other liquid.
• Before cleaning, unplug the power cord from the outlet and let the pressure cooker cool down. - To avoid electric shock, cook only in the original stainless steel cooking pot. Avoid spilling or overflowing liquids outside the stainless steel cooking pot, and avoid spilling liquids on the hot air lid connector.
- Do not use the pressure cooker with a damaged cord. If the pressure cooker is not operating properly or has been damaged in any way, return the pressure cooker to TESLA Service for inspection, repair, or electrical and mechanical adjustment.
- Do not fill the pressure cooker more than two-thirds full. Additionally, the pressure cooker should not be filled more than half full when cooking foods that foam or expand, such as rice, grains, dried beans, peas and lentils, or foods that are mostly liquids, such as soups. You may block the pressure cooker's vent and build up excessive pressure.
- Do not use pressure to cook apples, cranberries, rhubarb, grains, pasta, split peas, and dried soup mixes. These foods tend to foam, and the foam and its spatter can block the air vent or air vent/hood lock.
- Do not remove the metal ring in the top lid that holds the silicone seal. If the metal ring is
damaged, stop using the pressure cooker immediately and replace it.
- Do not use the pressure cooker for pressure cooking with oil (deep frying with the lid closed).
- Do not open the pressure cooker until it has cooled down and the internal pressure has been released. If the blue valve does not allow the top lid to be turned, this means that the pressure cooker is still under pressure.
- Do not place the pressure cooker on a gas burner, electric burner, or in a heated oven.
- Do not use the pressure cooker in excessively hot, dusty or humid environments. Keep it away from flammable and volatile substances.
- Do not repair the pressure cooker, as this may expose you to the risk of electric shock and void the warranty.
- Do not use the pressure cooker if your hands or feet are wet.
- The surface between the stainless steel pot and the heating element at the bottom of the pressure cooker should always be clean.
- Do not use the stainless steel pot for cooking with other heat sources.
- Replace the silicone sealing ring if it has changed shape, size or is otherwise mechanically damaged.
- Adult supervision is necessary when using the pressure cooker near children. It is not recommended for children to use the pressure cooker alone.
- Be careful when moving the pressure cooker due to the very hot liquid. Do not touch hot surfaces. Always use the pressure cooker handles.
- Use only original TESLA accessories intended for this model.
- The manufacturer and importer into the European Union is not liable for damage caused by the operation of the pressure cooker, such as injury, scalding, fire, damage, damage to other things, etc.
WARNING: The plastic bags used to package this appliance can be dangerous. To avoid the risk of suffocation, keep these bags out of the reach of children. These bags are not toys.
IMPORTANT INFORMATION ABOUT THE POWER CORD
To reduce the risk of electric shock, do not attempt to modify the power cord plug. The length of the power cord reduces the risk of becoming entangled in or tripping over the power cord.
DO NOT USE THE PRESSURE COOKER WITH AN EXTENSION CORD OR POWER ADAPTER. PLUG THE POWER CORD DIRECTLY INTO AN ELECTRICAL OUTLET.
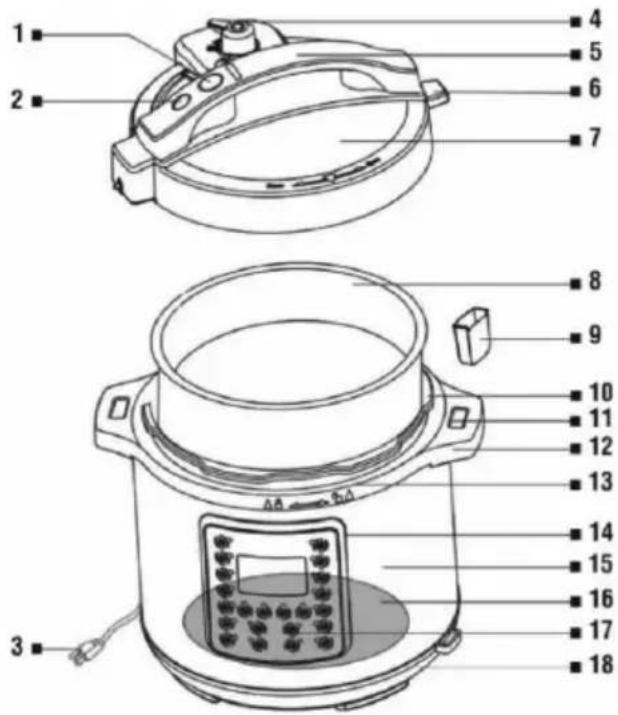
PRESSURE COOKER
1 Top cover release button
2 Blue safety valve
3 Power cable
4 Pressure relief valve
5 Top lid handle
6 Plastic stopper
7 Top cover
8 Stainless steel pot
9 Condensate pot
10 Outer pot
11 Connector for connecting the hot air lid
12 Handle for holding the pressure cooker
13 Upper circle
14 Control panel
15 Pressure cooker body
16 Heater
17 Sensor
18 Pressure cooker bottom
HOT AIR LID
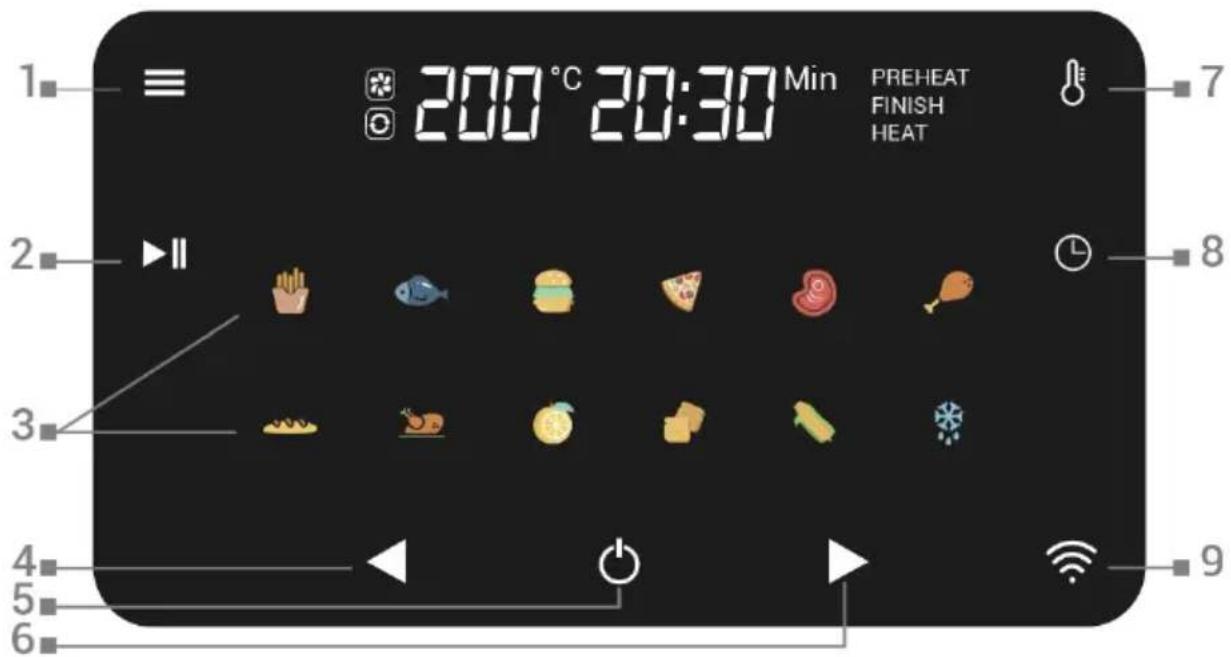
1 Program selection button 6
2 Start/Pause 7
3 Programs 8
4 Reducing the temperature 9 /heating time
5 Power On/Off
Increase temperature/heating time
Temperature change
Changing the heating duration
Turn WiFi on/off
BEFORE FIRST USE
- Remove all packaging materials.
- Remove the sticker on the front of the product.
- Wash the silicone seal and top lid in warm, soapy water. Do not immerse the top lid in water. Rinse and dry the parts thoroughly.
- Wipe the underside of the hot air lid with a damp cloth.
- WARNING! Never pour water inside the pressure cooker and never immerse the power cord in water. Always make sure the stainless steel pot is completely dry before placing it back into the pressure cooker body.
• If the stainless steel cooking pot is not inserted, the display will show POT. - After the initial cleaning, reassemble the top lid of the pressure cooker and replace the metal ring with the silicone seal.
- Connect the plug to the pressure cooker, then plug the power cord into a power outlet.
- To disconnect the pressure cooker, press the „Keep Warm/Cancel“ button once, then unplug the power cord.
- Although you do not need to clean the metal filter and blue safety valve after each use, you should check them regularly and clean them if necessary. Clean the metal filter with a damp cloth and dishwashing detergent.
natural_image
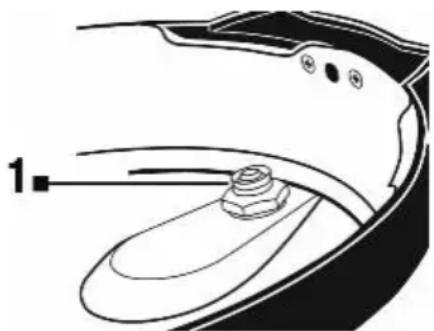
Technical line drawing of a mechanical component with labeled part 1 (no text or symbols beyond label)Remove the small gasket from the bottom of the top cover of the blue safety valve, pull out the blue safety valve on the top and wash it in warm, soapy water. Check the release nut on the pressure relief valve vent pipe regularly. If necessary, retighten it gently with a wrench.
• ! CAUTION! Never loosen or remove the nut.
Reassemble the blue safety valve into the top lid. Insert the blue safety valve with the narrower side into the lid opening from the top and then fit the small silicone ring (1) onto the valve from the bottom of the lid. Incorrect assembly will cause the top lid to leak and steam to escape!
- Place the plastic condensate pot on the back of the pressure cooker.
OPENING THE PRESSURE COOKER
Move the valve to the „Venting“ position. Hold the top lid firmly, press the blue „OPEN“ button to release the top lid and turn it counterclockwise. However, a slight vacuum may develop in the pressure cooker, so sometimes you can also lift the stainless steel pot with the lid.
CLOSE THE PRESSURE COOKER
Before closing the pressure cooker, make sure that the silicone seal is properly fitted around the entire circumference of the top lid, the blue safety valve with seal and the metal filter are in place. Firmly grasp the top lid and turn it clockwise until you hear a click and a beep. The mark on the top lid will align with the mark on the body of the pressure cooker. If the top lid is not fitted or not closed properly, the display will show LID (except Frying program).
The „Frying“ function should only be used without the top lid.
Warning: If the silicone seal is damaged, never continue cooking!
IMPORTANT INFORMATION FOR DAILY USE
To ensure that the pressure cooker works properly, check the following before each use:
NEVER COOK WITHOUT A STAINLESS STEEL COOKING POT
Make sure the outside of this stainless steel cooking pot is completely dry before placing it in the pressure cooker body. After placing the stainless steel pot in the pressure cooker body, rotate it slightly to ensure good contact between the stainless steel pot and the heating element at the bottom of the pressure cooker. If the air vent filter is clogged, clean it. You do not need to clean the metal filter after each use of the pressure cooker, but you should check it regularly and clean it if necessary.
WARNING
We recommend soaking foods such as dry beans, peas or lentils in water before cooking. These foods tend to foam during cooking and could cause the vent pipe to become blocked. Never pressure cook apples, cranberries, rhubarb, pasta and dried soup mixes.
• Make sure you do not exceed the "MAX PRESSURE COOK" mark on the stainless steel pot.
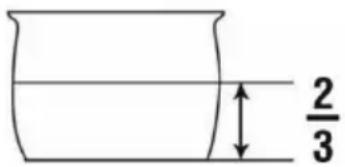
When cooking foods that foam or expand like rice, legumes, beans, peas, lentils, dried vegetables, or foods that are mostly liquids like soups, never fill the stainless steel pot more than halfway full!
- Make sure you do not exceed the „MAX RICE CUP ½“ mark in the stainless steel pot when cooking rice.
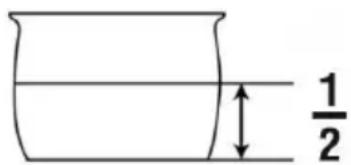
When cooking rice, do not exceed the MAX RICE CUP 12 mark.
The display shows
0000 End of the countdown/cooking not started
bb Ending pressure cooking and switching to „Keep warm“ mode
POT Warning - stainless steel cooking pot not inserted
lid For attention - the top lid is not attached or is not closed properly
BUTTON PRESSURE/TEMPERATURE
Soup, Meat, Bean, Rice, Steam, Manual setting 30 \~ 45 kPa /50 \~ 65 kPa
Yogurt 35 °C \~ 43°C
Slow cook 85 °C \~ 98 °C
Fry 150 °C \~ 190 °C
Sous vide approx. 55 °C
Keep warm approx. 75 °C \~ 80 °C
Select the desired program, use the PREFERENCES or +/- buttons to set the cooking time, use the PRESSURE button to set low or high pressure and press the START button to start cooking. As long as the pressure cooker is building pressure, the time on the display will not change. The pressure cooker (except for the SLOW COOK program) will only start counting down when the correct pressure/temperature for the selected program is reached. For the SLOW COOK program, the countdown starts immediately after starting. After the cooking program (soup, meat, legumes, steam, slow cook, manual setting) is complete, the pressure cooker will go into keep warm mode. After the rice, yogurt, frying and Sous vide programs are complete, it will go into standby mode. You can stop cooking at any time by pressing the „Keep Warm/Cancel“ button and the pressure cooker will then go into standby mode.
PREFERENCES
This button is used in combination with the program buttons. For example, if you select the „Soup“ program, the display will show a cooking time of 30 minutes („P30“). If you then press the „Preferences“ button again, the cooking time will change to 60 minutes („More“), a second press of the preset button will change the soup cooking time to 20 minutes („Less“), and another press will change the time to 30 minutes („Medium“).
PRESSURE
The „Pressure“ button is used in combination with the pressure cooking program buttons.
The default working pressure is high pressure, the „Pressure“ button switches the pressure setting between „High Pressure“ (50 \~ 65 kPa) and „Low Pressure“ (30 \~ 45 kPa) for the pressure cooking function.
Example: First press the „Rice“ button and set the cooking time, the „High Pressure“ indicator is on, press the „Pressure“ button once and the „Low Pressure“ indicator will be on.
• High pressure is suitable for most foods.
- Use low pressure for delicate foods such as fish and some vegetables.
HOW TO USE A PRESSURE COOKER FOR PRESSURE COOKING
Before you start cooking, read the „IMPORTANT SAFETY INSTRUCTIONS“ section and always check that the pressure cooker is assembled correctly.
- Place the pressure cooker on a dry and flat surface.
- Hold the top lid firmly, turn it clockwise until you hear a click and the mark on the top lid is aligned with the mark ▲ on the pot body.
- Move the valve to the „Sealing“ position.
- Select the cooking program on the control panel, set the desired time and pressure (Low or High) and press the START button.
- When the pressure cooker is heated, steam may be released around the safety or vent valve. Once the pressure cooker is properly pressurized, the top lid will lock against opening and the cooking time will begin to count down.
- During cooking, you may sometimes notice steam escaping from the safety or air vent valve. This is normal. It is also normal if you hear the pressure cooker turning on and off during cooking, to check the pressure in the pot.
- After the cooking time has elapsed, the pressure cooker will beep and automatically switch to „Keep Warm“ mode for the soup, meat, legumes, steam, slow cooking, manual settings programs, and to standby mode for the rice, yogurt, frying and Sous vide programs.
-
After releasing the pressure in the pot, you will see that the blue safety valve in the top lid is in the down position.
-
After the pressure has reduced on its own or after you have quickly released it yourself by turning the valve lever to the „Venting“ position, carefully turn the top lid counterclockwise and lift it straight up so that the condensed liquid drips into the pot.
- After cooking is complete, unplug the power cord from the electrical outlet and then from the pressure cooker.
- ATTENTION! Steam and hot liquid can cause burns. During cooking and when opening the top lid, strong vertical escape of hot steam may occur. Be careful!
- The casing, stainless steel pot and metal parts of the appliance become hot during cooking.
- During cooking, until it cools down, steam may escape from the pressure cooker and there is a risk of scalding.
- As long as there is still pressure in the pressure cooker (the blue safety float valve is in the upper position), do not lean over the pressure cooker as hot steam may escape.
- To release pressure in the pressure cooker, grasp the end of the valve lever (not the entire valve) and turn it to the „Venting“ position.
PRESSURE RELEASE
Quick Pressure Release
This method is used when cooking vegetables, seafood and other delicate foods. After the cooking time has elapsed, press the „Keep Warm/Cancel“ button and immediately move the valve lever to the „Venting“ position. You will hear steam escaping and within 2 to 3 minutes the pressure will be released. The pressure drop will also be visible on the blue safety valve, which will be in the down position.
Slow pressure release
The self-release function is used when cooking foods such as meat, soups, etc. After the cooking time has elapsed, leave the valve lever in the „Sealing“ position. The pressure cooker will slowly cool down and the blue safety valve will move to the lower position.
KEEP WARM/CANCEL
After the cooking time has elapsed (except for the „Rice, Yogurt, Fry and Sous vide“programs), the pressure cooker will beep, automatically switch to „Keep warm“ mode and „bb“ will appear on the display. „Keep warm“ should not be used for more than 4 hours. The quality and texture of the cooked food will start to change after just 1 hour. To cancel the program, press the „Keep warm/Cancel“ button until „0000“ appears on the LED display.
FRY
Use this program for browning/sautéing, typically before pressure cooking or Slow cooking. The „Fry“ program is typically used for meat, vegetables, poultry, browning e.g. onions, reducing liquid after pressure cooking or for a full-flavoured sauce for your food.
Select the desired heating temperature by pressing the „Preset“ button:
Less: approx. 150 °C
Medium: approx. 175 °C
More: approx. 190 °C
Let the pressure cooker preheat for 3 to 4 minutes before actually adding the food. When the browning/sautéing is complete, press the „Keep warm/Cancel“ button. Let the pressure cooker cool for 2 to 3 minutes before pressure cooking. Do not use the top lid during the „Fry“ program.
STEAM
The „Steam“ program is designed for steaming food, such as vegetables, seafood, or reheating food. It can also be used for sterilization. When using the program, insert the steaming holder into the stainless steel pot. Make sure the valve lever is in the „Sealing“ position. When cooking vegetables and seafood, use a quick steam release to prevent overcooking. Use 1\~2 cups (160 ml) of water for 1\~2 minutes to steam fresh or frozen vegetables. Use the “Presets”, „+“ or „-“ buttons to change the cooking time. Unlike other pressure cooking functions, the pressure cooker operates at full power during the „Steam“ program. This high power can burn food if the food is in direct contact with the bottom of the stainless steel pot.
MANUAL SETTINGS
Manually program the pressure level and cooking time according to your favorite recipe or preference. Setting your own cooking time is ideal for cooking meat or poultry weighing more than 1.5 kg.
SLOW COOK
Due to the nature of slow cooking, meat will not brown as it would if it were cooked in a pan or oven. It is not necessary to brown meat or poultry before Slow Cooking, but you can do so if you prefer it that way. Browning ground beef, bacon, and sausage before Slow Cooking may be desirable if you want to remove excess fat from the food. Avoid opening the pot during Slow Cooking, as this will cause significant heat loss. If you must open the pressure cooker, do so as quickly as possible. Some foods, such as carrots, potatoes, and beets, take longer to cook than meat, so cut them into smaller pieces before adding them to the meat.
- It is being cooked without pressure, the valve lever is in the „Venting“ position.
- The default cooking time is 6 hours, the maximum cooking time is 12 hours.
• The slow cooking temperature is 85 °C to 98 °C. - You can also manually set the time for „Slow Cook“, in 30 minute increments, by pressing the „+“ or „-“ buttons.
DELAY
Use this function to delay the start of cooking. We do not recommend using this function for perishable foods such as meat or fish if they are left uncooked for several hours at room temperature. Cooked rice may change its texture to soft due to the longer soaking time or it may burn more easily. Porridge, oatmeal, foamy and sticky foods are also not suitable for this function as they may block the safety valve.
- Place the food in the cooking pot.
- Close the top lid by turning it clockwise.
• Make sure the valve lever is in the „Sealing“ position. - Press the „Delay“ button. The LED display will show „0:30“, which is equal to 30 minutes of delay. Pressing the „Delay“ button again will extend the cooking start delay by another 30 minutes. The maximum delay time is 24 hours.
- The time displayed on the LED display indicates how long the pressure cooker will wait before starting the next selected program.
-
For example, if you want to program the pressure cooker to automatically turn on after 3 hours, press the „Delay“ button several times until the LED display shows „3:00“.
• After setting the delay length, select the program to be started. -
"Delay" button on the front panel will light up and another light will light up next to the program you selected.
- Press the „START“ button to start the delayed start and cooking program.
• The display will count down the time remaining until the program starts. - „Delay“ cannot be used with the Frying, Yogurt and Sous vide programs.
YOGURT
You can make delicious homemade yogurt in a pressure cooker according to your own preferences. You can use pasteurized or fresh milk for production.
Pasteurized milk
• Pour 2 liters of milk into a stainless steel pot.
- Then mix 2 teaspoons of yogurt (unsweetened, without fruit) into the milk and place the stainless steel pot in the body of the pressure cooker.
- Close the pressure cooker, the valve can be either in „Sealing“ position or also in position „Venting“.
- Press the „Yogurt“ button, then press the „Presets“ button until the display shows „08:00“ to culture the milk for 8 hours or „12:00“ to culture the milk for 12 hours, or set your own time using the „+“ or „-“ buttons.
- Press the „START“ button.
- When cultivation is complete, the LED display will show „YOGT“.
- Press the „Cancel“ button.
- Remove the yogurt from stainless steel pot and store it in the refrigerator.
Fresh milk
• Pour 2 liters of milk into a stainless steel pot.
- Close the pressure cooker and move the valve lever to the „Sealing“ position.
- Press the „Yogurt“ button, then press the „Presets“ button until „00:20“ is displayed on the LED display.
- The milk will start to heat up to 72\~83 °C and pasteurize the milk. Then the heating will stop and the LED display will show „YOGT“.
- Press the „Cancel“ button, move the lever to the „Venting“ position and open the lid.
- Remove the stainless steel pot and let the milk cool to about 40 °C, checking the temperature with a thermometer. You can speed up the cooling of the milk by cooling the stainless steel pot in an ice bath.
- Then stir 2 teaspoons of yogurt (unsweetened, without fruit) into the milk and place the stainless steel pot back into the pressure cooker body.
- Close the pressure cooker, the valve can be either in position „Sealing“ or also in position „Venting“.
- Press the „Yogurt“ button, then press the „Presets“ button until the display shows „08:00“ to culture the milk for 8 hours or „12:00“ to culture the milk for 12 hours, or set your own time using the „+“ or „-“ buttons.
- Press the „START“ button.
- When cultivation is complete, the LED display will show „YOGT“.
- Press the „Cancel“ button.
- Remove the yogurt from stainless steel pot and store it in the refrigerator.
SOUS VIDE
Sous vide cooking is a true culinary art! Although it is essentially a very simple cooking method, this cooking method is often used by gourmet chefs to prepare complex meals, rich appetizers and vegetables. But now you can bring five-star cooking quality to your kitchen.
- The thickness of meat, poultry and fish will determine the cooking time. After removing the food from the bag, use a thermometer to verify that a safe internal temperature has been reached.
- Food safety when handling and cooking is always a priority. If you are unsure of proper cooking, add 30 minutes of cooking time to safely pasteurize eggs or poultry.
- Frying after cooking gives foods a crispy texture. After cooking is complete, pour oil into a hot pan and quickly fry the cooked meat for 30 seconds on each side.
• Vegetables will cook faster if they are cut into thin, small pieces. - Fruit can be cooked using Sous Vide to make toppings, purees, syrups and more.
- Always use BPA-free vacuum sealing bags when cooking food. Vacuum seal food in appropriately sized bags.
- Place the food in the stainless steel cooking pot. When cooking multiple portions or types, the bags should not touch each other.
- Add enough water to the pot to ensure your food is fully submerged.
- Close the top lid by turning it clockwise.
- To cook without pressure, set the valve lever to the „Venting“ position.
- Press the „Sous vide“ button.
- Use the "Presets", "+" or "-"buttons to change the cooking time. Press the „START" button to start cooking.
- Once the water reaches the correct temperature, the device will beep and the cooking time will begin to count down.
- When the cooking time has elapsed, the appliance will beep and the display will show 00:00.
- Open the device and lift the top lid straight up so that the residual liquid drips into the pot.
- Carefully remove the bag from the water and enjoy your meal.
HOT AIR
By replacing the top lid with the Hot Air Frying Lid, you can bake, dry or defrost food using hot air. Do not fill the inner stainless steel cooking pot with oil, frying fat or other liquid.
PROGRAM TEMPERATURE / TIME
Hot air programs 80 °C \~ 200 °C/1 min \~1 hour
Drying 30 °C \~ 80 °C/1 hour \~12 hour
Defrosting
approx. 50 °C / 1 min \~1 hour
PRE-heat/ADD food and SHAKE/TURN functions
For selected programs (except Drying and Defrosting), the automatic preheating function is activated after heating is started. When the approximate temperature is reached, you will be prompted to insert food. Remove the hot air lid, insert the food and replace the lid. After approximately 10 seconds, the cooking time will automatically start counting down. You can insert food into the pot even before heating is started; the program will continue automatically 10 seconds after the prompt even if no food is inserted.
Approximately halfway through the cooking time (excluding Pizza, Bread, Drying and Defrost programs), the cooker will beep and prompt you to turn or shake the food. If you do not take any action, the program will continue automatically.
If no mode is selected or started, the device will beep and automatically turn off.
- Place the inner stainless steel pot in the base, you can use the appropriate accessory, frying basket or grid, and place the food.
- Place the hot air lid on the base, once connected, the pressure cooker display will turn off and the display on the hot air lid will light up.
- Press the „ON/OFF“ button.
- Set the desired temperature and cooking time, or press the program selection button and select one of the preset programs.
- To increase or decrease the default cooking time, press the „CHANGE HEATING DURATION“ button and set the desired time by pressing the „INCREASE TEMPERATURE/HEATING DURATION“ or „DECREASE TEMPERATURE/HEATING DURATION“ button.
- To change the temperature, press the „CHANGE TEMPERATURE“ button and set the desired temperature by pressing the „INCREASE TEMPERATURE/HEATING DURATION“ or „DECREASE TEMPERATURE/HEATING DURATION“ button.
- Press the „START/PAUSE“ button to start cooking.
- During cooking, you can press the „START/PAUSE“ button, remove the lid and shake/turn the food to ensure even cooking. Then replace the lid and press the „START/PAUSE“ button to continue cooking.
- When cooking is complete, the device will beep and the display will show „FINISHED“.
- Remove the lid and enjoy your meal.
COMBINATION COOKING
Combination cooking allows you to quickly cook food under pressure and then roast it with hot air.
• Cook food under pressure in a stainless steel cooking pot.
- Remove the stainless steel pot from the base and remove excess liquids.
- Put the pot back in and replace the hot air lid.
- For the procedure, program selection and settings, continue following the instructions in the "HOT AIR" chapter.
CONTROLLING A PRESSURE COOKER/HOT AIR COOKER LID USING YOUR PHONE
• Turn on Bluetooth and Location (GPS) on your phone.
- Install the device control app on your phone and follow the guide to pair it with the pressure cooker.

ANDROID
search for the "Smart Life" app in Google Play

iOS
search for the "Smart Life" app in the Apple Store
• Create your account in the "Smart Life" app and log in.
- Allow all permissions requested by the app.
ANDROID: Allow the app permissions "Location" and "Nearby devices".
iOS: Allow the app permissions "Location", "Bluetooth" and "Local network".
• Plug the pressure cooker into an electrical outlet.
- After logging into the "Smart Life" app, click the "+" icon on the top right, and then click "Add Device".
- The found devices will be displayed under "Discovering devices": "TESLA EliteCook K70 WiFi", click "Add", the WiFi network will be displayed, enter the password to the WiFi network (if it is not already found automatically) and click "Next". The pressure cooker will start pairing with the app.
- After successful pairing, a green icon will appear next to the name and your TESLA EliteCook K70 WiFi pressure cooker has been successfully added to the app.
- Click "Done" and you can now control selected functions of the pressure cooker with your phone.
- Place the hot air lid on the base of the pressure cooker.
- Click the "+" icon in the top right and then click "Add Device".
- The found devices will be displayed under "Discovering devices": "TESLA EliteCook WiFi Lid", click on "Add", the WiFi network will be displayed, enter the password to the WiFi network (if it is not already found automatically) and click on "Next". The hot air lid will start pairing with the app.
- After successful pairing, a green icon will appear next to the name and your TESLA EliteCook WiFi Lid has been successfully added to the app.
- Click "Done" and you can now control selected functions of the hot air lid with your phone.
- Use the pressure cooker programs with the app only with the pressure lid closed except for the Frying program. If the pressure cooking lid is not attached or not closed properly, the app will stop the program after the program has started.
Due to the software requirements of the operating system and Google/Apple's requirements for application security, it is necessary to regularly adjust the application's functions. Also, keep your phone's operating system updated to the latest version. The application requires the operating system Android 10 and higher or iOS 10 and higher, otherwise its functionality cannot be guaranteed.
TROUBLESHOOTING WITH THE APPLICATION
- The TESLA EliteCook K70 WiFi pressure cooker and the TESLA EliteCook K70 WiFi Lid will be displayed separately in the application. When the hot air lid is attached, the pressure cooker will be turned off and will display the Offline status. Once you remove the hot air lid, it will be displayed as Offline and you will be able to connect to the pressure cooker.
- If „TESLA EliteCook K70 WiFi/TESLA EliteCook WiFi Lid“ does not appear in the „Smart Life“ app, reset the WiFi connection. Turn on the pressure cooker, press and hold the „WIFI“ button for at least 5 seconds until you hear a beep, the WiFi icon starts flashing. Then perform a new pairing according to the above procedure.
- Make sure that the WiFi signal coverage for your phone and pressure cooker is good and strong enough. Perform the initial setup of the pressure cooker near your WiFi router.
• Make sure that the „Bluetooth and Location“ (GPS) functions are enabled on your phone.
- Make sure that a third-party application (VPN, antivirus, firewall, etc.) is not blocking access to your phone.
• A WiFi network operating at a frequency of 2.4 GHz and WPA1 or WPA2 security is supported.
- Try connecting to another WiFi router or WiFi Hotspot on another phone to rule out an error on your Internet connection.
- You have too many devices connected to your WiFi router or the ability to connect a new device to it is blocked.
- Restart your WiFi router.
CLEANING A PRESSURE COOKER
After each use:
- Unplug the power cord from the wall outlet and then from the pressure cooker and allow it to cool completely.
- After each use, disassemble and clean the top lid, metal filter, safety valve, pressure relief valve and check the silicone seal.
- Wash the individual parts in warm, soapy water. Do not wash these parts in the dishwasher.
• Make sure the vent pipe is clean, hold the cover up to the light and inspect it. - Clean the vent pipe if it is blocked or partially blocked.
- Dry all parts thoroughly.
- Remove the stainless steel pot and wash it in warm water with a mild detergent. The stainless steel pot is dishwasher safe.
- Never pour liquid into the body of the pressure cooker itself or immerse it in water. Always make sure the pressure cooker is completely dry before using it.
- When you are not using the pressure cooker, store it in a dry place and do not close the top lid tightly.
CLEANING THE HOT AIR LID
After each use:
- Remove the hot air lid from the pressure cooker base and let it cool completely.
- Wipe the hot air lid on the outside and inside with a soft cloth soaked in warm soapy water.
• Dry all parts thoroughly. - Never pour liquid into the body of the hot air lid itself or immerse it in water. Always make sure the hot air lid is completely dry and clean before use.
• If you are not using the hot air lid, store it in a dry place.
DESCRIPTION OF PRESSURE COOKER PROGRAMS
| PROGRAM | TIME | PRESSURE/TEMPERATURE | |||
| Preferences | Preset | Options | Preset | Options | |
| Manual setting (pressure cooking) | Less | 1 minute | 1 - 99 minutes | High | Low - High |
| Center | 30 minutes | ||||
| More | 99 minutes | ||||
| Soup | Less | 20 minutes | 20 - 60 minutes | High | Low - High |
| Center | 30 minutes | ||||
| More | 60 minutes | ||||
| Meat | Less | 15 minutes | 15 - 60 minutes | High | Low - High |
| Center | 30 minutes | ||||
| More | 60 minutes | ||||
| Legumes | Less | 10 minutes | 10 - 90 minutes | High | Low - High |
| Center | 40 minutes | ||||
| More | 90 minutes | ||||
| Rice | Less | 8 minutes | 8 - 15 minutes | High | Low - High |
| Center | 12 minutes | ||||
| More | 15 minutes | ||||
| Slow cooking | Less | 3 hours | 3 - 12 hours | approximately 85 °C - 98 °C | - |
| Center | 6 hours | ||||
| More | 12 hours | ||||
| Steam | Less | 2 minutes | 2 - 25 minutes | High | Low - High |
| Center | 15 minutes | ||||
| More | 25 minutes | ||||
| Yogurt | Less | 8 hours | 8 - 24 hours | 35 °C - 43 °C | - |
| Center | 12 hours | ||||
| More | 20 minutes | - | 72 °C - 83 °C | ||
| Frying | Less | 30 minutes | - | approx. 150 °C | - |
| Center | approx. 175 °C | ||||
| More | approx. 190 °C | ||||
| Sous vide | Less | 1 hour | 1 - 24 hours | approx. 50°C - 55 °C | - |
| Center | 8 hours | ||||
| More | 24 hours | ||||
QUESTIONS AND ANSWERS
- What does it mean when the display shows „E3“ and the pressure cooker stops working? The pressure cooker has overheated. You have probably been using it for pressure cooking with little or no liquid. If this occurs, unplug the appliance and let the pressure cooker cool down slowly, about 10 minutes. Then open the pressure cooker, add liquid, program it and start cooking again.
- What does it mean if the display shows „E1“, „E2“ or „E4“? E1: sensor error, E2: short circuit, E4: switch error. Contact TESLA service.
- Sometimes when pressure cooking, I notice droplets of moisture forming in the area of the pressure valve. Sometimes I hear a sound that sounds like steam escaping before the timer starts counting down for the food to cook.
Both of these are normal and can be expected as part of pressure cooking.
- I accidentally pressed the wrong button and the pressure cooker won't let me press the correct button.
Press the „Keep warm/Cancel“ button. This will allow you to start over and press the correct button.
• I see steam escaping from the top lid.
You forgot to put the silicone seal on the top lid or the blue safety valve. If either of these parts is not in the correct place, pressure will not build up and the device may be damaged.
- I hear steam escaping from the quick release valve and the pressure in the pot is not increasing.
The quick-release valve is in the „Venting“ position. This valve must be in the „Sealing“ position to seal the pressure cooker.
• The cooking time does not change.
The pressure cooker has not yet reached operating pressure or the hot air lid has not reached the required preheating temperature. The countdown will start as soon as the operating pressure or the temperature for the selected cooking type has been reached. The total cooking time may therefore be slightly longer.
• Sometimes the top lid is difficult to open.
If the top lid is difficult to open, there may still be pressure in the pressure cooker. Check that the blue safety valve in the top lid of the pressure cooker has dropped to its lower position.
- Sometimes my food is not ready after the programmed time. When I try to put the top lid back on the pot to cook the food longer, the top lid will not close.
Allow the pressure cooker to cool slightly. When the pressure cooker is still hot, the vent valve will rise and prevent you from closing the lid. Before placing the top lid back on the pressure cooker, make sure the quick release valve is in the „Venting“ position. Once the top lid is closed, move the valve to the „Sealing“ position.
• What can be done if a food prepared in a pressure cooker contains more liquid than required?
After removing the top lid, press the „Fry“ button and let the excess liquid evaporate. The next
time you cook the same recipe, use less liquid.
- I think I clean the pressure cooker thoroughly, but sometimes I notice that the smell of my last meal remains in the pot.
The sealing ring under the top lid is made of silicone. Silicone has many great properties, and one of them is its tendency to retain odors. Over time, any odors will dissipate.
• The display does not light up when plugged in.
Check that the power cord is properly connected to the pressure cooker or try a different electrical outlet. Check that the hot air lid is properly placed on the pressure cooker base.
PRACTICAL PROCEDURE - example of cooking soup
This pressure cooker is ideal for preparing delicious soups. If you add dry beans and peas to the soup, remember to soak them first.
CAUTION! Do not pressure cook soups containing barley, rice, pasta, grains, and dried soup mixes as they tend to foam and could block the vent valve. These foods should be added to the soup after pressure cooking.
FOR COOKING SOUP AND STEWING, FILL THE STAINLESS STEEL POT NO MORE THAN HALF THE VOLUME.
Chicken broth
1 chicken, can be frozen
1 celery, cut into pieces
1 onion, halved
3 halved garlic cloves
salt, pepper, soup seasoning
for seasoning
Add chicken, celery, onion, garlic, salt, pepper, spices and water to the stainless steel cooking pot. Close the top lid, press the „Soup“ button, the LED display will show „P30“ and „High Pressure“ will light up.
The pressure cooker will start heating, once the desired pressure is reached, the actual cooking will begin and a 30-minute countdown will appear on the display. Once the countdown is complete, let the pressure slowly drop on its own (you can adjust the cooking time, lengthening or shortening it as you wish, according to your needs).
You can find other useful recipes in the enclosed printed color cookbook, on our Facebook or YouTube channel.
TECHNICAL SUPPORT
Do you need help setting up and operating the TESLA EliteCook K70 WiFi Duo?
Contact us: www.tesla-electronics.eu
CONSUMABLES AND ACCESSORIES
You can purchase consumables in the official TESLA store eshop.tesla-electronics.eu (glass lid, silicone strap, silicone lid, baking dish, silicone muffin tin, silicone seal for the top lid, steaming holder, original stainless steel pot, steaming basket, set of 6 cups for making yogurt, blue safety valve with plug and many more).
WARRANTY REPAIR
For warranty repair, contact the retailer from whom you purchased your TESLA product.
The warranty does NOT cover:
• normal tear and wear.
• using the pressure cooker for purposes other than those for which it is intended.
- failure to follow the „Important Safety Instructions“ listed in the user manual.
• electromechanical or mechanical damage caused by improper use.
- damage caused by natural elements such as water, fire, static electricity, surges, etc.
- damage caused by unauthorized repair.
- illegible serial number of the pressure cooker.
DECLARATION OF CONFORMITY
We, TESLA Electronics LTD, declare that this device is in compliance with the essential requirements and other relevant provisions of the standards and regulations relevant to the type of device.


This product meets the requirements of the European Union.
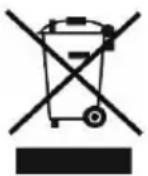
Please inform yourself about the local separate collection system for electrical and electronic products. Please follow your local regulations and do not dispose of your old products with normal household waste. The correct disposal of your old product helps prevent potential negative consequences for the environment and human health.
As the product is being developed and improved, we reserve the right to modify the user manual. The current version of the user manual can always be found at www.tesla-electronics.eu.
Design and specifications are subject to change without notice, printing errors excepted.
HU
Kedves Ügyfél,
ANDROID
natural_image
Technical line drawing of a mechanical component with labeled part 1 (no text or symbols beyond label)ANDROID
ROZWIĄZYWANIE PROBLEMÓW Z APLIKACJĄ
ANDROID


- ANDROID
- PRED PRVÝM POUŽITÍM
- PROGRAM TEPLOTA /ČAS
- Dear customer, thank you for choosing the TESLA EliteCook K70 WiFi Duo.
- IMPORTANT SAFETY INSTRUCTIONS
- IMPORTANT INFORMATION ABOUT THE POWER CORD
- PRESSURE COOKER
- HOT AIR LID
- BEFORE FIRST USE
- OPENING THE PRESSURE COOKER
- CLOSE THE PRESSURE COOKER
- IMPORTANT INFORMATION FOR DAILY USE
- NEVER COOK WITHOUT A STAINLESS STEEL COOKING POT
- WARNING
- The display shows
- BUTTON PRESSURE/TEMPERATURE
- PREFERENCES
- PRESSURE
- HOW TO USE A PRESSURE COOKER FOR PRESSURE COOKING
- PRESSURE RELEASE
- Quick Pressure Release
- Slow pressure release
- KEEP WARM/CANCEL
- FRY
- STEAM
- MANUAL SETTINGS
- SLOW COOK
- DELAY
- YOGURT
- Pasteurized milk
- Fresh milk
- SOUS VIDE
- HOT AIR
- PROGRAM TEMPERATURE / TIME
- PRE-heat/ADD food and SHAKE/TURN functions
- COMBINATION COOKING
- CONTROLLING A PRESSURE COOKER/HOT AIR COOKER LID USING YOUR PHONE
- iOS
- search for the "Smart Life" app in the Apple Store
- TROUBLESHOOTING WITH THE APPLICATION
- CLEANING A PRESSURE COOKER
- After each use:
- CLEANING THE HOT AIR LID
- QUESTIONS AND ANSWERS
- PRACTICAL PROCEDURE - example of cooking soup
- FOR COOKING SOUP AND STEWING, FILL THE STAINLESS STEEL POT NO MORE THAN HALF THE VOLUME.
- Chicken broth
- TECHNICAL SUPPORT
- CONSUMABLES AND ACCESSORIES
- WARRANTY REPAIR
- The warranty does NOT cover:
- DECLARATION OF CONFORMITY
- HU
- Kedves Ügyfél,
- ROZWIĄZYWANIE PROBLEMÓW Z APLIKACJĄ
Brand : TESLA
Model : EliteCook K70 WiFi Duo
Category : Frying Pan