
UT301A+ - Thermometer Uni-T - Free user manual and instructions
Find the device manual for free UT301A+ Uni-T in PDF.


| Product Type | Infrared Thermometer |
| Brand & Model | Uni-T UT301A+ |
| Measurement Range | -32°C to 430°C (-25.6°F to 806°F) |
| D:S Ratio (Distance to Spot) | 12:1 |
| Accuracy | ±1.5°C or ±1.5% of reading (whichever greater) for 0°C to 430°C; ±0°C ± (1.5°C<0.12°C) below 0°C |
| Response Time | <28 ms (95% of reading) |
| Emissivity | Adjustable from 0.1 to 1.0 (5 preset values storable) |
| Display | Color LCD (E-BTN) with backlight, 30mm x 35mm |
| Laser | Single laser, wavelength <500 nm-470 nm, output <1 mW, Class 2 |
| Data Hold / Lock Measurement | Yes; lock measurement with settable timer (1 min to 5 hours) |
| MAX/MIN/AVG/DIF Modes | Yes |
| High/Low Temperature Alarm | Yes (visual LED and audible buzzer) |
| Power Supply | One 9V battery (6F22) |
| Battery Life | ≥5 hours with alkaline battery (continuous measurement) |
| Auto Power Off | After 15 seconds of inactivity in HOLD mode |
| Operating Temperature | 0°C to 50°C (32°F to 122°F) |
| Storage Temperature | -27°C to 60°C (-4°F to 140°F) |
| Dimensions (HxWxD) | 161.06 x 101.06 x 40.06 mm (estimated) |
| Weight | Approx. 70 g |
| Tripod Mount | Yes (screw hole) |
| Safety Standards | CE (EN61326-1:2013), Laser: EN60825-1:2014 |
| Warranty | 1 year limited warranty |
Frequently Asked Questions - UT301A+ Uni-T
User questions about UT301A+ Uni-T
0 question about this device. Answer the ones you know or ask your own.
Ask a new question about this device
Download the instructions for your Thermometer in PDF format for free! Find your manual UT301A+ - Uni-T and take your electronic device back in hand. On this page are published all the documents necessary for the use of your device. UT301A+ by Uni-T.
USER MANUAL UT301A+ Uni-T
UT301A+/UT302A+/UT303A+
Infrared Thermometer User Manual
Preface
Thank you for purchasing the new infrared thermometer. In order to use this product safely and correctly, please read this manual thoroughly, especially the Safety Instructions part.
After reading this manual, it is recommended to keep the manual at an easily accessible place, preferably close to the device, for future reference.
Limited Warranty and Liability
Uni-Trend guarantees that the product is free from any defect in material and workmanship within one year from the purchase date. This warranty does not apply to damages caused by accident, negligence, misuse, modification, contamination and improper handling. The dealer shall not be entitled to give any other warranty on behalf of Uni-Trend. If you need warranty service within the warranty period, please contact your seller directly.
Uni-Trend will not be responsible for any special, indirect, incidental or subsequent damage or loss caused by using this device. As some countries or regions do not allow limitations on implied warranties and incidental or subsequent damages, the above limitation of liability may not apply to you.
Introduction
UT301A+/UT302A+/UT303A+ infrared thermometer (hereinafter referred to as the thermometer) can quickly and accurately determine the surface temperature by measuring the infrared energy radiated from the target surface. It is suitable for non-contact surface temperature measurement.
The D:S ratios are:
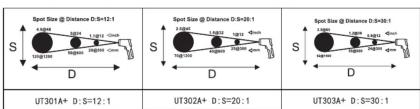
UT301A+: 12:1
UT302A+: 20:1
UT303A+: 30:1
Safety Instructions
Warning:
To prevent eye damage or personal injury, please read the following safety instructions before using the thermometer:
- Please do not irradiate people or animals with laser directly or indirectly.
- Please do not look at the laser directly or through other optical tools (telescope, microscope, etc.).
LASER RADIATION DO NOT STARE INTO BEAM
OUTPUT <1mW COMPLIES WITH EN60825-1:2014
Precautions:
- Do not look directly at the laser emitter.
- Do not disassemble or modify the thermometer or laser.
● To ensure the safety and accuracy of the thermometer, it should only be repaired by a qualified professional
using the original replacement parts.
- If the battery symbol on the LCD display is flashing, please replace the battery immediately to prevent inaccurate
- Inspect the case before using the thermometer. Do not use the thermometer if it appears damaged. Look for
- Inspect the case before using the thermometer. Do not use the thermometer if it appears damaged. Look for cracks or missing plastic.
- Please refer to the emissivity information for the actual temperature. Highly reflective objects or transparent
materials can cause the measured temperature value to be lower than the actual temperature.
- When measuring high temperature surfaces, please be aware not to touch them.
- Do not use the thermometer in an environment close to flammable or explosive materials.
- Using the thermometer around steam, dust, or environments with large temperature fluctuations may lead to
inaccurate temperature measurement.
- To ensure measurement accuracy, please place the thermometer in the measurement environment for 30 minutes before using
● Avoid keeping the thermometer near high temperature environment for long periods.
Technical Specifications
| Model | UT301A+ | UT302A+ | UT303A+ |
| D:S ratio | 12:1 | 20:1 | 30:1 |
| Measuring range | -32°C~420°C/-25.6°F~788°F | -32°C~700°C/-25.6°F~1292°F | -32°C~800°C/-25.6°F~1472°F |
| LCD size | 30mm*30mm | 35mm*35mm | 35mm*35mm |
| LCD display | Color EBTN | ||
| Accuracy | <0°C; ± (1.5°C+0.1°C/°C);±0°C; ±1.5°C or ±1.5% of reading, whichever is greater <32°F; ± (3.0°F+0.1°F/°F); ±32°F; ±3.0°F or ±1.5% of reading, whichever is greater | ||
| Temperature coefficient | ±0.1°C/°C or ±0.1%/°C, whichever is greater (±0.1°F/°F or ±0.1%/°F, whichever is greater) | ||
| Repeatability | 0.7°C or 0.7%, whichever is greater (1.5°F or 0.7%, whichever is greater) | ||
| Emissivity | 0.1–1.0 (adjustable, can store 5 sets of preset values) | ||
| Response time | ≤250ms (95% of reading) | ||
| Spectral response | 8um–14um | ||
| Auto power off | 15s | ||
| Low battery indication | √ | ||
| High/Low temperature LED alarm | √ | ||
| High/Low temperature audible alarm | √ | ||
| Data hold | √ | ||
| Unit conversion (°C/°F) | √ | ||
| MAX/MIN/AVG/DIF mode | √ | ||
| Lock measurement | √ | ||
| Laser | Single laser, wavelength 630nm–670nm; output power <1mW, class 2 laser | ||
| Operating temperature | 0°C–50°C (32°F–122°F) | ||
| Storage temperature | -20°C–60°C (-4°F–140°F) | ||
| Operating humidity | < RH90% (non-condensing) | ||
| Drop test | 1m | ||
| Battery type | 9V battery (6F22) | ||
| Battery life | Continuous temperature measurement: ≥9 hours for the alkaline battery; ≥4 hours for the carbon battery | ||
| Product color | Red and grey | ||
| Product net weight | 204g | 310g | 310g |
| Product size | 161. 50x90. 00x48. 00 (mm) | 179. 00x126. 50x53. 00 (mm) | 179. 00x126. 50x53. 00 (mm) |
Safety Standards
CE certification: EN61326-1:2013
Laser safety standard: EN60825-1:2014
Reference Standard
JJG 856-2015
Product Features
- Precise single laser air
- Bright color EBTN display
- MAX/MIN/AVG/DIF value hold - Feats of high-irradiation slags post-values and Feats of nominal temperature values can be stored from year to
- 5 sets of high/low temperature alarm preset values and 5 sets of emissivity preset values can be stored for users to set up quickly.
- With tricolor (red, green and blue) LED and buzzer alarm functions
- Lock measurement, for processes that require temperature monitoring
- With Tripod mount installation hole
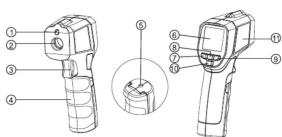
External Structure
| 1 | Laser |
| 2 | Infrared sensor |
| 3 | Trigger |
| 4 | Battery cover |
| 5 | Tripod screw hole |
| 6 | LCD display |
| 7 | MODE button |
| 8 | SET button |
| 9 | HI/LO button |
| 10 | Laser switch button |
| 11 | Laser warning label |
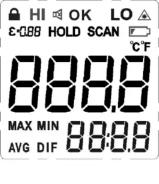
LCD Description
| Lock measurement indicator | |
| Buzzer indicator | |
| HI OK LO | Temperature measurement alarm indicator |
| Low battery indicator | |
| SCAN | Temperature measurement indicator |
| HOLD | Temperature hold indicator |
| °C °F | Temperature unit indicator |
| 8888 | Main display of the measured temperature |
| 8888 | Auxiliary display of the measured temperature |
| +0.88 | Emissivity indication |
| Laser indicator | |
| MAX MIN AVG. DIF | Measurement mode indication |
Operating Instructions
In the off state, short press (less than 0.5s) the trigger to turn on the thermometer and the measurement data held before last shutdown will be displayed. Toggle to view the MAX/MIN/AVG/DIF value by short pressing the MODE button.
Auto Power Off
In the HOLD mode, if there is no operation for 15s, the thermometer will automatically power off and save the currently held measurement.
Manual Measurement
-
Pull and hold the trigger after aiming at the target. The SCAN icon will be flashing indicating that the target short temperature is being measured. The measurement result will be updated on the LCD
-
Release the trigger, the SCAN icon disappears, and the HOLD icon appears, indicating that the measurement has been stopped and the last measured value is held.
Lock Measurement
Description:
- In the lock measurement function setting interface, the lock measurement time (1 minute to 5 hours) can be set. Refer to Lock Measurement Setting for details
• After time setting, the measurement starts after the activation of the lock function. When the set time is reached, the thermometer will automatically press off and save the last measured value.
- You can view the measured values by short pressing (less than 0.5s) the trigger (NOTE: The measured values will be cleared by long press). This operation is applicable to processes that require regular monitoring of temperature. If no timing is needed, just do not set the time.
Operation
-
When the lock measurement function is turned on, short press the trigger to enable it. The 🔒 icon will appear on the thermometer screen and the SCAN icon will flash. The thermometer will continuously measure the target temperature.
-
Pull the trigger again, the 🔒 and SCAN icons disappear, and the HOLD icon appears. The thermometer stops the measurement and holds the last measured value.
NOTE: During measurement, it is best to ensure that the measured target diameter is twice the spot size (S) of the thermometer, and then determine the test distance (D) according to the D:S diagram (refer to D:S part).
For example, if you use the UT301A+ to measure the temperature of an object with a diameter of about 4" (10cm), then according to the above, the spot size (S) of the thermometer should be about 2" (5cm) for highest accuracy, and according to the D:S diagram, the measured distance (D) is about 24" (60 cm).
MAX/MIN/AVG/DIF Value Reading
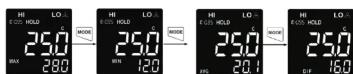
Short press the MODE button to switch the "MAX→MIN→AVG→DIF" measurement mode in turn and the temperature value of the corresponding mode will be shown in the auxiliary display area (as shown below).
Laser Indication Function On/Off
Short press the 🔒 button to turn on/off the laser indication function. When it is turned on, the laser indicator 🔒 will be displayed on the LCD, and the laser will accurately indicate the position you are measuring during temperature measurement.
NOTE: Please follow the laser precautions when the laser is turned on to avoid damage to human or animal eyes.
High/Low Temperature Alarm On/Off
Short press the HI/LO button to turn the high/low limit alarm function on and off in sequence.
When HI limit alarm function is turned on and the measured temperature value is higher than the set high alarm limit, the red LED and HI indicator flash. If the audible alarm function has been turned on, the buzzer will beep.
When LO limit alarm function is turned on and the measured temperature value is lower than the set low alarm limit, the blue LED and LO indicator flash. If the audible alarm function has been turned on, the buzzer will beep. When HI/LO limit alarm function is turned on and the measured temperature value is within the high and low alarm limit range, the green LED lights up and the OK indicator is displayed, indicating that the measured temperature is normal.


Function Setting
In the HOLD interface, short press the SET button to enter the settings of high alarm limit → low alarm limit → emissivity → temperature unit → audible alarm → lock measurement, etc. In these setting interfaces, pull the trigger or do not operate for 10s to return to the HOLD interface.
High Alarm Limit Setting
In the HOLD interface, short press the SET button once to enter the high alarm limit setting interface. Short press the ▲ button to quickly select the preset high alarm limit value (P1-P5). If there is no desired value among the preset values, select any value closest to the high alarm limit, and adjust it by pressing the ▼ button or ▲ button. Add or subtract 1 each time by short press, and add or subtract 10 per second by long press.
(see Figure 1)


Figure 1
Low Alarm Limit Setting
In the HOLD interface, short press the SET button twice to enter the low alarm limit setting interface, and adjust the low alarm limit value by pressing the ▼ button or ▲ button. Add or subtract 1 each time by short press, and add or subtract 10 per second by long press. (see Figure 2)
Emissivity Setting
In the HOLD interface, short press the SET button until emissivity setting is displayed. Short press the ▲ button to quickly select the preset emissivity value (P1-P5). If no desired value among the preset values, select any value closest to the emissivity, and adjust it by pressing the ▼ button or ▲ button. Add or subtract 0.01 each time by short press, and add or subtract 0.1 per second by long press. (see Figure 3)
Temperature Unit Setting
In the HOLD interface, short press the SET button until temperature unit setting is displayed, and switch between °C and °F by pressing the ▼ button or ▲ button.
Audible Alarm Setting
In the HOLD interface, short press the SET button until audible alarm setting is displayed, and turn on/off the audible alarm by pressing the ▼ button or ▲ button.
Lock Measurement Setting
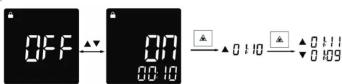
In the HOLD interface, short press the SET button until lock measurement setting is displayed, and turn on/off the lock measurement by pressing the ▼ button or ▲ button. When the lock measurement is turned on, press the △ button to perform the timing setting "00:00" for the lock measurement. At this time, the selected time position flashes, and the time value can be adjusted by pressing the ▼ button or ▲ button. Set timing to "00:00" to turn off timing function.
D:S (Distance Coefficient)
As the distance (D) from the target being measured to the thermometer increases, the spot size (S) on the measured area becomes larger. The relationship between the distance and the spot size is as shown below.
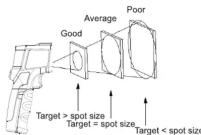
of View
Make sure that the measured target is larger than the spot size. The smaller the target, the closer the test distance should be (please refer to D:S for the spot size at different distances). To obtain the optimum measurement result, it is recommended that the target being measured is 2 times larger than the spot size.
Emissivity
Emissivity is a symbol of the energy radiation of a material. The emissivity of most organic materials and coated or oxidized surfaces is about 0.95. To measure the temperature of a bright metal surface, cover the surface to be tested with masking tape or matt black paint with a high emissivity setting (if it is possible), wait for a period of time, and measure the temperature of the tape or black paint surface when it reaches the same temperature on the surface of the object covered below. The total emissivity of some metals and non-metals are listed in the following table.
| Measured Surfaces | Emissivity |
| Metal | |
| Aluminum | |
| Oxidization | 0.2-0.4 |
| A3003 Alloy | |
| Oxidization | 0.3 |
| Rough | 0.1-0.3 |
| Brass | |
| Burnishing | 0.3 |
| Oxidization | 0.5 |
| Copper | |
| Oxidization | 0.4-0.8 |
| Electric Terminal Board | 0.6 |
| Hastelloy | |
| Alloy | 0.3-0.8 |
| Inconel | |
| Oxidization | 0.7-0.95 |
| Sand-Blasting | 0.3-0.6 |
| Electro Burnishing | 0.15 |
| Iron | |
| Oxidization | 0.5-0.9 |
| Rusting | 0.5-0.7 |
| Iron (Casting) | |
| Oxidization | 0.6-0.95 |
| Non-Oxidization | 0.2 |
| Casting | 0.2-0.3 |
| Iron (Forging) | |
| Passivation | 0.9 |
| Lead | |
| Rough | 0.4 |
| Oxidization | 0.2-0.6 |
| Molybdenum | |
| Oxidization | 0.2-0.6 |
| Nickel | |
| Oxidization | 0.2-0.5 |
| Platinum | |
| Black | 0.9 |
| Steel | |
| Cold Rolling | 0.7-0.9 |
| Steel Plate Rubbing | 0.4-0.6 |
| Steel Plate Burnishing | 0.1 |
| Zinc | |
| Oxidization | 0.1 |
| Non-Metal | |
| Asbestos | 0.95 |
| Asphalt | 0.95 |
| Basalt | 0.7 |
| Carbon | |
| Non-Oxidization | 0.8-0.9 |
| Graphite | 0.7-0.8 |
| Silicon Carbide | 0.9 |
| Ceramics | 0.95 |
| Clay | 0.95 |
| Concrete | 0.95 |
| Cloth | 0.9 |
| Glass | |
| Convex Glass | 0.76-0.8 |
| Smooth Glass | 0.92-0.94 |
| Lead-Boron Glass | 0.78-0.82 |
| Plates | 0.96 |
| Plaster | 0.8-0.95 |
| Ice | 0.98 |
| Limestone | 0.98 |
| Paper | 0.95 |
| Plastics | 0.95 |
| Water | 0.93 |
| Soil | 0.9-0.98 |
| Wood | 0.9-0.95 |
Maintenance
Clean
Use clean compressed air to blow away falling particles.
Use wet cotton swab to carefully wipe lens surface.
Use wet sponge or soft cloth to clean product exterior. Do not rinse the thermometer or immerse it in water.
DO NOT HINSE THE THERMOH
Battery Replacement
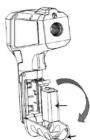
Install or replace a 9V battery (6F22) as follows:
-
Open the battery cover.
-
Insert the battery and pay attention to the polarity.
-
Close the battery cover
Troubleshooting
| Symptom | Problem | Action |
| OL appears when measuring | Measured value is greater than the maximum fange | Stop measuring |
| -OL appears when measuring | Measured value is less than the minimum range | Stop measuring |
| Err appears when booting | Exceeding the minimum or maximum operating ambient temperature | Place the thermometer in a 0°C–50°C (32°F–122°F) environment and it can be recovered after 30 minutes |
| Battery indicator flashes | Low battery | Replace the battery |
| Laser falls to work / week laser | Low battery | Replace the battery |
| The measurement is inaccurate | Emissivity mismatching, measured distance is too far, measured target diameter is less than 20mm, etc. | Please refer to the instructions for field of view, D/S, etc. |
UNI-T®
UNI-TREND TECHNOLOGY (CHINA) CO., LTD.
No. 6, Gong Ye Bei 1st Road.
Songshan Lake National High-Tech Industrial
Development Zone, Dongquan City,
Guangdong Province, China
Tel: (86-769) 8572 3888
www.uni-trend.com


- UT301A+/UT302A+/UT303A+
- Infrared Thermometer User Manual
- Preface
- Limited Warranty and Liability
- Introduction
- Safety Instructions
- Warning:
- Precautions:
- Safety Standards
- Reference Standard
- JJG 856-2015
- Operating Instructions
- Auto Power Off
- Manual Measurement
- Lock Measurement
- Description:
- Operation
- MAX/MIN/AVG/DIF Value Reading
- Laser Indication Function On/Off
- High/Low Temperature Alarm On/Off
- Function Setting
- High Alarm Limit Setting
- Low Alarm Limit Setting
- Emissivity Setting
- Temperature Unit Setting
- Audible Alarm Setting
- Lock Measurement Setting
- D:S (Distance Coefficient)
- Emissivity
- Maintenance
- Clean
- Battery Replacement
- UNI-T®
Brand : Uni-T
Model : UT301A+
Category : Thermometer