
RVM-10V1 - Radio MB QUART - Free user manual and instructions
Find the device manual for free RVM-10V1 MB QUART in PDF.


| Product Type | 10" Mechless Source Unit (Marine/Vehicle Radio) |
| Brand | MB Quart |
| Model | RVM-10V1 |
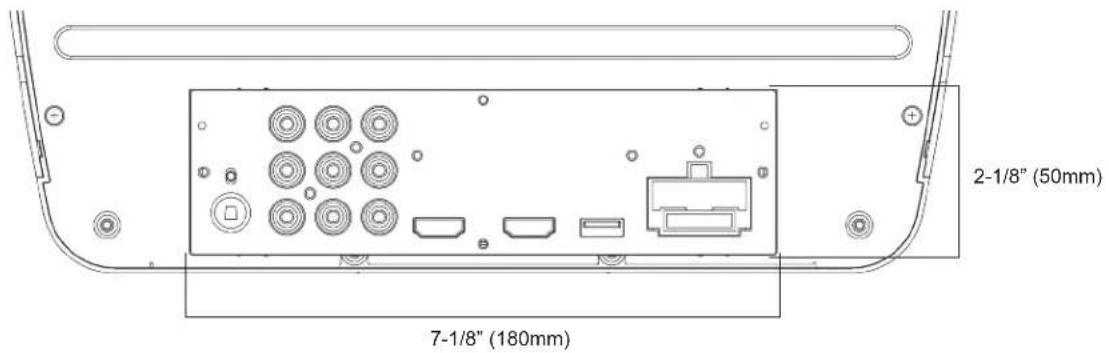
| Installation Size | 7-1/8" (180mm) x 2-1/8" (50mm) DIN opening |
| Power Supply | 12V DC (negative ground) |
| Fuse Rating | 10A (replace with same rating) |
| Weight (approx.) | 1.5 lbs (0.68 kg) |
| Bluetooth | Yes, for music streaming and phone link |
| USB | Front USB-A port for MP3/WMA playback |
| AUX Input | Front 3.5mm jack and rear RCA (AV IN) |
| Radio Bands | FM (3 groups, 18 presets) and AM (2 groups, 12 presets) |
| RDS | Yes (AF, TA, PTY) - Europe only for AF |
| Audio Zones | Dual zone (Zone 1 and Zone 2) with independent mute and volume |
| Equalizer | Preset EQ (Pop, Rock, Classic, Jazz, Beat, User) with Bass/Treble/Balance/Loudness |
| Display | Color LCD with brightness/contrast/saturation/hue adjustment |
| Camera Input | Reverse trigger (ground) and +12V trigger for camera mode |
| High Definition Throughput | Pass-through HDMI (or similar) from front to rear |
| Headphone Jack | 3.5mm front panel (mutes speakers when inserted) |
| Remote Control | Included (full function remote) |
| Reset Button | Front panel reset (not memory clear) - Factory data reset in settings |
| Safety | FCC Class B, 20cm minimum distance from body, proper installation required |
| Warranty | 1 year from purchase (defects in material/workmanship) |
Frequently Asked Questions - RVM-10V1 MB QUART
User questions about RVM-10V1 MB QUART
0 question about this device. Answer the ones you know or ask your own.
Ask a new question about this device
Download the instructions for your Radio in PDF format for free! Find your manual RVM-10V1 - MB QUART and take your electronic device back in hand. On this page are published all the documents necessary for the use of your device. RVM-10V1 by MB QUART.
USER MANUAL RVM-10V1 MB QUART
10" MECHLESS SOURCE UNIT

CAUTION

Improper use can result in electric shock or fire hazard. The safeguards incorporated in this unit protect you only if you observe the following procedures for installation, use, and servicing.
Notes:
- Consult with your nearest dealer if installation requires the drilling of holes or other modifications of the vehicle. (This installation may require drilling holes and/or cutting, professional installation is recommended.)
- Choose the mounting location where the unit will not distract interfere with the normal driving function of the driver.
- Properly secure the unit to the mounting panel, using the provided hardware
- Before final assembly, test the unit for functionality
- Keep the volume level low enough to be aware of road and traffic conditions.
- Avoid installing the unit where it would be subject to high temperature, such as from direct sunlight, or from hot air, from the heater, or where it would be subject to dust, dirt, or excessive vibration.
• This product is designed to operate with a 12-Volt DC
Avoid installing the unit where it would be subject to high temperatures, such as from direct sunlight, hot air, heater, or where it would be subject to dust, dirt, or excessive vibration.
DIN FRONT/REAR-MOUNT
This unit can be properly installed either from "Front"(conventional DIN Front-mount) or "Rear" (DIN Rear-mount installation, utilizing threaded screw holes at the sides of the unit chassis). For details, refer to the following illustrated installation methods.
INSTALLATION OPENING
Source Unit can be installed in any dashboard having a 7-1/8" (180mm) x 2-1/8" (50mm) opening as shown below:


- Please make sure the BATTERY+ (YELLOW) and ACC (RED) pin locations are correct before making connection. These two pins may be different in certain vehicles. Wrong connection of these two pins will burn the fuse.
- "Reverse Trigger" wire must be connected to "ground" in order to activate the video function.
- This player can only be used by the 12-V DC grounding electrical system.
- Please make sure to connect the yellow wire to the positive of the battery (+).
- When changing the fuse, replace with a new fuse of the same rating.

- IR Remote Sensor
- Mute
- USB
-
AUX-IN
-
Headphone Button
- High Definition Throughput
- VOLUME +
- VOLUME -
TURN ON/OFF THE UNIT AND ALL MUTE FUNCTION
Press the ⏻ button to turn on the unit. When the unit is powered on, Shortly press this button for both ZONE1 and ZONE2 mute on/off. Press and hold turn off the unit.
ZONE1 OR ZONE2 INDIVIDUALLY MUTE OPERATION
In every source, tap 1 or 2 icon, at top of screen, for ZONE1 or ZONE2 mute on/off.
SOURCE CHANGE
Press ↗ or ↙ to show the main menu. Choose your desired source in this menu.
ZONE1/ZONE2 VOLUME UP/DOWN
Press “+”/“-” button to up/down both ZONE1 and ZONE2 volume together. In the volume pop-up window, you can individually slide ZONE1 or ZONE2 volume bar to up/down.
AUDIO SETTING
Press 🎨️ icon to set the audio setting screen. You can set ZONE1 or ZONE2 below preferences: BAS/TRE/BAL/LOUD/EQ/BEEP.


BEEP ON/OFF
Beep on: enables audible beep function allows you to hear the beep tone through the speakers whenever a button is pressed on the unit.
SUB ON/OFF AND SUB LPF
Click "80Hz" letter to change the LPF to 80Hz/120Hz/160Hz/SUB off.
(Note: When the 80Hz/120Hz/160Hz is selected, the SUB is in the ON status.)


SETTINGS ADJUSTMENT
In main menu, press the ⚙️ icon to enter settings menu. Press the corresponding icons to adjust: Language/Radio Area/Time/Other/Display/Wallpaper/System Info.
LANGUAGE SELECTION
In this item, you can select: English/Spanish/French/Italian...
RADIO AREA
In this item, you can select: Europe/USA/South America/Russia
TIME SETTING
In this item, you can adjust the clock, 12Hr/24Hr format and time synchronization with the station. If the “SYNC” is turned on, when an RDS station is received, the clock will be synchronized with the station’s clock.
OTHER
In this menu, you can set the "Video Warning" on/off, "Factory Data Reset", and "Software Update".
VIDEO WARNING ON
It needs the "BRAKE" wire connected to the ground to watch video or photo.
VIDEO WARNING OFF
It doesn't need the "BRAKE" wire connected to the ground to watch video or photo.
FACTORY DATA RESET
Click the "Factory Data Reset" then click "YES" to restore all the data to the factory settings.
(Note: If the "Factory Data Reset" Function is executed, All the Memories will be lost!)

DISPLAY
In this menu, you can set the value of Brightness/Contrast/Saturability/Hue.
WALLPAPER
In this menu, you can change the wallpaper.
SYSTEM INFO
MCU and MPEG software version information.
DIMMER FUNCTION
In main menu, press the ⚙️ icon to the brightness to LOW/HIGH.
DISPLAY ON/OFF
In main menu press the ⏻ icon to make the display off. Press anywhere on the screen to restore the display.
RESET BUTTON
on the panel, there is a "RESET" button, Press this button to restart the unit (Not the reset the memory). If you want to clear the memories. Please use the "Factory Data Reset" function which in the "Other" item of the "Settings"
RADIO OPERATION
RECEIVE A RADIO STATION
There are 3 FM station groups - FM1, FM2 and FM3. There are 2 AM station groups - AM1 and AM2.
- Tap the "FM1" to change the Radio BAND to FM2/FM3/AM1/AM2/FM1.
- Press and quickly release the ▶▶ /◀◀ button to tune by automatically seeking up or down to the next available radio station frequency.
- Press and hold the ▶▶ /◀◀ button for manual tuning up or down to the desired frequency.
MANUALLY STORE AND RECALL RADIO STATION PRESETS
The unit offers 6 presets for each of the AM and FM station groups. There are a total of 18 FM presets and 12 AM presets.
- To store radio station presets, press and hold one of the preset buttons. (such as) for 2 seconds. The current station is stored in the number button.
- To recall a given radio station preset, quickly press the preset button (such as) to directly listen to the station saved in the corresponding preset button.
AUTO-STORE STATIONS
This is a useful method to populate available radio stations in a new area.
- Press button to automatically store stations to numeric buttons 1-6 of band 1, 2 or (if FM) 3. Stations will store in the order of scanning and reception. Use front panel buttons 1-6 to recall presets.
PRESET STATIONS SCAN
Press "PS" button to listen to each preset station for 5 seconds.
STEREO/MONO FUNCTION
Press button to change between stereo and mono.
LOC ON/OFF FUNCTION
Press "LOC" button to turn on/off LOCAL function. LOC ON: Receive strong signal stations only. LOC OFF: Receive strong and weak signal stations.
RDS OPERATION
Press "RDS" button to show the RDS menu pop-up window: AF/TA/PTY. You can turn on/off the AF/TA function in this pop-up window.
TA ON
When received a (traffic announcement) TA station it will switch temporarily to radio mode to listen to the TA station whatever in RADIO/USB/AUX/BT mode. If the volume level was under the TA volume it will be raised to the TA volume automatically.
TA OFF
Turn off the TA function.
AF ON
Symbol “AF” appears on the display. Program name is displayed on 12 receiving a RDS station. “AF” symbol starts blinking if the broadcasting signal getting worse. It will start to search the stronger station which in AF list and switch to the good station. If it doesn’t find a stronger station in AF list. It will activate the PI (Programmed Identification) SEEK mode to search station which as same PI.
AF OFF
Switch off the AF mode. (Note: The AF feature is only available in Europe.)
PTY OPERATION
In the RDS pop-up window, tap the "PTY" (program type) button to show the PTY list, then select one of the PTY options, it will start to seek this PTY station.
When a USB source such as a thumb drive is inserted to the USB port on the front panel of the unit, it supports playback of MP3 and WMA files automatically.
- Press the NEXT ▶▶I or PREVIOUS I◀◀ button to skip to next/previous file.
- Hold the NEXT ▶▶I or PREVIOUS ▶▶I button to fast forward or rewind.
You can also swipe the progress bar to fast-forward and rewind
PLAY/PAUSE
Press ▶II button to play/pause the playback.
REPEAT ONE/ALL
Press the ↻ button select "Repeat One" or "Repeat All".
Repeat One: Repeat the same file.
Repeat All: Repeat all files.
RANDOM ON/OFF
Press the ➕ button select the "Random On" or "Random Off".
Random On: Plays all files in random order.
Random off: Turns off the random function.
PLAYLIST OPERATION
Press the button to list the playlist. Then tap the desired file to play.
Press the ← button to list the playlist. Unsure of icon Press the Music/Video/Photo icon on the left of the screen. It will change to playlist. Then tap the desired file to play.
(You also press the 🔊 button return to the main menu, then press
"Music"/"Video"/"Photo" icon to switch to corresponding source.
AUX IN / AV IN OPERATION
- After connecting the audio and video signal to the unit. In the main menu, Click the AUX IN or AV IN icon switch to AUX IN or AV IN source.
- Choose AUX IN for front panel 3.5mm jack. Choose Av IN for preamp-level RCA input on the back of the unit.
HEADPHONE JACK
There is a 3.5mm headphone jack in the front panel to allow for use of wired headphones.
- When a headphone plug is inserted into the jack, the unit's speakers are muted.
BLUETOOTH PAIRING
You must first pair a Bluetooth-enabled device to stream music to your unit.
- Select "search" or "discover" on the Bluetooth device while the unit is in the BT MUSIC mode. "RVM_10V1" should appear in the list of available devices. Select "RVM_10V1".
- If a password is required, input "0000."
- When successfully paired, BT MUSIC is displayed on LCD. If no Bluetooth device is paired, "UNPAIRED" will show in the LCD display.
STREAM BLUETOOTH AUDIO
This unit supports Bluetooth music streaming using the Headset Profile (HSP). It also supports text readout from compatible BT streams.
- Using a Bluetooth-enabled device, press the button then tap "Bluetooth" icon to switch to BT MUSIC source. It will play a song from the BT device automatically if it's been selected in the music player on the device.
- Press the ▶II button to play/pause the song. Press ▶▶I/I◀◀ button to select next/previous song.
CAMERA OPERATION
When camera trigger is connected to a high level (+12V) - it will switch to CAMERA mode automatically (or in main menu - press "Camera" icon switch to CAMERA mode). Press anywhere on the screen to show the function bar at the top. Tap the ↻ icon to revert back to the main menu.
OPERATION
PHONE LINK
When a mobile phone is connected to the unit via USB cable, it will switch to PHONE LINK mode automatically (needs to be paired and connected to Bluetooth). Also, in the main menu, press the "Phone Link" icon and you can switch to Phone Link mode.
HIGH DEFINITION THROUGHPUT
The front High Definition Throughput port is pass through to the rear High Definition Throughput port (so any operation will not affect the High Definition Throughput playback).
REMOTE CONTROL KEY FUNCTIONS
| KEYS ACTION RADIO USB AUX BLUETOOTH | |||||
| POWER | Short | Power on/off | Power on/off | Power on/off | Power on/off |
| Long | / / / | ||||
| ZONE 1 MUTE | Short | Zone 1 mute on/off | Zone 1 mute on/off | Zone 1 mute on/off | Zone 1 mute on/off |
| Long | / / / | ||||
| ZONE 2 MUTE | Short | Zone2 mute on/off | Zone2 mute on/off | Zone2 mute on/off | Zone2 mute on/off |
| Long | / / / | ||||
| ZONE1 | Short | Active Zone1 VOL | Active Zone1 VOL | Active Zone1 VOL | Active Zone1 VOL |
| Long | / / / | ||||
| ZONE2 | Short | Active Zone2 VOL | Active Zone2 VOL | Active Zone2 VOL | Active Zone2 VOL |
| Long | / / / | ||||
| MODE | Short | Source change | Source change | Source change | Source change |
| Long | / / / | ||||
| BAND | Short | Band Change | / | / | / |
| Long | / / / | ||||
| AMS | Short | Preset scan | Song List | / | / |
| Long | Auto Store | / | / | / | |
| VOL+ | Short | Volume up | Volume up | Volume up | Volume up |
| Long | Volume up fast | Volume up fast | Volume up fast | Volume up fast | |
| VOL- | Short | Volume down | Volume down | Volume down | Volume down |
| Long | Volume down fast | Volume down fast | Volume down fast | Volume down fast | |
| |◀◀ | Short | Seek down | Previous file | / | Previous file |
| Long | Manual tune down | Fast reverse | / | / | |
| ▶▶| | Short | Seek up | Next file | / | Next file |
| Long | Manual tune up | Fast forward | Reset | / | |
| SEL | Short | Zone 1 EQ/ Zone 2 EQ | Zone 1 EQ/ Zone 2 EQ | Zone 1 EQ/ Zone 2 EQ | Zone 1 EQ/ Zone 2 EQ |
| Long | / / / | ||||
| EQ | Short | Zone 1/2 EQ (POP-ROCK-CLAS -JAZZ-BEAT-US-ER) | Zone 1/2 EQ (POP-ROCK-CLAS -JAZZ-BEAT-USER) | Zone 1/2 EQ (POP-ROCK-CLAS -JAZZ-BEAT-US-ER) | Zone 1/2 EQ (POP-ROCK-CLAS -JAZZ-BEAT-US-ER) |
| Long | / / / | ||||
| KEYS ACTION RADIO USB AUX BLUETOOTH | |||||
| DISP | Short | / / / | |||
| Long | / / / | ||||
| 1/▶II | Short | Recall 1 station | Play/pause | / | / |
| Long | Save station to 1 | / | / | / | |
| 2/INT | Short | Recall2 station | / | / | / |
| Long | Save station to 2 | / | / | / | |
| 3/RPT | Short | Recall3 station | RPT one/all | / | / |
| Long | Save station to 3 | / | / | / | |
| 4/RDM | Short | Recall4 station | RDM on/off | / | / |
| Long | Save station to 4 | / | / | / | |
| 5/-10/ DIR | Short | Recall5 station | -10 | / | / |
| Long | Save station to 5 | / | / | / | |
| 6/+10/ DIR+ | Short | Recall6 station | +10 | ||
| Long | Save station to 6 | / | / | / | |
This equipment has been tested and found to comply with the limits for a Class B digital device, pursuant to Part 15 of the FCC Rules. These limits are designed to provide reasonable protection against harmful interference in a mobile installation. This equipment generates uses and can radiate radio frequency energy. If not installed and used in accordance with the instructions, this equipment may cause harmful interference to radio communications. There is no guarantee that interference will not occur in a particular installation.
WARNING: Changes or modifications not expressly approved by the party responsible for compliance could void the user's authority to operate the equipment.
This equipment complied with FCC radiation exposure limits set forth for an uncontrolled environment. This equipment should be installed and operated with a minimum distance of 20cm between the radiator and your body.


MBQuart.com #MUSIC DEFINED
The information contained within this document is intended to offer some basic guidelines for a few of the most common installations. More complex audio systems should be installed by a competent professional. Additional installation information available at www.maxxsonics.com
WARRANTY
Maxxsonics, LLC. warrants this product, to the original consumer purchaser, to be free from defects in material and workmanship for a period of one (1) year from the date of purchase. Maxxsonics, LLC. will, at its discretion, repair or replace defective products during the warranty period. Components that prove to be defective in materials and workmanship under proper installation and use must be returned to the original authorized Maxxsonics, LLC. retailer from where it was purchased. A photocopy of the original receipt must accompany the product being returned. The costs associated with removal, re-installation, and freight are not the responsibility of Maxxsonics, LLC. This warranty is limited to defective parts and specifically excludes any incidental or consequential damages connected therewith. To view the full warranty, please visit the website.
MB Quart products are designed and engineered in the USA by
MAXXSONICS®

- CAUTION
- Notes:
- DIN FRONT/REAR-MOUNT
- INSTALLATION OPENING
- TURN ON/OFF THE UNIT AND ALL MUTE FUNCTION
- ZONE1 OR ZONE2 INDIVIDUALLY MUTE OPERATION
- SOURCE CHANGE
- ZONE1/ZONE2 VOLUME UP/DOWN
- AUDIO SETTING
- BEEP ON/OFF
- SUB ON/OFF AND SUB LPF
- SETTINGS ADJUSTMENT
- LANGUAGE SELECTION
- RADIO AREA
- TIME SETTING
- OTHER
- VIDEO WARNING ON
- VIDEO WARNING OFF
- FACTORY DATA RESET
- DISPLAY
- WALLPAPER
- SYSTEM INFO
- DIMMER FUNCTION
- DISPLAY ON/OFF
- RESET BUTTON
- RADIO OPERATION
- RECEIVE A RADIO STATION
- MANUALLY STORE AND RECALL RADIO STATION PRESETS
- AUTO-STORE STATIONS
- PRESET STATIONS SCAN
- STEREO/MONO FUNCTION
- LOC ON/OFF FUNCTION
- RDS OPERATION
- TA ON
- TA OFF
- AF ON
- AF OFF
- PTY OPERATION
- PLAY/PAUSE
- REPEAT ONE/ALL
- RANDOM ON/OFF
- PLAYLIST OPERATION
- AUX IN / AV IN OPERATION
- HEADPHONE JACK
- BLUETOOTH PAIRING
- STREAM BLUETOOTH AUDIO
- CAMERA OPERATION
- OPERATION
- PHONE LINK
- HIGH DEFINITION THROUGHPUT
- MBQuart.com #MUSIC DEFINED
- WARRANTY
Brand : MB QUART
Model : RVM-10V1
Category : Radio