
Freetalk com III - Talkie Walkie STABO - Free user manual and instructions
Find the device manual for free Freetalk com III STABO in PDF.


| Product Type | PMR 446 Handheld Radio Set |
| Brand | Stabo |
| Model | Freetalk com III |
| Dimensions (H x D x W) | 55 x 31 x 165 mm (incl. antenna) |
| Weight | 175 g (incl. battery pack) |
| Power Supply | Li-Ion Battery Pack 3.7V / 1700 mAh |
| Battery Charging Time | Approx. 2-2.5 hours |
| Frequency Range | 446.00625 - 446.19375 MHz |
| Number of Channels | 16 |
| Channel Spacing | 12.5 kHz |
| Output Power | ≤500 mW ERP |
| Modulation | FM-F3E |
| Sensitivity | 0.25 µV |
| Protection Class | IP54 |
| CTCSS Tones | 38 |
| DCS Codes | 83 |
| VOX Function | Yes, 9 sensitivity levels |
| Key Lock | Yes |
| Wireless Pairing | Yes (clone function) |
| Roger Beep | Yes, selectable |
| Scan Function | Yes (automatic) |
| Monitor Function | Yes |
| Antenna | Fixed |
| Operating Temperature Range | -10°C to +40°C |
| Cleaning | Use a slightly damp, lint-free cloth |
Frequently Asked Questions - Freetalk com III STABO
User questions about Freetalk com III STABO
0 question about this device. Answer the ones you know or ask your own.
Ask a new question about this device
Download the instructions for your Talkie Walkie in PDF format for free! Find your manual Freetalk com III - STABO and take your electronic device back in hand. On this page are published all the documents necessary for the use of your device. Freetalk com III by STABO.
USER MANUAL Freetalk com III STABO
stabo freetalk com III
Prior to using the device for the first time, carefully and completely read through all operating instructions. Keep these operating instructions in a safe place it contains important in its for operating the device.
CTCSS (Continuous Tone Coded Squelch System)
| Nr. | CTCSS-Frequenz (Hz) | Nr. | CTCSS-Frequenz (Hz) | Nr. | CTCSS-Frequenz (Hz) | Nr. | CTCSS-Frequenz (Hz) |
| 1 | 67.0 | 11 | 97.4 | 21 | 136.5 | 31 | 192.8 |
| 2 | 71.9 | 12 | 100.0 | 22 | 141.3 | 32 | 203.5 |
| 3 | 74.4 | 13 | 103.5 | 23 | 146.2 | 33 | 210.7 |
| 4 | 77.0 | 14 | 107.2 | 24 | 151.4 | 34 | 218.1 |
| 5 | 79.7 | 15 | 110.9 | 25 | 156.7 | 35 | 225.7 |
| 6 | 82.5 | 16 | 114.8 | 26 | 162.2 | 36 | 233.6 |
| 7 | 85.4 | 17 | 118.8 | 27 | 167.9 | 37 | 241.8 |
| 8 | 88.5 | 18 | 123.0 | 28 | 173.8 | 38 | 250.3 |
| 9 | 91.5 | 19 | 127.3 | 29 | 179.9 | ||
| 10 | 94.8 | 20 | 131.8 | 30 | 186.2 |
DCS (Digital Coded Squelch)
| No | DCS Code | NO | DCS Code | No | DCS Code | No | DCS Code | No | DCS Code |
| 39 | 023 | 56 | 125 | 73 | 245 | 90 | 412 | 107 | 624 |
| 40 | 025 | 57 | 131 | 74 | 251 | 91 | 413 | 108 | 627 |
| 41 | 026 | 58 | 132 | 75 | 261 | 92 | 423 | 109 | 631 |
| 42 | 031 | 59 | 134 | 76 | 263 | 93 | 431 | 110 | 632 |
| 43 | 032 | 60 | 143 | 77 | 265 | 94 | 432 | 111 | 654 |
| 44 | 043 | 61 | 152 | 78 | 271 | 95 | 445 | 112 | 662 |
| 45 | 047 | 62 | 155 | 79 | 306 | 96 | 464 | 113 | 664 |
| 46 | 051 | 63 | 156 | 80 | 311 | 97 | 465 | 114 | 703 |
| 47 | 054 | 64 | 162 | 81 | 315 | 98 | 466 | 115 | 712 |
| 48 | 065 | 65 | 165 | 82 | 331 | 99 | 503 | 116 | 723 |
| 49 | 071 | 66 | 172 | 83 | 343 | 100 | 506 | 117 | 731 |
| 50 | 072 | 67 | 174 | 84 | 346 | 101 | 516 | 118 | 732 |
| 51 | 073 | 68 | 205 | 85 | 351 | 102 | 532 | 119 | 734 |
| 52 | 074 | 69 | 223 | 86 | 364 | 103 | 546 | 120 | 743 |
| 53 | 114 | 70 | 226 | 87 | 365 | 104 | 565 | 121 | 754 |
| 54 | 115 | 71 | 243 | 88 | 371 | 105 | 606 | ||
| 55 | 116 | 72 | 244 | 89 | 411 | 106 | 612 |
Pleaseread this manual carefully and completely to make yourself familiar with the various functions of your radio set. Make sure to observe the safety instructions to avoid any danger for you and other persons as well as damage to the radio set. Keep the operating instructions in a safe place. Be sure to hand over the instructions in case you lend out or sell the radio set.
The manufacturer disclaims any liability for damage and consequential damage caused by the nonobservance of these instructions!

Safety warnings
Persons with cardiac pacemakers are generally advised not to use radio sets! No transmission in immediate proximity to persons with cardiac pace makers.
Do not touch the antenna during the transmission, do not hold it close to your body, especially not close to the face or the eyes. When using a headset be sure not to turn the volume of your radoset too high: otherwise the noise might tdamage your hearing.
Do not operate the radio sets neither in an aircraft nor in a hospital or in comparable facilities. Switch off the radio set, if you are in explosive-prone environment (e.g. petrol station). Make sure not to change the battery packs in those places.
When using the radio set in a vehicle be sure to comply with the national regulations! In some countries it is forbidden to use a radio set while driving a vehicle! In a vehicle equipped with an airbag you must not operate or store the radio set neither directly above the airbag nor in the inflation zone of the airbag.
Never open the housing of a radio set or its accessories and do not carry out any modification. Ensure that any repair is carried out exclusively by qualified personnel. Modifications of or interventions in the radio set automatically lead to an expiry of the type approval, moreover it voids all warranty claims.
Prevent children from playing with the radio set, accessories or the packing material!
If you state the odor emissions or the formation of smoke, immediately switch off the radio set and remove the battery packs. Do not operate the radio set, if you detect any damage of the housing or the antenna. Contact a qualified works hop.
Protect your radio sets and the accessories against strong vibrations and extreme temperatures (avoid operating temperatures below -1 0°C or above +40°C). Do not expose the radio set to direct sunlight for a prolonged period (e.g. shelf in the vehicle).
The power supply unit must be protected against humidity/moistness.
Never throw the battery packs into the fire! Never short-out the contacts of the battery packs!
Important information/Intended use
stabo freetalk com III isa PMR 446 handheld radio set for voice radio over short distances.
The radio standard PMR 446 is assigned in AT, BE, CH, DE, DK, ES, FI, FR, GB, GR, IE, NL, NO, PL, PT, SI (free of charge and without any registration). There is obligatory registration in IT: Italian residents have to pay a nonrecurring charge upon registration of theradio set! (Tourists may use their radio sets free of charge for the duration of their stay in Italy.)
For information on national regulations concerning the use of radio sets on travels abroad please contact the embassies/consulates of the corresponding countries or you may get the information from the corresponding telecoms and postal regulator.
PMR 446-radio sets transmit/receive on 16 specified channels (446 MHz). Within the radius of reach you can communicate via an optional number of radio sets, however, only one person can talk and the other/s listen. Uncoded voice radio links are not confidential!
The range is a function of many factors. Apart from the statutory transmitting power other factors are relevant: e.g. the position of the antenna (it should be installed at right angle and send freely), the energy supply (fully charged batte rypacks fully exploit their each) and above all the environment where you transmit. Each “obstacle” (hills, buildings, trees) reduces the range, some materials (e.g. reinforced concrete, pieces of rock) give rise for considerable screening effects. Under optimum conditions (e.g. during sailing or paragliding) PMR 446 radiosets have a maximum reach of 10 km. In housing areas a range of 1 - 2 km is realistic, in strongly screened environment (e.g. in the mountains or inside buildings made of reinforced concrete) the reach may drop to a few hundred meters or less.
Scope of deli very
1 PMR 446 handheld radio
1 USB power supply (230 V/50 Hz)
1 Charging cable type C
1 Li-Ion battery pack (3.7 V/1700 mAh)
1 Belt clip
1 Hand strap
1 Carrying bag
1 Owners manual DE/EN
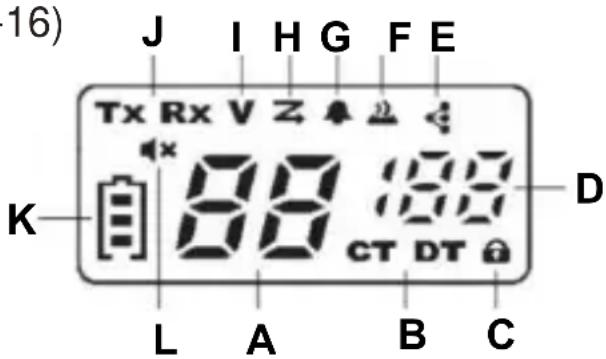
The display
A Adjusted selected channel number (1-16)
B CTCSS- and DCS function activated
C Key lock a ctivated
D CTCSS-/DCS number
E Wireless pairing activated
F Keytone activated
G Roger Beep activated
H Scanning activated
I VOX activated
J Transmission and Reception indicator
K Battery status indicator
L Mute mode
Control elements and connections
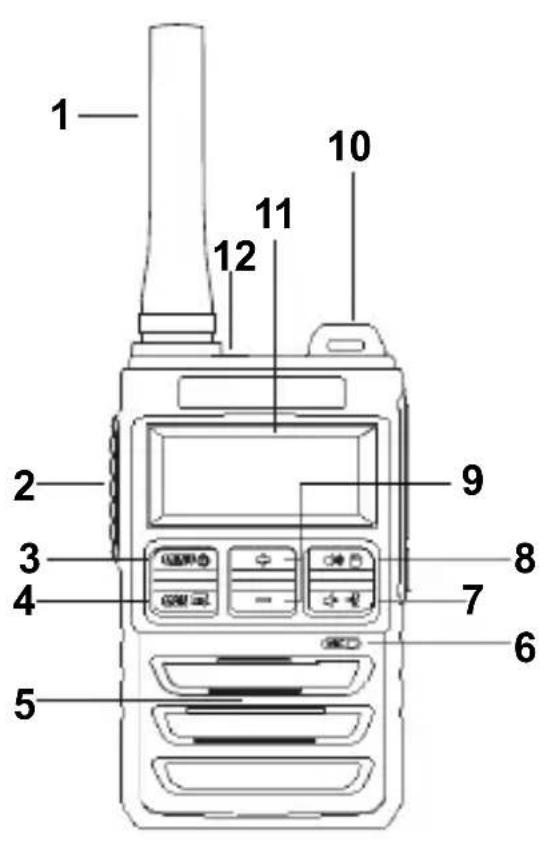
1 Antenna (The antenna is fixed to the housing, do not try to unscrew it!)
2 PTT-key: transmission key
3 ON/OFF-switch/ Menu-key: Switching over to the Set menu
4 Monitor-key/ Scan-Key: Cuts off the squelch/ Start search run
5 Loudspeaker
6 Microphone
7 / -key: Short press to decrease the volume / long press to activate the clone function.
8 🔍 key: Short press increases the volume / long press activates the keyboard lock.
9+/—-key: Channel selection, switching the individual settings in the Set menu.
10 Hand strap eyelet
11 LED-Display
12 LED Indicator: Yellow: transmit mode, green: receive mode.
Flashing red: low battery warning, flashing green: scan mode.
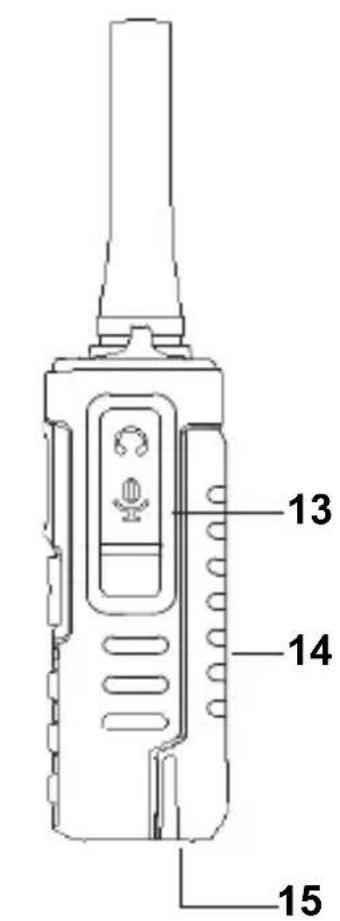
13 MIC/SPK socket: socket for connecting an (optional) headset.
14 Li-lon battery pack
15 USB charging port with LED charging indicator
Provisions for the operation
Charging the battery pack
The Li-Ion battery pack is precharged: Before using the device, the Li-Ion battery pack must first be fully charged (charging time ard. 2-2,5 hours).
Inserting/removing the Li-Ion battery pack
Place the battery pack on the back of the radio. Press the battery pack into the radio and then slide it upwards until the battery lock on the radio audibly clicks into place.
To remove, press the battery lock towards the radio and pull the battery pack downwards.

Safety instructions for charger and battery pack
Only use the charger in closed spaces. Protect it from moisture, dust, heat and strong vibrations. If possible, only use the charger at ambient temperatures between 5° and 40°C. (Charging outside: this temperature range can lead to incomplete charging).
Never try to remove the battery case.
Disconnect the power supply when not in use.
Make sure the radio is switched off while charging.
Never short-circuit the contacts on the battery pack (risk of explosion!).
Never throw the battery pack into a fire, it could explode due to gas formation!
Charging the battery pack with the USB charging socket of the battery pack

Note: The radio must be switched off.
Connect the charging cable to the USB power supply.
Plug the USB power supply into a 230 V mains socket.
Open the cover cap of the USB charging socket of the battery pack. Insert the USB-C-plug of the charging cable into the USB-C-charging socket of the battery pack.
The LED of the battery pack lights up red permanently, the battery pack is charging.
When the battery pack is fully charged, the LED lights up green.
Remove the USB plug and close the cover cap on the USB socket.

Information for disposal of battery packs
Used off battery packs are not to be thrown into the domestic waste.
Be sure to observe the national disposal regulations and dispose used off battery packs (inserted into asmall plastic bag) with the corresponding collecting points.
Battery saving circuit/low battery warning
The power consumption of this radio is very low. If no signal is received for 5 seconds, the electronic battery saving circuit is automatically activated.
When the capacity decreases, the LED indicator flashes red. Then charge the battery pack.
Installing the Belt Clip
Attach the belt clip to the radio using the two screws provided.
Connecting an (optional) speaker/microphone combination
Open the cover cap and insert the plugs of the external speaker/microphone combination into the sockets.

Note: To protect the sockets from dirt, you should close the cover cap after use!
Switching the radio on/off
The radio can be switched on/off by pressing the ⏻ -key. When switched on, a triple confirmation tone sounds and the last channel set is displayed.
When switched off, a double confirmation tone sounds.
LED-Display
The display is switched on when you receive or send a signal or press a button. The display is switched on for approx. 15 seconds
Adjusting the volume
There are 9 volume levels available.
Adjust the volume by pressing the 📄/ 🔊 -key; the set volume level (e.g. 5) appears on the display.

Note: The speaker is muted when the volume level is set to 0. The -symbol appears on the display.
Selecting the channel
There are 16 channels available (see channel frequency table).
Press the +/- -key and select an empty channel.
Note: Always set the same channel on both radios.
Receiving
When switched on, the radio is ready to receive (provided it is not currently transmitting). When the device receives a signal, the RX symbol appears on the display and the LED indicator lights up green.
Transmitting
Hold down the PTT-key and speak into the microphone at a normal volume of a distance of about 5 cm. While sending, the LED indicator lights up yellow and the TX symbol appears on the display. When you have finished your message, release the PTT-key.
Functions

Note: When you make a setting, you must confirm it with the PTT-key. If a setting is not confirmed within 5 seconds, the device automatically adopts the last setting!
Pilot tone process CTCSS/ DCS
Your radio set is equipped with two pilot tone processes (CTCSS with 38 different tones and DCS with 83 digital codes). That permits to address specific individual partner stations or groups or to receive only calls from the latter.

Note: Make sure that you and your partner uses the same CTCSS tone resp. the same DCS code.

Note: CTCSS: numbers 1 to 38. DCS: numbers 39 to 121.
Activating the pilot tone process CTCSS or DCS
Press the MENU-key 1x and the number 0 will flash on the display. Use the +/- -key to select the desired number and the letters CT for CTCSS or DT for DCS will appear depending on your selection. After the selection, the set number is flashing. Confirm by pressing the PTT-key.
Deactivating the pilot tone process CTCSS or DCS
Press the MENU-key 1x and the set number flash on the display. Use the +/- -key to select the number 0, the lettering CT or DT disappears. Confirm by pressing the PTT-key.
VOX function (verbal transmission)
This function permits to send without pushing the transmit key:
Voices/noises which hit the microphone switch on the transmitter of the radio set.
Adjust the sensitivity according to the environmental noises, and the set switches from reception to transmission if your voice volume is appropriate. You can select between 9 sensitivity levels (level 1=highest sensitivity).
Activating VOX
Press the MENU-key 2x, the letter V and the word OF will appear on the display. Use the +/- -key to select the desired sensitivity level.
Confirm by pressing the PTT-key.

Note: The letter V on the display indicates that the VOX function is activated.
Deactivating VOX
Press the MENU-key 2x, the set sensitivity level flashes on the display. Use the +/- -key to select OF. Confirm by pushing the PTT-key.

Note: The letter V in the display expires and the VOX function is deactivated
Roger bee p
When releasing the PTT key after transmission, a signal tone is automatically transmitted. This tone signalled to your contact partner that your message is finished and your partner can talk (this is useful for instance for distur bed radio communications).
Deactivating/activating the roger beep
To deactivate, press the MENU-key 3x. The symbol 🙏 will appear on the display and the word ON is flashing.
Use the +/- -key to select OF. Confirm by pushing the PTT-key. The symbol 🔥 in the display expires.
To activate, push the MENU-key 3x. The symbol 🔔 appears on the display and the word OF will flash.
Use the +/- -key to select ON. Confirm by pushing the PTT-key. The symbol 🔥 appears on the display.
Deactivating/activating the key tone
To deactivate, push the MENU-key 4x. The symbol 🎩 appears on the display and the word ON will flash.
Use the +/- -key to select OF. Confirm by pressing the PTT-key. The symbol 🏠 in the display expires.
To activate, push the MENU-key 4x. The symbol 🎨 appears on the display and the word OF is flashing.
Use the +/- -key to select ON. Confirm by pushing the PTT-key. The symbol 🎥 appears on the display.
Monitor function
The automatic squelch can bypassed and you can hear weak signals.
Activating the monitor function
Briefly push the MON/ Z -key, you will hear a noise. The RX symbol will appear on the display and the operating LED will light up green.
Deactivating the monitor function
The squelch is bypassed until you shortly push again the MON/z -key.
Automatic scan
The automatic scan permits to find active channels quickly. It scans independently allo of the 16 channels and stops as soon as a signal exceeds the squelch threshold. It will start again, if no signal is available.
Activating/deactivating the channel scan
Push the MON/Z-key for 4 seconds, the search starts and the search symbol-Z appears in the display.
To end the search, push the MON/Z -key again for 4 seconds.
On the display, the search symbol-z expires.
Key lock
As a protection against faulty operation you can lock the keyboard (with the exception of PTT-key and ⏻-key).
Activating/deactivating the key lock
To activate, push the /key for 4 seconds, the -symbol appears on the display.
To deactivate, push the 🔊/ 🔒 -key again for 4 seconds; the 🔔 symbol expires on the display.
Wireless Pairing
By cloning device data, you can quickly and easily program additional handheld radios to your personal settings. The master device is the data transmitter and the slave device is the data receiver.
Activating the slave device
Push the 🔊/←-key for 2 seconds. The ← symbol appears on the display and the operating LED is yellow. The device is now activated for data reception.

Note: You can activate several devices for data reception at the same time.
Activating the master device
Push the 🔊/←-key for 4 seconds. The ← symbol flashes on the display and the power LED flashes red. The device is now transmitting the data.
Transmission
When the slave device receives the data from the master device, the operating LED on the slave device is green. If the data transfer is successful, the slave device will restart automatically.
Push the PTT-key on the master device to finish the pairing mode.
Earpiece -VOX- microphone
Activate the VOX-function (see user manual, page 23).
Turn off the radio.
Plug the headset into the speaker/microphone jack.
Turn on the radio.
The VOX-function can now be used with the headset.

Note: You can also use the headset without VOX-function with the PTT-key.
Care instructions
Clean the housings of the radio sets by the means of a slightly damp, lint-free cloth, do not use at all detergents or solvents.
Protect the radio sets against extreme temperatures and strong vibrations.
Keep the battery contacts clean by the means of a dry cloth.
Remove the battery pack, if you do not use your devices for a longer period.
Protect the accessories against humidity/moistness, dust/contamination, strong vibrations and extreme temperatures.
Disposal instructions
Electric and electronic devices are not to be thrown into the domestic waste. Deliver devices which are out of order/used at a corresponding collecting point.
Please contact your local authorities for corresponding information.
Used up battery packs are not to be thrown into the domestic waste: Dispose them (inserted into a small plastic bag) at the corresponding collecting points!
Troubleshooting
Fault/Remedy
Your radio set cannot be switched on.
Charge the battery pack.
You can neither speak nor hear your radio partner.
Check whether the same channel and (if activated) the same CTCSS tone resp. DCS code are programmed.
If you are out of reach, reduce the distance to your radio partner.
No key function.
The key lock is switched on. Deactivate the key lock.
The channel is permanently busy.
Check the VOX setting. If required, reduce the VOX sensitivity of the second device as well.
Other parts in your environment occupy the channel. Switch to another channel.
SIMPLIFIED EU DECLARATION OF CONFORMITY
Hereby, sabo Elektronik GmbH declares that the radio equipment type
stabo freetalk com III
is in compliance with Directive 2014/53/EU.
The full text of the EU declaration of conformity is available at the following internet address:
https://stabo.de/fileadmin/DoC/DoC_stabo_freetalk_com_III.pdf
Technical data
Frequency range: 446.00625 MHz- 446.19375 MHz
Number of channels: 16
channel spacing: 12,5 kHz
Output power: ≤500 mW ERP
Modulation: FM-F3E
Sensitivity: 0.25 V
Antenna: Fixed
Operating voltage: 3,7 V
Li-Ion battery pack: 3,7 V / 1700 mAh
Protection class IP 54
Dimensions (H x D x W): 55 x 31 x 165 mm (incl. antenna)
Weight: 175 g (incl. battery pack)
Channel frequency table
| Channel no. | Frequency (MHz) |
| 1 | 446.00625 |
| 2 | 446.01875 |
| 3 | 446.03125 |
| 4 | 446.04375 |
| 5 | 446.05625 |
| 6 | 446.06875 |
| 7 | 446.08125 |
| 8 | 446.09375 |
| 9 | 446.10625 |
| 10 | 446.11875 |
| 11 | 446.13125 |
| 12 | 446.14375 |
| 13 | 446.15625 |
| 14 | 446.16875 |
| 15 | 446.18125 |
| 16 | 446.19375 |
CTCSS (Continuous Tone Coded Squelch System)
| No. | CTCSS-Frequency (Hz) | No. | CTCSS-Frequency (Hz) | No. | CTCSS-Frequency (Hz) | No. | CTCSS-Frequency (Hz) |
| 1 | 67.0 | 11 | 97.4 | 21 | 136.5 | 31 | 192.8 |
| 2 | 71.9 | 12 | 100.0 | 22 | 141.3 | 32 | 203.5 |
| 3 | 74.4 | 13 | 103.5 | 23 | 146.2 | 33 | 210.7 |
| 4 | 77.0 | 14 | 107.2 | 24 | 151.4 | 34 | 218.1 |
| 5 | 79.7 | 15 | 110.9 | 25 | 156.7 | 35 | 225.7 |
| 6 | 82.5 | 16 | 114.8 | 26 | 162.2 | 36 | 233.6 |
| 7 | 85.4 | 17 | 118.8 | 27 | 167.9 | 37 | 241.8 |
| 8 | 88.5 | 18 | 123.0 | 28 | 173.8 | 38 | 250.3 |
| 9 | 91.5 | 19 | 127.3 | 29 | 179.9 | ||
| 10 | 94.8 | 20 | 131.8 | 30 | 186.2 |
DCS (Digital Coded Squelch)
| No | DCS Code | NO | DCS Code | No | DCS Code | No | DCS Code | No | DCS Code |
| 39 | 023 | 56 | 125 | 73 | 245 | 90 | 412 | 107 | 624 |
| 40 | 025 | 57 | 131 | 74 | 251 | 91 | 413 | 108 | 627 |
| 41 | 026 | 58 | 132 | 75 | 261 | 92 | 423 | 109 | 631 |
| 42 | 031 | 59 | 134 | 76 | 263 | 93 | 431 | 110 | 632 |
| 43 | 032 | 60 | 143 | 77 | 265 | 94 | 432 | 111 | 654 |
| 44 | 043 | 61 | 152 | 78 | 271 | 95 | 445 | 112 | 662 |
| 45 | 047 | 62 | 155 | 79 | 306 | 96 | 464 | 113 | 664 |
| 46 | 051 | 63 | 156 | 80 | 311 | 97 | 465 | 114 | 703 |
| 47 | 054 | 64 | 162 | 81 | 315 | 98 | 466 | 115 | 712 |
| 48 | 065 | 65 | 165 | 82 | 331 | 99 | 503 | 116 | 723 |
| 49 | 071 | 66 | 172 | 83 | 343 | 100 | 506 | 117 | 731 |
| 50 | 072 | 67 | 174 | 84 | 346 | 101 | 516 | 118 | 732 |
| 51 | 073 | 68 | 205 | 85 | 351 | 102 | 532 | 119 | 734 |
| 52 | 074 | 69 | 223 | 86 | 364 | 103 | 546 | 120 | 743 |
| 53 | 114 | 70 | 226 | 87 | 365 | 104 | 565 | 121 | 754 |
| 54 | 115 | 71 | 243 | 88 | 371 | 105 | 606 | ||
| 55 | 116 | 72 | 244 | 89 | 411 | 106 | 612 |
Herstellergarantie

- stabo freetalk com III
- Safety warnings
- Important information/Intended use
- Scope of deli very
- The display
- Control elements and connections
- Provisions for the operation
- Charging the battery pack
- Inserting/removing the Li-Ion battery pack
- Safety instructions for charger and battery pack
- Charging the battery pack with the USB charging socket of the battery pack
- Information for disposal of battery packs
- Battery saving circuit/low battery warning
- Installing the Belt Clip
- Connecting an (optional) speaker/microphone combination
- Switching the radio on/off
- LED-Display
- Adjusting the volume
- Selecting the channel
- Receiving
- Transmitting
- Functions
- Pilot tone process CTCSS/ DCS
- Activating the pilot tone process CTCSS or DCS
- Deactivating the pilot tone process CTCSS or DCS
- VOX function (verbal transmission)
- Activating VOX
- Deactivating VOX
- Roger bee p
- Deactivating/activating the roger beep
- Deactivating/activating the key tone
- Monitor function
- Activating the monitor function
- Deactivating the monitor function
- Automatic scan
- Activating/deactivating the channel scan
- Key lock
- Activating/deactivating the key lock
- Wireless Pairing
- Activating the slave device
- Activating the master device
- Transmission
- Earpiece -VOX- microphone
- Care instructions
- Disposal instructions
- Troubleshooting
- Fault/Remedy
- SIMPLIFIED EU DECLARATION OF CONFORMITY
- Technical data
- CTCSS (Continuous Tone Coded Squelch System)
- DCS (Digital Coded Squelch)
- Herstellergarantie
Brand : STABO
Model : Freetalk com III
Category : Talkie Walkie