
SWS 9500 - Weather Station SENCOR - Free user manual and instructions
Find the device manual for free SWS 9500 SENCOR in PDF.


| Product Type | Weather Station |
| Brand | Sencor |
| Model | SWS 9500 |
| Dimensions (Base Station) | 120 x 80 x 25 mm (approximate) |
| Weight (Base Station) | 250 g (approximate) |
| Outdoor Sensor Dimensions | 65 x 95 x 30 mm (approximate) |
| Outdoor Sensor Weight | 80 g (approximate) |
| Power Supply | 2 x AA batteries for base station, 2 x AA batteries for outdoor sensor |
| Display Type | LCD with backlight |
| Indoor Temperature Range | -5°C to 50°C (23°F to 122°F) |
| Outdoor Temperature Range | -20°C to 60°C (-4°F to 140°F) |
| Humidity Measurement Range | 20% to 95% RH |
| Barometric Pressure Range | 700 to 1100 hPa |
| Wireless Range | Up to 100 m (open area) |
| RF Frequency | 433 MHz |
| Functions | Indoor/outdoor temperature & humidity, barometric pressure, weather forecast, trend indicators, moon phase, alarm clock, snooze |
| Maintenance | Clean with a dry soft cloth; avoid liquids; replace batteries when low |
| Safety | Not for outdoor use of base station; keep away from water; use only specified batteries |
| Spare Parts and Repairability | Contact Sencor service center for replacement sensors or accessories |
Frequently Asked Questions - SWS 9500 SENCOR
User questions about SWS 9500 SENCOR
0 question about this device. Answer the ones you know or ask your own.
Ask a new question about this device
Download the instructions for your Weather Station in PDF format for free! Find your manual SWS 9500 - SENCOR and take your electronic device back in hand. On this page are published all the documents necessary for the use of your device. SWS 9500 by SENCOR.
USER MANUAL SWS 9500 SENCOR
natural_image
Weather station instrument with digital display showing temperature and weather metrics (no readable text or symbols)EN ■ User Manual
Weather station with wireless sensor
- Pre installation....5
2.1 Checkout....5
2.2 Site selection....5
- Getting started....5
3.1 Wireless 8-in-1 sensor 5
3.2 Install Wireless 8-in-1 sensor....6
3.2.1 Battery and installation....6
3.2.2 Assembly the stand and pole 6
3.2.3 Mounting guidelines 7
3.3 Synchronizing additional sensor(s) (optional) 8
3.3.1 Optional Thermo-hygro sensors 8
3.4 Setup the Console....8
3.4.1 Power up the display console 9
3.4.2 Setup display console 9
3.4.3 Synchronizing wireless 8-in-1 sensor array 10
3.4.4 Data clearing....10
- Display console functions and operation.... 10
4.1 Screen Display....10
4.2 Display console keys....11
4.3 Wireless sensor signal receiving....12
4.4 Time and date 12
4.4.1 Radio controlled / atomic clock function.... 12
4.4.2 RCC Signal strength indicator.... 12
4.4.3 DAYLIGHT SAVING TIME (DST) 13
4.4.4 Moon phase 13
4.5 Time, Date, Unit and other setting 13
4.6 Setting alarm time and high / low weather alert 14
4.6.1 View alarm time and weather alert value 15
4.6.2 Alarm operation.... 15
4.6.3 Weather alert operation 16
4.7 Console features....16
4.7.1 Weather forecast.... 16
4.7.2 Barometric pressure....16
4.7.3 Outdoor temperature, humidity, dew point and index 17
4.7.4 Indoor and optional CH1\~3 temperature and humidity 18
4.7.5 Wind....19
4.7.6 Rain....21
4.7.7 Light intensity, UV index & exposure level 22
4.8 Trend indicator 22
4.9 Maximum / Minimum records....22
4.9.1 To Clear the Maximum / Minimum records 23
4.10 Back light....23
- Maintenance....23
5.1 Battery replacement....23
5.1.1 Re-pairing the sensor array manually 23
5.2 Reset and factory reset....23
5.3 Wireless 8-in-1 sensor array maintenance....24
-
Troubleshoot 24
-
Specifications....25
7.1 Console 25
7.2 Wireless 8-in-1 sensor 27
ABOUT THIS USER'S MANUAL

This symbol represents a warning. To ensure safe use, always adhere to the instructions described in this documentation.

This symbol is followed by a user's tip.
PRECAUTIONS
! i
- Keeping and reading the "User manual" is highly recommended. The manufacturer and supplier cannot accept any responsibility for any incorrect readings, export data lost and any consequences that occur should an inaccurate reading take place.
- Images shown in this manual may differ from the actual display.
- The contents of this manual may not be reproduced without the permission of the manufacturer.
- Technical specifications and user manual contents for this product are subject to change without notice.
- This product is not to be used for medical purposes or for public information
- Do not subject the unit to excessive force, shock, dust, temperature or humidity.
- Do not cover the ventilation holes with any items such as newspapers, curtains etc.
- Do not immerse the unit in water. If you spill liquid over it, dry it immediately with a soft, lint-free cloth.
- Do not clean the unit with abrasive or corrosive materials.
- Do not tamper with the unit's internal components. This invalidates the warranty.
- Placement of this product on certain types of wood may result in damage to if manufacturer will not be responsible. Consult the furniture manufacturer's care instructions for information.
- Only use attachments / accessories specified by the manufacturer.
- This product is not a toy. Keep out of the reach of children.
- The console is intended to be used only indoors.
- Place the console at least 20cm from nearby persons.
- Console working temperature: -5°C \~ 50°C
Warning
- An appliance is only suitable for mounting at height ≤ 2m. (Equipment mass ≤1kg)
- This product is intended for use only with the adaptor provided:
Manufacturer: Dong Guan Shi Jie Hua Xu Electronics Factory
Model: HX075-0501000-AG-001
- When disposing of this product, ensure it is collected separately for special treatment.
- The AC/DC adaptor is used as disconnect device.
- The AC/DC adaptor of apparatus should not be obstructed OR should be easily accessed during intended used.
- To be completely disconnect the power input, the AC/DC adaptor of apparatus shall be disconnected from the mains.
Caution
- Do not ingest the battery. Chemical Burn Hazard.
- This product contains a coin/key cell battery. If the coin/key cell battery is swallowed, it can cause severe internal burns in just 2 hours and can lead to death.
- Keep new and used batteries apart. If battery door does not close securely, stop using the product and keep it away from children.
- If you think batteries might have been swallowed or placed inside any part of the body, seek immediate medical attention.
-
Danger of explosion if battery is incorrectly replaced. Replace only with the same or equivalent type.
-
Battery cannot be subjected to high or low extreme temperatures, low air pressure at high altitude during use, storage or transportation.
- Replacement of a battery with an incorrect type can result in an explosion or the leakage of flammable liquid or gas.
- Disposal of a battery into fire or a hot oven, or mechanically crushing or cutting of a battery, can result in an explosion.
- Leaving a battery in an extremely high temperature surrounding environment can result in an explosion or the leakage of flammable liquid or gas.
- A battery subjected to extremely low air pressure may result in an explosion or the leakage of flammable liquid or gas.
1. INTRODUCTION
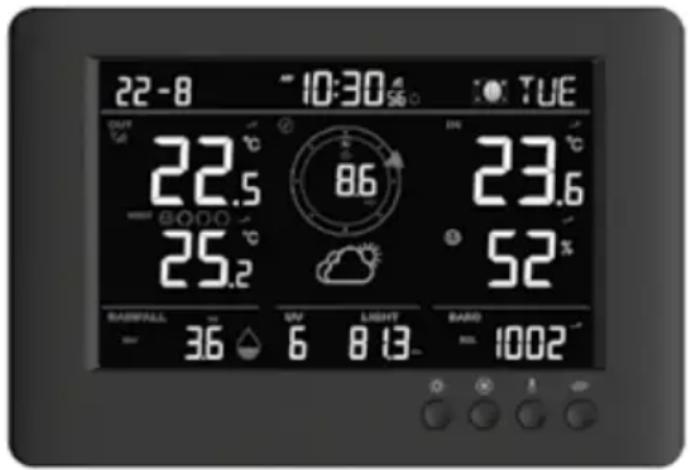
Thank you for your purchase of this full function color display weather station with 8-IN-1 sensor.
The wireless 8-IN-1 sensor contains a self-emptying rain collector for measuring rainfall, UV index, light intensity, anemometer, wind vane, WBGT, temperature and humidity sensors. It is calibrated for your easy installation. It sends data by a low power radio frequency to the console up to 150m away (line of sight).
The colorful display console displays all the weather data received from the 8-IN-1 sensor outside. It remembers the data for a time range for you to monitor and analyze the weather status for past 24 hours. It has advance features such as the HI / LO Alert alarm which will alert the user when the set high or low weather criteria are met. The barometric pressure records are computed to give users forthcoming weather forecast and stormy warning. Day and date stamps are also provided to the corresponding maximum and minimum records for each weather details.
The system also analyzes the records for your convenient viewing, such as the display of rainfall in terms of rain rate, hourly, daily, weekly, monthly and total records, whereas WGBT in different levels. Different useful readings such as Feels like, WBGT, Wind-chill, Heat Index, Dew-point, Comfort level are also provided.
1.1 Quick start guide
The following Quick Start Guide provides the necessary steps to install and operate the weather station, along with references to the pertinent sections.
| Step Description Section | |
| 1 Power up the 8-in-1 wireless sensor array 3.2.1 | |
| 2 Power up the display console and pair with sensor array 3.4 |
2. PRE INSTALLATION
2.1 Checkout
Before permanently install your weather station, we recommend the user to operate the weather station at a location which is easy to access to. This will allow you to get familiar with the weather station functions and calibration procedures, to ensure proper operation before installing it permanently.
2.2 Site selection
Before installing the sensor array, please consider the followings;
- Rain gauge must be clean every few months
- Batteries must be changed every 2 to 2.5 years
- Avoid radiant heat reflected from any adjacent buildings and structures. Ideally, the sensor array should be installed at 1.5m (5') from any building, structure, ground or roof top.
- Choose an area of open space in direct sunlight without any obstruction of rain, wind, and sunlight.
- Transmission range between sensor array and display console could reach a distance of 150m (or 450 feet) at line of sight, providing there are no interfering obstacles in between or nearby such as trees, towers, or high voltage line. Check the reception signal quality to ensure good reception.
- Household appliance such as fridge, lighting, dimmers may pose Electro-magnetic interference (EMI), while Radio Frequency Interference (RFI) from devices operating in the same frequency range may cause signal intermittent. Choose a location at least 1-2 meter (3-5 feet) away from these interference sources to ensure best reception.
3. GETTING STARTED
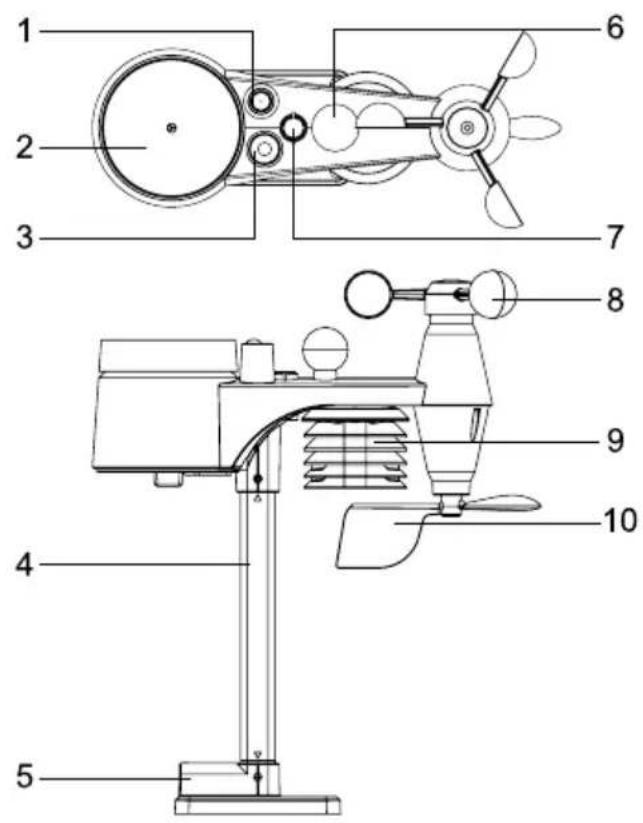
3.1 Wireless 8-in-1 sensor
-
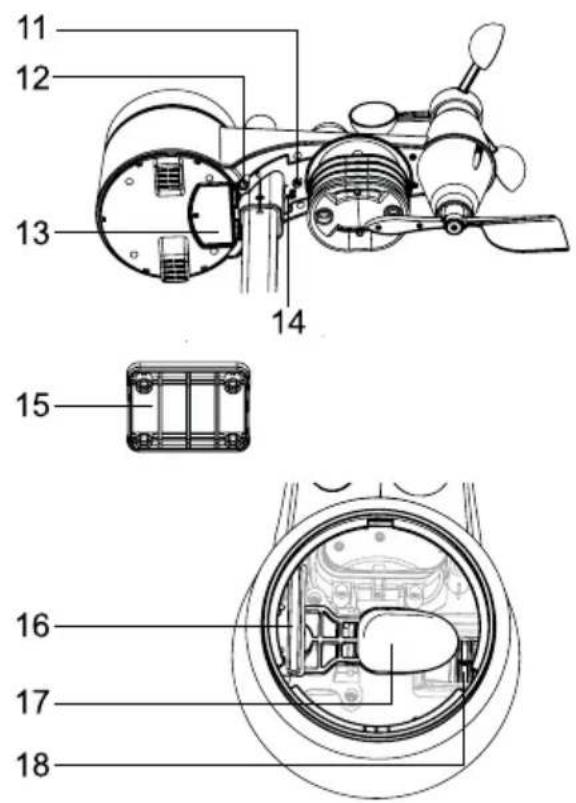
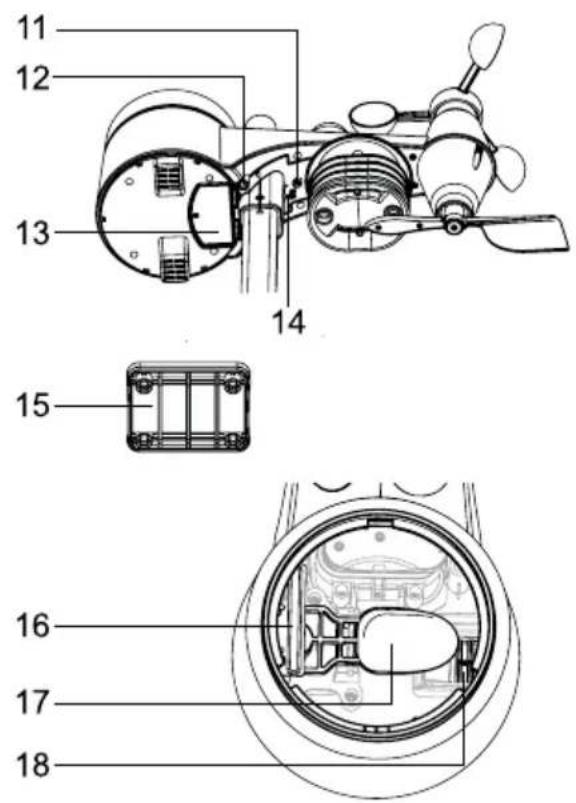
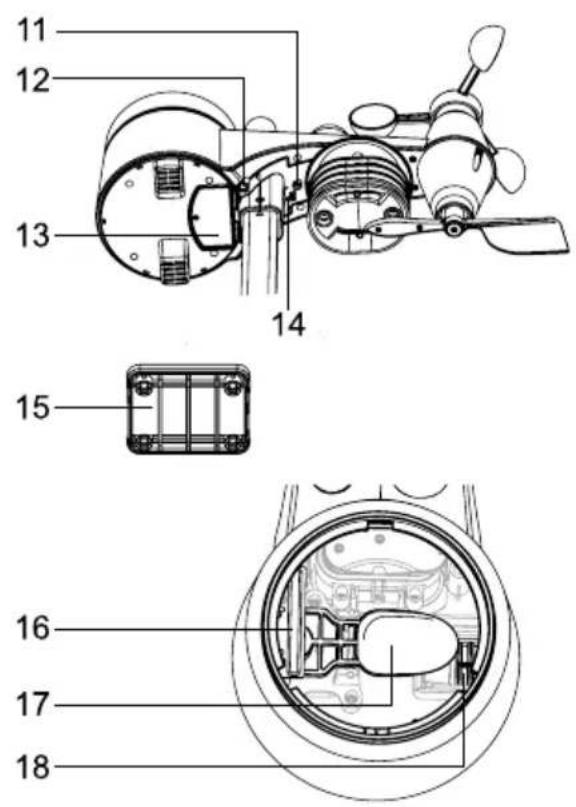
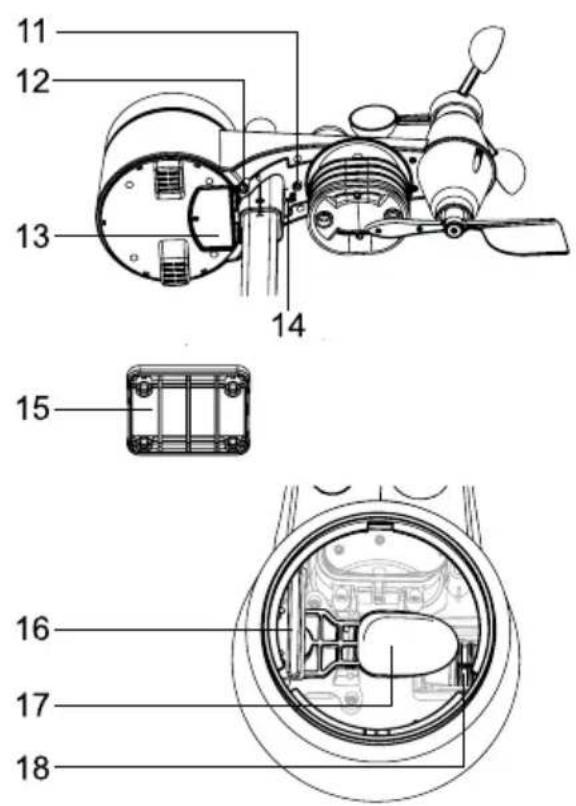
Antenna
-
Balance indicator
-
Battery door
-
Rain collector
-
Wind cups
-
[RCC] key
-
UVI / light sensor
-
Radiation shield
-
Mounting clamp
-
Mounting pole
-
Wind vane
-
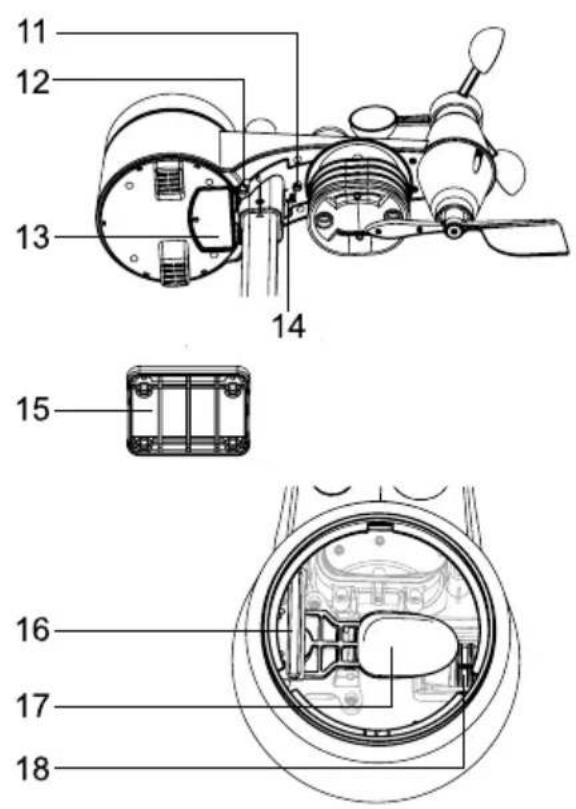
Rain sensor
-
Mounting base
-
Red LED indicator
-
Tipping bucket
-
Black globe sensor
-
[ RESET ] key
-
Drain holes
3.2 Install Wireless 8-in-1 sensor
Your wireless 8-in-1 sensor measures wind speed, wind direction, rainfall, UV index, light intensity, WBGT, temperature and humidity for you. It's fully assembled and calibrated for your easy installation.
3.2.1 Battery and installation
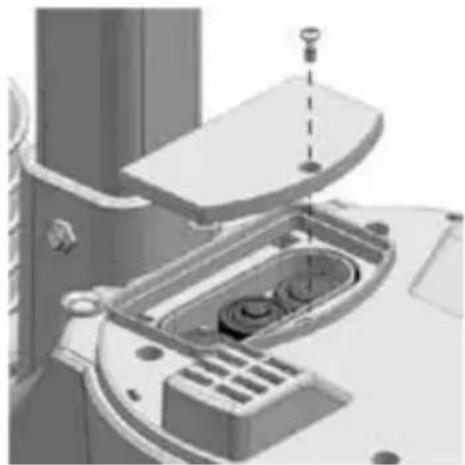
Unscrew the battery door at bottom of unit and insert the batteries according to the +/- polarity indicated.
Screw the battery door compartment on tightly.

Note:
- Ensure the water tight O-ring is properly aligned in place to ensure water resistant.
- The red LED will begin flashing every 12 seconds.
natural_image
3D rendering of a mechanical device with internal components and mounting bracket (no visible text or symbols)3.2.2 Assembly the stand and pole
| Step 1Insert the top side of the pole to the square hole of the weather sensor.Note:Ensure the pole and sensor's indicator align. | 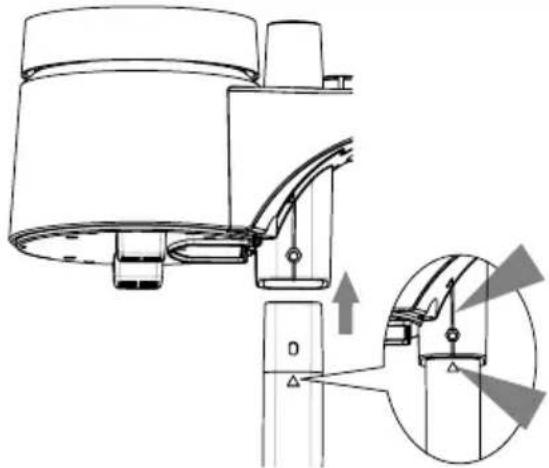 |
| Step 2Place the nut in the hexagon hole on the sensor, then insert the screw in other side and tighten it by the screw driver. | 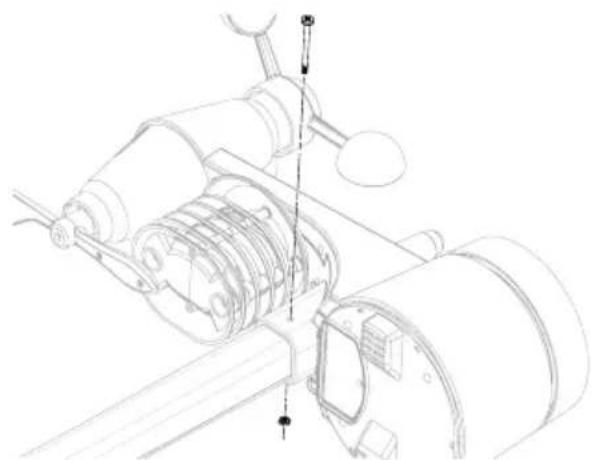 |
| Step 3Insert the other side of the pole to the square hole of the plastic stand. | 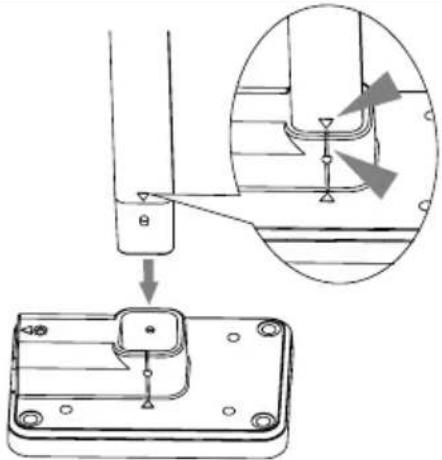 |
| Note:Ensure the pole and stand's indicator align. | |
| Step 4Place the nut in the hexagon hole of the stand, then insert the screw in other side and then tighten it by the screw driver. | 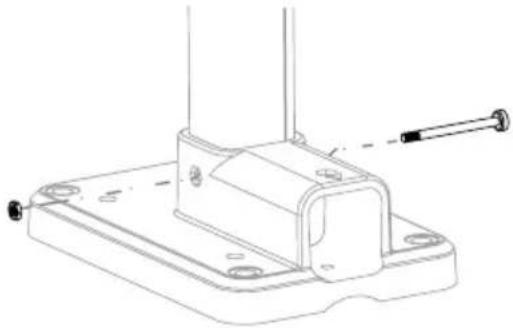 |
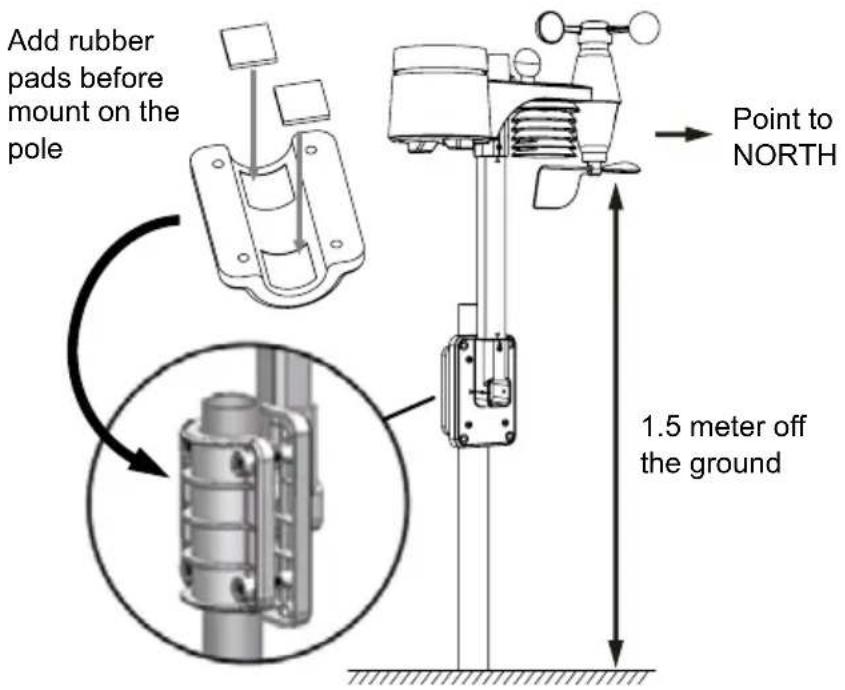
Install the wireless 8-in-1 sensor in an open location with no obstructions above and around the sensor for accurate rain and wind measurement. Install the sensor with the smaller end facing the North to properly orient the wind direction vane. Secure the mounting stand and clamps (included) to a post or pole, and allow minimum 1.5m off the ground.
3.2.3 Mounting guidelines
- Install the wireless 8-in-1 sensor at least 1.5m off the ground for better and more accurate wind measurements.
- Choose an open area within 150 meters from the LCD console.
- Install the wireless 8-in-1 sensor as level as possible to achieve accurate rain and wind measurements.
- Mount the wireless 8-in-1 sensor with the wind meter end pointing to the North to correctly orient direction of the wind vane.
natural_image
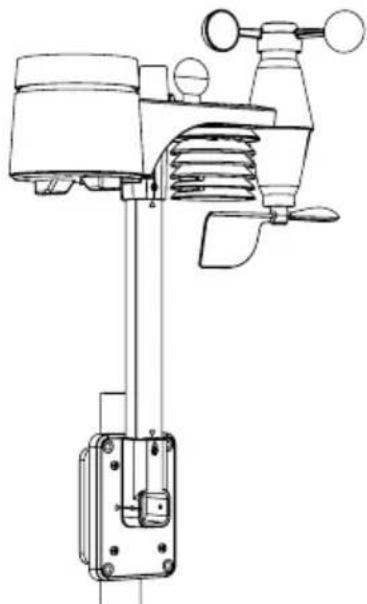
Technical line drawing of a mechanical device with no visible text or symbolsA. Mounting on pole (Pole Diameter 1"\~1.3") (25\~33mm)
natural_image
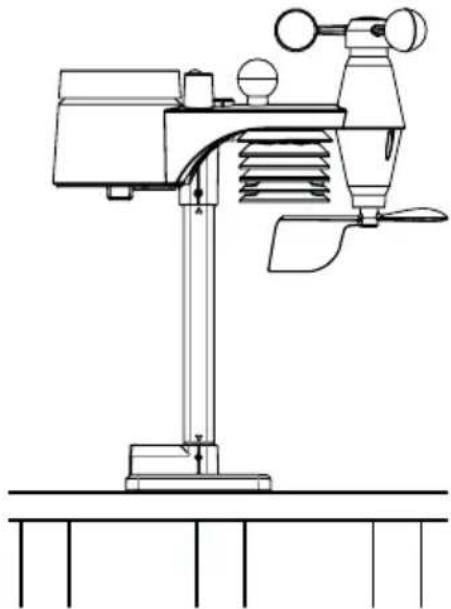
Technical line drawing of a weather monitoring instrument with no visible text or symbolsB. Mounting on the railing
3.3 Synchronizing additional sensor(s) (optional)
The console can support up to 3 optional wireless thermo-hygro sensors. Please contact your local retailer for details of different sensors.
3.3.1 Optional Thermo-hygro sensors
| No. of sensor supported | Description Image | |
| Up to 3 sensors | High Precision Thermo-Hygro sensorSensor data:CH3~1 temperature and humidity |  |
| Pool sensorSensor data:CH3~1 water temperature |  |
3.4 Setup the Console
Follow the procedure to setup the console connection with wireless sensor array.
3.4.1 Power up the display console
1. Install the back-up CR2032 battery
| Step 1 Step 2 Step 3 | ||
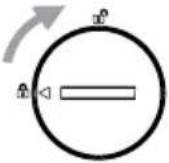 | 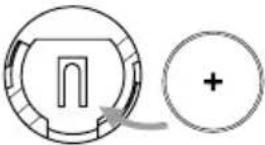 | 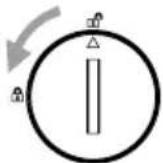 |
| Remove the console battery door with coin | Insert a new CR2032 button cell battery | Replace the battery door. |
2. Connect the display console power jack to AC power with the adaptor included.
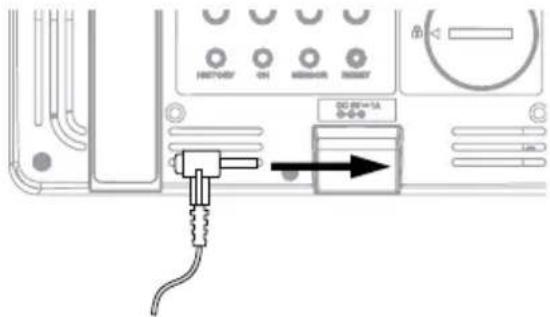

Note:
- The backup battery can backup: Time & Date & Max/Min weather records, rainfall records and alert setting values / status.
- The built-in memory can backup: Hemisphere setting, Calibration values, and Sensor ID.
- Please always remove the back-up battery if the device is not going to be used for a while. Please keep in mind that even when the device is not in use, certain settings, such as the clock, alert settings and records in its memory, will still drain the back-up battery.
3.4.2 Setup display console
Once the console power up, all the segments of the LCD will be shown.
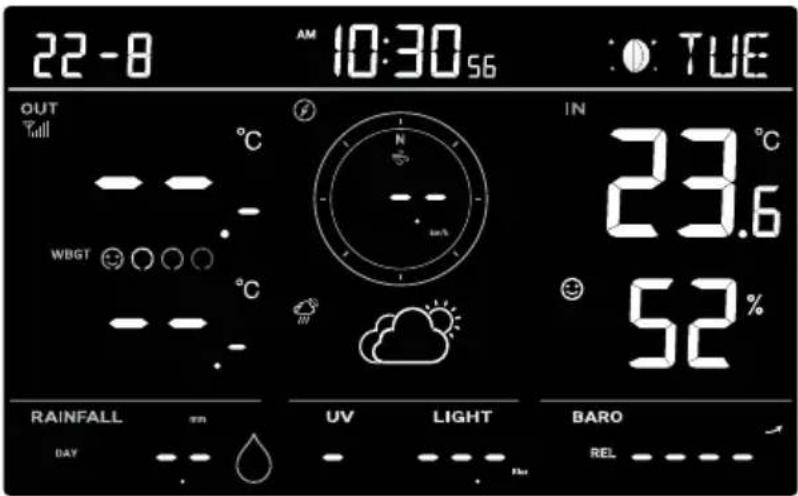
If no display appears when power up the console, you can press [ RESET ] key by using a pointed object. If this process still not work, you can remove the backup battery and unplug the adapter then re-power up the console again.
3.4.3 Synchronizing wireless 8-in-1 sensor array
Immediately after power up the console, while still in synchronization mode, the 8-in-1 sensor can be paired to the console automatically (as indicated by the flashing antenna ggg). User may also manually restart the synchronization mode by pressing the [SENSOR] key. Once they are paired up, the sensor signal strength indicator and weather reading will appear on your console display.
3.4.4 Data clearing
During installation of the wireless 8-in-1 sensor, the sensors were likely to be triggered, resulting in erroneous rainfall and wind measurements. After the installation, user may clear out all the erroneous data from the display console. Simply press the [RESET] key once to re-start the console.
4. DISPLAY CONSOLE FUNCTIONS AND OPERATION
4.1 Screen Display
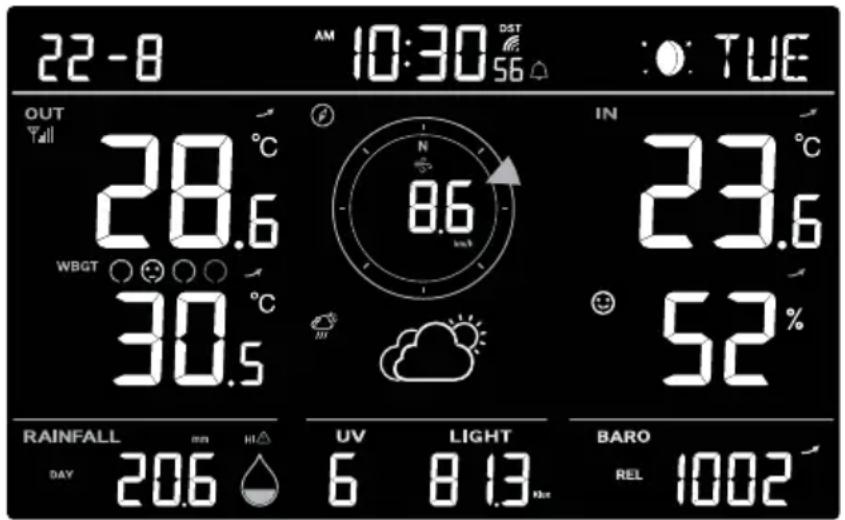
| 1 | ||
| 2 | 3 | 5 |
| 4 | ||
| 6 | 7 | 8 |
- Time, date and moon phase
- Outdoor temperature, humidity, WBGT, Feels like, Heat Index, Wind Chill and Dew Point
- Wind speed, gust & direction
- Weather forecast
- Indoor / CH1\~3 temperature and humidity
- Rain
- Light intensity, UV index
- Barometric pressure
4.2 Display console keys
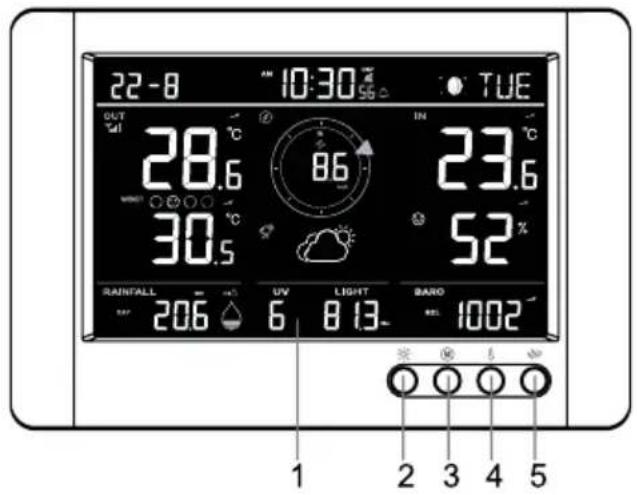
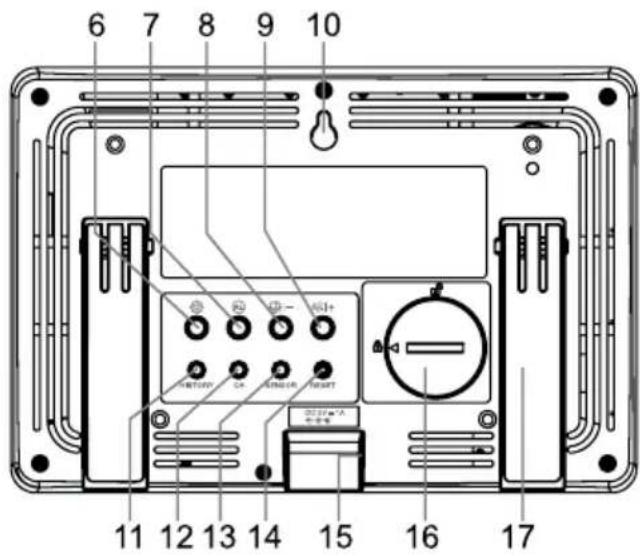
| No. Key / Part Name Description | ||
| 1 Display screen | ||
| 2 | BACK LIGHT / SNOOZE | Press to change the back light level or stop alarm sound |
| 3 MEMORY To switch between maximum and minimum values since last reset | ||
| 4 INDEX | To switch between WBGT, Feels Like, Heat Index, Wind Chill and Dew point | |
| 5 | RAIN | Press to switch between rain rate and rainfall of different periods |
| 6 SET Hold 2 seconds to enter time, date and other setting | ||
| 7 ALARM Press to view alarm time and alert values | ||
| 8 - / BARO | Press to switch current pressure and past 1, 2, 3, 6 hour average pressureHold 2 seconds to change between relative and absolute pressure | |
| 9 + / WIND | Press to change between current, 10 minutes and 12 hours gustHold 2 seconds to change between wind speed and Beaufort scale | |
| 10 Wall mount hole | ||
| 11 HISTORY Press to view the past 24 hours records | ||
| 12 CHANNEL Press to switch between indoor and CH1~3 temperature and humidity | ||
| 13 SENSOR Press to start sensor synchronization (pairing) | ||
| 14 RESET | Press to reset the consoleHold 6 seconds to factory reset the console | |
| 15 Power jack | ||
| 16 Battery compartment | ||
| 17 Table stand | ||
4.3 Wireless sensor signal receiving
- The console display signal strength for the wireless sensor(s), as per table below:
| No signal Weak | signal Good signal | ||
| 8-in-1 sensor array |  |  |  |
| Channel 1~3 optional sensor(s) | 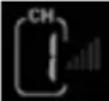 | 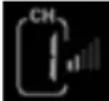 | 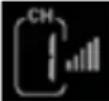 |
- If the signal has discontinued and does not recover within 15 minutes, the signal icon will disappear. The temperature and humidity will display "Er" for the corresponding channel.
- If the signal does not recover within 48 hours, the "Er" display will become permanent. You need to replace the batteries and then press [SENSOR] key to pair up the sensor again.
4.4 Time and date

- Date
- Time with Daylight saving time (DST) indication
- Alarm and ice pre-alarm
- Moon phase
- Day of week
4.4.1 Radio controlled / atomic clock function
When the unit receives RCC signal, a sync-time symbol will appear on the LCD, and synchronizes daily.
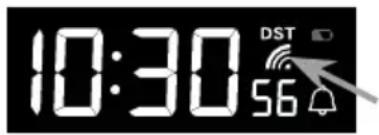
4.4.2 RCC Signal strength indicator
The signal indicator shows signal receive status. Flashing wave segment means RCC signals are being received.
The signal receiving status could be classified into 2 types.
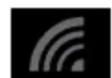
No signal

Received RCC signal

Note:
- Every day the wireless sensor will automatically receive radio-controlled time signal and send to console.
-
The strength of radio-controlled time signal from the transmitter tower may be affected by geographical location or building around.
-
Always place the console away from interfering sources such as TV set, computer, etc.
- Avoid placing the console on or next to metal plates.
- The console can more easy to receive the signal, if the distance between console and the adapter is 1m or more.
- Closed areas such as airport, basement, tower block, or factory are not recommended.
4.4.3 DAYLIGHT SAVING TIME (DST)
The console automatically set DST itself according to the radio controlled clock signal it received.
4.4.4 Moon phase
The moon phase is determined by time and date of the console. The following table explains the moon phase icons of the Northern and Southern Hemispheres. Please refer to section 4.5 about how to setup for the Southern Hemisphere.
| Northern Hemisphere Moon Phase Southern Hemisphere | ||
 | New Moon |  |
 | Waxing Crescent |  |
 | First quarter |  |
 | Waxing Gibbous |  |
 | Full Moon |  |
 | Waning Gibbous |  |
 | Third quarter |  |
 | Waning Crescent |  |
4.5 Time, Date, Unit and other setting
Press and hold the [SET] key for 2 seconds to enter the setting mode. Press [+WIND] or [-/BARO] key to adjust, and press [SET] key to proceed with next step of the setting. Please refer to following setting procedures.
| Step Mode Setting procedure | ||
| [SET]+2s | 12/24 hour format | Press [+/WIND] or [-/BARO] key to select 12 or 24 hour format |
| [SET] | Time | Press [+/WIND] or [-/BARO] key to adjust the minute / hour |
| [SET] | Year | Press [+/WIND] or [-/BARO] key to adjust the year |
| [SET] | Date | Press [+/WIND] or [-/BARO] key to adjust the day / month |
| [SET] | MD / DM display format | Press [+/WIND] or [-/BARO] key to select „Month / Day“ or „Day / Month“ display format |
| [SET] Time offset | Press [+/WIND] or [-/BARO] key to adjust the hour between -23 and +23 hours | |
| [SET] RCC On / Off | Press [+/WIND] or [-/BARO] key to enable or display RCC receiving function | |
| [SET] | DST (Daylight Saving Time) | Press [+/WIND] or [-/BARO] key to select AUTO / ON / OFF. AUTO is to adjust the daylight saving time automatically based on time zone entered. ON is to add one hour on current default time. OFF is to completely turn off the DST function. |
| [SET] Hemisphere | Press [+/WIND] or [-/BARO] key to select North / South hemisphere for moon phase and wireless sensor array point to direction. | |
| [SET] | Weekday language | Press [+/WIND] or [-/BARO] key to select weekday display language |
| [SET] | Temperature unit | Press [+/WIND] or [-/BARO] key to select °C or °F |
| [SET] | Wind speed unit | Press [+/WIND] or [-/BARO] key to select m/s, knots, mph or km/h |
| [SET] | Rain unit | Press [+/WIND] or [-/BARO] key to select mm or in |
| [SET] | Light unit | Press [+/WIND] or [-/BARO] key to select Klux, Kfc or W/m2 |
| [SET] | Baro pressure unit | Press [+/WIND] or [-/BARO] key to select hPa, mmHg or inHg |
| [SET] | Relative baro pressure calibration | Press [+/WIND] or [-/BARO] key to adjust the REL baro pressure value |
| Note:- The default relative atmospheric pressure value is 1013 hPa (29.91 inHg), which refers to the average atmospheric pressure.- The relative atmospheric pressure is based on the sea level, but it will change with the absolute atmospheric pressure changes after operating the clock for 1 hour. | ||
| [SET] Exit setting mode | ||

Note:
- In normal mode, press [ SET ] key to switch between year and date display.
- During the setting, you can back to normal mode by press and hold [SET] key for 2 seconds.
4.6 Setting alarm time and high / low weather alert
In normal time mode, press and hold [ALARM] key for 2 seconds to enter alarm and alert setting mode. Then press [ALARM] key to proceed with next step of the setting. Please refer to the following setting procedures.
| Step Mode Setting procedure | ||
| [ALARM]+2s | Time alarm | Press [+/WIND] or [-/BARO] key to adjust the time.Press [SET] key to turn the alarm, ice pre alarm on / off. |
| [ALARM] | IN / CH temperature high alert | Press [+/WIND] or [-/BARO] key to adjust the IN temperature high alert value. Press [ALARM] key to on / off the alert.Press [CH] key to select the IN and CH1~3 |
| [ALARM] | IN / CH temperature low alert | Press [+/WIND] or [-/BARO] key to adjust the IN temperature low alert value. Press [SET] key to on / off the alert. Press [CH] key to select the IN and CH1~3 |
| [ALARM] | IN / CH humidity high alert | Press [+/WIND] or [-/BARO] key to adjust the IN humidity high alert value. Press [SET] key to on / off the alert. Press [CH] key to select the IN and CH1~3 |
| [ALARM] | IN / CH humidity low alert | Press [+/WIND] or [-/BARO] key to adjust the IN humidity low alert value. Press [SET] key to on / off the alert. Press [CH] key to select the IN and CH1~3 |
| [ALARM] | OUT temperature high alert | Press [+/WIND] or [-/BARO] key to adjust the OUT temperature high alert value. Press [SET] key to on / off the alert. |
| [ALARM] | OUT temperature low alert | Press [+/WIND] or [-/BARO] key to adjust the OUT temperature low alert value. Press [SET] key to on / off the alert. |
| [ALARM] WBGT high alert | Press [+/WIND] or [-/BARO] key to adjust the WBGT high alert value. Press [SET] key to toggle the alert on / off. | |
| [ALARM] Feels like high alert | Press [+/WIND] or [-/BARO] key to adjust the feels like high alert value. Press [SET] key to on / off the alert. | |
| [ALARM] Feels like low alert | Press [+/WIND] or [-/BARO] key to adjust the feels like low alert value. Press [SET] key to on / off the alert. | |
| [ALARM] Heat index high alert | Press [+/WIND] or [-/BARO] key to adjust the heat index high alert value. Press [SET] key to on / off the alert. | |
| [ALARM] Wind chill low alert | Press [+/WIND] or [-/BARO] key to adjust the wind chill low alert value. Press [SET] key to on / off the alert. | |
| [ALARM] Dew point low alert | Press [+/WIND] or [-/BARO] key to adjust the dew point low alert value. Press [SET] key to on / off the alert. | |
| [ALARM] | OUT humidity high alert | Press [+/WIND] or [-/BARO] key to adjust the OUT humidity high alert value. Press [SET] key to on / off the alert. |
| [ALARM] | OUT humidity low alert | Press [+/WIND] or [-/BARO] key to adjust the OUT humidity low alert value. Press [SET] key to on / off the alert. |
| [ALARM] | Wind speed high alert | Press [+/WIND] or [-/BARO] key to adjust the wind speed high alert value. Press [SET] key to on / off the alert. |
| [ALARM] Rain rate high alert | Press [+/WIND] or [-/BARO] key to adjust the rain rate high alert value. Press [SET] key to on / off the alert. | |
| [ALARM] | Pressure drop alert (drop in 30 minutes) | Press [+/WIND] or [-/BARO] key to adjust the pressure drop alert value. Press [SET] key to on / off the alert. |
| [ALARM] UV high alert | Press [+/WIND] or [-/BARO] key to adjust the UV high alert value. Press [SET] key to toggle the alert on / off. | |
| [ALARM] | Light intensity high alert | Press [+/WIND] or [-/BARO] key to adjust the light intensity high alert value. Press [SET] key to on / off the alert. |
| [ALARM] Exit setting mode | ||

Note:
- When you turn on the time alarm, the "icon will display on time section.
- When you turn on the ice pre alarm, the "I" and "icon will display on time section.
- When you turn on the weather alert, the “icon will display near the top of reading.
- During the setting, press and hold the [+/WIND] or [-/BARO] key for quick-adjusting the value.
- The alarm function(s) will turn on automatically once you set the alarm time.
- During the setting, you can return back to normal mode by press and hold [SET] key for 2 seconds.
4.6.1 View alarm time and weather alert value
- In normal mode, press [ALARM] key to show the alarm time.
- Press [ALARM] key repeatedly to show the high alert value and low alert value for different parameters.
4.6.2 Alarm operation
When the time reaches the alarm time, the alarm sound will beep.
The alarm beeping can be stopped by following operation:
- Auto-stop after 2 minutes if without any operation and the alarm will activate again in the next day.
- By pressing [BACK LIGHT / SNOOZE] key to enter snooze, and the alarm will sound again after 5 minutes.
- By pressing and hold [BACK LIGHT / SNOOZE] key for 2 seconds or press [ALARM] key to stop the alarm and the alarm will activate again in the next day.

Note:
During the snooze, the alarm icon "will keep flashing.
4.6.3 Weather alert operation
If you set the weather alert, and this value out of the setting range, alarm sound will start and the related weather reading will flash.
Where it can be stopped by following operation:
- Auto-stop once the value back to the range.
- By pressing the [BACK LIGHT / SNOOZE] or [ALARM] key to stop the sound.
4.7 Console features
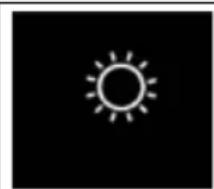
4.7.1 Weather forecast
The built-in barometer continually monitor atmosphere pressure. Based on the data collected, it can predict the weather conditions in the forthcoming 12\~24 hours within a 30\~50km (19\~31 miles) radius.
natural_image
Simple white sun icon on black background (no text or symbols)Sunny Partly cloudy Cloudy Rainy Rainy / Stormy Snowy
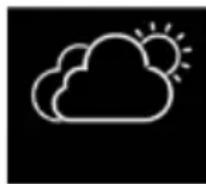
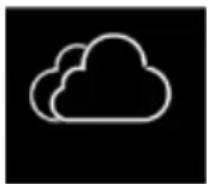
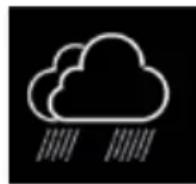
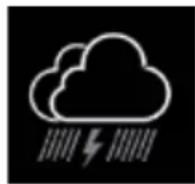

Note:
- The accuracy of a general pressure-based weather forecast is about 70% to 75%.
- The weather forecast is reflecting the weather situation for next 12\~24 hours, it may not necessarily reflect the current situation.
- The SNOWY weather forecast is not based on the atmospheric pressure, but based on the temperature of outdoor. When the temperature is below -3°C (26°F), the SNOWY weather icon will be displayed on the LCD.
4.7.2 Barometric pressure
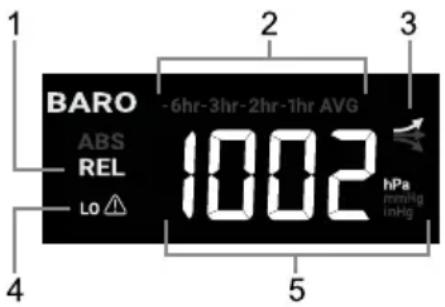
The atmospheric pressure is the pressure at any location of the earth caused by the weight of the column of air above it. One atmospheric pressure refers to the average pressure and gradually decreases as altitude increases. Meteorologists use barometers to measure atmospheric pressure. Because absolute atmospheric pressure decreases with altitude, meteorologist correct the pressure relative to sea-level conditions. Hence, your ABS pressure may read 1000 hPa at altitude of 300m, but the REL pressure is 1013 hPa.
To obtain accurate REL pressure for your area, consult your local official observatory or check weather website on internet for real time barometer conditions, and then adjust the relative pressure in setting mode (Section 4.5).
- Absolute / Relative pressure indicator
- Past 1, 2, 3, 6 hour average pressure mode indicator
- Trend indicator
- Pressure drop alert indicator
- Barometric pressure reading
4.7.2.1 Pressure history
Press [ BARO ] key for average pressure records of 1, 2, 3, 6 hour ago.
4.7.2.2 Absolute or relative barometric pressure
In normal mode, press and hold [ BARO ] key for 2 second to switch between ABSOLUTE and RELATIVE barometric pressure.
4.7.3 Outdoor temperature, humidity, dew point and index
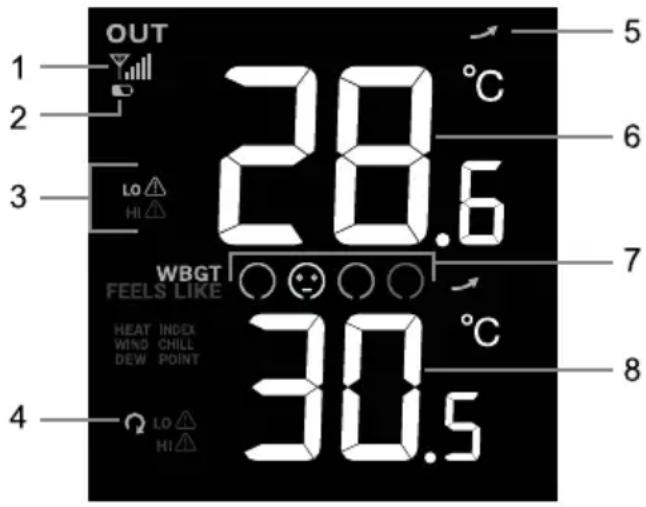
- Signal receiving strength indicator
- Low battery indicator
- High / Low alert indicator
- Auto loop
- Trend indicator
- Outdoor temperature reading
- WBGT level icon
- Weather index for WBGT, Feels like, Heat index and Wind chill

Note:
If temperature / humidity is below or above the measurement range, the reading will show "LO" or "HI" respectively.
View different weather index
Press [INDEX] key to switch display between WBGT, FEELS LIKE, HEAT INDEX, WIND CHILL and DEW POINT readings in weather index section.
4.7.3.1 WBGT and WBGT level
The wet-bulb globe temperature (WBGT) is a measure of environmental heat as it affects humans.
Unlike a simple temperature measurement, WBGT accounts for major environmental heat factors:
air temperature, humidity, and radiant heat from sunlight. It is used by industrial hygienists, athletes, sporting events and the military to determine appropriate exposure levels to high temperatures.
| Caution Extreme | Caution Danger Extreme | Danger | |||
 |  |  |  | ||
| 26.7 ~ 29.3°C 29.4 | ~ 31°C 31.1 ~ 32.1°C > 32 | 2°C | |||
Note:
- WBGT display range is 10 \~ 50°C (50 \~ 122°F), if below or above the measurement range, the reading will show “Lo” or “HI” respectively
- There is no WBGT level indication when the WBGT is below 26.7°C (80.1°F)
4.7.3.2 Feels like
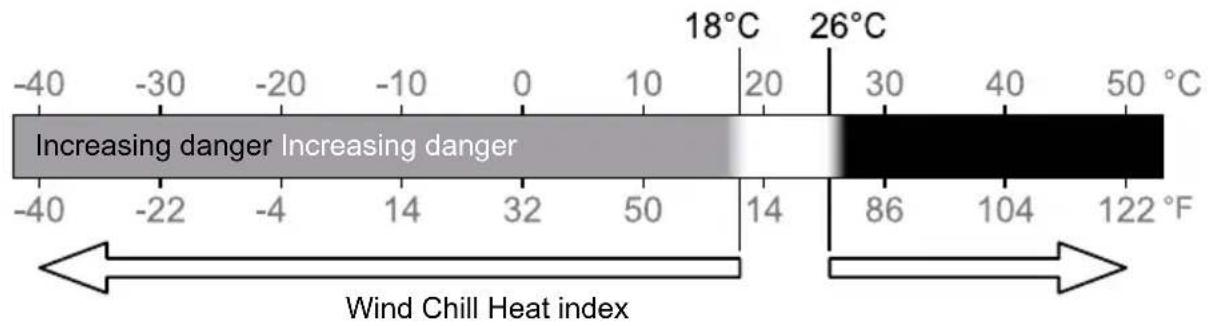
Feels Like Temperature shows what the outdoor temperature will feel like. It's a collective mixture of Wind Chill factor (18°C or below) and the Heat Index (26°C or above). For temperatures in the region between 18.1°C to 25.9°C where both wind and humidity are less significant in affecting the temperature, the device will show the actual outdoor measured temperature as Feels Like Temperature.
heatmap
| Temperature Change (°C) | Wind Chill Heat Index | | ------------------------ | --------------------- | | 18 | -40 | | 26 | -22 | | 30 | -4 | | 40 | 14 | | 50 | 32 | | 18 | 50 | | 26 | 86 | | 30 | 104 | | 50 | 122 |4.7.3.3 Heat index
The heat index which is determined by the wireless 8-in-1 sensor's temperature & humidity data when the temperature is between 26^ (79°F) and 50^ (120°F).
| Heat Index range Warning | Explanation | |
| 27°C to 32°C (80°F to 90°F) | Caution Possibility of heat exhaustion | |
| 33°C to 40°C (91°F to 105°F) | Extreme Caution Possibility of heat dehydration | |
| 41°C to 54°C (106°F to 129°F) | Danger Heat exhaustion likely | |
| ≥55°C (≥130°F) | Extreme Danger | Strong risk of dehydration / sun stroke |
4.7.3.4 Wind chill
A combination of the wireless 8-in-1 sensor's temperature and wind speed data determines the current wind chill factor. Wind chill number are always lower than the air temperature for wind values where the formula applied is valid (i.e. due to limitation of formula, actual air temperature higher than 10^ with wind speed below 9km/h may result in erroneous wind chill reading).
4.7.3.5 Dew point
Dew point is the temperature below which the water vapor in air at constant barometric pressure condenses into liquid water at the same rate at which it evaporates. The condensed water is called dew when it forms on a solid surface.
4.7.4 Indoor and optional CH1\~3 temperature and humidity
This console can display Indoor and CH1\~3 optional thermo-hygro sensor readings. In normal mode, press [CH] to switch between indoor and different wireless channels.
For auto-loop function, just press and hold the [CH] for 2 seconds and the 🔒 icon will appear. The console will scroll the readings of all the sensors every 4 seconds.
- Indoor indicator
- Signal strength for CH1\~3
- CH1\~3 indicator
- CH1\~3 auto loop icon
- Low battery indicator for CH1\~3
- High / Low alert indicator
- Comfort index icon
- Sensor type icon of optional pool or soil sensor
- Trend indicator
- Indoor / CH1\~3 temperature reading
- Indoor / CH1\~3 sensor humidity reading
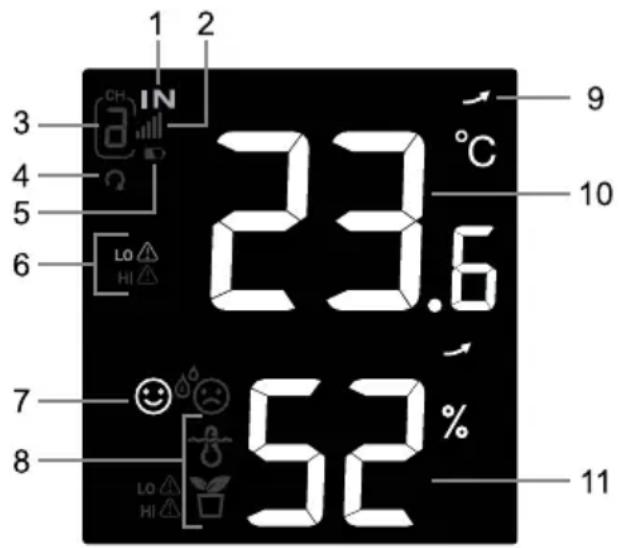
4.7.4.1 Comfort Indication
The comfort indication is a pictorial indication based on indoor air temperature and humidity in an attempt to determine comfort level.
|   |  | |
| Too cold Comfortable | Too hot | |
Note:
Comfort indication can vary under the same temperature, depending on the humidity.
There is no comfort indication when temperature is below 0^ C ( 32^ F) or over 60^ C ( 140^ F).
4.7.5 Wind
- High wind speed alert indicator
- Real time wind direction indicator (16 points)
- Wind speed, Gust or Beaufort scale reading
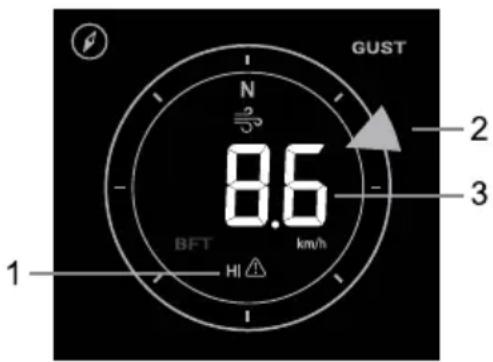
4.7.5.1 Wind speed and Beaufort Scale display
Wind speed is defined as the average wind speed in the 12 second update period. Press [WIND] key to toggle between Wind speed, gust and Beaufort scale reading.
4.7.5.2 Beaufort scale table
The Beaufort scale is an international scale of wind velocities ranging from 0 (calm) to 12 (Hurricane force).
| Beaufort Scale | Description | Wind Speed Land Condition | |
| 0 Calm | < 1 km/h | Calm. Smoke rises vertically. | |
| < 1 mph | |||
| < 1 knots | |||
| < 0.3 m/s | |||
| 1 Light air | 1.1 ~ 5km/h | Smoke drift indicates wind direction.Leaves and wind vanes are stationary. | |
| 1 ~ 3 mph | |||
| 1 ~ 3 knots | |||
| 0.3 ~ 1.5 m/s | |||
| 2 Light breeze | 6 ~ 11 km/h | Wind felt on exposed skin. Leaves rustle.Wind vanes begin to move. | |
| 4 ~ 7 mph | |||
| 4 ~ 6 knots | |||
| 1.6 ~ 3.3 m/s | |||
| 3 Gentle breeze | 12 ~ 19 km/h | Leaves and small twigs constantly moving, light flags extended. | |
| 8 ~ 12 mph | |||
| 7 ~ 10 knots | |||
| 3.4 ~ 5.4 m/s | |||
| 4 | Moderate breeze | 20 ~ 28 km/h | Dust and loose paper raised. Small branches begin to move. |
| 13 ~ 17 mph | |||
| 11 ~ 16 knots | |||
| 5.5 ~ 7.9 m/s | |||
| 5 Fresh breeze | 29 ~ 38 km/h | Branches of a moderate size move.Small trees in leaf begin to sway. | |
| 18 ~ 24 mph | |||
| 17 ~ 21 knots | |||
| 8.0 ~ 10.7 m/s | |||
| 6 Strong breeze | 39 ~ 49 km/h | Large branches in motion. Whistling heard in overhead wires. Umbrella use becomes difficult.Empty plastic bins tip over. | |
| 25 ~ 30 mph | |||
| 22 ~ 27 knots | |||
| 10.8 ~ 13.8 m/s | |||
| 7 High wind | 50 ~ 61 km/h | Whole trees in motion. Effort needed to walk against the wind. | |
| 31 ~ 38 mph | |||
| 28 ~ 33 knots | |||
| 13.9 ~ 17.1 m/s | |||
| 8 Gale | 62 ~ 74 km/h | Some twigs broken from trees. Cars veer on road.Progress on foot is seriously impeded | |
| 39 ~ 46 mph | |||
| 34 ~ 40 knots | |||
| 17.2 ~ 20.7 m/s | |||
| 9 Strong gale | 75 ~ 88 km/h | Some branches break off trees, and some small trees blow over. Construction / temporary signs and barricades blow over. | |
| 47 ~ 54 mph | |||
| 41 ~ 47 knots | |||
| 20.8 ~ 24.4 m/s | |||
| 10 Storm | 89 ~ 102 km/h | Trees are broken off or uprooted, structural damage likely. | |
| 55 ~ 63 mph | |||
| 48 ~ 55 knots | |||
| 24.5 ~ 28.4 m/s | |||
| 11 Violent storm | 103 ~ 117 km/h | Widespread vegetation and structural damage likely. | |
| 64 ~ 73 mph | |||
| 56 ~ 63 knots | |||
| 28.5 ~ 32.6 m/s | |||
| 12 | Hurricane force | ≥ 118 km/h | Severe widespread damage to vegetation and structures. Debris and unsecured objects are hurled about. |
| ≥ 74 mph | |||
| ≥ 64 knots | |||
| ≥ 32.7m/s | |||
4.7.6 Rain
- Period of rainfall and rain rate indicator
- Rainfall or rain rate reading
- Rain rate high alert indicator
- Rain rate level
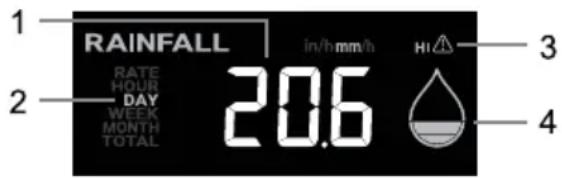
4.7.6.1 The rain display mode
Press [RAIN] key to toggle between:
- RATE - current rainfall rate (base on 10 min rain data)
- HOUR - the total rainfall of the current hour
- DAY - the total rainfall from midnight (default)
- WEEK - the total rainfall of the current week
- MONTH- the total rainfall of the current calendar month
- TOTAL - the total rainfall since the last reset
4.7.6.2 Rain rate level definition
| Level 1 Level 2 Level 3 Level 4 | |||||||
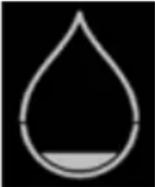 |  |  | 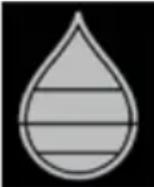 | ||||
| Light rain Moderate Heavy rain Violent rain | |||||||
| 0.1~2.5 mm/h 2.51 ~ 10.0 mm/h 10.1 ~ 50.0 mm/h > 50.0 mm/h | |||||||
To reset the total rainfall record
In normal mode, press and hold [RAIN] key for 6 seconds to reset all the rainfall record.

Note:
Erroneous readings may occur during the installation of the 8-in-1 sensor array. Once the installation is completed and functioning correctly, it's advisable to clear all the data and start afresh.
4.7.7 Light intensity, UV index & exposure level
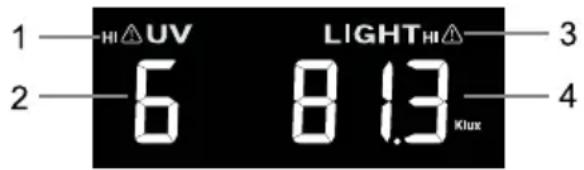
- UV index
- UV high alert indicator
- Solar light intensity
- Light intensity high alert indicator
| Exposure level Low Moderate High Very high Extreme | |||||||||||
| UV index 1 2 3 4 5 | 6 7 8 10 11 | 12~16 | |||||||||
| Sunburn time N/A | 45 minutes 30 minutes 15 minutes 10 minutes | ||||||||||
| Recommended protection | N/A | Moderate or high UV level!Suggest to wear sunglasses,broad brim hat and long-sleeved clothing. | Very high or Extreme UV level!Suggest to wear sunglasses, broad brim hat and long-sleeved clothing,If you have to stay outdoors, make sure to seek shade. | ||||||||

Note:
- The sunburn time is based on normal skin type, it is just a reference of UV strength. In general, the darker one's skin is, the longer (or more radiation) it takes to affect the skin.
- The light intensity function is for sunlight detection.
4.8 Trend indicator
The trend indicator shows the temperature humidity and barometric pressure trends of changes in the forthcoming few minutes.
 |  |  |
| Rising | Steady | Falling |
4.9 Maximum / Minimum records
The console can record MAX / MIN readings both daily and since last reset.
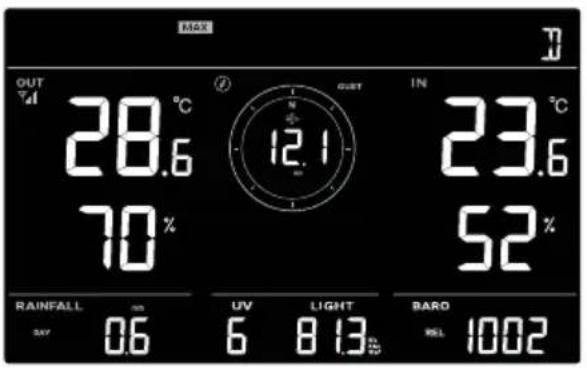
Daily MAX record mode
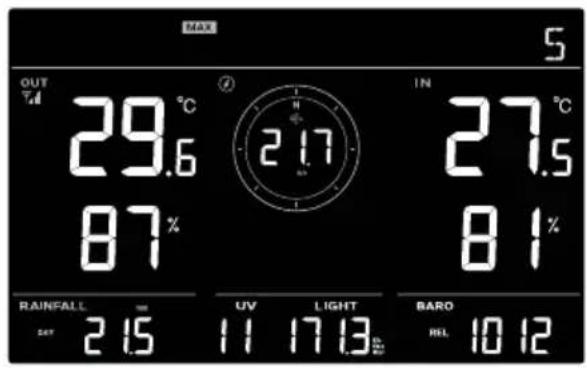
Since MAX record mode
In normal mode, press [MEMORY] key to display the records on screen in the following sequence: daily MAX records → daily MIN records since MAX records since MIN records.
Press [INDEX] key to switch between WBGT, Feels Like, Heat Index and Wind Chill.
Press [CH] key to switch between Indoor and CH1\~3 records.
4.9.1 To Clear the Maximum / Minimum records
Press and hold [ MEMORY ] key for 2 seconds to reset all the MAX and MIN records.
4.10 Back light
Press [ BACK LIGHT/SNOOZE ] key to toggle the backlight between Hi, Lo or Off.
5. MAINTENANCE
5.1 Battery replacement
When low battery indicator "appear near the sensor antenna icon, it indicates that the current sensor battery power is low respectively. Please replace with new batteries.
5.1.1 Re-pairing the sensor array manually
Whenever you changed the batteries of the 8-in-1 weather sensor array or other additional sensors, re-synchronization must be done manually.
- Change all the batteries to new ones of the wireless sensor array.
- Press [SENSOR] key on the console to enter sensor synchronization mode (as indicated by the flashing antenna ☐).
5.2 Reset and factory reset
To reset the console and start again, press the [RESET] key once or remove the backup battery and then unplug the adapter.
5.3 Wireless 8-in-1 sensor array maintenance

REPLACE THE WIND CUP
- Remove rubber cap and Unscrew
- Remove the wind cup for replacement
CLEANING THE UV SENSOR AND CALIBRATION
- For precision UV measurement, gentle clean the UV sensor cover
• Over time, the UV sensor will naturally degrade. The UV sensor can be calibrated with a utility grade UV meter, please refer to Calibration section in previous page for about the UV sensor calibration.
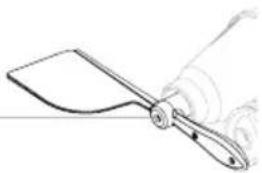
REPLACE THE WIND VANE
Unscrew and remove the wind vane for replacement
natural_image
Line drawing of a hand holding a curved blade or blade with a handle, no text or symbols present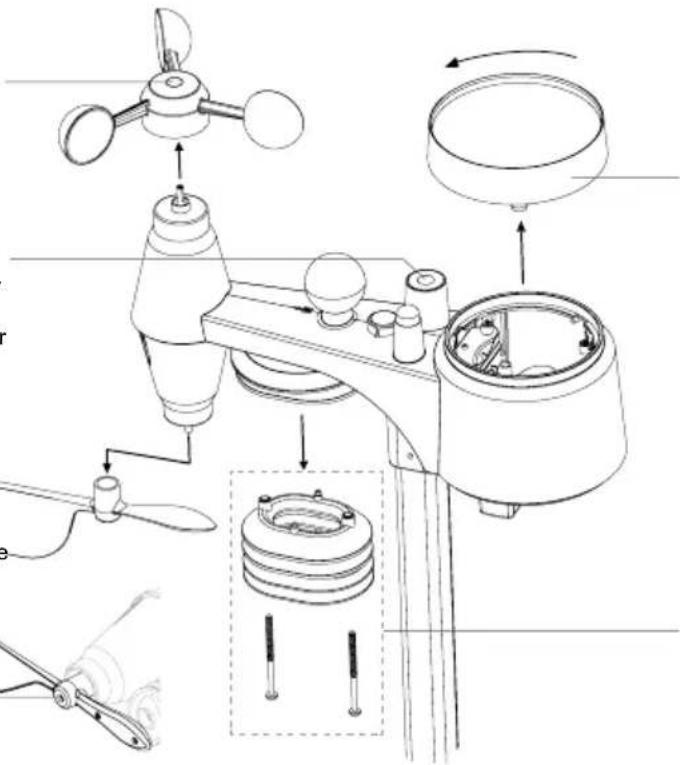
CLEANING THE RAIN COLLECTOR
- Rotate the rain collector by turning it 30°anti-clockwise.
- Gently remove the rain collector.
- Clean and remove any debris or insects.
- Install the collector when it is clean and fully dried.
CLEANING HYGRO-THERMO SENSOR
- Remove the 2 screws at the bottom of the radiation shield.
- Gently pull out the bottom 4 shields.
- Carefully remove any dirt or insects on the sensor (do not let the sensors inside get wet).
- Clean the shield with water to remove any dirt or insects.
- Install all the parts back when they are clean and fully dried.

In general, if the regular maintenance schedule in the owner's manual is followed, the user can expect a lifetime in excess of 3 years before the sensor array is completely replaced. The life expectancy of a weather station is largely influenced by its environment, see the following examples:
Coastal, swampy or wetland environments. Salt air, salt spray, and acidification are the environments for a weather station to live long. These can corrode bearings, sensor plates (temperature, humidity, etc.), mounting hardware, and other moving parts. In this environment, the expected product life is 1-3 years. Our boards are conformal coated to prevent this corrosion. Digital thermometer and hygrometer sensors rely on the changing nature of the metal's resistance, allowing corrosion to occur faster. Long-term exposure to high humidity environment. Prolonged exposure to high humidity, whether salty or acidic, can easily cause premature failure of metal parts. In a hot and dry environment, the lifespan of a weather station is known to last up to 5 years.
Hurricanes and tropical storms can also shorten the lifespan of weather stations.
6. TROUBLESHOOT
| Problems Solution | |
| 8-in-1 wireless sensor array is intermittent or no connection | 1. Make sure the sensor array is within the transmission range2. If it still does not work, reset the sensor pair with console again |
| Rainfall is not correct | 1. Make sure the rain collector is clean for the tipping bucket to tip smoothly2. Make sure the sensor has stable and level mounting to ensure correct tipping |
| Temperature reading too high in the day time | 1. Place the sensor in open area and at least 1.5m off the ground.2. Ensure that the sensor is placed away from heat generating sources or structures, such as buildings, pavement, walls or air conditioning units. |
| Some condensation beneath the UV sensor may occur overnight | This will disappear when temperature rises up under the sun and will not affect the performance of the unit. |
7. SPECIFICATIONS
7.1 Console
| General specification | |
| Dimensions (W × H × D) 171 × 116 × 21mm (6.8 × 4.6 × 0.8 in) | |
| Weight 246g (with battery, without adaptor) | |
| Main power DC 5V, 1A adapter | |
| Backup battery CR2032 | |
| Operating temperature range -5°C ~ 50°C | |
| Operating Humidity range RH 10 ~ 90% non-condensing | |
| Support sensor | - 1 Wireless 8-in-1 weather sensor array- 3 Wireless thermo-hygro sensor (optional) |
| RF frequency 868Mhz | |
| RADIO-CONTROLLED / ATOMIC CLOCK (Note: RC signal receive from 8-in-1 sensor) | |
| Synchronization Auto or disabled | |
| Clock display Date / HH:MM:SS / Weekday | |
| Hour format 12hr AM / PM or 24hr | |
| Calendar DD / MM | |
| Weekday in 7 languages EN / FR / DE / ES / IT / NL | / RU |
| RCC time signal (from wireless 8-in-1 sensor array) | DCF (EU version) |
| DST | AUTO / ON / OFF |
| Barometer (Note: Data detected by console) | |
| Barometer unit | hPa, inHg and mmHg |
| Measuring range | 540 ~ 1100hPa |
| Accuracy | (700 ~ 1100hPa ± 5hPa) / (540 ~ 696hPa ± 8hPa)(20.67 ~ 32.48inHg ± 0.15inHg) / (15.95 ~ 20.55inHg ± 0.24inHg)(525 ~ 825mmHg ± 3.8mmHg) / (405 ~ 522mmHg ± 6mmHg)Typical at 25°C (77°F) |
| Resolution | 1hPa / 0.01inHg / 0.1mmHg |
| Indoor temperature (Note: Data detected by console) | |
| Temperature unit | °C and °F |
| Accuracy | ≤0°C ± 2°C (≤32°F ± 3.6°F)>0 °C ± 1°C (>32 °F ± 1.8°F) |
| Resolution | °C / °F (1 decimal place) |
| Indoor humidity (Note: Data detected by console) | |
| Humidity unit % | |
| Accuracy | 1 ~ 9% RH ± 8% RH @ 25°C (77°F)10 ~ 90% RH ± 5% RH @ 25°C (77°F)90 ~ 99% RH ± 8% RH @ 25°C (77°F) |
| Resolution 1% | |
| Outdoor temperature (Note: Data detected by 8-in-1 sensor) | |
| Temperature unit °C and °F | |
| WBGT display range 10 ~ 50°C | |
| Feels like display range -65 ~ 50°C | |
| Heat index display range 26 ~ 50°C | |
| Wind chill display range -65 ~ 18°C (wind speed >4.8km/h) | |
| Dew point display range -20 ~ 80°C | |
| Accuracy | 0.1 ~ 60°C ± 0.4°C (32.2 ~ 140°F ± 0.7°F)-19.9 ~ 0°C ± 0.7°C (-3.8 ~ 32°F ± 1.3°F)-40 ~ -20°C ± 1°C (-40 ~ -4°F ± 1.8°F) |
| Resolution °C / °F (1 decimal place) | |
| Outdoor humidity (Note: Data detected by 8-in-1 sensor) | |
| Humidity unit % | |
| Accuracy | 1~9% RH ± 5% RH @25°C (77°F)10~90% RH ± 3.5% RH @25°C (77°F)91~99% RH ± 5% RH @25°C (77°F) |
| Resolution 1% | |
| Wind speed & direction (Note: Data detected by 8-in-1 sensor) | |
| Wind speed unit mph, m/s, km/h and knots | |
| Wind speed display range 0 ~ 112mph, 50m/s, 180km/h, 97knots | |
| Resolution mph, m/s, km/h and knots (1 decimal place) | |
| Speed accuracy | < 5m/s: +/- 0.8m/s; > 5m/s: +/- 10% (whichever is greater) |
| Wind direction display mode 16 directions | |
| Rain (Note: Data detected by 8-in-1 sensor) | |
| Unit for rainfall mm and in | |
| Unit for rain rate mm/h and in/h | |
| Accuracy ±7% or 1 tip | |
| Range 0 ~ 19999mm (0 ~ 787.3 in) | |
| Resolution 0.254mm (3 decimal place in mm) | |
| UV index (Note: Data detected by 8-in-1 sensor) | |
| Display range | 0 ~ 16 |
| Resolution Integer | |
| Light intensity (Note: Data detected by 8-in-1 sensor) | |
| Light intensity unit | Klux, Kfc and W/m2 |
| Display range | 0 ~ 200Klux |
| Resolution Klux, Kfc and W/m | 2(2 decimal place) |
7.2 Wireless 8-in-1 sensor
| Dimensions (W × H × D) | 343.5 × 393.5 × 136mm (13.5 × 15.5 × 5.35in) installed mounting |
| Weight 741.5g (with pole & stand, without batteries) | |
| Main power | 3 × AA size 1.5V batteries (Non-rechargeable Lithium batteries recommended) |
| Weather data | WBGT, temperature, humidity, wind speed, wind direction, rain, UV and light intensity |
| RCC function RCC receiver | |
| RF transmission range 150m | |
| RF frequency (depend on country version) 868Mhz | |
| Transmission interval 12 seconds | |
| Operating temperature range | -40 ~ 60°C (-40 ~ 140°F) Non-rechargeable Lithium batteries required for low temperature |
| Operating humidity range 1 ~99% RH |
Adapter technical specifications:
| Manufacturer's name or trade mark, commercial registration number and address: | Dongguan Shijie Hua Xu Electronics Factory, No.200, Technology East Road, Shijie Town, Dongguan City, Guangdong P.R. China |
| Model identifier: HX075-0501000-AG-001 | |
| Input voltage: AC100 - 240V | |
| Input AC frequency: 50/60Hz | |
| Output voltage: 4.75-5.25V | |
| Output current: 1.0A | |
| Output power: 5.0W | |
| Average active efficiency: 73.62% | |
| Efficiency at low load (10 %): | 64.93% |
| No-load power consumption: | ≤0.1W |
INSTRUCTIONS AND INFORMATION ON THE DISPOSAL OF DISCARDED PACKAGING MATERIALS
Take the packaging material to a collection yard for disposal.
DISPOSAL OF DISCARDED ELECTRICAL AND ELECTRONIC EQUIPMENT
This symbol on the product, accessory or packaging indicates that the product must not be treated as normal household waste. Please dispose of this product in a collection yard designated for the recycling of electrical and electronic equipment. In some EU countries or in some European countries, you can return your products to your local retailer when you buy an equivalent new product. Correct disposal of this product helps save valuable natural resources and prevents possible adverse impacts on the environment and human health that might be caused by improper waste disposal. Please contact your local authority or the nearest waste collection yard for further details. Improper disposal of this type of waste may be subject to a legal fine.
For companies in the European Union
If you need to dispose of electrical or electronic equipment, ask your dealer or supplier for the necessary information.
Disposal in countries outside the European Union
To dispose of this product, please ask your local authorities or dealer for the necessary information on correct disposal.

This product complies with EU requirements.
FAST ČR, a. s. hereby declares that the radio device type SWS 9500 complies with Directive 2014/53/EU. For full version of the EU declaration of conformity, please refer to the website: www.sencor.cz
Changes in the text, design and technical specifications may be made without prior notice and we reserve the right to make such changes.
The original version is in Czech.
Manufacturer: FAST ČR, a.s., U Sanitasu 1621, Ríčany 251 01, Czech Republic info@sencor.com
Authorized service centers: Visit www.sencor.com for detailed information about authorized service centers.
SENCOR®
EN Warranty conditions
Warranty card is not a part of the device packaging.
This product is warranted for the period of 24 months from the date of purchase to the end-user. Warranty is limited to the following conditions. Warranty is referred only to the customer goods using for common domestic use. The claim for service can be applied either at dealer's shop where the product was bought, or at below mentioned authorized service shops. The end-user is obligated to set up a claim immediately when the defects appeared but only till the end of warranty period. The end user is obligated to cooperate to certify the claiming defects. Only completed and clean (according to hygienic standards) product will be accepted. In case of eligible warranty claim the warranty period will be prolonged by the period from the date of claim application till the date of taking over the product by end-user, or the date the end-user is obligated to take it over. To obtain the service under this warranty, end-user is obligated to certify his claim with duly completed following documents: receipt, certificate of warranty, certificate of installation.
This warranty is void especially if apply as follows:
■ Defects which were put on sale.
■ Wear-out or damage caused by common use.
The product was damaged by unprofessional or wrong installation, used in contrary to the applicable instruction manual, used in contrary to legal enactment and common process of use or used for another purpose which has been designed for.
The product was damaged by uncared-for or insufficient maintenance.
The product was damaged by dirt, accident of force majeure (natural disaster, fire, and flood).
■ Defects on functionality caused by low duality of signal, electromagnetic field interference etc.
The product was mechanically damaged (e.g. broken button, fall).
■ Damage caused by use of unsuitable media, fillings, expendable supplies (batteries) or by unsuitable working conditions (e.g. high temperatures, high humidity, quakes).
■ Repair, modification or other failure action to the product by unauthorized person.
■ End-user did not prove enough his right to claim (time and place of purchase).
■ Data on presented documents differs from data on products.
■ Cases when the claiming product cannot be identified according to the presented documents (e.g. the serial number or the warranty seal has been damaged).
Manufacturer:
FAST ČR, a.s., U Sanitasu 1621, Řičany 251 01, Czech Republic
Visit www.sencor.com for detailed information about authorized service centers.
The original version of the instructions is in the Czech language, other language versions are made by the appropriate translation.
OBSAH
- Úvod 4
natural_image
3D rendering of a mechanical device with internal components and mounting bracket (no visible text or symbols)natural_image
Technical line drawing of a mechanical device with no visible text or symbolsnatural_image
Technical line drawing of a weather monitoring instrument with no visible text or symbolsnatural_image
Line drawing of a hand holding a curved blade or blade with a handle, no text or symbols present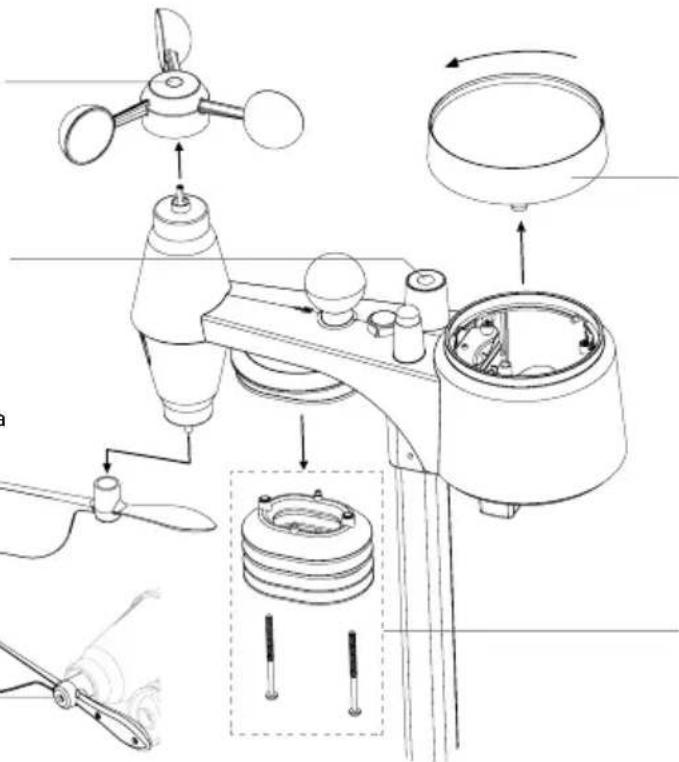
ČIŠTĚNÍ SBĚRAČE DEŠTĚ
- Anténa
- Indikátor rovnováhy
- Dvierka priestoru na batérie
- Zberač dažd'a
- Veterné misky
- Tlačidlo [ RCC ] (Rádiom riadené hodiny)
- Snímač UVI/svetla
- Radiačný štít
- Montážny stožiar
- Veterná lopatka
- Montážna svorka
- Montážna základňa
- Červený LED indikátor
- Snímač dažďa
- Čierny gul'ový snímač
- Tlačidlo [ RESET ]
- Preklápací člnok
- Odtokové otvory
natural_image
3D rendering of a mechanical device interior with no visible text or symbols3.2.2 Zostavenie stojana a stožiara
natural_image
Technical line drawing of a mechanical device with no visible text or symbolsnatural_image
Technical line drawing of a weather monitoring instrument with no visible text or symbols
Poznámka:
natural_image
Line drawing of a hand holding a flat blade with a handle, no text or symbols present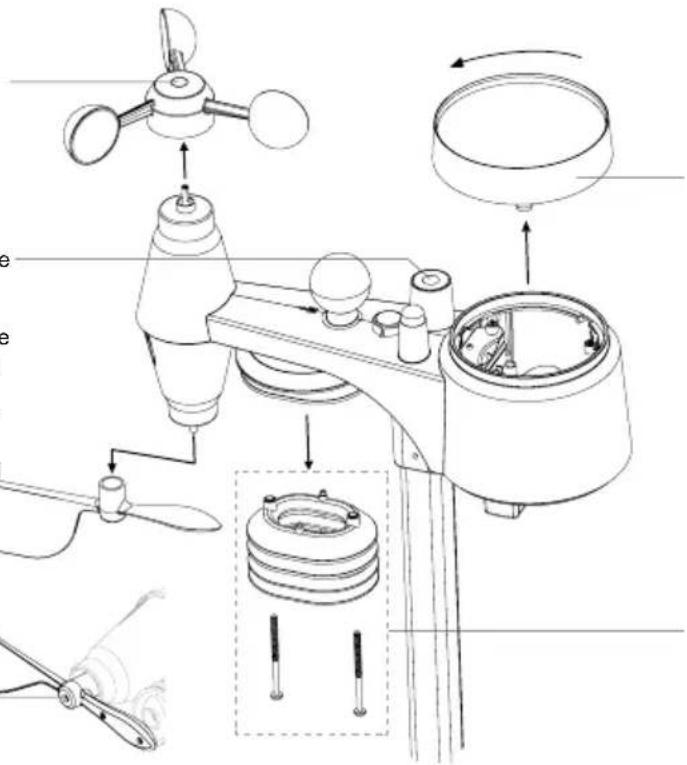
ČISTENIE ZBERAČA DAŽDA
natural_image
3D cutaway view of a mechanical device showing internal components and mounting features (no text or symbols visible)natural_image
Technical line drawing of a mechanical device with no visible text or symbolsnatural_image
Technical line drawing of a weather monitoring instrument with no visible text or symbols
Megjegyzés:

Megjegyzés:
natural_image
Line drawing of a curved tool or blade with a handle and blade, no text or symbols present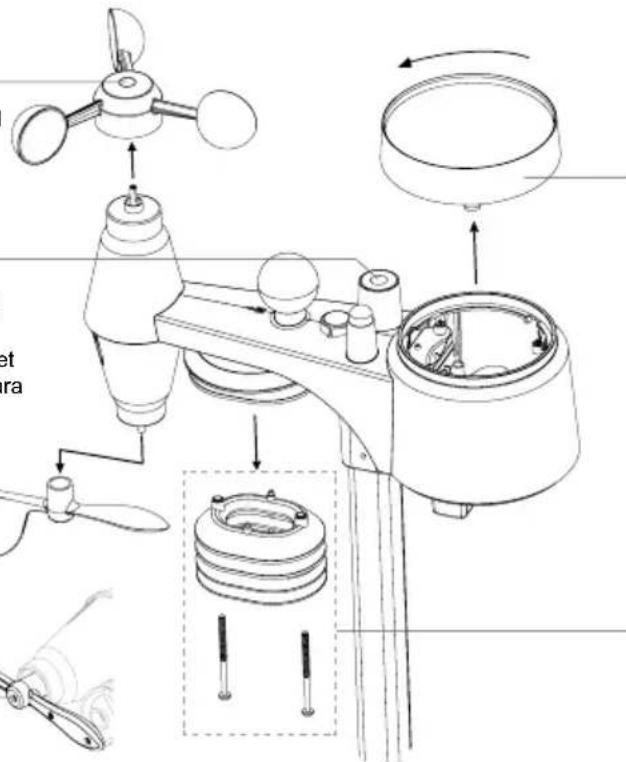
Producent: Dong Guan Shi Jie Hua Xu Electronics Factory
Model: HX075-0501000-AG-001
natural_image
3D cutaway view of a kitchen appliance showing internal components and a lid (no text or symbols visible)natural_image
Technical line drawing of a mechanical device with an inset showing a close-up of a component detail (no text or symbols)Krok 2
natural_image
Technical line drawing of a mechanical assembly with rollers and shafts (no text or symbols)natural_image
Technical line drawing of a mechanical device with no visible text or symbolsnatural_image
Technical line drawing of a weather monitoring instrument with no visible text or symbols4.7.3.3 Index temperature
natural_image
Line drawing of a hand holding a flat blade with a handle, no text or symbols present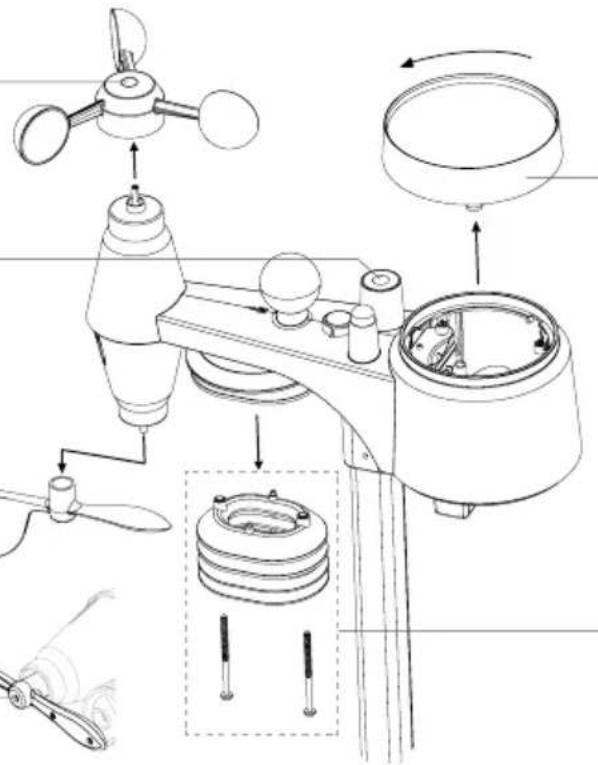
CZYSZCZENIE ŁAPACZA DESZCU
- ABOUT THIS USER'S MANUAL
- PRECAUTIONS
- ! i
- Warning
- Caution
- INTRODUCTION
- Quick start guide
- PRE INSTALLATION
- Checkout
- Site selection
- GETTING STARTED
- Wireless 8-in-1 sensor
- Install Wireless 8-in-1 sensor
- Battery and installation
- Note:
- Assembly the stand and pole
- Mounting guidelines
- Synchronizing additional sensor(s) (optional)
- Optional Thermo-hygro sensors
- Setup the Console
- Power up the display console
- Install the back-up CR2032 battery
- Connect the display console power jack to AC power with the adaptor included.
- Setup display console
- Synchronizing wireless 8-in-1 sensor array
- Data clearing
- DISPLAY CONSOLE FUNCTIONS AND OPERATION
- Screen Display
- Display console keys
- Wireless sensor signal receiving
- Time and date
- Radio controlled / atomic clock function
- RCC Signal strength indicator
- DAYLIGHT SAVING TIME (DST)
- Moon phase
- Time, Date, Unit and other setting
- Setting alarm time and high / low weather alert
- View alarm time and weather alert value
- Alarm operation
- Weather alert operation
- Console features
- Weather forecast
- Barometric pressure
- Pressure history
- Absolute or relative barometric pressure
- Outdoor temperature, humidity, dew point and index
- View different weather index
- WBGT and WBGT level
- Feels like
- Heat index
- Wind chill
- Dew point
- Indoor and optional CH1\~3 temperature and humidity
- Comfort Indication
- Wind
- Wind speed and Beaufort Scale display
- Beaufort scale table
- Rain
- The rain display mode
- Rain rate level definition
- To reset the total rainfall record
- Light intensity, UV index & exposure level
- Trend indicator
- Maximum / Minimum records
- To Clear the Maximum / Minimum records
- Back light
- MAINTENANCE
- Battery replacement
- Re-pairing the sensor array manually
- Reset and factory reset
- Wireless 8-in-1 sensor array maintenance
- REPLACE THE WIND CUP
- CLEANING THE UV SENSOR AND CALIBRATION
- REPLACE THE WIND VANE
- CLEANING THE RAIN COLLECTOR
- CLEANING HYGRO-THERMO SENSOR
- TROUBLESHOOT
- SPECIFICATIONS
- Wireless 8-in-1 sensor
- Adapter technical specifications:
- INSTRUCTIONS AND INFORMATION ON THE DISPOSAL OF DISCARDED PACKAGING MATERIALS
- DISPOSAL OF DISCARDED ELECTRICAL AND ELECTRONIC EQUIPMENT
- For companies in the European Union
- Disposal in countries outside the European Union
- SENCOR®
- EN Warranty conditions
- This warranty is void especially if apply as follows:
- Manufacturer:
- OBSAH
- ČIŠTĚNÍ SBĚRAČE DEŠTĚ
- Zostavenie stojana a stožiara
- Poznámka:
- ČISTENIE ZBERAČA DAŽDA
- Megjegyzés:
- Index temperature
- CZYSZCZENIE ŁAPACZA DESZCU
Brand : SENCOR
Model : SWS 9500
Category : Weather Station