
SDV4760 - Cooker Concept - Free user manual and instructions
Find the device manual for free SDV4760 Concept in PDF.


| Product Type | Built-in Glass Ceramic Hob |
| Model | SDV4760 |
| Brand | Concept |
| Dimensions (W x D x H) | 590 x 520 x 51 mm |
| Installation Dimensions (W x D) | 560 x 480 mm |
| Weight | 74 kg |
| Voltage | 220-240V~50/60Hz or 380-415V 3N~50/60Hz |
| Max Input Power | 6000-7200 W |
| Number of Cooking Zones | 4 |
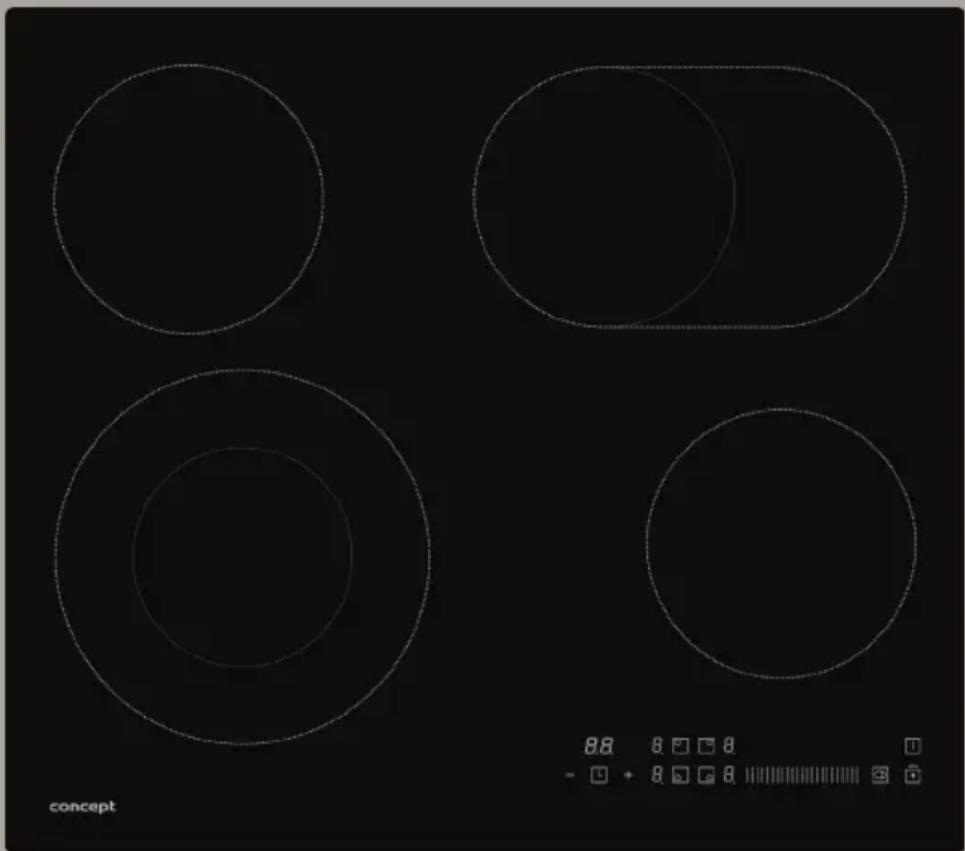
| Cooking Zones | Left front: ø140/230 mm, 1000/2200 W; Left rear: ø165 mm, 1200 W; Right rear: ø165/270x165 mm, 1100/2000 W; Right front: ø165 mm, 1200 W |
| Heating Technology | Radiant (Ceramic Glass) |
| Dual Flexi Zones | Left front and right rear zones with inner/outer sections |
| Control Type | Touch control with slider for power levels (0-9) |
| Child Lock | Yes, with activation/deactivation button |
| Timer Function | Yes, with countdown and delayed shut-off |
| Residual Heat Indicator | “H” symbol for hot zones |
| Automatic Shut-off | Yes, if no power level set within 1 minute; also for cooking zones (max 8/4/2 hours depending on level) |
| Energy Efficiency (Hob per kg) | 183.5 Wh/kg |
| Cleaning | Use agents for ceramic glass; avoid abrasives; clean with scraper if needed |
| Installation | Built-in; worktop thickness 38-40 mm; min. 50 mm side clearance; 760 mm above if no hood |
| Electrical Connection | 3-core (230 V) or 4-core (400 V); terminal box as per manual |
Frequently Asked Questions - SDV4760 Concept
User questions about SDV4760 Concept
0 question about this device. Answer the ones you know or ask your own.
Ask a new question about this device
Download the instructions for your Cooker in PDF format for free! Find your manual SDV4760 - Concept and take your electronic device back in hand. On this page are published all the documents necessary for the use of your device. SDV4760 by Concept.
USER MANUAL SDV4760 Concept
Built-in glass ceramic hob
natural_image
Four concentric circles on a black background, no text or symbols presentSDV4760
concept
CZ
Poděkování
natural_image
Four identical cooking pots with crossed-out handles, shown in a row (no text or symbols)
CZ
concept
concept
CZ
ENERGETICKÁ ÚČINNOST
natural_image
Four identical cooking pots with crossed-out kitchen pan symbols, no text or labels presentSK
concept
concept
SK
ENERGETICKÁ ÚČINNOST
Thank you for purchasing a Concept product. We wish you much joy with your new appliance every day you use it. Please read the instruction manual carefully before initial use. To refer to this manual any time you need to, we recommend you to keep it in a safe place. And please pass it to any future owner of the appliance.
TABLE OF CONTENTS
Acknowledgements Technical specifications Important safety information Product description Control panel layout Examples of cooking application Cooking tips Energy saving tips Operating instructions Advanced features Care and cleaning Installation instructions Troubleshooting Error message Environmental concerns
| TECHNICAL SPECIFICATIONS | |
| Voltage 220-240V~50/60Hz | 380-415V 3N~50/60Hz |
| Max. input power 6 000~7 200 W | |
| Left front cooking zone diameter and input ø 140/230 mm, 1 000/2 200 W | |
| Left rear cooking zone diameter and input ø 165 mm, 1 200 W | |
| Right rear cooking zone diameter and input ø 165/270 x 165 mm, 1 100/2 000 W | |
| Right front cooking zone diameter and input ø 165 mm, 1 200 W | |
| External dimensions (W x D x H) 590 x 520 x 51 mm | |
| Dimensions for installation (W x D) 560 x 480 mm | |
| Weight 74 kg | |
The manufacturer reserves the right to make any technical changes, printing errors and differences in the illustration without prior notice.
70
IMPORTANT SAFETY INFORMATION
Delivery
- Check the package and unit immediately after the delivery for any damage that may have occurred during shipping.
- CAUTION! Some corners and edges of this appliance that will be hidden after installation can be sharp! Take care to avoid injury!
- If the unit is damaged, do not operate it. Contact the supplier as soon as possible.
- Remove all the covering and marketing materials from the appliance before the first use.
- Keep all packaging away from children and dispose of it appropriately.
- This appliance must be installed in accordance with the regulations in force and should only be used in a well-ventilated area. Read the manuals before installing and using the appliance.
Installation
- The appliance is intended for assembly into correct built-in units and workspaces that align to the standards.
- The sealant on the edges of the appliance protects the cut surfaces of the worktop against moisture.
- Use the unit only as described in this instruction manual.
- The appliance has to be disconnected from the power supply during installation.
- Make sure that the parameters on the rating plate are compatible with the electrical ratings of the main power supply. Use only correct electricity mains cable that is earthed.
- This appliance is suitable for domestic use only, it is not for commercial use.
- Make sure the mains cables of other electrical appliances do not touch the hot cooking zones. Otherwise both the insulation of the cables and the hob may be damaged.
- Never touch hot cooking zones. Risk of burns!
- The indicator of residual heat "H" shows that the cooking zones are still hot. Keep children away from the appliance. Risk of serious burns!
- Do not touch the hot surfaces when using the appliance or shortly after.
- Do not operate the appliance with wet or damp hands.
- Do not operate the appliance when it has contact with water.
- If there is a drawer under the appliance, do not keep flammable or inflammable objects, aluminium foil or sprays in it. Risk of fire or explosion!
EN
concept
concept
EN
- Use the appliance out of reach of children and do not allow the children and unauthorised individuals to operate the appliance.
- Do not let children play with the appliance.
- Care should be taken when using the appliance near children.
- Do not use the appliance as a toy.
- This appliance can be used by children aged from 8 years and above and persons with reduced physical, sensory or mental capabilities or lack of experience and knowledge if they have been given supervision or instruction concerning the use of the appliance in a safe way and understand the hazards involved.
- In case of any failure turn off the appliance and disconnect it from the mains outlet or switch off the circuit breaker from the power supply.
- Do not immerse the mains cable in water or any other liquid.
- Check the appliance and the mains cable for damage regularly.
- Never switch on a damaged appliance.
- Make sure that all controls are in the OFF position when the appliance is not in use.
- Do not use cookware with bulging or irregular bottoms or with a smaller diameter than recommended. Otherwise the cooking effectiveness could be reduced.
- If there is water between the cookware bottom and the cooking zone, vapour pressure may arise. The vapour pressure could make the cookware jump up. CAUTION! Risk of injury!
• Make sure that the cooking zones and cookware bottom are dry. - Do not use cookware with cracked enamel. High temperature occurs in the point of enamel damage, which heats the corresponding spot on the hob. Risk of damage to the hob!
- Do not put cookware on the control panel or the frame or edge of the hob. Risk of damage to the hob!
- Never use plastic or aluminium foil cookware on the appliance.
- Do not lay flammable things on the hob. Risk of fire!
- Do not lay any metal objects on the induction hob. If the appliance has been switched on accidentally, these objects could heat up very quickly and cause burns!
- Do not use the appliance as a work surface or as a storage surface!
- Keep the appliance clean at all times. Food remnants could ignite during operation and cause fire!
-
Food such as soups, sauces or beverages may heat up and overflow very quickly during cooking. Proceed carefully, use the appropriate settings and stir the food as often as necessary.
-
While deep frying or frying food observe this it at all times. In the case of oil overheating, there is a risk of fire!
- Never heat up grease or oil unattended. Overheated oil or grease may ignite rapidly. Risk of fire!
- Never try to extinguish a fire with water. Immediately cover the flame in the cookware with a lid or a plate. Switch off the appliance and let the cookware cool down.
- Use manufacturer-recommended accessories only.
- Do not use accessories which have a damaged surface, are worn or have other defects.
- Do not use any corrosive cleaning agent for cleaning. With regular maintenance and cleaning you extend the lifetime of the appliance.
- Children aged under 8 years shall not carry out cleaning and user maintenance of the appliance without supervision.
WARNING!
- This appliance complies with the directive of safety and electromagnetic compatibility; nevertheless, individuals with an implanted pacemaker should keep away from the appliance. In some other devices, such as hearing aids, etc., malfunction may occur.
- If the unit is switched on, do not bring magnet sensitive things (e.g. credit cards, USB, hard discs, etc.) near it.
Possible malfunctions
- Only an authorised service technician can install, connect or repair this appliance.
- Disconnect the appliance from the mains supply before maintenance or repair. Turn off the relevant circuit breaker.
- If the mains cable is damaged, contact an authorized service centre.
Damages from failure to follow the manufacturer's instructions are not covered by the warranty.
EN
concept
concept
EN
PRODUCT DESCRIPTION
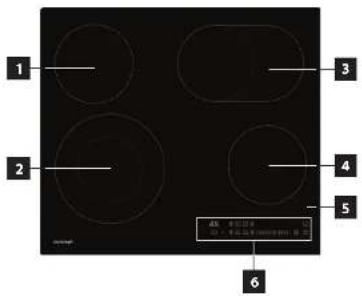
- Left rear cooking zone (ø 165 mm)
- Left front cooking zone (ø 140/230 mm)
- Right rear cooking zone (ø 165/270 x 165 mm)
- Right front cooking zone (ø 165 mm)
- Ceramic glass hob
- Control panel
CONTROL PANEL LAYOUT
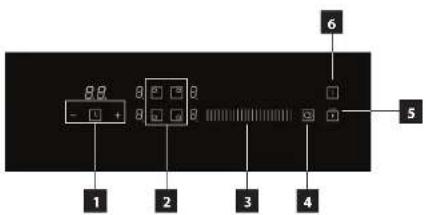
- Timer setting button
- Cooking zone selection button
- Setting the power level of the cooking zones (slider)
- Button for dual flexi zones control
- Button for activation/deactivation of the child lock
- ON/OFF button
74
COOKING TIPS
The power level settings described below are just examples. The correct setting of power levels depends on several factors, including the cookware used and the amount of food you cook. Experiment with the hob, and gradually determine which power level settings are most suitable for you.
Some examples of power level settings:
a) Level 1-2 can be used for:
- Keeping liquids simmering,
• Moderate and slow heating without the risk of burning, - Melting butter or chocolate, etc.
- Defrosting,
• Boiling a small quantity of liquid.
b) Level 3-4 can be used for:
- Intensive boiling,
- Keeping a larger quantity of liquid boiling,
- Stewing.
c) Level 5-6 can be used for:
- Pancakes.
d) Level 7–8 can be used for:
- Cooking pasta.
e) Level 9 can be used for:
- Cooking food requiring fast heating and high temperature (beef steaks, schnitzels, fried potatoes, etc.).
- Boiling water or soup,
• Heating food before switching over to a lower level.
ENERGY SAVING TIPS
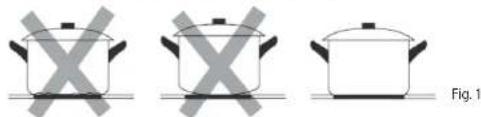
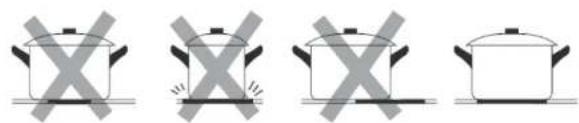
- Do not use cookware with bulging or irregular bottoms (Fig. 1) or otherwise the cooking effectiveness could be reduced and may result in extension of the cooking time.
natural_image
Three identical cooking pots with X marks crossed out, labeled Fig. 1 (no text or symbols on pots)- For each cooking zone, use the correct cookware size. The diameter of the cookware bottom should correspond to the size of the cooking zone (Fig. 2).
natural_image
Four identical cooking pots with crossed-out kitchen pan symbols, no text or labels presentFig. 2
EN
concept
concept
EN
- Use small cookware for small amount of food. A big and only partially filled up cookware requires a lot of energy.
• Always cover the cookware with a suitable lid. When cooking without a lid, you consume much more energy.
• Always cook food with a small amount of water or fat. You save energy. This way vitamins and minerals will be preserved when cooking vegetables. - At the beginning of the cooking, set the cooking zone to the highest power level and reduce the cooking zone power level after it is heated up.
Examples of possible damage
- Coarse bottoms of cookware could scratch the ceramic glass plate. Check the cookware bottom regularly. Cookware with coarse bottom can cause scratches of the hob. Always lift these objects up when you have to move them on the cooking surface (Fig. 3), To protect the hob from being scratched.
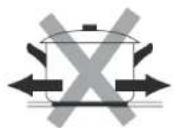
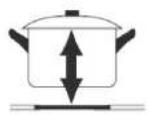
Fig. 3
- Salt, sugar and sand grains (e.g. from cleaning vegetables) can scratch the hob. Do not use the appliance as a work surface or as a storage surface!
- Sugar, as well as food with high sugar content, damages the hob when in contact with it. Immediately remove the overcooked food of this kind using a glass scraper.
CAUTION! The ceramic glass scraper is sharp and can cause injuries!
• The following damages do not negatively affect the function or performance of the hob.

Stains
Burnt remains of sugar or food with high sugar content.

Colouring
Metallic-gloss colouring caused by the use of unsuitable cleaning agents or abrasions from the cookware bottom.

Scratches
Scratches caused by grains of salt, sugar or sand or by the coarse cookware bottom.

Wear of the decoration
Wear caused by the use of unsuitable cleaning agents.
- This damage has been caused by inappropriate maintenance of the hob and hence is not subject to warranty. These are not technical problems with the appliance.
OPERATING INSTRUCTIONS
- Areas designed for cooking only – electric cooking zones – are indicated on the hob. The diameters of the cooking zones are derived from the usual dimensions of cookware.
- Only the surface inside the indicated diameter is heated; other surfaces remain relatively cold and can be used as put aside areas.
• The temperature sensor prevents the cooking zone under the ceramic glass plate from overheating. - The light up "H" symbol on the indicator position of the input power levels signals increased temperature of the cooking zone after being switched off (residual heat). The symbol will go off as soon as the cooking zone has cooled down to such a temperature that there is no risk of burning.
- The inputs of the cooking zones can be regulated within the range of 9 levels, which can be set by pressing the button with respective indicators on the control panel. An acoustic signal sounds each time the button is pressed. The response time for pressing a symbol is 1 second. For this period, it is necessary to hold your finger on the symbol.
Note:
- The touch control is activated by placing a finger on the required symbol on the ceramic glass hob.
- Use the entire fingertip, not just the tip, to operate the touch buttons (Fig. 4).
- Keep the control panel clean and dry. Even a small amount of water on the control panel can make it more difficult to operate the buttons. Do not place anything on the control panel of the hob.
- The sensors do not respond to matte and dark colours (do not use black gloves).
- Make sure not to switch on the appliance accidentally. Risk of serious burns!
Before first use
Prior to first operation of the appliance, you should wipe it with a wet cloth.
Switching on the hob
Touch the ON/OFF symbol (6) for 3 seconds to activate the hob.
Switching on a cooking zone
- Touch the ON/OFF symbol (6) for 3 seconds to activate the hob. In addition to the cooking zone selection buttons (2), "-" will be lit on the control panel display (6).
- Press to select the cooking zone you want to use. Then use the slider, the tool for setting the cooking zone power level (3), to select the desired cooking level by pulling from left to right.
Note:
- You can change the desired cooking zone power at any time during cooking from 0 to 9.
- If you do not set any required power level within 1 minute of switching on the hob, it will automatically switch off.
Switching OFF the cooking zone
- Press the selected cooking zone that you wish to switch off. Then slide your finger across the slider (3) from right to left to reduce the power of the selected cooking zone to 0.
- By pressing the ON/OFF button (6) you can turn off the hob.
Note:
- After switching off the hob the "H" symbol can be displayed, which indicates that the used cooking zone is still hot and there is a risk of serious burns.
- Symbol "H" disappears, when the used cooking zone cools down to a safe temperature (that is not too hot to touch).
- If the "H" symbol is light up on the control panel, it is possible to use the residual heat e.g. for heating up another cookware.
EN
concept
concept
EN
Switching OFF the hob
- By pressing the ON/OFF button (6) you can turn off the hob. All the settings will be reset.
- After switching off the hob the "H", symbol can be displayed, which indicates that some of the used cooking zones are still hot and there is a risk of serious burns. Never touch these cooking zones!
Note:
- If all the cooking zones will be switched off and within 1 minute the control panel will not be touched the hob will switch off automatically.
- For safety reasons, the automatic switch off (cooking time) on individual cooking zones is limited to 8 hours (power level 1–3), 4 hours (power level 4–6) or 2 hours (power level 7–9).
ADVANCED FEATURES
Function of dual flexi zones
This function is only active in the left front cooking zone (2) and the right rear cooking zone (3). Within the dual cooking flexi zone, it is possible to use the entire cooking area marked by the outer limit of the cooking zone for cooking, but also just the central field. As a result, the cooking area is adapted to the size of the dishes used and cooking is more energy efficient.
- Press the appropriate cooking zone selection button and then slide your finger on the slider to set the desired cooking zone power.
- Within the dual flex zone, the centre section is switched on to the desired performance level and then the dual flex zone control button (4) is pressed to activate the outer part of the selected zone, increasing the size of the dual flex zone.
- Press the selected cooking zone and then press the dual flexi zone control button (4) to deactivate the outer part of the selected zone.
Child lock function
This function prevents unwanted operation of the hob.
- For locking the control panel press the symbol for activation/deactivation of the child lock (5).
- The "Lo" (Lock) symbol will be displayed on the control panel, which symbolises that the control panel is locked. Thus, the control panel of the hob is locked except for the ON/OFF symbol (6), which is deactivated.
- For unlocking the control panel press and hold the symbol for activation/deactivation of the child lock (5).
- The "Lo" symbol disappears and the control panel is active again.
Note:
- If the hob is switched off while the child lock function is activated, the control panel lock is active even after the hob has been switched off. In this case the child lock is activated when the hob is switched on and the "Lo" symbol is displayed on the control panel.
- For unlocking the control panel press and hold the symbol for activation/deactivation of the child lock (5) until the acoustic sound goes off. The "Lo" symbol disappears and the control panel is active again.
Setting the cooking time (timer function)
This function can be set when the cooking zone has not been selected.
1. Press the timer setting button (1).
2. Use the "-" and "+" buttons to set the desired time on the timer display in one-minute steps. To set the time in ten-minute steps, press and hold "-" or "+" for 3 seconds.
3. To cancel the set cooking time, press the "-" and "+" buttons simultaneously. "-" appears on the display.
4. After the set cooking time has elapsed, the '-' symbol appears on the display above the timer setting buttons (1) and acoustic sounds will be heard for 30 seconds.
Delayed shut down function of one cooking zone
The delayed shut down function can be used for all the cooking zones of the hob. For each cooking zone, different delay times can be set.
- Press the cooking zone selection button (2) for which you want to use the delayed shut down function.
- Press the timer button (1) on the control panel (6). The number "10" will be displayed above the buttons and will start to flash.
- By pressing the "+" or "-" button for setting the timer (1) you can set the delayed shut down function of the selected cooking zone.
Note: Press the "+" or "-" button to increase or decrease the delayed shut down time by 1 minute. Press and hold the "+" or "-" button to increase or decrease the delayed shut down time by 10 minutes.
- After the delayed shut down time is set, the time set will be flashing on the display for 5 seconds. After this time, the delayed shut down time will count down, and a dot in the lower right corner will flash in addition to the selected power level of the selected cooking zone.
- To cancel the delayed shut down time, on the control panel (6) press the "+" and "-" buttons for setting the timer (1) simultaneously. The number "00" will be displayed.
- After the set delayed shut down time has elapsed, the "-" symbol appears on the display above the timer setting buttons (1) and the selected cooking zone, for which the delayed shut down was set, will shut down automatically.
Delayed shut down function for multiple cooking zones
To set the delayed shut down for multiple cooking zones, proceed as in setting the delayed shut down of one cooking zone.
- Press the cooking zone selection button (2) for which you want to use the delayed shut down function.
- Press the timer button (1) on the control panel (6). The number "10" will be displayed above the buttons and will start to flash.
- By pressing the "+" or "-" button for setting the timer (1) you can set the delayed shut down function of the selected cooking zone.
Note: Press the "+" or "-" button to increase or decrease the delayed shut down time by 1 minute. Press and hold the "+" or "-" button to increase or decrease the delayed shut down time by 10 minutes.
- After the delayed shut down time is set, the time set will be flashing on the display for 5 seconds. After this time, the delayed shut down time will count down, and a dot in the lower right corner will flash in addition to the selected power level of the selected cooking zone.
- To cancel the delayed shut down time, on the control panel (6) press the "+" and "-" buttons for setting the timer (1) simultaneously. The number "00" will be displayed.
- After the set delay shut down time has elapsed, the respective cooking zone will automatically shut down and the lowest set delay time of the next cooking zone will be displayed in the display above the timer setting buttons (1).
- For the respective cooking zone for which the next delay shut down time is set, a dot will flash in the lower right corner next to the set power level.
- After the set delayed shut down time has elapsed, the "-" symbol appears on the display above the timer setting buttons (1) and the selected cooking zone, for which the delayed shut down was set, will shut down automatically.
Note:
- If the delayed shut down is only set for one cooking zone, only the cooking zone for which the delayed shut down has been set is switched off after the set delay time has elapsed. Other cooking zones will remain on if no delayed shut down is set for them.
- Delayed shut down can be set for a maximum of 99 minutes.
EN
concept
concept
EN
CARE AND CLEANING
The hob itself does not warm up, so no food remains should get burnt on it. Therefore, you do not have to wait until it cools down to clean the hob.
Do not use a steam cleaner or high-pressure cleaner to clean the appliance. Risk of damage to the hob!
- Clean the hob with a protective and preservation agent specially designed for ceramic glass surfaces.
- For removal of food remains and other dirt, apply dirt repellent to the hob, which will facilitate cleaning of the hob surface.
- Use only agents and repellents specially designed for ceramic glass surfaces.
- Never use coarse sponges, abrasive agents or aggressive cleaners (e.g. spray for cleaning ovens) or stain removers.
- Keep the control panel clean! Make sure the panel is always clean and dry.
- Food and water residues negatively affect the operation of the control panel; therefore it may not be fully functional.
- Clean the hob after each cooking session. It will prevent the remains of food from burning during the next cooking session.
- For cleaning the lukewarm hob use a cleaning agent and a paper towel. Then wipe the hob with a damp cloth and wipe it dry using a soft cloth.
- If the hob is cleaned while hot, stains could appear on it.
- Never leave residues of the cleaning agent on the hob; it could stain the glass surface.
• Metallic-gloss colouring appears after the use of unsuitable cleaners or abrasion of the cookware bottom. - Its removal is very difficult. Use cleaning agents specially designed for ceramic glass surfaces.
- For the removal of food remains and a layer of grease use a special scraper for the glass.
- Clean the hob by placing the scraper at an acute angle and move the blade on the surface. Never use the handle for cleaning the glass surface. Risk of scratches!
- WARNING! The glass scraper is very sharp! Risk of injury! If the edge is damaged, replace it immediately.
• After cleaning, secure the scraper again and keep it out of the reach of children.
INSTALLATION INSTRUCTIONS
- The warranty does not cover damages caused by incorrect installation.
• The responsibility for installing the appliance lies with the buyer, not the manufacturer.
- The manufacturer is not responsible for any injuries or damages that are the result of incorrect installation.
• To ensure the correct function of the appliance, place it in a suitable furniture.
- The appliance should be assembled into correct built-in units and work surfaces that align to the standards and have dimensions shown in Fig. 5.
- The kitchen furniture must be made of sufficiently heat-resistant material, at least 120 °C. The materials and adhesives used must be resistant to heat from the appliance as according to the CSN EN 60335-2-6 standard. Materials and adhesives that do not meet the stated standard may deform or peel-off.
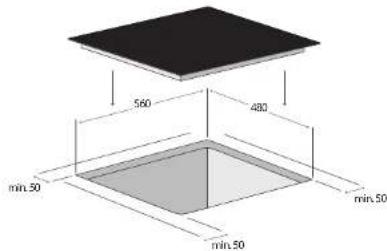
Fig. 5
Follow the following instruction during installation:
-
Remove all the covering and marketing materials from the appliance before the first use.
-
The required dimensions of the built-in space in the worktop made of heat-resistant material of a minimum thickness of 38–40 mm are on Fig. 5.
- Leave min. 50 mm space for the adjacent cabinets on the sides. Leave at least 50 mm free space behind the hob.
- We recommend installing a cook hood above the hob. The cooking hood should be at least 600 mm above the hob.
- A separate cabinet without a cooking hood should be at least 760 mm above the hob (Fig. 6).
- For sufficient air circulation the appliance needs to be installed as shown in Fig. 6 and the cabinet must be designed so that the air can flow at the bottom. Make sure that the ventilation space of 20 mm, between the drawer and the rear wall and 50 mm between the drawer and the hob, is free (Fig. 6).
- Make sure that the ventilation space of 50 mm, between the hob and the top of the below unit, is free.
- If the appliance is installed above drawers make sure that the space, between the bottom of the appliance and the upper drawer, is 50 mm.
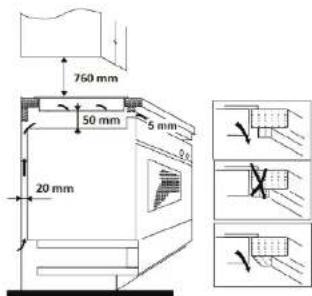
Fig. 6
EN
concept
concept
EN
- Position the appliance onto the edge of the worktop and pass the mains cable through the opening so that the plug or terminals remain accessible after installation.
- Push the appliance carefully into place. Make sure not to cause damage to the mains plug or to the mains cable.
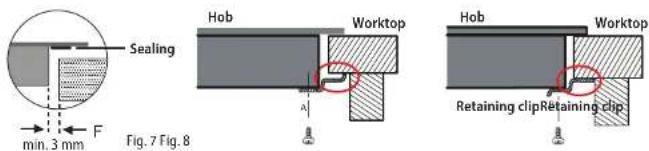
- The bottom of the hob base is fitted with a sealant to prevent it from moisture and leakage of liquids. After installation the space between the edge of the hob and the worktops should be min. 3 mm (Fig. 7).
- Secure the hob in the required position from the bottom to the worktop with the supplied retaining clips (Fig. 8).
- Connect the supply cable to the terminal box and then turn on the appropriate circuit breaker on.
Removal
To uninstall the unit, it is important to proceed correctly:
1. First, switch off the circuit breaker and unplug the mains cable from the socket.
2. Remove the retaining clips.
3. Take out the hob and at the same time pull out the mains cable carefully.
Connecting to the mains power
- Only a qualified person can install this appliance!
- Make sure that the parameters on the rating plate are compatible with the electrical ratings of the main power supply.
- Make sure that the parameters on the rating plate are compatible with the mains voltage and the current protection. Otherwise the installed electric circuit could be overloaded, especially in the case of single-phase connection (230 V).
- If the hob is connected to the mains power in a single phase (see Connection of the terminal box of the appliance), all cooking zones cannot be used for maximum performance. The hob automatically reduces the power consumption of individual cooking zones to avoid overloading of the circuit breaker.
• We recommend using a self-contained electrical circuit to connect to the mains. - Use solely electric power distribution with PE protective conductor.
- Do not use multi-plug adapters, connectors and extension cables. Risk of fire due to overheating!
• Make sure that there is access to the mains plug or the circuit breaker after the installation - The electrical safety of the appliance can only be guaranteed if the protective terminal of the unit is connected to the protective conductor of the mains.
- The manufacturer is not responsible for any injuries or damages that are the result of incorrect or missing protective installation.
- Make sure the mains cable or plug does not touch the hot appliance or hot cookware, to prevent it from becoming deformed and excessively bent.
- In the event of disconnecting the hob from the mains power, all set parameters will be reset and the hob control panel will be locked.
Connection of the terminal box of the appliance
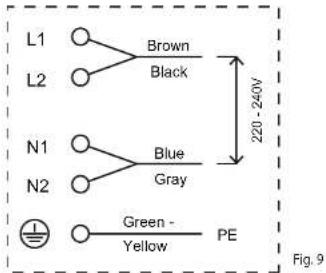
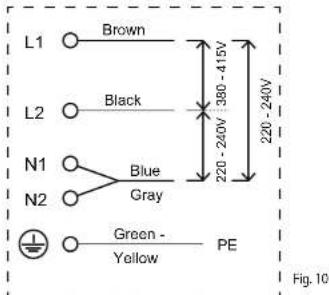
- The hob is already supplied with a mains cable. In case it is necessary to replace the mains cable due to damage, Fig. 9 or Fig. 10, shows the wiring of the terminal box.
• The mains cable must be replaced with the same type of cable with the corresponding wire cross section.
• After connecting the new mains cable to the terminal box, secure the cable from being pulled out from the terminal box. - Follow the same procedure as described above when installing the appliance into the worktop cut-out and connecting it to the mains power.
Connecting the hob by a 3-core mains cable (230 V)
Use a cable with wires of a diameter of at least 4 mm ^-1 .
Connecting the hob by a 4-core mains cable (400 V)
Use a cable with wires of a diameter of at least 2.5 mm ^-2 .
EN
concept
concept
EN
TROUBLESHOOTING
| Problem Possible cause Remedy | ||
| When the hob is switched on the household wiring protection reacts. | The current load is too high for household wiring. | Check that the input of all switched-on units does not exceed the maximum load of the household wiring. Make sure that the parameters on the rating plate are compatible with the mains voltage and the current protection. |
| After pressing the ON/OFF button of the hob, the hob turns on, but the display for each cooking zone does not work. | Power electronics malfunction. | Replacement of power electronics required. Contact an authorized service centre. |
| Control panel electronics malfunction. | Replacement of control panel electronics required. Contact an authorized service centre. | |
| After setting the power level of the cooking zone, the cooking zone does not work. | Overheating of the cooking zone. | The temperature of the cooking zone is too high. Check that the cooling fan located at the bottom of the hob functions well. If the fan is working, contact an authorised service centre. |
| Cooling fan malfunction. | Cooling fan replacement required. Contact an authorized service centre. | |
| Power electronics malfunction. | Replacement of power electronics required. Contact an authorized service centre. | |
| The cooking zone is hot but the control panel does not work. | Control panel or power electronics malfunction. | Press the ON/OFF button on the hob again and re-set the cooking zones. |
| The hob switches off during cooking. | The ON/OFF button has been pressed accidentally. | Press the ON/OFF button on the hob again and re-set the cooking zones. |
| Cracks or tears in the ceramic glass hob. | Cookware has been dropped on the hob, which damaged the ceramic glass hob. | Disconnect the appliance immediately from the power supply by pressing the ON/OFF button or the appropriate circuit breaker. Contact an authorized service centre. |
ERROR MESSAGE
| Code Problem description Possible cause | ||
| E0 Error 0 | Replacement of power supply electronics required. Contact an authorized service center. | |
| E1/E2/E7 | Malfunction of the cooking zone temperature sensor. | Temperature sensor replacement required. Contact an authorized service center. |
| C1 The cooking zone temperature is too high. | Wait for the cooking zone temperature to drop. Press the ON/OFF button to restart the hob. | |
| E3/E4 | Temperature sensor failure. | Contact an authorised service centre. |
| EL/EH The power supply voltage does not match. Check the voltage or contact a specialist. | ||
| EU | Communication error between electronics. | Contact an authorised service centre. |
ENERGY EFFICIENCY
Product information according to EU Directive 66/2014 for the domestic market within the EU
| Model Identification | SDV4760 | |
| Type of hob | Build-in hob | |
| Number of cooking zones and/or areas | 4 | |
| Heating technology Radiant cooking zones | ||
| Diameter of circular cooking zones (∅) | Left frontLeft rearRight rearRight front | 23.0 cm16.5 cm27.5*16.5 cm16.5 cm |
| Dimension of non-circular cooking zones (exi/bridge) | / | / |
| „Energy consumption per cooking zone or area calculated per kg (EC electric cooking)" | Left frontLeft rearRight rearRight front | 185,7 Wh/kg173,7 Wh/kg195.8 Wh/kg178.7 Wh/kg |
| Energy consumption for the hob calculated per kg (EC electric hob) | 183,5 Wh/kg | |
ENVIRONMENTAL CONCERNS
• Packaging materials and old appliances should be recycled.
• Packaging materials may be disposed of as sorted waste.
- Dispose of the plastic bags made of polyethylene (PE) as sorted waste.
Recycling of the appliance at the end of its lifespan:

This appliance conforms the European Union Directive 2012/19/EU on Waste Electrical and Electronic Equipment (WEEE Directive). The symbol on the product or on its packaging indicates that this product may not be treated as household waste. Instead it should be taken to the appropriate collection point for the recycling of electrical and electronic equipment. By ensuring this product is disposed of correctly, you will help prevent potential negative consequences for the environment and human health, which could otherwise be caused by inappropriate waste handling of this product. The disposal of such material must be performed in accordance to the regulations of waste disposal. For more detailed information about recycling of this product, please contact your local council, your household waste disposal service or the shop where you purchased the product.



- concept
- Poděkování
- CZ
- ENERGETICKÁ ÚČINNOST
- SK
- TABLE OF CONTENTS
- IMPORTANT SAFETY INFORMATION
- Delivery
- Installation
- EN
- WARNING!
- Possible malfunctions
- PRODUCT DESCRIPTION
- CONTROL PANEL LAYOUT
- 74
- COOKING TIPS
- ENERGY SAVING TIPS
- Examples of possible damage
- CAUTION! The ceramic glass scraper is sharp and can cause injuries!
- Stains
- Colouring
- Scratches
- Wear of the decoration
- OPERATING INSTRUCTIONS
- Note:
- Before first use
- Switching on the hob
- Switching on a cooking zone
- Switching OFF the cooking zone
- Switching OFF the hob
- ADVANCED FEATURES
- Function of dual flexi zones
- Child lock function
- Setting the cooking time (timer function)
- Delayed shut down function of one cooking zone
- Delayed shut down function for multiple cooking zones
- CARE AND CLEANING
- INSTALLATION INSTRUCTIONS
- Follow the following instruction during installation:
- Removal
- Connecting to the mains power
- Connection of the terminal box of the appliance
- ENERGY EFFICIENCY
- ENVIRONMENTAL CONCERNS
- Recycling of the appliance at the end of its lifespan:
Brand : Concept
Model : SDV4760
Category : Cooker