
PAA 120DAB - Receiver Glemm - Free user manual and instructions
Find the device manual for free PAA 120DAB Glemm in PDF.


| Type of product | DAB/DAB+ & FM Digital Radio Receiver |
| Brand | Glemm |
| Model | PAA 120DAB |
| Dimensions (approx.) | 200 x 130 x 70 mm |
| Weight (approx.) | 500 g |
| Power supply | AC 100-240V 50/60Hz or 3x AA batteries (not included) |
| Frequency bands | DAB/DAB+ (Band III), FM (87.5-108 MHz) |
| Display | LCD with backlight |
| Preset memories | 20 (DAB) + 20 (FM) |
| Audio output | Built-in speaker, 3.5 mm headphone jack |
| Alarm function | Dual alarm with snooze |
| Sleep timer | Yes (adjustable) |
| Bluetooth | Not specified (assumed no) |
| Remote control | Not included |
| Cleaning | Wipe with a soft, dry cloth. Do not use solvents. |
| Safety precautions | Keep away from moisture, heat sources, and direct sunlight. |
| Spare parts / Repairability | Contact Glemm customer service for replacement parts. |
| Manual | Available for download at notice-facile.com |
Frequently Asked Questions - PAA 120DAB Glemm
User questions about PAA 120DAB Glemm
0 question about this device. Answer the ones you know or ask your own.
Ask a new question about this device
Download the instructions for your Receiver in PDF format for free! Find your manual PAA 120DAB - Glemm and take your electronic device back in hand. On this page are published all the documents necessary for the use of your device. PAA 120DAB by Glemm.
USER MANUAL PAA 120DAB Glemm
PAA 120DAB PAA 240DAB PAA 350DAB
Amplificatore PA
PA amplifier
• OTROS IDOMAS •
• OUTRAS LINGUAS •
AMPLIFICATORE Amplifier

TELECOMANDO Remote control

MANUALE
Manual
IT
The manufacturer, in order to improve its products, reserves the right to modify their characteristics whether technical or aesthetic, at any time and without notice.
SPECIFICHE TECNICHE - TECHNICAL SPECIFICATIONS
| PAA 120DAB | PAA 240DAB | PAA 350DAB | |
| Potenza max / Max Power | 120W | 240W | 350W |
| Potenza RMS / RMS Power | 60W | 120W | 175W |
| Alimentazione / Power supply | AC ~ 220/240V50 - 60Hz | AC ~ 220/240V50 - 60Hz | AC ~ 220/240V50 - 60Hz |
| Controllo toni / Tone control | Alti e Bassi /Bass & Treble | Alti e Bassi /Bass & Treble | Alti e Bassi /Bass & Treble |
| Impedenza costante /Low impedance | 4 - 8 Ohm | 4 - 8 Ohm | 4 - 8 Ohm |
| Tensione costante /Voltage line | 70V - 100V | 70V - 100V | 70V - 100V |
| Ingressi Line / Line inputs | 2 | 2 | 2 |
| Ingressi Mic / Mic inputs | 5 | 5 | 5 |
| Uscite / Outputs | 1 linea + 1 Rec /1 line+ 1 Rec | 1 linea + 1 Rec /1 line+ 1 Rec | 1 linea + 1 Rec /1 line+ 1 Rec |
| Multizona / Zones | 5 zone / 5 zones | 5 zone / 5 zones | 5 zone / 5 zones |
| Priority / Priority | Su MIC1 | Su MIC1 | Su MIC1 |
| Compatibilità files /Files compatibility | MP3, WAV | MP3, WAV | MP3, WAV |
| Bluetooth (versione) /Bluetooth (version) | 5.0 (2.4 GHz) | 5.0 (2.4 GHz) | 5.0 (2.4 GHz) |
| Risposta in frequenza /Frequency response | 60 Hz - 15 KHz | 60 Hz - 15 KHz | 60 Hz - 15 KHz |
| Dimensioni / Dimensions | 430 x 100 x 360 mm | 430 x 100 x 360 mm | 430 x 100 x 360 mm |
| Peso / Weight | 8,4 Kg | 11,5 Kg | 12,2 Kg |
CE
DICHIARAZIONE DI CONFORMITA' UE EU COMPLIANCE DECLARATION
Hereby, KARMA ITALIANA SRL declares that the equipment type amplifier with radio and bluetooth model PAA 120DAB, PAA 240DAB and PAA 350DAB is in compliance with Directive 2014/53/EU. The full text of the EU declaration of conformity is available at the following internet address: www.karmaitaliana.it.
Karma Italiana Srl
ITALIANO
GRAZIE PER IL VOSTRO ACQUISTO
Language selection: English, Portugues, Espanol, Francaise, Italiano, Deutsch. (SW version)
Language selection: English, Portugues, Espanol, Francaise, Italiano, Deutsch. (SW version)
(DRC) Dynamic range compression.
The product you have purchased is the result of careful planning by specialized engineers. High quality materials were used for its construction, to ensure its functioning over time.
The product is manufactured in compliance with the strict regulations imposed by the European Union, a guarantee of reliability and safety.
Please read this manual carefully before starting using the device in order to take advantage of its full potential.
Hoping that you will be satisfied of your purchase, we thank you again for your trust in our brand and we invite you to visit our website www.glemm.eu where you will find the whole range of our products, along with useful information and updates.

CAUTIONS AND WARNINGS
- Read and follow strictly the instructions contained in this manual.
- Keep this manual for future reference and include it if you give the product to another user.
- This device works with dangerous 220 - 240V mains power. Do not open, do not disassemble and don't try to operate inside it. In case of wrong use an electric shock may occur.
- The product is conceived for professional use. Its installation must be carried out exclusively by specialized technicians, skilled in electric and audio systems. In case of wrong installation or connections, the manufacturer doesn't take any responsibility for damages to people or objects.
• Make sure that your power outlet voltage matches with the product's voltage. A wrong voltage would seriously damage the fixture.
• To avoid the risk of dangerous electric shocks, before turning on the product always check that the system is connected to ground.
• Before making any connection with other devices, check that all the fixtures are disconnected from the power source and that all the volumes are set on minimum.
- The product is not suitable for outdoor use. To avoid the risk of shortcircuits don't expose it to high temperatures (above 40°), rain or humidity.
• Do not allow flammable liquid, water or metal objects to enter the product.
- Don't touch the product with wet hands.
- Do not place any recipients filled with liquids, such as vases, on top of or directly next to the appliance.
• Install the product in a stable and ventilated position, far from heat sources and don't obstruct the air vents.
• Use the fixture and its controls with due accuracy, avoiding falls, vibrations or impacts.
- If the product doesn't turn on, check the fuse and if necessary replace it with one of the same type and rating, after disconnecting the fixture from power.
- In the event of a serious operating problem, stop using the product immediately. Never try to repair it by yourself, but contact the authorized technical service center. Repairs carried out by unskilled persons could lead to serious damages both to the fixture and to people.
• Do not turn the product on and off at short intervals, it may reduce the life of the device.
- Disconnect the unit from power when it is not used.
- Never disconnect the product from the power source by pulling on the cord. Do not cut, kink, otherwise damage nor modify the power supply cord and periodically check that it is in good condition.
- Wait for the product to cool before cleaning or maintenance.
- To clean the product, use only a dry or slightly damp cloth, avoiding solvents or detergents of any kind.
- Keep away from children's reach.

• To prevent possible hearing damage, do not listen at high volume levels for long periods.

This symbol alerts you of the presence of important operating and maintenance instructions, in the manual or in the documentation accompanying the product
This symbol alerts you to the presence of uninsulated dangerous voltage within the product's enclosure that might be of sufficient magnitude to constitute a risk of electric shock. Do not open the product's case.
The CE mark indicates that this product complies with the applicable European directives and their related standards. Compliance documentation in complete form is available at the company Karma Italiana Srl
Directive 2012/19/UE regarding electric and electronic equipment waste (WEEE).
The symbol of the crossed-out dustbin indicates that the product at the end of its life must be collected separately from other waste. The user must, therefore, confer the fixture complete with all the essential components to an authorized disposal center for collection of electronic and electrical waste, or return it to the dealer when buying new equipment of equivalent type, at a rate of one to one, or one to zero if external dimension is less than 25cm. Appropriate separate collection to send the decommissioned equipment to recycling, treatment and environmentally compatible disposal helps to prevent negative impact on the environment and human health and promotes recycling of the materials making up the product. In Italy illegal dumping of the product by the user entails the application of administrative sanctions pursuant to Legislative Decree n. 49 (14/03/2014).
The remote control is powered by batteries subject to European Directive 2013/56/EU, which cannot be disposed of with normal domestic waste. Find out about the local regulations regarding the separate collection of batteries: a correct disposal allows to avoid negative consequences for environment and health.
WARRANTY CONDITIONS
The product is covered by warranty according to current national and European regulations.
For detailed warranty conditions and RMA requests please refer to our website:
www.karmaitaliana.it or www.glemm.eu.
- The warranty covers manufacturing defects and faults occurred in the first 2 years from the date of purchase. In case of purchase with invoice, the warranty is limited to 1 year.
• Damages caused by negligence or wrong use of the device are not covered by warranty.
• The warranty is no longer effective if the item is modified or disassembled by not authorized people.
• This warranty doesn't necessarily envisage the product's replacement. - External components, batteries, knobs, switches and any removable or subject to wear and tear parts are excluded from warranty.
- Shipment for the return of faulty items is at expense and risk of the owner.
- For all intents and porpuses the warranty is effective only upon exhibition of the invoice or of the purchase receipt.
- If you send the product for repair, it must be shipped with complete original packaging: we therefore recommend to save it.
We also suggest to register your product on our website www.karmaitaliana.it, after signing in to access the reserved area. In this way you will have the possibility to keep track of the warranty validity and to receive updates on our items.
INTRODUCTION
This amplifier has been designed for "P.A. system" applications. It is used for example in offices, schools, churches, shops, shopping centers, restaurants, convention centers, auditoriums, etc.
It is endowed with protection systems preventing damages caused by short circuits, overheating and overloads and making it safe and reliable. Easy to install, it can also be mounted in standard 19" racks.
It comes with 5 microphone inputs, 2 line inputs, 1 line output and 1 REC output.
It can manage both 4-8 Ohm and constant voltage 70V / 100V connections.
It is endowed with a particular FM(RDS) /DAB+ radio module to receive all radio systems.
IMPEDANCE SPEAKER CONNECTION
This type of connection does not allow to limit individually the power of each single speaker, but it gives the possibility to obtain higher performances. The main rule to be respected is that the total impedance of the speakers must be compatible with the impedances managed from the amplifier to which the speakers will be
connected (generally 4, 8, 16Ω), If you use more than one speaker, the value of impedance will be added up or divided depending on the type of connection (in series or in parallel). If you connect only one speaker you have to consider the impedance of the speaker itself.
Here are two examples of connection:
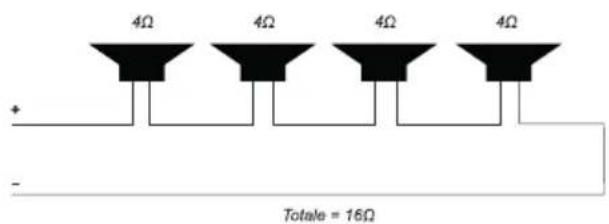

Until you use few speakers it is easy to reach 4, 8, 16 Ω required by common amplifiers, but when using more speakers it is necessary to choose a
SERIES WIRING
The impedances add up. In this example the 4 x 4Ω speakers can be connected to an amplifier suitable for 16Ω connections.
PARALLEL WIRING
The impedances are divided. In this example the 4 x 16Ω speakers can be connected to an amplifier suitable for 4Ω connections.
type of mixed series / parallel connection allowing to obtain the desired impedance.
Here is an example:
![graph TD A["100W"] --> B["40W"] A --> C["50W"] B --> D["40"] B --> E["50W"] C --> F["40"] C --> G["50W"] D --> H["40"] E --> I["50W"] F --> J["40"] G --> K["50W"] H --> L["Total + 40 con potentiore totale di +60W"] I --> L J --> L K --> L](/content/2026/05/854880/images/67dd474f80617ad002fd386a3d824c13a0a676d1dba205058233fffca05da737.jpg)
SERIES / PARALLEL MIXED WIRING
In this example the impedance of the 4 and 8Ω speakers is added (being connected in series). Then the 4 groups of speakers, connected in parallel, halve their impedance to reach a total impedance of 4Ω.
CONSTANT VOLTAGE SPEAKER CONNECTION
It is the type of monophonic system realized in shops, conference rooms, churches and in any environment where a uniform sound diffusion is necessary, with maximum ease of installation and use. Only 2 wires are used, starting from the amplifier and getting up to the last speaker. On the amplifier you have to connect a wire to the "com"[common) terminal and the other wire to the terminal indicating 100V.
The two wires will go all around the installation, and they will be connected to the speakers or rather the transformers included in the speakers. The speakers of this type usually have a selector to set the output power, from the minimum to the maximum value supported by the transformer.
As a matter of fact, it is possible to connect to the same 2 main wires, a number of speakers, even different from each other or with different power. The amplifier signal will reach the transformer present in each speaker and the transformer will provide the desired power.
When you operate on the amplifier volume, you will increase or lower the volume of all speakers in proportion. Important: the sum of the maximum power of the speakers must be equal to or less than the amplifier's maximum power.

EXAMPLE: You connect to the system 5 speakers for a total of 90W. The amplifier handles up to 110W: so in the future you will be able to be connect other speakers, up to reach the amplifier's maximum power.

EXAMPLE: How to use speakers with transformer in 100V installations.

EXAMPLE: How to use speakers with transformer in 70V installations.

To activate zones is necessary to bridge 100V and SW contacts
FRONT PANEL

FRONT PANEL FUNCTIONS
- USB port
- Display
- Infrared sensor for remote control
- Volume + / Volume - of MP3 modul
- NEXT/ PREV (Track forward / back)
- ENTER (to confirm choices)
-
MENU (it works with NEXT/PREV/ENTER). In FM mode:
(scan setting): it makes radio station scanning (all or the best).
(System setting) language selection: English, Portugues, Espanol, Francais, Italiano, Deutsch.
(SW version)
(Factory reset): it cancels all stations and memory
(Audio setting): it selects Stereo or Mono In DAB+ mode:
(Full scan): It scans all the stations
(System setting) language selection: English, Portugues, Espanol, Francais, Italiano, Deutsch.
(SW version)
(Factory reset): it cancels all stations and memory.
(Prune) It cancels all the radio stations which are no longer receivable.
(DCR) Dynamic range compression.
It reduces the volume of high tones and amplifies the bass ones. Useful during amplification at low volume.
(Manual tune): manual research of all the radio stations. -
Select keys. With a long touch you can save a station. With a short touch you go directly to the station previously saved.
- PRESET: It allows to go to all the stations in memory. You can choose through NEXT/PREV and ENTER.
- MUTE
- INFO: It gives information about the FM (RDS) or DAB+ transmitted radio station.
- MODE: Use it to choose among USB, DAB+, FM and Bluetooth
- AUTO SCAN: it scans and saves all the stations which will be then displayed in Preset. Press it again to stop scanning.t
- ZONE SELECTORS: use them to enable or disable the reproduction on the desired zone.
- STATUS LEDS
(PW) Product on
(-32/0) Output audio level
(CLIP) It flashes if the signal is too high (PROT)
It lights on if the amplifier goes into protection mode. Reduce volumes and turn it on again. - MIC1: Microphone input with priority
- VOICE PRIORITY: available on MIC1
- Volume control for microphone inputs 1,2,3,4
- Volume MIC5 and Aux1
- Volume Aux2
- Aux2 signal selector. It allows to select the source connected to inputs Tuner, CD and Aux.
- Bass tone adjustment
ENGLISH
- High tone adjustment
- General volume
- Whistle button
-
Whistle volume
-
Siren button (tone 1)
- Siren volume
- Siren button (tone 2)
- On/off button
REAR PANEL

REAR PANEL CONNECTIONS
- Power socket
- Fuse
- Speaker connectors: 70V, 100V, 4 and 8 Ohms. Before using the zones check you have set the right output voltage (70/100V) connected to the switch terminal (SW).
- RCA for connection to external line signal
- RCA for external CD player connection
- Input for AUX2 signal
-
MIC 2/3/4 sockets via 6,3mm jack
-
48V phantom key available for XLR MIC sockets 1/2/3/4
- RCA AUX1 signal sockets
- AUX1/MIC5 switch
- Socket for bluetooth antenna
- Socket for FM/DAB+ antenna
- RCA type LINE OUT sockets
- RCA type REC OUT sockets
- XLR sockets for MIC 1/2/3/4/5
REMOTE CONTROL
It allows to control at a distance all the amplifier's functions. Some buttons are intended for other fixtures and are therefore not active. The remote control is powered by 2 x AAA 1,5V batteries (not included).
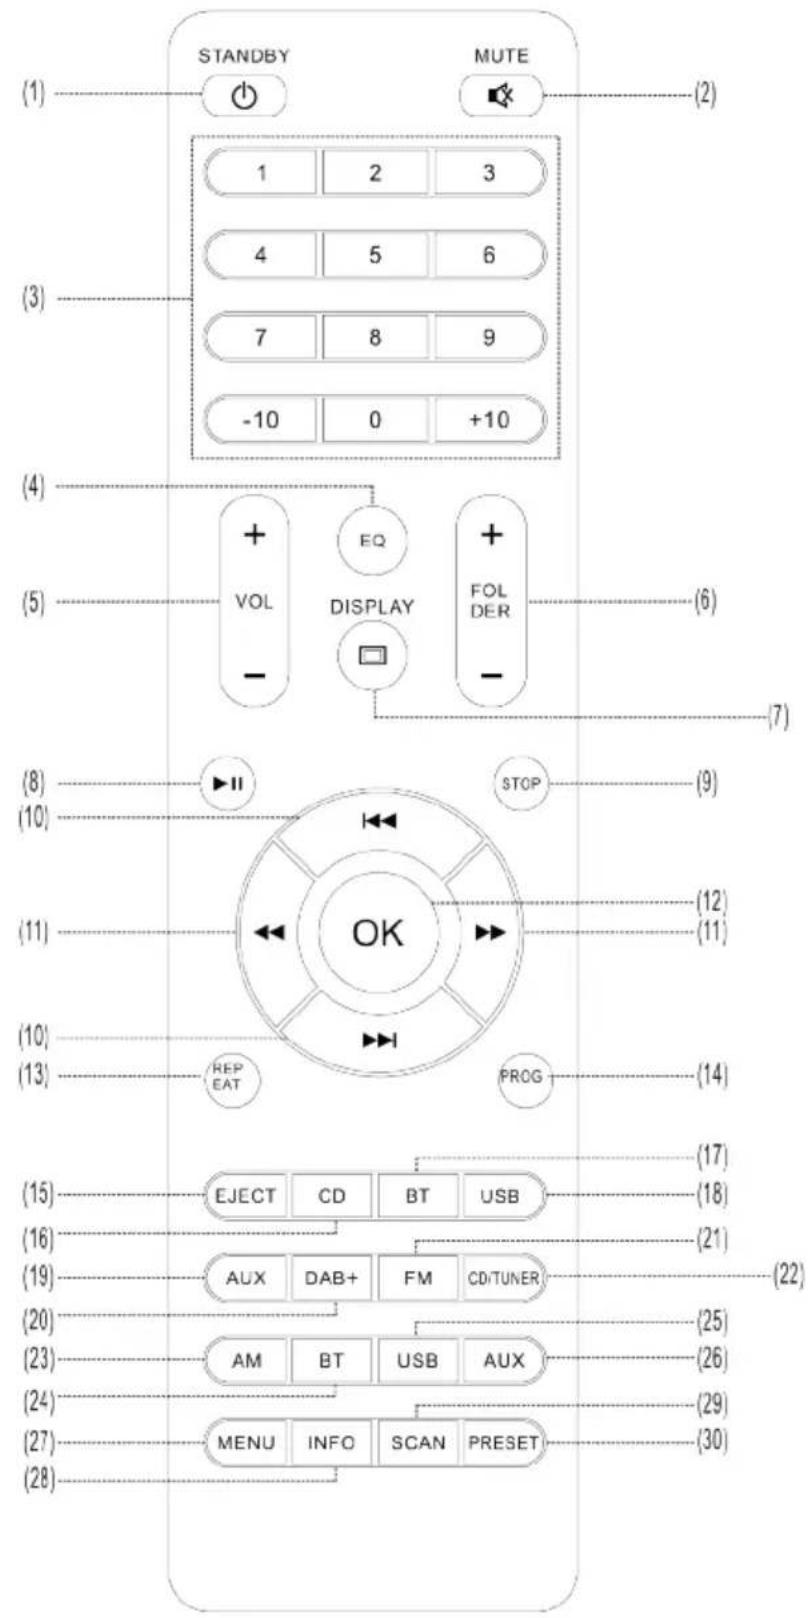
REMOTE CONTROL FUNCTIONS
- STANDBY: To activate and deactivate the unit.
- MUTE: Press this button to mute audio.
- Number buttons: Use these buttons to select tracks or preset stations.
- EQ selection: Press this to select the EQ mode among Classic, Rock, Pop, Jazz and Flat.
5 .VOL +/- button: Press this to adjust the output audio level. - FOLDER: Press this to select the folder when using USB media.
- DISPLAY: Push this button to make the screen light on/off.
8.PLAY/PAUSE: Press this to start, resume, or pause the playback. - STOP: Press this to stop playback.
- SKIP (PREV. & NEXT) button: When in the USB and Bluetooth mode: Press these buttons to skip to previous or next track.
11.: This button is used for other models. - OK: To confirm a selection
-
REPEAT: Press this turn the repeat playback function on/off.
14-19 These buttons are used for other models. -
DAB+: Press this to switch the input source to "DAB+ Mode".
- FM(containing RDS) Press this to switch to the input of source to "FM Mode".
- This button is used for other models.
- This button is used for other models.
- BT: Press this to switch the input source to "Bluetooth Mode", its name "R-BLUETOOTH" shall appear on your mobile device for pairing.
- USB : Press this to switch the input source to "USB Mode".
- AUX: Press this to switch the input source to "AUX" by connecting an additional audio player.
- MENU: Please refer to the operations of front panel "MENU".
28 .INFO: Allows to show the related information for the FM(RDS) and DAB+ mode. - SCAN: Press this to scan through and store the stations automatically.
- PRESET: Press this button to review the 60 stored stations, press 'NEXT' or 'PREV' to choose a desired station then press 'ENTER' to play this station.
GLEMM
- Paa 120DAB paa 240DAB paa 350DAB
- It
- Ce
- Dichiarazione di conformita' ue eu compliance declaration
- Italiano
- Grazie per il vostro acquisto
- Cautions and warnings
- Warranty conditions
- Introduction
- Impedance speaker connection
- Series wiring
- Parallel wiring
- Series / parallel mixed wiring
- Constant voltage speaker connection
- Front panel
- Front panel functions
- English
- Rear panel connections
- Remote control
- Remote control functions
Brand : Glemm
Model : PAA 120DAB
Category : Receiver