
OAS KC8V1SW IX - Oven WHIRLPOOL - Free user manual and instructions
Find the device manual for free OAS KC8V1SW IX WHIRLPOOL in PDF.

| Product Type | Built-in Oven |
| Brand | Whirlpool |
| Model | OAS KC8V1SW IX |
| Functions | Conventional, Forced Air, Pizza, Grill, Turbo Grill, Rising, Eco Forced Air, Steam, Pyrolytic Cleaning |
| Cleaning Method | Pyrolytic (Automatic Cleaning) |
| Control Type | Electronic with selection and thermostat knobs, push buttons, display |
| Temperature Range | 60 °C - 250 °C |
| Timer | Yes, with cooking duration and delayed start |
| Display | Digital with time and temperature indicators |
| Knobs | Retractable (push to pop up) |
| Steam Function | Yes, pour water on bottom cavity for steam cooking (fish, meat, bread) |
| Accessories Included | Wire shelf, baking tray, drip tray, sliding runners |
| Preheating | Yes, with audible signal and flashing icon |
| Residual Heat Indicator | Yes |
| Energy Source | Electric |
| Safety | Child lock not specified; automatic switch-off after cooking |
Frequently Asked Questions - OAS KC8V1SW IX WHIRLPOOL
User questions about OAS KC8V1SW IX WHIRLPOOL
0 question about this device. Answer the ones you know or ask your own.
Ask a new question about this device
Download the instructions for your Oven in PDF format for free! Find your manual OAS KC8V1SW IX - WHIRLPOOL and take your electronic device back in hand. On this page are published all the documents necessary for the use of your device. OAS KC8V1SW IX by WHIRLPOOL.
USER MANUAL OAS KC8V1SW IX WHIRLPOOL
THANK YOU FOR BUYING A WHIRLPOOL PRODUCT
In order to receive a more complete assistance, please register your product on www.whirlpool.eu/register

Before using the appliance carefully read the Safety Instruction.
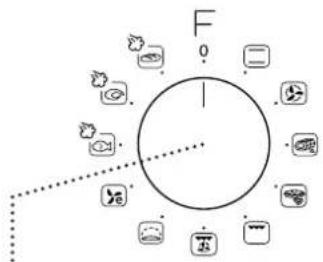
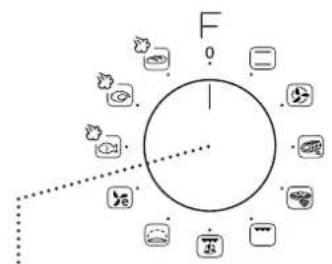
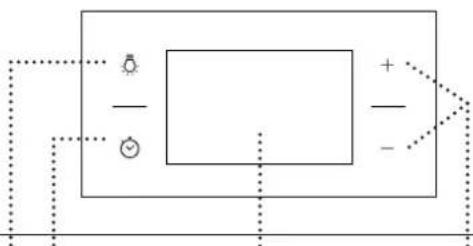
CONTROL PANEL DESCRIPTION
flowchart
graph TD
    A["F"] --> B["Circle"]
    B --> C["1"]
    B --> D["2"]
    B --> E["3"]
    B --> F["4"]
    B --> G["5"]
    B --> H["6"]
    B --> I["7"]
    B --> J["8"]
    B --> K["9"]
    B --> L["10"]
13245

natural_image
Pure electrical circuit lines without any symbols
6
1. SELECTION KNOB
For switching the oven on by selecting a function. Turn to the position to switch the oven off.
2. LIGHT
With the oven switched on, press 📄 to turn the oven compartment lamp on or off.
3. SETTING THE TIME
For accessing the cooking time settings, delayed start and timer.
For displaying the time when the oven is off.
4. DISPLAY
5. ADJUSTMENT BUTTONS
For changing the cooking time settings.
6. THERMOSTAT KNOB
Turn to select the temperature you require when activating manual functions.
Please note: The knobs are retractable. Press the knobs in the middle and they pop up.
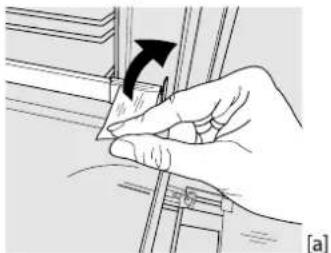
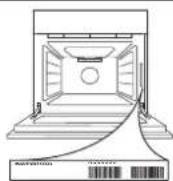
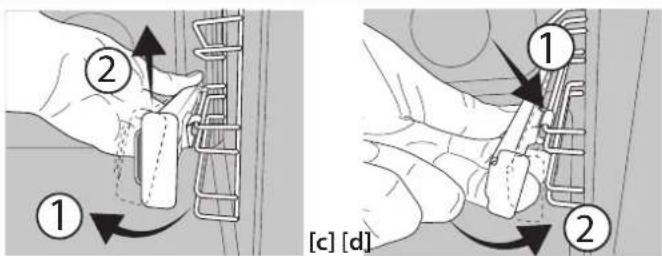
SLIDING RUNNERS AND SHELF GUIDES
Before using the oven remove the protective tape [a] and then remove the protective foil [b] from the sliding runners.
natural_image
Illustration of a hand holding a tool with an arrow indicating rotation (no text or symbols present)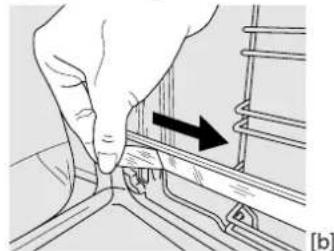
natural_image
Hand pressing a button on a rail track component with an arrow indicating direction (no text or symbols)REMOVING THE SLIDING RUNNERS [c]
Pull the lower part of the sliding runner to uncouple the lower hooks (1) and pull the the sliding runners upwards, removing them from the upper hooks (2).
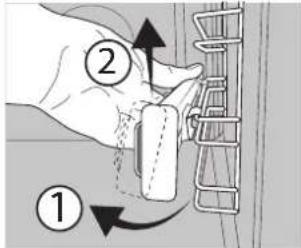
REFITTING THE SLIDING RUNNERS [d]
Hook the upper hooks on the shelf guides (1) then press the lower part of the sliding runners against the shelf guides, until
the lower hooks are clicking (2).
![[c] [d] ① ②](/content/2026/05/854357/images/55ee3fc39f01aac455c4b5c6bcc9cab53466e57bf36b0c70201a02388c52aa7e.jpg)
REMOVING AND REFITTING THE SHELF GUIDES
-
To remove the shelf guides, firmly grip the external part of the guide, and pull it towards you to extract the support and the two internal pins from the lodging.
-
To reposition the shelf guides, position them near the cavity and initially insert the two pins into their lodgings. Next, position the external part near its lodging, insert the support, and firmly press towards the wall of the cavity to make sure the shelf guide is properly secured.
FIRST TIME USE
1. SETTING THE TIME
You will need to set the time when you switch on the appliance for the first time: Press until the icon and the two digits for the hour start flashing on the display.
Use + or to set the hour and press to confirm. The two digits for the minutes will start flashing. Use + or to - set the minutes and press to confirm.
Please note: When the icon is flashing, for example following lengthy power outages, you will need to reset the time.
2. HEAT THE OVEN
A new oven may release odours that have been left behind during manufacturing: this is completely normal. Before starting to cook food, we therefore recommend heating the oven with it empty in order to remove any possible odours. Remove any protective cardboard or transparent film from the oven and remove any accessories from inside it.
Heat the oven to 250 °C for about one hour. The oven must be empty during this time.
Please note: It is advisable to air the room after using the appliance for the first time.
FUNCTIONS & DAILY USE

CONVENTIONAL
For cooking any kind of dish on one shelf only.

FORCED AIR
For cooking different foods that require the same cooking temperature on several shelves (maximum three) at the same time. This function can be used to cook different foods without odours being transferred from one food to another.

AUTOMATIC CLEANING - PYRO
For cooking large joints of meat (above 2.5kg). We recommend turning the meat over during cooking to ensure that both sides brown evenly. We also recommend basting the joint every so often to prevent it from drying out excessively.

PIZZA
For baking different types and sizes of pizza and bread. It is a good idea to swap the position of the baking trays halfway through cooking.

GRILL
For grilling steaks, kebabs and sausages, cooking vegetables au gratin or toasting bread.
When grilling meat, we recommend using a dripping pan to collect the cooking juices: position the pan on any of the levels below the wire shelf and add 200 ml of drinking water.

TURBO GRILL
For roasting large joints of meat (legs, roast beef, chicken). We recommend using a dripping pan to collect the cooking juices: position the pan on any of the levels below the wire shelf and add 200 ml of drinking water.
1. SELECT A FUNCTION
To select a function, turn the selection knob to the symbol for the function you require: the display will light up and an audible signal will sound.
2. ACTIVATE A FUNCTION
MANUAL
To start the function you have selected, turn the thermostat knob to set the temperature you require.
Please note: During cooking you can change the function by turning the selection knob or adjust the temperature by turning the thermostat knob. The function will not start if the thermostat knob will be on. You can set the cooking time, cooking end time (only if you set a cooking time) and a timer.
RISING
To start the "Rising" function, turn the thermostat knob to the relevant symbol; if the oven is set to a different temperature, the function will not start.
Please note: You can set the cooking time, cooking end time (only if you set a cooking time) and a timer.

RISING
For helping sweet or savoury dough to rise effectively.
Turn the thermostat knob to the icon to activate this function.

ECO FORCED AIR
For cooking roasts and stuffed roasting joints on a single shelf. Food is prevented from drying out excessively by gentle, intermittent air circulation.
When this ECO function is in use, the light will remain switched off during cooking but can be switched on again by pressing ☐.
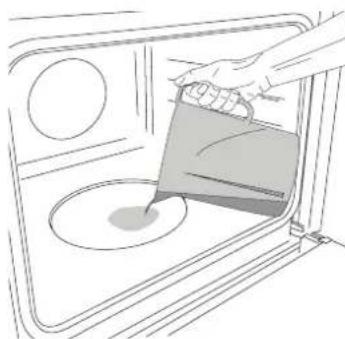
STEAM
| FISH | MEAT | BREAD |
The STEAF/MS provide excellent results thanks to the addition of steam in cooking cycles. Only when the oven is cold, pour drinking water on the bottom of the oven and select the specific function for your preparation. The optimal water quantities and temperatures for each food category are listed in the relative cooking table. Do not preheat the oven before inserting food.
STEAM
natural_image
Line drawing of a kitchen interior with a hand pouring liquid into a bowl (no text or symbols)Only when the oven is cold, fill the embossing of the cavity with the quantity of drinking water suggested in the relative cooking table. Place the food in the oven.
Set and activate the STEAM function: At the end, carefully open the door and let steam escape slowly.
Please note: During steam cooking, do not open the door and never top up the water.
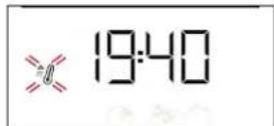
3. PREHEATING AND RESIDUAL HEAT
Once the function starts, an audible signal and a flashing icon on the display indicate that the preheating phase has been activated.
At the end of this phase, an audible signal and the fixed icon on the display will indicate that the oven has reached the set temperature: at this point, place the food inside and proceed with cooking.
Please note: Placing the food in the oven before preheating has finished may have an adverse effect on the final cooking result.
After cooking and with the function deactivated, the icon may continue to remain visible on the display even after the cooling fan has switched off to indicate that there is residual heat in the compartment.
Please note: The time after which the icon switches off varies because it depends on a series of factors such as ambient temperature and function used. In any case, the product should be considered to be off when the pointer on the selection knob is at "0".
4. PROGRAMMING COOKING
You will need to select a function before you can start programming cooking.
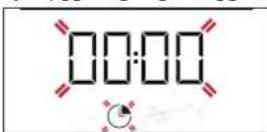
DURATION
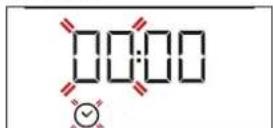
Keep pressing until the icon and "00:00" start flashing on the display.
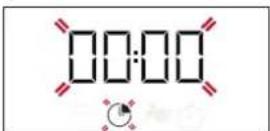
Use ☑ to set the cooking time you require, then press ☑ to confirm.
Activate the function by turning the thermostat knob to the temperature you require: an audible signal will sound and the display will indicate that cooking is complete.
Please note: To cancel the cooking time you have set, keep pressing 🔗 until the ⏻ icon starts flashing on the display, then use — to reset the cooking time to "00:00". This cooking time includes a preheating phase.
PROGRAMMING THE END COOKING TIME/DELAYED START
After a cooking time has been set, starting the function can be delayed by programming its end time: press until the icon and the current time start flashing on the display.
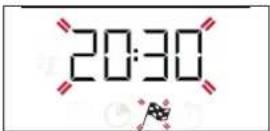
Use +r to set the time you want cooking to end and
COOKING TABLE
| RECIPE FUNCTION PREHEAT TEMPERATURE (°C) | DURATION(MIN) | LEVEL AND ACCESSORIES | ||||
| Leavened cakes | Yes 170 | 30 - 50 | 2 | |||
| Yes 160 | 30 - 50 | 2 | ||||
| Yes 160 | 40 - 60 | 4 | 1 | |||
| Biscuits / tartlets | Yes 160 | 25 - 35 | 3 | |||
| Yes 160 | 25 - 35 | 3 | ||||
| Yes 150 | 35 - 45 | 4 | 2 | |||
| Pizza / Focaccia | Yes | 190 - 250 | 15 - 50 | 1 / 2 | ||
| Yes | 190 - 250 | 20 - 50 | 4 | 2 | ||
| Lasagne / baked pasta / cannelloni / flans | Yes | 190 - 200 | 45 - 65 | 2 | ||
| Lamb / veal / beef / pork 1 kg | Yes | 190 - 200 | 80 - 110 | 3 | ||
| Chicken / rabbit / duck 1 kg | Yes | 200 - 230 | 50 - 100 | 2 | ||
| Toasted bread | 5' | 250 | 2 - 6 | 5 | ||

press ⏻ to confirm.
Activate the function by turning the thermostat knob to the temperature you require: the function will remain paused until it starts automatically after the period of time that has been calculated in order for cooking to finish at the time you have set.
Please note: To cancel the setting, switch the oven off by turning the selection knob to the 0 position.
Delay to start functionality is not available for Grill and Turbo Grill functions.
END OF COOKING
An audible signal will sound and the display will indicate that the function has finished.
Turn the selection knob to select a different function or to 0 to switch the oven off.
Please note: If the timer is active, the display will show "END" alternately with the remaining time.
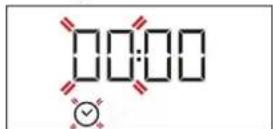
5. SETTING THE TIMER
This option does not interrupt or program cooking but allows you to use the display as a timer, either during while a function is active or when the oven is off.
Keep pressing 🔒 until the icon and "00:00" start flashing on the display.
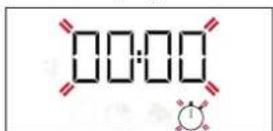
Use ☑ to set the time you require and press to ☺ confirm. An audible signal will sound once the timer has finished counting down the selected time.
Notes: To cancel the timer, keep pressing ☑ until the icon starts flashing, then use to reset the time to "00:00".
| STEAM | ||||||
| RECIPE FUNCTION | WATER (ML) | PREHEAT | TEMPERATURE (°C) | DURATION (MIN) | LEVEL AND ACCESSORIES | |
| Fish fillets / cutlets 0.5 - 2 cm | STEAM | 250 | - | 190 - 210 | 15 - 25 | 3 |
| Whole fish 300 - 600 g | STEAM | 250 | - | 190 - 210 | 15 - 30 | 3 |
| Whole fish 600 g - 1.2 kg | STEAM | 250 | - | 180 - 200 | 25 - 45 | 3 |
| Roast Beef rare 1 kg 250 - 190 - 210 | STEAM | 3 | ||||
| Lamb shank 500 g - 1.5 kg | STEAM | 250 | - | 170 - 190 | 60 - 75 | 2 |
| Chicken / guinea fowl / duckWhole 1 - 1.5 kg | STEAM | 250 - 200 | - 220 55 - 75 | 2 | ||
| Chicken / guinea fowl / duckPieces 500 g - 1.5 kg | STEAM | 250 - 200 | - 220 40 - 60 | 3 | ||
| Chicken / turkey / duckWhole 3 kg | STEAM | 250 - 160 | - 180 100 - 140 | 2 | ||
| Lamb / Beef / Pork 1 kg | STEAM | 250 | - | 170 - 190 | 60 - 100 | 3 |
| Small bread 80 - 100 g | STEAM | 200 | - | 200 - 220 | 30 - 45 | 3 |
| Sandwich loaf in tin 300 - 500 g | STEAM | 250 | - | 170 - 190 | 45 - 60 | 3 |
| Bread loaf 500 g - 2 kg | STEAM | 250 | - | 160 - 170 | 50 - 100 | 2 |
| Baguettes 200 - 300 g | STEAM | 250 | - | 200 - 220 | 30 - 45 | 3 |
The time indicated includes the preheating phase: we recommend placing the food in the oven and setting the cooking time when starting the function.
To remove the remaining limescale from the bottom of the cavity after the STEAM cooking, just pour 250 ml of white vinegar onto the embossing of the cavity (alternatively, use a specific descaling product. For availability please contact the After Sales Service). Leave it to work at room temperature for 30 minutes, then clean the cavity with warm drinking water and a soft cloth. Cleaning is recommended at least for every 5 to 10 STEAM cooking cycles.
TROUBLESHOOTING
| Problem | Possible cause | Solution |
| The oven is not working. | Power cut.Disconnection from the mains. | Check for the presence of mains electrical power and whether the oven is connected to the electricity supply.Turn off the oven and restart it to see if the fault persists. |
| The display shows the letter “F” followed by a number or letter. | Oven failure. | Contact you nearest Client After-sales Service Centre and state the number following the letter “F”. |
| The display is showing the message “Hot” and the selected function will not start. | Temperature too high. | Allow the oven to cool down before activating the function.Select a different function. |
| The display shows unclear text and appears to be broken. | Another language set. | Contact you nearest Client After-sales Service Centre. |
Download the complete Use and Care Guide from docs.whirlpool.eu for more informations about your product

Policies, standard documentation and additional product information can be found by:
- Visiting our website docs.whirlpool.eu
• Using QR Code - Alternatively, contact our After-sales Service (See phone number in the warranty booklet). When contacting our After-sales Service, please state the codes provided on your product's identification plate.

БЛАГОДАРИМ ВИ, ЧЕ ЗАКУПИХТЕ ПРОДУКТ НА WHIRLPOOL
natural_image
Pure electrical circuit lines without any symbols
6
natural_image
Illustration of a hand holding a tool with an arrow indicating rotation (no text or symbols present)
natural_image
Illustration of a hand adjusting a rail track component with an arrow indicating direction (no text or symbols present)![① ② [c] [d]](/content/2026/05/854357/images/f849f65f0b7e25edff15e512f23b715120cf337fde9a30f54b58ed346d7825c5.jpg)
ИЗВАЖДАНЕ И ПОСТАВЯНЕ НА ВОДАЧИТЕ
natural_image
Line drawing of a hand pouring liquid into a microwave oven (no text or symbols)ZAHVALJUJEMO VAM NA KUPOVINI PROIZVODA WHIRLPOOL
Kako bismo vam mogli pružiti potpuniju pomoć, registrirajte svoj uređaj na adresi www.whirlpool.eu/register

Pažljivo pročitajte sigurnosne upute prije upotrebe uređaja.
OPIS UPRAVLJAČKE PLOČE
flowchart
graph TD
    A["Central Node"] --> B["Node 1"]
    A --> C["Node 2"]
    A --> D["Node 3"]
    A --> E["Node 4"]
    A --> F["Node 5"]
    A --> G["Node 6"]
    A --> H["Node 7"]
    A --> I["Node 8"]
    A --> J["Node 9"]
    A --> K["Node 10"]
    A --> L["Node 11"]
    A --> M["Node 12"]
    A --> N["Node 13"]
    A --> O["Node 14"]
    A --> P["Node 15"]
    A --> Q["Node 16"]
    A --> R["Node 17"]
    A --> S["Node 18"]
    A --> T["Node 19"]
    A --> U["Node 20"]
13245
natural_image
Pure electrical circuit lines without any symbols
6
1. GUMB ZA ODABIR
Za uključivanje pećnice odabirom funkcije. Okrenite u položaj za isključivanje pećnice.
2. SVJETLO
natural_image
Illustration of a hand holding a tool with an arrow indicating rotation (no text or symbols present)
natural_image
Hand holding a small object with an arrow indicating direction, next to a mechanical component (no text or symbols visible)UKLANJANJE KLIZNIH VODILICA [c]
Povucite donji dio klizne vodilice da biste odvojili donje kuke (1) i klizne vodilice povucite prema gore skidajući ih s gornjih kuka (2).
PONOVNO POSTAVLJANJE KLIZNIH VODILICA [d]
Zakvačite gornje kuke na vodilice rešetki (1) pa zatim pritisnite donji dio kliznih vodilica na vodilice rešetki sve dok donje kuke ne kliknu (2).
SKIDANJE I PONOVNO POSTAVLJANJE VODILICA REŠETKI
- Vodilice rešetki skinite tako da čvrsto uhvatite vanjski dio vodilice i povučete je prema sebi da biste potporu i dva interna zatika izvukli iz ležišta.
- Ponovno ih postavite tako da ih postavite blizu unutrašnjosti i najprije umetnete dva zatika u njihova ležišta. Zatim vanjski dio postavite u blizinu njegovog ležišta, umetnete nosač i čvrsto ga pritisnete prema stijenci unutrašnjosti da biste provjerili je li vodilica rešetke dobro učvršćena.
PRVA UPOTREBA
1. POSTAVLJANJE VREMENA
natural_image
Line drawing of a hand pouring liquid into a microwave oven (no text or symbols)Tek kada je pećnica hladna, napunite udubljenje u pećnici količinom vode navedenom u odgovarajućoj tablici pečenja. Namirnice stavite u pećnicu. Postavite i uključite funkciju STEAM: Na kraju pažljivo otvorite vrata i pustite da para polako izađe.
Napominjemo: Prilikom kuhanja na pari nemojte otvarati vrata i nikada nemojte nadolijevati vodu.
3. ZAGRIJAVANJE I PREOSTALA TOPLINA
Nakon pokretanja funkcije zvučni signal i ikona koja treperi na zaslonu označavaju da je uključena faza zagrijavanja pećnice.
Po završetku te faze, zvučni signal i stalno uključena ikona na zaslonu označit će da je pećnica dosegla postavljenu temperaturu: tada stavite jelo u unutrašnjosti i nastavite s pečenjem.
natural_image
Pure electrical circuit lines without any symbols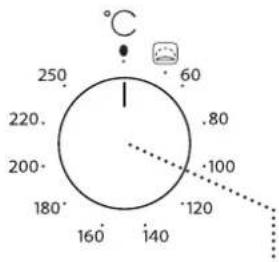
6
1. VOLICÍ KNOFLÍK
natural_image
Illustration of a hand holding a small object with an arrow indicating rotation (no text or symbols present)
natural_image
Close-up of a hand pressing down on a mechanical component with an arrow indicating direction (no text or symbols)VYJMUTÍ VÝSUVNÝCH LIŠT [c]
DEMONTÁŽ A INSTALACE VODICÍCH DRÁŽEK
natural_image
Line drawing of a microwave oven with a hand pouring liquid into the pan (no text or symbols)3. PŘEDEHŘEV A ZBYTKOVÉ TEPLO
natural_image
Pure electrical circuit lines without any symbols
radar
| Angle (°) | Value | |-----------|-------| | 0 | 250 | | 45 | 220 | | 90 | 200 | | 135 | 180 | | 180 | 160 | | 225 | 140 | | 270 | 120 | | 315 | 100 | | 360 | 80 | | 405 | 60 |6
1. VALIKUNUPP
natural_image
Illustration of a hand holding a piece of paper with an arrow indicating rotation (no text or symbols present)
natural_image
Hand pressing a button on a mechanical component with an arrow indicating direction (no text or symbols)LIUGSIINIDE EEMALDAMINE [c]
RIIULISIINIDE EEMALDAMINE JA ÜMBERPAIGUTAMINE
natural_image
Line drawing of a hand pouring liquid into a microwave oven (no text or symbols)natural_image
Pure electrical circuit lines without any symbols
6
1. ΚΟΥΜΠΙ ΕΠΙΛΟΓΗΣ
natural_image
Illustration of a hand holding a small object with an arrow indicating rotation (no text or symbols present)
natural_image
Hand turning a component with an arrow indicating direction (no text or symbols present)natural_image
Line drawing of a kitchen interior with a hand pouring liquid into a bowl (no text or symbols)natural_image
Pure electrical circuit lines without any symbols
6
1. VÁLASZTÓGOMB
natural_image
Illustration of a hand holding a tool with an arrow indicating rotation (no text or symbols present)
natural_image
Hand pressing a button on a rail track, showing a black arrow indicating direction (no text or symbols present)natural_image
Line drawing of a person pouring liquid into a microwave oven (no text or symbols)natural_image
Pure electrical circuit lines without any symbols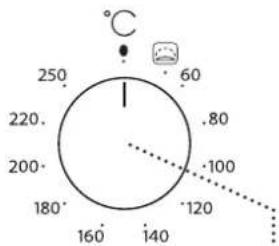
radar
| Angle (°) | Value | |-----------|-------| | 0 | 250 | | 45 | 220 | | 90 | 200 | | 135 | 180 | | 180 | 160 | | 225 | 140 | | 270 | 120 | | 315 | 100 | | 360 | 80 | | 405 | 60 |6
1. ATLASES SLĖDZIS
natural_image
Illustration of a hand holding a small object with an arrow indicating rotation (no text or symbols)
natural_image
Hand pressing a button on a rail track, showing a black arrow indicating direction (no text or symbols present)SLÍDOŠO SLIEČU IZNEMŠANA [c]
PLAUKTU VADOTNU IZNEMŠANA UN ATKÄRTOTA IEVIETOŠANA
natural_image
Line drawing of a hand pouring liquid into a microwave oven (no text or symbols)natural_image
Pure electrical circuit lines without any symbols
6
1. PASIRINKIMO RANKENÉLÉ
natural_image
Illustration of a hand holding a tool with an arrow indicating rotation (no text or symbols present)
natural_image
Hand pressing a button on a rail track component, showing a black arrow indicating direction (no text or symbols present)SLANKIOJANČIŲ GROTELIŲ IŠĖMIMAS [c]
SKERSINIŲ GROTELIŲ IŠĖMIMAS IR ISTATYMAS
The image contains a graphical icon of a light bulb with rays, possibly indicating illumination or illumination. There is no text or mathematical content to extract.
STEAM

ŽUVIS

MÉSA

DUONA

natural_image
Line drawing of a person pouring liquid into a microwave oven (no text or symbols)natural_image
Pure electrical circuit lines without any symbols
6
1. POKRETŁO WYBORU
PROWADNICE WYSUWANE I DRABINKI METALOWE
natural_image
Illustration of a hand holding a piece of paper with an arrow indicating rotation (no text or symbols present)
natural_image
Hand pressing a button on a rail track component, showing a black arrow indicating direction (no text or symbols present)DEMONTAŻ PROWADNIC WYSUWANYCH [c]
PONOWNY MONTAŻ PROWADNIC WYSUWANYCH [d]
WYJMOWANIE I PONOWNY MONTAŻ DRABINEK
natural_image
Line drawing of a microwave oven with a hand pouring liquid into the pan (no text or symbols)VĂ MULȚUMIM CĂ AȚI ACHIZIȚIONAT UN PRODUS WHIRLPOOL
natural_image
Pure electrical circuit lines without any symbols
6
1. BUTONUL DE SELECTARE
natural_image
Illustration of a hand holding a tool with an arrow indicating rotation (no text or symbols present)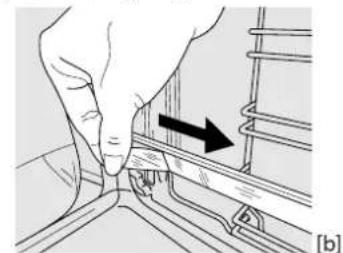
natural_image
Hand pressing a button on a mechanical component with an arrow indicating direction (no text or symbols present)DEMONTAREA GHIDAJELOR CULISANTE [c]
DEMONTAREA ŞI REMONTAREA GHIDAJELOR PENTRU GRĂTAR
natural_image
Line drawing of a hand pouring liquid into a microwave oven (no text or symbols)4. PROGRAMAREA PREPARĂRII
natural_image
Pure electrical circuit lines without any symbols
6
1. DUGME ZA BIRANJE
Za uključivanje pećnice biranjem funkcije. Okrenite na položaj da biste isključili pećnicu.
2. OSVETLJENJE
natural_image
Illustration of a hand holding a tool with an arrow indicating rotation (no text or symbols present)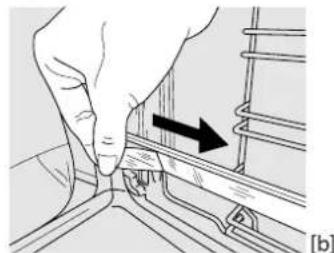
natural_image
Hand pressing a button on a rail track, showing a black arrow indicating direction (no text or symbols present)UKLANJANJE KLIZNIH VODICA [c]
Povucite donji deo klizne vođice da biste otkačili donje kuke (1) i povucite klizne vođice nagore, skidajući ih sa gornjih kuka (2).
PONOVNO POSTAVLJANJE KLIZNIH VODICA [d]
Zakačite gornje kuke na vođice police (1), a zatim pritisnite donji deo kliznih vođica na vođice police, dok donje kuke ne kliknu (2).
![Diagram illustrating hand positioning and movement of a mechanical component, labeled with parts 1 and 2, and reference to [c] [d].](/content/2026/05/854357/images/4a8709b44ca4af5b2bc941a9828de5129e5cbd1ec7a7569dc8656de41507e9f1.jpg)
UKLANJANJE I PONOVNO POSTAVLJANJE VODICA
-
Da biste uklonili vođice, čvrsto uhvatite spoljašnji deo vođice i povucite je ka sebi da biste izvukli nosač i dva unutrašnja pina iz ležišta.
-
Da biste ponovo postavili vodice, postavite ih uz šupljinu i prvo umetnite dva pina u ležište. Zatim, postavite spoljašnji deo blizu ležišta, umetnite nosač i čvrsto pritisnite prema zidu šupljine da bi se vodica pravilno pričvrstila.
PRVA UPOTREBA
1. PODEŠAVANJE VREMENA
natural_image
Line drawing of a hand pouring liquid into a microwave oven (no text or symbols)natural_image
Pure electrical circuit lines without any symbols
6
1. VOLIACI GOMBÍK
natural_image
Illustration of a hand holding a tool with an arrow indicating rotation (no text or symbols present)
natural_image
Hand pressing a button on a rail track, showing motion direction (no text or symbols)VYBRATIE POSUVNÝCH BEŽCOV [c]
VYBERANIE A VSÁDZANIE VODIACICH LÍŠT
- Ak chcete vodiace lišty vybrať, pevne uchopte vonkajšiu časť lišty, potiahnite ju k sebe, aby ste vytiahli podperu a dva vnútorné kolíky z otvorov.
- Ak ich chcete zasa nasadit, priložte ich k priestoru rúry a najprv zasuňte oba kolíky do otvorov. Potom umiestnite vonkajšiu časť k otvoru, zasuňte podperu a pevne zatlačte k stene priestoru rúry tak, aby bola vodiaca lišta pevne osadená.
PRVÉ POUŽITIE
1. NASTAVENIE ČASU
natural_image
Line drawing of a person pouring liquid into a microwave oven (no text or symbols)natural_image
Pure electrical circuit lines without any symbols
6
1. IZBIRNI GUMB
natural_image
Illustration of a hand holding a tool with an arrow indicating rotation (no text or symbols present)
natural_image
Hand holding a small mechanical component with an arrow indicating direction (no text or symbols present)DEMONTAŽA DRSNIH VODIL [c]
ODSTRANJEVANJE IN PONOVNO VSTAVLJANJE VODIL ZA PEKAČE
- Če želite odstraniti vodila za pekače, čvrsto primite zunanji del vodila in ga potegnite proti sebi, tako da iz lukenj izvlečete nosilec in dva notranja zatiča.
- Če želite vodila za pekače ponovno vstaviti, jih postavite blizu vdolbine in najprej v ustrezni luknji vstavite dva zatiča. Nato blizu ustrezne luknje postavite zunanji del, vstavite nosilec in močno pritisnite proti steni vdolbine tako, da se prepričate, da je vodilo pravilno pritrjeno.
PRVA UPORABA
1. NASTAVITEV ČASA
Ko aparat prvič vklopite, morate nastaviti čas: Pritisnite , dokler ne začnejo utripati simbol 📂 stevki za ure na zaslonu.
natural_image
Line drawing of a microwave oven with a hand pouring liquid into the pan (no text or symbols)Samo ko je pečica hladna, napolnite nišo s količino pitne vode, ki je navedena v ustrezni preglednici za pripravo jedi. Živila položite v pečico.
natural_image
Pure electrical circuit lines without any symbols
6
1. РУЧКА ВИБОРУ
natural_image
Hand holding a tool with an arrow indicating rotation (no text or symbols present)-

natural_image
Illustration of a hand adjusting a mechanical component with an arrow indicating direction (no text or symbols present)ЗНЯТТЯ ТЕЛЕСКОПИЧНИХ НАПРЯМНИХ [с]
![[c] [d] ① ②](/content/2026/05/854357/images/0ac2bdb80e5dce3c94f43e027aa7949902f66c61c174e7ca87fb514bdcdaf6f5.jpg)
natural_image
Line drawing of a hand pouring liquid into a microwave oven (no text or symbols)natural_image
Pure electrical circuit lines without any symbols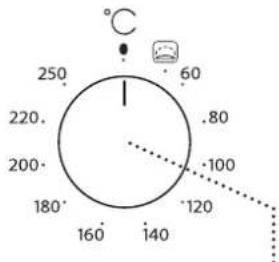
6
1. 369305 2007305
g g b j o n l s h z o o g y d m o l h u s m o s s o. d s o m o s m o 0 3 m o n s o g y y d m o l z d m u s m o s s o.
2. δυσημός
###
3. மெயு தூரே
natural_image
Illustration of a hand holding a small object with an arrow indicating direction (no text or symbols present)
natural_image
Close-up of a hand adjusting a metal bracket with an arrow indicating direction (no text or symbols)![① ② [c] [d]](/content/2026/05/854357/images/c33cae340512ac83501927919e771bc4e20900da6d0e976dd33331920abfed6c.jpg)
gān bān gān gān gān gān gān gān gān gān gān gān gān gān gān gān gān gān gān gān gān gān gān gān gān gān gān gān gān gān gān gān gān gān gān gūng yu gu gu gu gu gu gu gu gu gu gu gu gu gu gu gu gu gu gu gu gu gu gu gu gu gu gu gu gu gu gu gu gu gu gu gu gu gu gu gu gu gu gu gu gu gu gu gu gu gu gu gu gu gu gu gu gu gu gu gu gu gu gu gu gu gu gu gu gu gu gu gu gu gu gu gu gu gu gu gu gu gu gu gu gu gu gu gu gu gu gu gu gu gu gu gu gu gu gu gu gu Gu
gān mān gān gān gān gān gān
natural_image
Line drawing of a hand pouring liquid into a microwave oven (no text or symbols)4. 36m36s0n0g0y0n0 y6m0s
_1f_3g_5 _6g_0 _6h_0m_0 _7g_5f_0 , _0n_0 _0d_0m_0 3 m_3g_5d_0m_0g_0d_0m_0 g_0m_0u _5g_5y_0g_0 .
65636dmo3m0s
a b c d e f g h i j o o o o o o o o o o o o o o o 00:00"
_un _un _un _un _un _un _un _un _un _un _un _un _un _0 _0 _0 _0 _0 _0 _0 _0 _0 _0 _0 _0 _0 _0 _0 _0 _0 _0 _0 _0 _0
Assayangng on agybjos ongdmuyou momszou lusuny30m yd3gnsyynou bodymby dmmosmydoon: agybjos osmihjds ydyzhyomso dbsdoy, lubid ou sghmdymsq sthsamzjds qnmol ygmomou smyymzou ydqgy, mndgmaq gzmzmonno nym dmhtsgdou cosuynmgdunozou nf36b1 dong gablsyq3nym qmdao.
gōnǎmzōn gānānzhāmnlǚjīnǎmōn: 3āmśādʒǔfēn lù gālsuŋfādʒāmāsō, gādmhāngqōn mṛṇḍāgām sūsṃhāgāo māmshzōl dāmṣṭmāsāmgādōm o 3mānǎgānsbī.
| 36m05m05s | 36m05m05m05m05m05m05m05m05m05m05m05m05m05m05m05m05m05m05m05m05m05m05m05m05m05m05m05m05m05m05m05m05m05m05 | 36m05m05m05m05m05m05m05m05m05m05m05m05m05m05m05m05m05m05m05m05m05m05m05m05m05m05m05m05m05m05m05m05 |
| 36m05m05m05m05m05m05m05m05m05m05m05m05m05m05m05m05m05m05m05m05m05m05m05m05m05m05m05m05m05m05m05m05 | 36s05m05m05m05m05m05m05m05m05m05m05m05m05m05m05m05m05m05m05m05m05m05m05m05m05m05m05m05m05m05m05m05m05m 36s05m05m05m05m05m05m05m05m05m05m05m05m05m05m05m05m05m05m05m05m05m05m05m05m05m05m05m05m05m05m05m05m 36h05m05m05m05m05m05m05m05m05m05m05m05m05m05m05m05m05m05m05m05m05m05m05m05m05m05m05m05m05m05m05m05m05m16h05m05m05m05m05m05m05m05m05m05m05m05m05m05m05m05m05m05m05m05m05m05m05m05m05m05m05m05m05m05m05m05m07h05m05m05m05m05m05m05m05m05m05m05m05m05m05m05m05m05m05m05m05m05m05m05m05m05m05m05m05m05m05m05m05m05 | 42s05m05m05m05m05m05m05m05m05m05m05m05m05m05m05m05m05m05m05m05m05m05m05m05m05m05m05m05m05m05m05m05m05 m05m05m05m05m05m05m05m05m05m05m05m05m05m05m05m05m05m05m05m05m05m05m05m05m05m05m05m05m05m05m05m05m05m |
| 36s05m05m05m05m05m05m05m05m05m05m05m05m05m05m05m05m05m05m05m05m05m05m05m05m05m05m05m05m05m05m05m05 | 36s15m05m05m05m05m05m05m05m05m05m05m05m05m05m05m05m05m05m05m05m05m05m05m05m05m05m05m05m05m05m05m05m05m08h05m05m05m05m05m05m05m05m05m05m05m05m05m05m05m05m05m05m05m05m05m05m05m05m05m05m05m05m05m05m05m05m05 |

hsdmdq306m0 gsdmyq6p8ou ous dm3mou lunymn u5bgmddm3s6pmm docs.whirlpool.eu omj396o 36mmpyf8ou dglusbd dgho obgzmdsybnou3nou

3mnmgngzou, Uggbgsnghywn gmmgydgbggnolus gss gssdsgjdnnn obgmndsgnou dnuagdsgh3g6u 3mnmgngj6g: