
KND247W - Refrigerator Kluge - Free user manual and instructions
Find the device manual for free KND247W Kluge in PDF.


| Product Type | Freestanding Fridge |
| Brand | Kluge |
| Model | KND247W |
| Dimensions (H x W x D) | 1800 x 600 x 650 mm |
| Weight | 65 kg |
| Energy Class | E |
| Power Supply Voltage | 220-240 V / 50 Hz |
| Power Consumption | 120 W |
| Climate Class | N-ST |
| Noise Level | 42 dB(A) |
| Refrigerant Type | R600a (Isobutane) |
| Net Capacity (Fridge) | 247 L |
| Temperature Range | 0°C to 8°C |
| Adjustable Thermostat | Yes |
| Interior Light | Yes (LED) |
| Door Reversibility | Yes (reversible) |
| Shelves Material | Tempered glass |
| Number of Shelves | 4 |
| Vegetable Drawer | Yes |
| Door Storage | Yes (3 compartments) |
| Cleaning Advice | Wipe with soft damp cloth; avoid abrasive cleaners |
| Safety Note | Keep ventilation clear; do not cover |
| Spare Parts Availability | Contact Kluge support |
Frequently Asked Questions - KND247W Kluge
User questions about KND247W Kluge
0 question about this device. Answer the ones you know or ask your own.
Ask a new question about this device
Download the instructions for your Refrigerator in PDF format for free! Find your manual KND247W - Kluge and take your electronic device back in hand. On this page are published all the documents necessary for the use of your device. KND247W by Kluge.
USER MANUAL KND247W Kluge
natural_image
Simple geometric diagram with two vertical lines, no text or symbols presentKND247W
KND247W
natural_image
Technical line drawing showing a mechanical assembly before and after modification (no text or symbols)natural_image
Technical line drawing of a mechanical clamp or bracket assembly (no text or symbols)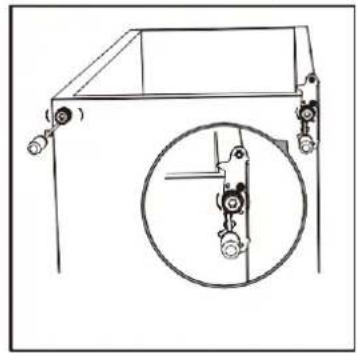
natural_image
Technical line drawing of a mechanical device with a circular inset showing internal components (no text or symbols)natural_image
Technical line drawing of a mechanical lifting device with a magnified inset showing internal components (no text or symbols)natural_image
Technical line drawing of a mechanical clamp or bracket assembly (no text or symbols)natural_image
Line drawing of a device with a base and a switch, showing no text or symbols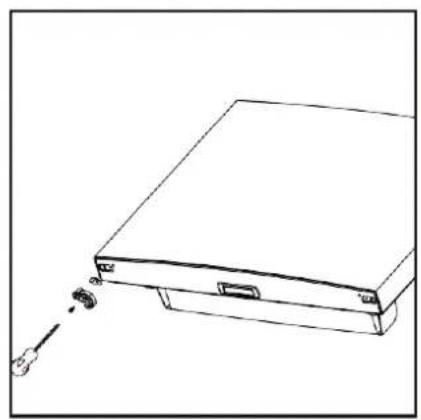
natural_image
Line drawing of a device with a cable inserted into a box (no text or symbols)natural_image
Simple line drawing of a mechanical bracket with a small protrusion, no text or symbols presentnatural_image
Simple line drawing of a mechanical clamp or bracket (no text or symbols)natural_image
3D diagram of a rectangular box with an upward arrow and 100mm dimension label, inside a transparent cube (no text or symbols beyond measurement)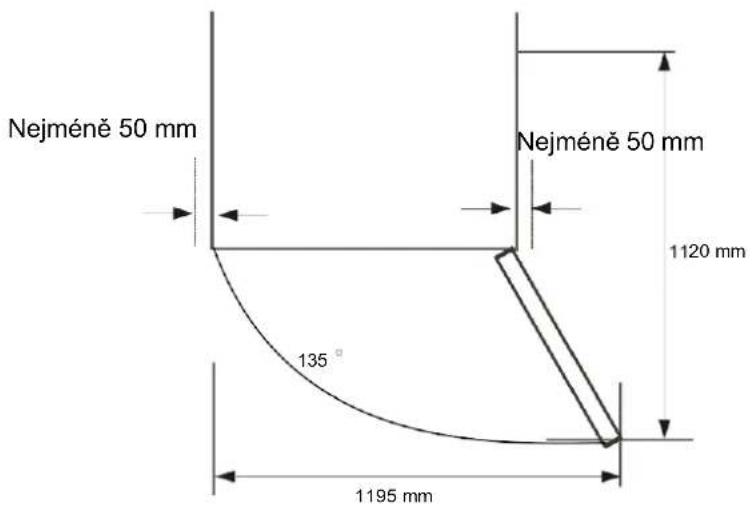
natural_image
Line drawing of a hand holding a shelf with a plastic sheet, no text or symbols presentnatural_image
Simple line drawing of a container with two upward-pointing arrows inside (no text or symbols)natural_image
Cartoon illustration of two anthropomorphic blocks with arms and legs, one showing a 45° angle and the other holding objects (no text or symbols)natural_image
Cartoon illustration of three anthropomorphic blocks with expressive faces and expressive gestures, set against a bright sun and water background (no text or symbols)Mrazák
natural_image
Illustration of two cartoon cubes with smiling faces, connected by a hand holding a pencil and a small square, next to a separate diagram showing the same cube's drawing style.natural_image
Cartoon illustration of a sad, anthropomorphic character with arms and legs, standing inside a rectangular box (no text or symbols)NEJCHLADNĚJŠÍ ČÁST CHLADNIČKY

INSTALACE INDIKÁTORU TEPLOTY
KND247W - URL: https://eprel.ec.europa.eu
natural_image
Symbol of a trash bin crossed with no visible text or labelsflowchart
graph LR
    A["LED"] --> B["Worker Icon"]
    B --> C["LED"]
natural_image
Technical line drawing showing a mechanical assembly before and after modification, with no visible text or symbols.natural_image
Technical line drawing of a mechanical clamp or bracket assembly (no text or symbols)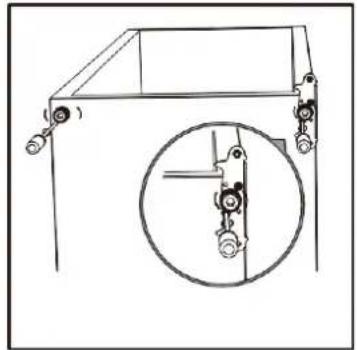
natural_image
Technical line drawing of a mechanical device with a circular inset showing internal components (no text or symbols)natural_image
Technical line drawing of a mechanical lifting device with a magnified inset showing internal components (no text or symbols)natural_image
Technical line drawing of a mechanical clamp or bracket assembly (no text or symbols)natural_image
Line drawing of a device with a handle and attached cable, showing no text or symbols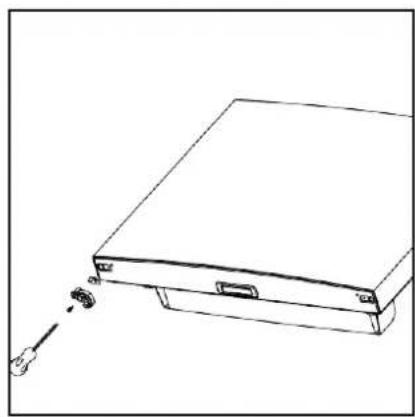
natural_image
Line drawing of a device with a cable inserted into a base, showing no text or symbolsnatural_image
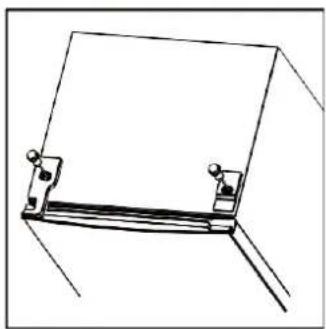
Simple line drawing of a person climbing a ladder with a monitor on the wall (no text or symbols)- Vyberte l'avý kryt z vrecka s príslušenstvom a nainštalujte ho na horný záves. Potom nainštalujte kryt otvoru na pravej strane.
natural_image
Simple line drawing of a mechanical clamp or bracket with two metal fasteners (no text or symbols)natural_image
3D diagram of a rectangular box with an upward arrow and a 100mm dimension label, inside a transparent cube (no text or symbols on the box itself)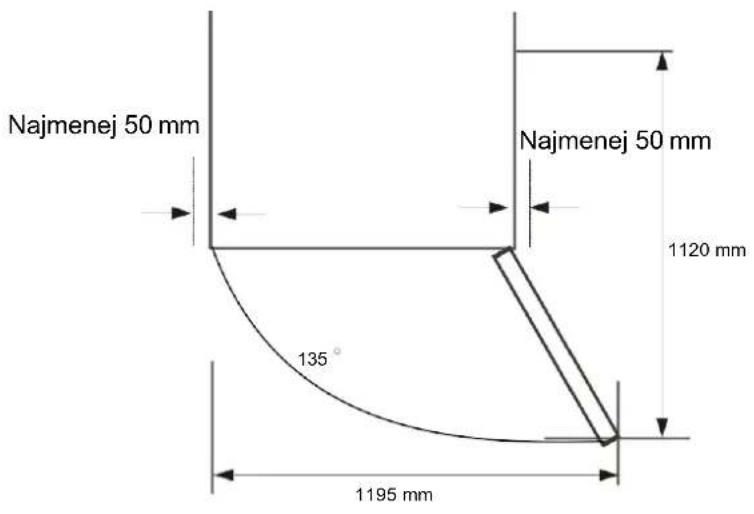
Vyrovnanie chladničky
natural_image
Simple line drawing of a vertical container with a black checkmark inside (no text or symbols)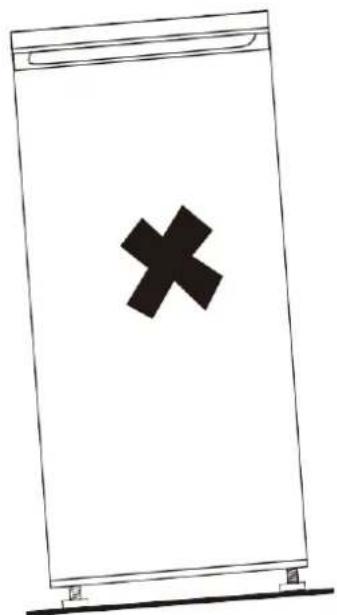
natural_image
Simple line drawing of a rectangular device with a black 'X' symbol on its surface (no text or labels)natural_image
Line drawing of a hand holding a shelf with a tool, no text or symbols presentnatural_image
Simple line drawing of a container with two upward-pointing arrows inside (no text or symbols)natural_image
Cartoon illustration of two anthropomorphic blocks with arms and legs, one showing a 45° angle and the other holding a bag (no text or symbols)natural_image
Cartoon illustration of two anthropomorphic blocks with angry faces and expressive gestures, set against a sun and landscape (no text or symbols)Mraznička
natural_image
Illustration of two cartoon cubes with smiling faces, connected by lines to a small square and a pencil (no text or symbols)natural_image
Cartoon illustration of a sad, anthropomorphic character with arms and legs, holding a book (no text or symbols present)NAJCHLADNEJŠÍ ČASŤ CHLADNIČKY

INŠTALÁCIA INDIKÁTORA TEPLOTY
KONTROLA TEPLOTY V NAJCHLADNEJŠÍ OBLASTI
KND247W - URL: https://eprel.ec.europa.eu
natural_image
Symbol of a trash bin with crossed lines indicating no waste or restriction, plus a solid black rectangle below (no text or symbols)flowchart
graph LR
    A["LED"] --> B["Worker Icon"]
    B --> C["LED"]
natural_image
Technical line drawing showing a mechanical assembly before and after modification, with no visible text or symbols.natural_image
Line drawing of a mechanical lever assembly with a handle and pivot (no text or symbols)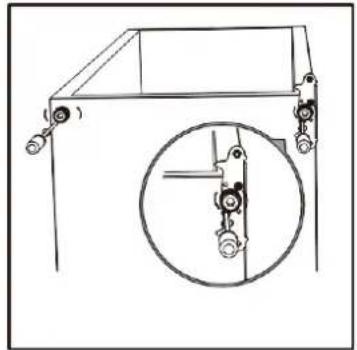
natural_image
Technical line drawing of a mechanical device with a circular inset showing internal components (no text or symbols)natural_image
Technical line drawing of a mechanical lifting device with a magnified inset showing internal components (no text or symbols)natural_image
Technical line drawing of a mechanical clamp or bracket assembly (no text or symbols)natural_image
Line drawing of a device with a handle and attached cable, showing no text or symbols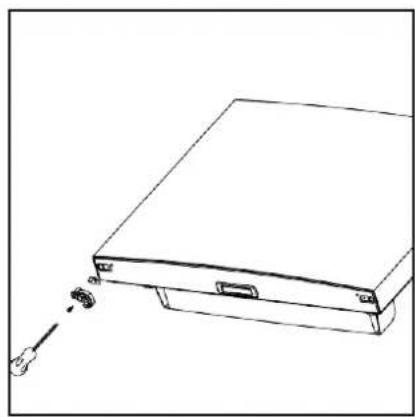
natural_image
Line drawing of a device with a cable inserted into a base, showing no text or symbolsnatural_image
Simple line drawing of a person climbing a ladder with a monitor on the wall (no text or symbols)natural_image
Simple line drawing of a mechanical clamp or bracket with two metal fasteners (no text or symbols)natural_image
3D diagram of a rectangular box with an upward arrow and 100mm dimension label, inside a transparent cube (no text or symbols on the box itself)Co najmniej 50 mm
natural_image
Simple line drawing of a vertical container with a black checkmark symbol on the side (no text or labels)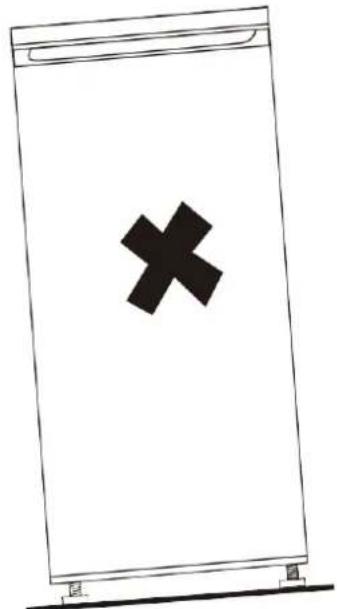
natural_image
Simple line drawing of a rectangular device with a black 'X' symbol on its side (no text or labels)natural_image
Line drawing of a hand holding a shelf with a wooden board (no text or symbols)natural_image
Simple line drawing of a container with two upward-pointing arrows inside, no text or symbols present.natural_image
Cartoon illustration of two anthropomorphic blocks with expressive faces, one holding a 45° angle and the other looking distressed (no text or symbols)natural_image
Cartoon illustration of two anthropomorphic blocks with expressive faces and dynamic poses, one standing on a surface with a sun in the background (no text or symbols)Zamrażarka
natural_image
Cartoon illustration of a sad, anthropomorphic character with arms and legs, standing in front of a rectangular block (no text or symbols)NAJZIMNIEJSZA CZĘŚĆ LODÓWKI

KND247W - URL: https://eprel.ec.europa.eu
natural_image
Symbol of a trash bin with crossed lines indicating no waste or restriction, plus a solid black rectangle below (no text or symbols)flowchart
graph LR
    A["LED"] --> B["Worker Icon"]
    B --> C["LED"]
    style A fill:#fff,stroke:#000
    style C fill:#fff,stroke:#000
Please read the following instructions carefully before using this device. Please keep these instructions for future reference.
SAFETY INSTRUCTION
Read all instructions before using the appliance. Read this manual carefully before using the appliance so that you know exactly what to do and what not to do. Improper use of the appliance can be dangerous, especially for children.
This device is intended for use in domestic applications.
This appliance may be used by children of at least 8 years of age and by persons with reduced physical, sensory or mental capabilities or lacking experience or knowledge, if they are properly supervised or if they have been given instructions on the safe use of the appliance and are aware of the risks involved.
Children must not play with the appliance. Cleaning and maintenance by the user must not be carried out by unsupervised children.
Children should be supervised to ensure that they do not play with the device.
CAUTION: Keep ventilation openings in the appliance enclosure or flush-mounted structure clear.
CAUTION: Do not use mechanical devices or other means to accelerate the defrosting process other than those recommended by the manufacturer.
CAUTION: Do not damage the refrigeration system.
CAUTION: Do not use electrical appliances inside the food storage compartment unless they are of the type recommended by the manufacturer.
If the power cable is damaged, it must be replaced by the manufacturer, its service department or similarly qualified persons to avoid a hazard.
Do not store explosive substances such as aerosols containing flammable propellants in this device.
- Before disposing of your appliance: remove the door and leave the shelves in place so that children cannot easily play inside.
- Never allow children to operate or play with the appliance.
- Never clean parts of the appliance with flammable fluids. The fumes are a fire hazard or may cause explosions.
- Do not store or use gasoline or other flammable gases or liquids in or near this appliance. Fumes may cause a fire or explosion.
- Do not install this device in a place with extreme weather conditions such as: insufficient ventilation, temperatures below 16°C or above 43°C
This product complies with current European safety standards for electrical appliances. It has been subjected to extensive testing and meticulous trials to assess its safety and reliability.
Before connecting the appliance, check that the data on the rating plate corresponds to that of your installation.
The packaging materials can be recycled, do not leave them in the environment, take them to a specialised centre for recycling. The electrical safety of this appliance is ensured only when it is connected to an electrical system equipped with an earth connection in good condition, according to the current standard. In case of doubt, contact
carefully check the installation by a qualified technician. The use of this appliance, as with any electrical appliance, requires that certain basic rules be observed:
- Do not touch the unit with wet or damp hands or feet;
- Do not pull on the power cord to remove the plug from the socket;
- Do not leave the unit exposed to the weather;
- Do not allow the appliance to be used by unsupervised children;
- Do not unplug or plug the appliance into the socket with wet hands; before carrying out any cleaning or maintenance operation, disconnect the appliance from the power supply by pulling out the plug or turning off the main switch of the system; the socket must remain accessible after the appliance has been installed.
- In the event of a breakdown or malfunction, switch off the appliance and do not damage it. The power supply socket must always remain accessible after installation of the appliance.
- Do not install this unit in a location subject to extreme weather conditions such as: insufficient ventilation, temperatures below 16°C or above 43°C.
WARNING: When positioning the unit, make sure that the power cord is not pinched or damaged.
WARNING: Do not place portable power strips or power outlets on the back of the unit.
Children aged 3 to 8 years are allowed to load and unload refrigeration appliances.
To avoid contamination of food, please observe the following instructions:
- Prolonged opening of the door can lead to a significant increase in temperature in the appliance's compartments.
- Regularly clean surfaces that may come into contact with food and accessible drainage systems.
- Store raw meat and fish in appropriate containers in the refrigerator so that they do not come into contact with or drip onto other foods.
- The two-star frozen food compartments are suitable for storing frozen food, storing or making ice and for making ice cubes.
- The one, two and three star compartments are not suitable for freezing fresh food.
- If the refrigeration appliance is left empty for long periods of time, turn it off, defrost, clean, dry and leave the door open to prevent mould growth in the appliance.
Place the unit against a wall with a clearance of not more than 75 mm and not less than 50 mm.
This refrigeration appliance is not intended for use as a built-in appliance.
Recommended storage times for frozen foods in the freezer. These times vary depending on the type of food. The food you freeze can be stored from 1 to 12 months (minimum at -18°C).
| Grocery Duration of storage | |
| Bacon, stew, milk 1 month | |
| Bread, ice cream, sausages, pies, prepared shellfish, fatty fish | 2 months |
| Lean fish, shellfish, pizza, cookies and muffins | 3 months |
| Ham, pies, biscuits, beef and lamb chops, poultry pieces | 4 months |
| Butter, vegetables (blanched), whole eggs and yolks, boiled crayfish, minced meat (raw), pork (raw) | 6 months |
| Fruit (dry or in syrup), egg whites, beef (raw), whole chicken, lamb (raw), fruit pies | 12 months |
When freezing fresh food with an 'expiry/use-by/use-by' date, you must freeze it before that date expires.
Check that the food has not already been frozen. Frozen food that has thawed completely should not be refrozen.
Once thawed, food should be eaten quickly.
- To avoid food spoilage due to germ transfer: Store unpackaged animal and vegetable products separately in the drawers.
This also applies to the different kinds of meat.
- If the food is to be stored together by lack of space: wrap them up.
- Never store fruit and vegetables on a shelf. balcony with meat or fish.
| Grocery Duration of storage | |
| Butter | 90 days |
| Hard cheese 110 days | |
| Milk | 7 days |
| Sausage, cold cuts | 9 days |
| Meat | 7 days |
Refrigerant
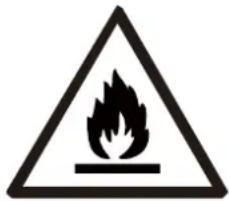
Danger; fire hazard/flammable materials
Danger; fire hazard / flammable materials
- WARNING: When positioning the unit, make sure that the power cord is not pinched or damaged.
- WARNING: Do not place portable power strips or power outlets on the back of the unit.
The refrigerant gas contained in the circuit of this appliance is isobutane (R 600a), a low-polluting but flammable gas.
When transporting and installing
the appliance, take care not to damage any part of the refrigeration system
Do not use sharp or pointed tools to defrost the appliance.
Do not use any electrical appliances inside the appliance.

Suitable for food
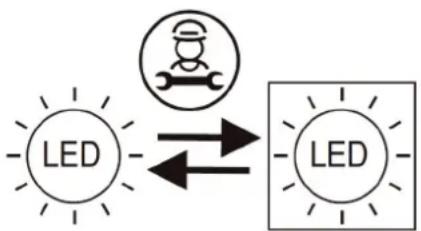
Only an authorised technician can change the LED in the event of a fault.
INSTRUCTIONS FOR USE
IDENTIFICATION OF THE DEVICE
Each appliance has a sign plate in the refrigerator on the side adjacent to the fruit and vegetable box.
FEATURES
The most important feature of this device is:
Automatic defrosting of the refrigerator cell. The defrosting water is conveyed to a tank placed on the compressor from where it evaporates with the heat generated during the refrigeration process.
ATTENTION!
When installing your refrigerator, it is important to take into account the climate class of the product. To find out which climate class your refrigerator belongs to, please check the data plate as shown below: The refrigeration appliance operates correctly within the ambient temperature range indicated in the table, depending on the climate class.
| Class | Symbol | Average ambient temperature °C |
| Subnormal | SN | from +10 to +32 |
| Normal N from | +16 to +32 | |
| Subtropical | ST | from +16 to +38 |
| Tropical T from | +16 to +43 |
ELECTRICAL CONNECTION
Check that the voltage values of the electrical network can withstand those indicated on the nameplate behind the crisper of the refrigerator.
If the socket outlet is not equipped with an earth connection, or if the plug is not suitable for your network, we recommend that you contact a specialist electrician.
Do not use detergents or drifters to avoid overheating and burning. If the appliance is not equipped with an electrical socket, it must be connected to the mains by means of a switch connected directly to the power supply terminals. This switch must guarantee a single-pole disconnection of the appliance with a contact separation of not less than 3 mm.
TECHNICAL ASSISTANCE
Before calling the After Sales Service, if the refrigerator is not working, check that the power plug is well inserted in the socket and that the thermostat is not in position "0"; if the refrigerator is noisy, check that it is levelled and that there are no objects in contact with the back wall; if the refrigerator is not efficient enough, check that the interior is not full, that the door closes and that the condenser is not full of dust.
If there is water in the lower part of the refrigerator (crisper and pull-out shelf), check that the hole for the defrost water outlet is not blocked.
Installation is the responsibility of the purchaser. Our company is not responsible for damages due to bad installation and declines any responsibility in case the ground connection does not comply with the National Standards in force.
At the end of the functional life of the appliance using the refrigerant gas R 600a (isobutane) and the flammable gas inside the insulating foam, the appliance must be made safe before being disposed of. For information on this operation, contact your trusted dealer or the local authority in charge.
CAUTION: Do not damage the refrigerant circuit.
Device description
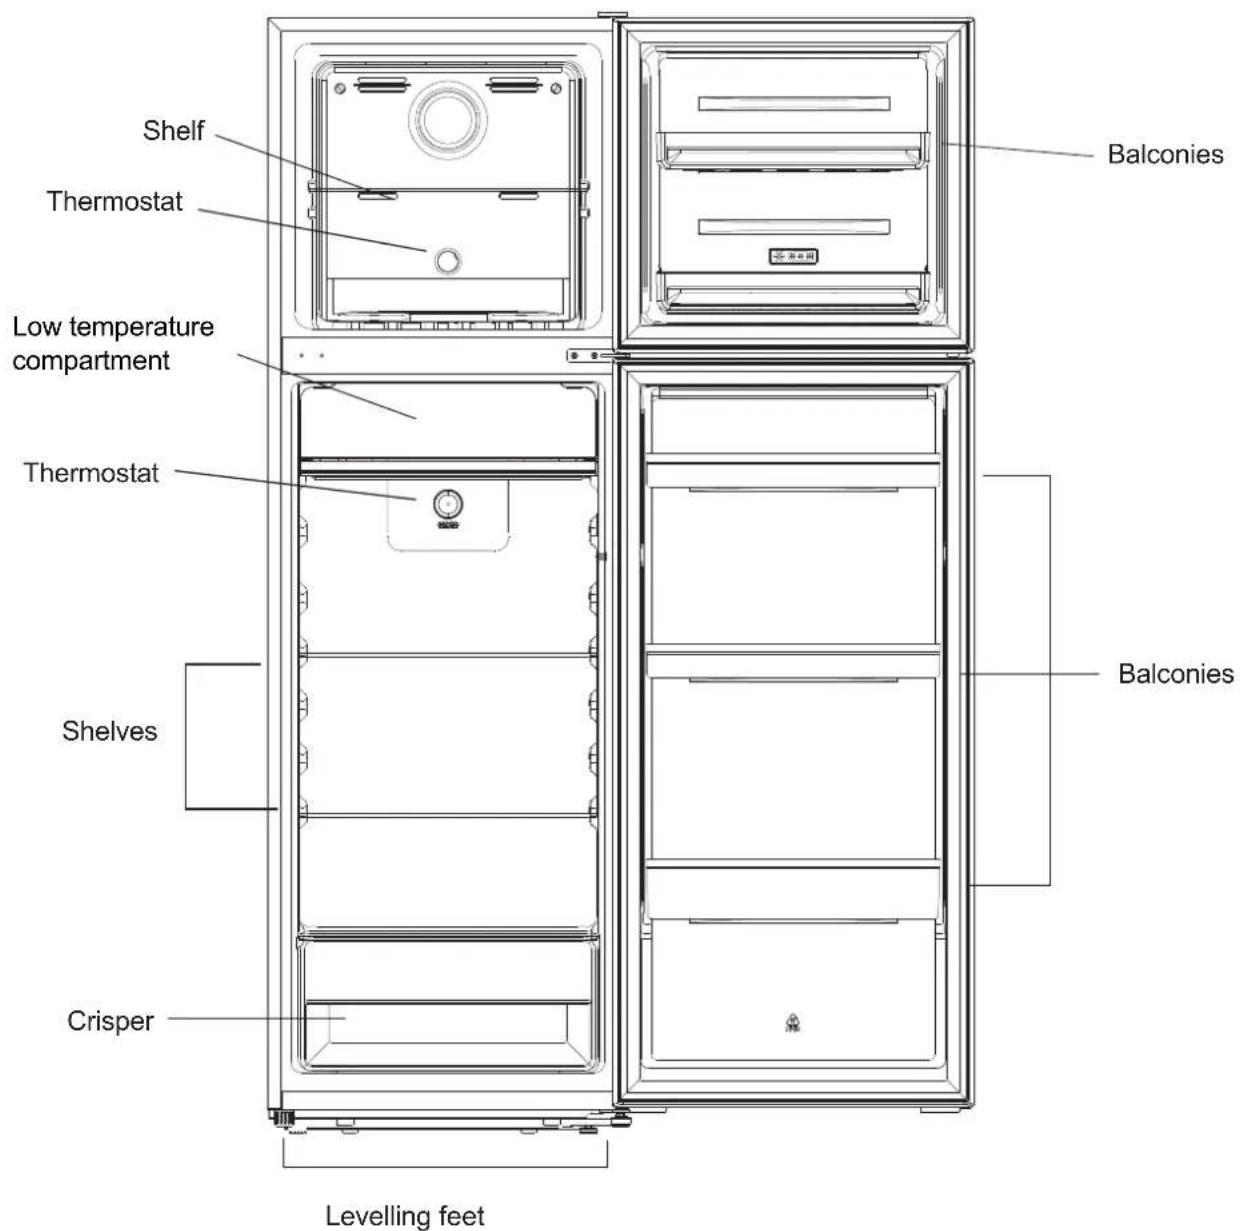
The design and number of shelves are indicative references and may be subject to change.
Need for space
- Select a location without direct sunlight;
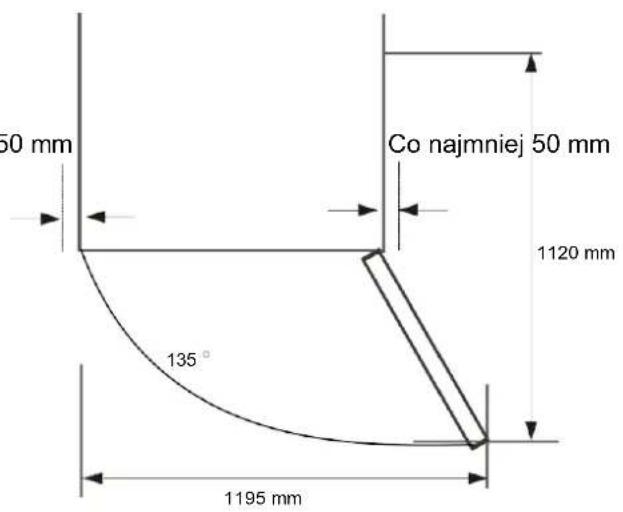
- Select a location with enough space for the refrigerator doors to open easily;
- Select a location with a level (or nearly level) floor;
- Leave enough space to install the refrigerator on a flat surface;
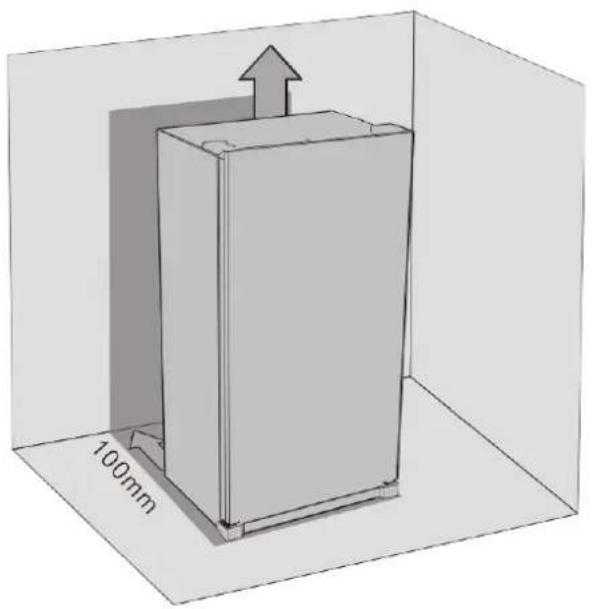
- Leave space on the right, left, back and top when installing. This will help reduce energy consumption and lower your energy bills.
- Keep a gap of at least 50 mm on both sides and at the back.
Positioning
Install this appliance in a location where the ambient temperature corresponds to the climate class indicated on the appliance's rating plate:
| Climate class | Ambient temperature |
| SN | ^+10 °C to ^+32 °C |
| N | ^+16 °C to ^+32 °C |
| ST | ^+16 °C to ^+38 °C |
| T | ^+16 °C to ^+43 °C |
Location
The appliance should be installed away from heat sources such as radiators, boilers, direct sunlight, etc. Make sure that air can circulate freely at the back of the cabinet. For best performance, if the unit is placed under an overhanging wall unit, the minimum distance between the top of the cabinet and the wall unit should be at least 100 mm. Ideally, however, the unit should not be placed under suspended elements. Accurate levelling is ensured by one or more adjustable feet at the base of the cabinet.
For refrigeration appliances with a climate class :
- Subnormal (SN): This refrigeration appliance is intended for use in ambient temperatures between 10^ C and 32^ C;
- Normal (N): This refrigeration appliance is intended for use in ambient temperatures between 16°C and 32°C;
- Subtropical (ST): This refrigeration appliance is intended for use in ambient temperatures between 16°C and 38°C;
- Tropical (T): This refrigeration appliance is intended for use at ambient temperatures between 16°C and 43°C;
Significance of freezer labelling\* :
- The 1- (*), 2- (**), and 3-star (*** ) freezers are not suitable for freezing fresh food.
- The 2-star ( ^ ) and 3-star ( ^* ) freezers are suitable for storing frozen (prefrozen) food and ice or for making ice and ice cubes.
| APPLIANCECOMPARTMENT | STARS(*) | STORAGE TEMPERATURE TARGET | SUITABLE FOODS |
| FREEZINGCOMPARTMENT | (***) * | ≤-18°C | Suitable for seafood (fish, shrimp, shellfish), freshwater and meat products.Recommended storage period: 3 monthsSuitable for freezing fresh food. |
| FREEZINGCOMPARTMENT | *** | ≤-18°C | Suitable for seafood (fish, shrimp, shellfish), freshwater and meat products.Recommended storage period: 3 monthsNot suitable for freezing fresh food. |
| FREEZINGCOMPARTMENT | ** | ≤-12°C | Suitable for seafood (fish, shrimp, shellfish), freshwater and meat products.Recommended storage period: 2 monthsNot suitable for freezing fresh food. |
| FREEZINGCOMPARTMENT | * | ≤-6°C | Suitable for seafood (fish, shrimp, shellfish), freshwater and meat products.Recommended storage period: 1 monthsNot suitable for freezing fresh food. |
| 0*-COMPARTMENT | - | -6°C - 0°C | Suitable for fresh meat products (pork, beef, chicken, etc.) and processed foods consumed or processed on the same day or within three days of storage (max.).Not suitable for freezing food or storing frozen food. |
Warning! It must be possible to disconnect the appliance from the mains; the plug must therefore be easily accessible after installation.
Electrical connection
Before connecting the appliance, make sure that the voltage and frequency of the power supply of your home network comply with the specifications indicated on the rating plate attached to the refrigerator. The appliance must be connected to an earthed socket. The power cable plug has a pin designed for this purpose. If the electrical outlet used is not earthed, connect the appliance to a separate earthing system in accordance with the regulations. Contact an electrician to do this.
The manufacturer declines all responsibility if the above safety precautions are not applied.
The appliance complies with the CE directives.
Reversing the door
Before reversing the door, please prepare the following tools and materials: flathead screwdriver, Phillips screwdriver, spanner and the components contained in the plastic bag:
Left Hinge x 1
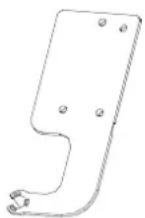
Middle left hook x 2
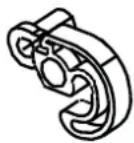
Left Hinge Cover x 1
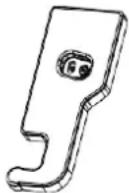
Metal wedge for left middle hook x 2

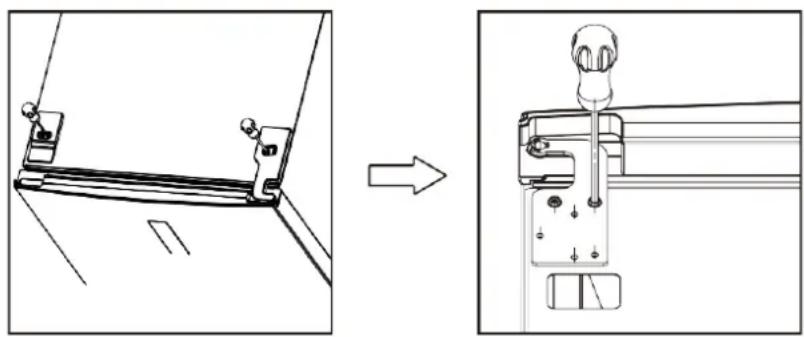
- Close the top door, remove the screws from the top hinge covers using the Phillips screwdriver.
I. Remove the hinge cover, unplug the terminal and then unscrew the top hinge and remove the top door.
natural_image
Technical line drawing showing a mechanical assembly before and after modification (no text or symbols)- Unscrew the centre hinge with a Phillips screwdriver and remove the bottom door.
natural_image
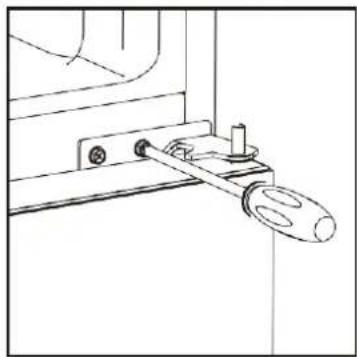
Technical line drawing of a mechanical clamp or lever assembly (no text or symbols)- Lay the refrigerator down, remove the adjustment feet as below, then unscrew the bottom hinge with a Phillips screwdriver.
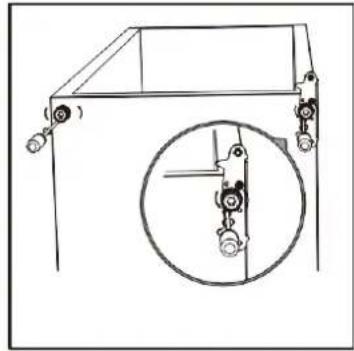
natural_image
Technical line drawing of a mechanical device with a circular inset showing internal components (no text or symbols)- Unscrew and remove the lower hinge pin, turn the bracket over and replace it.
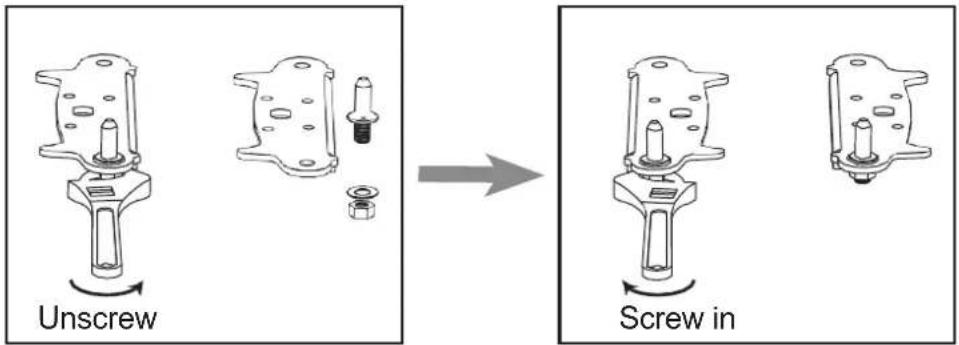
- Replace the clip holding the bottom hinge pin. Replace the two levelling feet. Return the door to the correct position.
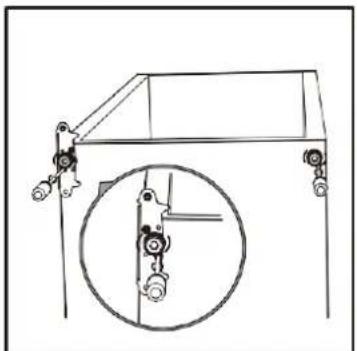
natural_image
Technical line drawing of a mechanical lifting device with a magnified inset showing internal components (no text or symbols)- Reverse the direction of the centre hinge by 180^ , then transfer it to the left property position. Place the centre hinge pin in the upper hole of the lower door and tighten the screws.
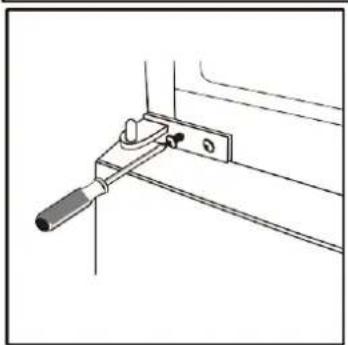
natural_image
Technical line drawing of a mechanical clamp or bracket assembly (no text or symbols)- Unscrew the right middle hook and metal shim from the bottom and top doors. Install the left middle hook and metal shim on the left side of the bottom and top doors. (Repeat on the bottom door.)
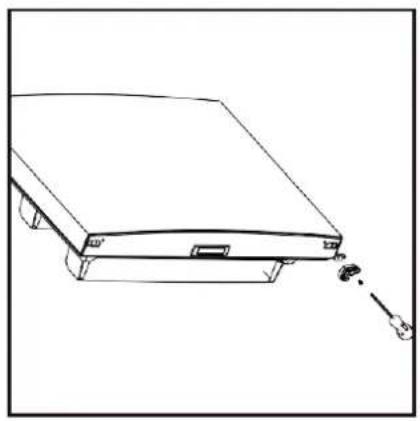
natural_image
Line drawing of a flat electronic device with a small component and a separate connector (no text or symbols)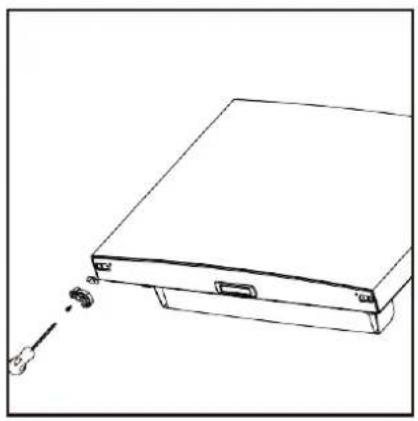
natural_image
Line drawing of a device with a screw and connector, no text or symbols present- Install the top door, attach the top door hinge to the cabinet.
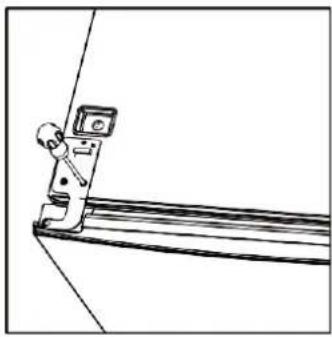
natural_image
Simple line drawing of a person climbing a ladder with a monitor on the wall (no text or symbols)- Take the left hinged cover from the accessory bag and install it with the top hinge. Then install the hole cover on the right side.
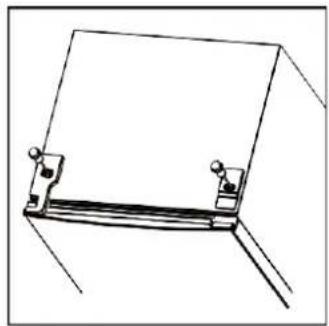
natural_image
Simple line drawing of a mechanical clamp or bracket (no text or symbols)Requirements of the installation site
- Choose a place sheltered from direct sunlight;
- Choose a place with enough space so as not to obstruct the opening of the doors;
- Choose a place with a level floor;
- Make sure you have enough room to install the refrigerator on a flat surface;
- Make sure you leave space on the right, left, back and top of the fridge when installing. This will help reduce energy consumption and your electricity bill.
natural_image
3D diagram of a rectangular box with an upward arrow and 100mm dimension label, inside a transparent cube (no text or symbols beyond measurement)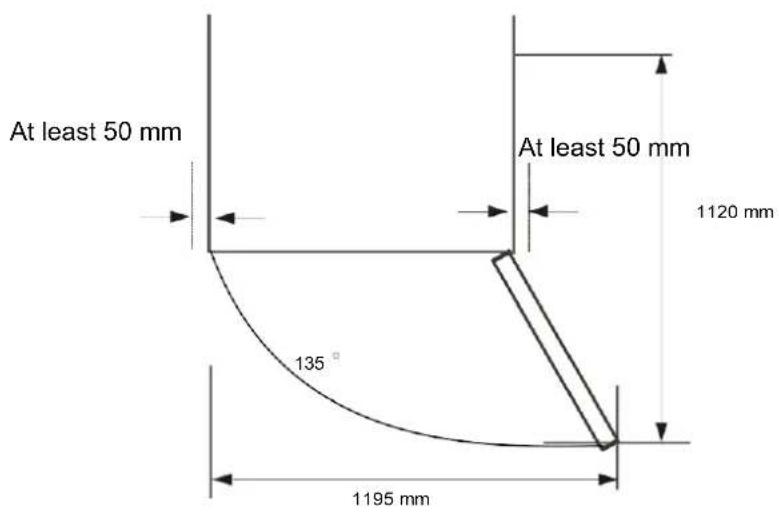
Levelling the refrigerator
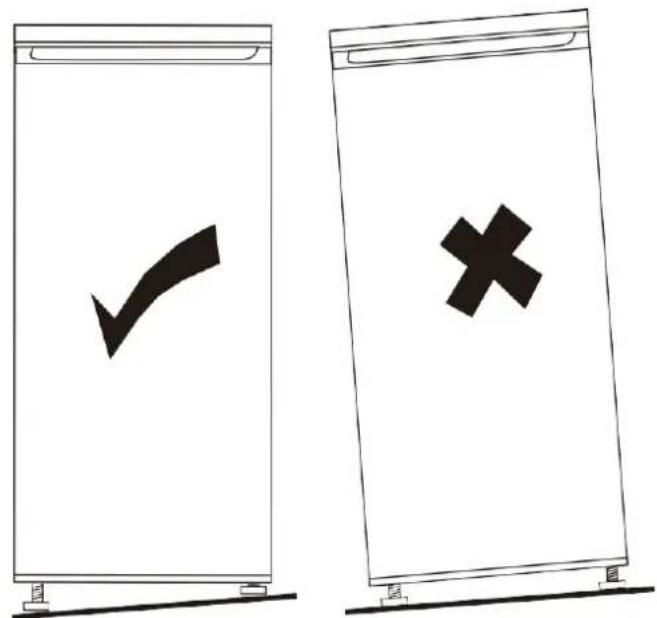
To do this, adjust the two levelling feet on the front of the unit.
If the unit is not level, the doors and closing magnets will not be correctly aligned.
Using the control panel
Freezer compartment temperature control
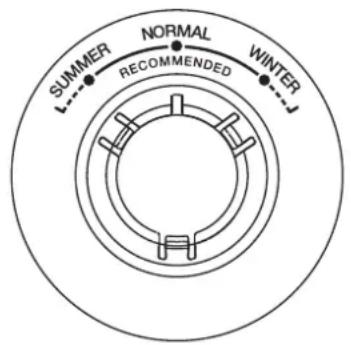
Plug in your appliance. The internal temperature is controlled by a sensor. There are 3 settings SUMMER, NORMAL and WINTER. SUMMER is the highest temperature and WINTER is the lowest.
The appliance may not be able to operate at the correct temperature if it is installed in a particularly hot location or if you open the door frequently.
Setting the temperature in the refrigerator compartment
Plug on your appliance. The internal temperature is controlled by a sensor. There are 8 settings: 0,1,2,3,4,5,6,7. 1 is the warmest setting and 7 is the coldest, 0 is off.
The appliance may not operate at the correct temperature if it is in a particularly hot place or if you open the door frequently.
Neither the refrigerator nor the freezer operates when the setting is OFF.
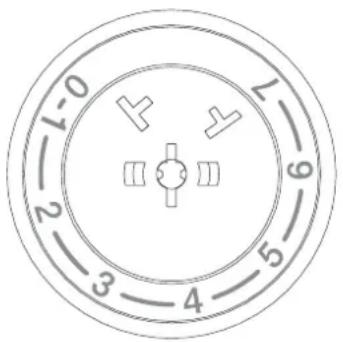
Adjusting the humidity of the crisper:
Low humidity: slide the knob to the left
High humidity: slide the knob to the right
Fruit Vegetables
<< LOW
Daily use
First use
Cleaning the inside of the compartment Before using the appliance for the first time, wash the interior and all interior accessories with warm water and neutral soap to remove the normal residual odours of a new product. Then dry thoroughly.
Important! Do not use detergents or scouring powders, as these products will damage the surface of the compartment.
Daily use
Place the different foods in the different compartments as described in the table below.
| Refrigerator compartments | Type of food |
| Refrigerator compartment door or shelves | Naturally preserved foods, such as jams, juices, drinks and condiments.Do not store perishable food. |
| Vegetable tray (salad tray) | Place fruit, herbs and vegetables separately in the crisper.Do not store bananas, onions, fruit or vegetables.potatoes or garlic in the refrigerator. |
| Refrigerator shelf - bottom low temperature section (compartment/bin) | Raw meat, poultry and fish (short-term storage) |
| Refrigerator shelf - middle | Dairy products, eggs |
| Refrigerator shelf - top | Foods that do not need to be cooked, such as ready meals, cold cuts or leftovers. |
| Freezer bin(s)/rack | Food that keeps for a long time.Bottom tray/rack for raw meat, fish, meat productspoultry and fish.Middle bin/rack for vegetables and fruit frozen Chips.Top bin/rack for ice, fruit or frozen baked foods. |
Accessories
Removable shelves
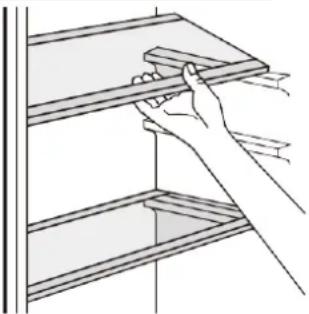
The walls of the refrigerator are equipped with several rails that allow you to position the shelves as you wish.
natural_image
Line drawing of a hand using a tool to clean or store shelves (no text or symbols)Installation of door trays
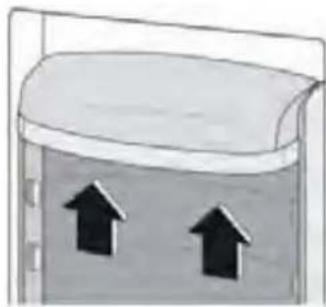
To store different sizes of packaged food, you can position the shelves at different heights. To make these adjustments, pull a rack in the direction of the arrows until it releases, then reposition it as desired.
natural_image
Simple line drawing of a container with two upward-pointing arrows inside, no text or symbols present.Freezing fresh food
- The freezer compartment is suitable for freezing fresh food and storing frozen or deep-frozen food for long periods.
- Place the fresh food you wish to freeze in the bottom compartment.
- The maximum amount of food that can be frozen in 24 hours is indicated on the type plate.
- The freezing process takes 24 hours: during this time, do not add extra food.
Storing frozen food
When using for the first time, or when the appliance has not been used for a long time, run the refrigerator for at least 2 hours on the maximum setting before putting food in it.
Important! In the event of accidental defrosting, e.g. if the power supply has been switched off for longer than the time indicated in the technical data as "Time for temperature rise", the food should be eaten as soon as possible or cooked and refrozen (after cooking). Defrosting
Frozen or deep-frozen food can be defrosted in the refrigerator compartment or at room temperature, depending on the time you have available.
Small pieces of food can be cooked even if they are still frozen, directly from the freezer. In this case, cooking may take longer.
Useful tips and tricks
Tips for freezing
To ensure the best results when freezing food, follow these important tips:
- The maximum quantity of food that can be frozen in 24 hours is indicated on the type plate;
- The freezing process takes 24 hours. Do not add extra food to be frozen during this time;
- Freeze only the best quality, fresh and thoroughly washed foodstuffs;
-
Prepare food in small portions to allow for quicker and more complete freezing, and to allow only the desired amount to be thawed later;
-
Wrap your food in aluminium or plastic food wrap and make sure that the wrapping is airtight;
- do not put unfrozen food in contact with already frozen food to avoid increasing the temperature of the frozen food;
- low-fat foods keep better and longer than high-fat foods salt reduces the shelf life of food;
- ice cubes, if consumed immediately after removal from the freezer compartment, can burn the skin;
- It is advisable to mark the freezing date on each package individually to allow removal from the compartment without risk of freezer burn;
- It is advisable to indicate the date of freezing on each package individually to keep track of the storage time.
Tips for storing frozen food
To ensure that you get the best performance from this device, you should :
Ensure that food purchased frozen in a shop has been properly stored by the shopkeeper; Make sure that the transport time of frozen food from the shop to your freezer is as short as possible;
Avoid opening the door frequently and do not leave it open longer than necessary. Do not refreeze food once it has been defrosted, as it will spoil quickly.
Do not exceed the shelf life indicated by the food producer.
Tips for chilling fresh food
To ensure the best performance:
- Do not store hot food or steamy liquids in the refrigerator
- Cover or wrap food, especially if it has a strong smell
Tips for refrigeration
Useful tips:
- Original (all types): wrap in plastic bags and place on the glass shelves above the crisper.
- To be safe, do not store food for more than 2 days.
- Cooked food, cold dishes, etc. These foods must be covered and can then be placed on any of the shelves.
- Fruit and vegetables: these should be washed thoroughly and placed on the appropriate shelf(s).
- Butter and cheese: these foods should be placed in special airtight containers or wrapped in aluminium or plastic bags to avoid contact with the air as much as possible.
- Milk bottles: these should be stored with their caps on and on the shelves in the door.
- Bananas, potatoes, onions and garlic: if they are not wrapped, do not put them in the refrigerator.
For hygienic reasons, the outer surface and the accessories inside the refrigerator should be cleaned regularly. Caution! The appliance must not be connected to the mains supply during cleaning, danger of electric shock! Before cleaning, switch off the appliance and remove the plug from the socket. You can also switch off or open the fuse. Never clean the appliance with a steam cleaning system. Moisture could accumulate in the electrical components, resulting in a risk of electric shock! Hot vapours can damage plastic parts. The appliance must be dry before it is put back into operation.
External cleaning
To keep your appliance looking good, you should clean it regularly.
- Wipe the digital panel and display panel with a soft, clean cloth.
- Spray water onto a cleaning cloth instead of spraying water directly onto the surface of the appliance. This will help to ensure that the moisture is evenly distributed over the surface.
- Clean the doors, handles and compartment surfaces with a mild detergent and wipe with a soft cloth.
Important!
Ether-based oils and organic solvents such as lemon juice, or juice from orange peels, butyric acid or cleaners containing acetic acid can attack plastic parts.
- Do not allow such substances to come into contact with the plastic parts of the appliance.
- Do not use abrasive detergents.
- Remove food from the freezer. Store them well covered in a cool place.
- Switch off the appliance and remove the plug from the socket. You can also turn off or open the fuse breaker.
- Clean the appliance and the accessories inside with a cloth and lukewarm water. After cleaning, wipe the surfaces with clean water and wipe with a cloth.
- When everything is dry, you can put the appliance back into operation
Internal cleaning
You should clean the inside of the machine regularly. It will be easier to clean when food stocks are low. Wipe the inside of the fridge-freezer with a weak solution of
of baking soda, then rinse with warm water using a sponge or wrung-out cloth. Wipe completely dry before replacing the shelves and baskets.
Dry all surfaces and removable parts thoroughly. Although this appliance defrosts automatically, a layer of frost may form on the inside walls of the freezer compartment if the freezer door is opened frequently or left open for too long. If the frost is too thick, choose a time when food stocks are low and proceed as follows:
- Remove existing food and accessory baskets, disconnect the appliance from the mains supply and leave the doors open. Make sure the room is well ventilated to speed up the defrosting process.
- When defrosting is complete, clean your freezer as described above.
Caution! Do not use sharp objects to remove the no-fost from the freezer compartment. Only when the interior is completely dry can the appliance be reconnected to the power supply and switched on again.
Cleaning door seals
Take care to keep the door seals clean. Sticky food and drinks can cause the seals to stick to the compartment and damage them when you open the door. Wash the seals with a mild detergent and hot water. Rinse and dry thoroughly after cleaning.
Caution! Only when the door seals are completely dry can the appliance be reconnected to the power supply and switched on again.
Troubleshooting guide
If you have a problem with your appliance or you think your appliance is not working properly, there are some simple checks you can do before calling for service, please see below. There are a few simple things you can do to check before you call for service.
Do not attempt to repair the appliance yourself. Do not attempt to repair the appliance yourself. If the problem persists after carrying out the checks mentioned below, contact a qualified electrician, a registered engineer or the shop where you bought the product.
| Problem | Possible cause and solution |
| The device does not work properly | Check that the power cable is correctly connected to a power outlet. |
| Check the fuse or circuit of your power supply, and replace if necessary. | |
| The room temperature is too high. Try setting the room temperature to a cooler level to solve this problem. | |
| It is normal for the freezer not to operate during the automatic defrost cycle, or for a short period of time after the appliance has been switched on to protect the compressor. | |
| There are odours in the compartments | The interior may need to be cleaned |
| Certain foods, containers or packaging cause odours. | |
| The device makes noise | The sounds listed below are perfectly normal:Compressor operating noises.Air circulation noises from the small fan motor in the freezer compartment or other compartments.Gurgling sounds like boiling water.Noises during automatic defrost.Clattering before the compressor starts. |
| Other unusual noises are due to the following reasons and should be checked to take the necessary measures: The unit is not level. The condenser of the appliance is touching the wall. Bottles or containers have fallen or are rolling. | |
| The engine runs continuously | It is normal to hear the sound of the engine frequently; it works more under the following circumstances:The temperature setting is set colder than necessaryA large amount of hot food has recently been stored in the appliance.-The ambient temperature is too high-Doors are kept open too frequently or for too longAfter installation of your device or when it has been switched off for a long period of time. |
| A layer of gel has formed in the compartment | Check that the air outlets are not blocked by food and ensure that the food is placed in the appliance in such a way as to allow sufficient ventilation. Make sure the door is completely closed. To remove the frost, please refer to the section on cleaning and maintenance. |
| The temperature inside is too hot. | You may have left the doors open too long or opened them too often; or the doors are held open by an obstruction; or the appliance is installed in a location with insufficient clearance on the sides, back and top. |
| The temperature inside is too cold. | Increase the temperature according to the paragraph "Control panel". |
| Doors cannot be closed easily | Check whether the top of the refrigerator is tilted back by 10-15 mm to allow the doors to close by themselves, or whether something inside is preventing the doors from closing. |
| Drops of water drip onto the ground. | The water tray (located at the back of the compartment) may not be properly levelled, or the drain spout (located under the top of the compressor deposit) may not be properly positioned to direct water to the tray, or the water flow may be blocked. You may need to move the refrigerator away from the wall to check the tray and drain spout. |
Installation instructions
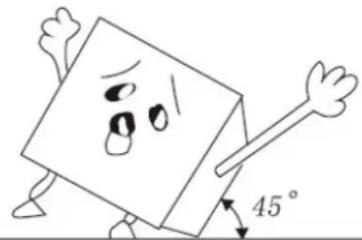
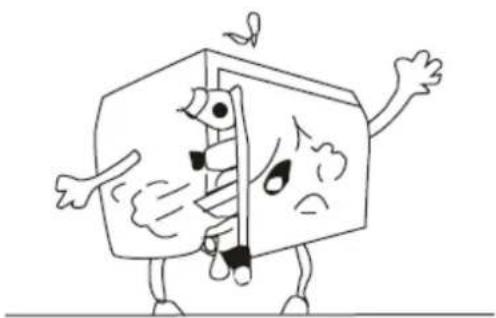
- Make sure that the appliance remains upright during transport. Do not tilt the appliance more than 45 degrees when moving it. Do not apply pressure to the condenser, door and door handle to avoid deformations or disturbances in the operation of the refrigerator.
natural_image
Cartoon illustration of a sad cube character with arms and legs, holding a stick, with a 45° angle标注 (no text or symbols beyond the angle marker)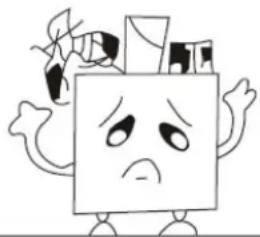
natural_image
Cartoon character with sad expression, surrounded by floating objects (no text or symbols)- Make sure there is enough space around the refrigerator for it to work properly. Allow about 12 cm of free space at the back and sides of the appliance so that air can circulate to cool the compressor. Also leave about 30 cm above the compressor.
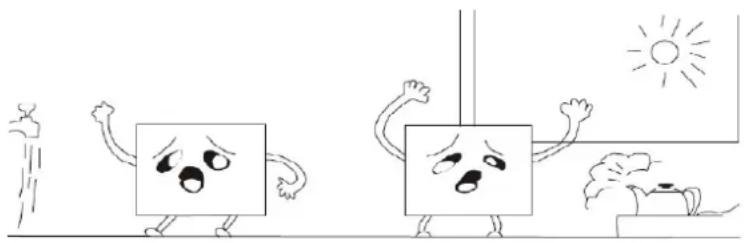
- Place the unit away from direct sunlight and heat sources (stoves, heaters, radiators, etc.). Direct sunlight can damage the acrylic coating and heat sources can increase power consumption. Extremely cold ambient temperatures can also cause malfunctions. Avoid placing the unit in damp locations. If there is too much moisture in the air, frost will quickly form on the evaporator.
natural_image
Cartoon illustration of three anthropomorphic blocks with expressive faces and expressive gestures, set against a bright sun and water background (no text or symbols)Freezer
Top freezer drawer
Storage of frozen food such as ice cream.
Middle/lower freezer drawer
Storage of fresh meat and fish or dry food, divided into small portions.
Note:
For more space, you can store food after removing the drawers and ice cube tray.
The storage volume of the freezer compartment is calculated after removing the ice cube tray, the ice drawer and the top and middle freezer drawers.
Food packaging
Pack food in portions that suit your needs.
Fruit and vegetable portions should not exceed 1 kg, meat portions can be up to 2.5 kg.
Smaller portions freeze faster and help preserve the quality of the food when defrosting and preparing dishes.
It is important to pack food in airtight bags or containers before freezing to avoid loss of flavour or dehydration.
Pack the food, expel the air and seal the bag or container.
Appropriate packaging :
Plastic bags, cling film, foil and freezer trays. You can obtain these packaging materials from your usual retailers.
Inappropriate packaging:
Wrapping paper, greaseproof paper or cellophane, previously used bin liners or bags.
Appropriate sealing devices :
Elastic bands, plastic staples, cords, freezer bag ties or similar devices. Plastic films and bags can be sealed with a special press.
Before placing the package in the freezer, label it with the name of the contents and the freezing date.
Precautions:
-
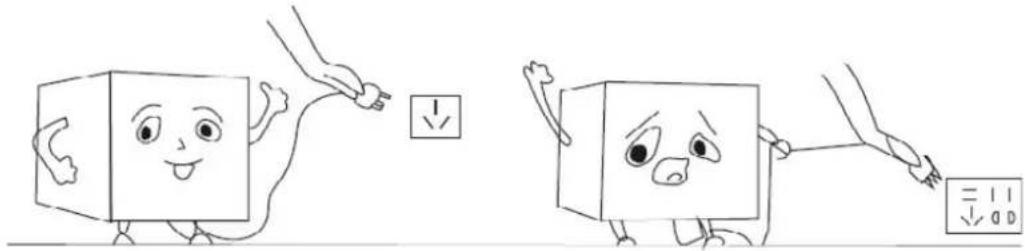
Plug the appliance into a properly installed and grounded proprietary wall outlet. Never (for any reason) cut or remove the (ground) wire from the power cord. Any questions regarding the power supply or grounding should be referred to a licensed electrician or servicing facility. Warning: If the grounded plug is used improperly, there is a risk of electric shock.
-
The installation socket must always be earthed. If the power supply is not earthed, you must not connect the appliance to the mains.
natural_image
Illustration of two cartoon cubes with smiling faces, connected by a hand holding a pencil and a small square, next to a separate diagram showing the same cube's drawing style.-
Do not throw water on the refrigerator: it may cause equipment failure or risk of electric shock.
-
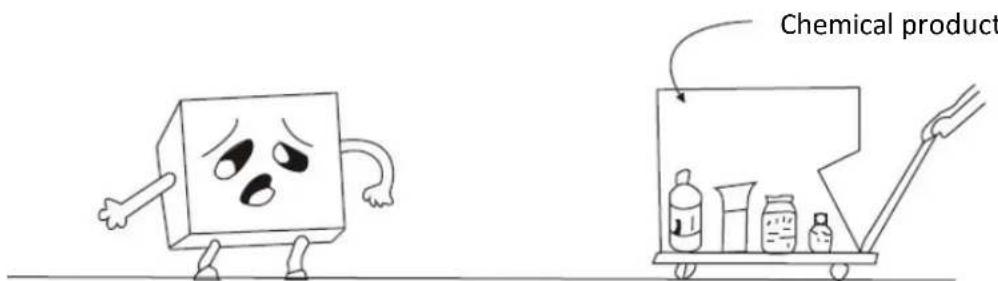
Do not store or use gasoline or other flammable gases or liquids near this appliance. Fumes may cause a fire or explosion.
Use :
- Before connecting the appliance to the power supply, let it stand for about two hours to reduce the risk of malfunction in the cooling system due to handling during transport. Run your product for about 2 to 3 hours before adding food
WARNING: To avoid danger caused by instability of the appliance, it must be installed and secured in accordance with the instructions in the installation manual.
- Do not put too much food in the appliance. Do not open the door too often to maintain the interior temperature and save electricity.
natural_image
Cartoon illustration of a character with arms and legs, holding a device (no text or symbols present)COLDEST PART OF THE REFRIGERATOR

The symbol on the right indicates the location of the coldest area of your refrigerator. This area is bounded at the bottom by the glass of the crisper, and at the top by the symbol or the shelf positioned at the same height.
In order to guarantee the temperatures in this zone, make sure that the position of this shelf is not changed. In forced-air refrigerators (equipped with a fan or No Frost models), the symbol for the coldest zone is not shown because the temperature inside them is uniform.
INSTALLATION OF THE TEMPERATURE INDICATOR
To help you set up your refrigerator properly, it is equipped with a temperature indicator that will allow you to check the average temperature in the coldest zone. ATTENTION: This indicator is intended to work only with your refrigerator, be careful not to use it in another refrigerator (indeed, the coldest zone is not identical), or for any other use.
TEMPERATURE CHECK IN THE COLDEST AREA
With the temperature indicator, you can regularly check that the temperature in the coldest area is correct. The temperature inside the refrigerator depends on several factors such as the ambient temperature of the room, the amount of food stored and how often the door is opened. Take these factors into consideration when setting up the appliance.
When the indicator shows "OK", this means that your thermostat is set correctly, and that the indoor temperature is correct.
If the colour of the indicator is white, this means that the temperature is too high, in which case the thermostat setting should be increased and a new visual check of the indicator should be carried out after 12 hours.
After loading or opening the door, the indicator may turn white after a few moments.

Correct setting
Temperature too high, adjustable thermostat
FACTSHEET ON THE ENERGY LABELLING REGULATION: 2019/2016/UE
The product information sheet according to EU Regulation 2019/2016 Energy label for refrigeration appliances can be found under the URL or QR code indicated on the energy label
KND247W - URL: https://eprel.ec.europa.eu
Relationship between the 1060/2010/EU energy label and the new 2019/2016/EU energy label
The current 1060/2010/EU label uses the A+++/D labelling system, which has become less effective. The mixed scale of the label with many "+" is no longer transparent and the majority of products are already in the first 2-3 classes today.
As a result, the EU has revised and optimised the label according to users' needs. The new energy label 2019/2016/EU will contain only energy classes A to G. The levels of the classes will be regularly updated.
GUARANTEE
The warranty does not cover wear parts of the product or problems or damage resulting from :
(1) superficial damage due to normal wear and tear of the product;
(2) defects or deterioration due to contact of the product with liquids and due to corrosion caused by rust or the presence of insects;
(3) any incident, abuse, misuse, unauthorised modification, disassembly or repair;
(4) any improper maintenance, use not in accordance with the product instructions or connection to an incorrect voltage;
(5) any use of accessories not supplied or approved by the manufacturer.
The warranty will be void if the nameplate and/or serial number of the product is removed.
Product warranty and spare parts available
According to the terms of the manufacturer's warranty applicable to the location, the use of the Customer Service is free of charge. The minimum warranty period (manufacturer's warranty for private consumers) in the European Economic Area is 2 years according to the warranty terms applicable to the location. The warranty terms do not affect any other rights or claims you may have under local law.
Detailed information on the warranty period and warranty conditions in your country is available from customer service, your dealer or our website.
Original functional spare parts according to the relevant Ecodesign Directive can be obtained from the customer service for a period of at least 4 years from the date of placing your appliance on the market in the European Economic Area.
Advice - Energy saving
Install the appliance in a temperate, dry and well ventilated room.
Do not expose the device to direct sunlight and never place it near a direct heat source (e.g. near a radiator).
Do not block any ventilation holes or grills in the appliance. Allow
food to cool before placing it in the appliance. Place frozen products
in the refrigerator to defrost.
The low temperature of the frozen products will contribute to the cooling of the foodstuffs being frozen. in the refrigerator.
Do not leave the appliance doors open for too long when storing or removing food from the appliance.
When freezing food or storing food in the freezer, place it directly in the top tray of the freezer.
DISPOSAL
natural_image
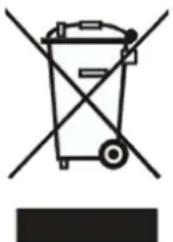
Symbol of a trash bin crossed with no text or numbers, representing waste sorting or disposal (no text present)This logo on the product means that it is an appliance whose treatment as waste falls within the scope of Directive 2012/19/EU of 4 January 2012 on waste electrical and electronic equipment (WEEE).
The presence of hazardous substances in electrical and electronic equipment can have potential effects on the environment and human health in the reprocessing cycle of this product.
This product complies with the requirements imposed by Directives 2014/35/EU (repealing Directive 73/23/EEC as amended by Directive 93/68/EEC) and 2014/30/EU (repealing Directive 89/336/EEC)
This product contains a light source with energy efficiency class G.
flowchart
graph LR
    A["LED"] --> B["Robot Icon"]
    B --> C["LED"]
The replacement of the light source in this product must only be carried out by a professional. For this purpose, contact a qualified technician or the manufacturer's service department.


- KND247W
- Mrazák
- NEJCHLADNĚJŠÍ ČÁST CHLADNIČKY
- INSTALACE INDIKÁTORU TEPLOTY
- Vyrovnanie chladničky
- Mraznička
- NAJCHLADNEJŠÍ ČASŤ CHLADNIČKY
- INŠTALÁCIA INDIKÁTORA TEPLOTY
- KONTROLA TEPLOTY V NAJCHLADNEJŠÍ OBLASTI
- Zamrażarka
- NAJZIMNIEJSZA CZĘŚĆ LODÓWKI
- SAFETY INSTRUCTION
- Refrigerant
- Danger; fire hazard / flammable materials
- INSTRUCTIONS FOR USE
- FEATURES
- ATTENTION!
- ELECTRICAL CONNECTION
- TECHNICAL ASSISTANCE
- Device description
- Need for space
- Positioning
- Location
- For refrigeration appliances with a climate class :
- Significance of freezer labelling\* :
- Reversing the door
- Requirements of the installation site
- Levelling the refrigerator
- Using the control panel
- Freezer compartment temperature control
- Setting the temperature in the refrigerator compartment
- Adjusting the humidity of the crisper:
- Daily use
- First use
- Accessories
- Installation of door trays
- Freezing fresh food
- Storing frozen food
- Useful tips and tricks
- Tips for freezing
- Tips for storing frozen food
- Tips for chilling fresh food
- Tips for refrigeration
- External cleaning
- Important!
- Internal cleaning
- Cleaning door seals
- Troubleshooting guide
- Installation instructions
- Freezer
- Top freezer drawer
- Middle/lower freezer drawer
- Note:
- Food packaging
- Appropriate packaging :
- Inappropriate packaging:
- Appropriate sealing devices :
- Precautions:
- Use :
- COLDEST PART OF THE REFRIGERATOR
- INSTALLATION OF THE TEMPERATURE INDICATOR
- TEMPERATURE CHECK IN THE COLDEST AREA
- FACTSHEET ON THE ENERGY LABELLING REGULATION: 2019/2016/UE
- Relationship between the 1060/2010/EU energy label and the new 2019/2016/EU energy label
- GUARANTEE
- Product warranty and spare parts available
- Advice - Energy saving
- DISPOSAL
Brand : Kluge
Model : KND247W
Category : Refrigerator