
OW16 - Multimeter Owon - Free user manual and instructions
Find the device manual for free OW16 Owon in PDF.


| Product Type | Digital Multimeter |
| Model | OW16 |
| Brand | Owon |
| Display | LCD with backlight, 6000 counts |
| AC Voltage Range | 0.1 mV to 600 V |
| DC Voltage Range | 0.1 mV to 600 V |
| AC Current Range | 0.1 µA to 10 A |
| DC Current Range | 0.1 µA to 10 A |
| Resistance Range | 0.1 Ω to 60 MΩ |
| Capacitance Range | 1 pF to 100 mF |
| Frequency Range | 0.001 Hz to 10 MHz |
| Temperature Measurement | -20°C to 1000°C (with thermocouple) |
| Diode Test | Yes |
| Continuity Test | Yes, with beeper |
| Auto Range | Yes |
| Data Hold | Yes |
| Relative Mode | Yes |
| Auto Power Off | Yes, after 15 minutes |
| Safety Rating | CAT II 600V |
| Power Supply | 2 x AAA batteries (1.5V) |
| Dimensions | 130 x 70 x 30 mm |
| Weight | Approx. 180 g (with batteries) |
| Accessories Included | Test leads, thermocouple, batteries, user manual |
Frequently Asked Questions - OW16 Owon
User questions about OW16 Owon
0 question about this device. Answer the ones you know or ask your own.
Ask a new question about this device
Download the instructions for your Multimeter in PDF format for free! Find your manual OW16 - Owon and take your electronic device back in hand. On this page are published all the documents necessary for the use of your device. OW16 by Owon.
USER MANUAL OW16 Owon
July 2019 edition V1.0.3
Copyright © LILLIPUT Company. All rights reserved.
The LILLIPUT's products are under the protection of the patent rights, including ones which have already obtained the patent rights and those which are applying for. The information in this manual will replace all materials published.
The information in this manual was correct at the time of printing. However, LILLIPUT will continue to improve products and reserves the rights to change specification at any time without notice.
owon ^® is the registered trademark of the LILLIPUT Company.
Fujian LILLIPUT Optoelectronics Technology Co., Ltd.
No. 19, Heming Road
Lantian Industrial Zone, Zhangzhou 363005 P.R. China
Tel: +86-596-2130430
Fax: +86-596-2109272
Web: www.owon.com.cn
E-mail: info@owon.com.cn
General Warranty
OWON warrants that the product will be free from defects in materials and workmanship for a period of 1 year from the date of purchase of the product by the original purchaser from the OWON Company. This warranty only applies to the original purchaser and is not transferable to the third party, and does not apply to fuses, disposable batteries or to any product which has been misused, altered, neglected or damaged by accident or abnormal conditions of operation or handling.
If the product proves defective during the warranty period, OWON either will repair the defective product without charge for parts and labor, or will provide a replacement in exchange for the defective product. Parts, modules and replacement products used by OWON for warranty work may be new or reconditioned like new performance. All replaced parts, modules and products become the property of OWON.
In order to obtain service under this warranty, Customer must notify OWON of the defect before the expiration of the warranty period. Customer shall be responsible for packaging and shipping the defective product to the service center designated by OWON, and with a copy of customer proof of purchase.
This warranty shall not apply to any defect, failure or damage caused by improper use or improper or inadequate maintenance and care. OWON shall not be obligated to furnish service under this warranty a) to repair damage resulting from attempts by personnel other than OWON representatives to install, repair or service the product; b) to repair damage resulting from improper use or connection to incompatible equipment; c) to repair any damage or malfunction caused by the use of non-OWON supplies; or d) to service a product that has been modified or integrated with other products when the effect of such modification or integration increases the time or difficulty of servicing the product.
Please contact the nearest OWON's Sales and Service Offices for services.
For better after-sales service, please visit www.owon.com.cn and register the purchased product online.
Excepting the after-sales services provided in this summary or the applicable warranty statements, OWON will not offer any guarantee for maintenance definitely declared or hinted, including but not limited to the implied guarantee for marketability and special-purpose acceptability. OWON should not take any responsibilities for any indirect, special or consequent damages.
Table of Contents
1. Safety Information .... 1
Safety Considerations .... 1
Measurement Category.... 3
Safety Terms and Symbols.... 4
2.Quick Start....5
General Inspection....5
Install the Batteries....5
Adjusting the Tilt Stand....6
Power On 6
Sleep Mode 6
LCD Backlight Control....6
Selecting the Range....7
Multimeter in Brief 7
Front panel 7
Rotary switch....8
Keypad....9
Display screen....9
Input terminals....10
3.Making Measurements 12
Measuring AC or DC Voltage....12
Measuring Resistance ....12
Testing for Continuity....13
Testing Diodes ....13
Measuring Capacitance 13
Measuring Frequency....14
Measuring Temperature....14
Non-Contact Voltage Detect (NCV) 14
Measuring Transistor — Only for specific models....15
Measuring DC or AC Current....15
4.Multimeter Features....17
Data Hold Mode....17
Making Relative Measurements....17
Buzzer Feature....17
5. To Connect with Mobile Device - Only for OW16B 18
Android App ....19
How to Connect with Android Device....19
User Interface in Android App....20
Operations in Android App....21
Multimeter Offline Record (Android)....23
iOS App ....24
How to Connect with iOS Device....24
User Interface in iOS App 26
Operations in iOS App 28
Multimeter Offline Record (iOS) 30
6. To Connect with Computer – Only for OW16B 32
How to Connect with Computer 32
Step 1: Install multimeterBLE software....32
Step 2: Install driver of Bluetooth USB adapter ....32
Step 3: Connect to multimeterBLE software....38
User Interface in MultimeterBLE Software 40
Operations in MultimeterBLE Software 41
Multimeter Offline Record (PC Software) 41
7. Technical Specifications .... 44
8. Appendix......46
Appendix A: Enclosure ....46
Appendix B: General Care and Cleaning 46
1. Safety Information
Safety Considerations
Before any operations, please read the following safety precautions to avoid any possible bodily injury and prevent damage to this product or any other products connected. To avoid any contingent danger, use this product only as specified.
EC Declaration of Conformity:
Meets intent of Directive 2004/108/EC for Electromagnetic Compatibility.
■ Limit operation to the specified measurement category, voltage, or amperage ratings.
■ Do not use the multimeter if it is damaged. Before you use the multimeter, inspect the case. Look for cracks or missing plastic. Pay particular attention to the insulation surrounding the connectors.
■ Do not use the test leads provided for other products. Use only the certified test leads specified for this product.
■ Inspect the test leads for damaged insulation or exposed metal.
■ Before use, verify the multimeter's operation by measuring a known voltage.
■ Only the qualified technicians can implement the maintenance.
■ Always use the specified battery type. The power for the multimeter is supplied with two standard AA 1.5 V batteries. Observe the correct polarity markings before you insert the batteries to ensure proper insertion of the batteries in the multimeter.
- Check all Terminal Ratings. To avoid fire or shock hazard, check all ratings and markers of this product. Refer to the user's manual for more information about ratings before connecting to the multimeter.
■ Do not operate the multimeter with the cover or portions of the cover removed or loosened.
■ Use Proper Fuse. Use only the specified type and rating fuse for the multimeter.
■ Do not operate if in any doubt. If you suspect damage occurs to the multimeter, have it inspected by qualified service personnel before further operations.
■ To avoid electric shock, do not operate this product in wet or damp conditions.
■ Do not operate in an explosive atmosphere.
- Keep product surfaces clean and dry.
■ Do not apply more than the rated voltage (as marked on the multimeter) between terminals, or between terminal and earth ground.
■ When measuring current, turn off the circuit power before connecting the multimeter in the circuit. Remember to place the multimeter in series with the circuit.
■ When servicing the multimeter, use only the specified replacement parts.
■ Use caution when working above 60 V DC, 30 V AC RMS, or 42.4 V peak. Such voltages pose a shock hazard.
■ When using the test leads, keep your fingers behind the finger guards on the test leads.
■ Remove the test leads from the multimeter before you open the battery cover.
■ To avoid false readings, which may lead to possible electric shock or personal injury, replace the battery as soon as the low battery indicator 📄 appears and flashes.
■ Disconnect circuit power and discharge all high-voltage capacitors before testing resistance, continuity, diodes, or capacitance.
■ Use the proper terminals, function, and range for your measurements. When the range of the value to be measured is unknown, set the rotary switch position as the highest range, or choose the auto ranging mode. To avoid damages to the multimeter, do not exceed the maximum limits of the input values shown in the technical specification tables.
■ Connect the common test lead before you connect the live test lead. When you disconnect the leads, disconnect the live test lead first.
■ Before changing functions, disconnect the test leads from the circuit under test.
Measurement Category
The multimeter has a safety rating of 600 V, CAT III.
Measurement category definition
Measurement CAT I applies to measurements performed on circuits not directly connected to the AC mains. Examples are measurements on circuits not derived from the AC mains and specially protected (internal) mains- derived circuits.
Measurement CAT II applies to protect against transients from energy-consuming equipment supplied from the fixed installation, such as TVs, PCs, portable tools, and other household circuits.
Measurement CAT III applies to protect against transients in equipment in fixed equipment installations, such as distribution panels, feeders and short branch circuits, and lighting systems in large buildings.
Measurement CAT IV applies to measurements performed at the source of the low-voltage installation. Examples are electricity meters and measurements on primary over current protection devices and ripple control units.
Safety Terms and Symbols
Safety Terms
Terms in this Manual. The following terms may appear in this manual:

Warning: Warning indicates the conditions or practices that could result in personal injury or death.

Caution: Caution indicates the conditions or practices that could result in damage to this product or other property.
Terms on the Product. The following terms may appear on this product:
Danger: It indicates an injury or hazard may immediately happen.
Warning: It indicates an injury or hazard may be accessible potentially.
Caution: It indicates a potential damage to the instrument or other property might occur.
Safety Symbols
Symbols on the Product. The following symbol may appear on the product:
| Direct current (DC) | Fuse | ||
| Alternating current (AC) | Caution, risk of danger (refer to this manual for specific Warning or Caution information) | ||
| Both direct and alternating current | CAT II | Category II overvoltage protection | |
| Ground terminal | CAT III | Category III overvoltage protection | |
| Conforms to European Union directives | CAT IV | Category IV overvoltage protection | |
| Equipment protected throughout by double insulation or reinforced insulation |
2. Quick Start
General Inspection
After you get a new multimeter, make a check on the instrument according to the following steps:
1. Check whether there is any damage caused by transportation.
If it is found that the packaging carton or the foamed plastic protection cushion has suffered serious damage, do not throw it away first till the complete device and its accessories succeed in the electrical and mechanical property tests.
2. Check the Accessories
The supplied accessories have been already described in the Appendix A: Enclosure of this Manual. You can check whether there is any loss of accessories with reference to this description. If it is found that there is any accessory lost or damaged, please get in touch with the distributor of OWON responsible for this service or the OWON's local offices.
3. Check the Complete Instrument
If it is found that there is damage to the appearance of the instrument, or the instrument can not work normally, or fails in the performance test, please get in touch with the OWON's distributor responsible for this business or the OWON's local offices. If there is damage to the instrument caused by the transportation, please keep the package. With the transportation department or the OWON's distributor responsible for this business informed about it, a repairing or replacement of the instrument will be arranged by the OWON.
Install the Batteries
The multimeter is powered by two 1.5 V AA alkaline batteries.

Warning: To avoid false readings, which could lead to possible electric shock or personal injury, replace the battery as soon as the low battery
indicator appears.
Before replacing the battery, turn off the meter, disconnect test leads and any connectors from any circuit under test, remove test leads from the input terminals. Use only the specified battery type.
Use the following procedure to install the batteries.
(1) Ensure that the rotary switch is at the OFF position. Remove test leads and any connectors from the input terminals.
(2) Lift the tilt stand and loosen the screws with a suitable Phillips screwdriver and remove the battery cover.
(3) Observe the battery polarity indicated inside the battery compartment, Insert the batteries.
(4) Place the battery cover back in its original position and tighten the screws.

Caution: To avoid instruments being damage from battery leakage, always remove the batteries and store them separately if the multimeter is not going to be used for a long period.
Adjusting the Tilt Stand
Pull the tilt stand outward to its maximum reach (about 85^ to the meter body).
Power On
(1) To power ON the multimeter, turn the rotary switch to any other position except OFF.
(2) To power OFF the multimeter, turn the rotary switch to the OFF position.
Sleep Mode
The multimeter automatically enters the sleep mode if the rotary switch is not moved or a key is not pressed for 30 minutes. (When the Bluetooth is activated, this function is disabled.)
Pressing Select or turn the rotary switch will turn the multimeter back to operation mode from the sleep mode.
One minute before Auto Power-off, the buzzer will beep five times to warn. Before shutoff, the buzzer will emit a long beep, and then the multimeter will shut off.
Note: In sleep mode, the multimeter will still consume a little power. If the multimeter is not going to be used for a long period, the power should be turned off.
LCD Backlight Control
To view the display in low-light conditions, you can activate the LCD backlight by pressing 📂/H for more than 2 seconds. The backlight will last for one minute. To turn off manually, pressing 📂/H for more than 2 seconds.
Selecting the Range
● Auto ranging is set as default when the meter is powered on, AUTO is displayed.
- When auto ranging is enabled, press Range to enter the manual range mode.
- In manual range, each additional press of Range sets the multimeter to the next higher range, unless it is already in the highest range, at which point the range switches to the lowest range.
- When manual range is enabled, press Range for more than 2 seconds to enter the auto ranging mode.
Note: Manual range is not available when measuring capacitance.
Multimeter in Brief
Front panel
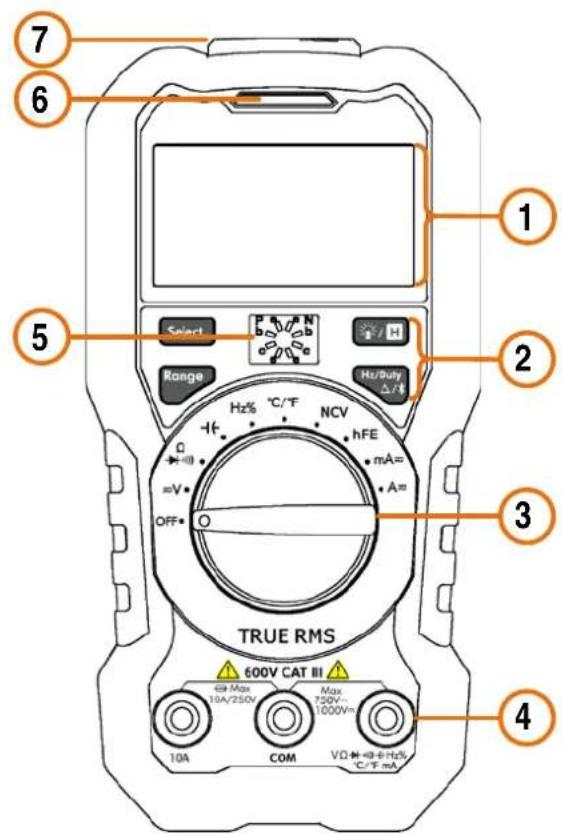
Figure 2-1 Front panel overview (OW16B with hFE is shown for example)
| No. | Description | Details |
| 1 | Display screen Page 9 | |
| 2 | Keypad Page 9 | |
| 3 | Rotary switch Page 8 | |
| 4 | Input terminals | Page 10 |
| 5 | Transistor test holes (only for specific models) | Page 15 |
| 6 | LED indicator | |
| 7 | Non-contact voltage detector (NCV) | Page 14 |
Rotary switch
| Position | Description | Details |
| OFF | Power off | Page 6 |
| ≈ V | DC or AC voltage measurement | Page 12 |
| o)) | Resistance measurement | Page 12 |
| Continuity test | Page 13 | |
| Diode test | Page 13 | |
| -If | Capacitance measurement | Page 13 |
| Hz% | Frequency measurement | Page 14 |
| °C/°F | Temperature measurement | Page 14 |
| NCV | Non-contact voltage detect | Page 14 |
| hFEor A ≈ | Transistor measurementorDC or AC current measurement(up to 600 microamperes) | Page 15orPage 15 |
| mA ≈ | DC or AC current measurement(up to 600 milliamperes) | Page 15 |
| A ≈ | DC or AC current measurement |
Keypad
| Key | Description | Details |
 | Select DC or AC | |
| Select Resistance / Continuity / Diode | ||
 | Auto/Manual range Page 7 | |
 | Backlight | Page 6 |
| Data Hold | Page 17 | |
 | Select frequency/duty cycle | Page 14 |
| Measuring frequency in AC voltage/current mode | ||
| Relative Measurements | Page 17 | |
| Bluetooth (only for OW16B) | Page 18 |
Display screen
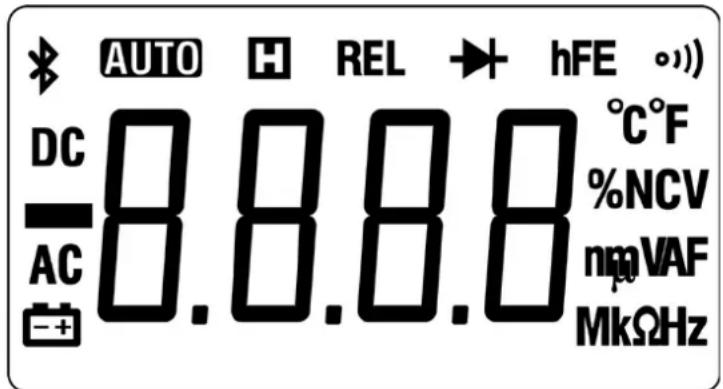
Figure 2-2 Display screen
| Symbol | Description | Details |
| [SWT4] | Bluetooth enabled Page 18 | |
 | Auto range | Page 7 |
 | Data hold enabled | Page 17 |
 | Relative enabled | Page 17 |
 | Diode test selected | Page 13 |
 | Transistor measurement | Page 15 |
 | Continuity test selected | Page 13 |
 | DC | Page 12 and |
- Quick Start
 | AC | Page 14 |
 | Battery is low Page 5 | |
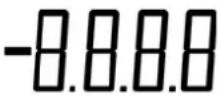 | Measurement display("OL" is short for overload, indicates the reading exceeds the display range) | |
 | NCV is for Non-contact Voltage Detect | Page 14 |
 | ||
 | Measuring units | Page 10 |
 |
Measurement units
| Sign | Description | |
| M | Mega 1E+06 (1000000) | |
| k | kilo 1E+03 (1000) | |
| m | milli | 1E-03 (0.001) |
| μ | micro | 1E-06 (0.000001) |
| n | nano | 1E-09 (0.000000001) |
| Sign | Description | Measurement type |
| °C | Degree Celsius | Temperature |
| °F | Degree Fahrenheit | |
| V | Voltage | Voltage |
| A | Ampere | Current |
| Ω | Ohm | Resistance |
| Hz | Hertz | Frequency |
| % | Percent, | Duty cycle |
| F | Farad | Capacitance |
Input terminals
The terminal connections for the different measurement functions of the multimeter are described in the table below.

Warning: Before starting any measurement, observe the rotary switch position of the multimeter, and then connect the test leads to the correct terminals.

Caution: To avoid damaging the multimeter, do not exceed the rated input limit.
| Rotary switch position | Input terminals Overload protection | |||
| ≈V | VΩ→(°))-I(-Hz% °C/°F mA) | COM | 750 VAC/1000 VDC | |
| Ω→(°)) | VΩ→(°))-I(-Hz% °C/°F mA) | COM | 250 VAC/300 VDC | |
| -Hz% | ||||
| °C/°F | ||||
| mA≈ | VΩ→(°))-I(-Hz% °C/°F mA) | COM | Model with hFE | 630mA/250V, fast-acting fuse |
| Model without hFE | 630mA/600V, fast-acting fuse | |||
| A≈ | 10A | COM | Model with hFE | 10A/250V, fast-acting fuse |
| Model without hFE | 10A/600V, fast-acting fuse | |||
3. Making Measurements
Measuring AC or DC Voltage

Warning: Do not measure any voltage of over 1000 Vdc or 750 Vac rms to avoid instrument damage or electric shock.
Do not apply more than 1000 Vdc or 750 Vac rms between the common terminal and the earth ground to avoid instrument damage or electric shock.
This multimeter displays DC voltage values as well as their polarity. Negative DC voltages will display a negative sign on the left of the display.
(1) Rotate the rotary switch to ≈ V . Default is DC measurement mode, DC will be displayed. Press Select to switch into AC measurement mode, AC will be displayed.
(2) Connect the black test lead to the COM terminal and the red test lead to the V +)) -1(-Hz% ^/^ mA terminal.
(3) Probe the test points and read the display. Press Range to enable and cycle through the manual ranges.
Note: When measuring AC voltage, press duty cycle measuring, and original measure

to cycle through frequency measuring,
Measuring Resistance

Caution: To avoid possible damage to your multimeter or to the equipment under test, disconnect the circuit power and discharge all high-voltage capacitors before measuring resistance.
(1) Rotate the rotary switch to ))
(2) Connect the black test lead to the COM terminal and the red test lead to the VΩ→○))H(-Hz% ℃/°F mA) terminal.
(3) Probe the test points and read the display. Press Range to enable and cycle through the manual ranges.
Testing for Continuity

Caution: To avoid possible damage to your multimeter or to the equipment under test, disconnect the circuit power and discharge all high-voltage capacitors before testing for continuity.
(1) Rotate the rotary switch to Press Select once to enter continuity testing mode, ) will be displayed.
(2) Connect the black test lead to the COM terminal and the red test lead to the V + (Hz%) terminal.
(3) Probe the test points to measure the resistance in the circuit. If the reading is below 30 , the multimeter will beep continuously.
Testing Diodes

Caution: To avoid possible damage to your mul timer or to the equipment under test, disconnect the circuit power and discharge all high-voltage capacitors before testing diodes.
(1) Rotate the rotary switch to Press Select twice to enter diode testing mode, will be displayed.
(2) Connect the black test lead to the COM terminal and the red test lead to the VΩ→○))H(-Hz% ℃/°F mA) terminal.
(3) Connect the red test lead to the positive terminal (anode) of the diode and the black test lead to the negative terminal (cathode). The cathode of a diode is indicated with a band.
(4) Read the diode forward bias. If the test lead connection is reversed, the multimeter will display "OL".
Measuring Capacitance

Caution: To avoid possible damage to the multimeter or to the equipment under test, disconnect circuit power and discharge all high-voltage capacitors before measuring capacitance. Use the DC voltage function to confirm that the capacitor is fully discharged.
(1) Rotate the rotary switch to +←.
(2) Connect the black test lead to the COM terminal and the red test lead to the V +)) -I(-Hz% ℃/°F mA terminal.
(3) Probe the test points and read the display.
Measuring Frequency
(1) Rotate the rotary switch to Hz%.
(2) Connect the black test lead to the COM terminal and the red test lead to the VΩ→○))-I(-Hz% ℃/°F mA) terminal.
(3) Probe the test points and read the display.
(4) Press Hz/Duty / to switch between the frequency and duty cycle measurements.
Note: When measuring AC voltage or AC current, press Hz/Duty /1 to cycle through frequency measuring, duty cycle measuring, and original measuring.
To measure the frequency of signal with large amplitude, it is recommended to press

to measure the frequency in AC voltage measurement mode.
Measuring Temperature
(1) Rotate the rotary switch to ^ C/ ^ F.
(2) Connect the red connection of the K-type thermocouple to the ·s·s·s·s·s·s·s·s·s·s·s·s·s·s·s·s·s·s·s·s·s·s·s·s·s·s·s·s·s·s·s·s·s·s terminal and the black connection to the COM terminal.
(3) Probe the test points and read the display.
Non-Contact Voltage Detect (NCV)
To detect the presence of AC voltage, place the top of the meter close to a voltage source. When voltage is detected, the LED above the display will glow, and the meter will beep.

Warning:
● Always test the NCV function on a known live circuit before use.
- Do not attempt to use the meter as an AC Voltage Detector if the battery is weak or bad.
- Even without indication, voltage may still be present. Do not rely on NCV detection to check the shielded wire. Detection could be impaired by socket design, insulation thickness, or other factors.
● External interference such as static electricity sources could mistakenly trigger NCV indication.
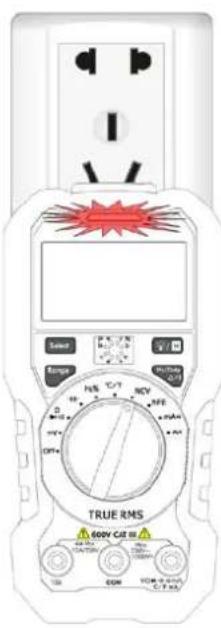
Beep
(1) Rotate the rotary switch to NCV.
(2) Test the NCV function on a known live circuit before use.
(3) Place the top of the meter very close to the voltage source as shown in the figure.
(4) If voltage is detected, the LED above the display will flash, and the meter will beep.
Measuring Transistor — Only for specific models
(1) Rotate the rotary switch to hFE.
(2) Verify the type of the transistor is NPN or PNP, and locate the Emitter, Base and Collector leads. Insert leads of the transistor into the corresponding test holes on the panel.
(3) Read the hFE value.
Measuring DC or AC Current

Warning: Never attempt an in-circuit current measurement where the open-circuit potential to earth is greater than 250 V. Doing so will cause damage to the multimeter and possible electric shock or personal injury.

Caution: To avoid possible damage to the multimeter or to the equipment under test, check the multimeter's fuse before measuring current. Use the proper terminals, function, and range for your measurement. Never place the test leads in parallel with any circuit or component when the leads are plugged into the current terminals.
(1) Turn off the power of the measured circuit. Discharge all high-voltage capacitors.
(2) Connect the black test lead to the COM terminal. For currents below 600 mA, connect the red test lead to the +) C/ F (Hz%) terminal; for currents within 600 mA – 10 A, connect the red test lead to the 10A terminal.
(3) Rotate the rotary switch to the appropriate position according to the measurement range, A ≈ (only for specific models) , mA ≈, or A ≈ .
(4) Disconnect the circuit path to be tested. Connect the black test lead to one side of the circuit (with a lower voltage); connect the red test lead to the other side (with a higher voltage). Reversing the leads will produce a negative reading, but will not damage the multimeter.
(5) Select DC or AC measurement mode. Default is DC measurement mode, DC will be displayed. Press Select to switch into AC measurement mode, AC will be displayed.
(6) Turn on the power of the measured circuit, and read the display. Press Range to enable and cycle through the manual ranges. If "OL" is displayed, it indicates the input exceeds the selected range and the rotary switch should be set to the position with higher range.
(7) Turn off the power of the measured circuit and discharge all high-voltage capacitors. Remove the test leads and restore the circuit to the original condition.
Note: When measuring AC current, press

to cycle through frequency measuring,
duty cycle measuring, and original measuring.
4. Multimeter Features
Data Hold Mode
(1) Press 📞/ H to freeze the display during measurement, H will be shown on the display.
(2) Press 📞/ H again to exit this mode.
Making Relative Measurements
When making relative measurements, reading is the difference between a stored reference value and the input signal.
(1) Press Hz/Duty to enter the relative mode, REL will be shown on the display.
The measurement value when pressing Hz/Duty /% is stored as the reference value.
In this mode, REL△ (current reading) = input value - reference value.
(2) Press it again to exit the mode.
In relative measurement, the manual range mode will be activated automatically. (The relative measurement should be carried out under a certain range, that is, this function is only available under the manual range mode.)
Note: This function is not available when measuring AC voltage/current, and frequency.
Buzzer Feature
- Press the function key, the buzzer emits a short beep.
● One minute before Auto Power-off, the buzzer will beep five times to warn. Before shutoff, the buzzer will emit a long beep, and then the multimeter will shut off. - The buzzer beeps continuously to warn once the measured DC voltage exceeds 1000 V, or the measured AC voltage exceeds 750 V.
- The buzzer emits a long beep when the short circuit resistance is less than about 50Ω during the continuity test.
- When the Bluetooth function is idle for 10 minutes, the Bluetooth will be turned off automatically. Before turning off, the buzzer will beep twice.
5. To Connect with Mobile Device – Only for OW16B
OW16B supports communications with Android or iOS based smart device through Bluetooth. You can use the free application software on the smart devices to monitor the measurements, perform remote control, view trending graphs, etc. The recorded data can be saved as CSV file. The maximum number of record that can be stored depends on the free storage space in your smart device. More than one meters can be connected simultaneously.
Note: Bluetooth connectivity works over a range of about 7 to 8 meters. The work range is much longer in open-sided and non-occluded wide range environment, even up to 20 meters.
Install the free application software
System Requirements of Mobile Devices
● Bluetooth 4.0 Android APP
Android devices with BLE 4.0 connectivity.
Android versions: 4.3 or above
- Bluetooth 4.0 iOS APP
iPhone 6s/6s Plus, iPhone 6/6 Plus, iPhone 5c/5s, iPhone 5
(Support iPhone with BLE 4.0 connectivity, iOS7.0 or above; iPhone 4s or the older devices are not supported.)
For Android device
If the system and Bluetooth version of your mobile device meet the requirements, scan the QR Codes below with your mobile device, select the Bluetooth 4.0 Android APP and install it.
Bluetooth 4.0 Android APP

Note: The help content below may be not completely consistent with the application software, only for reference. Visit www.owon.com.cn to get the latest version of this user manual.
For iPhone
You can search "OWON" in the APP Store, select the APP with the then install it.

icon, and
Note: The help content below may be not completely consistent with the application software, only for reference. Visit www.owon.com.cn to get the latest version of this user manual.
Android App
How to Connect with Android Device
(1) Install the free application software for Android on your Android smart device.
(2) Launch the "Multimeter" application.
(3) Turn on the multimeter, press and hold Hz/Duly / until × appear on the display.
(4) Click the icon on the top left of the screen to launch device connection.
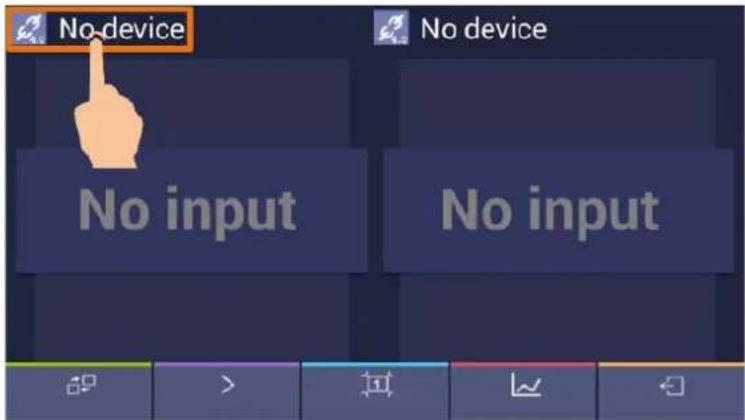
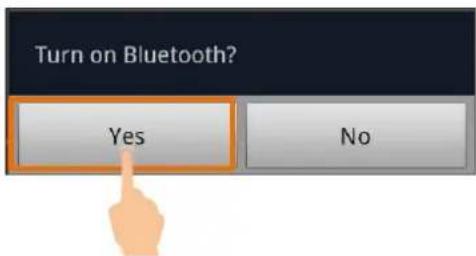
(5) If the Bluetooth function is not activated, a dialog box will ask whether to turn on Bluetooth. Click "Yes".
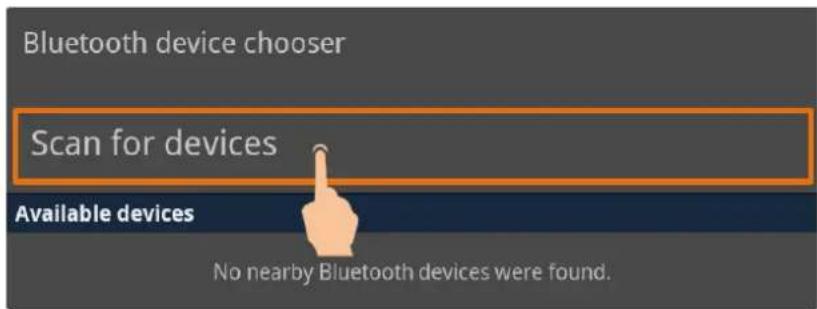
Click to scan for Bluetooth devices.
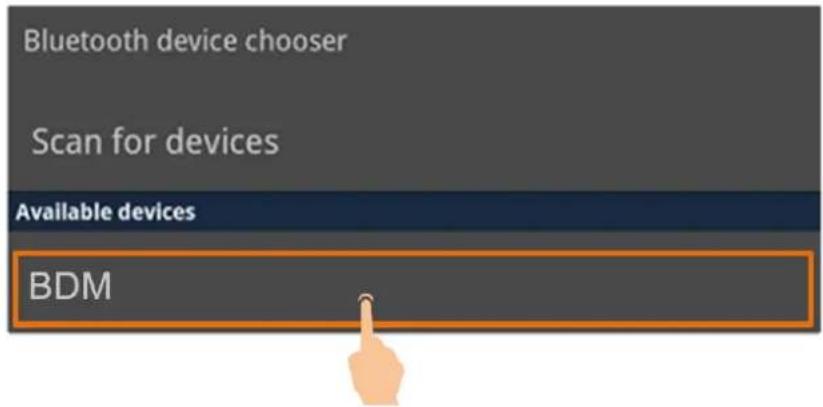
(6) Click "BDM" in the device list to pair.
User Interface in Android App
Double View
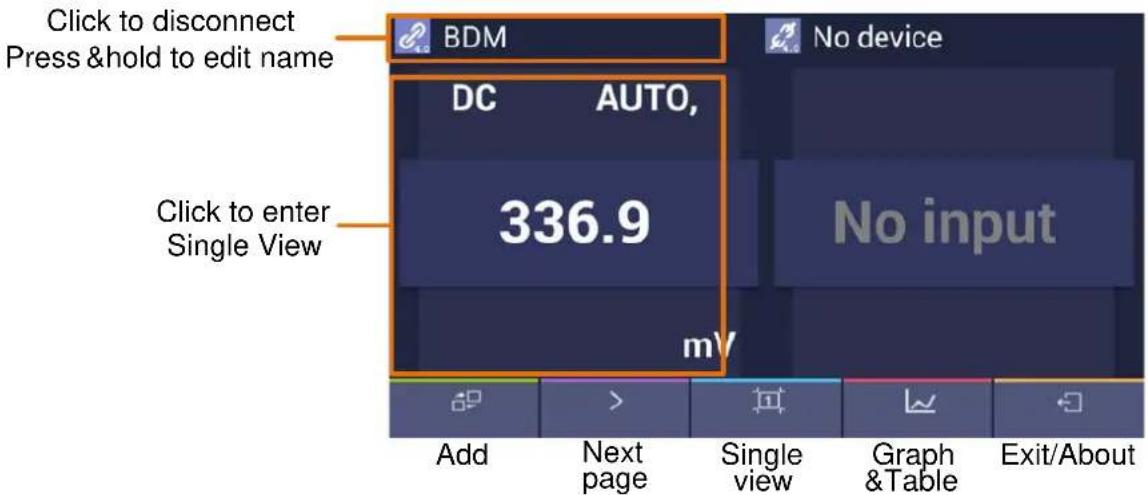
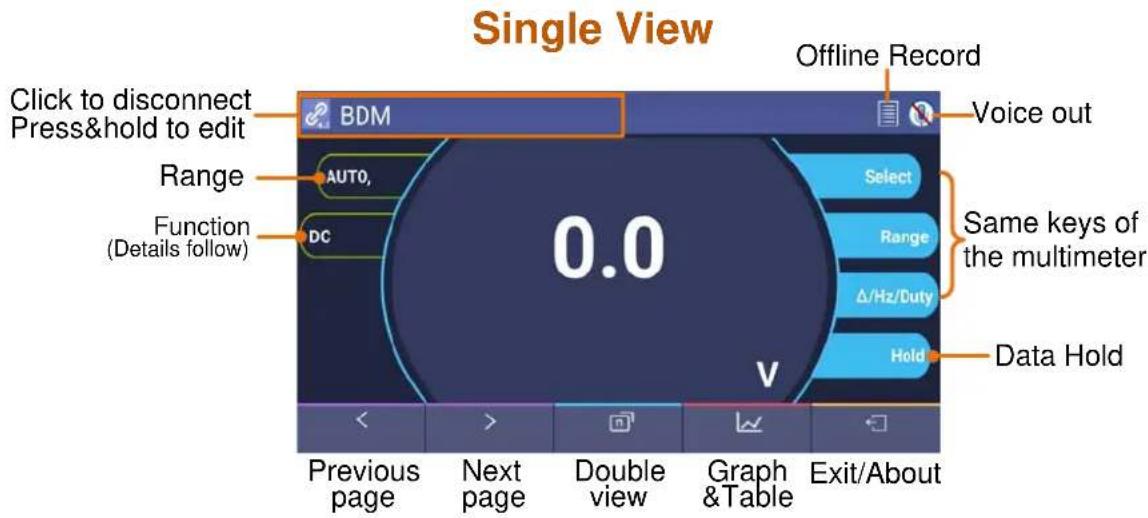
Function Description Table
| Display | Function |
| DC | Direct Current |
| AC | Alternating Current |
| RES | Measuring Resistance |
| DIO | Testing Diodes |
| BEEP | Testing for Continuity |
| Display | Function |
| CAP | Measuring Capacitance |
| Hz | Measuring Frequency |
| DUT | Measuring Duty Cycle |
| TEMP | Measuring Temperature |
| NCV | Non-contact Voltage Detect |
Operations in Android App
- Customize the meter name
The device name of meter can be customized. Press and hold the name on the top left of the screen, a dialog box below will pop up. You can input the customized name, this name will be memorized in the device. If this meter is connected to the same device next time, the customized name will be shown. If this meter is connected to another device, the name is still the default one or the customized name to the connected device.
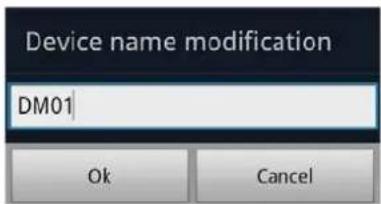
- Add meter: In double view, click softkey.
- Select meter: In single or double view, click > or < softkey.
- Disconnect meter: In single or double view, click 4.0 or the meter name.
- Remote Control: In single view, the control softkeys (blue background softkeys, as Hold, Rel, Select, etc.) can be short or long pressed to perform control, just as press
the corresponding keys of multimeter.
- Voice out function
Provide an audible out of the readings through the text-to-speech (TTS) engine on
your Android device. Click the 📄 icon on the top right of the screen to turn on
voice out. Click 📄 to turn off. In settings menu on your Android device, you can set the language-specific voice for the spoken text, or speech rate etc.
You may change to different voices by installing different TTS engines. TTS engines can be downloaded by scanning QR Codes or visit www.owon.com.cn.
- Upgrade Online: Click , and click "About". Click "Upgrade".
● Data Graph and Table: Click 📊 to view data graph and table. Click → to show setting menu.
Data Graph&Table
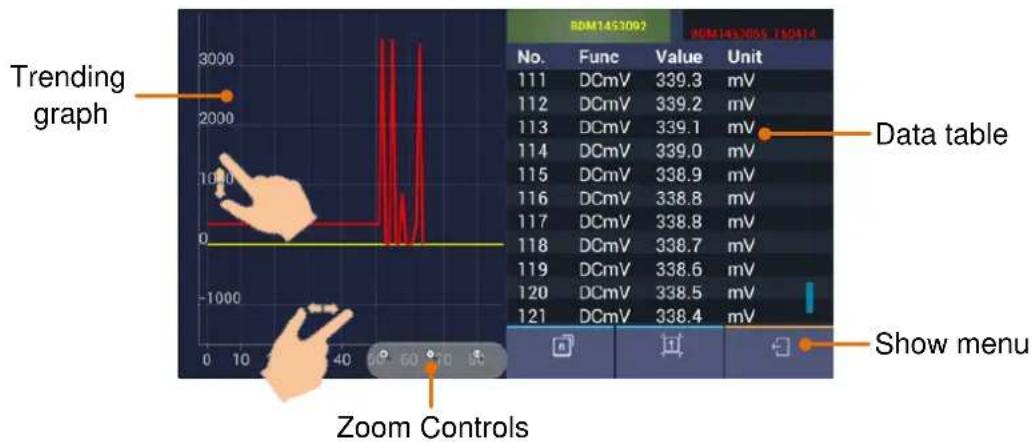
Setting menu:
| Softkey | Description |
| Open local file | Read the saved file (.CSV) |
| Save data | Save the displayed data into .CSV file |
| Share | Share the measurements via the installed sharing apps |
| Clear data | Clear the data that is being displayed |
| Setting | Record Interval: Set the record interval in the application software. Enable Period: Log data within the defined period. Record Period: Define the period time if the period is enabled. Fill: Check to fill the area as blue below the data line. |
| Exit | Exit the APP |
Note: In trending graph, you can pinch the screen to zoom. The Y axis (value) can be zoomed by gesturing along the up-down direction, and the X axis (time) can be zoomed by gesturing along the left-right direction.
Multimeter Offline Record (Android)
When measuring with OW16B, you can use Android device APP to send a command, the multimeter will start recording the measurements. After receiving the command, the connection will be disconnected automatically. The multimeter will record the measuring data in its own memory. After completion of the record, use Android APP to reconnect the multimeter, and then you can read the measuring data into the Android device as a CSV file. You can use this function to record for a long time without staff on duty, while reducing Bluetooth consumption to conserve the battery power of the multimeter.
Note: When the low battery indicator 📄 appears on the meter screen, the offline record function may not work correctly. Please check the batteries of the meter to ensure them in a good state.
(1) Connect the Android device with the multimeter, see "How to Connect with Android Device" on P19.
(2) In APP single view, tap on the icon on the top right, select Record setting from the pop-up menu.
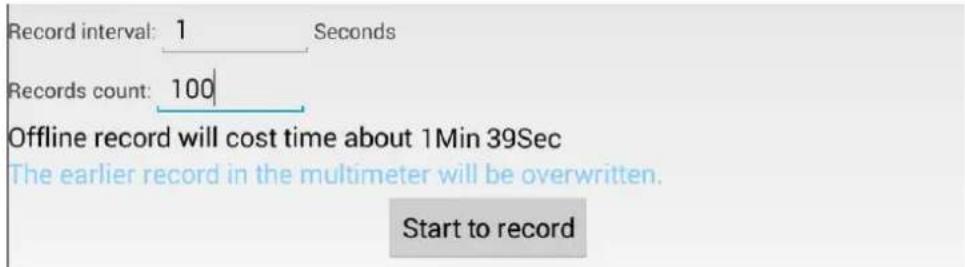
(3) Set "Record interval" and "Records count" (maximum records count is 10,000). Tap on .The memory in the multimeter can only store the recording data of one time. When start to record, the earlier offline record stored in the multimeter will be overwritten. After starting, the APP interface will display
The record command has been sent to the multimeter, Bluetooth connection will be disconnected in two seconds.
The Android device will disconnect with the multimeter in two seconds. After disconnecting, the information "Bluetooth connection has been disconnected." will be shown on APP. The multimeter will record the current measurements and store in the memory.
Note: If the multimeter is in the process of recording data and not finished yet, connect the Android device and the multimeter, a dialog box will pop up:
| The device is recording data now,please choose? | |
| Stop recording | Continue and disconnect |
Select Stop recording, the recording process will be interrupted. The Android device will connect with the multimeter to read data.
Select , Continue record continue recording, the connection will be aborted.
(4) After completion of the record, to read the measuring data, reconnect the Android device and the multimeter.
(5) In APP single view, tap on the 📄icon on the top right, select Record read from the pop-up menu. The file name start with "Offline", the following part can be customized.
![Offline data bytes: 22 bytes Offline data save as: [Offline]+ BDM Read data](/content/2026/05/853333/images/d4f7e2be1c0c5fdf34972b5fd07e57b46681ac8d9a89764e54be8aa84b7e0906.jpg)
(6) Tap on Read data, APP will read the measuring data and save as a CSV file into the Android device. After reading, display as below:
![Offline data bytes: 22 bytes Offline data save as: [Offline]+ BDM Back Display data](/content/2026/05/853333/images/0d690002e768247c34d5781377e2380462209af782fa42ee750363aee10b6648.jpg)
(7) Tap on Display data, the data will be displayed in Data Graph and Table interface.
iOS App
How to Connect with iOS Device
(1) Install the free application software for iOS on your iOS smart device.
(2) Launch the application MultimeterBI.E. If the Bluetooth function is not activated, a dialog box will prompt you to turn on Bluetooth. Tap on "Settings".
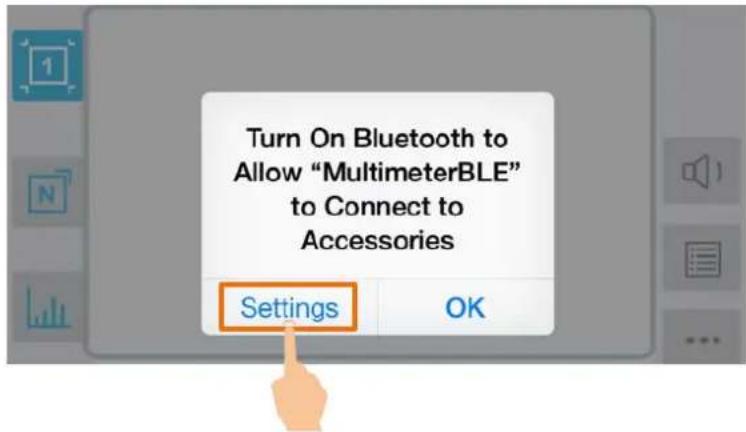
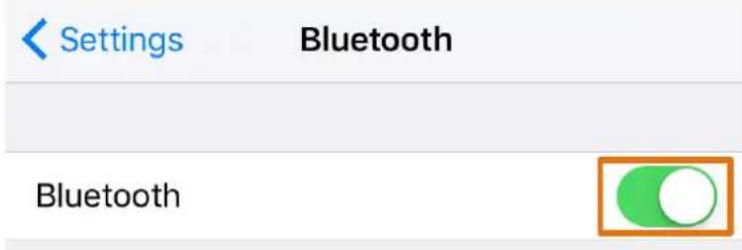
Turn on Bluetooth, and return to the multimeter APP.
(3) Turn on the multimeter, press and hold / until appear on the display.
(4) Tap on the center to launch device connection.
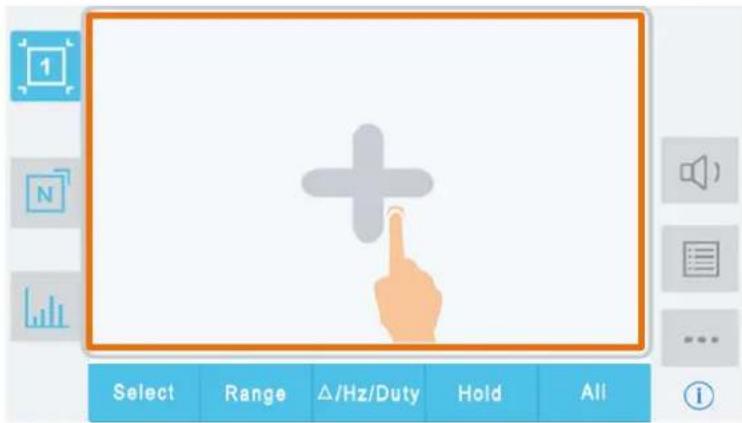
(5) Select the desired multimeter in the device list.
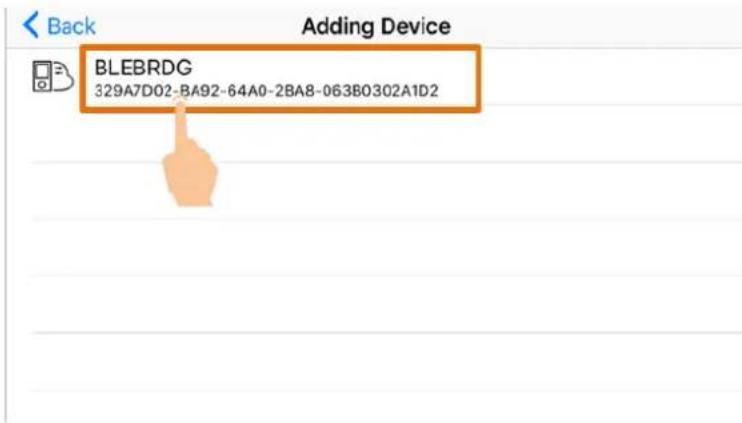
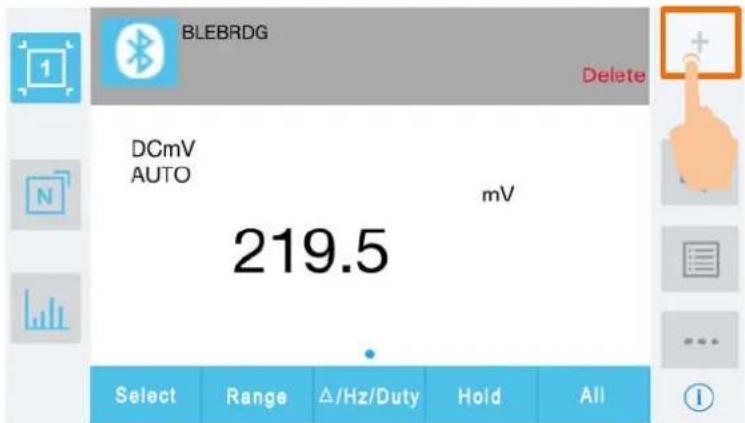
(6) The measurements will be shown if the connection is successful. You can tap on the softkey on the right to add another multimeter.
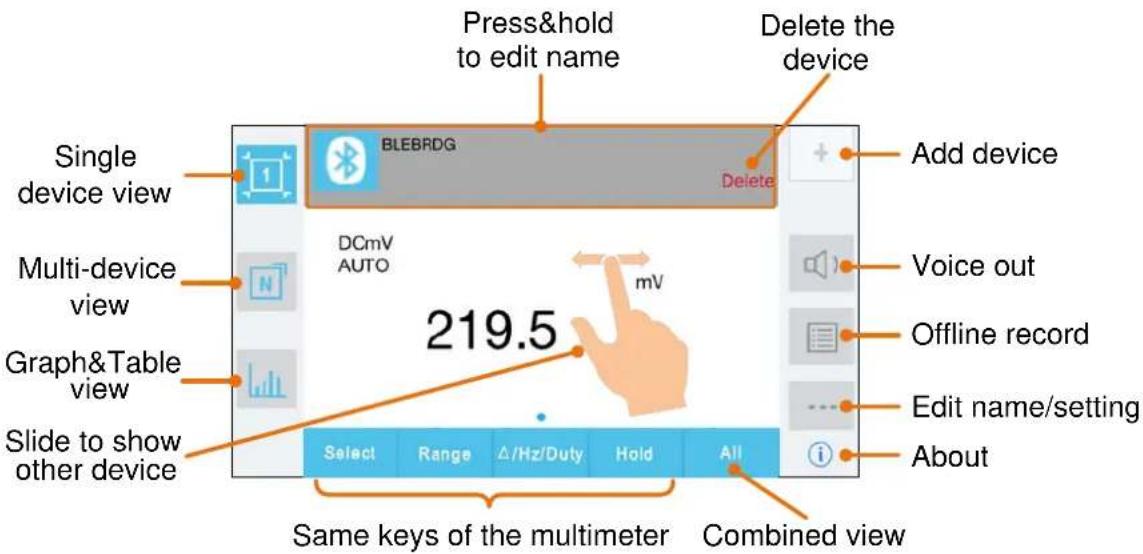
User Interface in iOS App
Single Device View
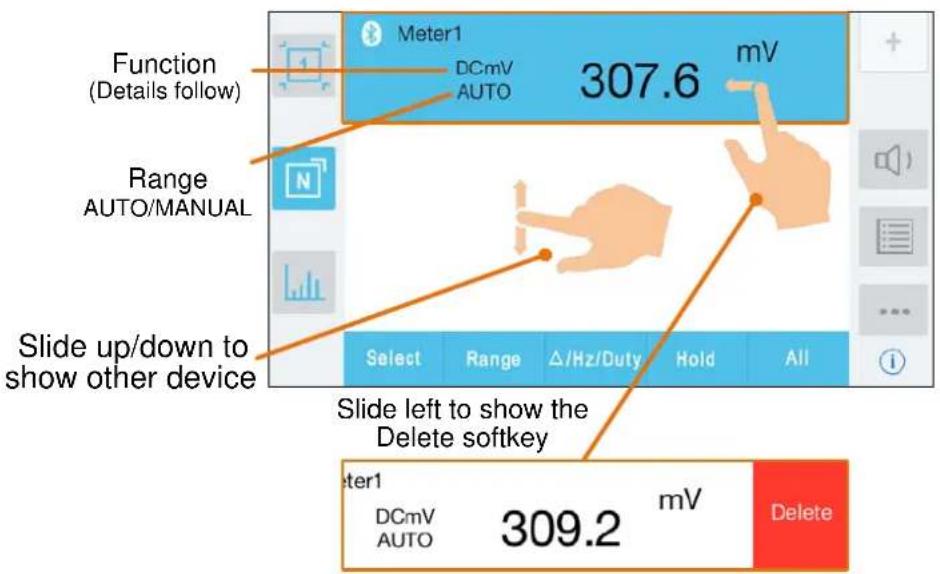
Multi-device View
Function Description Table
| Display | Function |
| DC | Direct Current |
| AC | Alternating Current |
| RES | Measuring Resistance |
| DIO | Testing Diodes |
| BEEP | Testing for Continuity |
| Display | Function |
| CAP | Measuring Capacitance |
| Hz | Measuring Frequency |
| DUT | Measuring Duty Cycle |
| TEMP | Measuring Temperature |
| NCV | Non-contact Voltage Detect |
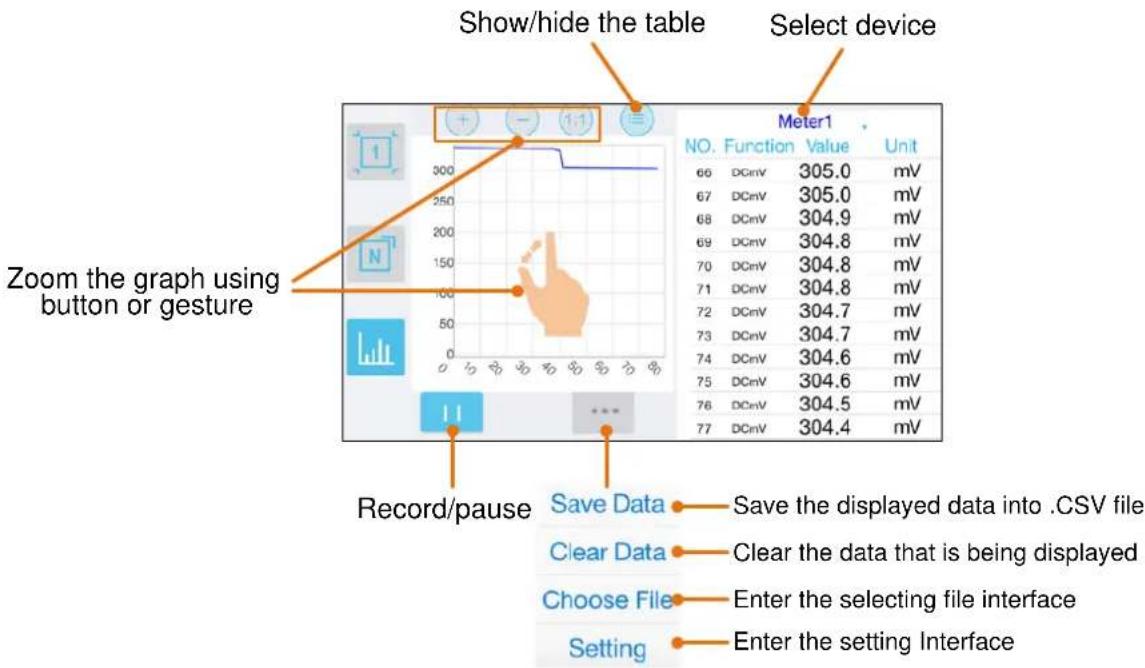
Graph&Table View
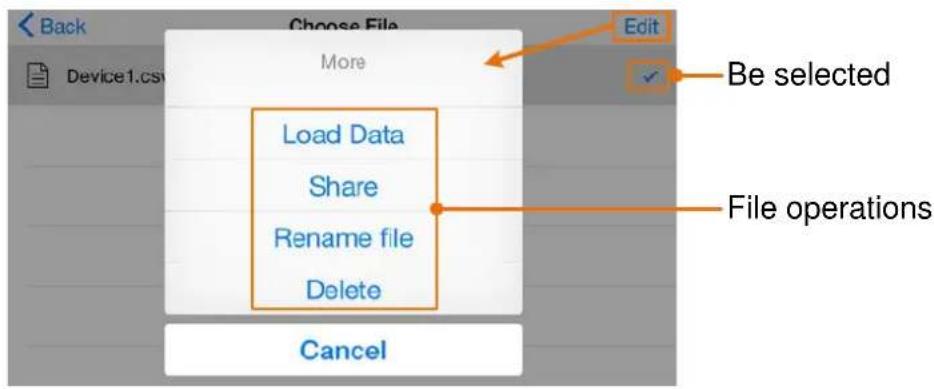
Selecting File Interface
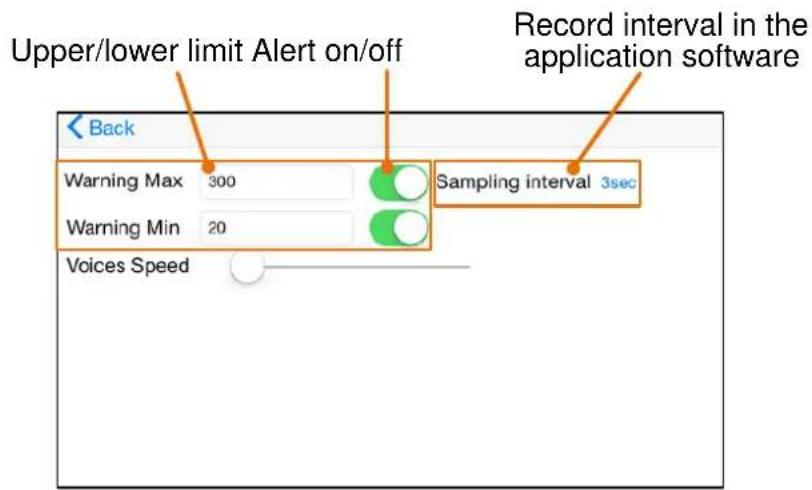
Setting Interface
Operations in iOS App
- Customize the meter name
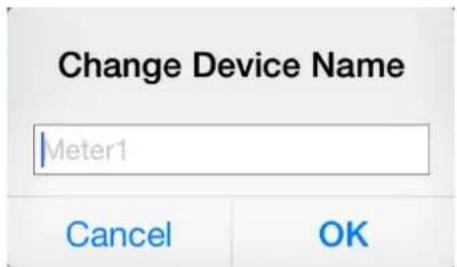
The device name of the meter can be customized. Press and hold the device name (in single device view), or click softkey (in single or multi-device view) and select "Change Device Name", a dialog box below will pop up. You can input the customized name, this name will be memorized in the device. If this meter is connected to the same device next time, the customized name will be shown. If this meter is connected to another device, the name is still the default one or the customized name to the connected device.
- Add meter: In single or multi-device view, click + softkey.
- Select meter: In single device view, slide left or right to switch the meter view. In multi-device view, click a device item to select it, the background is turned to blue.
- Disconnect meter: In single device view, click "Delete". In multi-device view, slide a device item to the left to show the "Delete" softkey, and click it.
- Voice out function: In single or multi-device view, click the icon to turn on voice out. Click to turn off. In settings interface, you can adjust the reading speed.
- Alert: In setting interface, you can enable the alert notification, and set the upper/lower limit. APP will alert for any out-of-limit event.
- Upgrade Online: In single or multi-device view, click ⓘ. If "Latest" is shown, indicates it is the latest version, no need to update. If "Update" is shown, you can click to update the APP.
- Remote Control: In single or multi-device view, the control softkeys below
Select Range /Hz/Duty Hold, can be short or long pressed to perform control, just as press the corresponding keys of the multimeter.
Multimeter Offline Record (iOS)
When measuring with OW16B, you can use iOS device APP to send a command, the multimeter will start recording the measurements. After receiving the command, the connection will be disconnected automatically. The multimeter will record the measuring data in its own memory. After completion of the record, use APP to reconnect the multimeter, and then you can read the measuring data into the iOS device as a CSV file. You can use this function to record for a long time without staff on duty, while reducing Bluetooth consumption to conserve the battery power of the multimeter.
Note: When the low battery indicator 📄 appears on the meter screen, the offline record function may not work correctly. Please check the batteries of the meter to ensure them in a good state.
(1) Connect the iOS device with the multimeter, see "How to Connect with iOS Device" on P24.
(2) In APP device view, tap on the softkey on the right, select "Record setting" from the pop-up menu.
Tips: The earlier record in the multimeter will be overwritten.
Record interval 1 Sec
Record counts 10 Maximum is 10,000
Record will cost time about: 9Sec
start offline record
(3) Set "Record interval" and "Records counts" (maximum records count is 10,000). Tap on "start offline record". The memory in the multimeter can only store the recording data of one time. When start to record, the earlier offline record stored in the multimeter will be overwritten.
Note: If you want to interrupt the recording process of the multimeter, reconnect the iOS device and the multimeter, select "Stop recording".
(4) After completion of the record, to read the measuring data, reconnect the iOS device and the multimeter.
(5) In APP device view, tap on the softkey on the right, select "Record read" from the pop-up menu. The file name start with "Offline", the following part can be customized.
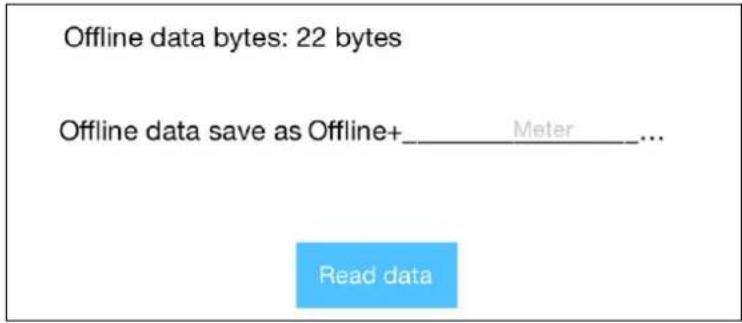
(6) Tap on "Read data", APP will read the measuring data and save as a CSV file into the iOS device.
After reading, display as below:
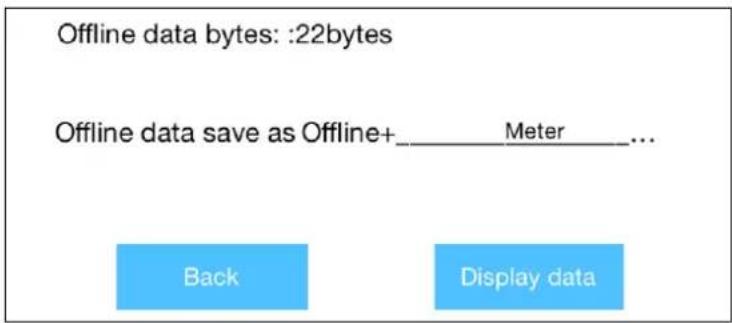
(7) Tap on "Display data", the data will be displayed in Data Graph and Table interface.
6. To Connect with Computer – Only for OW16B
To connect the multimeter to a computer, a Bluetooth USB adapter should be plugged into the USB port of computer.
● Use only the Bluetooth USB adapter (optional) supplied with the product.
- The computer must be running the Windows operating system (Windows 10, Windows 8, Windows 7, Windows Vista, Windows XP).
OW16B supports communications with a computer through Bluetooth. You can use the free multimeterBLE software on computer to monitor the measurements, perform remote control, view trending graphs, etc. The recorded data can be saved as CSV file. The maximum number of record that can be stored depends on the free storage space in your smart device. Up to three multimeters can be connected simultaneously.
How to Connect with Computer
Step 1: Install multimeterBLE software
Install the multimeterBLE software on your computer.
Step 2: Install driver of Bluetooth USB adapter
(1) Navigate to the multimeterBLE software installation folder (for example, C:\Program Files\multimeterBLE).
Double-click BLE-CC254x-1.4.1.43908.exe in this folder.
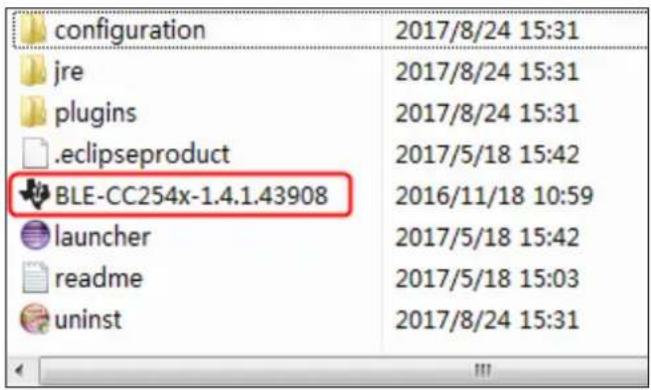
(2) Click "Next".
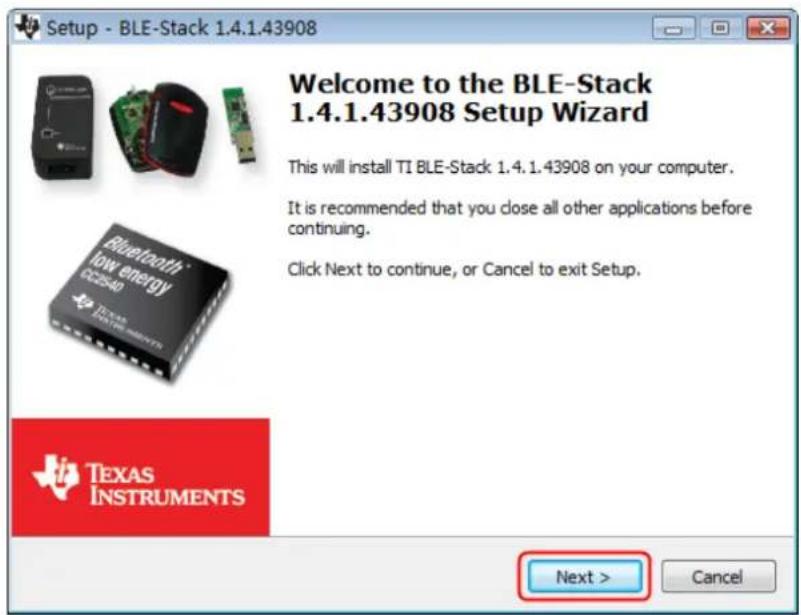
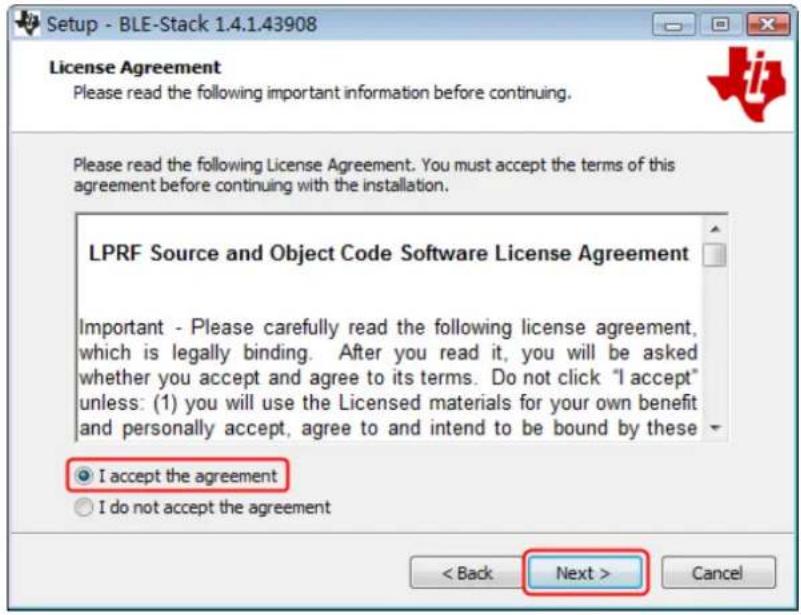
(3) Select "I accept the agreement", and then click "Next".
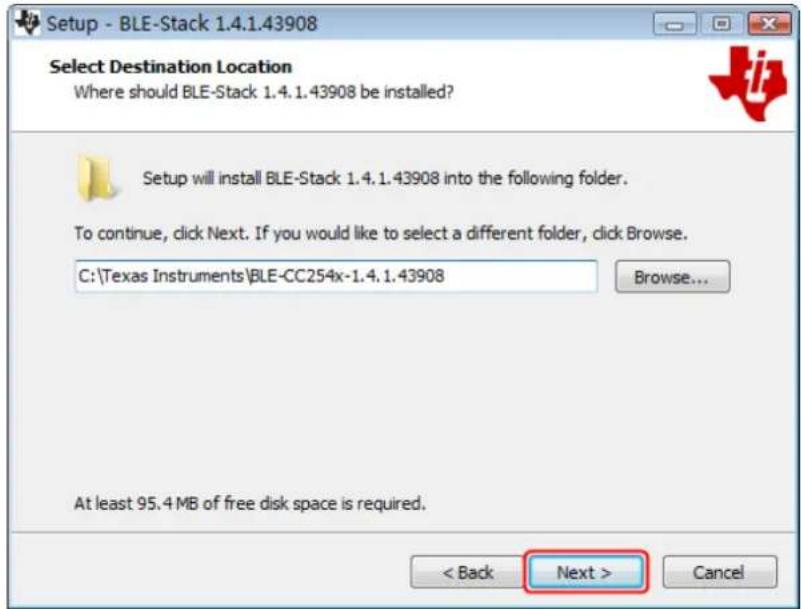
(4) Select the destination folder, and then click "Next".
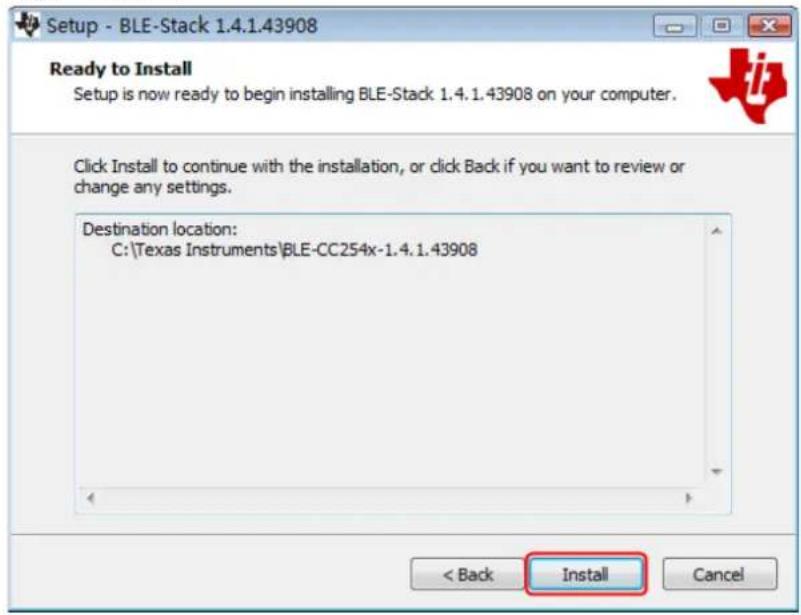
(5) Click "Install".
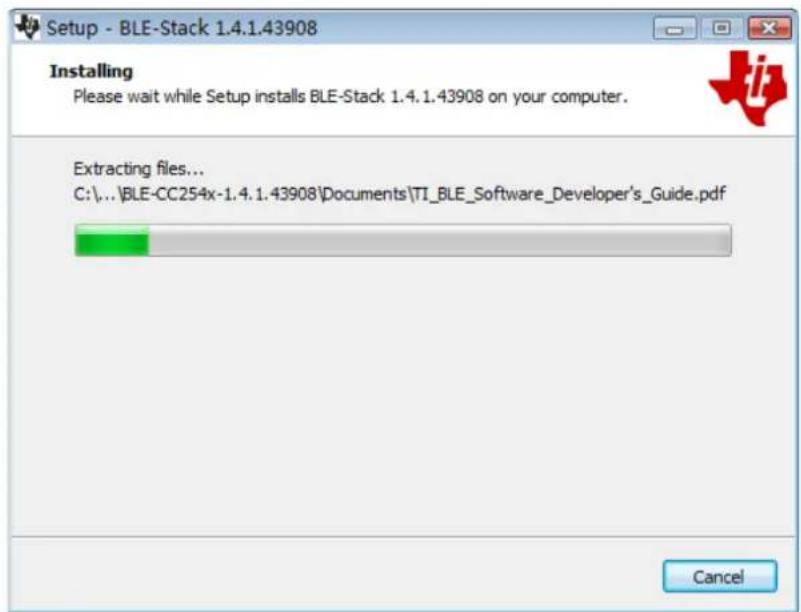
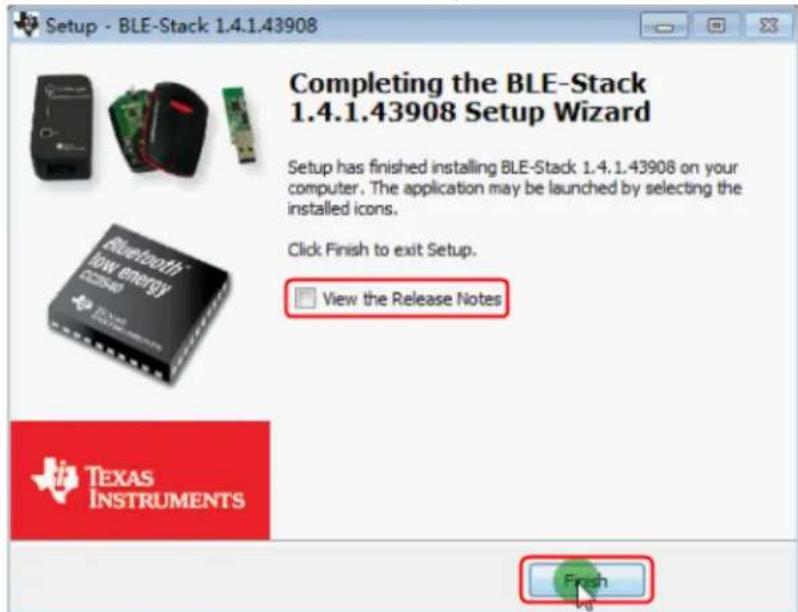
(6) Uncheck "View the Release Notes", and click "Finish" to exit Setup.
(7) Plug the Bluetooth USB adapter into a USB port on your computer.
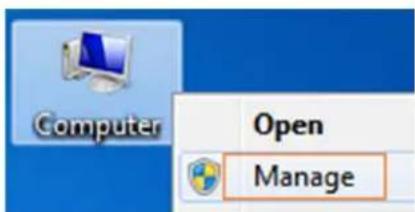
Right click [Computer], you can find it on the desktop, or in [Start] menu. In the drop down menu, click on [Manage], the "Computer Management" window opens.
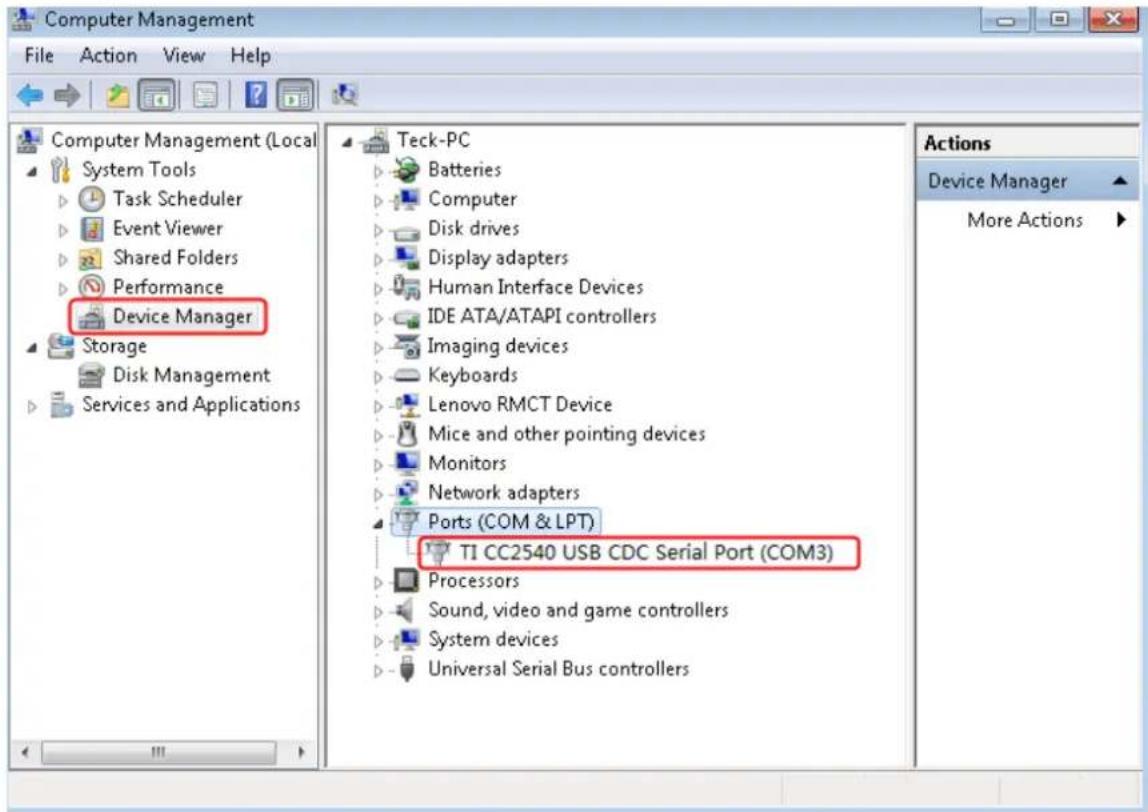
Click on "Device Manager" on the left hand side. On the right hand side, double click on "Ports (COM & LPT)".
Under ports, if "TI CC2540 USB CDC Serial Port (COM#)" is displayed, that means the driver is installed successfully. Remember the "COM #" because you will need to configure the multimeterBLE software.
Note: If an unknown device is displayed, try to install the driver manually following the steps below.
How to install the driver manually
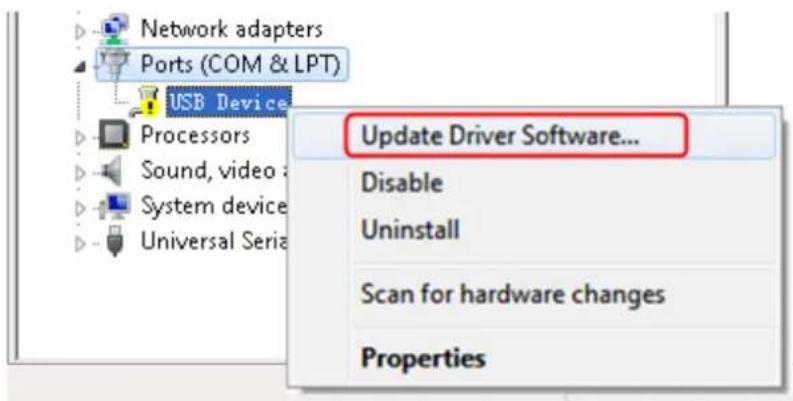
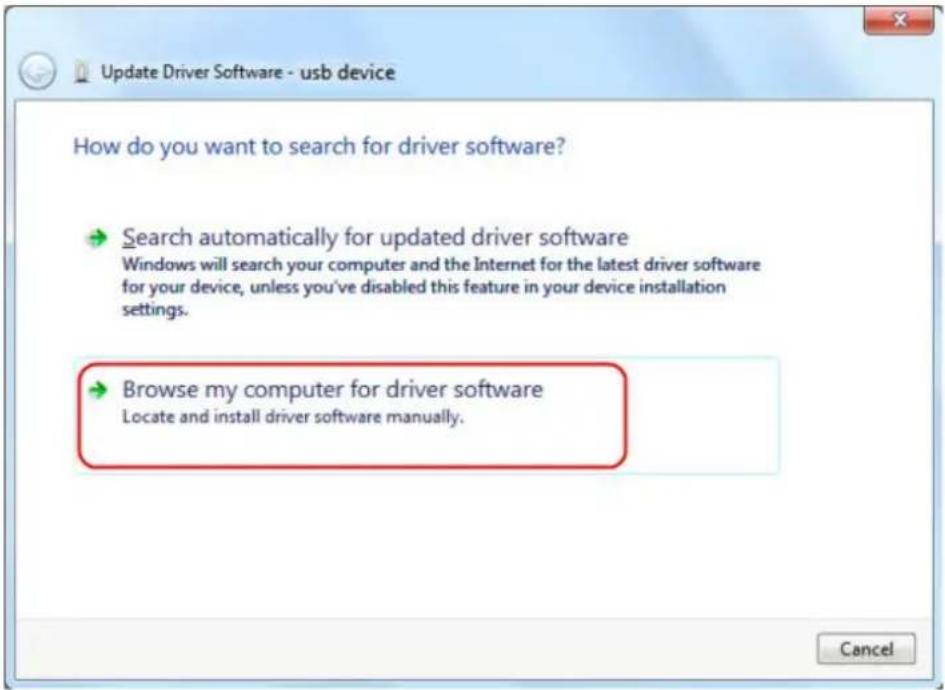
Right click the unknown device icon, in the drop down menu, click "Update Driver Software...".
Select "Browse my computer for driver software".
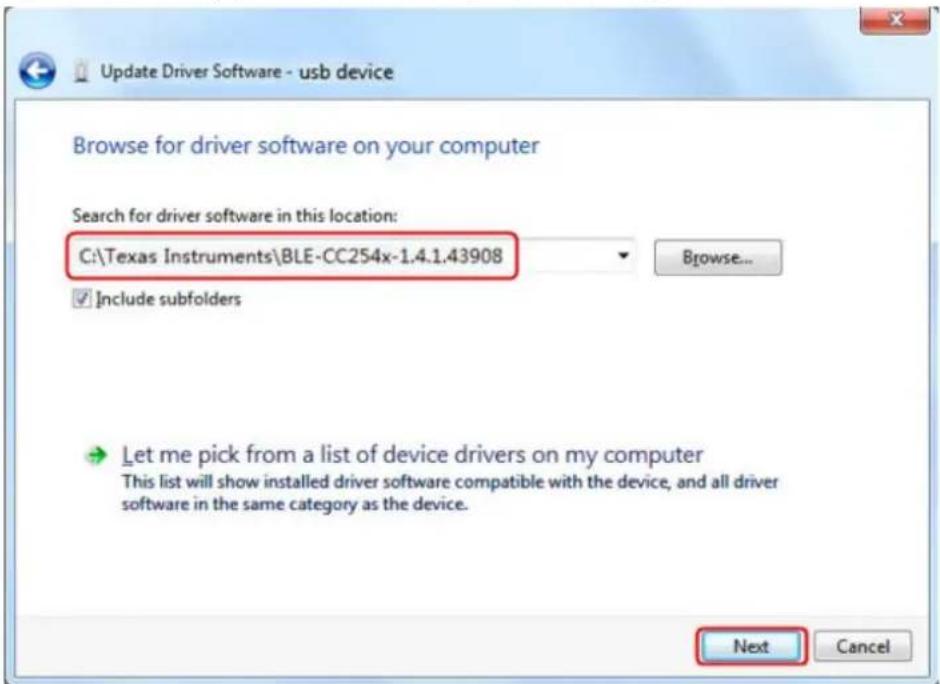
Select a directory path for the driver, and click "Next".
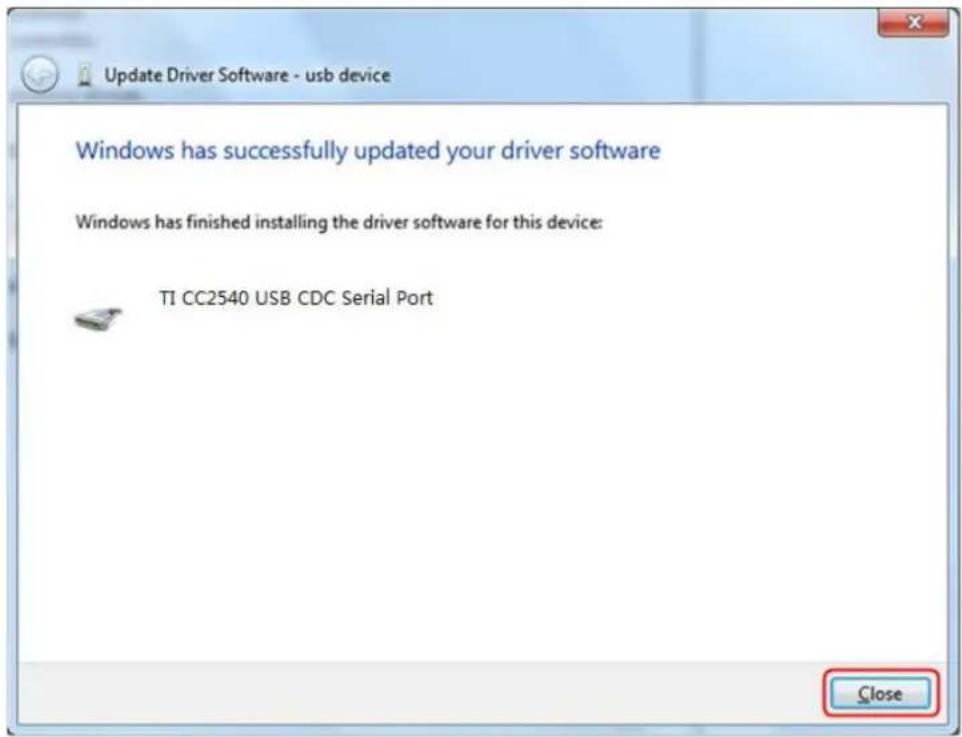
After installing successfully, click "Close".
In Device Manager, check if "TI CC2540 USB CDC Serial Port (COM#)" is displayed under Ports (COM & LPT).
Step 3: Connect to multimeterBLE software
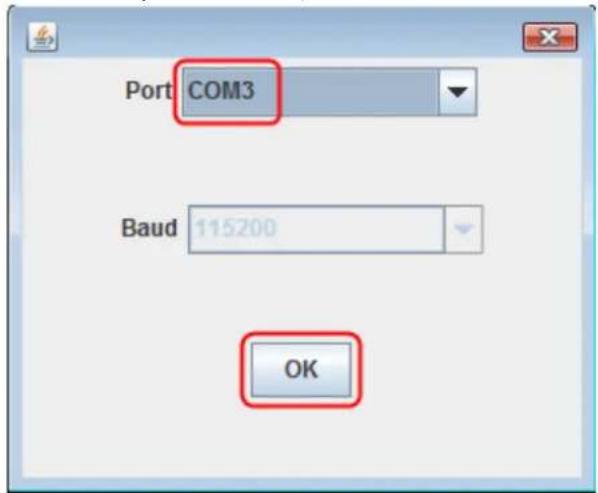
(1) After installing the Bluetooth USB adapter driver successfully, run the multimeterBLE software, the configure dialog box appears.
Make sure that the Bluetooth USB adapter is plugged into the computer.
To find the "Port" (COM #), you will need to look for it under "Ports (COM & LPT)" in Device Manager window.
Select the port number, and click "OK".
(2) Turn on the multimeter, press and hold Hz/Dufy △/* until ✝ appear on the display.
(3) Click + softkey on the right, a Scan Devices dialog box appears. A progress bar shows the progress of scanning multimeters. It will take a few seconds. When the
scan is finished, select the desired multimeter in the device list. Click the "Connect" button.
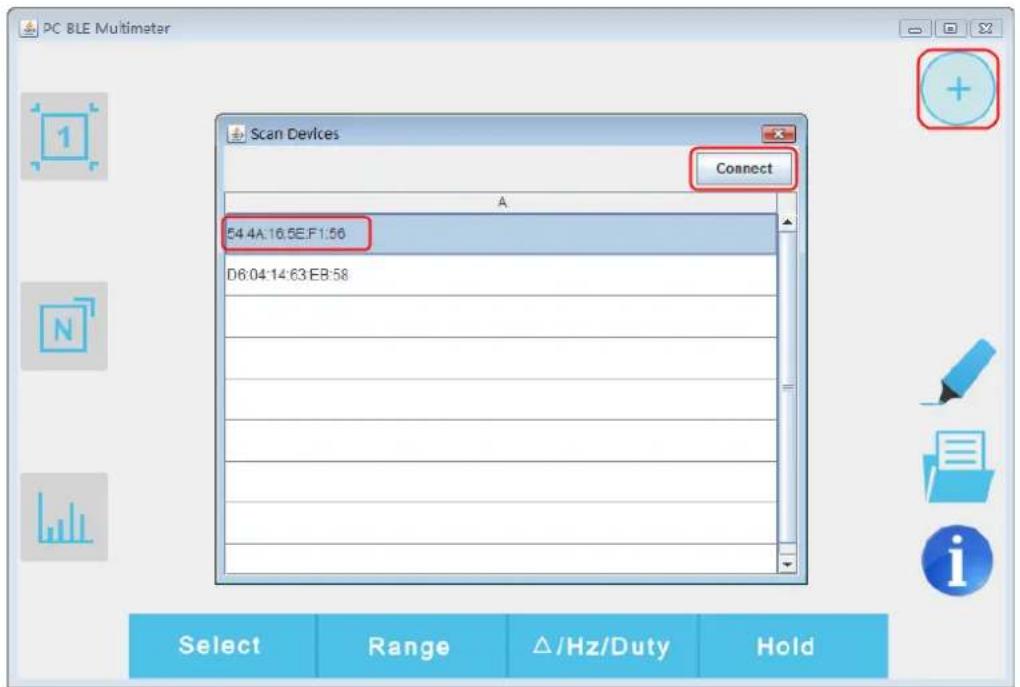
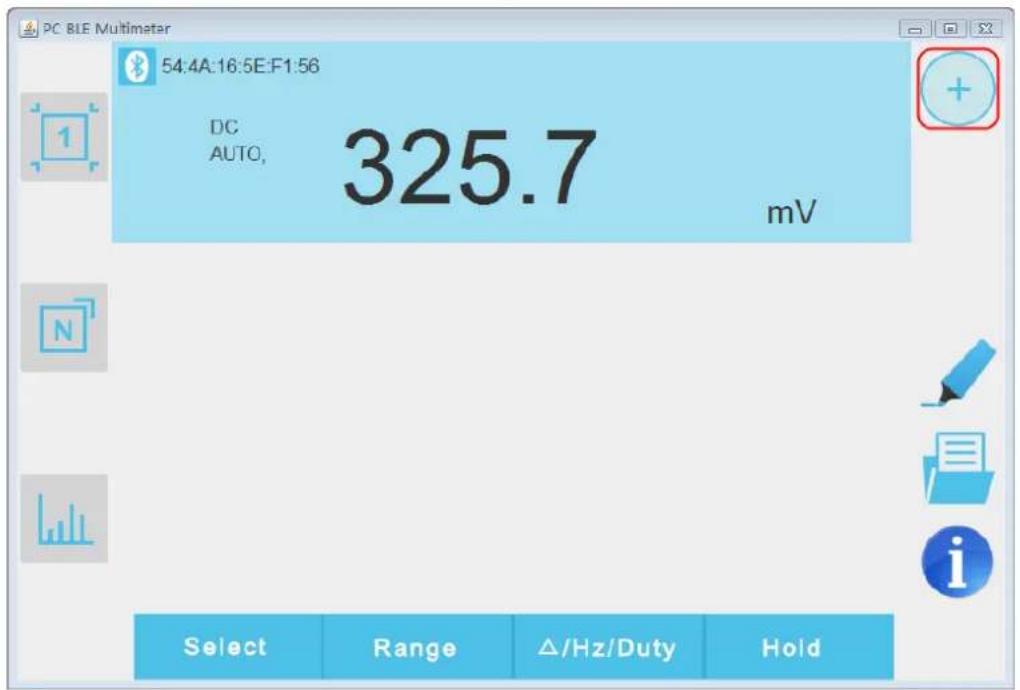
(4) The measurements will be shown if the connection is successful. You can tap on the

softkey on the right to add another multimeter.
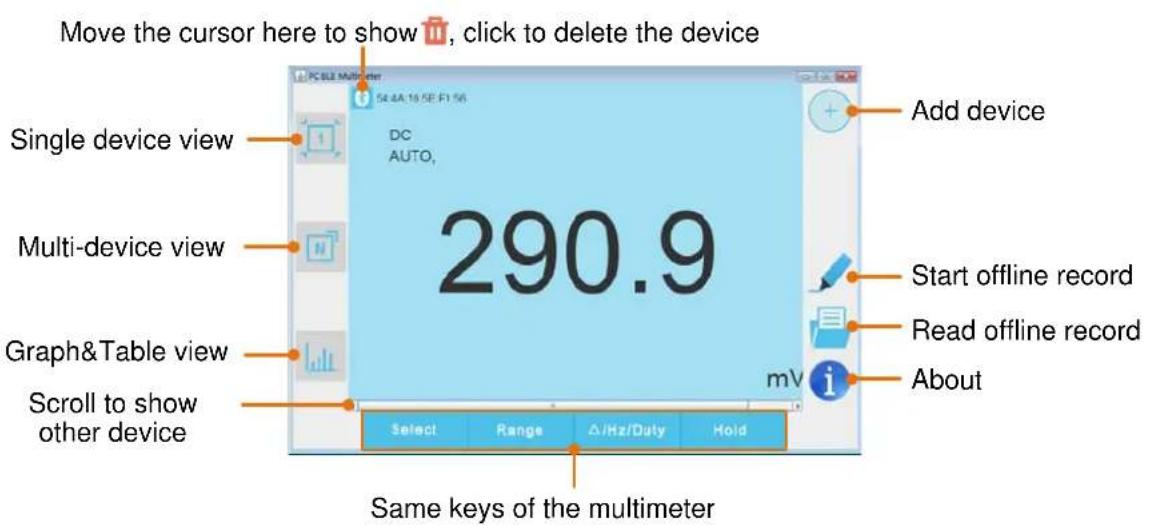
User Interface in MultimeterBLE Software
Single Device View
Multi-device View
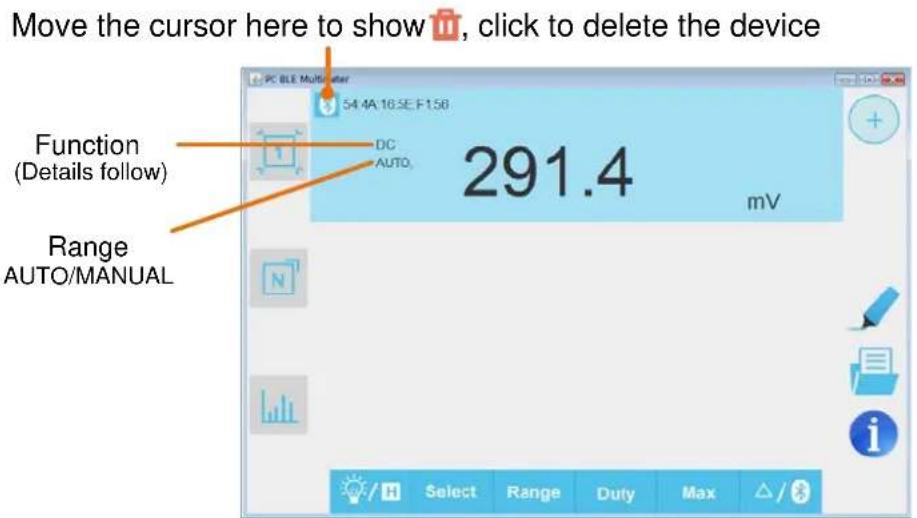
Function Description Table
| Display | Function |
| DC | Direct Current |
| AC | Alternating Current |
| RES | Measuring Resistance |
| DIO | Testing Diodes |
| BEEP | Testing for Continuity |
| Display | Function |
| CAP | Measuring Capacitance |
| Hz | Measuring Frequency |
| DUT | Measuring Duty Cycle |
| TEMP | Measuring Temperature |
| NCV | Non-contact Voltage Detect |
Graph&Table View
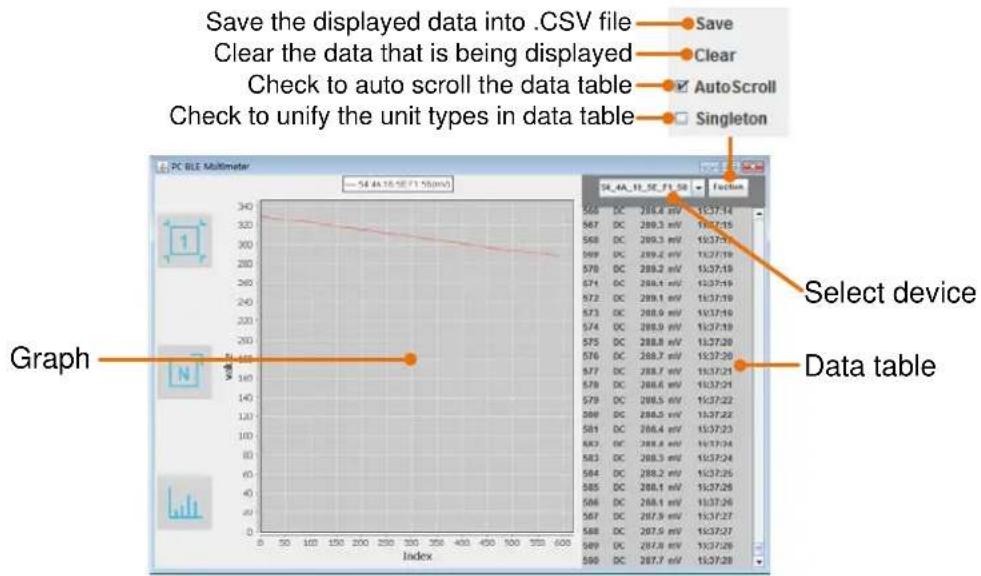
Operations in MultimeterBLE Software
- Add meter: In single or multi-device view, click + softkey on the right.
- Select meter: In single device view, scroll left or right to switch the meter view. In multi-device view, click a device item to select it, the background is turned to blue.
- Disconnect meter: In single or multi-device view, move the cursor over the icon, it will change to 📋, click it.
- Remote Control: In single or multi-device view, the control softkeys
| Select | Range | /Hz/Duty | Hold |
can be short or long pressed to
perform control, just as press the corresponding keys of the multimeter.
- Unify the unit types: In Graph&Table view, sometimes the unit type will be changed while recording, for example, V is changed to mV. To unify the unite types, click "Function" on the top right, in the drop down menu, check "Singleton".
Multimeter Offline Record (PC Software)
When measuring with OW16B, you can use PC software to send a command, the multimeter will start recording the measurements. After receiving the command, the connection will be disconnected automatically. The multimeter will record the measuring data in its own memory. After completion of the record, use PC software to reconnect the multimeter, and then you can read the measuring data into the Android device as a CSV file. You can use this function to record for a long time without staff on duty, while reducing Bluetooth consumption to conserve the battery power of the multimeter.
Note: When the low battery indicator - + appears on the meter screen, the offline
record function may not work correctly. Please check the batteries of the meter to ensure them in a good state.
(1) Connect the multimeterBLE software with the multimeter, see "How to Connect with Computer" on P32.
(2) On software interface, click the softkey on the right, a dialog will show.
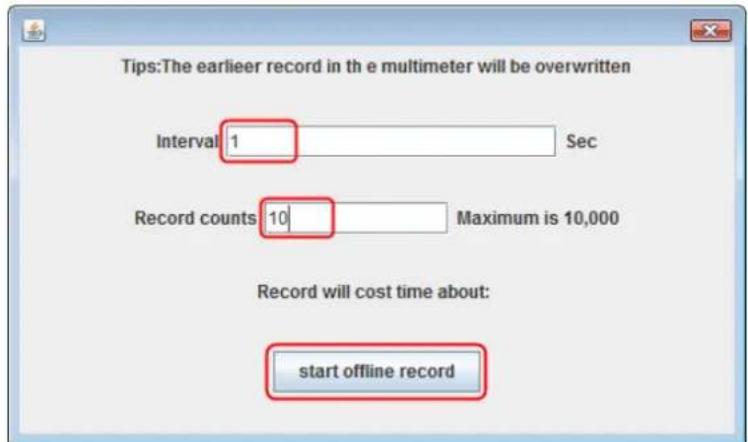
(3) Set "Interval" and "Record counts" (maximum records count is 10,000). Click "start offline record". The memory in the multimeter can only store the recording data of one time. When start to record, the earlier offline record stored in the multimeter will be overwritten.
Note: If you want to interrupt the recording process of the multimeter, reconnect the software and the multimeter, select "Stop recording".
(4) After completion of the record, to read the measuring data, reconnect the software and the multimeter.
(5) On software interface, click softkey on the right, a dialog will show. The file name start with "Offline", the following part can be customized.
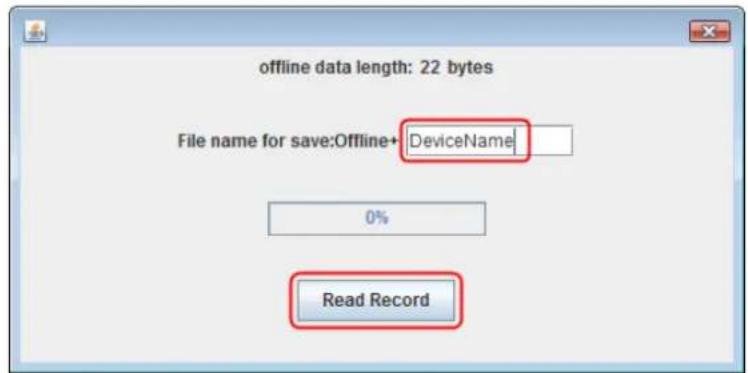
(6) Click "Read Record", the software will read the measuring data and save as a CSV file into computer. After reading, the dialog is as below:
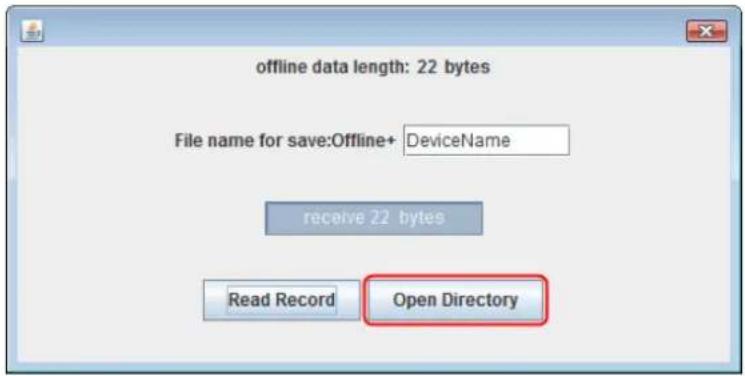
(7) Click "Open Directory" to open the directory where the CSV files are saved.
7. Technical Specifications
All these specifications apply to the multimeter unless otherwise explanation.
Standard conditions: The environment temperature is 18^ C to 28^ C, the relative humidity is less than 80%.
Note: When measuring AC voltage/current or capacitance, accuracy guarantee range is 5% to 100% of the range.
| Function Measurement Range | Resolution | Function | ||
| DC Voltage (V) | V | 600.0mV/6.000V/60.00V/600.0V | 0.1mV | ±(0.5%+2dig) |
| 1000V | 1V | ±(0.8%+2dig) | ||
| AC Voltage (V) | V | 600.0mV | 0.1mV | ±(2%+5dig) |
| 6.000V/60.00V/600.0V | 1mV | ±(0.8%+3dig) | ||
| 750V | 1V | ±(1%+3dig) | ||
| DC Current (A) | μA[1] | 600.0μA/6000μA | 0.1μA | ±(0.8%+2dig) |
| mA | 60.00mA/600.0mA | 0.01mA | ±(0.8%+2dig) | |
| A | 10.00A | 0.01A | ±(1.2%+3dig) | |
| AC Current (A) | μA[1] | 600.0μA/6000μA | 0.1μA | ±(1%+3dig) |
| mA | 60.00mA/600.0mA | 0.01mA | ±(1%+3dig) | |
| A | 10.00A | 0.01A | ±(1.5%+3dig) | |
| Resistance (Ω) | 600.0Ω/6.000kΩ/60.00kΩ/600.0kΩ/6.000MΩ | 0.1Ω | ±(0.8%+2dig) | |
| 60.00MΩ | 0.01 MΩ | ±(2%+3dig) | ||
| Capacitance (F) | 60.00nF/600.0nF/6.000μF/60.00μF | 0.01nF | ±(3%+3dig) | |
| 600.0μF/6.000mF/60.00mF [2] | 0.1μF | ±(3%+5dig) | ||
| Frequency [3] (Hz) | 9.999Hz/99.99Hz/999.9Hz/9.999kHz/99.99kHz/999.9kHz/9.999MHz | 0.001Hz | ±(0.8%+2dig) | |
| Duty Cycle [4] (%) | 0.1% - 99.9%(Typical: Vrms=1 V, f=1 kHz) | 0.1% | ±(1.2%+3dig) | |
| 0.1% - 99.9%(≥1 kHz) | ±(2.5%+3dig) | |||
| Temperature (°C/°F) | -50 °C to 400 °C | 1 °C | ±(2.5%+3dig) | |
| -58 °F to 752 °F | 1 °F | ±(4.5%+5dig) | ||
[1] The rotary switch position A ≈ is only for specific models.
[2] When measuring capacitance, for the 60.00mF range, the measuring duration should be over 30 seconds.
[3] When measuring frequency, the typical waveform is Square or Sine. The signal meets
the following conditions.
| Frequency | Amplitude (rms) |
| 1 Hz – 5 MHz | ≥slant 700 mV |
[4] When measuring duty cycle, the typical waveform is Square.
| Characteristics | Instruction | |
| Display | 5999 | |
| Frequency Response (Hz) | (40 - 1000) Hz | |
| Sample rate for digital data | 3 times/second | |
| Bluetooth | OW16A | Without |
| OW16B | ✓ | |
| Auto ranging | ✓ | |
| True RMS | ✓ | |
| Diodes Test | ✓ | |
| Sleep Mode | ✓ | |
| Continuity Test | ✓ | |
| Low battery indication | ✓ (The "−" displayed when the battery is under the proper operation range.) | |
| Data Hold | ✓ | |
| Relative Measurement | ✓ | |
| LCD Backlight | ✓ | |
| Input Protection | ✓ | |
| Input Impedance | ≥ 10 MΩ | |
| Battery(Not included) | 3 V (1.5 V × 2) AA alkaline batteries | |
| LCD Size | 47 mm * 27 mm | |
| Weight (without package) | 0.29 kg | |
| Dimension | 74 mm * 154 mm * 49 mm | |
| Working temperature | 0°C to 40°C | |
| Storage temperature | -10°C to 60°C | |
| Relative Humidity | ≤ 80% | |
| Altitude | Operating: 3,000 mNon-operating: 15,000 m | |
Interval Period of Adjustment:
One year is recommended for the calibration interval period.
8. Appendix
Appendix A: Enclosure
Standard Accessories:
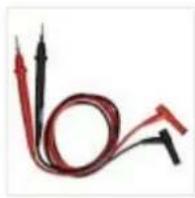
natural_image
Coiled black and red electrical test probes (no text or symbols visible)Multimeter Leads
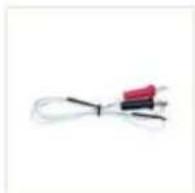
K-type thermocouple

Quick guide
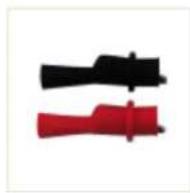
Alligator Clips (only for OW16B)
Options:
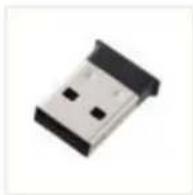
Bluetooth USB adapter to PC (only for OW16B)
Appendix B: General Care and Cleaning

Warning: To avoid electrical shock or damage to the multimeter, ensure that the insides of the casing stay dry at all times.
Cleaning
To clean the instrument exterior, perform the following steps:
Wipe the dust from the instrument surface with a soft cloth. Do not make any scuffing on the screen when clean the LCD. Clean the instrument with a wet soft cloth not dripping water. It is recommended to scrub with soft detergent or fresh water. To avoid damage to the instrument, do not use any corrosive chemical cleaning agent.
Dirt or moisture in the terminals can distort readings. Follow the steps below to clean your multimeter.
- Turn the multimeter off and remove the test leads.
- Turn the multimeter over and shake out the dirt in the terminals.
- Wipe the contacts in each terminal with a clean swab dipped in alcohol.
- July 2019 edition V1.0.3
- General Warranty
- Table of Contents
- Safety Information .... 1
- 2.Quick Start....5
- Multimeter in Brief 7
- 3.Making Measurements 12
- 4.Multimeter Features....17
- To Connect with Mobile Device - Only for OW16B 18
- Android App ....19
- iOS App ....24
- To Connect with Computer – Only for OW16B 32
- Technical Specifications .... 44
- Appendix......46
- Safety Information
- Safety Considerations
- EC Declaration of Conformity:
- Measurement Category
- Measurement category definition
- Safety Terms and Symbols
- Safety Terms
- Safety Symbols
- Quick Start
- General Inspection
- Check whether there is any damage caused by transportation.
- Check the Accessories
- Check the Complete Instrument
- Install the Batteries
- Adjusting the Tilt Stand
- Power On
- Sleep Mode
- LCD Backlight Control
- Selecting the Range
- Multimeter in Brief
- Front panel
- Display screen
- Input terminals
- Making Measurements
- Measuring AC or DC Voltage
- Measuring Resistance
- Testing for Continuity
- Testing Diodes
- Measuring Capacitance
- Measuring Frequency
- Measuring Temperature
- Non-Contact Voltage Detect (NCV)
- Warning:
- Measuring Transistor — Only for specific models
- Measuring DC or AC Current
- Multimeter Features
- Data Hold Mode
- Making Relative Measurements
- Buzzer Feature
- To Connect with Mobile Device – Only for OW16B
- Install the free application software
- For Android device
- For iPhone
- Android App
- How to Connect with Android Device
- User Interface in Android App
- Double View
- Operations in Android App
- - Customize the meter name
- - Voice out function
- Multimeter Offline Record (Android)
- iOS App
- How to Connect with iOS Device
- Selecting File Interface
- Setting Interface
- Operations in iOS App
- Multimeter Offline Record (iOS)
- To Connect with Computer – Only for OW16B
- How to Connect with Computer
- Step 1: Install multimeterBLE software
- Step 2: Install driver of Bluetooth USB adapter
- How to install the driver manually
- Step 3: Connect to multimeterBLE software
- User Interface in MultimeterBLE Software
- Graph&Table View
- Operations in MultimeterBLE Software
- Multimeter Offline Record (PC Software)
- Technical Specifications
- Appendix
- Appendix A: Enclosure
- Appendix B: General Care and Cleaning
- Cleaning
Brand : Owon
Model : OW16
Category : Multimeter