
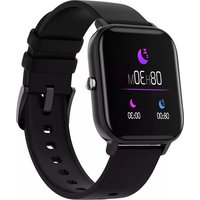
SW-61 - Smartwatch Canyon - Free user manual and instructions
Find the device manual for free SW-61 Canyon in PDF.


| Product Type | Smartwatch |
| Brand | Canyon |
| Model | SW-61 |
| Dimensions | Approximately 45 x 38 x 10 mm |
| Weight | Approximately 40 g |
| Display | 1.3-inch TFT LCD touchscreen |
| Power Source | Rechargeable lithium-ion battery, 3.7V, 300 mAh |
| Charging Method | Magnetic charging cable |
| Battery Life | Up to 7 days typical use |
| Water Resistance | IP67 (protected against immersion up to 1m for 30 minutes) |
| Connectivity | Bluetooth 5.0 |
| Compatible Systems | iOS 9.0+ / Android 5.0+ |
| Main Functions | Heart rate monitoring, step counter, sleep tracking, call/message notifications, sedentary reminder, stopwatch, alarm clock |
| Care and Cleaning | Clean with a soft, dry cloth; avoid exposure to extreme temperatures or chemicals |
| Safety Precautions | Do not attempt to replace the battery; keep away from children under 3 years; remove during MRI or X-ray |
| Spare Parts and Repairability | Battery and strap available from Canyon support; non-user-serviceable; contact authorized service center |
| Manual Format | PDF digital manual (19 pages, English) |
Frequently Asked Questions - SW-61 Canyon
User questions about SW-61 Canyon
0 question about this device. Answer the ones you know or ask your own.
Ask a new question about this device
Download the instructions for your Smartwatch in PDF format for free! Find your manual SW-61 - Canyon and take your electronic device back in hand. On this page are published all the documents necessary for the use of your device. SW-61 by Canyon.
USER MANUAL SW-61 Canyon
for the use of mobile application Canyon Life
Introduction 3
Step 1. Consents and Permissions 4
Step 2. Device Connection 4
2.1. Connection of Bluetooth Device 5
2.2. Connection of GSM Device 6
2.3. Universal Device Connection Wizard 7
Step 3. Device Configuration 7
3.1. Connection of Devices from the "Settings" Menu 7
3.1.1. Connection of Bluetooth Devices 8
3.1.2. Connection of GSM Devices
3.1.3. Section "Other"
3.2. Bluetooth Device Configuration 9
3.3. GSM Device Configuration 10
3.3.1. GSM Device Configuration
Step 4. Maintenance 15
4.1. Bluetooth Device Maintenance 15
4.1.1. Activity 15
4.1.2. Statistics 16
4.2. GSM Device Maintenance 17
Introduction
Dear user, thank you for installing our application and for using Canyon smart devices as this app has been developed specially and only for them.
It used to be called Canyon Fit as the line of smart devices included only wearable sports gadgets. But what if it is possible to monitor not only our sports achievements and changes of own body measurements, but also to take care of our nearest and dearest due to remote monitoring available in your GSM devices? Now many of your daily concerns are easily accessible in one application – Canyon Life. Canyon Life is your reliable companion in life.
Step 1.
Consents and Permissions.
Please read the terms and conditions for using the app. To continue, you need to accept them. It is important to know that our company strictly complies with the legislation of the countries, where Canyon smart devices
are sold, that's why be sure that your personal data will be safe and secure and all permissions required by the application are necessary only for its complete fulfillment of the functions imposed.


Step 2.
Device Connection.
First of all, after installation, it is necessary to connect your devices to the app. Some theory. All Canyon smart gadgets are divided into two types depending on the connection technology -
Bluetooth and GSM. To connect your device, choose which type is correct for your device or click "I don't know", if this question puzzled you.

2.1. Connection of Bluetooth Device.
Make sure the Bluetooth function is enabled in the smart device and phone and detailed geolocation is turned on in the smartphone. Place your Canyon smart device at a distance no more than 1 m from the smartphone. Click "Start".

After scanning is over, the list of devices available for connection is shown on the screen.


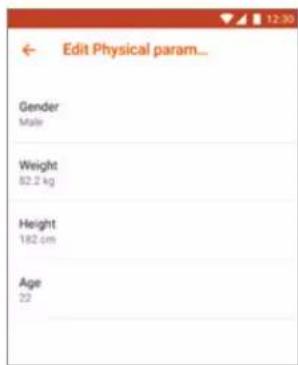
After installation', you will be redirected to the screen for device settings, where first of all you need to enter your personal parameters and set sports goals"
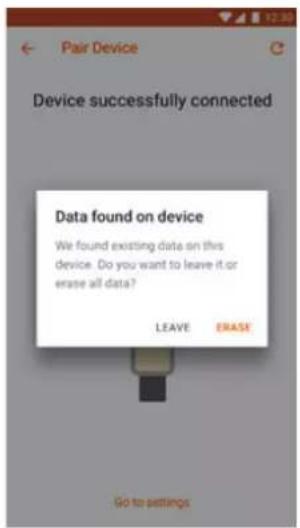
*If your smart device memory contained some data before connection, the system will ask whether to keep or delete this data. By choosing "keep", data from the device will be copied to the phone and added to the ongoing statistics and analytics.
" Personal parameters may be skipped and entered later, but we highly recommend to add it before active operation of the connected device, as calculation accuracy of all indices, including steps taken, calories burnt etc. depends directly on data entered.
2.2. Connection of GSM Device.
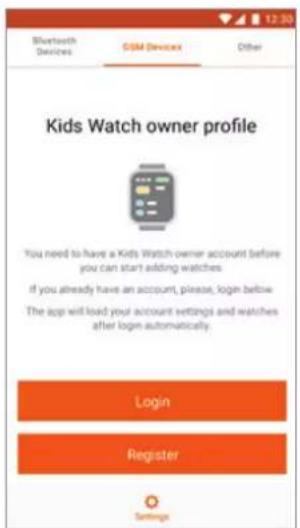
The first screen you will see after selection of GSM device is the login/registration screen'.
If you have already registered for Canyon Life, enter your login and password to continue or register first.
* authorization in the system is required as connected GSM devices are actually bound to your account in our system. You become the administrator of these devices and will be entitled to manage all device settings, allow other users to connect to these devices and to use these devices for their intended purpose.
Once connected, the device will be bound only to your user account, no matter from which device you connect, that's why it is important not to lose registration data, otherwise it will be impossible to regain control over your GSM device!
After registration/authorization, the GSM device connection module will become available for you.
Make sure that all terms and conditions for device connection have been fulfilled, noting the corresponding paragraphs'.
Enter "registration code of the connected device".
Click "Next".... Upon successful connection you be redirected to the screen of device settings.
* it is of the utmost importance to ensure the SIM card inserted into the GSM device has: a) disabled PIN code (our devices do not have keyboard, that's why it is impossible to enter a PIN code), b) switched on data transmission mode in 2G networks, c) positive balance. Otherwise, you won't be able to use the device and the app will not be able to help you connect to the smartphone, the device shall after switching on access the Internet and inform our server that it has appeared and is ready for operation. Only after this will all connection and management procedures will start working as normal.
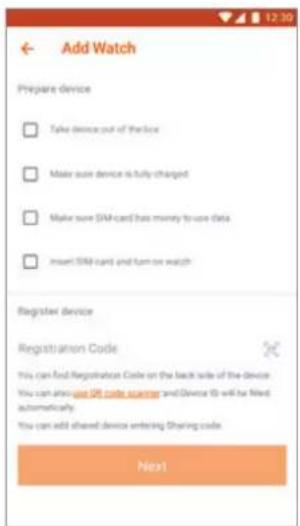
"You can enter the code manually or click the "scanner" button. In this case, in-app QR code scanner will switch on (probably it will be necessary to give permission for the app to use the smartphone camera). Scan QR code from the label or device screen (depending on the model), follow further instructions."
^*** Registration code is a unique identifier, given to the device during production. Depending on device type, this code may be applied on the device body, pasted into the warranty sheet or fastened to the strap with a separate label and to guarantee number safety we also try to duplicate this number in the memory of the device. Do not lose this number! In case of loss, it will be impossible to connect the GSM device! It is also important to understand that the number can be compromised, therefore, access
to the device will be received by the first one to register it. In case of a secondary sale of GSM device, make sure that the seller has “unlinked” the registration code from his account, otherwise the seller, and not you, will remain the administrator of this device.
“” If after attempting to connect the device, the system informs that the entered registration code has not been found, check again thoroughly the registration code entered. If you are sure the number is correct, but the device does not connect, send a message to our technical support indicating IMEI number of the device, which can be found (as a rule, either on the device body near SIM card slot) or on a separate label (as a rule close to registration code).
2.3. Universal Device Connection Wizard
If in the first step you have chosen "I don't know", you will be redirected to a window for selecting devices from a list. Here all models of Canyon smart devices put on retail sale are presented. Start to enter item number of the model or select your model from the list. Click "Add device". Depending the device type, you will be transferred to configuration of c.2.1 or 2.2.

Step 3.
Device Configuration
3.1. Connection of Devices From the "Settings" Menu
If for any reason you decided to skip the device connection process when launching the app for the first
time or deleted all earlier connected devices, then the Canyon Life app will look like this:
Only one tab is available at the bottom - "Settings" and 3 tabs at the top:
Bluetooth Devices
GSM Devices
Other
* Depending on the connection type of the Canyon smart device to the smartphone, the corresponding user tabs will be available at the bottom. Learn more in further steps.

3.1.1. Connection of Bluetooth Devices
By default you are at the page of Bluetooth Device
Settings (ref. Top Menu) Click "Connect Bluetooth Device"
and follow instructions of c. 2.1
3.1.2. Connection of GSM Devices
Go to tab "GSM Devices".
The screen for the GSM Device Settings will look different depending on whether you have logged into our system from this smartphone or not. If you haven't logged in
or registered in our system, the screen of GSM Device Settings will look as follows:

Login or register in order to go to the adding device screen
If you have logged in (for example, during the first attempt to connect the GSM device, registration was
successfully completed but you didn't manage to connect the device or if you changed your smartphone and connected again when there was already a "bound" phone), the screen will look as follows:

Click "Add GSM Device", ref. c.2.2 from the paragraph of adding device. Click "Account" in order to view details of your account, change password, etc.
3.1.3. Section "Other"
In section "Other" you can read other instructions, conditions and discover the installed app version as well as change regional application settings.


3.2. Bluetooth device configuration
If at least one Bluetooth device has been already connected to the smartphone, configuration screen looks like this:
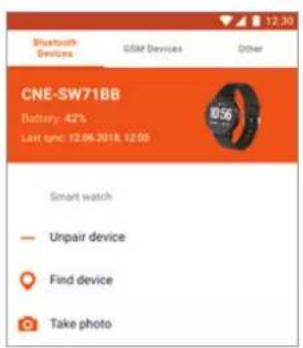

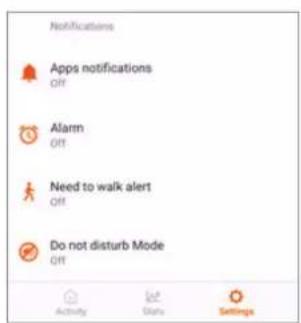
Top menu displays device appearance, battery level, date and time of the last synchronization. They are followed by general and most frequently used menu items ^**

Connect device Connection of a new Bluetooth device

Unpair device Unpair connection with the current device

Find device Find Bluetooth device

Take photo Remote camera management

Firmware v1.0.12 (latest)
Firmware version ^***
*If at the top of the screen under the name of the model, inscription "Error Connection" appeared instead of battery level, click on it to activate the function of compulsory repeated connection with the device. If the repeated connection does not give results, please have a look with this instructional video to solve this problem.
"The set of menu items depends on type and equipment of the connected device. Since this document is about the rules of app usage, so for more detailed configuration of specific device, study its operational manual."
**To check the latest firmware version, click on this menu item.

Read release notes attentively to find out which changes will happen after update. If you agree to update microcode software, click "Download" or "Skip".
3.3. GSM Device Configuration
If you have already logged in and at least one GSM Device has been added, the configuration screen looks like this:
Quick Links

All Chats
Transfer to user chat module*

Account settings
View and change your account settings

Add Kids Watch
Adding a new GSM Device
* Refer to description of this module in section "User Modules of GSM Devices".

List of Devices
This section gives the list of connected GSM devices. Clicking the device will lead you to settings of specific device. If such an icon is shown opposite the device, it
means access to this device for you was opened by other user (for example, access to child's watch was opened to a family member).
3.3.1. GSM Device Configuration
Depending on GSM Device type, the list of settings will differ. In particular case, the settings screen looks as follows:


Top menu displays device appearance, battery level, date and time of the last synchronization. They are followed by general and frequent menu items":
Quick Links

Return to general GSM device settings

Transfer to interactive map and the location of the device on it

Open chat with device
Device Settings

Device name in the app. Required for device identification among others (if several are connected).

Device colour in the app. Positioning marks on map, chat bookmarks etc. will be reflected in selected colour. Required for device identification among others

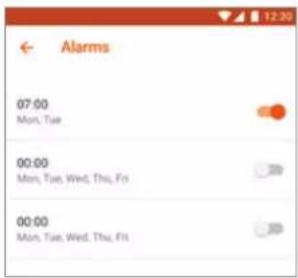
Alarm. Set up to three alarms, selecting time and days of week for the alarm.

Do not disturb Mode. Set time (in work days of week), when the watch will be in this mode. By activating this mode in the device all functions will be switched off except for the SOS call.


Silent Callback. Possibility to make a silent callback to the main phone number from GSM device. This function works as voice monitoring. In this mode GSM device by command from the phone makes a secret call to the specified number, herewith, device display as well as loudspeaker will be switched off.
SOS
SOS phones & SMS settings.
Main phone number - specify main phone, where sms notifications will be received and for the silent callback number.
Set triggers - Low battery and/or SOS signal. Set up to three numbers, where SOS calls will be made ^TM


Callback. Enter phone number and give a command to GSM device to call to the specified number.

Geolocation settings. Select the frequency for updating the device positioning. Select the mode suitable for you, considering that the more often the device checks the geolocation, the more battery is consumed.


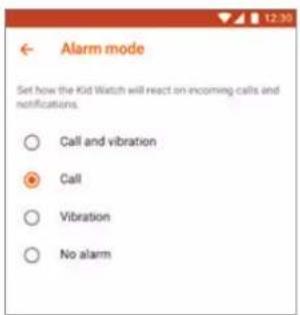
Signal settings. Select operating mode of the GSM device (depending on model): sound and vibration, only sound, only vibration or silent mode.

Phonebook. Set telephone numbers, which will be saved in the GSM device. By using these numbers the GSM device will be able to make phone calls, also the device will only answer incoming calls from these numbers

Steps counter / pedometer (depending on model). Enable function to count steps taken by user on GSM device.

Regional settings. Set language and time zone for your GSM device.

Device reset****

Device switch off

Share device.
In order to grant access to the GSM device for another user, copy a temporary code or give the QR code for scanning

Hereupon, 📄 icon will appear opposite this device in general settings of GSM device for the other user who was granted access.
Delete device. By selecting this option, you will unbind watch from your user account.
Simultaneously the watch will be unbound from all user accounts, which were granted shared access.
*Green indicator over the device image shows that watch was connected, red - disconnected.
"Set of menu items depends on type and equipment of the connected device. Since this document is on application use rules, so for more details on configuration of specific device, examine its operational manual."
***SOS call algorithm: if SOS numbers have not been set, notification on alarm trigger will be received by the app. If 1 number is set, GSM device will make 2 attempts of phone call. If several numbers are set, calls will be taken by turn, also 2 attempts.
“”After GSM device is connected to the smartphone, reset and switching off will become possible only via the app. It is made for the sake of device user's safety, so it will be impossible to switch it off manually.
Step 4.
Maintenance
As it has been already mentioned in Step 1, depending on type and number of devices connected, the app functionality differs. Navigation menu for switching
between modules is in the bottom part of screen. Maximum 4 screens are available now:

Activity

Stats

Tracking

Settings
Activity and Stats modules belong to Bluetooth devices, subsequently available only by connection of the proper device type.
Tracking module is available, if GSM device is connected. The app also supports push notifications. This can be notifications on firmware updates or notifications of various kinds from wearable devices.
4.1. Bluetooth Device Maintenance
Canyon Bluetooth devices fulfill the role of fitness assistants for its owner.
All functional modules collect, analyze and will display received data as: steps taken, calories used, sleep quality,
heart rate as well as for more advanced devices, stress level, readiness for training, state of body musculature, metabolic rate, quantity of fat, water etc.
4.1.1. Activity
Go to the Activity tab to view the activity results of the present day:


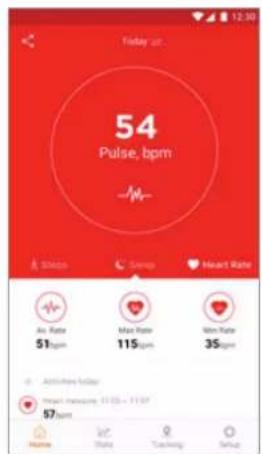
Switch between the Steps, Sleep and Pulse tabs to view the results of the present day. Scroll down to view additional functions on each of the tabs. Click the flag
in the left corner of the Steps bookmark to set a steps goal.
Scroll down to view training history for today:
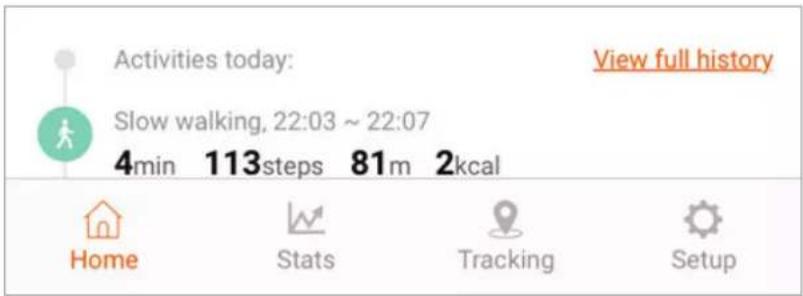
Click Training History to view total history:


other
11.07.2018: | Activity | Time (min) | Steps | Kiloliters | | :--- | :--- | :--- | :--- | | A | 13 | 339 | 9 kcal | | B | 28 | 927 | 19 kcal | | C | 4 | 113 | 2 kcal | | D | 1:5 | 2123 | 684 kcal | | E | Slow walking, 21-03 - 22-07 | 4 | 2 kcal | | F | Fast walking, 21-15 - 21-43 | 28 | 19 kcal | | G | Slow walking, 21-02 - 21-15 | 13 | 9 kcal | | H | Gym, 19-37 - 21-02 | 1:5 | 684 kcal |4.1.2. Statistics
Go the Statistics tab. By selecting Steps, Sleep and Pulse, view your statistics. To change the time period view, use the left and the right arrows or swipe the schedule on the
corresponding side. To change display interval (week, month, year), swipe the button showing the current interval, from top to bottom
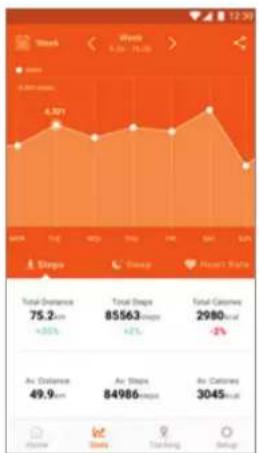
line
| Metric | Value | | :--- | :--- | | Total Distance (cm) | 75.2 | | Total Steps (steps) | 85563 | | Total Calories (Count) | 2980 | | Air Distance (km) | 49.9 | | Air Steps (steps) | 84986 | | Air Calories (Count) | 3045 |
line
| Week | Heart Rate (%) | |---|---| | 1 | 51 | | 2 | 48 | | 3 | 50 | | 4 | 52 | | 5 | 51 | | 6 | 47 |
line
| Metric | Value | | :--- | :--- | | Air Sleep Sleep | 1:43 | | Air Light Sleep | 4:32 | | Air Sleep Time | 6:22 | | Day To Bed (Av.) | 23:11 | | Sun Up (Av.) | 07:15 | | Sleep Time (min) | -2min |4.2. GSM Device Maintenance
Go the the Tracking tab. The following buttons are situated on the interactive map:
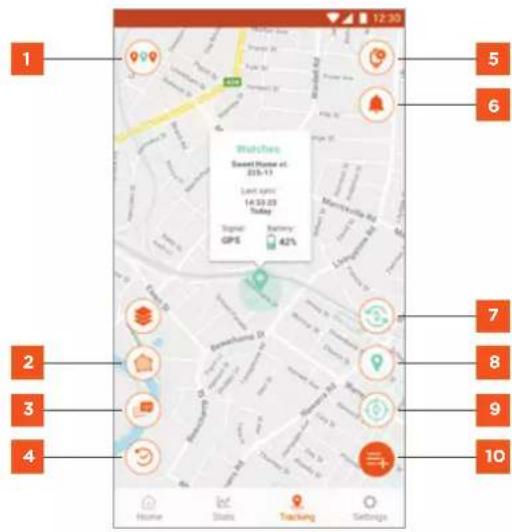
Overview of all GSM devices on the map with opportunity to select for management. The colour corresponds to the corresponding device color in the settings.
Setting a safety zone. Drag the slider to set the safety zone, if GSM device crosses the line of safety zone, GSM device will send alarm notification.
Chat with device. Click to open the chat module. Click and hold the microphone icon to send a voice message to the GSM device or click text entry line to send a text message. Your messages will be displayed on the right. Replies from the GSM device user will be displayed on the left.
Device tracking. Click here to set the time period and to show the map history of device movement. Maximum period of showing history is 1 week.
5 Transfer to GSM device settings.
6 Alarm call log.
7 Change the displayed GSM device.
8 Map positioning on the last point of device direction finding.
Compulsory positioning. Click here to send a command to GSM device for compulsory sending the current coordinates (despite of the frequency of direction finding in the settings).
10 Request of the list of available for GSM device functions
For more details on the technology of positioning (GPS/LBS/WiFi), time of the last direction finding, battery level etc., click exactly on mark on the map

* For different GSM devices, various functions are available.
Here are only some of them:


Find watch. Click this button if you have lost your GSM device somewhere nearby. The device will make a loud sound, until you will press the functional button.

Remote camera management. Select this function for remote camera management of GSM device (for example, for video recording or taking picture)

Silent Callback. For more details refer to c. 3.3.1

Callback. For more details refer to c. 3.3.1
For more information about smartwatch usage, please contact the support service at Canyon website:
http://canyon.eu/ask-your-question/

- Introduction 3
- Step 1. Consents and Permissions 4
- Step 2. Device Connection 4
- Step 3. Device Configuration 7
- Step 4. Maintenance 15
- Introduction
- Step 1.
- Consents and Permissions.
- Step 2.
- Device Connection.
- Connection of Bluetooth Device.
- Connection of GSM Device.
- Universal Device Connection Wizard
- Step 3.
- Device Configuration
- Connection of Devices From the "Settings" Menu
- Bluetooth Devices
- GSM Devices
- Connection of Bluetooth Devices
- Connection of GSM Devices
- Section "Other"
- Bluetooth device configuration
- GSM Device Configuration
- Quick Links
- List of Devices
- GSM Device Configuration
- Device Settings
- SOS
- SOS phones & SMS settings.
- Share device.
- Step 4.
- Maintenance
- Bluetooth Device Maintenance
- Activity
- Statistics
- GSM Device Maintenance
Brand : Canyon
Model : SW-61
Category : Smartwatch