
FZP 70105-0 - Saw Fieldmann - Free user manual and instructions
Find the device manual for free FZP 70105-0 Fieldmann in PDF.


| Product Type | Cordless Mini Chainsaw |
| Brand | Fieldmann |
| Model | FZP 70105-0 |
| Rated Voltage | 20 V DC |
| Chain Speed (Low/High) | 8.5 m/s / 11 m/s |
| Guide Bar Length | 125 mm |
| Oil Tank Capacity | 40 ml |
| Weight (without battery) | 1.2 kg |
| Maximum Operating Duration (2Ah battery) | 20 minutes |
| Maximum Operating Duration (4Ah battery) | 40 minutes |
| Battery Compatibility | FDUZ 79020 (2 Ah), FDUZ 79040 (4 Ah) |
| Charger Compatibility | FDUZ 79100 (Fast charger), FDUZ 79110 (Fast dual charger) |
| Cutting Capacity (estimated max cut depth) | Approx. 100 mm |
| Safety Features | Chain brake, lock-off button, speed control, hand guards |
| Lubrication | Automatic oiling system; use chain lubricating oil |
| Maintenance | Clean body with mild soap and water; sharpen chain regularly; clean oil slots and guide bar groove |
| Storage | Empty oil tank, remove and clean bar/chain, store in dry place out of reach of children |
| Warranty | 24 months for domestic use |
Frequently Asked Questions - FZP 70105-0 Fieldmann
User questions about FZP 70105-0 Fieldmann
0 question about this device. Answer the ones you know or ask your own.
Ask a new question about this device
Download the instructions for your Saw in PDF format for free! Find your manual FZP 70105-0 - Fieldmann and take your electronic device back in hand. On this page are published all the documents necessary for the use of your device. FZP 70105-0 by Fieldmann.
USER MANUAL FZP 70105-0 Fieldmann
natural_image
Abstract black-and-white spiral pattern with no text or symbolsFIELDMANN®
Home & Garden Performance
20V _LH
FASTPOWER

natural_image
Close-up of a mechanical chain-linking tool with visible branding and mounting base (no text or symbols on the device itself)FZP 70105-0
Cordless Mini Chainsaw 20V FASTPOWER USER'S MANUAL
Thank you for purchasing this cordless mini chainsaw. Before you start using it, please carefully read this user's manual and save it for possible future use.
TABLE OF CONTENTS
- SAFETY INSTRUCTIONS......4
- SYMBOLS 5
- DESCRIPTION....7
- SAFETY INSTRUCTIONS....8
- FUNCTIONAL DESCRIPTION 10
- OPERATION 14
- CLEANING AND MAINTENANCE....19
- STORAGE....22
- TECHNICAL DATA 22
- DISPOSAL....23
- DECLARATION OF CONFORMITY....24
1. SAFETY INSTRUCTIONS
WARNING!
Carefully read the instruction manual before use.
Important safety warnings
* Unpack the product carefully and be sure not to throw away any part of the package before having found all components of the product.
Keep the product in a dry place out of reach of children.
Read all cautions and instructions. The failure to adhere to warning cautions and instructions may result in an accident, fire and/or a serious injury.
Packaging
The product is placed in a package preventing damage during transport. This package is a raw material therefore it can be handed-over for recycling.
Instructions for use
Before beginning to work with the machine, read the following safety rules and instructions for use. Familiarize with operating elements and the proper use of the device. Keep the manual in a safe place for future reference. We recommend keeping the original package including the inner packaging materials, cash voucher and guarantee card for a period of warranty at minimum. For a case of transportation, pack the machine into the original box from the manufacturer, thus ensuring a maximum protection of the product during a possible transport (e.g. moving or sending into a service station).

Note: If you hand the machine over to next persons, hand it over together with the manual. Adherence to the attached instructions for use is a precondition for the proper use of the machine. The operation manual includes also instructions for operation, maintenance and repairs.
The manufacturer does not take any responsibility for accidents or damages resulting from the failure to adhere to this manual.
2. SYMBOLS

Be careful when handling the device! Observe all safety instructions in the instructions for use!

Read and observe the operating instructions before commissioning.

Do not expose the machine to moisture.

Area with a danger of kickback.
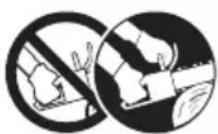
Always hold the device firmly in both hands.
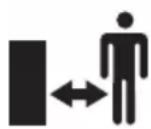
Always maintain a sufficiently safe distance.
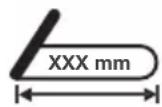
Length of the saw rail

Eye protection: wrap-around goggles/protective visor on the helmet

Ear protection: earplugs/ear muffs

Head protection: safety helmet with visor

Foot protection: safety shoes with gripping soles, steel caps and leg protection

Hand protection: protective chainsaw gloves

Clothing: safety overalls (cut-proof), Safety jacket (cut-proof)
3. DESCRIPTION
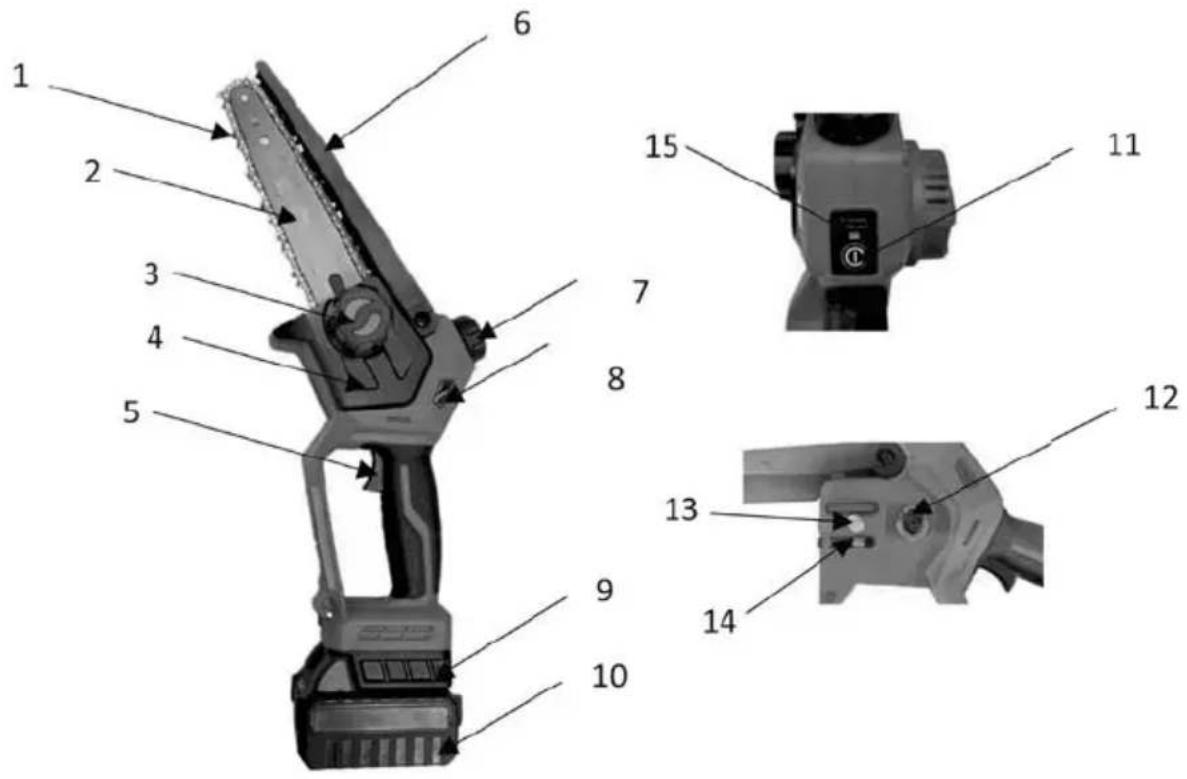
Machine Description (see Fig. 1)
- Saw chain
- Bar
- Knob
- Sprocket cover
- on/off switch
- Fenders
- Oil tank cap
- Oil bottle
- Battery pack bracket
- Battery pack
- Sprocket
- Guide bolt
- Tensioning pin
-
indicator light
-
Lock-off button and Speed regulating switch
4. SAFETY INSTRUCTIONS
ATTENTION!
Familiarize yourself with all the warning and safety instructions and with the tool operating instructions.
ATTENTION!
Failure to adhere to warning or safety instructions may result in electric shock, fire and/or serious injury.
ATTENTION!
Keep all the warning and safety instructions in a practical place for future reference.

Note: The term "power tool" in all the warning instructions specified hereafter means mains-operated (corded) power tool.
Work area safety
Keep work area clean and well lit. Cluttered or dark areas at the workplace invite accidents.
Do not operate power tools in explosive atmospheres, such as in the presence of flammable liquids, gases or dust. Power tools create sparks which may ignite the dust or fumes.
Keep children and bystanders away while operating a power tool. Distractions can cause you to lose control over the tool.
Electrical safety
Power tool plugs must match the mains outlet. Never modify the plug in any way. Do not use any adapter plugs with earthed (grounded) power tools. Unmodified plugs and matching outlets will reduce the risk of electric shock.
Avoid body contact with earthed or grounded surfaces, such as pipes, radiators, ranges and refrigerators. There is an increased risk of electric shock if your body is earthed or grounded. Do not expose power tools to rain or wet conditions. Water entering a power tool will increase the risk of electric shock.
Do not abuse the cord. Never use the cord for carrying, pulling or unplugging the power tool. Keep cord away from heat, oil, sharp edges or moving parts. Damaged or entangled cords increase the risk of electric shock.
When operating a power tool outdoors, use an extension cord suitable for outdoor use. Use of a cord suitable for outdoor use reduces the risk of electric shock.
If operating a power tool in a damp location is unavoidable, use a residual current device (RCD) protected supply. Use of residual current device (RCD) reduces the risk of electric shock.

Note: The term "residual current device" (RCD) may be substituted by the term "ground fault circuit interrupter" (GFCI) or "earth leakage circuit breaker" (ELCB).
Personal safety
Stay alert, watch what you are doing and use common sense when operating a power tool. Do not use a power tool while you are tired or under the influence of drugs, alcohol or medication. A moment of inattention while operating power tools may result in serious personal injury.
Use personal means of protection. Always wear eye protection. Safety equipment such as dust mask, non-skid safety shoes, hard hat, or hearing protection used in conformity with the working conditions will reduce personal injuries
Avoid accidental starting. Ensure the switch is in the off-position before connecting the battery, storing or carrying the power tool. Carrying power tools with your finger on the switch or plugging in power tools that have the switch on invites accidents.
Remove any adjusting tools or wrenches before turning the power tool on. An adjusting tool or wrench left attached to a rotating part of the power tool may result in personal injury.
Do not overreach. Keep proper footing and balance at all times. This enables better control of the power tool in unexpected situations.
* Dress properly. Do not wear loose clothing or jewellery. Keep your hair, clothing and gloves away from moving parts. Loose clothes, jewellery or long hair can be caught in moving parts,. If devices are provided for the connection of dust extraction and collection facilities, ensure these are connected and properly used. Use of these devices can reduce dust-related hazards.
Power tool use and maintenance
Do not force the power tool. Use only the correct power tool for your application. The correct power tool will do the job better and safer at the rate for which it was designed.
Do not use the power tool if the switch does not turn it on and off. Any power tool that cannot be controlled with the switch is dangerous and must be repaired.
* Unplug the power cord from the mains outlet before making any adjustments, changing accessories, or storing power tools. Such preventative safety measures reduce the risk of starting the power tool accidentally.
Store idle power tools out of the reach of children and do not allow persons unfamiliar with the power tool or these instructions to operate the power tool. Power tools are dangerous in the hands of untrained users.
* Maintain power tools. Check for misalignment or binding of moving parts, pay particular attention to cracks, breakage of parts and any other condition that may affect the power tool's operation. If damaged, have the power tool repaired before use. Many accidents are caused by poorly maintained power tools.
Keep cutting tools sharp and clean. Properly maintained cutting tools with sharp cutting edges are less likely to bind and are easier to control.
Use the power tool, accessories and tool bits etc., in accordance with these instructions and in the manner intended for the particular type of power tool, taking into account the given working conditions and the work to be performed. Use of the power tool for operations other than those for which the power tool is intended could result in hazardous situations.
Service
Have your power tool serviced by a qualified repair person using only original replacement parts. This will ensure that the safety of the power tool is maintained.
Storage
* only carry and store the tool with the scabbard fitted
* carefully clean the tool and carry out adequate maintenance before storing
before carrying, secure the tool against fuel leakage, damage or injury
Use and treatment of the cordless tool
Only charge the batteries with chargers recommended by the manufacturer. A charger that is suitable for a certain type of battery creates a fire hazard when used with other batteries.
Only use the batteries provided for this purpose in the power tools. The use of other batteries can lead to injuries and fire hazards.
- Keep the unused battery away from paper clips, coins, keys, nails, screws or other small metal objects that could cause the contacts to be bridged. A short circuit between the battery contacts can result in burns or fire.
If used incorrectly, liquid can leak out of the battery. Avoid contact with it. In case of accidental contact, rinse with water. If the liquid gets into your eyes, get additional medical help. Leaking battery fluid can cause skin irritation or burns.
5. FUNCTIONAL DESCRIPTION
⚠️ CAUTION! Always be sure that the tool is switched off and the battery cartridge is removed before adjusting or checking function on the tool.
Installing or removing battery cartridge
⚠️ CAUTION! Always switch off the tool before installing or removing of the battery cartridge.
⚠️ CAUTION! Always switch off the tool before installing or removing of the battery cartridge.
⚠️ CAUTION! Hold the tool and the battery cartridge firmly when installing or removing battery cartridge.
Failure to hold the tool and the battery cartridge firmly may cause them to slip off your hands and result in damage to the tool and battery cartridge and a personal injury.
To remove the battery cartridge, slide it from the tool while sliding the button on the side of the cartridge.
To install the battery cartridge, align the tongue on the battery cartridge with the groove in the housing and slip it into place. Insert it all the way until it locks in place with a little click.
⚠️ CAUTION! Do not install the battery car-tridge forcibly. If the cartridge does not slide in easily, it is not being inserted correctly.
Checking the chain brake
⚠️ CAUTION! Hold the chain saw with single hands when switching it on. The bar and the chain must not be in contact with any object.
Mounting the chain bar
⚠ WARNING! The saw chain has very sharp edges. Use protective gloves for safety. The saw chain and bar are packed separately in the carton.
- Place the chainsaw on the table or floor.
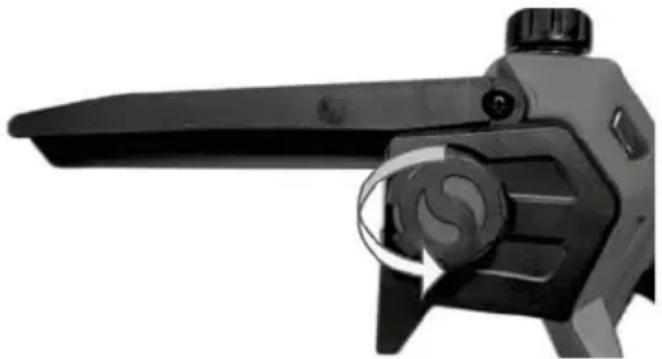
- Loose nut on sprocket cover, and remove sprocket cover (fig.2)
natural_image
Close-up of a black handheld device with a handle and control knob, showing a circular motion indicator (no text or symbols visible)Fig.2
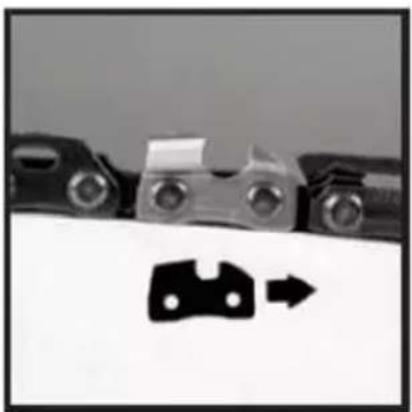
- Place the chain (1) in the grove of the bar (2), pay attention to the correct running direction, as shown by the running direction symbol (fig.3)
natural_image
Close-up of mechanical components with a black arrow pointing to a small component (no text or symbols visible)Fig.3
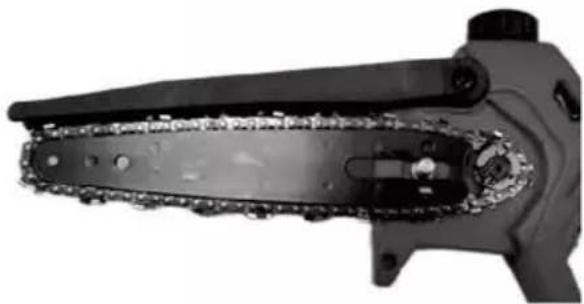
- Place the chain links around the sprocket (12) and put the bar on such that the one locating pegs fit into the slotted hole of the bar. (fig.4)
natural_image
Close-up of a mechanical chain-linking device with visible internal components (no text or symbols)Fig.4
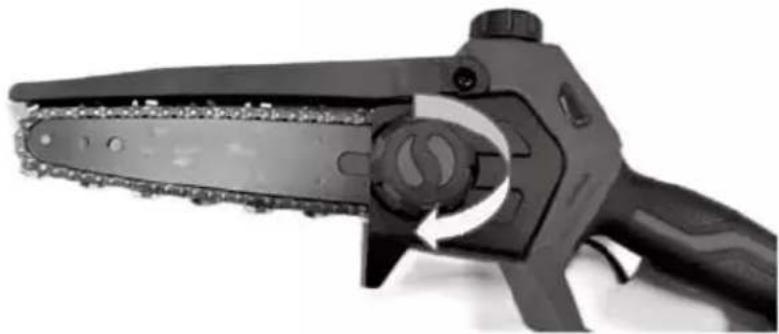
- Fitting the cover (4) and tighten knob(3) on sprocket cover. (fig.5)
natural_image
Close-up of a black chain-linking tool with a circular handle and chainmail, showing mechanical components and a curved arrow indicating rotation (no text or symbols visible)Fig.5
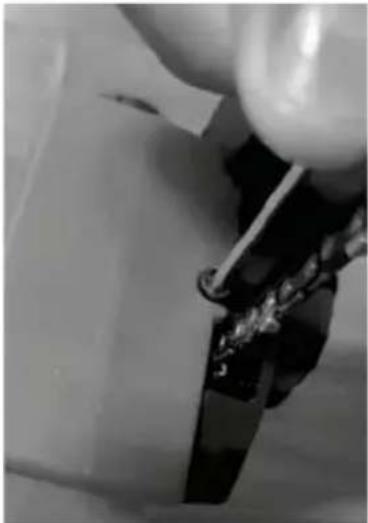
Setting the chain saw tension (fig.6)
WARNING!
The saw chain has very sharp edges. Use protective gloves for safety. To adjust the chain tension as follows:
- Before adjusting chain, make sure guide bar nuts are only finger tight. Also make sure adjusting block is in oval adjusting hole on guide bar.
- Turn adjusting screw clockwise until all slack is out of chain.

Note: There should be no gap between side likes of chain ad bottom of guide bar.
natural_image
Close-up of a hand using a tool to cut or wire around a dark object (no visible text or symbols)Fig.6
- Wearing protective gloves, move chain around guide bar, chain should move freely. If chain does no move freely. Loosen chain by turning adjusting screw counterclockwise.
- After chain tension is correct, tighten guide bar nuts firmly. If not, guide bar will move and loosen chain tension. This will increase the risk of kickback, this can also damage saw. Note: a new chain will stretch, check new chain after first few minutes of operation. Allow chain to cool down. Readjust chain tension.
WARNING!
Do not over tension the chain as this will lead to excessive wear and will reduce the life of bar and chain. Over tensioning also reduce the amount of cuts you should get.
Oil filling

Note: The chain saw is shipped without oil in it, the chain saw must never be used without oil or with an oil level that is below the indicator.

WARNING! Always ensure that the chainsaw is switched off ad the plug is removed from the power point ore making any adjustments.
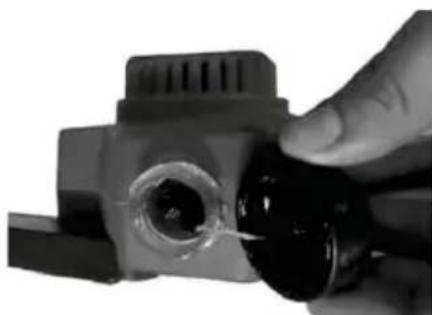
- Remove oil cap. (fig.7)
natural_image
Close-up of a hand holding a small black object with a transparent end, no visible text or symbolsFig.7
- Fill oil tank with chain lubricating oil.
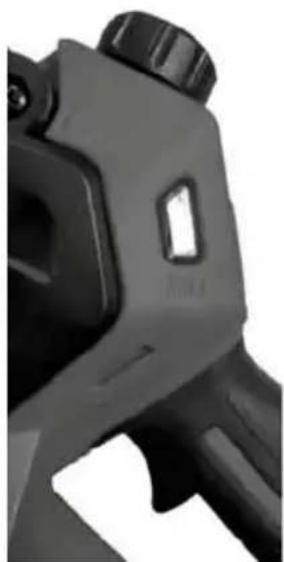
- Check the oil level periodically, through the oil level indicator (fig.8).
natural_image
Close-up of a black industrial fuel injector with a black handle and cap (no visible text or symbols)Fig.8
- Tighten oil cap firmly for good seal, this will avoid oil seepage from tank.
- Wipe off excess oil.

Note: It is normal for oil to seep when saw is not in use. Empty oil tank after each use to prevent seepage.
Checking the automatic oil function
Check the automatic operation of the chain lubrication by pointing the tip of the switched -on saw towards a piece of paper laying on the ground, if a patch of oil appears and becomes larger, then the automatic oil function is working. If there are no traces of oil even though the oil tank is full. Then the automatic oil function is not working.
If the automatic oil function is not working, remove the chain bar and clean out the oil ways of the chainsaw and chain bar, on reassemble if the chainsaw is still not working take it to a autorised if the chainsaw is still not working take it to an autorised service centre.
Avoid jamming
* Always cut into the compression wood first until the cut starts to close. Always make the compression cut beneath if the log or limb is suspended from one end, and on top if it is supported at both ends, cut from the other side towards the compression cut, make a habit of using a wedge to prevent the compression cut jamming tight on the chainsaw blade.
6. OPERATION
Start up
- Remove the bar cover
- Install the battery cartridge
- Hold the electric chain saw by its grip with hands.
- To start the chainsaw, press the lock-off button (11) (fig. 1) On the trigger switch.
- To stop the chain saw, release the trigger switch.
WARNING!
Hold the electric chain saw with hands until the chain is completely still.
Adjust speed
When the chain saw is normally started, the indicator light (15) (fig. 1) is green, and the chain saw is running at low speed. Press the speed control button (11) (fig. 1) again, the indicator light turns red, and the chain saw is running at high speed.
Remarks: The working state of the chainsaw can be switched freely by pressing the speed control button. The indicator light shows green for low speed, and the indicator light shows red for high speed.
Operating the electric chain saw
Safe chainsaw operation
While cutting, always:
run the chainsaw motor at full revs, this makes the job safer, as these is less chance of pull-in or kick-back.
Position your body to the left of the chainsaw so if it kicks back uncontrollably. It goes over your right shoulder.
Keep a firm grip with your left hand on the front handle, with your thumb securely below the handle. The swivel of your wrist in a kick-back situation will activate the chain brake.
Make sure the chain is tensioned correctly.
Observe the size of wood shavings, if they become dusty your chain could need sharpening.
Trimming a tree(pruning) (fig.9)
⚠ WARNING! Avoid kickback, kickback can result in severe injury or death,
⚠ WARNING! Do not operate chain saw while
In a tree.
On a ladder or any other unstable surface
In any awkward position
You may lose control of saw causing severe injury.
⚠ WARNING! Do not cut limbs higher than your shoulders.
Trimming a tree is the process of cutting limbs from a living tree, makes sure your footing is firm keep feet apart. Divide your weight evenly on both feet. Follow directions below to trim a tree.
-
Make first cut 15 centimeters from tree trunk on underside of limb, use top of guide bar to make this cut. Cut 1/3 through diameter of limb.
-
Move five to ten centimeters farther out on limb, make second cut from above limb. Continue cut until you cut limb off.
- Make third cut as close to tree trunk as possible on underside of limb stub. Use top of guide bar to make this cut. Cut 1/3 through diameter of stub.
- Make fourth cut directly above third cut. Cut down to meet third cut, this will remove limb stub.
⚠️ CAUTION! Seek professional help if facing conditions beyond your ability.
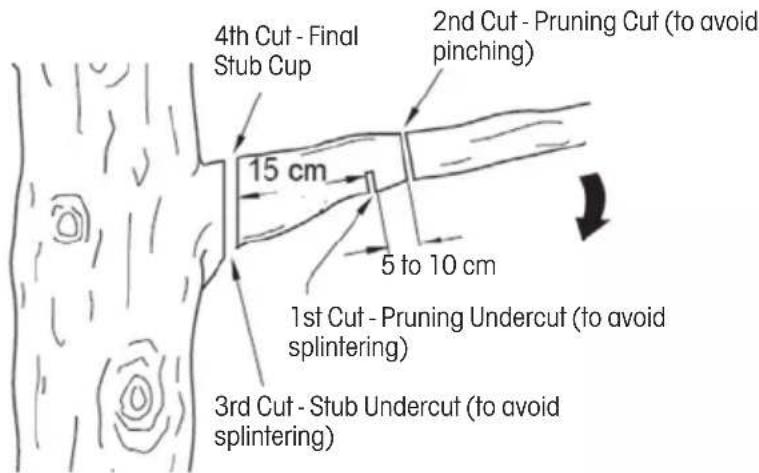
Fig.9
Felling a tree(cutting down a tree)
⚠ WARNING! Avoid kickback, kickback can result in severe injury or death,
do not fell a tree without ample skill or expert help.
Keep children, animals, and bystanders away from area when felling a tree.
If two or more persons perform bucking ad felling operations at the same time, provide ample distance between operations, provide distance of at least twice the height of tree being felled.
When felling a tree, be aware of your surroundings, do not endanger any person. Strike utility lines, or cause property damage, if tree strikes utility lines, contact utility company at once.
⚠️ CAUTION! Seek professional help if facing conditions beyond your ability.
Felling is the process of cutting down a tree. Make sure your footing is firm, keep feet apart, divide your weight evenly on both feet. Follow directions below to fell a tree.
Before felling a tree. (fig.10)
- Before felling, inspect tree, make sure there are no dead limbs or branches that may fall on you. Study natural lean of tree, location of larger branches. And wind direction. This will help you judge which way tree will fall.
- Clear work area around tree.
- Plan and clear a retreat path before felling, make retreat path opposite to planned direction of fall of tree and at 45^ angle.
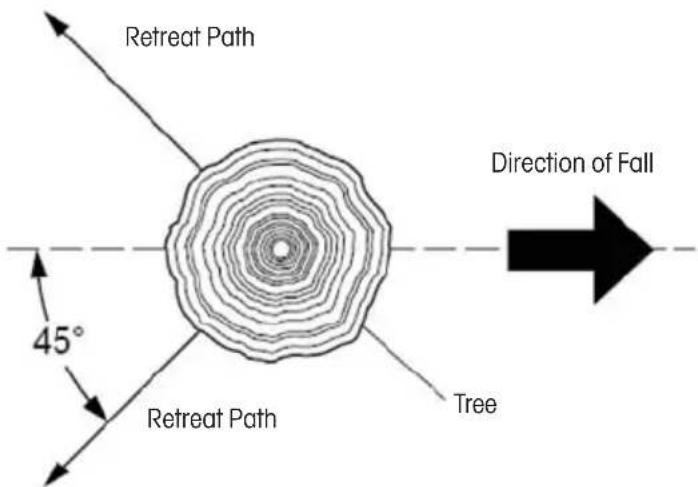
Fig.10
- Remove dirt, stones, loose bark, nails, staples, and wire from tree where you will make felling cuts.
- Stay on uphill side when felling tree. Tree could roll or slide downhill after falling.
Felling procedure
Felling notch (fig.11)
A properly placed felling notch will determine direction tree will fall, place felling notch on side of tree in direction you want tree to fall, follow directions below to create a felling notch.
- Make lower notch cut as close to ground as possible. Hold saw to guide bar is horizontal, cut 1/3 the diameter of tree truck. Note: always make this horizontal lower notch cut first. If you make this cut second, tree can pinch chain or guide bar.
- Start upper notch cut the same distance above first cut as first cut is deep. Example: if lower notch cut is 20 centimeters deep, start upper notch cut 20 centimeters above it, cut down ward at 45^ angle, the upper notch cut should meet end of lower notch cut
- Remove tree trunk wedge created by notching cuts.
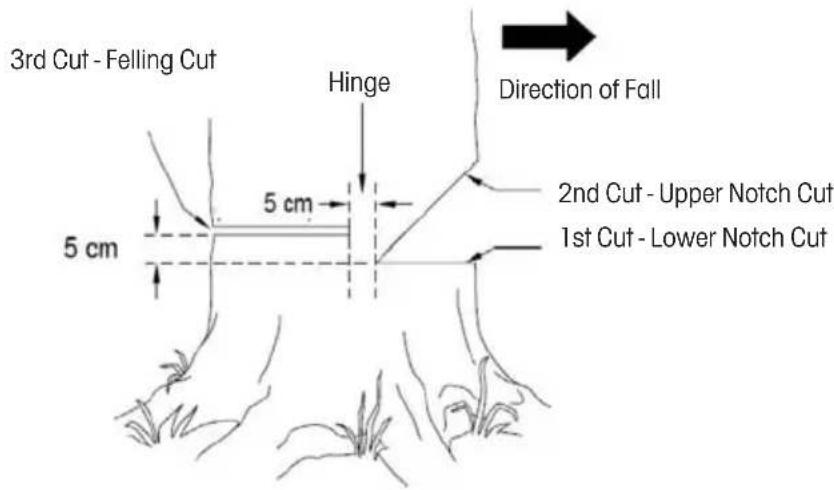
Fig.11
Felling cut (Fig. 11)
-
Make felling cut five centimeters higher than lower notch cut and on opposite side of tree. Keep felling cut parallel to lower notch cut.
-
Cut towards notch.

WARNING! Do not cut all the way through tree. Leave about five centimeters of tree diameter uncut directly behind felling notch, this uncut portion acts as a hinge, the hinge helps keep tree from twisting and falling in wrong direction.
-
As felling cut nears hinge, tree should begin to fall. Note: if needed, drive wedges into felling cut to control direction of fall. If tree settles back ad pinches chain, drive wedges into felling cut to remove saw. Only use wedges made of wood, plastic, or aluminum, never use wedge made of steel. This could cause kickback and damage to chain.
-
When tree begins to fall, quickly
Remove saw from felling cut
* release trigger to turn saw off.
Put saw down
Exit area using retreat path.
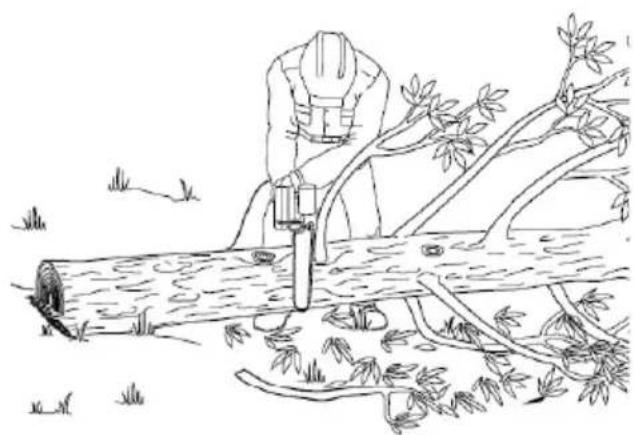
Limbing a tree (Fig. 12)
Limbing is removing branches from a fallen tree. Make sure your footing is firm, keep feet apart, divide your weight evenly on both feet, do not remove larger limbs under tree that support log off ground, remove each limb with one cut. clear cut limbs from work area often, this will help maintain a safe work area.
Make sure you start your cut where limb will not pinch saw during cutting. To avoid pinching, start cut on freely hanging limbs from above limb, start cut on limbs under tension from under limb, if pinch occurs, turn saw off, lift limb, and remove saw.
natural_image
Line drawing of a person using a saw to cut tree branches with grass (no text or symbols)Fig.12
Bucking a log

WARNING!
if on slope, make sure log will not roll down hill, secure log by using wooden stakes, drive wooden stakes into ground on downhill side of log. Stand on uphill side of log while cutting, log may roll after cutting.
* Never try cutting through two logs at same time, this could increase the risk of kickback.
While cutting log, never hold log with your hand ;leg. Or foot.
While cutting log, never allow another person to hold log.
Turn off and unplug saw before moving from one place to another.
Bucking a log is cutting a log into sections, make sure your footing is firm, keep feet apart, divide your weight evenly on both feet, stand slightly to left of saw, this keeps your body from being in direct line with chain, when possible, raise log or section off ground, do this by using limbs, logs, chocks, etc,
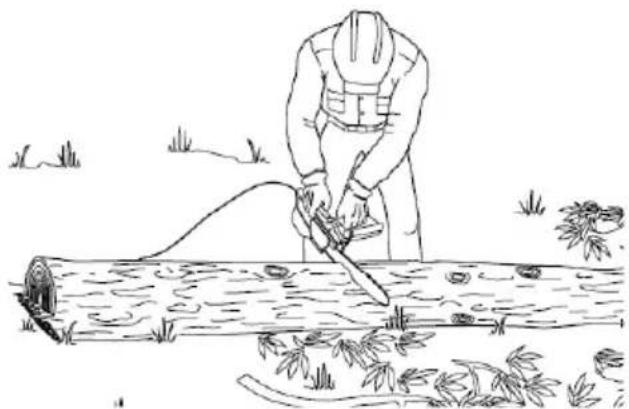
When cutting through log, maintain control by reducing cutting pressure near end of cut, do not relax your grip of chain saw handles, do not let moving chain touch log, release trigger to turn saw off before moving saw. Follow directions below to buck a log, Entire length of log on ground.
Cut log from top (fig13)
natural_image
Line drawing of a person in protective gear using a tool to cut a tree trunk with leaves and grass (no text or symbols)Fig.13
Log supported on one end (fig.14)
-
Make first cut on underside of log use top of guide bar to make this cut. Cut 1/3 through diameter of log. This cut will keep section from splintering when cut.
-
Make second cut directly above first cut. Cut down to meet first cut, this cut will keep log from pinching guide bar and chain.
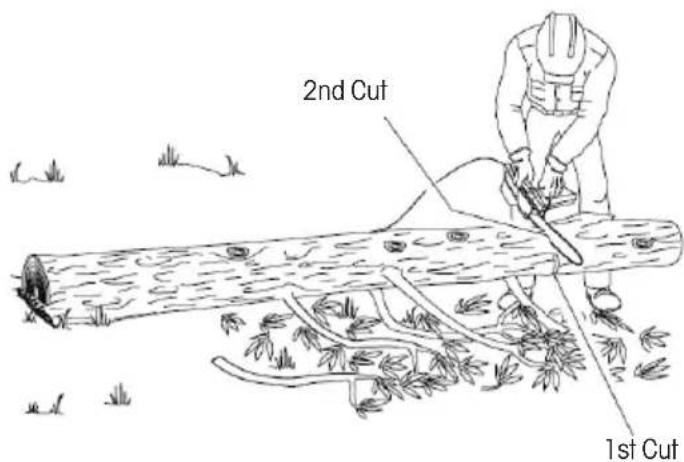
Fig.14
Log supported on both ends (fig, 15)
-
Make first cut from above log, cut 1/3 through diameter of log, this cut will keep section form splintering when cut.
-
Make second cut on underside of log. Directly under first cut. Use top of guide bar to make this cut. Cut up to meet first cut. This will keep log from pinching guide bar and chain.
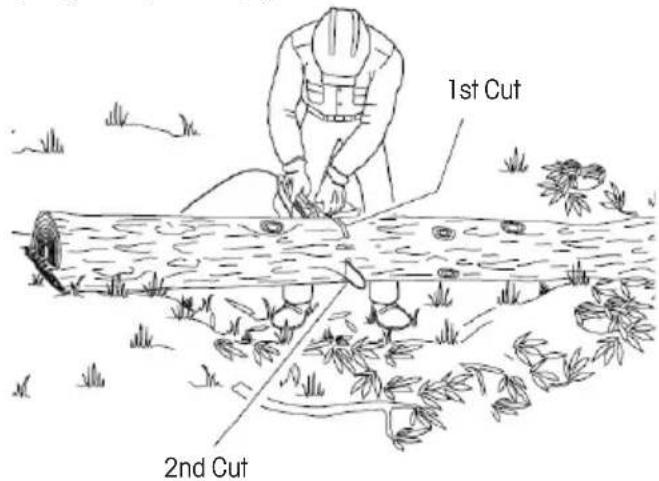
Fig.15
7. CLEANING AND MAINTENANCE
Cleaning saw body
⚠ Warning! Unplug chain saw from power source before servicing, sever injury or death could occur from electrical shock or body contact with moving chain.
⚠ Warning! Cutting edges o chain are sharp, use protective gloves when handling chain.
⚠ Warning! Cleaning saw body.
Do not submerge saw in any liquids.
Do not use products that contain ammonia, chlorine, or abrasives.
Do not use chlorinated cleaning solvents, carbon tetrachloride, kerosene, or gasoline.
Keep saw body clean, use a soft cloth dampened with a mild soap ad water mixture, wipe saw body to clean.
Care of guide bar (fig.16)
Uneven bar wear causes most guide bar problems, incorrect sharpening of chain cutter and depth gauge settings often cause this, when bar wears unevenly, it widens guide bar groove, this causes chain clatter ad river popping. Saw will not cut straight, replaces guide bar if this occurs.
Inspect guide bar before sharpening chain. A worn or damaged guide bar is unsafe. A worn or damaged guide bar will damage chain, it will also make cutting harder.
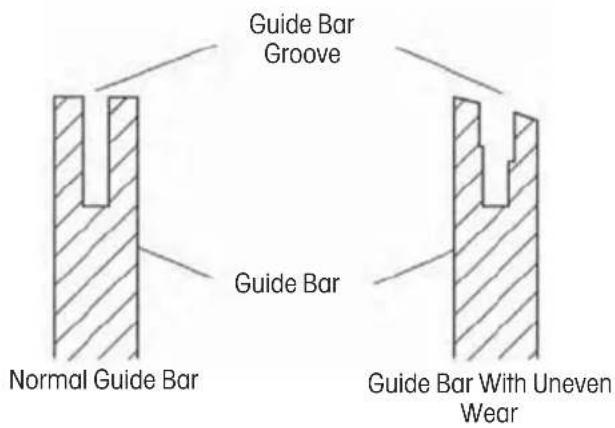
Fig.16
Normal guide bar maintenance (fig.17)
- Remove guide bar from chain saw.
- Remove sawdust from guide bar groove periodically. Use putty knife or wire,
- Clean oil slots after each day of use.
- Remove burrs from sides of guide bar. Use flat file to make side edges square.
Replace guide bar when
Bar is bent or cracked.
Inside groove of bar is badly worn.
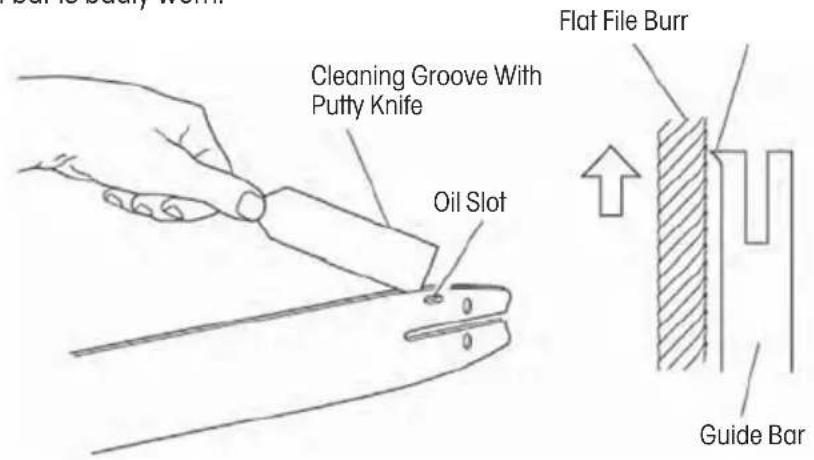
Fig.17
Chain sharpenig (fig.18.&fig.19& fig.20)
⚠ WARNING! Always ensure that the tool is switched off ad the plug is removed from the power point before making any adjustments or maintenance procedures.
The chain requies sharpenig when the chain saw does not cut appropriately. This operation is performed as follows :
- Extend the chain bar.
- Fix the bar in a vice so that the chain can slide.
- Fit the file in a flie holder and place it over the tooth at 35^
- File forward only until all the worn part of the tooth has been eliminated.
- Count the file movements made on the first tooth and do the same on all the others, both right and left
- After some sharpening the delimiting device on the chain will exceed the height of the cutting teeth, file the
exceeding part by means of a flat file to round off the depth delimiting device.
-
Ensure that the chain is replaced before stretching to exceed the maximum adjustment of the chain saw bar.
-
'Deep' filing should be performed with an electric file, we advise to use a service centre to perform this operation.
-
Ensure that the chain slides smoothly over the bar when pulled with hands, periodically sharpen chain and check the chain tension.
-
Bars with sprockets need frequent greasing which can be performed as follows :
-
Fill a syringe or similar device with grease for bearings.
- Each time the saw is used grease through the hole provided near the bar tip until the grease penetrated onto the tip.
- After 3 times of sharpening the chain your self have it professionally sharpened, this will ensure that all the teeth are even.
To avoid damage to the motor, do not keep the chain saw running if the chain is lodged in the wood.
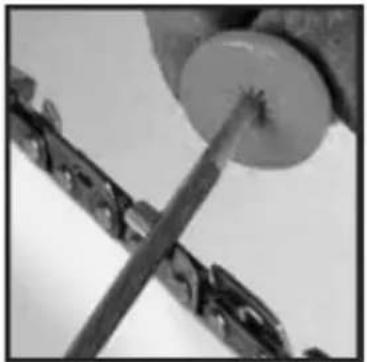
natural_image
Close-up of a metallic tool interacting with a circular component against a cloudy sky (no text or symbols visible)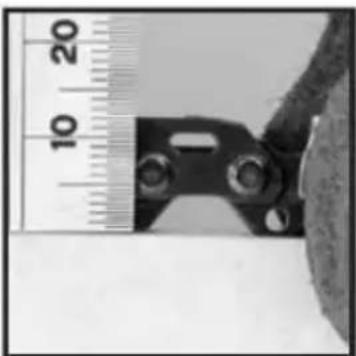
natural_image
Close-up of a metal bracket with a ruler for scale, showing no text or symbols on the object itself.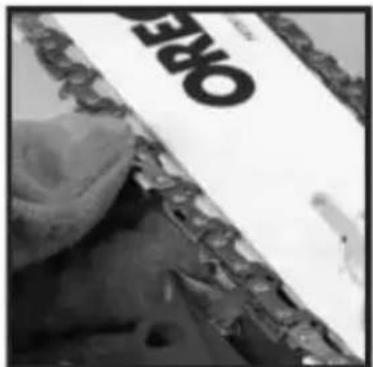
Fig.18 Fig.19 Fig.20
8. STORAGE
If you do not use the saw for a period exceeding 30 days, proceed as follows.
Empty the oil container.
Remove and clean the guide bar and the chain. Immerse the guide bar and the chain in a paraffin-based or soap-based cleaning bath.
Then dry the guide bar and the chain.
* Place the chain into a container filled with oil. This will prevent it from corroding.
* Slightly apply oil onto the guide bar.
Wipe the chainsaw body with a cloth. When cleaning, use a soft cloth soaked in a soap water.
Store the chainsaw
- in higher racks or in locked premises out of the reach of children
- in a dry place
9. TECHNICAL DATA
| MODEL | FZP | 70105-0 |
| Rated voltage | 1×20 V | |
| Chain speed 8.5m/s (low speed); 11m/s (high speed) | ||
| Oil tank capacity 40ml | ||
| Guide lenght 125mm | ||
| Max. operating duration with a full battery | 20min (1×2Ah), 40min (1×4Ah) | |
| Weight 1.2kg (not include battery) |
Accessories
| Item number Accessory | |
| FDUZ 79020 Battery pack 2 Ah | |
| FDUZ 79040 Battery pack 4 Ah | |
| FDUZ 79100 Fast charger | |
| FDUZ 79110 Fast dual charger |
10. DISPOSAL

The machine, rechargeable batteries, accessories and packaging should be sorted for environmentalfriendly recycling.
Do not dispose of power tools and batteries/rechargeable batteries into household waste!
Only for EC countries:
According to the European Guideline 2012/19/EU, power tools that are no longer usable, and according to the European Guideline 2006/66/EC, defective or used battery packs/batteries, must be collected separately and disposed of in an environmentally correct manner.
INSTRUCTIONS AND INFORMATION ON DISPOSAL OF USED PACKAGING.
Put any used package material to the place determined by the municipality for waste disposal.
DISPOSAL OF USED ELECTRIC AND ELECTRONIC EQUIPMENT
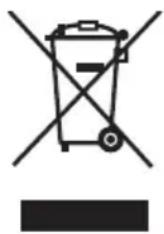
This symbol on products or accompanying documents means that used electric or electronic products must not be put to ordinary municipal waste.
Hand over such products to determined collection points for proper disposal, restoration and recycling. Alternatively, in some countries of the European Union or other European countries you can return your products to your local dealer when you buy an equivalent new product. By dutiful disposal of this product you can preserve precious natural resources and you help prevent any potential adverse effects on the environment and human health which could be the results of wrong waste disposal. Ask your local authority or the nearest collection point for additional details. In case of improper disposal of this waste kind penalties can be imposed in accordance with national regulations.
For companies in the European Union countries
Should you want to dispose of electric and electronic devices, ask your dealer or vendor for necessary information..
Disposal in other countries outside the European Union
Should you want to dispose of this product, ask your local authorities or your dealer for necessary information about disposal method.

This product fulfils all basic requirements of the EU directives that apply to it.
Text, design and technical specifications can change without prior notice and we reserve the right for their change.
User manual in the original language.
11. DECLARATION OF CONFORMITY
FAST®
FAST ČR, a.s.
U Sanitasu 1621, 251 01 Říčany, Czech Republic
tel:+420 323 204 111,fax:+420 323 204 110
EU DECLARATION OF CONFORMITY
Product / brand: Cordless Pruning Saw / FIELDMANN
Type / model: FZP 70105-0 as factory model GY2194
DC 20,0V (battery powered); length 125/150mm; Class III
L PA = dB(A), L WA = 100 dB(A) 89
Manufacturer: FAST ČR, a.s.
U Sanitasu 1621, 251 01 Ríčany, Czech Republic
VAT no: CZ24777749
This declaration of conformity is issued under the sole responsibility of the manufacturer.
The object of the declaration described above is in conformity with the relevant Union harmonization legislation:
Directive LVD 2006/42/EC Directive EMC 2014/30/EU
Directive NEOE 2000/14/EC Directive RoHS 2011/65/EU
The relevant harmonized standards and the other technical specifications:
EN 62841-1:2015+A11 EN ISO 12100:2010
EN IEC 55014-1:2021 EN IEC 55014-2:2021

Place of issuance: Prague
Date of issuance: 28.11.2022
Name: Petr Uher - Responsible Person
Signature:

natural_image
Abstract black and white spiral pattern with no text or symbolsFIELDMANN®
Home & Garden Performance
Model /Modell /Modelis:
Conditions of guarantee
This product is warranted for the period of 24 months from the adate aof purchase to the end-user. Warranty is limited to the following conditions. Warranty is referred only to the customer goods using for common domestic use. The claim forservice can be applied either at dealer's shop where the product was bought, or at below mentioned authorized service shops. The end-user is obligated to set up a claim immediately when the defects appeared but only till the end of warranty period. The end-user is obligated to cooperate to certify the claiming defects. Only completed and clean (according to hygienic standards) product will be accepted. In case of eligible warranty claim the warranty period will be prolonged by the period from the date of claim application till the date of taking overthe product by end-user, or the date the end-user is obligated to take it over. To obtain the service under this warranty, end-user is obligated to certify his claim with duly completed following documents: receipt, certificate of warranty, certificate of installation ...
This warranty is avoid aespecially if aapply as follows: ■ Defects which were put on sale. ■ Wear-out aor adamage caused by acommon use. ■ The aproduct awas adamaged aby aunprofessional aor wrong installation, used in contrary to the applicable instruction manual, used in contrary to legal enactment and common process of use or used for another purpose which has been designed for. ■ The product was damaged by uncared-for or insufficient maintenance. ■ The product was damaged by dirt, accident of force majeure (natural disaster, fire, flood, ...). ■ Defects on functionality caused by low duality of signal, electromagnetic field interference etc. ■ The product was mechanically damaged (e.g. broken button, fall...). ■ Damage caused by use of unsuitable media, fillings, expendable supplies (batteries) or by unsuitable working conditions (e.g. high temperatures, high humidity, quakes,...). ■ Repair, modification or other failure action to the product by unauthorized person ■ End-user did not prove enough his right to claim (time and place of purchase). ■ Data on presented documents differs from data on products. ■ Cases when the claiming product can not be identified according to the presented documents (e.g. the serial number or the warranty seal has been damaged).
fasthungary@fasthungary.hu
www.fasthungary.hu
natural_image
Black-and-white photo of a FELDMAN grasshopper with visible teeth and base (no text or symbols on the instrument itself)
FIELDMANN®
Home & Garden Performance

- FIELDMANN®
- Cordless Mini Chainsaw 20V FASTPOWER USER'S MANUAL
- TABLE OF CONTENTS
- SAFETY INSTRUCTIONS
- WARNING!
- Important safety warnings
- Packaging
- Instructions for use
- SYMBOLS
- DESCRIPTION
- Machine Description (see Fig. 1)
- SAFETY INSTRUCTIONS
- ATTENTION!
- Work area safety
- Electrical safety
- Personal safety
- Power tool use and maintenance
- Service
- Storage
- Use and treatment of the cordless tool
- FUNCTIONAL DESCRIPTION
- Installing or removing battery cartridge
- Checking the chain brake
- Mounting the chain bar
- Setting the chain saw tension (fig.6)
- Oil filling
- Checking the automatic oil function
- Avoid jamming
- OPERATION
- Start up
- Adjust speed
- Operating the electric chain saw
- Safe chainsaw operation
- Trimming a tree(pruning) (fig.9)
- Felling a tree(cutting down a tree)
- Before felling a tree. (fig.10)
- Felling procedure
- Felling cut (Fig. 11)
- Limbing a tree (Fig. 12)
- Bucking a log
- Cut log from top (fig13)
- Log supported on one end (fig.14)
- Log supported on both ends (fig, 15)
- CLEANING AND MAINTENANCE
- Cleaning saw body
- Care of guide bar (fig.16)
- Normal guide bar maintenance (fig.17)
- Chain sharpenig (fig.18.&fig.19& fig.20)
- STORAGE
- TECHNICAL DATA
- DISPOSAL
- Only for EC countries:
- INSTRUCTIONS AND INFORMATION ON DISPOSAL OF USED PACKAGING.
- DISPOSAL OF USED ELECTRIC AND ELECTRONIC EQUIPMENT
- For companies in the European Union countries
- Disposal in other countries outside the European Union
- DECLARATION OF CONFORMITY
- EU DECLARATION OF CONFORMITY
- Model /Modell /Modelis:
- Conditions of guarantee
Brand : Fieldmann
Model : FZP 70105-0
Category : Saw