
VS-1103 - Scelleuse sous vide Vivax - Free user manual and instructions
Find the device manual for free VS-1103 Vivax in PDF.

| Product Type | Vacuum Sealer |
| Brand | Vivax |
| Model | VS-1103 |
| Dimensions (L x W x H) | 382.5 x 104 x 62 mm |
| Rated Voltage | 200-240 V AC |
| Rated Frequency | 50/60 Hz |
| Rated Power | 110 W |
| Vacuum Power | > 60 kPa |
| Vacuum & Seal Time | 10 - 20 seconds |
| Seal Only Time | 8 - 12 seconds |
| Sealing Strip Material | Silicone contact bar and sealing foam gasket |
| Functions | Seal, Vac & Seal, Dry/Moist Food Settings, Accessory Mode, Stop |
| Indicator Lights | Yes (for each function) |
| Overheating Protection | Automatic shut-off, cool-down period required |
| Bag Cutter | Integrated (slide cutter on lid) |
| Accessory Hose | Included for canisters and bottles |
| Cleaning | Wipe exterior with damp cloth; interior with paper towel; do not immerse |
| Storage | Cool, dry place, out of reach of children |
| Safety Features | Auto shut-off on overheat; lid lock; child supervision advised |
| Intended Use | Household only, indoor use |
Frequently Asked Questions - VS-1103 Vivax
User questions about VS-1103 Vivax
0 question about this device. Answer the ones you know or ask your own.
Ask a new question about this device
Download the instructions for your Scelleuse sous vide in PDF format for free! Find your manual VS-1103 - Vivax and take your electronic device back in hand. On this page are published all the documents necessary for the use of your device. VS-1103 by Vivax.
USER MANUAL VS-1103 Vivax
natural_image
Line drawing of a rectangular electronic device casing with mounting holes and a lid (no text or symbols)natural_image
Technical line drawing of a mechanical device with a textured surface underneath (no text or symbols)
natural_image
Line drawing of a handheld device with a textured surface underneath (no text or symbols)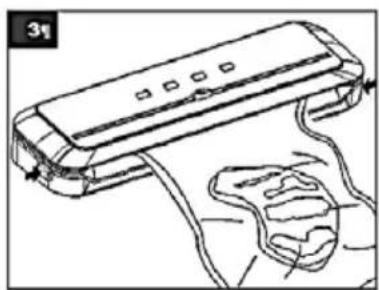
natural_image
Line drawing of a handheld electronic device with wires and a strap (no text or symbols)- Nemojte blokirati vakuumsku cjevčicu
- Zatvorite poklopac i pritisnite na oba kraja poklopca. Čuti ćete zvuk „klik“ što znači da se poklopac ispravno zatvorio. Nakon toga, pritisnite jednu od tipki za „Brtvljenje (Seal)“ ili „Vakumiranje i brtvljenje (Vax&Seal)“.
- Kad se lampice isključe, postupak je dovršen. Pritisnite na krajeve poklopca kako biste otvorili poklopac i izvadili zapečaćenu vrećicu.
Savjeti
natural_image
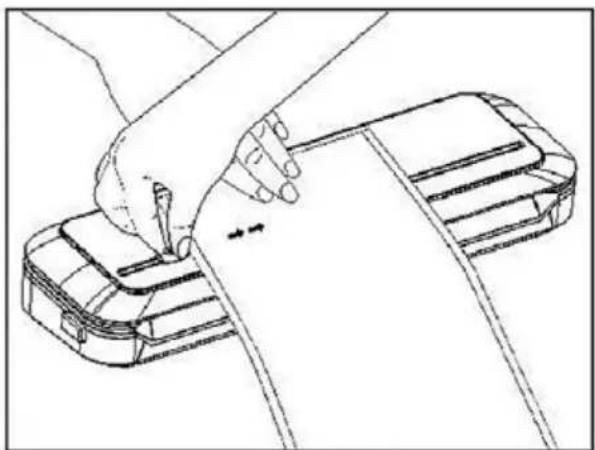
Line drawing of a hand holding a cable over a device (no text or symbols)Izvucite željenu duljinu vrećice i stavite je na poklopac.
Zatvorite poklopac uređaja i držite vrećicu jednom rukom, a zatim povucite rezač vrećice kako bi odrezali vrećicu na željenu duljinu.
KORISNI SAVJETI
- Vrećice nemojte odviše napuniti: ostavite dovoljno prostora, naročito u blizini otvora, kako bi uspiešno postavili vrećicu na ploču za vakumiranje.
- Otvoreni kraj vrećice ne smije biti mokar! Mokar rub vrećice uređaj neće dobro rastaliti i nepropusno zavariti!
- Vakumski sustav ne može zamijeniti toplinski proces konzerviranja. Pokvarljiva hrana i dalje treba biti u hladniaku ili u zamrzivaču.
- Kako biste izbjegli nabore na vrećici kod zavarivanja većih komada, pažljivo izravnajte površinu vrećice dok ju stayliate u vakumski kanal te ju držite sve dok ne počne vakumiranje.
- Kod vakumiranja i zavarivanja predmeta oštrih rubova (suhe špagete, oštri pribor za jelo), zaštite vrećicu od mogućeg oštećenja zamotavanjem predmeta u meki apsorbirajući materijal, kao na primier papirnati ručnik, ili možete koristiti spremnik umjesto vrećice.
- Kod korištenja dodataka, imaite na umu da ostavite 2.5 cm prostora na vrhu spremnika.
-
Za najbolje rezultate, odmrznite voće te blanširajte povrće prije vakumiranja i zavarivanja.
-
Ukoliko niste sigurni je li Vam vrećica pravilno zavarena, jednostavno ju ponovo zavarite.
- Za najbolje rezultate vakumiranja, koristite vrećice, spremnike, posude te dodatke istog proizvođača.
ČIŠĆENJE I ODRŽAVANJE
Vaš uređaj za vakumirano pakiranje čisti se vrlo jednostavno; u nastavku slijede upute:
◆ Prije čišćenja uvijek obavezno odspojite uređaj sa napajanja.
◆ Za čišćenje vanjske strane uređaja, koristite vlažnu krpu, spužvu ili pak blagi deterdžent.
◆ Unutrašnjost uređaja, odnosno ostatke hrane ili tekućine jednostavno obrišite papirnatim ubrusom.
◆ Temeljito osušite uređaj prije ponovnog korištenja.
◆ Držite uređaj na stabilnom i sigurnom mjestu, daleko od dohvata djece.
SAVJETI ZA ZAVARIVANJE S DODACIMA
Pripremanje dodataka za proces vakumiranog pakiranja. U dodatke ubrajaju se spremnici, posude i čepovi za boce.
- Uvijek ostavite barem 2.5 cm prostora između vakumiranog sadržaja i ruba spremnika.
- Obrišite rubove spremnika, posude ili boce da budu čisti i suhi.
- Spremnike i posude zatvarajte poklopcem, a bocu sa čepom.
- Kod dodataka i posuda s tipkom ventilom na poklopcu, proces vakumiranja započnite okretanjem tipke, a kada je proces vakumiranja dovršen, okrenite tipku-ventil u zatvoreni položaj (na suprotnu stranu) prije nego uklonite dodatno crijevo za vakumiranje.
RJEŠAVANJE PROBLEMA
NIŠTA SE NE DOGAĐA NAKON PRITISKA UREĐAJA:
- Provjerite je li priključni kabel pravilno umetnut u utičnicu napajanja.
- Provjerite priključni kabel napajanja i utikač i uvjerite se da nisu oštećeni.
- Probajte priključiti kabel u drugu utičnicu.
- Pazite da je poklopac dobro zatvoren i da je poklopac "zaključan".
- Pazite da je vrećica pravilno postavljena unutar vakumskog kanala.
- Čekajte 20 sekundi da se uređaj ohladi, a potom ga ponovo koristite.
Napomena: Uređaj će se automatski isključiti ukoliko se pregrije.
UREĐAJ NE ISIŠE SAV ZRAK IZ VREĆICE:
- Da bi vrećica bila pravilno zavarena, otvoreni kraj mora biti u potpunosti uvučen u unutrašnjost vakumskog kanala.
Ukoliko se rubovi vrećice nalaze izvan vakumskog kanala, vrećicu nećete moći pravilno zavariti.
- Vrećica možda ima rupicu ili je oštećena. Ovo možete provjeriti tako da vrećicu, u kojoj je ostalo nešto zraka, zavarite i zatim potopite u vodu te stisnete. Ako iz nje izlaze mjehurići, vrećica je probušena i morate je baciti.
- N abori na vrećici kod zavarivanja mogu prouzrokovati propuštanje zraka. Tada se preporuča izravnati vrećicu i ponovo ju zavariti.
- Nemojte pokušavati sami zavarivati bočne rubove Vivax vrećica jer one već imaju tvornički zavarene bočne rubove, i to sve do vanjske strane. Kada bi pravili vlastite zavarene rubove na vrećici, došlo bi do propuštanja zraka.
VREĆICA PROPUŠTA ZRAK
- Vrećica može propuštati na zavarenom dijelu ako su tamo prisutni nabori, izravnajte nabore, te pokušajte ponovno zavariti vrećicu.
- Pregledajte je li se u unutrašnjosti zavarene vrećice nakupilo vlage ili sokova od hrane uzduž varenog ruba; u tom ćete slučaju morati ćete prorezati otvor, obrisati vlagu i ponovno ju zavariti.
- Predmeti oštrih vrhova i rubova mogu probušiti vrećicu i ispustiti vakuum. Takve predmete, odnosno njihove rubove, omotajte prikladnim papirnatim ubrusima.
- Ukoliko vrećica još uvijek propušta zrak, hrana bi mogla početi fermentirati ili neugodno mirisati, odnosno mogla bi se pokvariti.
VREĆICA SE TALI:
Ako se Vaša vrećica počinje taliti, to znači da je traka za zavarivanje postala prevruća.
Stoga uvijek pričekajte 30 sekundi da se uređaj ohladi prije nego krenete ponovno vakumirati.
VAŽNO: Kako biste izbjegli moguću zarazu, nemojte ponovo koristiti vrećice nakon što ste ih jednom koristili za pohranu sirovog mesa, ribe ili masne hrane. Također, nemojte ponovo koristiti vrećice čiji se sadržaj prethodno kuhao ili je bio u mikrovalnoj pećnici.
SPREMNICI ZA VAKUMIRANO PAKIRANJE (nije u setu)
natural_image
Line drawing of a rectangular electronic device with four square slots and a central handle (no text or symbols)natural_image
Line drawing of a mechanical device with a paper sheet and a separate component (no text or symbols)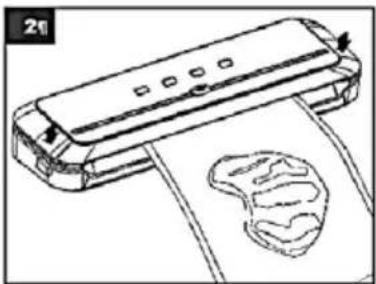
natural_image
Line drawing of a device with a footprint and a paper airplane (no text or symbols)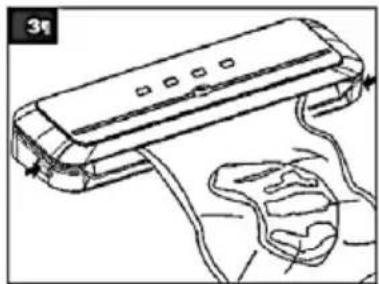
natural_image
Line drawing of a handheld electronic device with wires and a hand holding a strap (no text or symbols)- Nemojte da blokirate vakuumsku cevčicu
- Zatvorite poklopac i pritisnite na oba kraja poklopca. Čuti ćete zvuk „klik“ što znači da se poklopac ispravno zatvorio. Nakon toga, pritisnite jedan od tastera „Zaptivanje (Seal)“ ili „Vakumiranje i zaptivanje (Vac&Seal)“.
- Kad se lampice isključe, postupak je završen. Pritisnite na krajeve poklopca kako biste otvorili poklopac i izvadili zapečaćenu kesicu.
Saveti
natural_image
Line drawing of a hand pressing down on a cable or cable component (no text or symbols)natural_image
Line drawing of a rectangular electronic device casing with four square cutouts (no text or symbols)natural_image
Technical line drawing of a mechanical device with a textured surface underneath (no text or symbols)
natural_image
Line drawing of a device with a textured surface and directional arrows, no text or symbols present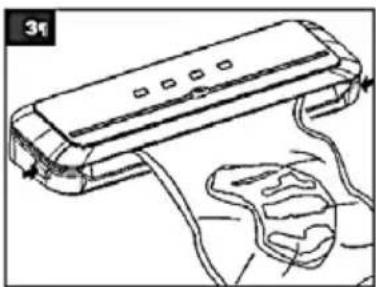
natural_image
Line drawing of a handheld electronic device with wires and a handle (no text or symbols)natural_image
Line drawing of a hand holding a cable over a device (no text or symbols)natural_image
Line drawing of a rectangular electronic device casing with mounting holes and a lid (no text or symbols)natural_image
Technical line drawing of a mechanical device with a textured surface underneath (no text or symbols)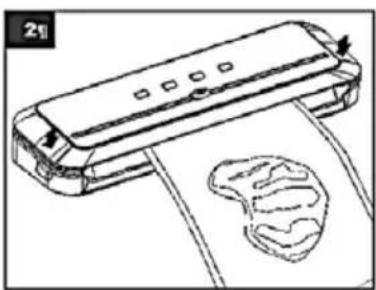
natural_image
Line drawing of a handheld device with a textured surface and directional arrows (no text or symbols)
natural_image
Line drawing of a handheld electronic device with wires and a strap (no text or symbols)- Ne blokirajte vakumske cevke
- Zaprite pokrov in pritisnite na oba konca pokrova. Slišali boste zvok "klik", kar pomeni, da se je pokrov pravilno zaprl. Po tem, pritisnite eno od tipk za „Tesnenje (Seal)“ ali „Vakumiranje in tesnenje (Vac&Seal)“.
- Ko se lučke ugasnejo, je postopek končan. Pritisnite na konce pokrova, da odprete pokrov in odstranite zapečateno vrečko.
Nasveti

natural_image
Line drawing of a hand holding a cable over a device (no text or symbols)SHRANITE NAPRAVO, KO JE NE UPORABLJATE
natural_image
Line drawing of a rectangular electronic device casing with mounting holes and a lid (no text or symbols)You are about to enjoy the freshness benefits of Vivax vacuum sealer, Vacuum Preservation System has helped millions of households keep food fresh longer in the refrigerator, freezer and pantry. The vacuum sealer system is designed to remove air and extend freshness up to 5 times longer than conventional storage methods, keep your Vivax VS-100 appliance on your worktop, and you will soon discover it's convenience and versatility.
Why need vacuum package?
Exposure to air causes food to lose nutrition and flavor, and also causes freezer bum and enables many bacteria, mold and yeast to grow, The Vivax vacuum packaging system removes air and seals in flavor and quality. You can now enjoy the benefits of a scientifically proven food storage method that keeps food fresh up to 5 times longer.
THE VACUUM SEALER SAVES TIME AND MONEY
Save much cost: With the Vivax Vacuum Sealer you can buy in bulk or buy on sale and vacuum package your food in desired portions without wasting food.
Save more time:
Cook ahead for the week, preparing meals and saving them in vacuum sealer bags
Marinate in minutes:
Vacuum packaging opens up the pores of food so you can get that great-marinated flavor in just 20 minutes instead of overnight.
Make entertaining easy:
Make your signature dish and holiday treats in advance so you can spend quality time with your guests.
Enjoy seasonal or specialty foods:
Keep highly perishable or infrequently used items fresh longer.
Control portions for dieting:
Vacuum package sensible portions and write calories and/or fat content on the bag.
Protect non-food items:
Keep camping and boating supplies dry and organized for outings; protect polished silver from tarnishing by minimizing exposure to air.
SAFETY AND WARNINGS
IMPORTANT: Please retain your instruction booklet for future use.
We believe that safe performance is the first priority in any consumer product. We ask that any electrical appliance that you use be operated in a sensible fashion with due care and attention placed on the following important operating instructions.
When using any electrically powered appliance, basic safety precautions should always be followed.
Warning: To reduce the risk of fire, electrical shock or injury to person or property:
- Ensure all packing materials and labels or stickers are removed from the appliance before first use.
● Always operate the product from a power source of the same voltage, frequency and rating as indicated on the product identification plate.
- Close supervision is necessary when the product is used by or near children or incapacitated individuals. Do not allow children to use it as a toy.
- Do not operate the product with a damaged cord or plug, or after the product malfunctions, or has been dropped or appears damaged in any way. Return the complete product to the place of purchase for inspection, replacement or refund.
- Unplug from the mains when not in use and before cleaning.
- This appliance can be used by children aged from 8 years and above and persons with reduced physical, sensory or mental capabilities or lack of experience and knowledge if they have been given supervision or instruction concerning use of the appliance in a safe way and understand the hazards involved.
● Children shall not play with the appliance
- Cleaning and user maintenance shall not be made by children without supervision.
● Children should always be supervised to ensure that they do not play with this product.
- Do not use any other accessories or attachments with this appliance.
● Always place the unit on a flat level surface. Never leave the product unattended while in use.
- Do not use the appliance with an extension cord to avoid product overloading.
- Avoid contact between the cord and hot surfaces.
● For indoor use only. For domestic use only. - Do not use the appliance for any other than its intended use.
- This appliance should be used only as described within the instructions for use that accompany it. Please retain these instructions for future reference.
- Always ensure that your hands are dry before removing the plug from the main outlet. Never pull the plug out of the mains outlet by its cord. Close supervisions is necessary when this appliance is used by or near children and invalids.
- Keep the air intake cover free of dust or fluff.
Caution:
- The appliance is not intended to be operated by means of an external timer or separate remote-control system.
- Make sure your hands are dry when plugging in and unplugging appliance. Do not immerise Power cord, plug or unit into water or any other liquid.
- Ensure all the parts are correctly mounted before switching on the appliance.
- To protect against fire, electric shock or personal injury, do not immerse cord, plug or unit in water or any other liquids.
- Always remove the plug after use.
Important Safeguards for all Electrical appliances
-
Carefully read all instructions before operating the appliance and save for future reference.
-
Remove and safely discard all packing materials and promotional labels before using the appliance for the first time.
- Fully unwind the power cable before use.
- Do not let the power cord hang over the edge of a bench or table, touch hot surface or become knotted.
- It is recommended to inspect the appliance regularly. Do not use the appliance if the supply cord, plug, connector or appliance becomes damaged in any way.
- The appliance is for household use only. Do not use this appliance for any other than its intended use. Do not use in moving vehicles or boats. Do not use outdoor. Misuse may cause injury.
- Always switch off at the power outlet and unplug at the power outlet when the appliance is not use.
- Before cleaning, always turn the appliance to the OFF position. Switch off at the power outlet and remove the power cord, if detachable, from the appliance and allow all parts to cool.
- Do not place this appliance on or near a heart source, such as a hot plate or oven.
OPERATING INSTRUCTIONS
Main parts
Note:
If several lights flasing at the same time after continuous working, overheating protection activated. PIs wait for 5-10 minutes for cooling down and the appliance will be back in normal mode.
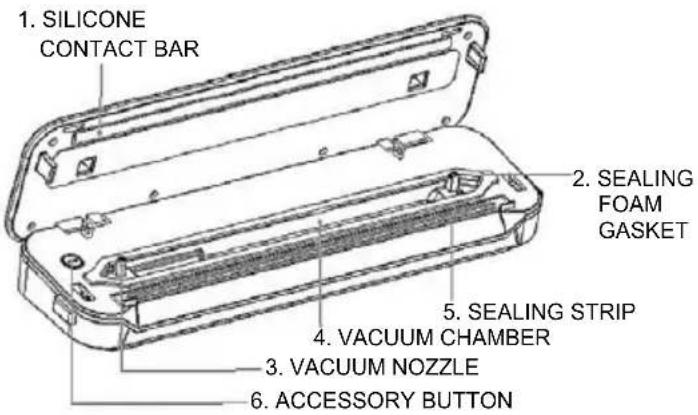
1. SILICONE CONTACT BAR
Work with silicone sealing gasket to make optimal sealing
2. SEALING FOAM GASKET
Objective to ensure vacuum chamber is airtight so the bag can be vacuumed properly
3. VACUUM NOZZLE
This is used for removing air from bags / canisters / bottles. Do not block the vacuum nozzle when vacuuming a bag. Accessory hose is required when vacuuming a canister or bottle.
4. VACUUM CHAMBER
An airtight chamber for vacuuming
5. SEALING STRIP
Work with silicone contact bar for sealing function
6. ACCESSORY BUTTON
Make sure connection of the vacuum tube before vacuuming the wine stoppers, vacuum canisters. Press this button to start vacuuming bottle or canister with light flashing. It will stop automatically when reaching a certain negative pressure
Vacuuming procedure
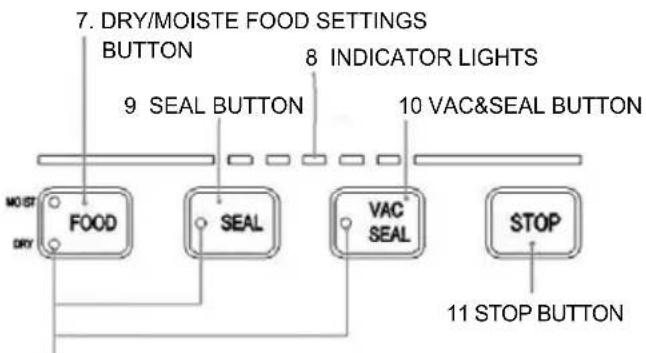
7. DRY/ MOIST FOOD SETTINGS BUTTON
It will take longer time to seal moist food than dry food.
The indicator light will be illuminated when the corresponding function selected
8. INDICATOR LIGHTS
The indicator light will be illuminated when the appliance is under any process
9. SEAL BUTTON
Press to create a seal no matter the bag is vacuumed or not. (Wait for 30s between seals to allow appliance to cool down)
10. VAC & SEAL BUTTON
It is the most frequently used function. Press to vacuum package and seal food airtight with a single touch. (Wait for 60s between uses to allow appliance to cool down).
11. STOP BUTTON
During any working status, press STOP button to stop current processing immediately.

natural_image
Technical line drawing of a mechanical device with a textured base and paper holder (no text or symbols)
natural_image
Line drawing of a printer with paper and a textured surface, no text or symbols present
natural_image
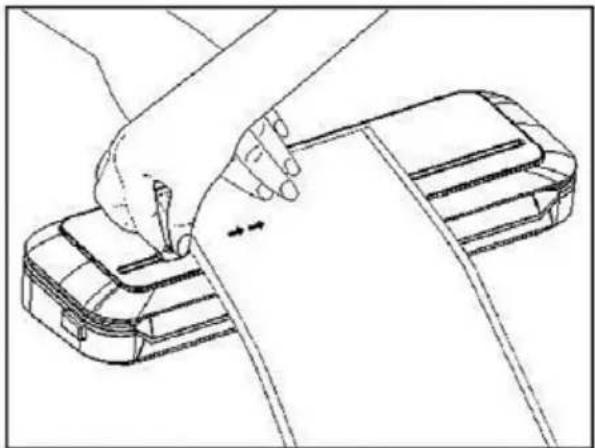
Line drawing of a handheld electronic device with wires and a hand holding the device (no text or symbols)- Please do not block the vacuum nozzle
- Close the lid and press on both end of the lid. You will hear a "clicking" sound if the lid is properly clocked. Then start to seal or vacuum & seal.
- When the indicator lights turn off, process is completed. Press unlock button at both end to open the lid and remove the sealed bag.
Tips
natural_image
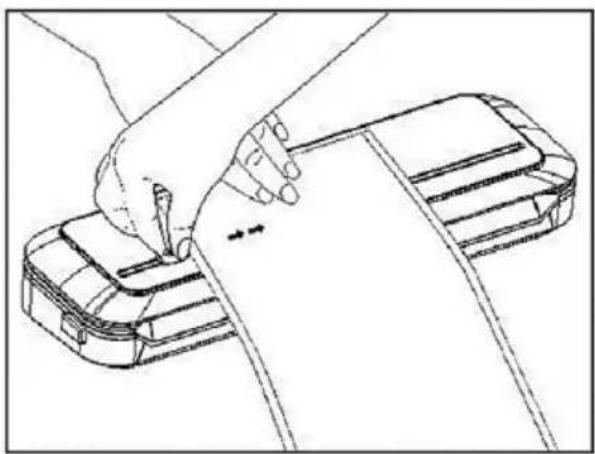
Line drawing of a hand holding a cable inserted into a device (no text or symbols)Pull out desired bag length and put it on the lid.
Close Appliance Lid and hold the bag by one hand, then slide bag cutter across the roll to get the needed bag length.
HELPFUL HINTS
- Do not overfull the bags: leave enough length at the open end of the bag so that it can be placed on the vacuum plate easily.
- Ensure that the open end of the bag is not wet. A wet bag may be difficult to melt and seal tightly.
- Vacuum is NOT a substitute for the heat process of canning, Perishables still need to be refrigerated or frozen.
- To prevent wrinkles in a seal when vacuum sealing bulky items, gently stretch bag flat while inserting int the vacuum channel and hold until the pump begins.
- When you are vacuum sealing items with sharp edges(dry spaghetti, silverware, etc.), protect the bag from punctures by wrapping item in soft cushioning material, such as a paper towel, you may want to use a canister or container instead of a bag.
- When using accessories, remember to leave 2.5cm of space at top of canister or container.
- Pre-freeze fruits and blanch vegetables before vacuum sealing for the best results.
- If you are unsure whether your bag was sealed properly, simply reseal the bag.
- For best results, use same brand bags, canisters, containers and accessories.
CLEANING AND MAINTENANCE
Your vacuum preservation system is easy to clean, just observe the following steps.
◆ Always unplug the unit before cleaning.
◆ Wipe the outside of the appliance with a damp cloth or sponge and mild soap if necessary.
◆ To clean the inside of the unit ,wipe away any food or liquid with a paper towel.
◆ Dry thoroughly before using again.
◆ Keep the unit in a flat, safe place, out of the reach of children.
TIPS ON VACUUM SEALING WITH ACCESSORIES
How to prepare accessories for vacuum packing. Accessories include vacuum packing canisters, containers and bottle stoppers.
- Always leave at least 2.5cm(1 inch) of space between the contents and the rim.
- Wipe rim of canister, container or bottle to ensure it is clean and dry.
- Place lid on canister or container, or place stopper in bottle.
- For accessories with a large knob on lid, turn knob to vacuum, when the vacuum process is complete, turn the knob to closed before removing the accessory hose.
TROUBLE SHOOTING
NOTHING HAPPENS WHEN I TRY TO VACUUM PACKAGE:
- Check the power cord to see if it is firmly plugged into electrical outlet.
- Examine power cord for any damage.
- Check electrical outlet is working by plugging in another position.
- Make sure the lid is closed and the latch is in the locked position.
- Make sure bag is placed correctly inside vacuum channel.
- Wait 20 seconds to allow appliance to cool off, and then try using it again.
Note: The appliance will shut off automatically if it becomes too hot.
AIR IS STILL IN THE BAG:
- Make sure the open end of bag is resting entirely inside vacuum channel. If the edge of the bag is beyond vacuum channel, bag will not seal properly.
- Examine bag for leaks. To see if your bag has a leak, seal bag with air, submerge it into water and apply pressure. Bubbles indicate a leak, use a new bag if bubbles appear.
- If you are using a custom-sized Vivax bag, check seal of bag. A wrinkle in the bag along the seal may cause leakage and allow air to re-enter, just cut bag and reseal.
- Do not attempt to make your own side seams for a Vivax bag, the bags are manufactured with special side seams, which are sealed all the way to the outer edge. Making your own side seams may cause leakage and allow air to re-enter.
AIR WAS REMOVED FROM THE BAG, BUT NOW AIR HAS RE-ENTERED.
- Examine seal of bag. A wrinkle along the seal may cause leakage and allow air to enter, simply cut bag and reseal.
- Sometimes moisture or food material(such as juices, grease, crumbs, powders, etc.) along seal prevents bag from sealing properly. Cut bag open, wipe top inside of bag and reseal.
-
If you are vacuum packing sharp food items, bag may have been punctured, use a new bag if there is a hole. Cover sharp food items with a soft cushioning material, such as a paper towel, and reseal.
-
If you are still experiencing difficulty with air in your bag, fermentation or the release of natural gases from inside the foods may have occurred, when this happens, food may have begun to spoil and should be discarded.
THE BAG MELTS:
If your bag melts, sealing strip may have become too hot, always wait at least 20 seconds for appliance to cool down before you vacuum package another item.
IMPORTANT: To avoid possible illness, do not reuse bags after storing raw meats, raw fish or greasy foods, do not reuse bags that have been microwaved or simmered.
VACUUM PACKING CANISTERS (not in set)
The external canisters are simple to use and ideal for vacuum packing delicate items such as muffins and baked goods, liquids and dry goods.
The canisters come in a variety of styles and sizes and can be used on the counter-top, In the refrigerator or in the pantry.
The Quick Marinator is an excellent way to marinate foods in minutes instead of hours, any canister can be used for marinating, but we recommend the or rectangular square or rectangular shapes because less marinade is needed, canisters should not be used in the freezer.
The stackable, lightweight containers are a convenient option to store make-ahead meals, leftovers and snacks.
Note: Allow hot foods to cool to room temperature before vacuum packing, otherwise contents may bubble up out of canister.
BOTTLE STOPPER (not in set)
Use bottle stoppers to vacuum package wine, non-carbonated liquids and oils, this will extend the life of the liquid and preserve the flavor, avoid using the bottle stopper on plastic bottles.
Noted: Do not vacuum package carbonated or sparkling beverages as gas removal will cause them to go flat.
USAGE TIMES
| In the fridge(5±2°C) | No vacuum | Vivax VPS |
| Red meat 3-4 days 8-9 days | ||
| White meat 2-3 days 6-8 days | ||
| Fish 1-3 days 4-5 days | ||
| Cooked meat 3-5 days 10-15 days | ||
| Soft cheese 5-7 days 20 days | ||
| Hard/semi hard cheese 1-5 days 60 days | ||
| Fruits 5-7 days 14-20 days | ||
| Vegetables 1-3 days 7-10 days | ||
| Soup 2-3 days 8-10 days | ||
| Pasta/rice leftover 2-3 days 6-8 days | ||
| Cream desserts 2-3 days 8 days |
| Room temperature( 25 ± 2^ ) | No vacuum | Vivax VPS |
| Fresh bread | 1-2 days 8-10 days | |
| biscuits | 4-6 months | 12 months |
| Uncooked pasta/rice | 5-6 months | 12 months |
| flour | 4-6 months | 12 months |
| Dry fruits | 3-4 months | 12 months |
| Ground coffee | 2-3 months | 12 months |
| Loose tea | 5-6 months | 12 months |
| Milk tea | 1-2 months | 12 months |
| In the freezer(-18±2°C) | No vacuum | Vivax VPS |
| Meat | 4-6 months | 15-20 months |
| Fish | 3-4 months | 10-12 months |
| Vegetables | 8-10 months | 8-24 months |
TECHNICAL DATA
Rated Voltage: 200-240V AC
Rated Power: 110W
VAC/Sealing Time: 10\~ -20 sec
Dimensions: L:382.5mm, W:104mm, H:62mm
Rated Frequency:50/60Hz
Sealing time: 8\~ -12 seconds
Vacuum Power: > 60kPa(approx.)
INSTRUCTIONS FOR CLEANING
Should you need to clean unit:
● Unplug the unit from the power outlet.
● Wipe it down with a damp cloth and a small amount of non-abrasive cleaning agent.
● Never get the unit wet. Do not use the appliance it if it is wet.
- Clean the unit regularly. You may use a vacuum cleaner for this.
STORAGE INSTRUCTIONS
The unit should be stored in a cool, dry place.
Do not allow to be in reach of children.
DISPOSAL OF ELECTRICAL AND ELECTRONIC EQUIPMENT
To protect our environment and to recycle the raw materials used as completely as possible, the consumer is asked to return unserviceable equipment to the public collection system for electrical and electronic. The symbol of the crossed indicates that this product must be returned to the collection point for electronic waste to feed it by recycling the best possible raw material recycling.
By ensuring this product you will prevent possible negative effects on the environment and human health, which could otherwise be caused due to improper disposal of that product. The recycling of materials from this product, you will help to preserve a healthy environment and natural resources.
For detailed information about the collection of EE products contact M SAN Grupa dd or the dealer where you purchased the product.
EU DECLARATON OF CONFORMITY
This device is manufactured in accordance with the applicable European standards and in accordance with all applicable Directives and Regulations.

EU declaration of conformity can be downloaded from the following link:
www.msan.hr/dokumentacijaartikala
POŠTOVANI!
Zahvaljujemo na kupnji Vivax uređaja i nadamo se da ćete biti zadovoljni odabirom. Ako u jamstvenom roku bude potreban popravak proizvoda, molimo savjetujte se sa ovlaštenim prodavačem koji Vam je proizvod prodao ili nas kontaktirajte na dolje navedene brojeve i adrese. MOLIMO VAS DA PRIJE UPORABE PROIZVODA PAŽLJIVO PROČITATE UPUTE PRILOŽENE UZ PROIZVOD!
JAMSTVENI LIST
VIVAX
HR
MODEL UREĐAJA
SERIJSKI BROJ
DATUM PRODAJE
BROJ RAČUNA PRODAVATELJA
POTPIS I PEČAT PRODAVATELJA
-
Ovim jamstvom M SAN Grupa kao davatelj jamstva u Republici Hrvatskoj jamči besplatan popravak istog u skladu s važećim propisima i u skladu s uvjetima opisanim u ovom jamstvenom listu.
Ovim jamstvom jamčimo da će predmet ovog jamstva raditi bez pogreške uzrokovane eventualnom lošom izradom ili lošim materijalom izrade. Svi, eventualno nastali, kvarovi biti će besplatno otklonjeni u ovlaštenom servisu u jamstvenom roku. -
UVJETI JAMSTVA Jamstveni rok počinje od dana kupnje proizvoda i traje 12 mjeseci, osim za Vivax Imago televizore za koje jamstvo traje 24 mjeseca.
-
U slučaju kvara na proizvodu koji je predmet ovog jamstva, obvezujemo se da ćemo isti popraviti u najkraćem mogućem roku, a najkasnije u roku od 45 dana. Ako se proizvod ne može popraviti ili se ne popravi u roku od 45 dana, biti će zamijenjen novim. Jamstvo će biti produženo za vrijeme trajanja popravka.
-
Jamstvo se priznaje samo uz račun o kupnji, te uz ovaj jamstveni list koji mora biti ispravno popunjen odnosno mora sadržavati datum prodaje, pečat i potpis prodavatelja.
5. JAMSTVO NE OBUHVAĆA
POTPIS I PEČAT PRODAVCA
6. PRAVO NA REKLAMACIJU NE OBUHVATA
- Ovom izjavom o saobraznosti proizvođač proizvoda, preko KIM TEC CG d.o.o., kao uvoznika i davaoca prava u Crnoj Gori besplatan popravak istog u skladu s vazećim propisima i u skladu s uslovima opisanim u ovoj izjavi o saobraznosti. Ovom izjavom o saobraznosti istićemo da će predmet ovog prava raditi bez greške uzrokovane eventualnom lošom izradom i lošim materijalom izrade. Svi eventualno nastali kvarovi biće besplatno otklonjeni u ovlašćenom servisu u predviđenom roku za reklamaciju.
- USLOVI REKLAMACIJE: Rok za reklamaciju počinje teći od dana kupovine proizvoda i traje 24 mjeseca.
- U slučaju kvara na proizvodu koji je predmet reklamacije, obavezujemo se da ćemo isti popraviti u najkraćem mogućem roku, a najkasnije u roku od 15 dana. Ako se proizvod ne može popraviti ili se ne popravi u roku od 15 dana, biće zamijenjen novim.
- Pravo na reklamaciju se priznaje uz fiskalni račun o kupovini, ili uz ovu izjavu o saobraznosti koji mora biti ispravno popunjen odnosno mora sadržati datum prodaje, pečat i potpis prodavca.
- Davalac izjave o saobraznosti osigurava servis i rezervne djelove 7 godina od datuma kupovine.
POTPIS I PEČAT PRODAVATELJA
GARANCIJSKA IZJAVA
- Ovom garancijom garantira proizvođač proizvoda, preko KIM TEC d.o.o., kao uvoznika i davatelja garancije u Republici Bosni i Hercegovini besplatan popravak istog u skladu s važećim propisima i u skladu s uvjetima opisanim u ovom garantnom listu. Ovom garancijom garantiramo da će predmet ove garancije raditi bez greške uzrokovane eventualnom lošom izradom i lošim materijalom izrade. Svi eventualno nastali kvarovi biti će besplatno otklonjeni u ovlaštenom servisu u garantnom roku.
UVJETI GARANCIJE:
Garantni rok počinje teći od dana kupnje proizvoda i traje 12 mjeseci, osim za Vivax Imago televizore (CRT, LCD, PDP) za koje jamstvo traje 24 mjeseca
- U slučaju kvara na proizvodu koji je predmet ove garancije, obavezujemo se da ćemo isti popraviti u najkraćem mogućem roku, a najkasnije u roku od 45 dana. Ako se proizvod ne može popraviti ili se ne popravi u roku od 45 dana, biti će zamijenjen novim. Ako popravak proizvoda traje duže od 10 dana, garancija se produljužuje za vrijeme trajanja popravka.
- Garancija se priznaje samo uz račun o kupnji, te uz ovaj garantni list koji mora biti ispravno popunjen odnosno mora sadržavati datum prodaje, pečat i potpis prodavatelja.
- Davalac garancije osigurava servis i rezervne dijelove 7 godina od datuma kupnje.
GARANCIJA NE OBUHVAĆA:
Kosova Electronic Service Center
Kosova Electronic Service Center
VIVAX Air Conditioners; White Goods and Small Home appliances