
FSA 120.0 R - Tondeuse à fil STIHL - Free user manual and instructions
Find the device manual for free FSA 120.0 R STIHL in PDF.


| Product Type | Cordless electric string trimmer / brushcutter |
| Brand | STIHL |
| Model | FSA 120.0 R |
| Weight (without deflector or cutting attachment) | 9.5 lbs (4.3 kg) |
| Overall Length | 70.4 in (1788 mm) |
| Power Source | STIHL AP series battery or STIHL AR series backpack battery (sold separately) |
| Battery Voltage | 36 V (typical for STIHL AP/AR) |
| Cutting Attachments | Mowing heads (nylon line) up to 13.1 in (335 mm) diameter; grass cutting blades 9 in (230 mm) diameter |
| Approved Mowing Heads | PolyCut 18-2, AutoCut 25-2/27-2/C 26-2, SuperCut 20-2, DuroCut 20-2, TrimCut C 32-2 |
| Approved Grass Cutting Blades | 230-2, 230-4, 230-8 |
| Deflector Options | Deflector for Mowing Heads (∅ 380 mm) and Deflector for Metal Cutting Attachments (∅ 230 mm) |
| Handle Type | Loop handle; optional loop handle with barrier bar |
| Harness Requirements | Shoulder strap or full harness (with quick-release) required for blade use; optional for mowing heads |
| Power Levels | Maximum and ECO power levels selectable via switch |
| Safety Features | Trigger switch lockout, retaining button, barrier bar (for blades), deflector, chain brake / kickout protection |
| Battery Diagnostics | LED indicators on battery for charge level, temperature, and malfunctions |
| Charging Time | Varies by battery; see STIHL charging time charts |
| Recommended Ambient Temperature (Use) | 14 °F to 104 °F (-10 °C to 40 °C) |
| Recommended Ambient Temperature (Charging) | 41 °F to 104 °F (5 °C to 40 °C) |
| Storage Temperature | -4 °F to 122 °F (-20 °C to 50 °C) |
| Maintenance | Keep clean, sharpen metal blades, replace worn line, check tightness of fasteners |
| Warranty | STIHL Incorporated Limited Warranty (see manual) |
| Country of Origin | Manufactured by STIHL; see product for origin |
Frequently Asked Questions - FSA 120.0 R STIHL
User questions about FSA 120.0 R STIHL
0 question about this device. Answer the ones you know or ask your own.
Ask a new question about this device
Download the instructions for your Tondeuse à fil in PDF format for free! Find your manual FSA 120.0 R - STIHL and take your electronic device back in hand. On this page are published all the documents necessary for the use of your device. FSA 120.0 R by STIHL.
USER MANUAL FSA 120.0 R STIHL
natural_image
Exterior view of a metal detector tool with adjustable arm and base (no text or symbols visible)2 - 45 Instruction Manual
Read Instruction Manual thoroughly before use and follow all safety precautions – improper use can cause serious or fatal injury.

ADVERTENCIA
1 Introduction.... 2
2 Guide to Using this Manual....3
3 Main Parts....3
4 Safety Symbols on the Products......4
5 General Power Tool Safety Warnings and Instructions....6
6 IMPORTANT SAFETY INSTRUCTIONS..10
7 Battery Safety.... 19
8 Maintenance, Repair and Storage...... 20
9 Before Starting Work....21
10 Charging the Battery.... 21
11 LED Diagnostics and Acoustic Signals..... 22
12 STIHL AR Backpack Battery....24
13 Assembling the Trimmer / Brushcutter.....25
14 Adjusting the Trimmer / Brushcutter...... 28
15 Inserting and Removing the Battery.....29
16 Switching the Trimmer / Brushcutter On and Off.... 30
17 Checking the Power Tool....31
18 During Operation....32
19 After Finishing Work....33
20 Transporting the Trimmer / Brushcutter and Battery....33
21 Storing the Trimmer / Brushcutter and Battery.... 34
22 Cleaning....35
23 Inspection and Maintenance.... 35
24 Troubleshooting Guide....38
25 Specifications....39
26 Approved Deflector, Cutting Attachment, Handle and Harness Combinations...... 41
27 Replacement Parts and Equipment...... 44
28 Disposal.... 44
29 Limited Warranty....44
30 Trademarks....44
31 Addresses.... 45
1 Introduction
Thank you for your purchase. The information contained in this manual will help you receive maximum performance and satisfaction from your trimmer and, if followed, reduce the risk of injury from its use.
The terminology utilized in this manual when referring to the power tool reflects the type of cutting attachments that may be mounted on it. The term "trimmer" is used to designate an FS / FSA unit that is equipped with a nylon line head or a head with flexible plastic blades (i.e., the PolyCut head). The term "brushcutter" designates a unit equipped with a rigid metal blade. Many STIHL FS / FSA models, including this power tool, may be used as either a trimmer or a brushcutter. Therefore, the power tool is referred in this manual as a "trimmer / brushcutter."
SAVE THIS MANUAL!

Because a trimmer / brushcutter is a high-speed cutting tool, special safety precautions must be observed to reduce the risk of personal injury.

Read this instruction manual thoroughly before use and periodically thereafter. Follow all safety precautions. Careless or improper use can cause serious or fatal injury.
Do not lend or rent the power tool without this instruction manual. Allow only persons who fully understand the information in this manual to operate the trimmer / brushcutter.
For further information, or if you do not understand any of the instructions in this manual, please go to www.stihlusa.com or contact your authorized STIHL servicing dealer.

WARNING
■ As more fully explained later in this manual, to reduce the risk of personal injury, make sure your unit is equipped with the proper handle, harness and deflector for the type of cutting attachment you are using. Use only cutting attachments that are specifically authorized by STIHL for use with this power tool. Always wear proper protective apparel and eye protection. Bystanders, especially children, and animals should not be allowed in the work area where the trimmer is in use.

WARNING
■ Use of this machine may be hazardous. If the rotating line or blade comes in contact with your body, it will cut you. When it comes in contact with solid foreign objects such as rocks, glass or bits of metal, it may fling them directly or by ricochet in the direction of bystanders or the operator. Striking such objects could damage the cutting attachment and may cause blades to crack, chip or break. Thrown objects, including broken heads or blades, may result in serious or fatal injury to the operator or bystanders. Follow the safety precautions in this manual to reduce the risk of personal injury.
2 Guide to Using this Manual English
2 Guide to Using this Manual
2.1 Signal Words
This manual contains safety information that requires your special attention. Such information is introduced with the following symbols and signal words:

DANGER
■ Indicates a hazardous situation which, if not avoided, will result in death or serious injury.

WARNING
■ Indicates a hazardous situation which, if not avoided, could result in death or serious injury.
NOTICE
■ Indicates a risk of property damage, including damage to the machine or its individual components.
2.2 Symbols in Text
The following symbol is included to assist you with the use of the manual:

Refers to a designated chapter or subchapter in this instruction manual.
3 Main Parts
3.1 Trimmer / Brushcutter and Battery
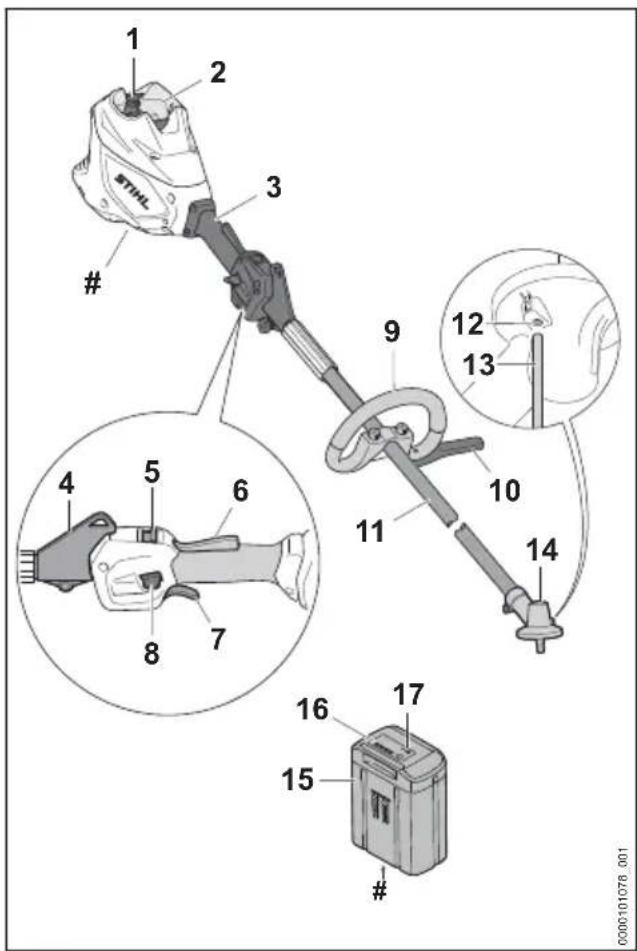
1 Locking Lever
Secures the battery in the battery compartment.
2 Battery Compartment Holds the battery.
3 Control Handle
Handle for the operator's rear hand.
4 Carrying Ring
For connecting a harness to the trimmer / brushcutter.
5 Power Level Switch
For selecting the power level.
6 Trigger Switch Lockout
Must be depressed to allow activation of the trigger switch.
7 Trigger Switch
Switches the motor on and off.
8 Retaining Button
For switching the trimmer / brushcutter on.
9 Loop Handle
Handle for the operator's front hand.
10 Barrier Bar
The barrier bar reduces the risk of inadvertent operator contact with the cutting attachment. Required equipment when operating the unit with a metal blade.
11 Drive Tube
Shaft of the power tool.
12 Opening for Stop Pin
Opening that allows the operator to block the output shaft by inserting the stop pin.
13 Stop Pin
Blocks the output shaft when mounting a cutting attachment.
14 Gearbox
Covers the transmission system.
15 Battery
Supplies electrical power to the motor.
16 Battery LEDs
Indicate the battery's state of charge and display error messages regarding potential malfunctions in the battery or power tool.
17 Push Button
Activates the battery's LEDs.
# Rating Plate
Contains electrical information and the product's serial number.
3.2 Available Cutting Attachments and Deflectors
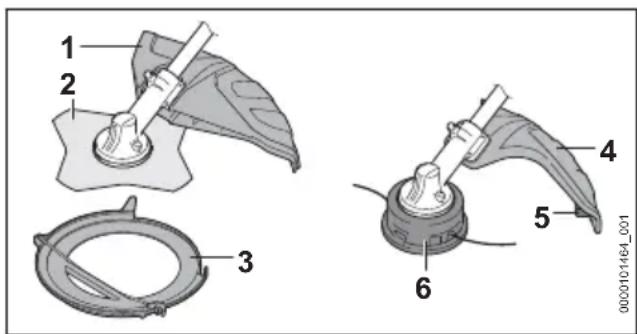
1 Deflector for Metal Cutting Attachments
Designed to reduce the risk of injury from thrown objects and contact with the cutting attachment.
2 Grass Cutting Blade
Metal grass blade to cut matted and dry grass, ferns, weeds and similar vegetation.
3 Transport Guard
Designed to reduce the risk of injury from contact with a metal cutting attachment while transporting the unit.
4 Deflector for Mowing Heads
Designed to reduce the risk of injury from thrown objects and contact with the cutting attachment.
5 Line Limiting Blade
Metal blade on the deflector that trims the nylon mowing line to the proper length.
6 Mowing Head
Mowing head for mounting nylon trimmer line.
This power tool is sold with a cutting attachment and appropriate deflector. Other cutting attachments and appropriate deflectors are available as accessories.
4 Safety Symbols on the Products
4.1 Trimmer / Brushcutter
The following safety symbols are found on the trimmer / brushcutter:

To reduce the risk of injury, follow the specified safety precautions.

Read and follow all safety precautions in the instruction manual. Improper use can lead to serious or fatal personal injury or property damage.

To reduce the risk of eye injury, always wear proper eye protection. Wear an approved protective helmet when there is a risk of head injury, ☐6.4.

Wear sturdy boots with non-slip soles. When working with a metal cutting attachment, wear steel-toed safety boots, 6.4.

Always wear non-slip, heavy-duty work gloves (e.g. made of leather or other wear resistant material) when handling the machine or metal cutting attachments, 6.4.
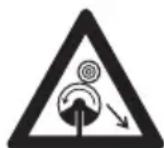
Kickout (blade thrust) may cause loss of control of the power tool resulting in serious or fatal injury to the operator or bystanders. To reduce the risk of injury, use extreme caution when using a rigid blade, ☐6.7.1.
4 Safety Symbols on the Products English
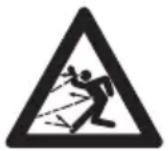
To reduce the risk of personal injury from thrown objects, inspect the work area and remove stones, glass, rocks, pieces of metal and other objects that could be thrown by the cutting attachment. 6.6.4.
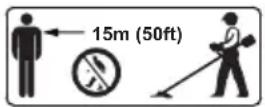
To reduce the risk of personal injury from thrown objects, keep bystanders at least 50 ft. (15 m) away, 6.6.4.

To reduce the risk of injury or property damage from unintended activation, remove the battery any time the trimmer / brushcutter is not in use, 1.
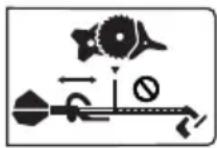
To reduce the risk of personal injury from cutting attachments, maintain the specified minimum distance between loop handle and cutting attachment, 14.2
4.2 Deflector for Mowing Heads
The following symbols may be found on deflectors designed for use with mowing heads:

The deflector may be used in combination with mowing heads.

The deflector must not be used in combination with grass cutting blades.

The deflector must not be used in combination with brush knives.

The deflector must not be used in combination with shredder blades.

The deflector must not be used in combination with circular saw blades.
4.3 Deflector for Metal Cutting Attachments
The following symbols may be found on deflectors designed for use with metal cutting attachments:

The deflector must not be used in combination with mowing heads.

The deflector may be used in combination with grass cutting blades.

The deflector must not be used in combination with shredder blades.

The deflector must not be used in combination with circular saw blades.
4.4 Skirt
The deflector for metal cutting attachments can be converted for use with mowing heads by mounting a skirt. The skirt must be mounted securely in accordance with the instructions at the bottom of the deflector before working with a mowing head.
The following symbol may be found on the skirt:

This deflector may be used in combination with mowing heads.
4.5 Battery
The following safety symbols are found on the AR series backpack battery and the AP series battery:

To reduce the risk of injury, follow the specified safety precautions.

Read and follow all safety precautions in the battery's instruction manual and the manual for the STIHL tool powered by this battery. Improper use can lead to

serious or fatal personal injury or property damage.
To reduce the risk of personal injury or property damage from fire, explosion or burns, including chemical burns, do not disassemble, crush, drop, damage or heat above 212 °F (100 °C). Never expose to fire or incinerate, 📄7.
AR 1000, 2000, 3000 Backpack Batteries

To reduce the risk of personal injury or property damage from a short circuit, fire or explosion, keep dry. Protect from rain, water, liquids and damp conditions. Never immerse in water or other liquids, 📄7.
AR L Backpack Batteries

To reduce the risk of personal injury or property damage from a short circuit, fire or explosion, keep dry. Never immerse in water or other liquids, 📄.
AP Series Batteries

To reduce the risk of personal injury or property damage from a short circuit, fire or explosion, keep dry. Never immerse in water or other liquids, 17.
Batteries sold separately.
5 General Power Tool Safety Warnings and Instructions
5.1 General Safety Warnings and Instructions
This section contains the prescribed general safety warnings and instructions for handheld, motor-operated electric trimmers. Additional important warnings and instructions are provided in subsequent sections of this manual.
WARNING
■ When using electric trimmers, basic safety precautions should always be followed to reduce the risk of fire, electric shock and personal injury, including the following:
READ ALL INSTRUCTIONS BEFORE USING THE TRIMMER!
1) Avoid Dangerous Environment – Don't use trimmers in damp or wet locations.
2) Don't Use In Rain.
3) Keep Children Away – All bystanders should be kept at a distance from work area.
4) Dress Properly – Do not wear loose clothing or jewelry. They can be caught in moving parts. Heavy-duty work gloves (e.g. made of leather or other wear resistant material) and substantial footwear are recommended when working outdoors. Wear protective hair covering to contain long hair.
5) Use Safety Glasses – Always use face or dust mask if operation is dusty.
6) Use Right Tool – Do not use tool for any job except that for which it is intended.
7) Avoid Unintentional Starting – Do not carry trimmer with finger on the trigger switch. Be sure the trimmer is off when inserting the battery.
8) Don't Force Trimmer – It will do the job better and with less likelihood of a risk of injury at the rate for which it was designed.
9) Don't Overreach – Keep proper footing and balance at all times.
10) Stay Alert – Watch what you are doing. Use common sense. Do not operate trimmer when you are tired.
11) Store Trimmer Indoors – When not in use, trimmer should be stored indoors in a dry, locked place out of reach of children with the battery removed.
12) Maintain Trimmer With Care – Keep cutting attachment clean for best performance and to reduce the risk of injury. Follow instructions for lubricating and changing accessories. Keep handles dry, clean, and free from oil and grease.
13) Check Damaged Parts – Before further use of the trimmer, a guard or other part that is damaged should be carefully checked to determine that it will operate properly and perform its intended function. Check for alignment of moving parts, binding of moving parts, breakage of parts, mounting, and any other condition that may affect its operation. A guard or other part that is damaged should be properly repaired or replaced by an authorized service center unless indicated elsewhere in this manual.
14) Keep guards in place and in working order.
15) Keep metal cutting blades sharp.
16) Keep hands and feet away from cutting area and cutting attachment.
SAVE THESE INSTRUCTIONS
5.2 Introduction
This chapter contains the prescribed general safety warnings and instructions for handheld, motor-operated electric power tools. Additional important warnings and instructions are provided in subsequent chapters of this manual.
WARNING
- Read all safety warnings, instructions, illustrations and specifications provided with this power tool. Failure to follow all instructions listed below may result in electric shock, fire and/or serious injury.
■ Save all warnings and instructions for future reference.
The term "power tool" in the warnings refers to your mains-operated (corded) power tool or battery-operated (cordless) power tool.
5.3 Work Area Safety
a) Keep work area clean and well lit. Cluttered or dark areas invite accidents.
b) Do not operate power tools in explosive atmospheres, such as in the presence of flammable liquids, gases or dust. Power tools create sparks which may ignite the dust or fumes.
c) Keep children and bystanders away while operating a power tool. Distractions can cause you to lose control.
5.4 Electrical Safety
a) Power tool plugs must match the outlet. Never modify the plug in any way. Do not use any adapter plugs with earthed (grounded) power tools. Unmodified plugs and matching outlets will reduce the risk of electric shock.
b) Avoid body contact with earthed or grounded surfaces, such as pipes, radiators, ranges and refrigerators. There is an increased risk of electric shock if your body is earthed or grounded.
c) Do not expose power tools to rain or wet conditions. Water entering a power tool will increase the risk of electric shock.
d) Do not abuse the cord. Never use the cord for carrying, pulling or unplugging the power tool. Keep cord away from heat, oil, sharp edges or moving parts. Damaged or entangled cords increase the risk of electric shock.
e) When operating a power tool outdoors, use an extension cord suitable for outdoor use. Use of a cord suitable for outdoor use reduces the risk of electric shock.
f) If operating a power tool in a damp location is unavoidable, use a residual current device (RCD) or ground fault circuit interruptor (GFCI) protected supply. Use of an RCD or GFCI reduces the risk of electric shock.
5.5 Personal Safety
a) Stay alert, watch what you are doing and use common sense when operating a power tool. Do not use a power tool while you are tired or under the influence of drugs, alcohol or medication. A moment of inattention while operating power tools may result in serious personal injury.
b) Use personal protective equipment. Always wear eye protection. Protective equipment such as dust mask, non-skid safety shoes, hard hat, or hearing protection used for appropriate conditions will reduce personal injuries.
c) Prevent unintentional starting. Ensure the switch is in the off-position before connecting to power source and/or battery pack, picking up or carrying the tool. Carrying power tools with your finger on the switch or energizing power tools that have the switch on invites accidents.
d) Remove any adjusting key or wrench before turning the power tool on. A wrench or a key left attached to a rotating part of the power tool may result in personal injury.
e) Do not overreach. Keep proper footing and balance at all times. This enables better control of the power tool in unexpected situations.
f) Dress properly. Do not wear loose clothing or jewellery. Keep your hair and clothing away from moving parts. Loose clothes, jewellery or long hair can be caught in moving parts.
g) If devices are provided for the connection of dust extraction and collection facilities, ensure these are connected and properly used. Use of dust collection can reduce dust-related hazards.
h) Do not let familiarity gained from frequent use of tools allow you to become complacent and ignore tool safety principles. A careless action can cause severe injury within a fraction of a second.
5.6 Power Tool Use and Care
a) Do not force the power tool. Use the correct power tool for your application. The correct power tool will do the job better and safer at the rate for which it was designed.
b) Do not use the power tool if the switch does not turn it on and off. Any power tool that cannot be controlled with the switch is dangerous and must be repaired.
c) Disconnect the plug from the power source and/or remove the battery pack, if detachable, from the power tool before making any adjustments, changing accessories, or storing power tools. Such preventive safety measures reduce the risk of starting the power tool accidentally.
d) Store idle power tools out of the reach of children and do not allow persons unfamiliar with the power tool or these instructions to operate the power tool. Power tools are dangerous in the hands of untrained users.
e) Maintain power tools and accessories. Check for misalignment or binding of moving parts, breakage of parts and any other condition that may affect the power tool's operation. If damaged, have the power tool repaired before use. Many accidents are caused by poorly maintained power tools.
f) Keep cutting tools sharp and clean. Properly maintained cutting tools with sharp cutting edges are less likely to bind and are easier to control.
g) Use the power tool, accessories and tool bits etc. in accordance with these instructions, taking into account the working conditions and the work to be performed. Use of the power tool for operations different from those intended could result in a hazardous situation.
h) Keep handles and grasping surfaces dry, clean and free from oil and grease. Slippery handles and grasping surfaces do not allow for safe handling and control of the tool in unexpected situations.
5.7 Battery Tool Use and Care
a) Recharge only with the charger specified by the manufacturer. A charger that is suitable for one type of battery pack may create a risk of fire when used with another battery pack.
b) Use power tools only with specifically designated battery packs. Use of any other battery packs may create a risk of injury and fire.
c) When battery pack is not in use, keep it away from other metal objects, like paper clips, coins, keys, nails, screws or other small metal objects that can make a connection from one terminal to another. Shorting the battery terminals together may cause burns or a fire.
d) Under abusive conditions, liquid may be ejected from the battery; avoid contact. If contact accidentally occurs, flush with water. If liquid contacts eyes, additionally seek medical help. Liquid ejected from the battery may cause irritation or burns.
e) Do not use a battery pack or tool that is damaged or modified. Damaged or modified batteries may exhibit unpredictable behaviour resulting in fire/explosion or risk of injury.
f) Do not expose a battery pack or tool to fire or excessive temperature. Exposure to fire or temperatures above 130 °C / 265 °F may cause explosion.
g) Follow all charging instructions and do not charge the battery pack or tool outside the temperature range specified in the instructions. Charging improperly or at temperatures outside the specified range may damage the battery and increase the risk of fire.
5.8 Service
a) Have your power tool serviced by a qualified repair person using only identical replacement parts. This will ensure that the safety of the power tool is maintained.
b) Never service damaged battery packs. Service of battery packs should only be performed by the manufacturer or authorized service provider.
5.9 Grass Trimmer, Brush Cutter and Brush Saw Safety Warnings
a) Do not use the machine in bad weather conditions, especially when there is a risk of lightning. This increases the risk of being struck by lightning.
b) Thoroughly inspect the area for wildlife where the machine is to be used. Wildlife may be injured by the machine during operation.
c) Thoroughly inspect the area where the machine is to be used and remove all stones, sticks, wires, bones, and other for-
5 General Power Tool Safety Warnings and Instructions English
eign objects. Thrown objects can cause personal injury.
d) Before using the machine, always visually inspect to see that the cutter or blade and the cutter or blade assembly are not damaged. Damaged parts increase the risk of injury.
e) Follow instructions for changing accessories. Improperly tightened blade security nuts or bolts may either damage the blade or result in it becoming detached.
f) The rated rotational speed of the blade must be at least equal to the maximum rotational speed marked on the machine. Blades running faster than their rated rotational speed can break and fly apart.
g) Wear eye, ear, head and hand protection. Adequate protective equipment will reduce personal injury by flying debris or accidental contact with the cutting line or blade.
h) While operating the machine, always wear non-slip and protective footwear. Do not operate the machine when barefoot or wearing open sandals. This reduces the chance of injury to the feet from contact with the moving cutters or lines.
i) While operating the machine, always wear safety footwear. Do not operate the machine when barefoot or wearing open sandals. This reduces the chance of injury to the feet from contact with a moving cutter, line or blade.
j) While operating the machine, always wear long trousers. Exposed skin increases the likelihood of injury from thrown objects.
k) Keep bystanders away while operating the machine. Thrown debris can result in serious personal injury.
I) Always use two hands when operating the machine. Holding the machine with both hands will avoid loss of control.
m) Hold the machine by insulated gripping surfaces only, because the cutting line or blade may contact hidden wiring or its own cord. Cutting line or blades contacting a "live" wire may make exposed metal parts of the machine "live" and could give the operator an electric shock.
n) Always keep proper footing and operate the machine only when standing on the ground. Slippery or unstable surfaces may cause a loss of balance or control of the machine.
o) Do not operate the machine on excessively steep slopes. This reduces the risk of loss of control, slipping and falling which may result in personal injury.
p) When working on slopes, always be sure of your footing, always work across the face of slopes, never up or down and exercise extreme caution when changing direction.
This reduces the risk of loss of control, slipping and falling which may result in personal injury.
q) Keep all parts of the body away from the cutter, line or blade when the machine is operating. Before you start the machine, make sure the cutter, line or blade is not contacting anything. A moment of inattention while operating the machine may result in injury to yourself or others.
r) Do not operate the machine above waist height. This helps prevent unintended cutter or blade contact and enables better control of the machine in unexpected situations.
s) When cutting brush or saplings that are under tension, be alert for spring back. When the tension in the wood fibres is released, the brush or sapling may strike the operator and/or throw the machine out of control.
t) Use extreme caution when cutting brush and saplings. The slender material may catch the blade and be whipped toward you or pull you off balance.
u) Maintain control of the machine and do not touch cutters, lines or blades and other hazardous moving parts while they are still in motion. This reduces the risk of injury from moving parts.
v) Carry the machine with the machine switched off and away from your body. Proper handling of the machine will reduce the likelihood of accidental contact with a moving cutter, line or blade.
w) When transporting or storing the machine, always fit the cover on metal blades. Proper handling of the machine will reduce the likelihood of accidental contact with the blade.
x) Only use replacement cutters, lines, cutting heads and blades specified by the manufacturer. Incorrect replacement parts may increase the risk of breakage and injury.
y) When clearing jammed material or servicing the machine, make sure the switch is off and the battery pack is removed. Unexpected
starting of the machine while clearing jammed material or servicing may result in serious personal injury.
5.10 Blade thrust related warnings
Blade thrust is a sudden sideways, forward or backward motion of the machine, which may occur when the blade jams or catches on an object such as a sapling or a tree stump. It can be violent enough to cause the machine and/or operator to be propelled in any direction, and possibly lose control of the machine.
Blade thrust and its related hazards can be avoided by taking proper precautions as given below.
a) Maintain a firm grip with both hands on the machine and position your arms to resist blade thrust. Position your body to the left side of the machine. Blade thrust can increase the risk of injury due to the machine moving unexpectedly. Blade thrust can be controlled by the operator if proper precautions are taken.
b) If the blade binds, or when interrupting a cut for any reason, switch the machine off and hold the machine motionless in the material until the blade comes to a complete stop. While the blade is binding, never attempt to remove the machine from the material or pull the machine backward while the blade is in motion, otherwise blade thrust may occur. Investigate and take corrective actions to eliminate the cause of blade binding.
c) Do not use blunt or damaged blades. Blunt or damaged blades increase the risk of jamming or catching on an object, resulting in blade thrust.
d) Always maintain good visibility of the material being cut. Blade thrust is more likely to occur in areas where it is difficult to see the material being cut.
e) If you are approached by another person while operating the machine, switch the machine off. There is an increased risk of injury to other persons being struck by the moving blade in the event of blade thrust.
6 IMPORTANT SAFETY INSTRUCTIONS
6.1 Introduction
WARNING
■ Use of this machine may be hazardous. If the rotating line or blade comes in contact with your body, it will cut you. When it comes in contact with solid foreign objects such as rocks, glass or bits of metal, it may throw or fling them directly or by ricochet in the direction of bystanders or the operator. Striking such objects could damage the cutting attachment and may cause blades to crack, chip or break. Thrown objects, including broken heads or blades, may result in serious or fatal injury to the operator or bystanders. As more fully explained later in this manual, to reduce the risk of personal injury:
- Make sure your unit is equipped with the proper handle, harness and deflector for the type of cutting attachment you are using.
- Use only cutting attachments that are specifically authorized by STIHL for use on your trimmer model.
■ Do not lend or rent your trimmer without the instruction manual. Be sure that anyone using it understands the information contained in this manual. Have your dealer show you how to operate your trimmer. Observe all applicable laws, regulations, standards and ordinances.
6.2 Intended Use
WARNING
- When mounted with a mowing head or grass cutting blade, this trimmer / brushcutter may be used for cutting heavy grass, weeds and similar vegetation. When mounted with a brush knife, it may be used for cutting heavy grass, weeds, brush, scrub and similar vegetation with a maximum diameter of 0.8 in. (20 mm).
- Do not use it for any other purposes.
■ Improper use could result in personal injury or property damage, including damage to the power tool.
– Use the power tool and battery only as described in this manual.
– Never attempt to modify or override the trimmer's / brushcutter's controls or safety devices in any way.
6 IMPORTANT SAFETY INSTRUCTIONS English
– Never use a trimmer / brushcutter that has been modified or altered from its original design.
- Be sure to read and follow the warnings and instructions for your battery and charger before charging or starting work.
■ This power tool may be powered by a STIHL AP series battery. Alternatively, it may be powered by a STIHL AR series backpack battery in combination with an AP Adapter.
Batteries, chargers and other accessories are sold separately.
6.3 Operator
WARNING
■ Working with the power tool can be strenuous. The operator must be in good physical condition and mental health. To reduce the risk of personal injury:
- Check with your doctor before using the power tool if you have any health condition that may be aggravated by strenuous work.
- Do not operate the power tool while under the influence of any substance (drug, alcohol or medication, etc.) that might impair vision, balance, dexterity or judgment.
— Be alert. Do not operate the power tool when you are tired. Take a break if you become tired. - Do not permit minors to use the power tool.
■ According to STIHL's current knowledge, the electric motor of this power tool should not interfere with a pacemaker.
- However, persons with a pacemaker or other implanted medical device should consult their physician and device manufacturer before operating the power tool.
6.4 Personal Protective Equipment
WARNING
■ Even a properly installed and adjusted deflector may not protect the operator from all foreign objects thrown or flung by the cutting attachment. Thrown objects may also ricochet and strike the operator. To reduce the risk of personal injury:
– Always wear proper clothing and protective apparel, including proper eye protection.
■ Loss of control and severe cut injuries may result if hair, clothing or apparel make contact with the moving cutting attachment or otherwise become entangled in the components of the trimmer / brushcutter. To reduce the risk of severe personal injury:

- Wear sturdy and snug-fitting clothing that also allows complete freedom of movement.
-
Wear overalls or long pants made of heavy material to help protect your legs. Do not wear shorts.
-
Avoid loose-fitting jackets, scarves, neckties, flared or cuffed pants, jewelry and any other apparel that could be caught on branches, brush or the moving cutting attachment.
– Secure hair above shoulder level before starting work.
■ To reduce the risk of eye injury:

- Always wear goggles or close-fitting protective glasses with adequate side protection that are impact-rated and marked as complying with ANSI Z87 "+".
- If there is a risk of facial injury, STIHL recommends that you also wear a face shield or face screen over your goggles or protective glasses. When working with a metal cutting attachment, always wear a face shield.
■ To reduce the risk of head injury:
– Wear an approved protective helmet when there is a risk of head injury.
■ Good footing is very important. To help maintain a secure footing and reduce the risk of injury while working:

- Wear substantial footwear with non-slip soles. Do not wear sandals, flip-flops, open-toed or similar footwear. When working with a metal cutting attachment, wear steel-toed safety boots.
■ To improve your grip and help protect your hands:

- Always wear heavy-duty non-slip work gloves made of leather or another wear-resistant material when handling the trim-mer / brushcutter.
- Always wear heavy-duty work gloves when mount-
ing or otherwise handling a metal cutting attachment.
6.5 Trimmer / Brushcutter
WARNING
■ To reduce the risk of electric shock:
- Do not immerse the power tool in water or other fluids.
- Store the power tool indoors.
■ If the moving cutting attachment contacts you, it will result in serious laceration injuries. To reduce the risk of such injuries:
- Keep hands, feet and other parts of your body away from the cutting attachment.
– Never touch the moving cutting attachment with your hand or any other part of your body.
– Never operate the trimmer / brushcutter with a damaged or missing deflector.
■ To reduce the risk of personal injury to the operator and bystanders from blade or line contact and thrown objects:

- Make sure your unit is equipped with the proper deflector, handle and harness for the type of cutting attachment being used. Keep the deflector and the attached skirt, where appropriate, properly adjusted at all times.
- Use of some cutting attachments will require you to change the deflector, barrier bar and/or harness. See chapter 26 of this manual for approved cutting attachment, deflector, handle and harness configurations.
■ To reduce the risk of personal injury to the operator and bystanders:
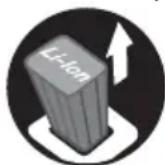
- Always release the trigger switch and remove the battery before assembling, transporting, adjusting, inspecting, cleaning, servicing, maintaining or storing the trimmer / brushcutter, and any other time it is not in use.
– Never leave the power tool unattended when the battery is inserted.
■ Although certain unauthorized attachments may fit your STIHL trimmer / brushcutter, their use may be extremely dangerous. Only attachments supplied by STIHL or expressly approved by STIHL for use with this specific model are recommended.
– Use only attachments supplied or expressly approved by STIHL.
- Never modify this trimmer / brushcutter in any way.
- Never attempt to modify or override the trimmer's / brushcutter's controls or safety devices in any way.
- Never use a trimmer / brushcutter that has been modified or altered from its original design.
- For a list of cutting attachments authorized by STIHL for your unit, along with the approved deflector, handle and harness configurations, see Chapter 26 of this instruction manual or the STIHL "Cutting Attachments, Parts & Accessories" catalog, available from your dealer or at www.stihlusa.com.
■ If the power tool or battery is dropped or subjected to similar heavy impacts:
- Check that it is undamaged, in good condition and functioning properly before continuing work.
- Check that the controls and safety devices are working properly.
- Check the LEDs on the battery for error messages, 24.
- Check that the battery has not been damaged. Never use or charge a malfunctioning, damaged, cracked, leaking or deformed battery.
– Never work with a damaged or malfunctioning power tool or battery. In case of doubt, have the power tool and battery checked by your authorized STIHL servicing dealer.
■ If the power tool or battery is damaged, not working properly, has been left outdoors and exposed to rain or damp conditions, or dropped into water or other liquid, its components may no longer function properly and safety devices may be inoperative. To reduce the risk of personal injury and property damage:
– Take the power tool and battery to your authorized STIHL servicing dealer to be checked before further operation.
■ Genuine STIHL replacement parts are specifically designed to match your power tool and meet safety and performance requirements. Use of parts that are not authorized or approved by STIHL may cause serious or fatal injury or property damage.
- STIHL recommends that only identical STIHL replacement parts be used.
6.6 Using the Trimmer / Brushcut-ter
6.6.1 Before Operation
WARNING
■ Misuse or unauthorized use may result in personal injury and property damage.
- Use the trimmer / brushcutter only as described in this instruction manual.
■ The cutting attachment and deflector must be an approved combination.

- Do not use circular saw blades on this trimmer / brushcutter.
- Read and follow the instructions on selecting the proper cutting attachment and deflector, 26.1.
■ The cutting attachment must be properly installed and tightened before starting work. Failure to use the proper parts to mount the cutting attachment may cause the blade or mowing head to fly off and seriously injure the operator or bystanders.
- Read and follow the instructions on mounting the cutting attachment, deflector and handle, 13.
- Never mount a cutting attachment to the trimmer / brushcutter without the proper installation of all required parts (e.g., nuts, screws, thrust washer, thrust plate, etc.).
- Before starting work, inspect for loose parts (nuts, screws, etc.) and for a cracked or damaged head or a cracked, bent, warped or damaged blade. Ensure the mowing head or nut that secures the blade is tightened firmly.
– Replace damaged or worn out heads or blades before using the power tool. - Always keep metal cutting attachments sharp.
■ Using only an approved combination of cutting attachment and deflector is extremely important to maximize cutting performance and reduce the risk of personal injury from thrown objects or contact with the cutting attachment:
- To reduce the risk of serious injury, never use wire or metal-reinforced line or other material in place of the recommended nylon cutting line. Pieces of wire could break off and be thrown at high speed toward the operator or bystanders.
■ Using a trimmer / brushcutter that is modified, damaged, improperly adjusted or maintained, or not completely and securely assembled can lead to a malfunction and increase the risk of serious personal injury or death.
– Never operate a trimmer / brushcutter that is modified, damaged, improperly maintained or not completely and securely assembled.
– Always check your unit for proper condition and operation before starting work, particularly the retaining button, trigger switch lockout, trigger switch, deflector, harness and cutting attachment.
- Ensure that the retaining button, trigger switch lockout and trigger switch move freely and spring back into place when released. The trigger switch must not engage until the trigger switch lockout is depressed.
– Never attempt to modify or override the controls or safety devices in any way.
- The cutting attachment must engage only when the battery is inserted, the retaining button is once depressed and the trigger switch lockout and trigger switch are depressed.
- If your trimmer / brushcutter or any part, including the battery, is damaged or does not function properly, take it to your authorized STIHL servicing dealer. Do not use the unit until the problem has been corrected.
■ Before inserting the battery:
- Check the electrical contacts in the battery compartment for corrosion or other foreign matter. Keep clean.
- Never insert or use a malfunctioning, damaged, cracked, leaking or deformed battery.
- Read and follow the instructions on switching on the power tool, 6.1.
■ To help reduce the risk of serious personal injury or death from unintentional starting:
- Release the trigger switch and trigger switch lockout before inserting the battery.
– Never carry the unit with your finger on the trigger switch. - Release the trigger switch before removing the battery.

- Remove the battery before assembling, transporting, adjusting, inspecting, cleaning, servicing, maintaining or storing the trimmer / brushcutter, and
any other time it is not in use.
– Never leave the power tool unattended when the battery is inserted.
– Never store the battery in the trimmer / brushcutter.
■ Before switching on your trimmer / brushcutter, take the following steps to reduce the risk of personal injury from thrown objects, loss of control or inadvertent contact with the cutting attachment:
- Be sure that the cutting attachment is clear of you and all other obstructions and objects, including the ground.
- Read and follow the instructions on switching on the trimmer / brushcutter, 16.1.
6.6.2 Holding and Controlling the Trimmer / Brushcutter
WARNING
■ To maintain a firm grip and properly control your trimmer / brushcutter:
- Keep the handles clean and dry at all times. Keep them free of moisture, pitch, oil, grease and resin.
- Operating the trimmer / brushcutter with one hand may lead to loss of control and is extremely dangerous. To reduce the risk of serious or fatal injury to the operator or bystanders from loss of control:
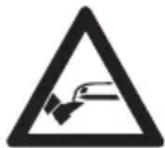
- Never attempt to operate the trimmer / brushcutter with one hand.
■ To reduce the risk of serious or fatal injuries to the operator or bystanders from loss of control:
—Always hold the power tool firmly with both hands when you are working.
- Wrap your fingers tightly around the handles, keeping the handles cradled between your thumb and forefinger (see illustration below).
- Position the power tool so that all parts of your body are clear of the cutting attachment whenever the battery is inserted.
- The operator must use a harness as instructed in this manual, 26
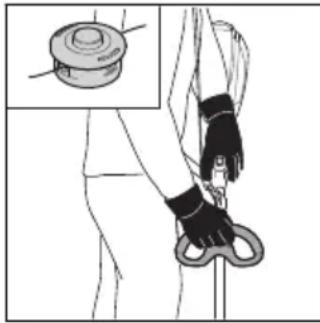
natural_image
Illustration of a person performing a high kick with a belt, showing no text or symbols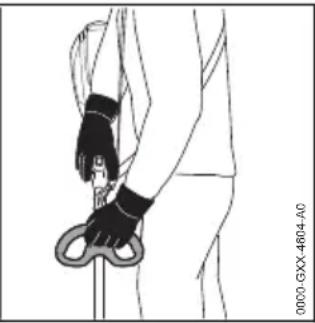
natural_image
Line drawing of a person holding a walking stick and wearing a black glove (no text or symbols)■ When the unit is mounted with a metal cutting attachment, the operator must take special precautions to reduce the risk of severe injury from loss of control and contact with the cutting blade:
- The operator must mount the proper deflector and the barrier bar as instructed in this manual, 13.2 and 13.3.
- The operator must use a harness, 14.1.
– During operation, the operator's right hand must grip the control handle and the operator's left hand must hold the loop handle. This applies to all operators, even those who are left-handed. Working with your hands in this position will allow you to more effectively manage the reactive forces encountered when working with a metal blade.
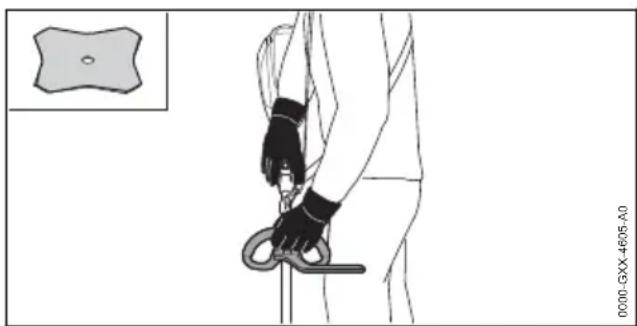
natural_image
Illustration of a person using a resistance band device, with no visible text or symbols■ Working with the cutting attachment above ground level or perpendicular to the ground increases the risk of severe injury from thrown objects. It also exposes more of the cutting attachment and makes the unit more difficult to control, increasing the risk of injury. To reduce the risk of serious or fatal injury from loss of control or thrown objects:
- Keep the cutting attachment at ground level, parallel to the ground.
■ To reduce the risk of serious or fatal injuries to the operator or bystanders from contact with the cutting attachment:
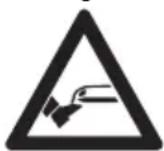
- Keep hands, feet and other body parts away from the cutting attachment.
- Never touch a moving cutting attachment with your
hand or any other part of your body.
- Do not touch the cutting attachment while the battery is inserted in the power tool.
■ To reduce the risk of serious or fatal cut injuries to the operator or bystanders from loss of control, keep proper footing and balance at all times:
- Make sure you have good balance and a secure footing at all times.
- Take special care in overgrown or wet terrain and always watch for hidden obstacles such as tree stumps, roots, rocks, holes and ditches to avoid stumbling or falling.
- Be extremely cautious when working on slopes or uneven ground.
- For better footing, always clear away fallen branches, scrub, cuttings and other material, objects or vegetation that can increase the danger of slipping, tripping or falling.
– Never operate above waist height. - Do not overreach.
■ The trimmer / brushcutter should be balanced for proper control and less fatigue during operation.
- Adjust the position of the loop handle and harness to achieve and maintain a comfortable and effective working position, 14.
6.6.3 Working Conditions
WARNING
■ Operate your trimmer / brushcutter only under good visibility during favorable daylight conditions.
- Postpone the work if the weather is windy, foggy, rainy or inclement.
- Your trimmer / brushcutter is a one-person machine.
– Bystanders, especially children, and animals should not be allowed in the area where it is in use.
– Switch it off immediately if you are approached.
■ To reduce the risk of injury to bystanders and unauthorized users:
– Never leave the trimmer / brushcutter unattended when the battery is inserted.
- Switch off the unit and remove the battery during work breaks and any other time the power tool is not in use.
■ Sparks generated from operation of the trim-mer / brushcutter, may be capable of igniting
combustible gases, liquids, vapors, dusts or other combustible materials and substances. To reduce the risk of fire and explosion:
– Never operate the trimmer / brushcutter in a location where combustible gases, liquids, vapors, dusts or other combustible materials and substances are present.
- Read and follow recommendations issued by government authorities (e.g., OSHA) for identifying and avoiding the hazards of combustible gases, liquids, vapors, dusts or other combustible materials and substances.
If a rotating metal blade strikes a rock or other hard object, sparks may be created, which can ignite flammable materials under certain circumstances. Flammable materials can include dry vegetation and brush, particularly when weather conditions are hot and dry.
- When there is a risk of fire or wildfire, do not use metal blades around flammable materials or around dry vegetation or brush.
- Contact your local fire authorities or the U.S. Forest Service if you have any question about whether vegetation and weather conditions are suitable for the use of a metal blade.
- STIHL does not recommend the use of metal blades when cutting in rocky areas or in areas with debris or other objects that could create sparks.
■ Some STIHL mowing heads have a metal core. High-speed contact with rock or other hard objects may create sparks, which can ignite flammable materials under certain circumstances. Flammable materials include dry vegetation and brush, particularly when weather conditions are hot and dry.
- When there is a risk of fire or wildfire, do not use a mowing head with a metal core around dry vegetation or brush.
- Contact your local fire authorities or the U.S. Forest Service if you have any question about whether vegetation and weather conditions are suitable for the use of a mowing head with a metal core.
- STIHL does not recommend using a mowing head with a metal core when cutting in rocky areas or in areas with debris or other objects that could create sparks.
■ Use of this trimmer / brushcutter can generate dust and other substances containing chemicals known to cause respiratory problems, cancer, birth defects and other reproductive harm.
English 6 IMPORTANT SAFETY INSTRUCTIONS
- Consult governmental agencies such as EPA, OSHA, CARB and NIOSH and other authoritative sources on hazardous materials if you are unfamiliar with the risks associated with the particular substances you are cutting or with which you are working.
■ Inhalation of certain dusts, especially organic dusts such as mold or pollen, can cause susceptible persons to have an allergic or asthmatic reaction. Substantial or repeated inhalation of dust or other airborne contaminants, especially those with a smaller particle size, may cause respiratory or other illnesses.
– Control dust at the source where possible.
- To the extent possible, operate the trimmer / brushcutter so that the wind or operating process directs any dust, mist or other particulate matter raised by the trimmer / brushcutter away from the operator.
- When respirable dust or other particulate matter cannot be kept at or near background levels, always wear a respirator that is approved by NIOSH and rated for worksite-specific conditions. Follow the recommendations of governmental authorities (e.g., OSHA/NIOSH) and occupational and trade associations.
■ If the vegetation being cut or the surrounding ground is coated with a chemical substance, such as a pesticide or herbicide:
- Read and follow the instructions and warnings that accompanied the substance coating the vegetation or surrounding ground.
6.6.4 Operating Instructions
WARNING
■ In the event of an emergency:
- Switch off the motor immediately and remove the battery.
■ The cutting attachment continues to rotate for a short period after the trigger switch is fully released. This is known as the "flywheel effect." To reduce the risk of serious personal injury from contact with the cutting attachment:
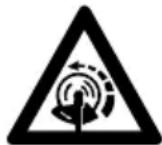
- Wait for the cutting attachment to stop before walking with the unit or putting it down.
■ The rotating cutting attachment may fling foreign objects directly or by ricochet a great distance. Thrown objects, including broken cutting attachments, may cause serious or fatal
injury to the operator or bystanders. To reduce the risk of severe personal injury:
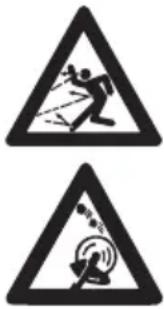
- Inspect the work area. Remove stones, glass, rocks, pieces of metal or other objects that could be thrown by the cutting attachment, damage the cutting attachment or cause personal injury or damage to property (e.g., parked vehicles, windows).
- STIHL does not recommend the use of rigid blades when cutting in rocky areas or in areas where there is debris or other objects that could be thrown by the cutting attachment.
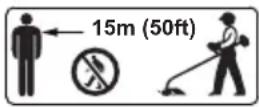
- Always wear proper eye protection and keep bystanders at least 50 ft. (15 m) away from the work area. Any persons who must enter the restricted area must also wear proper eye protection.
– To reduce the risk of damage to property, also maintain this distance from such objects as vehicles and windows.
- Maintaining a minimum distance of 50 ft. (15 m) cannot eliminate the potential risk of personal injury and property damage from thrown objects.
- Switch off the motor immediately if you are approached while working with the trimmer / brushcutter.
- Your trimmer / brushcutter is equipped with a deflector. To reduce the risk of personal injury from thrown objects and contact with the cutting attachment:
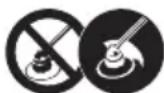
- Never operate the trim-mer / brushcutter with a damaged or missing deflector.
- The cutting attachment and deflector must be an approved combination.
- Keep the deflector properly adjusted at all times.
■ Use of wire, metal-reinforced line or other non-approved cutting attachments is not authorized and could be extremely dangerous.
– Never use wire or metal-reinforced line on this trimmer / brushcutter. Use only the
6 IMPORTANT SAFETY INSTRUCTIONS English
cutting attachments listed in this manual, in combination with the listed deflector.
See Combinations of Deflectors and Cutting Attachments, 26.
■ To reduce the risk of severe personal injuries from unintentional starting:
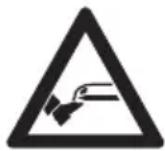
- Never touch the cutting attachment or mowing head with your hand, feet or any other part of your body while the battery is inserted, even when the cutting attachment is not moving. Keep bystanders at least 50 ft. (15 m) away.
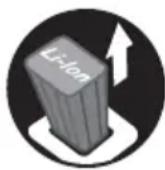
- Switch off the motor and remove the battery before inspecting a mowing head, cutting attachment or deflector. Clean dirt, grass, weeds and other material from the mowing head or blade and deflector at regular intervals, but only after removing the battery.
■ A damaged or loose cutting attachment may vibrate, crack, break or come off during operation, which may result in serious or fatal injury.
– Make sure the cutting attachment is properly tightened before starting work.
- Check the tightness and condition of the cutting attachment before starting work and any time cutting behavior changes during use. Always switch off the motor, wait for the cutting attachment to stop and remove the battery before inspecting the trimmer / brushcutter or its cutting attachment.
- If the cutting attachment loosens after being properly tightened, stop work immediately and have the unit inspected by your authorized STIHL servicing dealer.
■ A cracked, damaged or worn out cutting attachment may shatter at high speeds and cause serious or fatal injury.
- Replace a cracked, damaged or worn out mowing head or a cracked, bent, warped, damaged, dull or worn out blade immediately, even if damage appears to be limited to superficial cracks.
– Never use a trimmer / brushcutter with a loose or damaged cutting attachment.
DANGER
■ To reduce risk of electrocution:
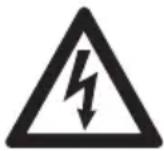
- Never operate this trimmer in the vicinity of any wires or cables that may be carrying electric current. Look carefully for concealed wires before starting work.
- Do not rely on the trimmer's insulation against electric shock, even when holding the power tool by insulated gripping surfaces.
6.7 Working with the Cutting Attachments
6.7.1 Kickout (Blade Thrust) with All Metal Cutting Attachments
natural_image
Diagram of a mechanical device with a rotating wheel and directional arrow, no text or symbols present.WARNING
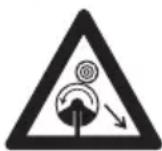
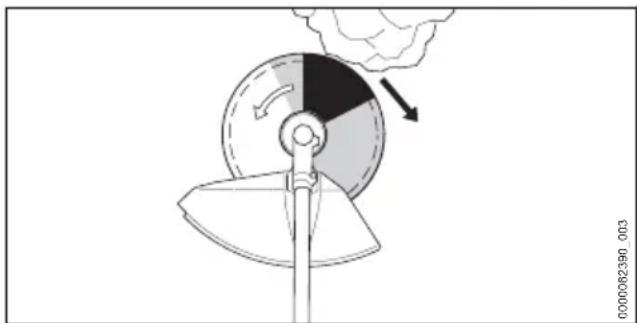
Kickout (blade thrust) is the sudden and uncontrolled movement of the cutting head toward the operator's right or rear that can occur when the shaded areas (especially the darkly shaded area) of a rotating blade contact a solid rigid object like a tree, rock, bush or wall. The cutting attachment may be thrown to the right or to the rear (black arrow) any time the rapid rotation of the blade is stopped, slowed, snagged or bound in an object that it doesn't immediately cut.
■ This kickout (blade thrust) may cause loss of control and may result in serious or fatal injury to the operator or bystanders. To reduce the risk of injury, extreme caution should be used when cutting with the shaded area of any rigid blade (see illustration).
■ The greater the force of the kickout reaction, the more difficult it becomes for the operator to control the unit. Blade thrust is more likely to occur in areas where it is difficult to see the material being cut.
■ Many factors influence the occurrence and force of the kickout reaction. These include
English 6 IMPORTANT SAFETY INSTRUCTIONS
cutting attachment speed, the speed at which the cutting attachment contacts the object, the location and angle of contact, the condition of the cutting attachment, and how quickly the cutting attachment is slowed, snagged or stopped, among other factors.
- Use caution when working with the shaded areas of any metal cutting attachment.
■ To reduce the risk of personal injury from kick-out and blade thrust when using a rigid cutting attachment:
- Avoid cutting close to fences, sides of buildings, tree trunks or other such objects when a metal cutting blade is mounted. STIHL recommends using a nylon line head for such jobs.
- Keep metal cutting attachments sharp.
- Keep bystanders at least 50 ft. (15 m) away from the work area.
6.7.2 Using a Mowing Head
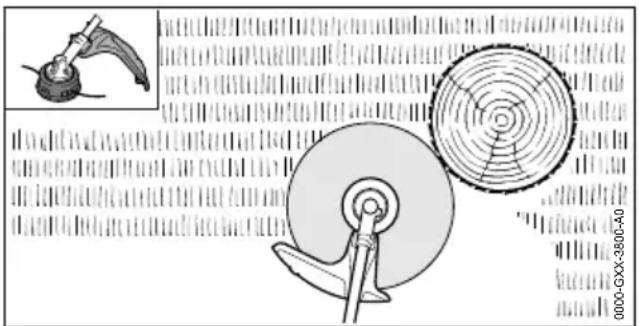
- When working, sweep the trimmer in a controlled manner, parallel to the ground in front of you.
Mowing heads are to be used only on units equipped with a line-limiting blade in the deflector in order to keep the line at the proper length. When trimming along a fence, wall or around trees, it is preferable to use a mowing head with nylon line to reduce the risk of blade thrust or kickout, damage to the cutting attachment, and to reduce damage to the fence, wall or trees.
WARNING
■ To reduce the risk of serious injury:
– Never use wire or metal-reinforced line or other material in place of the recommended nylon cutting line. Pieces of wire could break off and be thrown at high speed toward the operator or bystanders.
■ A cracked, damaged or worn out mowing head may shatter at high speeds and cause serious or fatal injury.
– Have a cracked, damaged or worn out mowing head replaced immediately, even
if damage appears to be limited to superficial cracks.
■ When working close to fences, sides of buildings, tree trunks of other such objects, be alert to an increased possibility of ricochets.
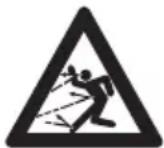
- Take care to clear area of all objects and debris before trimming along fences or walls, near tree trunks or other objects that could increase the possibility of injury from the ricochet of thrown objects.
6.7.3 Using a Grass Cutting Blade
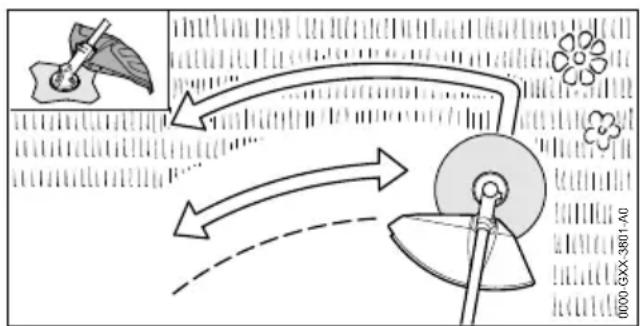
- When working with a grass cutting blade, sweep the trimmer in a controlled manner, parallel to the ground in front of you. To reduce the risk of kickout, use the left side of the cutting blade.
All kinds of grass and weeds can be cut with a grass cutting blade.
- The 4-tooth grass cutting blade is intended to cut grass and weeds. It has 4 cutting knives with cutting edges on both sides, i.e., front and rear. When the cutting edges on one side become dull, the blade can be turned over to utilize the cutting edges on the other side before it is resharpened.
- The 8-tooth grass cutting blade is recommended for cutting fern or similar fleshy vegetation. When the cutting edges on one side become dull, the cutting edges have to be resharpened. The blade cannot be turned over to utilize the cutting edges on the other side.
WARNING
- Improper use of a grass cutting blade may cause it to crack, chip or shatter. Thrown blade fragments may seriously or fatally injure the operator or bystanders. To reduce the risk of injury:
– Avoid contact with hard or solid foreign objects such as stones, glass, rocks or pieces of metal.
7 Battery Safety English
- Inspect the grass cutting blade at regular, short intervals for signs of damage. Do not continue working with a damaged grass cutting blade.
- Resharpen the grass cutting blade regularly as described on its packaging or instruction leaflet.
– Never attempt to cut woody material with the grass cutting blade.
7 Battery Safety
7.1 Warnings and Instructions
WARNING
- Read and follow the safety precautions on the battery and all warnings and instructions that accompany it.
■ Use of unauthorized batteries can damage the power tool and result in fire, explosion and personal injury and property damage. - Use only genuine STIHL AR or AP series batteries with this power tool.
■ Use of STIHL AR or AP series batteries for any purpose other than powering STIHL products could be extremely dangerous. - Use STIHL AR and AP series batteries only to power compatible STIHL products.
■ Use of unauthorized chargers can damage the battery and result in fire, explosion and personal injury and property damage.
– Charge STIHL AP series batteries only with genuine STIHL AL 101, AL 301, AL 301-4 or AL 500 series chargers.
– Charge STIHL AR series backpack batteries only with genuine STIHL AL 301, AL 301-4 or AL 500 series chargers.
■ The battery contains safety features and devices which, if damaged, may allow the battery to generate heat, rupture, leak, ignite or explode.

- Never heat the battery above 212 °F (100 °C).
- Never incinerate or place the battery on or near fires, stoves or other high-temperature locations.
- Never heat the battery above 212 °F (100 °C). - Never incinerate or place the battery on or near fires, stoves or other high-temperature locations.
– Never use or charge a malfunctioning, damaged, cracked, leaking or deformed battery.
– Never open, disassemble, crush, drop, subject to heavy impact or otherwise damage the battery.
– Never expose the battery to microwaves or high pressures.
– Never insert objects into the battery's cooling slots.
- Never use or charge a malfunctioning, damaged, cracked, leaking or deformed battery. - Never open, disassemble, crush, drop, subject to heavy impact or otherwise damage the battery. - Never expose the battery to microwaves or high pressures. - Never insert objects into the battery's cooling slots.
■ Extreme temperatures may cause the battery to generate heat, rupture, leak, ignite or explode, resulting in severe or fatal personal injury and property damage.
- Never charge, use or store the battery outside the specified ambient temperature limits, 125.3.
■ To reduce the risk of personal injury and property damage in the event the battery emits smoke, has an unusual smell or feels unusually hot while using, charging or storing:
– Immediately discontinue using or charging the battery. Contact the authorities in the event of fire or explosion.
■ To reduce the risk of a short circuit, which could lead to electric shock, fire and explosion:

- Keep STIHL AR 1000, 2000, 3000 backpack batteries dry. Protect from rain, water and other liquids. Attach the rain cover to the battery before starting work in rain or in very damp conditions.
- If a STIHL AP or AR L battery has been exposed to rain during work, remove it from the product and allow it to dry indoors. Make sure it is completely dry before charging or using.
- Never immerse any STIHL battery in water or other liquids.
- Keep STIHL AR 1000, 2000, 3000 backpack batteries dry. Protect from rain, water and other liquids. Attach the rain cover to the battery before starting work in rain or in very damp conditions. - If a STIHL AP or AR L battery has been exposed to rain during work, remove it from the product and allow it to dry indoors. Make sure it is completely dry before charging or using. - Never immerse any STIHL battery in water or other liquids.
– Never bridge the battery terminals with wires or other metallic objects.
- Keep a battery that is not in use away from small metal objects capable of conducting electricity (e.g., paper clips, nails, coins, keys).
- Store the battery indoors in a dry room.
– Never store the battery in damp or corrosive environments or in conditions that could lead to corrosion of its metal components.
– Never store the battery in the power tool.
- When storing the battery, maintain a charge of 40% to 60% for STIHL AP series batteries and a charge of 30% to 45% for STIHL AR series batteries (2 green LEDs).
- If storing the battery in the charger, disconnect the charger from the outlet.
- Protect the battery from exposure to corrosive agents such as garden chemicals and de-icing salts.
- Protect the battery from exposure to conductive liquids such as salt water.
- Never bridge the battery terminals with wires or other metallic objects. - Keep a battery that is not in use away from small metal objects capable of conducting electricity (e.g., paper clips, nails, coins, keys). - Store the battery indoors in a dry room. - Never store the battery in damp or corrosive environments or in conditions that could lead to corrosion of its metal components. - Never store the battery in the power tool. - When storing the battery, maintain a charge of 40% to 60% for STIHL AP series batteries and a charge of 30% to 45% for STIHL AR series batteries (2 green LEDs). - If storing the battery in the charger, disconnect the charger from the outlet. - Protect the battery from exposure to corrosive agents such as garden chemicals and de-icing salts. - Protect the battery from exposure to conductive liquids such as salt water.
English 8 Maintenance, Repair and Storage
- Do not attempt to repair, open or disassemble the battery. There are no user-serviceable parts inside.
■ Leaking battery fluid is potentially harmful and can cause skin and eye irritation, chemical burns and other serious personal injury.
– Avoid contact with skin and eyes.
- Use an inert absorbent such as sand on spilled battery fluid.
– In the event of accidental contact, immediately rinse the contact area thoroughly with mild soap and water.
- If fluid gets into your eye(s): do not rub. Rinse water over the open eye(s) for at least 15 minutes and seek medical attention.
■ A battery fire can be dangerous. To reduce the risk of severe personal injury and property damage in the event of fire:
- Evacuate the area. Fire can spread rapidly. Stay clear of any vapors generated and maintain a safe distance.
- Contact the fire department.
- Although water can be used to put out a battery fire, use of a multi-purpose dry chemical fire extinguisher is preferable.
- Consult the fire department regarding proper disposal of a burned battery.
8 Maintenance, Repair and Storage
8.1 Warnings and Instructions
WARNING
■ There are no user-authorized repairs for the battery or power tool. To reduce the risk of fire, electric shock or other personal injury and property damage:
- Users may carry out only the cleaning and maintenance operations described in this manual.
– Strictly follow the cleaning and maintenance instructions in the appropriate sections of this instruction manual. - Never attempt to repair a damaged or broken cutting attachment. This may cause broken parts to come off and result in serious or fatal injuries.
– Wear non-slip, heavy-duty work gloves when handling metal cutting attachments.
– STIHL recommends that all repair or replacement work be performed by authorized STIHL servicing dealers.
■ Unintentional starting may result in personal injury or property damage. To reduce the risk of personal injury and property damage from unintentional starting:
- Remove the battery before inspecting the trimmer / brushcutter or carrying out any cleaning, maintenance or repair work, before storing, and any other time the power tool is not in use.
■ Use of parts that are not authorized or approved by STIHL may cause serious or fatal injury or property damage.
- STIHL recommends that only identical STIHL replacement parts be used.
■ To reduce the risk of serious or fatal injuries from a loose or damaged cutting attachment:
- Keep blades sharp.
– Tighten all nuts, bolts and screws after each use.
– Never attempt to repair damaged cutting attachments by welding, straightening or modifying the shape. Always replace a damaged cutting attachment before use.
■ The gearbox becomes hot during operation. To reduce the risk of burn injury:

- Allow the gearbox to cool before inspecting or lubricating and before changing a cutting attachment or deflector. Avoid contacting the gearbox while it is still hot following operation.
■ Improper storage can result in unauthorized use, damage to the power tool and an increased risk of fire, electric shock and other personal injury or property damage.
- Remove the battery from the power tool before storing.
– Never store the power tool with the battery inserted. - When storing the battery, maintain a charge of 40% to 60% for STIHL AP series batteries and a charge of 30% to 45% for STIHL AR series batteries (2 green LEDs).
- If storing the battery in the charger, disconnect the charger from the outlet.
- Store the trimmer / brushcutter and battery indoors in a dry, secure place that cannot be accessed by children or other unauthorized users.
– Never store the battery in the trimmer / brushcutter or in a container with small metal objects capable of conducting electricity (e.g., paper clips, nails, coins, keys).
9 Before Starting Work English
■ Dropping the battery could result in personal injury or property damage. To prevent the battery from falling during removal:
- Place the trimmer / brushcutter on a level surface.
- Use care when ejecting the battery.
9 Before Starting Work
9.1 Preparing the Trimmer / Brush-cutter for Operation
Before starting work:
▶ Fully charge the battery, 10.
Mount the loop handle, 3.1.
▶ Mount a deflector that is approved for use with the cutting attachment you intend to use, 13.3.1 and 26.
▶ Mount an approved mowing head, grass cutting blade or brush knife, 13.4.1 or 13.5.1 and 26. Ensure the cutting attachment is securely mounted and tightened.
▶ If using a metal cutting attachment, mount the barrier bar, 13.2.
▶ Put on and adjust the harness, 14.1.
▶ Adjust the loop handle, 14.2.
- Balancing the Trimmer / Brushcutter, 4.3.
▶ Check the controls for proper function and condition, 7.1.
10 Charging the Battery
10.1 Setting up the Charger

WARNING
- Read and follow the safety precautions on the battery and charger and all warnings and instructions that accompany those products. To reduce the risk of short circuit, which could lead to electric shock, fire and explosion, make sure the charger and its components are dry and not damaged. Read and follow the warnings and instructions in your charger's manual. For optimum performance, observe the recommended ambient temperature ranges, 25.4.

WARNING
■ A typical household electric circuit is between 15 and 20 amps. A single STIHL AL 500 charger draws approximately 4.8 amps. A single AL 301 or AL 301-4 charger draws approximately 4.4 amps and an AL 101 approximately 1.3 amps. To reduce the risk of fire from overloading an electrical circuit:
- Ensure the electrical system is rated to withstand the expected electrical draw before charging your battery.
- Charge multiple batteries one at a time or on separate circuits, unless you know your circuit can handle the total expected draw from multiple chargers.

WARNING
■ Since the charger heats up during the charging process, do not operate the charger on a combustible surface or in a location where combustible gases, liquids, vapors, dusts or other materials and substances are present.
To set up the charger:
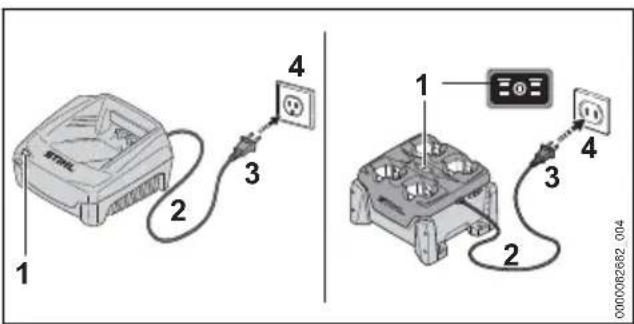
- Insert the plug (3) into a properly installed electrical outlet (4) matching the voltage and electrical frequency stated on the charger's rating plate.
The charger runs a self-test immediately after it is plugged in. The charger LED (1) will glow green for about 1 second, then it will glow red briefly before going out. Once the LED goes out, the self-test is complete and the charger is ready to charge the battery.
▶ Position the power supply cord (2) so that it will not be stepped on, tripped over, come in contact with sharp objects or moving parts or otherwise be subjected to damage or stress.
10.2 Charging

WARNING
■ STIHL batteries contain safety features and devices which, if damaged, may allow the battery to generate heat, rupture, leak, ignite or explode. Never charge a malfunctioning, damaged, cracked, leaking or deformed battery, or use a charger that has been damaged. Never insert a wet battery or battery adapter. Never use a wet charger. Follow all product-specific warnings and instructions accompanying your battery and charger.
A battery is not fully charged when it ships from the factory. STIHL recommends that you fully charge the battery before using it the first time.
Read and follow the warnings and instructions in your charger's manual. For optimum performance, observe the recommended ambient temperature ranges, 25.4.
The battery heats up during operation of the power tool. If a hot battery is connected to the charger, it may be necessary for it to cool down before charging starts. The charging process begins only after the battery has cooled down sufficiently.
Charging time depends on a number of factors, including battery condition and the ambient temperature. For a complete list of approximate charging times, see www.stihl.com/charging-times.
To charge an AR battery:
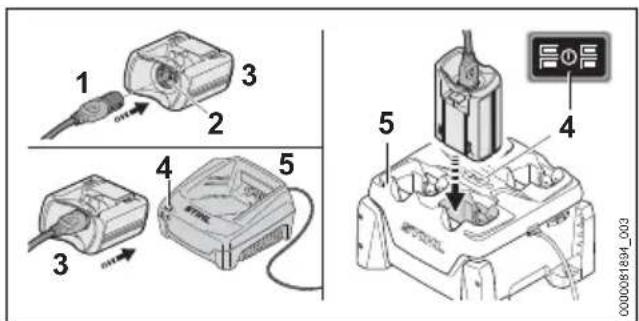
▶ Push the plug of the connecting cord (1) into the socket (2) of the AP Adapter (3) until it stops.
- Push the AP Adapter into the charger (5) until it stops.
The LED (4) on the charger glows green when the battery is charging.
The LEDs on the AR battery glow green and show the state of charge.
When the LEDs on the battery turn off, the charging process is complete and the charger
will shut itself off. The AP Adapter can be removed from the charger.
▶ Disconnect the power supply cord from the electrical outlet when the charger is not in use for extended periods of time.
▶ Charge STIHL AR backpack batteries only with genuine STIHL AL 301, AL 301-4 or AL 500 series chargers.
To charge an AP battery:
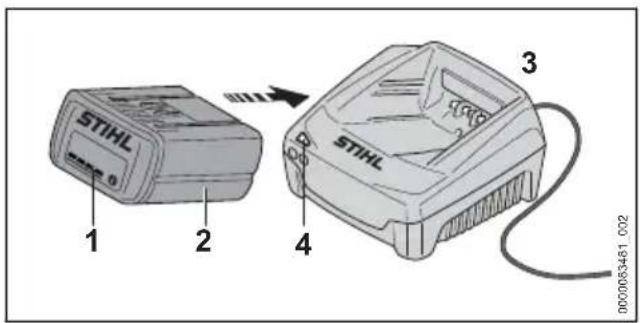
- Push the battery (2) into the charger (3) until it stops.
The LED on the charger glows green when the battery is charging.
The LEDs (1) on the AP battery glow green and show the state of charge.
When the LEDs on the battery go out, the charging process is complete and the charger will shut itself off. The AP battery can be removed from the charger.
▶ Disconnect the power supply cord from the electrical outlet when the charger is not in use for extended periods of time.
▶ Charge STIHL AP series batteries only with genuine STIHL AL 101, AL 301, AL 301-4 or AL 500 series chargers.
11 LED Diagnostics and Acoustic Signals
11.1 STIHL AP Battery
11.1.1 Battery Status
Four LEDs show the status of the battery. These LEDs can glow or flash green or red.
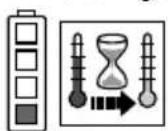
If one LED glows red continuously: the battery is either too hot or too cold. Allow the battery to warm up or cool down gradually at an ambient temperature of about 50 °F to 68 °F (10 °C to 20 °C).
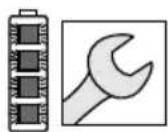
If all 4 LEDs flash red: the battery has a malfunction and must be replaced. Do not attempt to charge, use or store the battery.
11 LED Diagnostics and Acoustic Signals English
11.1.2 Power Tool Status
The same LEDs on the battery will indicate the status of the power tool.
If three LEDs glow red continuously: the power tool motor is too hot. Allow the motor to cool down.
If three LEDs flash red when you activate the trigger switch: the power tool has an electrical malfunction. Do not operate the power tool. Have it checked by an authorized STIHL servicing dealer before use or storage.
For troubleshooting information, 24.
11.1.3 Charge Status
The LEDs on the battery also show the battery's state of charge.
To determine the battery's state of charge:
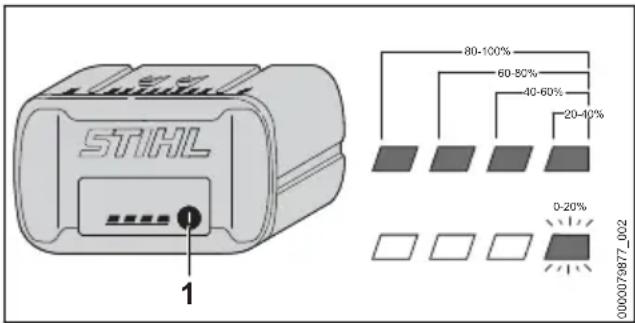
▶ Press the button (1) on the battery. The LEDs on the battery will glow or flash green for about 5 seconds and indicate the state of charge (see illustration).
For example:
If four green LEDs glow continuously: full charge.
If one green LED is flashing: less than 20 % charge.
11.2 STIHL AR Backpack Battery
11.2.1 Battery Status
Six LEDs and an acoustic signal indicate the status of the battery.
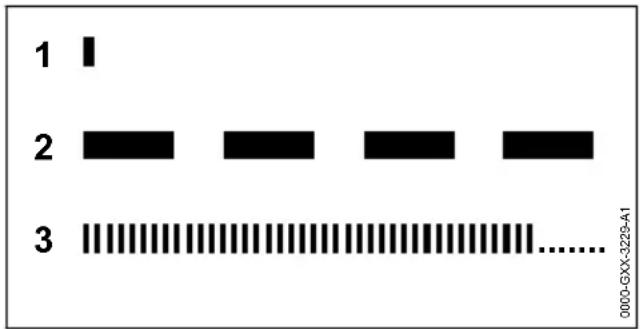
1 A short beep
The acoustic signal works as it should.
2 Four or six (AR L) long beeps
The battery's charge is low. Recharge the battery.
3 Rapid succession of short beeps
There is a malfunction in the battery. The signal stops automatically after a few seconds. Do not attempt to charge, use or store the battery. Replace the battery.
These LEDs can glow or flash green or red.
If one LED glows red continuously: the battery is either too hot or too cold. Allow the battery to warm up or cool down gradually at an ambient temperature of about 50 °F to 68 °F (10 °C to 20 °C).
If the four right side LEDs flash red and a rapid succession of several short beeps is emitted: the battery has a malfunction and must be replaced. Do not attempt to charge, use or store the battery.
▶ Be aware that your ability to hear the acoustic signal may be reduced when wearing hearing protection.
11.2.2 Power Tool Status
When the battery is connected to the power tool, the same LEDs on the battery will indicate the status of the power tool.
If three LEDs glow red continuously: the power tool motor is too hot. Allow the motor to cool down.
If three LEDs flash red when you activate the trigger switch: the power tool has an electrical malfunction. Do not operate the power tool. Have it checked by an authorized STIHL servicing dealer before use or storage.
For troubleshooting information, 24.
11.2.3 Charge Status
The LEDs and acoustic signals on the battery also indicate the battery's state of charge.
To determine the battery's state of charge:
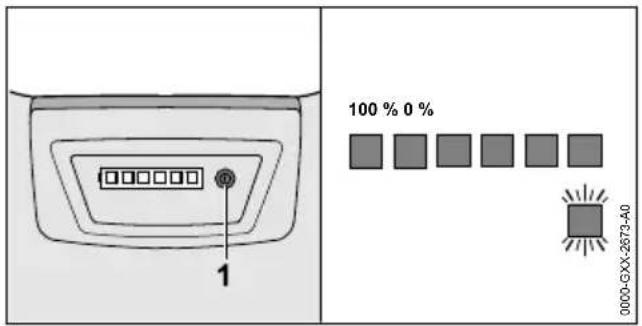
▶ Press the button (1) on the backpack battery.
A single short beep will be emitted. The LEDs on the battery will glow or flash green for about 5 seconds and indicate the state of charge (see illustration).
For example:
If six green LEDs glow continuously: full charge. If one green LED is flashing and four long beeps are emitted: less than 20 % charge.
12 STIHL AR Backpack Battery
12.1 Positioning the Connecting Cord

WARNING
■ To reduce the risk of injury from tripping on the connecting cord or losing control of the power tool, always secure the connecting cord with the hook and eye fasteners as described below. Always position and secure the connecting cord so that it will not interfere with the proper working technique as described in the instruction manual for the power tool you are using, or your ability to maintain control of the power tool.

WARNING
■ Manage the cord to prevent it from contacting the cutting/working attachment or catching on objects, which could cause you to lose balance or control of the power tool, resulting in serious personal injury and property damage.
The connecting cord can be secured in different positions and adjusted to suit the height and reach of the operator.
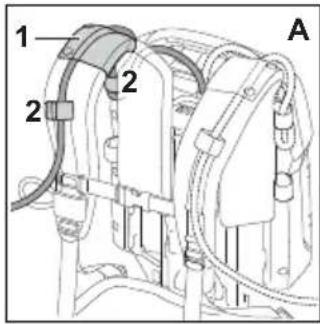
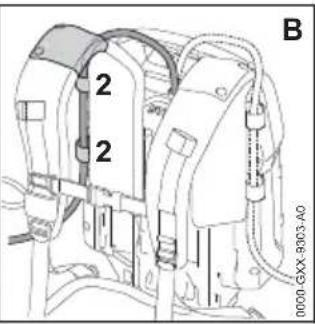
The connecting cord can run through the guide (1) on the shoulder strap (Illustration A), or along the back plate (Illustration B). Secure the connecting cord to the harness with the hook and eye fasteners (2). Always secure the connecting cord using the guide or hook and eye fasteners on the side of the body on which the power tool is held and controlled. Do not allow the connecting cord to swing across your body or hang at your side.
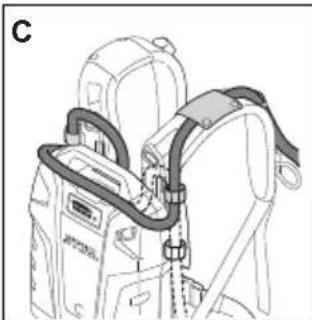
natural_image
Line drawing of a backpack with attached straps and straps (no text or symbols)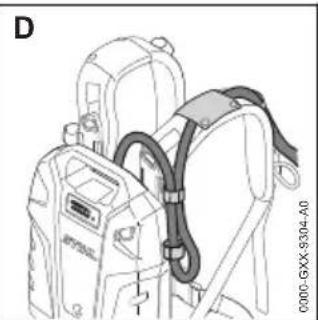
natural_image
Line drawing of a backpack with attached harness and belt (no text or symbols)The length of the connecting cord can be adjusted by making a loop around the top (Illustration C) or on the side (Illustration D) of the backpack battery with the hook and eye fasteners.
12.2 Putting on the Harness

WARNING
■ The operator must be able to remove the backpack battery quickly in the event of an emergency. In an emergency, open and remove the waist belt and chest strap quickly before dropping the battery to the ground.
To ensure a proper fit:
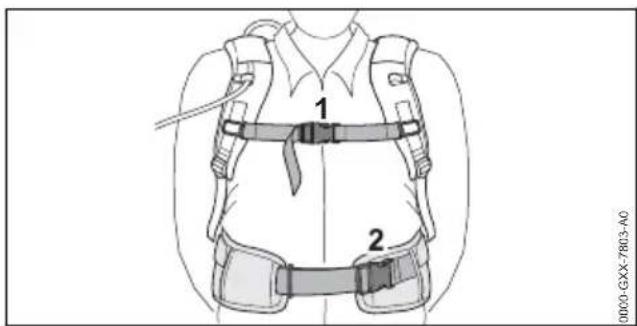
13 Assembling the Trimmer / Brushcutter English
▶ Put the backpack battery on your back.
▶ Fasten and adjust the waist belt (2) so that it rests comfortably but securely on your hips.
▶ Fasten the chest strap (1) and adjust it so that it fits comfortably but securely across your chest.
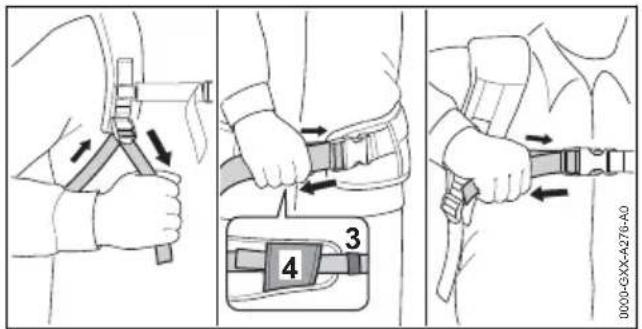
- Adjust the harness straps so that the back padding fits snugly and securely against your back.
▶ Always wear the battery harness over both shoulders. - Thread the end of the waist belt through the loops (3) and (4).
▶ To remove the harness, open the quick-release fasteners on the waist belt and chest strap and loosen the harness straps by lifting the sliding adjusters.
To help reduce the risk of injury in the event of an emergency, practice quickly opening the fasteners on the waist belt and chest strap, loosening the shoulder straps and removing the battery.
NOTICE
■ To avoid damage, ease the battery to the ground when practicing. Do not allow the battery to drop to the ground and do not throw it.
13 Assembling the Trimmer / Brushcutter
13.1 Mounting the Loop Handle

WARNING
■ To reduce the risk of injury from loss of control, ensure that the loop handle is properly and securely mounted before starting work.
To mount the loop handle:
▶ Switch off the power tool, 16.2.
▶ Remove the battery, 15.2.
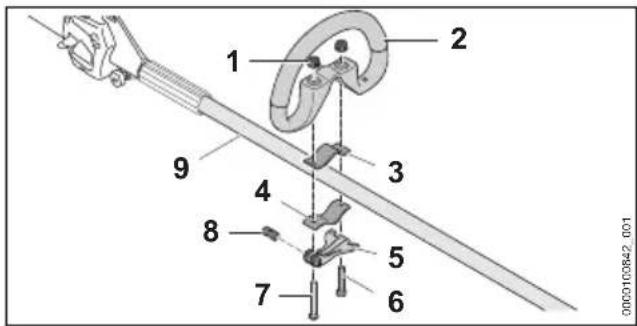
- Insert the bolt (8) through the hole in the clamping lever (5).
The indentation of the bolt (8) should be facing down.
▶ Place one clamp (3) in the loop handle (2) and line up the holes in the loop handle and clamp.
▶ Position the loop handle (2) and clamp (3) against the drive tube (9).
▶ Line up the holes in the bolt and clamping lever and Insert the long screw (7). - Position the other clamp (4) against the underside of the drive tube (9).
▶ Line up the holes and insert the short screw (6) and the long screw (7).
▶ Attach the nuts (1) and tighten until secure. Do not over-tighten.
▶ Close the clamping lever (5)
13.2 Mounting the Barrier Bar

WARNING
■ To reduce the risk of serious personal injury from loss of control or contact with the cutting attachment, use a metal grass blade or brush knife only if the unit is equipped with a loop handle, barrier bar and harness.
To mount the barrier bar:
▶ Switch off the power tool, 16.2.
▶ Remove the battery, 15.2.
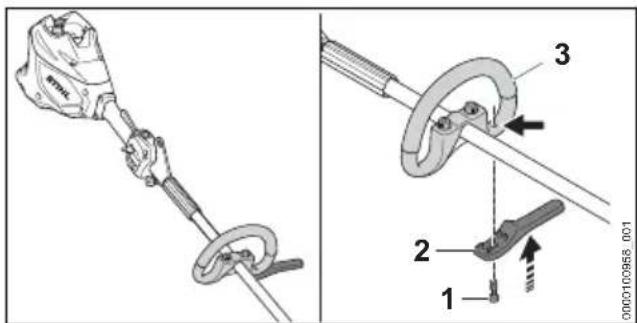
▶ Place the barrier bar (2) in position under the loop handle (3).
▶ Insert the screw (1) and tighten it down securely. Ensure that the handle and barrier bar are tight and will not move during operation.
English 13 Assembling the Trimmer / Brushcutter
13.3 Mounting and Removing a Deflector
13.3.1 Mounting a Deflector

WARNING
■ To reduce the risk of injury from thrown objects or contact with the cutting attachment, never operate the trimmer / brushcutter without a properly mounted deflector. Keep bystanders at least 50 ft. (15 m) away. When using a deflector designed for use with a metal cutting blade, you must change the deflector or add a skirt before mounting a mowing head.

WARNING
■ The cutting attachment and deflector must be an approved combination. Use only an approved combination of cutting attachment and deflector to maximize cutting performance and reduce the risk of serious personal injury from thrown objects or contact with the cutting attachment, 📄.
All deflectors are mounted to the gearbox in the same way. To mount a deflector:
▶ Switch off the power tool, 6.2.
▶ Remove the battery, 15.2.
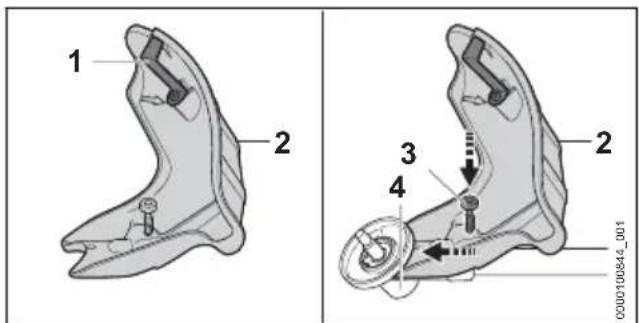
▶ Push the deflector (2) into the guides on the gearbox (4) until it stops. The deflector must be tight against the gearbox.
- Insert and tighten the screws (3). Ensure that the deflector is tight and will not move during operation.
The line limiting blade (1) comes mounted in the deflector and may not be removed.
13.3.2 Removing a Deflector
To remove a deflector:
▶ Switch off the power tool, 16.2.
▶ Remove the battery, 15.2.
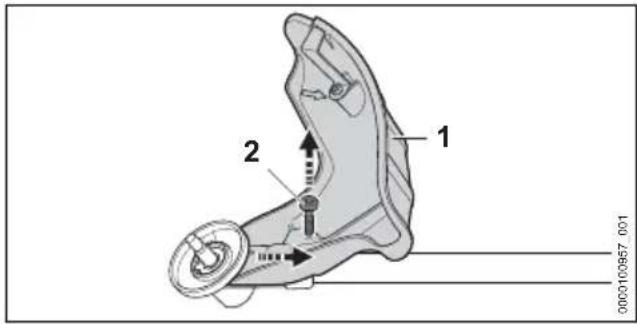
▶ Remove the screw (2).
▶ Remove the deflector (1).
13.4 Mounting and Removing a Mowing Head
13.4.1 Mounting a Mowing Head

WARNING
■ Use of wire or metal-reinforced line is not authorized and could be extremely dangerous. Use only the cutting attachments recommended in this manual, in combination with the recommended deflector, 6.6.4.

WARNING
■ A damaged or loose cutting attachment or mowing head may vibrate, crack, break or come off the trimmer / brushcutter, which may result in serious or fatal injury or property damage. Make sure the mowing head and cutting attachment are properly tightened and in good condition before starting work, 6.6.4.
To mount a mowing head:
▶ Switch off the power tool, 16.2.
▶ Remove the battery, 2.1.
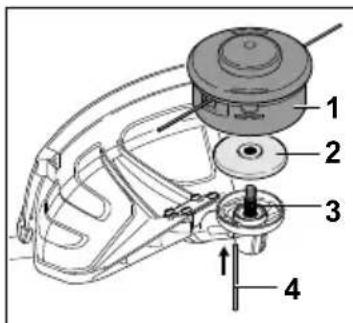
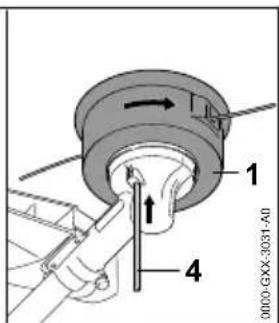
▶ Position the unit so that you are facing the underside of the deflector and the drive shaft is pointed upwards.
- Slip the thrust plate (2) onto the drive shaft (3), keeping the side of the thrust plate with the smaller diameter facing upwards toward the mowing head (1).
13 Assembling the Trimmer / Brushcutter English
▶ Insert the stop pin (4) in the hole in the gearbox and rotate the drive shaft until the stop pin slips into position and blocks the rotation of the drive shaft.
▶ By hand, screw the mowing head counterclockwise onto the drive shaft while keeping the stop pin inserted. The drive shaft must be blocked with the stop pin to mount or remove a cutting attachment.
▶ Continue screwing down the mowing head until it is properly and securely tightened.
▶ Remove the stop pin from the hole in the gearbox.
NOTICE
■ Using the trimmer with overly long trimmer line increases the load on the motor and reduces its operating speed. This may result in over-heating and damage to important components.
NOTICE
■ After mounting or removing the cutting attachment, always remove the stop pin used to block the drive shaft.
13.4.2 Removing a Mowing Head
To remove a mowing head:
▶ Switch off the power tool, 16.2.
▶ Remove the battery, 2.1.
▶ Block the rotation of the drive shaft with the stop pin.
- Position the unit so that you are facing the underside of the deflector and the drive shaft is facing upwards.
- Unscrew the mowing head by turning it clockwise.
▶ Remove the thrust plate.
- Remove the stop pin from the hole in the gearbox.
13.5 Mounting and Removing a Metal Cutting Attachment
13.5.1 Mounting a Metal Cutting Attachment

WARNING
■ Metal cutting attachments have many sharp cutting edges. If they contact your flesh, they will cut you, even if the metal cutting attachment is not moving. Always wear heavy-duty work gloves when mounting or otherwise handling a metal cutting attachment, 6.4.

WARNING
■ A metal cutting attachment that is damaged or loose may vibrate, crack, break or come off the unit, which may result in serious or fatal injury or property damage. Make sure the metal cutting attachment is properly tightened and in good condition before starting work, 6.6.4.
To mount a metal cutting attachment:
▶ Switch off the power tool, 16.2.
▶ Remove the battery, 15.2.
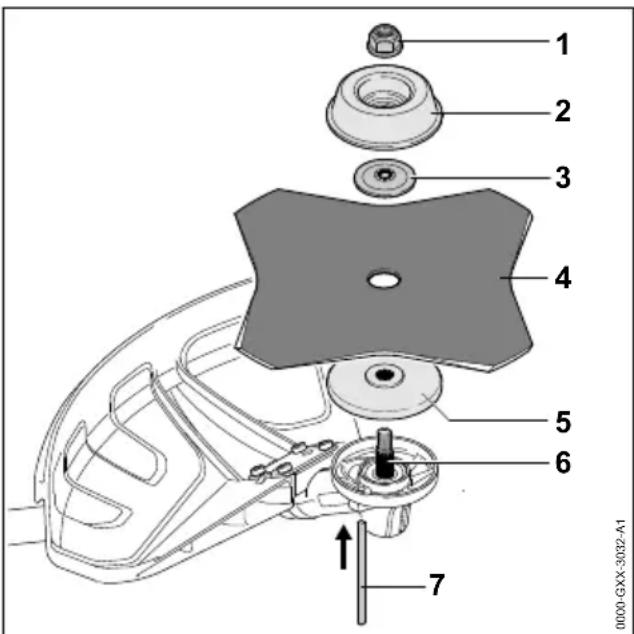
- Position the unit so that you are facing the underside of the deflector and the drive shaft is pointed upwards.
- Slip the thrust plate (5) onto the drive shaft (6). Keep the side of the thrust plate with the smaller diameter facing upwards.
▶ Place the cutting attachment (4) directly on top of the thrust plate. Ensure that the cutting attachment is positioned to rotate in the direction indicated on the deflector. - Slip the thrust washer (3) onto the drive shaft. Keep the arched side facing up and the flat side facing towards the metal cutting attachment.
- Slip the rider plate (2) onto the drive shaft.
▶ Insert the stop pin (7) in the hole in the gearbox and rotate the cutting attachment until the stop pin slips into position and blocks the rotation of the drive shaft.
▶ Screw on the nut (1) counterclockwise and tighten it down until the cutting attachment is properly and securely tightened. - Remove the stop pin from the hole in the gearbox.
English 14 Adjusting the Trimmer / Brushcutter
Cutting attachments with more than 4 cutting edges must be mounted with the cutting edges pointing in the direction of rotation. Otherwise, the cutting attachment will not cut. The direction of rotation is indicated by an arrow on the underside of the deflector.
NOTICE
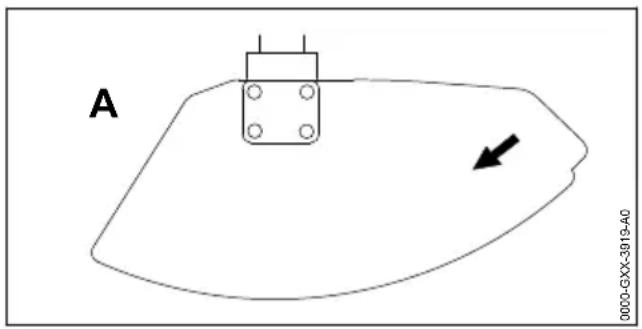
- Arrows on the deflector (A) (as seen from the underside) show the correct direction of rotation of the cutting attachment. When viewed from above, however, the cutting attachment rotates counterclockwise.
NOTICE
■ After mounting or removing the cutting attachment, always remove the stop pin used to block rotation of the drive shaft.
13.5.2 Removing a Metal Cutting Attachment
To remove a metal cutting attachment:
▶ Switch off the power tool, 16.2.
▶ Remove the battery, 5.2.
- Position the unit so that you are facing the underside of the deflector and the drive shaft is pointed upwards.
▶ Block the rotation of the drive shaft with the stop pin.
▶ Unscrew the nut by turning it clockwise.
- Remove the rider plate, thrust washer, metal cutting attachment and thrust plate.
- Remove the stop pin from the hole in the gearbox.
NOTICE
■ After mounting or removing the cutting attachment, always remove the stop pin used to block the rotation of the drive shaft.
14 Adjusting the Trimmer / Brushcutter
14.1 Putting on and Adjusting the Shoulder Strap or Full Harness
WARNING
■ To reduce the risk of injury from loss of control and contact with the cutting attachment, always wear a proper harness when working with a metal cutting attachment, 26.
Other approved harnesses are listed in this instruction manual, 26.
To put on the shoulder strap:
▶ Switch off the power tool, 16.2.
▶ Remove the battery, 15.2.
▶ Put the harness over your left shoulder if you are holding the rear handle with your right hand. Put it over your right shoulder if you are holding the rear handle with your left hand.
- When a metal cutting attachment is mounted, you must install the barrier bar, wear a proper harness and always grip the rear handle with your right hand and front handle with your left hand. That means you must place the single harness over your left shoulder when working with a metal cutting attachment.
To put on the full harness:
▶ Switch off the power tool, 16.2.
▶ Remove the battery, 15.2.
- Put on the full harness over both shoulders.
To adjust the harness:
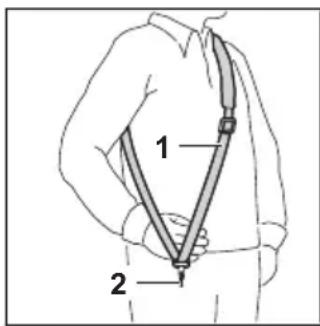
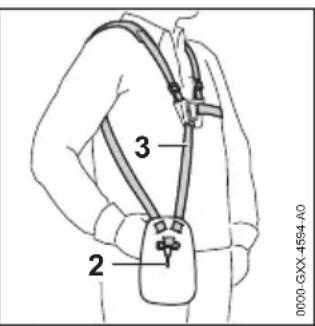
- Adjust the length of the harness strap (1) or full harness (3) so that the carabiner (2) is about a hand's width below the top of your hip.
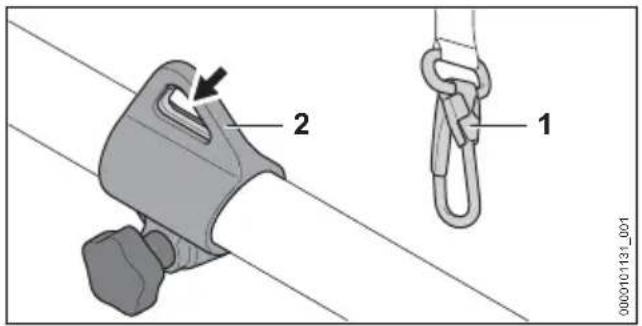
- Attach the carabiner (1) to the carrying ring (2) on the trimmer / brushcutter.
14.2 Adjusting the Loop Handle
The loop handle can be mounted to suit the height and reach of the operator.
To adjust the position of the loop handle:
▶ Switch off the power tool, 6.2.
▶ Remove the battery, 15.2.
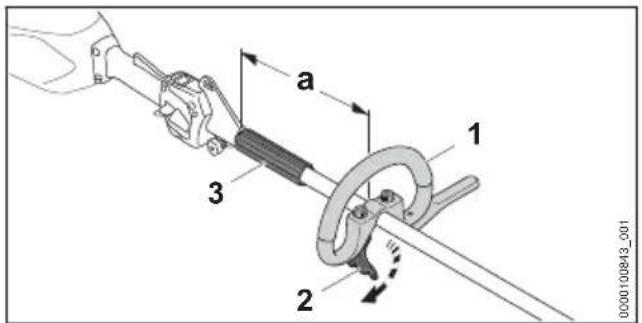
▶ Loosen the clamping lever (2).
▶ Slide the loop handle (1) to the desired position, subject to the following limitations:
- Always keep the spacer (3) positioned between the loop handle and carrier ring.
- If you are working with a mowing head, the distance marked "a" must be less than 11.8 in. (30 cm).
- If you are working with a metal cutting attachment, a barrier bar must be installed and the distance marked "a" must be less than 9.8 in. (25 cm).
▶ Tighten the clamping lever until the loop handle is secure and can no longer be moved along the drive tube.
14.3 Balancing the Trimmer / Brush-cutter
Battery and cutting attachment affect the balance of the trimmer / brushcutter. The trimmer / brushcutter must be balanced with the cutting attachment mounted and the battery inserted.
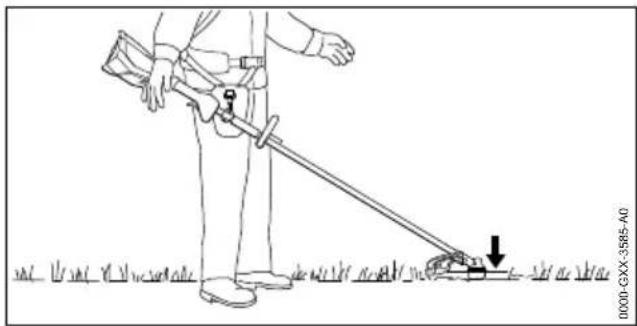
natural_image
Line drawing of a person using a long tool to measure a small object on grass, with no text or symbols present.▶ Let the trimmer / brushcutter sway on the harness until it stops moving.
The mowing head or the metal cutting attachment should come to rest gently on the ground or just above the ground.
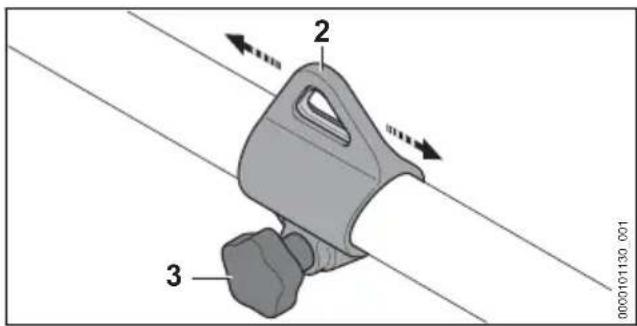
If the trimmer / brushcutter is not properly balanced:
▶ Loosen the screw (3) on the carrying ring.
▶ Slide the carrying ring (2) along the drive tube and re-tighten the screw.
▶ Allow the trimmer / brushcutter to hang freely again. Repeat and re-adjust as necessary to achieve the proper balance.
▶ Once the cutting attachment is properly positioned for work, tighten the screw and ensure that the carrying ring is secure.
15 Inserting and Removing the Battery
15.1 Inserting the Battery

WARNING
■ Never use a malfunctioning, damaged, cracked, leaking or deformed battery, 📄7. Never charge, use or store the battery outside the specified ambient temperature limits, 📄25.3.

WARNING
■ To reduce the risk of unintended activation, never store the battery in the trimmer / brush-cutter, 121.2.
To insert the battery:
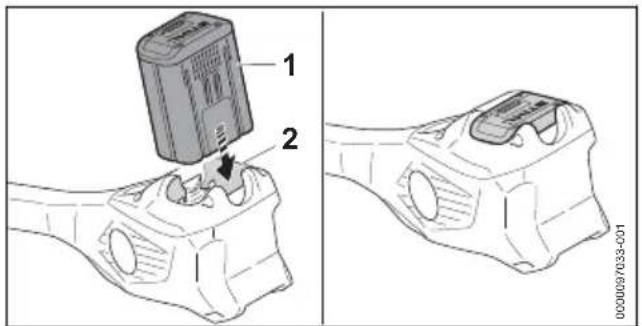
- Insert the battery (1) into the battery compartment (2) until it stops. The battery is properly inserted when you hear an audible click and the battery is flush with the top of the housing. In this position, there is electrical contact between the battery and the trimmer / brushcutter.
Since a new battery is not fully charged, STIHL recommends that you fully charge the battery before using it the first time, 📋10.
15.2 Removing the Battery

WARNING
■ To reduce the risk of severe personal injury from unintended activation, always remove the battery before assembling, transporting, adjusting, cleaning, servicing, maintaining or storing the trimmer / brushcutter, and any other time it is not in use.

WARNING
■ Use care when ejecting the battery to prevent it from falling and causing personal injury or property damage.
To remove the battery:
▶ Release the trigger switch.
- Place the trimmer / brushcutter on a level surface.
▶ Position your hand behind the battery.
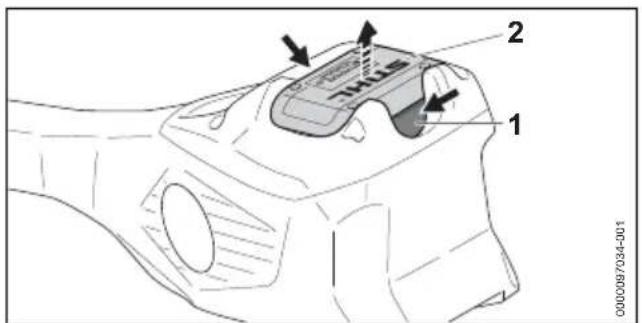
▶ Compress the locking lever (1) to eject the battery (2) from the battery compartment.
NOTICE
■ Avoid exposing the battery to excessive heat or prolonged periods of direct sunlight. Use or storage outside the recommended ambient temperature range can reduce the performance of the battery.
16 Switching the Trimmer / Brushcutter On and Off
16.1 Switching On

WARNING
■ To reduce the risk of serious or fatal injuries to the operator or bystanders, keep hands, feet and other parts of the body away from the cutting attachment, 6.6.2. Do not touch the cutting attachment while the battery is inserted. Never touch the moving cutting attachment with your hand or any part of your body, 6.6.4.

WARNING
■ Never operate your trimmer / brushcutter if it is damaged, improperly adjusted or maintained, not completely and securely assembled or not functioning properly, 6.5. To reduce the risk of personal injury, always wear proper clothing and protective apparel, including proper eye protection, 4.4. To reduce the risk of serious or fatal injury from loss of control, always hold the trimmer / brushcutter with both hands when you are working, 6.6.2.
Before switching on:
▶ Make sure you have a secure and firm footing.
▶ Stand upright.
▶ Always hold and operate the trimmer / brush-cutter with the rear hand firmly on the gripping surface (2) of the control handle and your front hand firmly on the loop handle.
To switch the trimmer / brushcutter on:
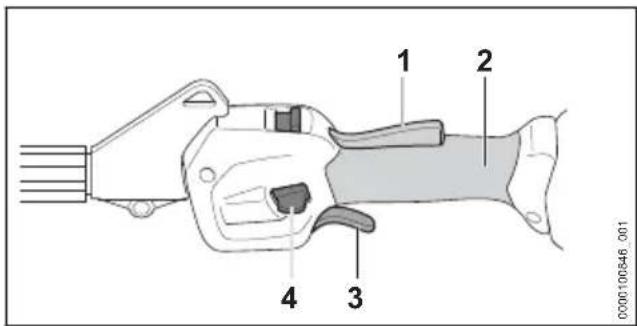
17 Checking the Power Tool English
▶ Depress and hold the trigger switch lock-out (1).
▶ While holding the trigger switch lockout, press the retaining button (4) with your thumb.
- Squeeze the trigger switch (3) with your index finger.
The cutting attachment will start moving.
The motor will not switch on unless the trigger switch lockout and retaining button have been depressed and the trigger switch has been squeezed.
The further the trigger switch is squeezed, the faster the cutting attachment will rotate.
16.2 Switching Off

WARNING
■ The cutting attachment will continue to move for a short while after the trigger switch is released. To avoid serious or fatal injury, avoid contact with the moving cutting attachment. To reduce the risk of personal injury from unintended activation or unauthorized use, switch off the motor, ensure the cutting attachment has stopped and remove the battery before transporting the unit or putting it down.
To switch the trimmer / brushcutter off:
▶ Release the trigger switch and trigger switch lockout so that the trigger switch springs back to the locked position. In the locked position, activation of the trigger switch is blocked by the trigger switch lockout. Activation of the trimmer / brushcutter is also electronically blocked by the retaining button once the LEDs stop flashing (after approximately 5 seconds).
The cutting attachment will continue to move for a short time after the trigger switch is released. Take care to avoid contact after releasing the trigger switch and when setting down the trim-mer / brushcutter.
17 Checking the Power Tool
17.1 Testing the Controls
Before starting work, confirm that the trigger switch lockout (1), retaining button (4) and trigger switch (3) are undamaged and functioning properly:
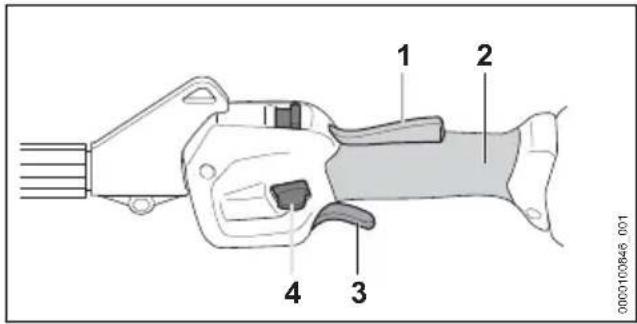
Trigger Switch Lockout (1), Retaining Button (4) and Trigger Switch (3)

WARNING
■ To reduce the risk of serious or fatal injuries, keep hands, feet and other parts of the body away from the cutting attachment. Do not touch the cutting attachment while the battery is inserted. Never touch the moving cutting attachment with your hand or any part of your body, 6.6.2. Keep bystanders at least 50 ft. (15 m) away while testing the controls.
To test the controls:
▶ Remove the battery.
▶ Attempt to depress the trigger switch.
If the trigger switch can be depressed without first depressing the trigger switch lockout, take the trimmer / brushcutter to an authorized STIHL servicing dealer to be repaired before use.
▶ Press down on the trigger switch lockout and retaining button. Make sure they move freely and spring back into place when released.
▶ Insert the battery.
- Hold the power tool firmly with both hands, your fingers wrapped tightly around the gripping surface (2) of the control handle. Depress and hold the trigger switch lockout, press the retaining button with your thumb and squeeze the trigger switch with your index finger.
The trimmer / brushcutter should switch on. If it does not, take the trimmer / brushcutter to an authorized STIHL servicing dealer to be repaired before use.
▶ Release the trigger switch. The trimmer / brushcutter should switch off. If the trimmer / brushcutter does not switch off after you release the trigger switch, remove the battery and take the trimmer / brushcutter to an authorized STIHL servicing dealer to be repaired before use.
18 During Operation
18.1 Selecting the Power Level
The unit can be operated at two different power settings, indicated by the position of the power level switch (1). The higher the power level, the faster the cutting attachment will rotate.
When the ECO power level is selected, the trim-mer / brushcutter operates at a lower RPM for situations requiring less power. This increases energy efficiency and battery runtime.
When the maximum speed mode is selected, the trimmer / brushcutter operates at a higher RPM for situations requiring more power. This decreases energy efficiency and battery runtime.
To set the power level:
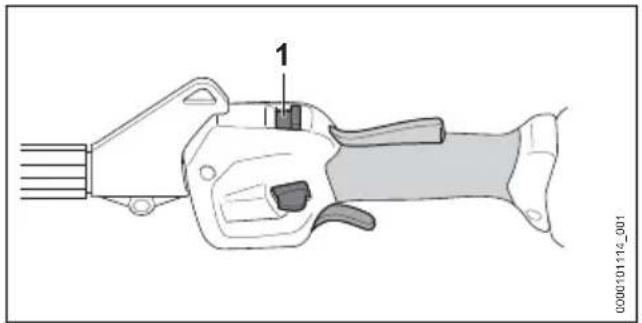
natural_image
Diagram of a handheld device with labeled component '1' (no text or symbols beyond label)- Switch the power level switch (1) to the preferred power level.
Generally, battery runtime will be shorter when operating continuously at the highest power level.
18.2 Using the Trimmer / Brushcut-ter

WARNING
■ Always wear proper clothing and protective apparel, including proper eye protection, when operating your trimmer, 6.4. Keep bystanders at least 50 ft. (15 m) away from the work area, 6.6.4. Work carefully and maintain proper control of the trimmer, 6.6.2.

WARNING
■ To reduce the risk of serious or fatal injuries to the operator or bystanders, keep hands, feet and other parts of the body away from the cutting attachment, 6.6.2. Do not touch the cutting attachment while the battery is inserted into the trimmer / brushcutter. Never touch the moving cutting attachment with your hand or any part of your body, 6.6.4.
The trimmer / brushcutter is designed for two-handed operation.
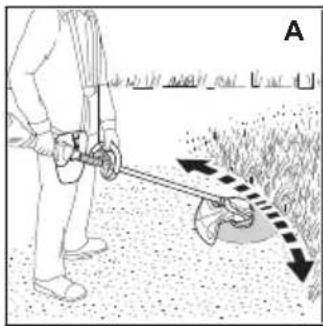
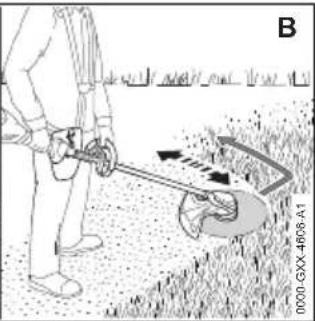
- When working with a mowing head, swing the unit back and forth carefully in a controlled manner parallel to the ground, as depicted in Illustration A, above.
- When working with a grass cutting blade or brush knife, sweep the unit in a controlled pattern parallel to the ground as depicted in Illustration B, above.
▶ Move forward slowly, keeping two hands on the unit at all times.
For optimum performance, observe the recommended ambient temperature ranges, 125.4.
Observe all applicable laws, regulations, standards and ordinances.
18.3 Adjusting the Nylon Line

WARNING
■ To reduce the risk of personal injury from unintended activation, always switch off the motor and remove the battery from the trimmer before manually adding or adjusting the nylon line.
AutoCut Mowing Heads
▶ While the cutting attachment is rotating, tap the rotating mowing head on the ground.
Approximately 1.2 in. (30 mm) of fresh nylon line will be advanced with each tap. The line limiting blade in the deflector trims the mowing line to the proper length.
The bump feed mechanism will not advance additional line if the mowing line is shorter than 1 in. (25 mm). To feed additional line manually:
- Switch off the power tool and remove the battery.
▶ Depress and hold the button on the mowing head.
▶ Pull out the mowing line by hand.
▶ If the mowing line cannot be pulled out to the required length, install a new spool of line.
SuperCut Mowing Heads
Fresh nylon line will be advanced automatically without tapping on ground. The line limiting blade in the deflector trims the mowing line to the proper length.
The automatic feed mechanism will not advance additional line if the mowing line is shorter than 1 in. (25 mm). To feed additional line manually:
- Switch off the power tool and remove the battery.
▶ Depress and hold the button on the mowing head.
▶ Pull out the mowing line by hand.
▶ If the mowing line cannot be pulled out to the required length, install a new spool of line.
STIHL recommends keeping nylon line in a water bath for at least 12 to 24 hours before use to increase its useful life.
19 After Finishing Work
19.1 Preparing for Transportation or Storage

WARNING
■ To reduce the risk of personal injury from unintended activation or unauthorized use, switch off the motor, ensure the cutting attachment has stopped and remove the battery before transporting the trimmer / brushcutter or putting it down.
To prepare the trimmer / brushcutter for transportation or storage:
- Switch off the trimmer / brushcutter, 16.2.
▶ Remove the battery, 15.2.
▶ If the battery or trimmer / brushcutter became damp or wet during operation, allow them to dry separately and completely before charging or storing, 25.4.
20 Transporting the Trimmer / Brushcutter and Battery
20.1 Trimmer / Brushcutter

WARNING
■ To reduce the risk of personal injury from unintended activation, never transport the trimmer / brushcutter with the battery inserted.

WARNING
■ To reduce the risk of injury from loss of control and blade or line contact, never carry or transport your trimmer / brushcutter with the cutting attachment moving, 6.6.4. Ensure the cutting attachment has stopped before setting the power tool down, 6.6.4.

WARNING
■ If a metal cutting attachment is mounted, STIHL recommends attaching an appropriate transport guard (special accessory) to help reduce the risk of cut injuries from inadvertent contact. Remove the transport guard before starting work.
When transporting the trimmer / brushcutter:
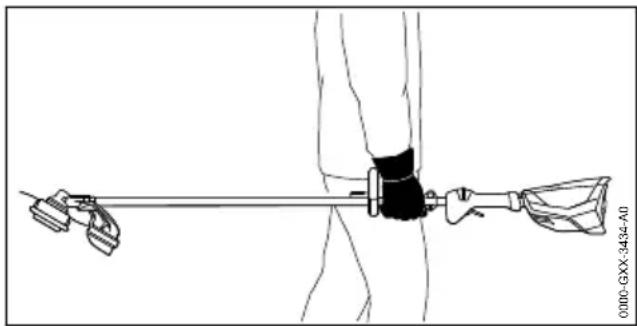
natural_image
Line drawing of a person holding a long rod with a bandage, no text or symbols present- When transporting the trimmer / brushcutter by hand, hold the drive tube so that the unit remains parallel to the ground. Keep the cutting attachment pointing backwards, opposite the direction in which you are walking.
- When transporting the trimmer / brushcutter in a vehicle, secure and position it to prevent turnover, impact and damage.
20.2 Battery

WARNING
■ To reduce the risk of a short circuit, which could lead to electric shock, fire and explosion, never transport the battery with small metal objects capable of conducting electricity (e.g., paper clips, nails, coins, keys), 7.
When transporting the battery:
- Secure the battery in a container against impact or damage. Never transport the battery with small metal objects capable of conducting electricity (e.g., paper clips, nails, coins, keys).
▶ If you are transporting the battery in a vehicle, secure it and its container to prevent turnover, impact and damage.
STIHL batteries comply with the requirements set forth in UN-Manual of Tests and Criteria, Part III, Subsection 38.3.
Commercial air, vessel and ground transportation of lithium ion cells and batteries is regulated. The battery is classified as a UN 3480, Class 9, packaging group II product. Shipping it, either as a complete tool or the battery, requires compliance with all applicable shipping regulations. Check with the ground, vessel, air cargo or passenger airline to determine if transport is prohibited or subject to restrictions or exemptions prior to shipping or travel.
Normally, no further conditions have to be met by the user in order to transport STIHL batteries by road to the power tool's operating site. Check and comply with any special regulations that may apply to your situation.
For further information please go to www.stih-lusa.com/battery-transportation-safety.
21 Storing the Trimmer / Brushcutter and Battery
21.1 Trimmer / Brushcutter

WARNING
■ Store the trimmer / brushcutter indoors in a dry, secure place that is inaccessible to children and other unauthorized users, 18.
Never store the battery in the trimmer / brushcutter. Improper storage can result in unauthorized use and damage to the trimmer / brushcutter, 8.

WARNING
■ To reduce the risk of unintended activation, never store the trimmer with the battery inserted. Always remove the battery before storing.
When storing the trimmer / brushcutter:
▶ Remove, clean and inspect the cutting attachment. Coat metal cutting attachments with corrosion inhibitor.
▶ Clean the trimmer / brushcutter, 22.
- Secure and position the trimmer / brushcutter to prevent turnover, impact and damage.
- Store the trimmer / brushcutter indoors in a dry and secure location, out of the reach of children and other unauthorized persons.
21.2 Battery

WARNING
■ To reduce the risk of a short circuit, which could lead to electric shock, fire and explosion, never store the battery with small metal objects capable of conducting electricity (e.g., paper clips, nails, coins, keys), 7. If the battery is damp or wet, allow it to dry thoroughly before storing, 7.

WARNING
■ Extreme temperatures can damage the battery and may also cause the battery to generate heat, rupture, leak, ignite or explode, resulting in severe or fatal personal injury or property damage. Never charge, use or store the battery outside the specified ambient temperature limits, 25.3.
To properly store the battery:
- Remove the battery from the trimmer.
▶ When storing the battery, maintain a charge of 40 % to 60 % for STIHL AP series batteries and a charge of 30 % to 45 % for STIHL AR series batteries (2 green LEDs).
▶ If storing the battery in the charger, disconnect the charger from the outlet.
▶ Make sure the battery is dry and store it indoors in a dry and secure location. - Keep it out of the reach of children and other unauthorized persons.
▶ Protect the battery against dampness and corrosive agents such as garden chemicals and de-icing salts. - Protect the battery from exposure to conductive liquids such as salt water.
For maximum battery life, store the battery at an ambient temperature between 50 °F and 68 °F (10 °C and 20 °C) with a charge between 40 % and 60 % for STIHL AP series batteries and a charge of 30 % to 45 % for STIHL AR series batteries (2 green LEDs). - Do not leave spare batteries unused. Use them in rotation.
NOTICE
■ A battery that is not stored properly may experience deep discharge, which can result in permanent damage. To avoid deep discharge:
- Remove the battery from the trimmer after finishing work.
- For maximum battery life, store the battery with a charge between 40% and 60% for STIHL AP series batteries and a charge of 30% to 45% for STIHL AR series batteries (2 green LEDs).
- If storing the battery in the charger, disconnect the charger from the outlet.
- For maximum battery life, store the battery at an ambient temperature between 50^ and 68^ (10 °C and 20 °C).
22 Cleaning
22.1 Cleaning the Trimmer and Battery

WARNING
■ To reduce the risk of personal injury from unintended activation, remove the battery before carrying out any cleaning work, 18. Users of this trimmer / brushcutter should carry out only the cleaning described in this manual.
23 Inspection and Maintenance
23.1 Inspection and Maintenance Chart
Always remove the battery before carrying out any inspection, cleaning or maintenance.
| The following maintenance intervals are examples and apply for normal operating conditions. Actual use and your experience will determine the frequency of required inspection and maintenance. | Before starting work | After finishing work or daily | Every 50 working hours | Relevant Chapter | |
| Complete Machine, including the Battery Compartment | Visual inspection X | ||||
| Clean | X | 22.1 | |||
| Controls Check function and condition | X | ||||
| Cutting Attachment Visual inspection | XXX | ||||
To clean the trimmer / brushcutter and battery:
- Clean the power tool's polymer components with a slightly dampened cloth. Do not use detergents or solvents. They may damage the polymer components.
▶ Do not use a pressure washer to clean the trimmer / brushcutter or otherwise spray it with water or other liquids. - Keep the battery housing and guides free from foreign matter and clean as necessary with a soft brush or soft, dry cloth.
English 23 Inspection and Maintenance
23.2 Inspecting and Maintaining the Trimmer / Brushcutter

WARNING
■ To reduce the risk of personal injury from unintended activation, remove the battery before inspecting the trimmer / brushcutter or carrying out any maintenance, 8. Carry out only the maintenance operations described in this manual. There are no user-authorized repairs. STIHL recommends that repair work be performed by authorized STIHL servicing dealers.
To properly maintain the trimmer / brushcutter:
- Replace a worn deflector, mowing head or metal cutting attachment.
▶ Have worn, missing or damaged safety labels replaced by an authorized STIHL servicing dealer.
If you make a warranty claim for a component that has not been serviced or maintained properly, coverage may be denied.
23.3 Lubricating the Gearbox

WARNING
■ The gearbox becomes hot during operation. To reduce the risk of burn injury, avoid contacting the gearbox while it is still hot following operation. Wait for the gearbox to cool down before performing this operation.
To lubricate the gearbox:
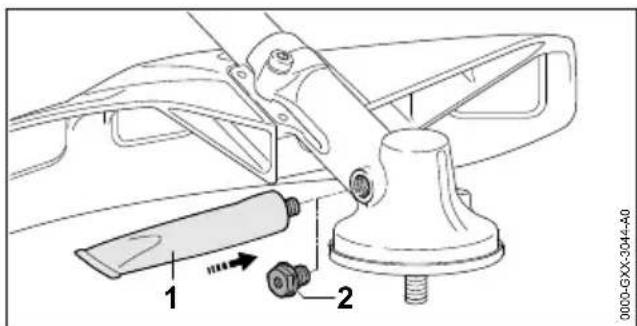
▶ Remove the screw plug (2).
▶ If no grease can be seen on the inside of the screw plug, screw the tube (1) of STIHL gear lubricant into the filler hole.
▶ Squeeze no more than 0.2 oz. (5 g) of STIHL gear lubricant into the gearbox.
- Remove the tube of STIHL gear lubricant.
- Insert the screw plug and tighten it.
NOTICE
■ Do not completely fill the gearbox with grease.
23.4 Replacing the Trimmer Line on an AutoCut 25-2 Mowing Head

WARNING
■ Use of wire or metal-reinforced line is not authorized and could be extremely dangerous. Use only the cutting attachments recommended in this manual, in combination with the recommended deflector.

WARNING
■ A damaged or loose cutting attachment or mowing head may vibrate, crack, break or come off the trimmer / brushcutter, which may result in serious or fatal injury or property damage. Make sure the mowing head and cutting attachment are properly and securely tightened and in good condition before starting work.
▶ Switch off the power tool, 16.2.
▶ Remove the battery, 15.2.
▶ Remove the mowing head, 13.4.2.
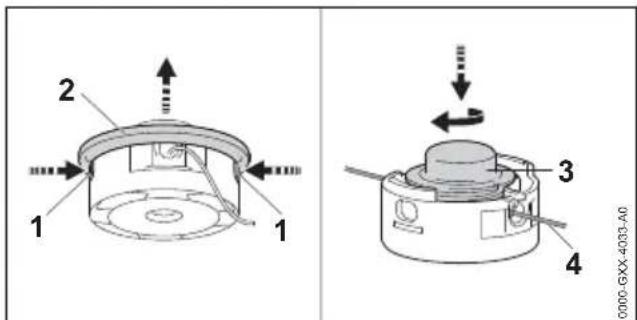
▶ Press both tabs (1) and remove the cover (2).
▶ Press down on the spool (3), turn it clockwise to release the spool and pull up to remove it.
- Remove the remaining trimmer line (4) and dispose of it.
▶ If you use trimmer line with a diameter of 0.095 in. (2.4 mm), cut a 33 ft. m (10 m) length of nylon line from the reel and then cut it in half, making two 16.5 ft. (5 m) lengths.
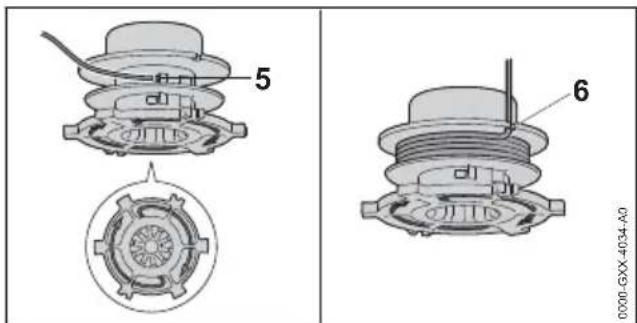
▶ Insert the first 16.5 ft. (5 m) length of line into the eyelet (5) nearest the notches (6) until it stops.
23 Inspection and Maintenance English
- Wind the trimmer line firmly and evenly in the direction of the arrow on the bottom of the mowing head.
- Hook the end of the trimmer line into one of the notches (6).
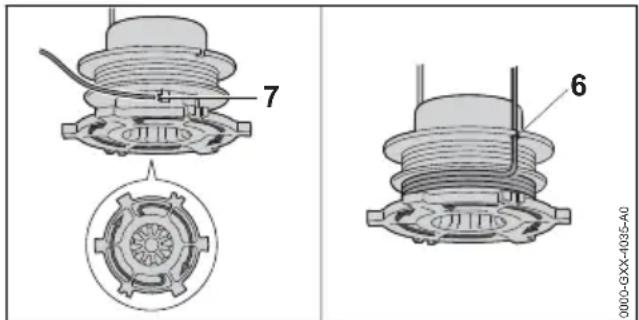
▶ Repeat the winding process with the second 16.5 ft. (5 m) length of trimmer line using the other eyelet (7) and notch (6).
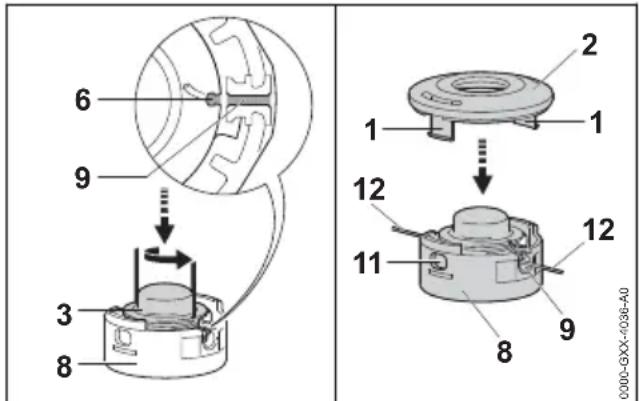
▶ Fit the spool (3) into the mowing head (8).
▶ Press and turn the spool until one of the notches (6) is aligned with one of the eyelets (9) and one of the spool tabs is held in place by a tab in the mowing head.
- Put the ends of the trimmer line (12) through the eyelets (9).
▶ Fit the cover (2) on the mowing head. Align the tabs (1) of the cover with the openings (11) in the mowing head.
Both tabs should click audibly into place.
▶ Pull on the line until the spool moves up slightly.
NOTICE
■ Overly long trimmer line increases the load on the motor and reduces its operating speed. This may result in overheating and damage to important components.

Watch a video on how to replace trimmer line on an AutoCut 25-2 mowing head at bit.ly/Auto-cut25-2. Click here or type this address into your browser.
23.5 Sharpening and Balancing a Metal Cutting Attachment

WARNING
■ Never use a dull or damaged metal cutting attachment. Working with a dull blade leads to increased physical strain, increased vibration load, unsatisfactory cutting results and increased wear, which can result in loss of control and injury to the operator or bystanders. A damaged cutting attachment may vibrate, crack, break or come off the trimmer / brushcutter, which may result in serious or fatal injury or property damage. Make sure the cutting attachment is sharp and in good condition before starting work.

WARNING
■ An improperly sharpened metal cutting attachment can increase the risk of kickout (blade thrust) and other reactive forces, resulting in severe personal injury or death. STIHL recommends having your metal cutting attachment sharpened and balanced by an authorized STIHL servicing dealer to reduce the risk of severe or fatal injury.
To sharpen the metal cutting attachment:
▶ Use a flat file to sharpen dull cutting attachments. In case of more serious wear or nicks, resharpen with a grinder or have it sharpened by an authorized STIHL servicing dealer.
▶ Sharpen frequently and take away as little metal as necessary to create a sharp edge. Two or three strokes of the file are usually enough.
▶ Resharpen the cutting edges uniformly. Take care not to alter the contour of the blade body.
▶ See cutting attachment packaging for additional sharpening instructions. Keep the packaging for future reference.
To balance the metal cutting attachment:
▶ After resharpening about 5 times, check the cutting tool for out-of-balance on a STIHL balancer (special accessory) or have it checked and rebalanced by an authorized STIHL servicing dealer as necessary.
24 Troubleshooting Guide
24.1 Trimmer / Brushcutter and Battery
Always remove the battery before carrying out any inspection, cleaning or maintenance.
| Condition LEDs on Battery | Cause Remedy | |
| Trimmer / Brush-cutter does not start when switched on. | No electrical contact between trimmer / brush-cutter and bat-tery. | Remove the battery,5.2.Visually check the electrical contacts in the bat-tery compartment and on the battery.Reinsert the battery,5.1. |
| 1 LED flashes green.STIHL AR Series: four long beeps are emitted (AR L - six beeps). | Battery has low charge. | |
| 1 LED glows red. | Battery too hot / too cold. | |
| 4 LEDs flash red.STIHL AR Series: Additionally, a rapid suc- cession of short beeps is emitted. | Malfunction in battery. | |
| 3 LEDs glow red. | Trimmer / Brush-cutter too hot. | |
| 3 LEDs flash | red. | Malfunction in trimmer / brush-cutter. |
| The trigger | switch was already depressed before operating the retaining but-ton. | |
| Trimmer / Brush-cutter cuts out during operation. | 1 LED glows red. | Battery too hot / too cold. |
| 3 LEDs glow red. | Trimmer / Brush-cutter too hot. | |
| Run-time is too short. | Battery not fully charged. | Charge the battery,10.2. |
| Useful life of | bat-tery has been reached or exceeded. | |
| The power levels cannot be set. | The triggerdepressed and the trimmer / brushcutter is switched on. | switch is► Select the power level as described in this instruction manual. |
| Battery is not being charged even though LED on charger glows green. | 1 LED glows red. | Battery too hot / too cold. |
25 Specifications
25.1 STIHL FSA 120.0 R
- Approved battery types:
- STIHL AP series
- STIHL AR series
- Weight without deflector or cutting attachment: 9.5 lbs. (4.3 kg)
– Length: 70.4 in. (1788 mm)
For technical information regarding the STIHL AP and AR / AR L series batteries, see the product information accompanying your battery.
For technical information regarding the STIHL AL 101, 301, 301-4 and 500 series chargers, see the product information accompanying your charger.
Batteries, chargers and other accessories sold separately. Contact your authorized STIHL servicing dealer for pricing and availability.
25.2 Symbols on the Power Tool, Deflector and Battery
| Symbol | Explanation |
| V Volt | |
| Hz Hertz | |
| A Ampere | |
| Ah Ampere hour | |
| W Watt | |
| Wh Watt | hour |
| AC Alternating current | |
| IPX4 Protection against spraying or splash-ing water from all directions. | |
Symbol on the deflector showing proper direction of rotation for the cutting attachment.
max ∅ XXX
Maximum allowable diameter of the cutting attachment

X
Maximum speed of the cutting attachment

Number of cells and stored energy according to cell manufacturer's specification. Usable energy will be less.
STIHL products must not be disposed of in the household trash, but only in accordance with local, state and federal laws and regulations and as provided in this manual, 28.1.

The RBRC seal indicates that STIHL has prepaid for battery recycling
Maximum power level.


ECO power level.
25.3 Ambient Temperature Limits

WARNING
■ Extreme temperatures can damage the battery and may also cause it to generate heat, rupture, leak, ignite or explode, resulting in severe or fatal personal injury or property damage. Never charge, use or store the battery outside the ambient temperature limits specified below.
- Do not charge the battery below - 4 °F (-20 °C) or above 122 °F (50 °C).
- Do not use the trimmer / brushcutter or battery below - 4 °F (- 20 °C) or above 122 °F (50 °C).
- Do not store the trimmer / bruscutter or battery below - 4 °F (- 20 °C) or above 158 °F (70 °C).
25.4 Ambient Temperature Recommendations
For optimum performance, observe the following ambient temperature ranges for the trim-mer / brushcutter and battery:
- Charging: 41 °F to 104 °F (5 °C to 40 °C)
- Use: 14 °F to 104 °F (- 10 °C to 40 °C)
- Storage: - 4 °F to 122 °F (- 20 °C to 50 °C)
Charging, using or storing the battery outside the recommended ambient temperature ranges may reduce performance.
If the battery became damp or wet during operation, allow it to dry at least 48 hours at temperatures between 59 °F (15 °C) and 122 °F (50 °C) and relative humidity below 70 % before charging or storing. Higher humidity can extend the drying time.
25.5 Engineering Improvements
STIHL's philosophy is to continually improve all of its products. As a result, engineering changes and improvements are made from time to time. Therefore, some changes, modifications and improvements may not be covered in this manual. If the operating characteristics or the appearance of your machine differs from those described in this manual, please contact your STIHL dealer or the STIHL distributor in your area for assistance.
25.6 FCC 15 Compliance Statement
This device complies with part 15 of the FCC Rules.
Operation is subject to the following two conditions:
- this device may not cause harmful interference.
- this device must accept any interference received, including interference that may cause undesired operation.
Note: This equipment has been tested and found to comply with the limits for a Class B digital device, pursuant to part 15 of the FCC Rules.
These limits are designed to provide reasonable protection against harmful interference in a residential installation. This equipment generates, uses and can radiate radio frequency energy and, if not installed and used in accordance with the instructions, may cause harmful interference to radio communications. However, there is no guarantee that interference will not occur in a particular installation.
If this equipment does cause harmful interference to radio or television reception, which can be determined by turning the equipment off and on, the user is encouraged to try to correct the interference by one or more of the following measures:
– reorient or relocate the receiving antenna,
– increase the separation between the equipment and receiver,
- connect the equipment to an outlet on a circuit different from that to which the receiver is connected,
- consult an authorized STIHL servicing dealer or an experienced radio/TV technician for help.
Do not change or modify this product in any way unless specifically allowed in this manual, since this could void your authority to operate it.
26 Approved Deflector, Cutting Attachment, Handle and Harness Combinations
26.1 STIHL FSA 120.0 R
The FSA 120.0 R is approved for use only with the following cutting attachments:
| Cutting Attachments Deflectors Handle Harnesses | |||
| Mowing heads with a diameter of 13.1 in. (335 mm):– PolyCut 18-2 (1)Mowing heads with round "quiet" line with a diameter of 0.095 in.(2.4 mm):– AutoCut 25-2 (2)– AutoCut 27-2 (3)– AutoCut C 26-2 (4)– SuperCut 20-2 (5)– DuroCut 20-2 (6)– TrimCut C 32-2 (7) | – Deflector for Mowing Heads(∅ 380 mm) (11) | – Loop Handle (13)– Loop Handle with Bar-rier Bar (14) | optional:– Shoulder Strap (15)– Full Harness (16) with a quick-release sys-tem– STIHL AR Backpack Battery in combination with Hip Pad (17)– STIHL Battery Belt with STIHL AP Bat-tery Bag with Con-necting Cord in com-bination with the Shoulder Strap (18)– STIHL Battery Belt with STIHL AP Bat-tery Bag with Con-necting Cord in com-bination with the Shoulder Harness and Hip Pad (19)– STIHL Battery Back-pack in combination with Hip Pad (20) |
| Diameter of 9 in.(230 mm)– Grass Cutting Blade 230-2 (8)– Grass Cutting Blade 230-4 (9)– Grass Cutting Blade 230-8 (10) | – Deflector for Metal Cutting Attachments(∅ 230 mm) (12) | – Loop Handle with Bar-rier Bar (14) | required:– Shoulder Strap (15)– Full Harness (16) with a quick-release sys-tem– STIHL AR Backpack Battery in combination with Hip Pad (17)– STIHL Battery Belt with STIHL AP Bat-tery Bag with Con-necting Cord in com-bination with the Shoulder Strap (18)– STIHL Battery Belt with STIHL AP Bat-tery Bag with Con-necting Cord in com-bination with the ShoulderHarness and Hip Pad (19)– STIHL Battery Back-pack in combination with Hip Pad (20) |
Description of the Cutting Attachments
PolyCut 18-2 (1)
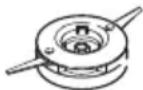
English 26 Approved Deflector, Cutting Attachment, Handle and Harness Combin...
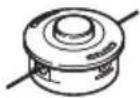
AutoCut 25-2 (2)
AutoCut 27-2 (3)
AutoCut C 26-2 (4)
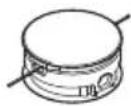
SuperCut 20-2 (5)
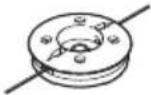
DuroCut 20-2 (6)
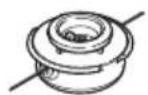
TrimCut C 32-2 (7)
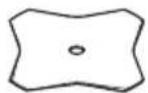
Grass Cutting Blade 230-2 (8)
Grass Cutting Blade 230-4 (9)
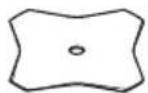
Grass Cutting Blade 230-8 (10)
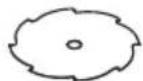
Description of the Deflectors
Deflector for Mowing Heads (11)
Deflector for Metal Cutting Attachments without Skirt (12)
Description of the Handles
Loop handle (13)
26 Approved Deflector, Cutting Attachment, Handle and Harness Combin... English
Loop Handle with Barrier Bar (14)
Description of the Harnesses
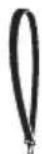
Shoulder Strap (15)
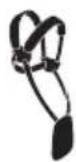
Full Harness (16) with a quick-release system
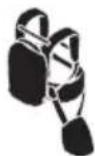
STIHL AR Backpack Battery in combination with Hip Pad (17)
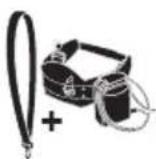
STIHL Battery Belt with STIHL AP Battery Bag with Connecting Cord in combination with the Shoulder Strap (18)
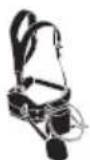
STIHL Battery Belt with STIHL AP Battery Bag with Connecting Cord in combination with the Shoulder Harness and Hip Pad (19)
STIHL Battery Backpack in combination with Hip Pad (20)

WARNING
■ To reduce the risk of personal injury from thrown objects and contact with the cutting attachment, never operate the trimmer / brushcutter without the proper deflector and harness, 16.6.4. Ensure that the deflector and handlebar are properly mounted and adjusted at all times while working.

WARNING
■ The operator must be able to remove the harness quickly in the event of an emergency. To reduce the risk of injury in an emergency:
- Practice removing and putting down the power tool as you would in an emergency. To avoid damage, do not throw the power tool to the ground when practicing.
- Use only one of the allowed harness options. Do not combine different harnesses or other harness combinations when using your power tool.
27 Replacement Parts and Equipment
27.1 Genuine STIHL Replacement Parts
STIHL recommends the use of genuine STIHL replacement parts. Genuine STIHL parts can be identified by the STIHL part number, the STIHL logo and, in some cases, by the STIHL parts symbol. The symbol may appear alone on small parts.
28 Disposal
28.1 Disposal of the Power Tool
STIHL products must not be thrown in household trash or disposed of except as outlined in this manual.
▶ Take the power tool, accessories and packaging to an approved disposal site for environmentally friendly recycling.
- Contact your authorized STIHL servicing dealer for the latest information on disposal and recycling.
28.2 Battery Recycling

WARNING
■ Handle discharged/depleted batteries carefully. Even if believed to be discharged, lithium ion batteries may never totally discharge and still may deliver a dangerous short circuit current. If damaged or exposed to extreme temperatures, they may leak, generate heat, catch fire or explode.
- Observe all federal, state and local disposal rules and regulations.
- Contact your authorized STIHL servicing dealer for the latest information on waste disposal.
▶ Recycle depleted batteries promptly.
- Keep batteries away from children. Do not disassemble and do not dispose of in fire.

STIHL is committed to the development of products that are environmentally responsible. This commitment does not stop when the product leaves the authorized STIHL servicing dealer. STIHL has partnered with the RBRC (Rechargeable Battery Recycling Corporation) to promote the collection and recycling of spent STIHL lithium ion batteries in the United States and Canada.
The RBRC seal indicates that STIHL has prepaid for battery recycling. RBRC has a toll free phone number (1-800-822-8837) that connects you to information on battery recycling locations and information on battery disposal bans or restrictions in your area. You can also return your spent battery to any authorized STIHL servicing dealer for recycling free of charge.
29 Limited Warranty
29.1 STIHL Incorporated Limited Warranty Policy
This product is sold subject to the STIHL Incorporated Limited Warranty Policy, available at www.stihlusa.com/warranty.html. It can also be obtained from your authorized STIHL dealer or by calling 1-800-GO-STIHL (1-800-467-8445).
30 Trademarks
30.1 Registered Trademarks
| STIHL® | FARM BOSS® |
| STIHL® | iCademy® |
| G1. | MAGNUM® |
| The color combination orange-grey (U.S. Registrations #2,821,860; #3,010,057, #3,010,058, #3,400,477; and #3,400,476) | MasterWrench Service®MotoMix®OIOMATIC®ROCK BOSS®STIHL Cutquik® |
| AutoCut® | STIHL DUROMATIC® |
| YARD BOSS® | STIHL Quickstop® |
| STIHL ROLLO-MATIC® | STIHL WOOD BOSS® |
| WOOD BOSS® | TIMBERSPORTS® |
 |  |
30.2 Common Law Trademarks
| 4-MIXTM HT PlusTM | |
| BioPlusTM STIHL Power | SweepTM |
| Easy2StartTM STIHL ProtechTM | |
| EasySpoolTM STIHL MiniBossTM | |
| ElastoStartTM STIHL MotoPlus 4TM | |
| EmaticTM Master Control LeverTM | |
| STIHL Precision SeriesTM | STIHL OUTFITTERSTM |
| FixCutTM STIHL PICCO | TM |
| Micro^TM TrimCut^TM | |
| Pro Mark ^TM STIHL M-Tronic ^TM | |
| Quad Power ^TM STIHL HomeScaper Series ^TM | |
| Quiet Line ^TM STIHL PolyCut ^TM | |
| STIHL Arctic ^TM STIHL RAPID ^TM | |
| STIHL Compact ^TM STIHL SuperCut ^TM | |
| STIHL Interchangeable Attachment Series ^TM | STIHL Multi-Cut HomeScaper Series ^TM |
| TapAction ^TM STIHL Territory ^TM | |
This listing of trademarks is subject to change.
Any unauthorized use of these trademarks without the express written consent of ANDREAS STIHL AG & Co. KG, Waiblingen is strictly prohibited.
31 Addresses
31.1 STIHL Incorporated
STIHL Incorporated
536 Viking Drive
P.O. Box 2015
Virginia Beach, VA
23452-2015
Contenido
natural_image
Illustration of a person holding a belt buckle with an inset showing the wheel (no text or symbols)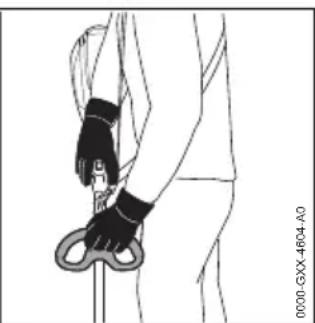
natural_image
Line drawing of a person holding a resistance band and wrist, no text or symbols presentnatural_image
Illustration of a person using a rope harness, with a small inset showing a cross-section (no text or symbols)natural_image
Diagram of a mechanical device with a rotating wheel and fan, showing airflow direction (no text or symbols)ADVERTENCIA
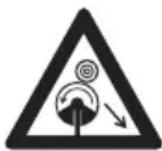
natural_image
Illustration of a mechanical device with a tool and circular components, no visible text or symbols– Tighten all nuts, bolts and screws after each use.
natural_image
Line drawing of a person wearing a full-body medical harness and safety harness (no text or symbols)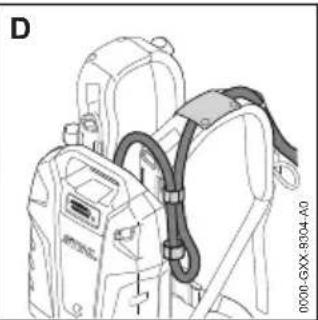
natural_image
Technical line drawing of a mechanical device with attached harness and belt (no text or symbols)natural_image
Line drawing of a person using a lever to measure a small object on grass, with no text or symbols present.natural_image
Technical line drawing of a mechanical tool or device with labeled component '1' (no text or symbols beyond label)natural_image
Line drawing of a person holding a long pole with attached straps (no text or symbols)This trimmer / brushcutter and battery contain chemicals known to the State of California to cause cancer, birth defects or other reproductive harm

ADVERTENCIA
Instruction Manual Manual de instrucciones

0458-029-8601-B

- ADVERTENCIA
- Introduction
- SAVE THIS MANUAL!
- WARNING
- Guide to Using this Manual
- Signal Words
- DANGER
- NOTICE
- Symbols in Text
- Main Parts
- Trimmer / Brushcutter and Battery
- Barrier Bar
- Drive Tube
- Opening for Stop Pin
- Stop Pin
- Gearbox
- Battery
- Battery LEDs
- Push Button
- # Rating Plate
- Available Cutting Attachments and Deflectors
- Deflector for Metal Cutting Attachments
- Grass Cutting Blade
- Transport Guard
- Deflector for Mowing Heads
- Line Limiting Blade
- Mowing Head
- Safety Symbols on the Products
- Trimmer / Brushcutter
- Safety Symbols on the Products English
- Deflector for Mowing Heads
- Deflector for Metal Cutting Attachments
- Skirt
- Battery
- General Power Tool Safety Warnings and Instructions
- General Safety Warnings and Instructions
- READ ALL INSTRUCTIONS BEFORE USING THE TRIMMER!
- SAVE THESE INSTRUCTIONS
- Introduction
- Work Area Safety
- Electrical Safety
- Personal Safety
- Power Tool Use and Care
- Battery Tool Use and Care
- Service
- Grass Trimmer, Brush Cutter and Brush Saw Safety Warnings
- General Power Tool Safety Warnings and Instructions English
- Blade thrust related warnings
- IMPORTANT SAFETY INSTRUCTIONS
- Introduction
- Intended Use
- IMPORTANT SAFETY INSTRUCTIONS English
- Operator
- Personal Protective Equipment
- Trimmer / Brushcutter
- Using the Trimmer / Brushcut-ter
- Before Operation
- Holding and Controlling the Trimmer / Brushcutter
- Working Conditions
- English 6 IMPORTANT SAFETY INSTRUCTIONS
- Operating Instructions
- Working with the Cutting Attachments
- Kickout (Blade Thrust) with All Metal Cutting Attachments
- Using a Mowing Head
- Using a Grass Cutting Blade
- Battery Safety English
- Battery Safety
- Warnings and Instructions
- Maintenance, Repair and Storage
- Warnings and Instructions
- Before Starting Work English
- Before Starting Work
- Preparing the Trimmer / Brush-cutter for Operation
- Charging the Battery
- Setting up the Charger
- Charging
- LED Diagnostics and Acoustic Signals
- STIHL AP Battery
- Battery Status
- Power Tool Status
- Charge Status
- For example:
- STIHL AR Backpack Battery
- Battery Status
- Power Tool Status
- Charge Status
- STIHL AR Backpack Battery
- Positioning the Connecting Cord
- Putting on the Harness
- Assembling the Trimmer / Brushcutter English
- Assembling the Trimmer / Brushcutter
- Mounting the Loop Handle
- Mounting the Barrier Bar
- Mounting and Removing a Deflector
- Mounting a Deflector
- Removing a Deflector
- Mounting and Removing a Mowing Head
- Mounting a Mowing Head
- Removing a Mowing Head
- Mounting and Removing a Metal Cutting Attachment
- Mounting a Metal Cutting Attachment
- Removing a Metal Cutting Attachment
- Adjusting the Trimmer / Brushcutter
- Putting on and Adjusting the Shoulder Strap or Full Harness
- Adjusting the Loop Handle
- Balancing the Trimmer / Brush-cutter
- Inserting and Removing the Battery
- Inserting the Battery
- Removing the Battery
- Switching the Trimmer / Brushcutter On and Off
- Switching On
- Before switching on:
- Checking the Power Tool English
- Switching Off
- Checking the Power Tool
- Testing the Controls
- During Operation
- Selecting the Power Level
- Using the Trimmer / Brushcut-ter
- Adjusting the Nylon Line
- AutoCut Mowing Heads
- SuperCut Mowing Heads
- After Finishing Work
- Preparing for Transportation or Storage
- Transporting the Trimmer / Brushcutter and Battery
- Trimmer / Brushcutter
- Battery
- Storing the Trimmer / Brushcutter and Battery
- Trimmer / Brushcutter
- Battery
- Cleaning
- Cleaning the Trimmer and Battery
- Inspection and Maintenance
- Inspection and Maintenance Chart
- Inspecting and Maintaining the Trimmer / Brushcutter
- Lubricating the Gearbox
- Replacing the Trimmer Line on an AutoCut 25-2 Mowing Head
- Inspection and Maintenance English
- Sharpening and Balancing a Metal Cutting Attachment
- Troubleshooting Guide
- Trimmer / Brushcutter and Battery
- Specifications
- STIHL FSA 120.0 R
- Symbols on the Power Tool, Deflector and Battery
- Ambient Temperature Limits
- Ambient Temperature Recommendations
- Engineering Improvements
- FCC 15 Compliance Statement
- Approved Deflector, Cutting Attachment, Handle and Harness Combinations
- STIHL FSA 120.0 R
- Description of the Harnesses
- Replacement Parts and Equipment
- Genuine STIHL Replacement Parts
- Disposal
- Disposal of the Power Tool
- Battery Recycling
- Limited Warranty
- STIHL Incorporated Limited Warranty Policy
- Trademarks
- Registered Trademarks
- Common Law Trademarks
- Addresses
- STIHL Incorporated
- Contenido
Brand : STIHL
Model : FSA 120.0 R
Category : Tondeuse à fil