
FZP 2020-E - Saw Fieldmann - Free user manual and instructions
Find the device manual for free FZP 2020-E Fieldmann in PDF.


| Product Type | Electric Chain Saw |
| Model | FZP 2020-E |
| Brand | Fieldmann |
| Power Input | 2400 W |
| Voltage/Frequency | 230-240 V / 50 Hz |
| Chain Pitch | 3/8" |
| Guide Bar Length | 40 cm (16 inch) |
| Number of Chain Links | 56 |
| Guiding Groove Width | 1.3 mm |
| Cutting Speed | 14 m/s |
| Oil Tank Capacity | 220 ml |
| Weight | 5.5 kg |
| Acoustic Power Level (LWA) | 112 dB(A) |
| File Diameter for Chain Sharpening | 4 mm |
| Included Accessories | 40 cm Oregon guide bar, Oregon chain, plastic guide bar cover, spare brushes set, mounting wrench |
| Safety Features | Automatic chain brake, trigger safety lock, safety motor brake |
| Lubrication | Automatic oil pump, use total-loss oil only |
| Chain Tensioning | Tool-less quick tensioning system |
| Power Cord Lock | Yes, with hook and hole |
| Storage | Store with protective cover in dry place, out of children's reach |
Frequently Asked Questions - FZP 2020-E Fieldmann
User questions about FZP 2020-E Fieldmann
0 question about this device. Answer the ones you know or ask your own.
Ask a new question about this device
Download the instructions for your Saw in PDF format for free! Find your manual FZP 2020-E - Fieldmann and take your electronic device back in hand. On this page are published all the documents necessary for the use of your device. FZP 2020-E by Fieldmann.
USER MANUAL FZP 2020-E Fieldmann
natural_image
Abstract black and white spiral pattern with no text or symbolsFIELDMANN®
Home & Garden Performance
natural_image
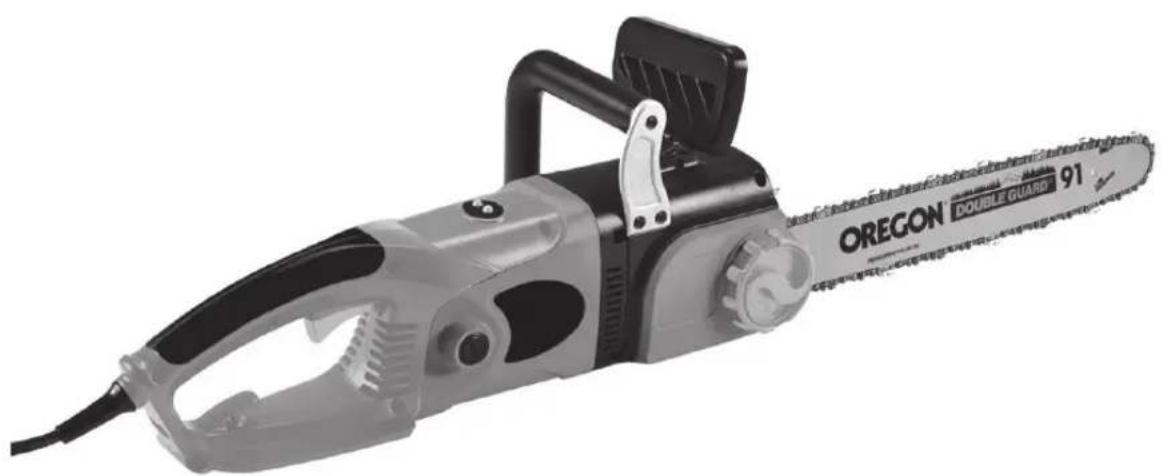
Oregon Double Guard 91 chain-link electric tool (no visible text or symbols on the device body)FZP 2020-E
English 3-20
Češťina....21-38
Slovenčina 39-56
Magyarul 57-74
Polski 75-92
Slovenščina 93-112
Electric Chain Saw
USER'S MANUAL
TABLE OF CONTENTS
- GENERAL SAFETY INSTRUCTIONS....4
- SYMBOLS 5
- SAFETY INSTRUCTIONS....7
- DESCRIPTION OF THE CHAIN SAW 9
- INSTALLING THE GUIDE BAR AND CHAIN 10
- FILLING THE CHAIN SAW OIL TANK....11
- OPERATING THE CHAIN SAW 11
- CHAIN BRAKE....12
- ADJUSTING THE CHAIN TENSION....13
- USING THE CHAIN SAW....13
- CUTTING....13
- CLEANING AND MAINTENANCE....15
- SHARPENING THE SAW CHAIN....16
- REPLACING THE SAW CHAIN 17
- STORAGE....18
- TECHNICAL SPECIFICATIONS....19
- DISPOSAL 19
1. GENERAL SAFETY INSTRUCTIONS
Important safety notice
Carefully unpack the product and take care not to throw away any part of the packaging before you find all the parts of the product.
Store the product in a dry place out of reach of children.
Read all warnings and instructions. Not following warnings or instructions may lead to injury by electrical shock, a fire and/or serious injuries.
Packaging
The product is packed in a package that prevents damage during transport. This package is a resource and so can be handed over for recycling.
Operating instructions
Before you start working with the power tool, read the following safety and usage instructions. Understand the operating elements and the correct use of the power tool. Keep the user's manual in a safe place where it can be easily retrieved for future use. Save the original packaging, including the internal packing material, warranty card and proof of purchase receipt, at least for the duration of the warranty. If you need to ship this power tool, pack it in the original cardboard box to ensure maximum protection during shipping or transport (e.g. when moving or when you need to send this power tool for repair to a service centre).

Note: If you hand over the power tool to somebody else, do so together with this user's manual. Following the instructions in the included user's manual is a prerequisite for the proper use of the power tool. The user's manual also contains operating, maintenance and repair instructions.
The manufacturer takes no responsibility for accidents or damages resulting from not following the instructions in this manual.
2. SYMBOLS

Do not expose the power tool to rain.

natural_image
Icon of a person using a laptop inside a circle (no text or symbols)Before using the power tool, carefully read the user's manual.

In the event that the power cord is damaged, immediately disconnect it from the power supply.

natural_image
Circular icon depicting a person wearing a hard hat and safety goggles (no text or symbols)When working, always use a safety helmet, safety glasses and ear protection.
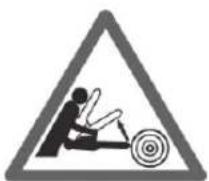
Careful: danger of kickback.
natural_image
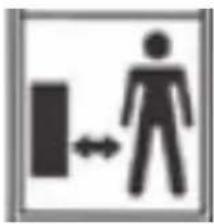
Simple icon showing a person standing next to a vertical bar with bidirectional arrow (no text or symbols)DANGER! Do not use the power tool if there are children, other persons or animals in your vicinity.

natural_image
Icon of two white gloves inside a dark circle (no text or symbols)While working use protective gloves.

natural_image
Simple icon of a boot inside a circle (no text or symbols)Use solid insulating work footwear.

natural_image
Icon of a person wearing headphones inside a circular frame (no text or symbols)Use hearing protection.

natural_image
Icon of a white glove with index finger, enclosed in a gray circle (no text or symbols)Use work gloves.

Be careful of falling branches.
3. SAFETY INSTRUCTIONS
ATTENTION!
Acquaint yourself with all warnings and safety instructions and with operation instructions for the power tool.
ATTENTION!
Not adhering to warnings or safety instructions may result in injury by electrical shock, a fire and/or serious injury.
ATTENTION!
Store all warnings and safety instructions in a practical location for future reference.
Note: The term "power tool" in all hereafter provided warnings is defined as an electric power tool powered from the power grid (via a fl exible power cord).
Safety in the work area
Keep the work area tidy and well illuminated. Untidiness and dark locations in the workplace are sources of accidents.
Do not use the power tool in environments where there is a explosion hazard, where there are flammable liquids, gases or dust. The power tool generates sparks which could ignite dust or vapours.
When using the power tool, prevent children and other persons access to the power tool. If you become distracted, you may lose control over the power tool.
Safety when working with power tools
The plug on the fl exible power cord must correspond to the power socket outlet. Never modify the plug in any way. Never use any socket adapters with power tools that have a safety earth grounding connection. Plugs that are not damaged by modifi cations and that correspond to the power socket will limit the danger of injury by electrical shock.
* Prevent your body from coming into contact with grounded objects, such as pipes, central heating radiators, stoves and refrigerators. The risk of injury by electrical shock is greater when your body is connected to the ground.
Do not expose the power tool to rain, dampness or wetness. The entry of water into the power tool increases the danger of injury by electrical shock.
Do not use the fl exible power cord for other purposes. Never carry or pull the power tool by its power cord or pull the plug out of the socket by the power cord. Protect the power cord against heat, grease, sharp edges and moving parts. Damaged or tangled power cords increase the danger of injury by electrical shock.
If the power tool is used outdoors, use an extension cord suitable for outdoor use. Using extension cords designed for outdoor use limits the risk of injury by electrical shock.
If you will be using the power tool in a damp environment, use a residual current device (RCD) in the power supply circuit. The use of a residual current device reduces the risk of injury by electrical shock.
Note: The "residual current device" (RCD) may be substituted for by the term "ground fault circuit interrupter" (GFCI) or "earth leakage circuit breaker" (ELCB).
Safety of people
When working with the power tool, always stay alert, watch what you are doing and use common sense. Do not use power tools if you are tired or under the influence of drugs, alcohol or medication. A moment of carelessness when working with power tools may result in serious injury.
Use personal protective aids. Always use eye protection. Use protective aids, e.g. respirator, safety footwear with anti-slip soles, hard head cover or hearing protection appropriately to the work conditions; they reduce the risk of injury to persons.
Avoid accidentally starting up the power tool. Before connecting to a power source, before connecting the battery, before storage or before carrying the power tool, make sure that the start/stop trigger is in the off position. Carrying the power tool with a finger on the trigger or connecting the power tool's plug with the trigger engaged may cause an accident.
Remove all adjustment tools and spanners before turning on the power tool. An adjustment tool or spanner left attached to a rotating part of the power tool may result in injury to persons.
Only work in locations that you can reach safely. Always maintain a stable stance and balance. In this way you will have better control over the power tool in unexpected situations.
Dress in an appropriate manner. Do not wear loose clothing or jewellery. Make sure that your hair, clothing and gloves are at a suffi cient distance from moving parts. Loose clothing, jewellery and long hair may become caught in the moving parts.
If there is equipment available for the extraction and collection of dust, make sure that such equipment is connected and used correctly. The use of such equipment may limit the danger posed by the created dust.
Using power tools and their maintenance
Do not overload the power tool. Only use power tools that are appropriate for the work being performed. Appropriate power tools for the given task will do the job better and more safely.
Do not use power tools that cannot be turned on and off with a switch. Any electric power tools that cannot be controlled using a switch are dangerous and must be repaired.
Before adjusting the power tool, before replacing accessories or if you will not be using the power tool, pull the power plug out of the power socket. These preventative safety measures limit the danger of accidentally turning on the power tool.
When not used, store the power tool out of children's reach and do not permit person not acquainted with the power tool or these instructions to use the power tool. A power tool in the hands of inexperienced users is dangerous.
Perform maintenance on the tool. Check the adjustment of moving parts and their movement, focus on cracks, broken parts or any other circumstances that may threaten the proper operation of the power tool. If the power tool is damaged, have it repaired before using it again. Many accidents are caused by insufficiently maintained power tools.
Keep cutting power tools clean and sharp. Correctly maintained and sharpened cutting power tools are less likely to get stuck on material or to jam and they are also easier to control.
Use power tools, accessories, working tools, etc. in accordance with these instructions and in such a manner as prescribed for the specific power tool with respect to the given work conditions and the type of work being carried out. Using power tools for tasks other than for which they are designed may lead to dangerous situations.
Service
Have your power tool repaired by a qualified person that will use original spare parts. In this manner, the same level of safety will be ensured as before the repair of the power tool.
Storage
* only move or store the power tool with the protective cover attached
carefully clean and perform appropriate maintenance before storing the power tool
before transporting the power tool, secure it against oil leakage, damage or injury hazard
4. DESCRIPTION OF THE CHAIN SAW
- Power cord safety hook
- Power cord fastening hole
- Rear handle
- Front handle
- Safety brake
- Chain tensioning wheel
- Sprocket cover fastening knob
-
Chain
-
Guide bar
- Sprocket cover
- Hole for replacement of motor brushes
- Start/stop trigger
- Trigger safety lock
- Oil tank cap
- Window for checking the oil level
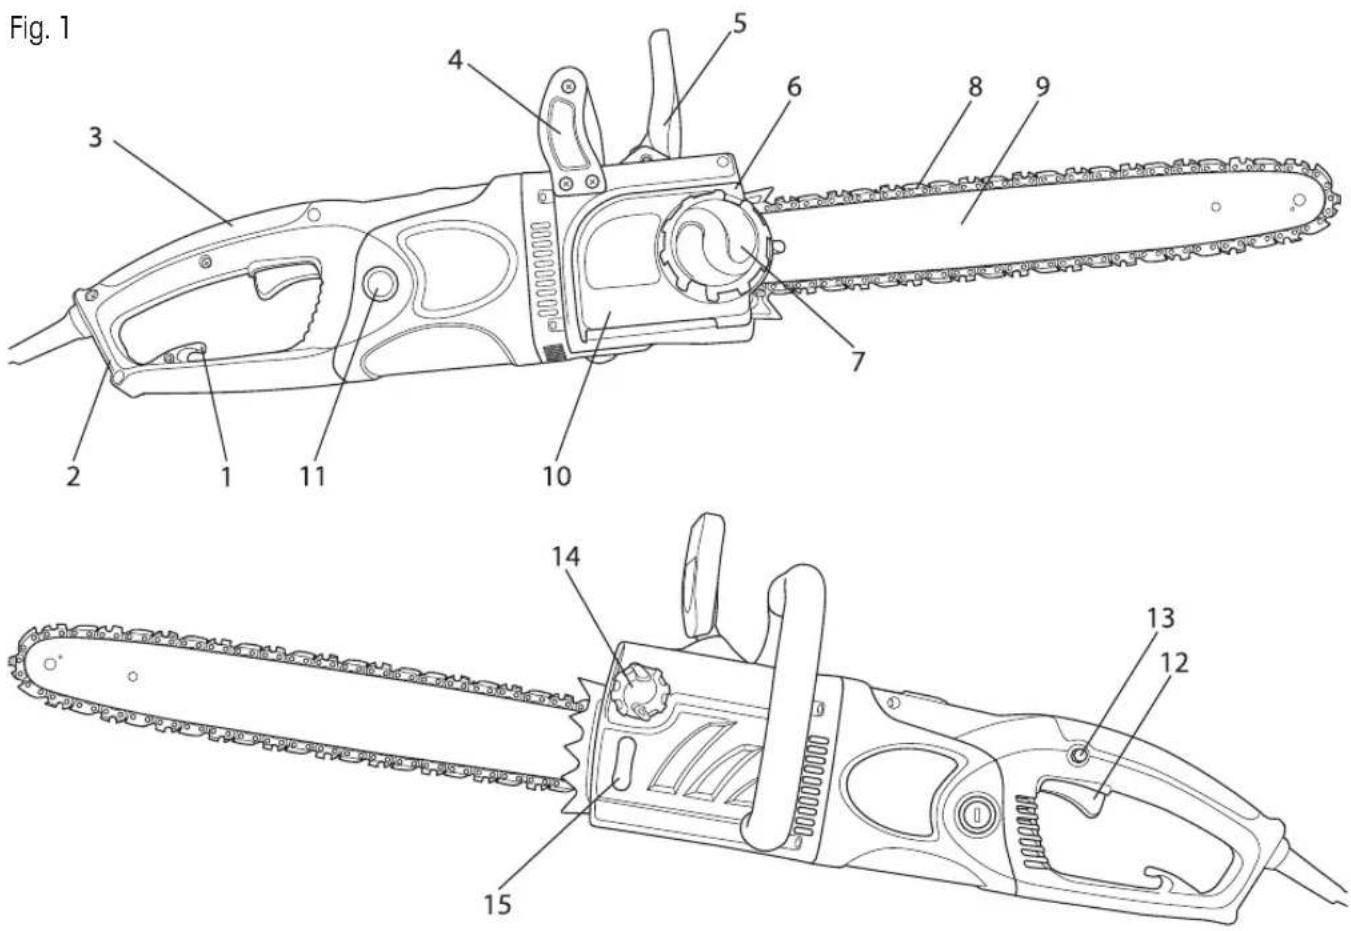
Included contents:
Electric chain saw, 40 cm Oregon guide bar, Oregon chain, plastic guide bar cover, spare brushes set, mounting wrench.
5. INSTALLING THE GUIDE BAR AND CHAIN
ATTENTION!
The chain saw must be disconnected from the power grid.
ATTENTION!
Always wear protective gloves when installing and inspecting the chain to prevent injury from the sharp cutting edges on the chain.
The safety brake lever (fi g. 1 point 5) must be disengaged (pull it towards the top handle)
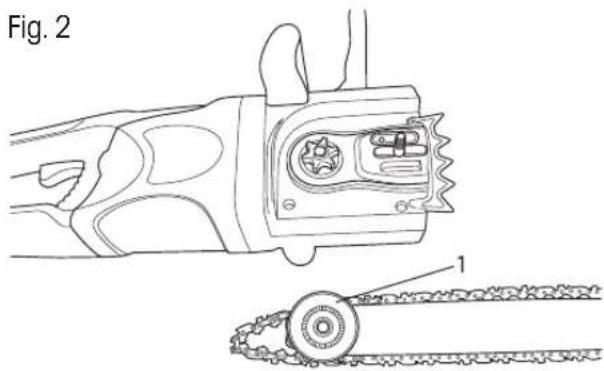
Loosen the sprocket cover fastening knob (fi g. 1, point 7) and remove the sprocket cover (fi g. 1, point 10)
The wheel of the quick coupling system (see fig. 2, point 1) is already mounted.
If the guide bar is replaced, it is possible to remove this wheel and mount it on the new guide bar
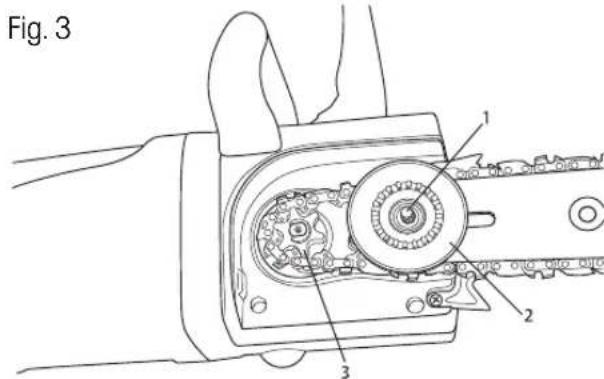
* Seat the chain on to the guide bar; put the guide bar with the chain on the guide bolt (fi g. 3, point 1) and thread the chain on to the drive sprocket wheel (fi g. 3, point 3)
Turn the wheel of the quick coupling system (fi g. 3, point 2) to easily tension the chain.
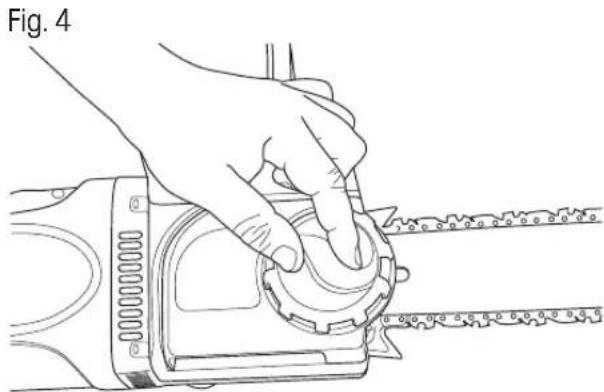
Put on the sprocket cover and fasten it using the sprocket cover fastening knob (fi g. 4)
Do not fully tighten the knob, it would not be possible to tension the chain
Tension the chain using the tensioning wheel (fi g. 1, point 6).
For tensioning it is necessary to hold down the sprocket cover fastening knob (see fig. 5)
ATTENTION!
The chain is correctly tensioned if it is possible to lift chain off the guide bar and its height in the horizontal position in the middle of the guide bar is 3 to 4 mm.
natural_image
Line drawing of a hand operating a mechanical component with chains attached (no text or symbols)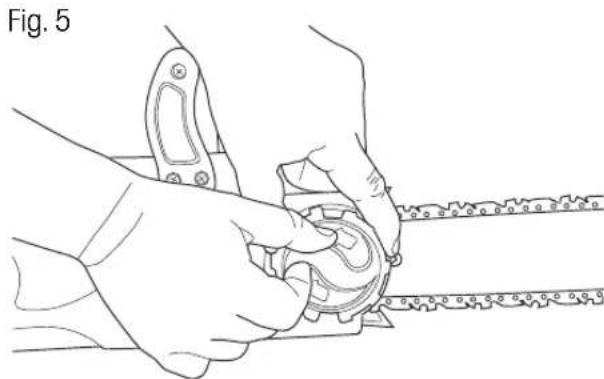
natural_image
Line drawing of hands operating a mechanical device with chains (no text or symbols)6. FILLING THE CHAIN SAW OIL TANK
ATTENTION!
A new chain requires a certain running-in period, which is usually 5 minutes. The lubrication of the chain is very important during this phase. After this running-in period, check the chain tension and readjust if necessary.
The oil tank on the supplied chain saw is empty. Fill this oil tank with oil prior to first use of this chain saw.
Only use oil specified for total-loss lubrication
* Screw off the oil tank cap (fi g. 1, point 14).
Pour the oil into the tank (take care to prevent the oil from becoming dirty while filling the tank).
Screw on the oil tank cap
ATTENTION!
Do not use oil that has already been used or processed because this could damage the oil pump. Only use oil specified for total-loss lubrication
Securing the extension cord.
ATTENTION!
When working with this chain saw, only use extension cords designed for outdoor use. The wire cross-sections on the extension cord must be at least 1.5 mm2.
* To ensure safe operation of this chain saw, it is necessary to secure the power cord in place. Bend the power cord approximately 20 cm before the socket. Thread the bend through the hole (fi g. 1, point 2) in the rear handle and fi t it into the hook. (fi g. 1, point 1)
ATTENTION!
If you use an extension cord longer than 30 m, the power of the chain saw will be reduced
Turning on / off
ATTENTION!
The voltage in the power grid must corresponds to the voltage on the rating label of the chain saw.
ATTENTION!
Hold the chain saw firmly with both hands when starting and working with it
Starting
* Press the trigger safety lock button located on the left above the start/stop trigger and then press the start/stop trigger (fi g. 1, point 13). When started, the chain saw will run at maximum speed.
ATTENTION!
If the chain saw does not start, disengage the brake lever (fi g. 1, point 5).
Turning off
Release the start/stop trigger (fi g. 1, point 12).
ATTENTION!
The chain saw is equipped with a safety motor brake, which will immediately stop the chain when the start/stop trigger is released. If the chain does not immediately come to a stop when the trigger is released, please contact an authorised service centre without delay.
Checking chain lubrication
ATTENTION!
Adhere to safety provisions and prevent the guide bar from coming into contact with the surface of the terrain. Use this power tool safely and maintain a minimum distance of 20 cm from the ground.
Before starting work, check the chain lubrication and the amount of oil in the oil tank. Start the chain saw and hold it above the ground. If you see a growing oil stain then chain lubrication is working properly. If there are no oil stains on the ground, clean the oil outlet, the top chain tensioning hole and the oil lines or contact an authorised service centre.
8. CHAIN BRAKE
This chain saw is equipped with an automatic brake that stops the chain in the event of kickback. The brake is automatically engaged as soon as the force of inertia acts on the ballast located inside the brake box.
The chain brake may also be engaged manually when the brake lever (fig. 1, point 5) is moved downwards towards the guide bar. The activation of the brake stops the chain movement within 0.12 seconds.
Checking the working order of the brake.
Check that the brake works properly before every use.
Place the running chain saw on to the ground and for 1 to 2 seconds leave it at full speed.
✿ Push the brake lever (fi g. 1, point 5) forward. The chain should stop immediately.
ATTENTION!
If the chain stops slowly or does not stop at all, do not use the chain saw and contact an authorised service centre.
If you wish to disengage the brake, pull the brake lever towards the top handle (fig. 1, point 4) so that you hear the typical sound for the disengagement of the brake.
ATTENTION!
Check that the chain brake is in order. A correctly functioning chain brake will protect you against potential injury, which could result from kickback. If the brake is not working properly, have it adjusted or repaired at an authorised service centre.
9. ADJUSTING THE CHAIN TENSION
ATTENTION!
Due to the effect of higher temperatures, during operation the saw chain has a tendency to lengthen. A longer chain becomes loose and could slide off the guide bar.
ATTENTION!
This chain saw has a chain tensioning system that does not require any tools.
Loosen the sprocket cover fastening knob (fi g. 1, point 7).
Make sure that the chain is seated in the guiding groove of the guide bar.
Turn the chain tensioning wheel (fig. 1, point 6) clockwise to tension the chain (fig. 5). It should be possible to lift a correctly tensioned chain in the middle of the guide bar in the horizontal position to a height of approximately 3 to 4 mm).
* Tighten the sprocket cover fastening knob (fi g. 1, point 7).
ATTENTION!
Do not tension the chain excessively. Excessive tension of a warm chain may result in excessively tension when it cools down.
10. USING THE CHAIN SAW
Before starting any kind of work, thoroughly acquaint yourself with the sections describing the safety instructions for the operation of the chain saw. We recommend that you acquire experience by practising on waste wood. In this way you will learn about the operating parameters of this chain saws.
Always adhere to safety instructions.
Only use this chain saw for cutting wood. Cutting any other materials is forbidden.
The vibration intensity and type of kickback on this chain saws depends on the type of wood being cut.
Do not use this chain saw as a lever for lifting, moving or splitting material.
If the chain jams in the material that is being cut, stop the chain saw and knock a wooden or plastic wedge into the cut to release the chain. Restart the chain saw and carefully commence cutting.
11. CUTTING
ATTENTION!
Before proceeding, please read the chapter "Safety instructions". We recommend that you gain experience by cutting smaller logs. In this way you will also get to know the chain saw.
Always adhere to safety instructions. The chain saw may only be used for cutting wood.
It is forbidden to cut any other materials. Vibrations and kickback differ for various materials. Do not use the chain saw as a lever for lifting, moving or splitting material. It is forbidden to attach any parts or jigs other than those specified in the technical documentation.
It is not necessary to push the chain saw into the cut. When the motor is running at full speed, push the chain saw down lightly.
If the chain jams in the cut, do not attempt to free it by pulling, rather stretch open the cut using a wedge or crowbar.
Safety brake (protection against kickback)
This chain saw is equipped with an automatic chain brake that, if it works correctly, immediately stops the chain in the event of kickback. It is necessary to check the working order of the chain brake before every use of the chain saw. Run the chainsaw at full speed for 1 - 2 seconds and then tilt the front protective cover. The chain must stop immediately even when the motor is running at high speed. If the chain stops slowly or does not stop at all, please contact an authorised service centre.
It is extremely important to check the working order of the chain brake and the sharpness of the chain before every use to ensure that the necessary level of safety in the event of a kickback is maintained. Removing safety accessories, incorrect maintenance or when using unsuitable guide bars or chains may, in the event of kickback, result in serious injuries.
Cutting trees
* Decide about the direction in which the tree will fall, respecting the wind direction, incline angle of the tree and location of the branches, and consider all other factors before cutting.
The area around the tree must be clear, without obstacles, and must enable a stable stance. The escape route must be passable.
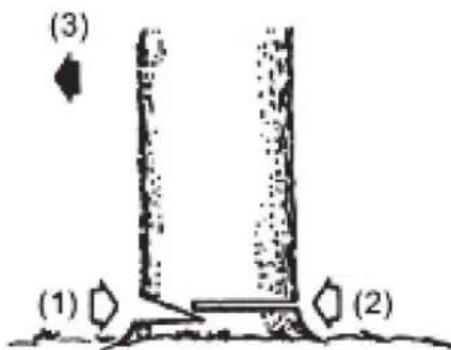
Cut a wedge into one third of the tree's diameter on the side to which the tree should fall. (see fi q. Cutting trees, point 1)
* From the opposite direction perform a separation cut at a level above the wedge cut. (see fig. Cutting trees, point 2)
The tree will fall in the direction towards the wedge cut. (see fig. Cutting trees, point 3)
Cutting trees
ATTENTION!
When cutting trees, inform other people in the area about the potential danger. Cutting trees requires experience and we do not recommend performing this task without the necessary experience.
Cutting logs
ATTENTION!
Always maintain a stable stance. Do not step on logs.
ATTENTION!
Before starting work, check that all components are in their place and that all nuts and bolts are tightened.
The log being cut may roll away. Especially when cutting on a slope, always stand above the log being cut
* Prevent kickback of the saw by following the instructions in chapter "Safety instructions".
Before starting work, assess the direction of the force causing the cut trunk to bend. The final cut needs to always be done from the opposite side of where the bending force is acting to prevent the guide bar from being clamped inside the cut.
Only carry the chain saw with the motor turned off and the guide bar protected by the protective cover.
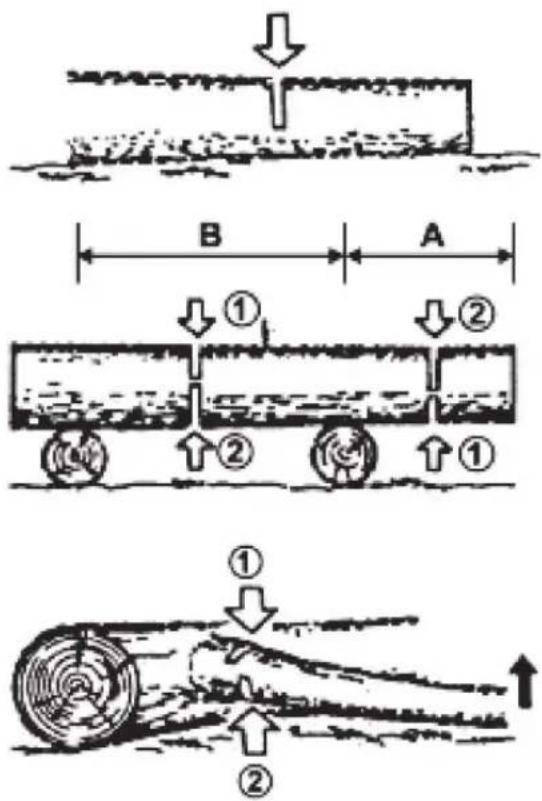
Log lying on the ground
Cut it halfway through, then roll it over and complete the cut from the other side.
Log above the ground
In part "A" make a cut from below to a third of the log and then complete the cut from above. In part "B" make a cut from above to a third of the log and then complete the cut from below.
Removing a fallen tree
* First find out to which side the branch is bent. Then make the initial cut from the side of the bend and then complete the cut from the opposite side.
ATTENTION!
A bent branch may spring up.
12. CLEANING AND MAINTENANCE
Cleaning the body of the chain saw
Keep the body of the chain saw clean. When cleaning, use a soft cloth dipped in a soap solution. Use this cloth to meticulously clean the body of the chain saw.
Maintaining the guide bar
Most problems with the guide bar arise due to uneven wear. Uneven wear occurs mainly as a result of an incorrectly sharpened chain or an incorrectly set depth gauge. When the guide bar is worn out unevenly, the guiding groove is widened (see Picture). The result is a rattling chain and rivets falling off.
The chain saw cannot be used for straight cuts. In such a case, replace the guide bar for a new one.
Always check the condition of the guide bar before sharpening the chain. Using a worn out or damaged guide bar is very dangerous. Using a worn out or damaged guide bar will result in damage to the chain. Cutting with such a power tool will also be much more difficult and demanding.
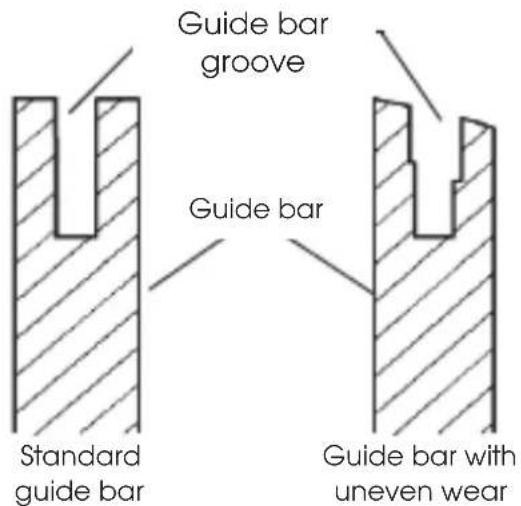
Normal maintenance of the guide bar
Remove the guide bar from the body of the chain saw.
Regularly remove sawdust from the guide bar groove. For cleaning use a spatula or a wire.
Clean oily grooves at the end of every work day.
Replace the guide bar if:
- it is bent or cracked
- its groove is very damaged or worn out

Note: To replace the guide bar, follow the instruction contained in this user's manual. You will find the correct guide bar type in the technical specifications.
13. SHARPENING THE SAW CHAIN
Keep the saw chain sharp. Cutting will be signifi cantly faster and most importantly safer. A blunt saw chain increases wear on the sprocket, guide bar, chain and motor. If you need to push on the saw and only sawdust with a few splinters are produced then this means that the chain is blunt.
For this task, we recommend that you contact an authorised service centre
Equipment necessary for sharpening a saw chain
Round fi le as per technical specifi cations
Depth gauge
File guide
Vice
Medium-size fl at fi le
Sharpening the teeth on the chain
Use the fi le guide set at an angle of 30° (mark A, see figure).
Set the saw chain tension to the correct level.
Fasten the guide bar in a vice so that you have the chain in a stable position.

Note: Do not fasten the chain itself.
✿ Push the round fi le, inserted in the fi le guide, into the groove between the top plate and the depth gauge on the chain. The chain should be touching both the top plate as well as the depth gauge (see fi gure)

Note: File in the middle of the guide bar.

Note: In the figure you can see the position of the figure guide and the direction for lifting the teeth on the left side of the chain.
Place the fi le guide at the required angle (mark A, see fi gure).
Check that the mark is at 30^ on the fi le guide aligned with the centre of the guide bar. This will ensure that you will fi le at an angle of 30^ .
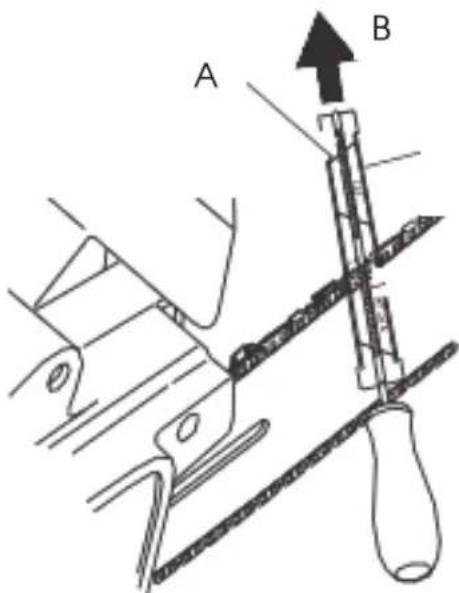
File the tooth in the direction from inside out (in direction B, see figure) until it is sharp. File only in this direction.

Note: Two to three passes of the file should be sufficient to sharpen the tooth.
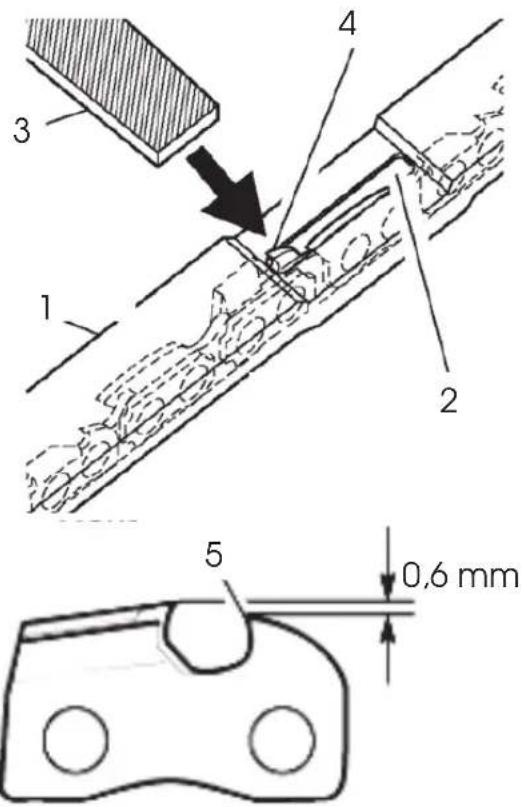
Filing the depth gauge
As a result of sharpening the teeth on the chain, the depth gauge tolerance is reduced. After every second or third sharpening, it is necessary to adjust the depth gauge setting.
* Place the depth gauge adjustment jig (see fi g., point 1) firmly on the top edge of two teeth. Make sure that the groove of the jig is in the groove of the depth gauge (see fi g., point 2.)
Use a medium-sized fl at fi le (see fi g., point 3).
File the depth gauge (see fi g., point 4) to the level of the depth gauge adjustment jig.
* Remove the depth gauge adjustment jig. Using a fl at fi le, round the front edge of the depth gauge (see fi gure). When fi ling, adhere to the prescribed values (see fi g., point 5).

Note: After the chain has been sharpened by hand several times, have the saw chain sharpened at an authorised service centre or sharpen it on a special sharpening machine. This will renew the even sharpness of all teeth.
14. REPLACING THE SAW CHAIN

ATTENTION!
When replacing the saw chain, do not clamp the chain saw or the guide bar in a vice.
Always replace the chain if the teeth are excessively worn out and they cannot be sharpened or if the chain snaps. Use only an original spare chain according to the specifications in this user's manual. When replacing the saw chain, always also replace the cogged wheel of the sprocket. This will ensure the correct position of the chain during movement. (Note: You will find the specifications of the correct chain type and the cogged wheel in the technical specifications.)
Loosen and remove the bar guide bolt.
Remove the sprocket cover.
Remove the saw chain.
Wind the new chain around the cogged wheel, then along the top groove of the guide bar and around the guide bar nose.

Note: Check that the saw teeth are facing in the correct direction. Put on the chain so that the teeth on the top side of the guide bar are facing towards the guide bar nose (see figure).
Before placing the sprocket cover into position, check that the chain tensioning pin is inserted into the adjustment hole on the guide bar.
Put the sprocket cover back on to the body of the chain saw.
Fasten the sprocket cover using the guide bar bolt.

ATTENTION!
Only tighten the bolt by hand.
Adjust the tension of the saw chain.
* Tighten the guide bar bolt.

ATTENTION!
Check that you have not placed the saw chain on the guide bar in the opposite direction. Otherwise, the chain saw will exhibit excessive vibrations and will not cut.

15. STORAGE
If you will not use the chain saw for longer than 30 days, proceed as follows.
Drain the oil tank.
Remove and clean out the guide bar and chain. Submerge the guide bar and chain into a kerosene-based or soap cleaning solution.
Then dry the guide bar and the chain.
Put the chain into a container filled with oil. This will prevent it from corroding.
Gently coat the guide bar with oil.
Wipe the body of the chain saw with a cloth. When cleaning, use a soft cloth dipped in a soap solution.
Store the chain saw
- In higher shelves or in locked areas out of children's reach
- in a dry location
16. TECHNICAL SPECIFICATIONS
| Power input 2400 W | |
| Voltage/frequency 230 V - 240 V / 50 Hz | |
| Chain pitch 3/8" | |
| Guiding groove width 1.3 mm | |
| Number of chain links 56 links | |
| Length of the guide bar 40 cm | |
| File diameter 4 mm | |
| Cutting speed 14 m/s | |
| Oil tank capacity 220 ml | |
| Weight (with guide bar and chain) 5.5 kg | |
| Level of acoustic power LWA measured 112 dB(A) |
User's manual in original language.
17. DISPOSAL
INSTRUCTIONS AND INFORMATION REGARDING THE DISPOSAL OF USED PACKAGING MATERIALS
Dispose of used packaging material at a site designated for waste in your municipality.
The machine and its accessories are manufactured from various materials, e.g. metal and plastic.
Take damaged parts to a recycling centre. Inquire at the relevant government department.
Changes in the text, design and technical specifications may be made without prior notice and we reserve the right to make these changes.

- FIELDMANN®
- Electric Chain Saw
- USER'S MANUAL
- TABLE OF CONTENTS
- GENERAL SAFETY INSTRUCTIONS
- Important safety notice
- Packaging
- Operating instructions
- SYMBOLS
- SAFETY INSTRUCTIONS
- ATTENTION!
- Safety in the work area
- Safety when working with power tools
- Safety of people
- Using power tools and their maintenance
- Service
- Storage
- DESCRIPTION OF THE CHAIN SAW
- Included contents:
- INSTALLING THE GUIDE BAR AND CHAIN
- FILLING THE CHAIN SAW OIL TANK
- Securing the extension cord.
- Turning on / off
- Starting
- Turning off
- Checking chain lubrication
- CHAIN BRAKE
- Checking the working order of the brake.
- ADJUSTING THE CHAIN TENSION
- USING THE CHAIN SAW
- CUTTING
- Safety brake (protection against kickback)
- Cutting trees
- Cutting logs
- Log lying on the ground
- Log above the ground
- Removing a fallen tree
- CLEANING AND MAINTENANCE
- Cleaning the body of the chain saw
- Maintaining the guide bar
- Normal maintenance of the guide bar
- SHARPENING THE SAW CHAIN
- Equipment necessary for sharpening a saw chain
- Sharpening the teeth on the chain
- Filing the depth gauge
- REPLACING THE SAW CHAIN
- STORAGE
- TECHNICAL SPECIFICATIONS
- DISPOSAL
- INSTRUCTIONS AND INFORMATION REGARDING THE DISPOSAL OF USED PACKAGING MATERIALS
Brand : Fieldmann
Model : FZP 2020-E
Category : Saw