
MFDP11F - Oven Becken - Free user manual and instructions
Find the device manual for free MFDP11F Becken in PDF.


| Product Type | Built-in Electric Oven |
| Model | MFDP11F |
| Brand | Becken |
| Dimensions (H x W x D) | 595 x 595 x 550 mm |
| Weight | 35 kg |
| Power Supply | 220-240 V ~ 50/60 Hz, 16A |
| Energy Efficiency Class | A |
| Oven Capacity | 70 L |
| Heating Functions | Conventional, Grill, Fan-assisted, Defrost, Top/Bottom Heat |
| Temperature Range | 50°C - 250°C |
| Interior Material | Easy-clean enamel |
| Cleaning System | Catalytic self-cleaning (back wall) |
| Safety Features | Child lock, cool door, automatic shut-off |
| Display | LED touch display with clock/timer |
| Spare Parts Available | Heating elements, thermostat, door gasket, glass door, control board |
| Cavity Light | Yes, replaceable 25W halogen bulb |
| Certifications | CE, RoHS |
Frequently Asked Questions - MFDP11F Becken
User questions about MFDP11F Becken
0 question about this device. Answer the ones you know or ask your own.
Ask a new question about this device
Download the instructions for your Oven in PDF format for free! Find your manual MFDP11F - Becken and take your electronic device back in hand. On this page are published all the documents necessary for the use of your device. MFDP11F by Becken.
USER MANUAL MFDP11F Becken
natural_image
Front view of a black oven with control knobs and a horizontal ventilation grille (no text or symbols)ATTENTION
This appliance can be used by children from 8 years old and above and persons with reduced physical, sensory or mental capabilities or lack of experience and knowledge if they have been given supervision or instruction concerning use of the appliance in a safe way and understand the hazards involved. Children shall not play with the appliance. Cleaning and maintenance shall not be made by children without supervision.
- These instructions are also available on www.suporteworten.pt
ATENCIÓN
We thank you for purchasing this product.
This appliance was submitted to several laboratorial tests, which certify its quality. To simplify the use of this appliance, this instruction manual has been provided. The instructions must ensure a quick and safe use.
Please read carefully the instructions and safety measures described in this manual.
We wish our clients great satisfaction in using their new appliance.
Index
- Safety Instructions.... 5
1.1. Power Energy 6
1.2. Power Cord and Other Cables....6
1.3. Humidity and Water 6
1.4. Cleaning....6
1.5. General Precautions ...... 7
- Utilization and Functioning 8
2.1. Introduction......8
2.2. Fitting the Oven into the Kitchen Unit 8
2.3. Product Description....9
2.4. Operation Instructions....10
2.4.1. Clock Setting....10
2.4.2. Function Setting....10
2.4.3. Lamp Setting....11
2.4.4. Inquiring Function ..... 11
2.4.5. Child Lock Function ..... 11
2.4.6. Reminder Function....11
2.4.7. Start/Pause/Cancel Function ..... 12
2.4.8. Energy-Saving Function....12
2.4.9. Meat Probe Function....12
2.4.10. Pyrolytic Function.... 13
2.4.11. Notes 13
3. Accessories....14
4. Installation....16
4.1. Securing the Oven to the Cabinet.... 16
4.2.Connection of the Oven 16
5. Aftermarket....17
6. Environment Conservation .... 18
1. Safety Instructions
 | ATTENTION |  |
| Risk of Electric ShockDo Not Open | ||
| Attention: to avoid the risk of electric shock, do not remove the cover. The interior does not contain any parts that may be repaired by the user. Ask for assistance to qualified personnel. | ||
Important Warnings
Before using your appliance, read carefully this instruction manual and keep it in a safe place, as you may need it for future consultations.
Before you start your appliance, and to ensure a correct use, do not use it if:
- It has fallen on the ground;
- You notice any evidence of damage;
- Any anomaly occurs during its operation;
To avoid hazards and deterioration of your appliance by an incorrect use, it is advisable to read the instructions carefully and attentively.
Your appliance must not be used to other ends than the ones foreseen in the instructions manual. Your safety is only guaranteed in a household use and not for commercial use. The incorrect use will not be covered and automatically cancels the right to warranty.
Assistance
Be sure that, in case of malfunction, you take your appliance to a qualified technician for assistance.
THIS APPLIANCE CAN BE USED BY CHILDREN FROM 8 YEARS OLD AND ABOVE AND PERSONS WITH REDUCED PHYSICAL, SENSORY OR MENTAL CAPABILITIES OR LACK OF EXPERIENCE AND KNOWLEDGE IF THEY HAVE BEEN GIVEN SUPERVISION OR INSTRUCTION CONCERNING USE OF THE APPLIANCE IN A SAFE WAY AND UNDERSTAND THE HAZARDS INVOLVED. CHILDREN SHALL NOT PLAY WITH THE APPLIANCE. CLEANING AND MAINTENANCE SHALL NOT BE MADE BY CHILDREN WITHOUT SUPERVISION.
1.1. Power Energy
Make sure the voltage of the electric network is compatible with the one of the appliance. If it does not match, consult the vendor or Customer Support Service.
1.2. Power Cord and Other Cables
Do not roll up or pull the cord to disconnect the appliance, and do not use to twine the appliance. Keep the cord far from warm surfaces.
Never use the appliance if it has a damaged cable or socket, or if it is not working properly.
In case of damage of the power cord, do not use your appliance. Take it to technical assistance for its replacement.
1.3. Humidity and Water
Do not use your appliance in humid places. Do not let your appliance to catch water under any circumstance, as it may be dangerous. TO AVOID FIRE HAZARD OR ELECTRIC SHOCK DO NOT EXPOSE YOUR APPLIANCE TO HUMIDITY OR WATER. Do not place your appliance under water (for example for washing).
1.4. Cleaning
- For the sake of a good appearance and reliability, keep the unit clean. The modern design of the unit facilitates maintenance to a minimum. The
parts of the unit which come into contact with food have to be cleaned regularly.
■ Before any maintenance and cleaning, disconnect the power. Set all controls in the OFF position.
- Wait until the inside of the unit is not hot but only slightly warm- cleaning is easier when warm.
- Clean the surface of the unit with a damp cloth, soft brush or fine sponge and then wipe dry. In case of heavy soiling, use hot water with non-abrasive cleaning product.
- For cleaning the glass of the oven door, do not use abrasive cleaners or sharp metal scrapers, these can scratch the surface or lead to the glass being damaged.
- Never leave acidic substances (lemon juice, vinegar) on stainless steel parts.
- Do not use a high pressure cleaner for cleaning the unit. The baking pans may be washed in mild detergent.
- Excess spillage must be removed before cleaning and shall specify which utensils can be left in the oven during cleaning.
1.5. General Precautions
- When the oven is first switched on, it may give off an unpleasant smell. This is due to the bonding agent used for the insulating panels within the oven. This is completely normal, if it does occur, you merely have wait for the smell to clear before putting food into the oven.
- During use, the appliance becomes very hot. Care should be taken to avoid touching heating elements inside the oven.
- Ensure that the appliance is switched off before replacing the oven lamp to avoid the possibility of electric shock.
- The means for disconnection must be incorporated in the fixed wiring in accordance with the wiring specifications.
-
Do not use the oven unless you are wearing something on your feet. Do not touch the oven with wet or damp hands or feet.
-
For oven: Oven door should not be opened often during the cooking period.
- The appliance must be installed by an authorized technician and put into use. The producer is not responsible for any damage that might be caused by defective placement, and installation by unauthorized personnel.
- When the door or drawer of oven is open do not leave anything on it, you may unbalance your appliance or break the door.
- Some parts of appliance may keep its heat for a long time; it is required to wait for it to cool down before touching onto the points that are exposed to the heat directly.
- If you will not use the appliance for a long time, it is advised to plug if off.
- Only use the temperature probe recommended for this oven.
2. Utilization and Functioning
2.1. Introduction
If the oven is to work properly, the kitchen housing must be suitable. The panels of the kitchen unit that are next to the oven must be made of a heat resistant material. Ensure that the glues of units that are made of veneered wood can with stand temperatures of at least 120^ C. Plastics or glues that cannot withstand such temperatures will melt and deform the unit, once the oven has been lodged inside the units, electrical parts must be completely insulated. This is a legal safety requirement. All guards must be firmly fixed into place so that it is impossible to remove them without using special tools. Remove the back of the kitchen unit to ensure an adequate current of air circulates around the oven. The hob must have a rear gap of at least 45 mm.
2.2. Fitting the Oven into the Kitchen Unit
Fit the oven into the space provided in the kitchen unit; it may be fitted underneath a work top or into an upright cupboard. Fix the oven in position by screwing into place, using the two fixing holes in the frame. To locate the fixing
holes, open the oven door and look inside. To allow adequate ventilation, the measurements and distances adhered to when fixing the oven.
2.3. Product Description
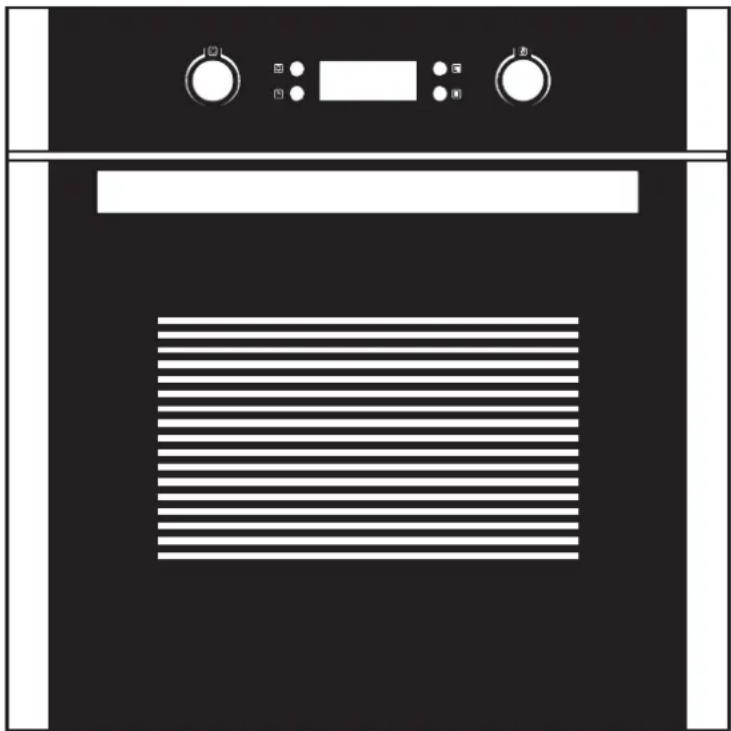
K1 Remind Button Start Button K2

natural_image
Pure electrical circuit lines without any symbolsTime Button Stop Button
| Symbols | Function Description |
 | Oven Lamp: which enables the user to observe the progress of cooking without opening the door. |
 | Defrost: The circulation of air at room temperature enables quicker thawing of frozen food (without using any heat). It's a gentle but quick way to speed up the defrosting time and thawing of ready-made dishes and cream filled produce etc. |
 | Bottom heat: A concealed element in the bottom of the oven provides a more concentrative heat to the base of food without browning. This is ideal for slow cooking dishes such as casseroles, stews, pastries and pizzas where a crispy base is desired. The temperature can be set within the range of 60-120°C. The default temperature is 60°C. |
 | Convectional cooking: The top and bottom work together to provide convectional cooking. The oven needs to be pre-heated to the required temperature, and is idea for single items, such as large cakes. Best results are achieved by placing food in the center of the oven. The temperature can be set within the range of 50-250°C. The default temperature is 220°C |
 | Convectional with fan: Combination of the fan and both heating element provides more even heat penetration, saving up to30-40% of energy. Dishes are lightly browned on the outside and still moist on the inside. Note: This function is suitable for grilling or roasting big pieces of meat at a higher temperature. The temperature can be set within the range of 50-250°C. The default temperature is 220°C. |
 | Radiant grilling: The inner grill element switches on and off to maintain temperature. Best results can be obtained from using the top shelf for small items and lower shelves for large items. The temperature can be set within the range of 180-240°C.The default temperature is 210°C. |
 | Double grilling: The inside radiant element and top element are working. The temperature can be set within the range of 180-240°C. The default temperature is 210°C. |
 | Double grilling with fan: The inside radiant element and top element are working with fan the temperature can be set within the range of 180-240OC. The default temperature is 210°C. |
 | Convection: An element around the convection fan provides an additional source of heat for convection style cooking. In convection mode the fan automatically comes on to improve air circulation within the oven and creates an even heat for cooking. The temperature can be set within the range of 50-240°C. The default temperature is 180°C. |
| Pyrolytic mode | Pyrolytic function: When the function is set to pyrolytic mode, LED displays "PYA". The default temperature is 450°C . The timer can be set 1:00-3:00 hours. |
2.4. Operation Instructions
2.4.1. Clock Setting
After connecting the unit to the power, the symbols 00:00 will be visible on the display.
1) Press "☐", the hour figures will flash.
2) Rotate "K2" to adjust the hour figures, (Time should be within 0--23).
3) Press "☐", the minutes will flash.
4) Rotate "K2" to adjust the minutes setting, (time should be within 0-59).
5) Press "☐" to finish the clock settings. ":" will flash, and the time will be illuminated.
Note: The clock is 24 hours. After connected to the mains power, the clock will untimed.
2.4.2. Function Setting
1) Rotate "K1" to choose the cooking function you require .The related indicator will illuminate.
2) Rotate "K2" to adjust the temperature.
3) Press "☐" to confirm the start of cooking. The corresponding icon for temperature "°C" will be on.
4) If step 2 is ignored, press "☐" to confirm the start of cooking. The default time is 9 hours, the default temperature will display on the LED
NOTE:
1) The step quantities for the adjustment time of the coding switch are as follow: 0--0:30min: step 1 minute, 0:30--9:00hour: step 5 minutes
2) The step quantities for the adjustment of temperature is 5^ C, and the grill function is 30^ C.
3) Rotate "K1" to adjust the cooking time when cooking begins. Then press "☐" to start cooking.
If " [H] " is not pressed within 3 seconds, the oven will revert back to the previous time to continue cooking.
4) Rotate"K2" to adjust the temperature when cooking begins. The related
indicator will be illuminated. Then press “▶” to start cooking. If “▶” not pressed in 3 seconds, the oven will revert back to the previous temperature to continue cooking.
2.4.3. Lamp Setting
1) Rotate"K1" to select the relevant function, then the corresponding icon will be on.
2) Press "button to start cooking. Lamp icon" "": "will flash.
2.4.4. Inquiring Function
During cooking process, you can use inquiring function, after 3 seconds return to the current working state.
1) During cooking mode, press " ☐ " button to see the current time.
2) If the clock was set, press "☐" button to ask for current time.
2.4.5. Child Lock Function
To lock press “☐” and “☐” simultaneously for 3 seconds, there will be a long "beeping" sound indicating the children-lock is on and the “☐” will be illuminated.
Lock quitting : press "☐" and "☐" simultaneously for 3 seconds, there will be a long "beeping" sound indicating the child-lock is released.
Note: During working mode, if you want to stop cooking, press stop button quickly. Do not need to long pressing on stop button, it is invalid.
2.4.6. Reminder Function
The oven has 9 hours reminder, this function will help to remind you to start cooking in a certain time from 1 minute to 9 hours. Only when oven is in standby mode, the reminder can be set. Follow below instructions to set the reminder:
1) Press reminder setting button “☐”.
2) Rotate "K2" to set the hour time of reminder.
3) Press reminder setting button "☐" again.
4) Rotate "K2" to set minute time of reminder.
5) Press "☐" to confirm cooking.
Note: After the set time, the oven buzzer will sound for 10 times “ ☐ “symbol disappears on the screen to remind you to start cooking. You can cancel the reminder during setting by pressing the stop button; After the reminder has been set, you can cancel it by pressing stop button twice.
2.4.7. Start/Pause/Cancel Function
1) If the cooking time has been set, press “☐” to start cooking. If the cooking is paused, press “☐” to resume cooking.
2) During cooking process, press “☐” once to pause the cooking. Press “☐” twice to cancel the cooking.
2.4.8. Energy-Saving Function
1) During in waiting state and reminding state, press “☐” for three seconds, the LED display will go off and set to energy-saving mode.
2) If no operation in 10 minutes under waiting state, the LED display will go off and go into energy-saving mode.
3) Under the energy-saving mode, press any key or rotate any encoder can quit the energy-saving mode.
2.4.9. Meat Probe Function
1) In waiting state, insert the meat probe, the LED will display "PROB".
2) Rotate "K1" to choose function you need. The related indicator will illuminated.
Functional sequence diagram: ☐ ☐ ☐ ☐ . Press “ ☐ “ to confirm function setting.
3) Rotate "K2" to adjust the temperature. Press "☐" to confirm temperature probe. The small LED display the temperature and the big LED display "PROB".
4) The buzzer will sound five times when cooking finish. The setting temperature lights when the setting temperature arrives. If the meat probe pulled out, it will turn back to waiting state and the time displays. Note: A). The range of the temperature is 50-150 degrees. B). During in probe function, the
cooking time cannot be set. C) During cooking process, press stop button once, it will stop cooking, LED flash; Press stop button again, cancel the current cooking. D) Before insert or pull out the meat probe from the oven, it will cancel all the programs. E) If the display shows "Er-3" after the program has been started, it means that the temperature sensor short circuit.
2.4.10. Pyrolytic Function
This function allows you to clean thoroughly the oven cavity, turning dirt to ashes that may in the end be eliminated with the simple swipe of a cloth.
1>Rotate "K1" to select the pyrolytic function. LED will display "2:00" "PYA".
2>Rotate"K2" to adjust the time. (time should be within 2-3hr)
If step 2 is ignored, Press " ☐" to confirm the cooking. And the default time is 2 hours, "PYA" will display on the LED.
Note: A) When the oven door is not closed, press start button will be invalid, LED display "COOL","PYA." B) When the oven center temperature is higher than 200°C, press cancel button can return to waiting state directly. When open the door in normal working condition, the relay for heater will stop working, LED display "door", the buzzer will beep continuously until the door closed or press the cancel button. C) When the pyrolytic function finished working and oven center temperature is lower than 300°C. LED display will go off. D) Before activating the pyrolytic cleaning function, remove any excessive spillage and make sure that oven is empty. Do not leave anything inside it (e.g. pans, baking tray, dripping pan, slider bracket etc.) as this could heavily damage them.
2.4.11. Notes
1) The oven lamp will be on for all functions (except pyrolytic function).
2) Once the cooking program has been set and the “ ☐” button is not pressed within 5 minutes, the current time will be displayed. The setting will be cancelled.
3) The buzzer sounds when effectively pressed, if not effectively pressed there will be no response.
4) The buzzer will sound five times to remind you when cooking has finished.
3. Accessories
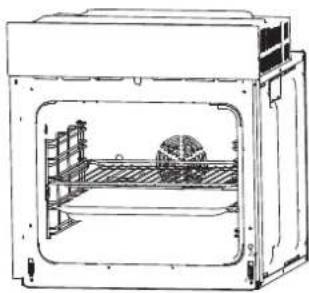
Wire shelves: For grill, dishes, cake pan with items for roasting and grilling.

Slider bracket: These shelf support rails on the right and left sides of the oven can be removed for cleaning oven walls.

Universal pan: For cooking large quantities of food such as moist cakes, pastries, frozen food etc, or for collecting fat/ spillage and meat juices.

To ensure the oven shelves operate safely, correct placement of the shelves between the side rails is imperative. This will ensure that during careful removal of the shelf or tray, hot food items should not slide out.
natural_image
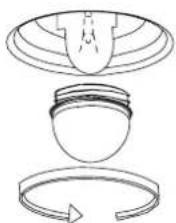
Technical line drawing of a two-wheeled oven with internal shelves and a spherical component (no text or symbols)Bulb replacement: The bulb in the light is a special bulb, and has high temperature resistance (240V\~25W). For replacement, proceed as follows:
1) Disconnect power from the mains outlet or switch off the circuit breaker of the unit's mains outlet.
2) Unscrew the covering glass and replace the bulb with a new one of the same type.
3) Screw the covering glass back in place.
4. Installation

4.1. Securing the Oven to the Cabinet
- Fit oven into the cabinet recess.
- Open the oven door.
- Secure the oven to the kitchen cabinet with two distance holders "A" which fit the holes in the oven frame and fit the two wood screws "B".

4.2. Connection of the Oven

5. Aftermarket
Becken has designed this appliance in order to guarantee the maximum reliability. However, if a problem occurs, by following the procedures suggested in this section you may be able to determine its cause.
Do not attempt to open the appliance – there is a risk of electrical shock. If you are not able to solve the problem, please contact your seller or manufacturer.
All users must be familiarized with this section. Knowing what could go wrong can help you avoid the occurrence of problems.
WARNING: any attempt of fixing the appliance without contacting the manufacturer will nullify the warranty.
In case the problem persists, take your appliance to an aftermarket section of any Worten, Modelo or Continente store in order to solve the problem.
Worten Equipamentos para o Lar ensures for a period of 2 years, counting from the date of purchase of this appliance, a warranty against any found manufacturing defect. The warranty supposes a correct use and maintenance of the appliance, namely according to the instructions expressed in this manual. In case otherwise identified, the malfunctions will not be under the warranty.
The repairing of electrical appliances must only be made by qualified technicians, as otherwise there may occur future complications on the appliances.
To avoid unnecessary risks, in case there are any malfunctions on the wires or on another type of components, repairing must be made on the specialized locations of technical assistance, as appropriate tools are needed.
6. Environment Conservation
Aiming to protect the environment, we try to reduce to a maximum the volume of the packages which are confined to three easy separation materials: cardboard, paper and plastic.
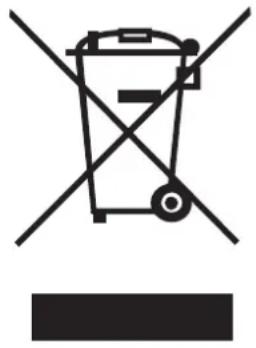
The appliance is made of recyclable material, once disassembled by a specialized company. Follow the local legislation concerning recycling of all materials.
natural_image
Symbol of a trash bin crossed with no text or numbers, representing waste sorting or disposal (no text present)Becken
65EAE40102
Horno Eléctrico

natural_image
Front view of a black oven with control knobs and a horizontal ventilation grille (no text or symbols)natural_image
Pure electrical circuit lines without any symbolsnatural_image
Simple line drawing of a rectangular grid structure with vertical lines (no text or symbols)natural_image
Line drawing of a multi-tiered rack or storage unit (no text or symbols)natural_image
Pure geometric diagram of a rectangular frame with internal diagonal lines, no text or symbols presentnatural_image
Technical line drawing of a mechanical oven or incubator with internal components (no text or symbols)5. Postventa
natural_image
Symbol of a trash bin crossed with a diagonal line, no text or numbers presentBecken
65EAE40102
Forno Elétrico
natural_image
Front view of a black oven with control knobs and a horizontal ventilation grille (no text or symbols)natural_image
Pure electrical circuit lines without any symbolsnatural_image
Line drawing of a rectangular metal grate with vertical slats (no text or symbols)natural_image
Line drawing of a multi-tiered rack or storage unit (no text or symbols)natural_image
Pure geometric diagram of a rectangular frame with internal diagonal lines and no text or symbolsnatural_image
Technical line drawing of a mechanical oven or enclosure with internal structure (no text or symbols)natural_image
Diagram showing three stages of a mechanical or electrical component: top view, middle section with bulb-like structure, and bottom section with circular arrow indicating rotation (no text or symbols)4. Instalação

5. Pós-Venda
natural_image
Symbol of a trash bin crossed with no visible text or labels- ATTENTION
- ATENCIÓN
- Index
- Safety Instructions
- Important Warnings
- Assistance
- Power Energy
- Power Cord and Other Cables
- Humidity and Water
- Cleaning
- General Precautions
- Utilization and Functioning
- Introduction
- Fitting the Oven into the Kitchen Unit
- Product Description
- Operation Instructions
- Clock Setting
- Function Setting
- NOTE:
- Lamp Setting
- Inquiring Function
- Child Lock Function
- Reminder Function
- Start/Pause/Cancel Function
- Energy-Saving Function
- Meat Probe Function
- Pyrolytic Function
- Notes
- Accessories
- Installation
- Securing the Oven to the Cabinet
- Connection of the Oven
- Aftermarket
- Environment Conservation
- Becken
- Postventa
- 65EAE40102
- Forno Elétrico
- Instalação
- Pós-Venda
Brand : Becken
Model : MFDP11F
Category : Oven