Rumour - Microphone Kurzweil - Free user manual and instructions
Find the device manual for free Rumour Kurzweil in PDF.


| Product Type | Reverb/Effects Processor (Studio-grade) |
| Brand | Kurzweil |
| Model | Rumour |
| Dimensions (H x W x D) | 1.8 in x 19 in x 8.1 in (45 mm x 482 mm x 205 mm) |
| Weight | 5 lbs (2.27 kg) |
| Power Supply | External 9V AC, 2A |
| Effects | 192 presets including reverbs, delays, choruses, flangers, phasers, LaserVerb, distortion, compression, and more |
| User Presets | 64 user-created presets in 4 user banks |
| Analog Inputs | 2 x 1/4" TRS balanced/unbalanced, +4 dBU or -10 dBV |
| Analog Outputs | 2 x 1/4" TRS balanced/unbalanced, switchable -10 dBV / +4 dBU |
| Digital I/O | S/PDIF (RCA) stereo input and output, up to 24-bit |
| MIDI | In and Out/Thru (switchable), supports SysEx, program change, CC |
| Sample Rates | 44.1 kHz or 48 kHz internal, external sync via S/PDIF |
| Frequency Response | 20 Hz – 20 kHz ±0.1 dB |
| Dynamic Range | >106 dB (A/D), >112 dB (D/A) |
| THD+N | <0.001% (analog input), <0.003% (analog output) @ 1 kHz |
| Pre-effects EQ | 3-band global EQ (bass, mid, treble) with gain, balance, width |
| Pedal Control | 1/4" TRS for tap tempo and bypass |
| Display | 2-line alphanumeric LCD with contrast adjustment |
| Front Panel Controls | Input/Output level knobs, Bank, Preset, Load, Store, Parameter Select/Value, Master, EQ, Tap, Bypass |
| Construction | 1U rackmount, metal chassis |
Frequently Asked Questions - Rumour Kurzweil
User questions about Rumour Kurzweil
0 question about this device. Answer the ones you know or ask your own.
Ask a new question about this device
Download the instructions for your Microphone in PDF format for free! Find your manual Rumour - Kurzweil and take your electronic device back in hand. On this page are published all the documents necessary for the use of your device. Rumour by Kurzweil.
USER MANUAL Rumour Kurzweil
© Young Chang Co., Ltd. 2003. All rights reserved.
Kurzweil® is a product line of Young Chang Co., Ltd. Young Chang®, Kurzweil®, Rumour™, Mangler™ V. A. S. T.®, KDFX®, Pitcher®, and LaserVerb®, KSP8™, K2600™, K2500™, and K2000™ are trademarks of Young Chang Co., Ltd. All other products and brand names are trademarks or registered trademarks of their respective companies. Product features and specifications are subject to change without notice.
Part Number: 910382 Rev. A


The lightning flash with the arrowhead symbol, within an equilateral triangle, is intended to alert the user to the presence of uninsulated "dangerous voltage" within the product's enclosure that may be of sufficient magnitude to constitute a risk of electric shock to persons.
The exclamation point within an equilateral triangle is intended to alert the user to the presence of important operating and maintenance (servicing) instructions in the literature accompanying the product.
IMPORTANT SAFETY & INSTALLATION INSTRUCTIONS
INSTRUCTIONS PERTAINING TO THE RISK OF FIRE, ELECTRIC SHOCK, OR INJURY TO PERSONS
WARNING - When using electric products, basic precautions should always be followed, including the following:
1) Read these instructions.
2) Keep these instructions.
3) Heed all warnings.
4) Follow all instructions.
5) Do not use this apparatus near water.
6) Clean only with a dry cloth.
7) Do not block any of the ventilation openings. Install in accordance with the manufacturer's instructions.
8) Do not install near any heat sources such as radiators, heat registers, stoves, or other apparatus (including amplifiers) that produce heat.
9) Do not defeat the safety purpose of the polarized or grounding-type plug. A polarized plug has two blades with one wider than the other. A grounding type plug has two blades and a third grounding prong. The wide blade or the third prong are provided for your safety. When the provided plug does not fit into your outlet, consult an electrician for replacement of the obsolete outlet.
10) Protect the power cord from being walked on or pinched, particularly at plugs, convenience receptacles, and the point where they exit from the apparatus.
natural_image
Symbolic illustration of a person pushing a cart with a diagonal line through it, enclosed in a circle (no text or symbols)11) Only use attachments/accessories specified by the manufacturer.
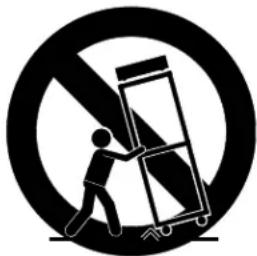
12) Use only with a cart, stand, tripod, bracket, or table specified by the manufacturer, or sold with apparatus. When a cart is used, use caution when moving the cart/apparatus combination to avoid injury from tip-over.
13) Unplug this apparatus during lightning storms or when unused for long periods of time.
14) Refer all servicing to qualified service personnel. Servicing is required when the apparatus has been damaged in any way, such as power-supply cord or plug is damaged, liquid has been spilled or objects have fallen into the apparatus, the apparatus has been exposed to rain or moisture, does not operate normally, or has been dropped.
15) Do not expose this apparatus to dripping or splashing and ensure that no objects filled with liquids, such as vases, are placed on the apparatus.
16) WARNING: To reduce the risk of fire or electric shock do not expose this apparatus to rain or moisture.
SAVE THESE INSTRUCTIONS
Young Chang International Contacts
Contact the nearest Young Chang office listed below to locate your local Young Chang/ Kurzweil representative.
A N D Music Corp.
P.O. Box 99995
Lakewood, WA 98499-0995
Tel: 1-253-589-3200
Fax: 1-253-984-0245
Young Chang Co., Ltd.
178-55 Gajwa-Dong
Seo-Ku, Inchon, Korea 404-714
Tel: 011-82-32-570-1380
Fax: 011-82-32-570-1218
Young Chang America, Inc. (Canadian Division)
3650 Victoria Park Ave. Suite 105
Toronto, Ontario Canada M2H 3P7
Tel: 1-416-492-9899
Fax: 1-416-492-9299
World Wide Web Home Page
http://www.kurzweilmusicsystems.com
RADIO AND TELEVISION INTERFERENCE
Warning: Changes or modifications to this instrument not expressly approved by Young Chang could void your authority to operate the instrument. Important: When connecting this product to accessories and/or other equipment use only high quality shielded cables.
Note: This instrument has been tested and found to comply with the limits for a Class A digital device, pursuant to Part 15 of the FCC Rules. These limits are designed to provide reasonable protection against harmful interference in a residential installation. This instrument generates, uses, and can radiate radio frequency energy and, if not installed and used in accordance with the instructions, may cause harmful interference to radio communications. However, there is no guarantee that interference will not occur in a particular installation. If this instrument does cause harmful interference to radio or television reception, which can be determined by turning the instrument off and on, the user is encouraged to try to correct the interference by one or more of the following measures:
- Reorient or relocate the receiving antenna.
- Increase the separation between the instrument and the receiver.
- Connect the instrument into an outlet on a circuit other than the one to which the receiver is connected.
- If necessary consult your dealer or an experienced radio/television technician for additional suggestions.
NOTICE
This apparatus does not exceed the Class A limits for radio noise emissions from digital apparatus set out in the Radio Interference Regulations of the Canadian Department of Communications.
AVIS
Using Equalization 1-3
Making Connections.... 2-1
The Rear Panel 2-1
Power 2-1
Audio....2-1
Analog Inputs and Outputs 2-2
Setting Levels for Analog Outputs 2-2
Digital Inputs and Outputs 2-3
Footpedal. 2-4
MIDI 2-4
Using Your Rumour or Mangler.... 3-1
The Front Panel.... 3-1
Input Level Knob & Input Meters 3-1
Input Level LEDs 3-1
Output Level Knob 3-2
Bypass Button 3-3
Master Button 3-4
Wet/Dry Mode 3-4
Input Source 3-5
Digital Clock.... 3-5
Digital Word Length.... 3-5
MIDI Channel.... 3-5
Program Change Receive 3-6
Program Change Transmit 3-6
System Tempo 3-6
MIDI Clock Source.... 3-6
Transmit MIDI Clock 3-6
Tap Tempo LED 3-7
Change Effect 3-7
Bypass Mode. 3-7
Show FX Parameters. 3-7
SysEx ID 3-8
SysEx Object Dump? 3-8
Erase User Banks? 3-9
Soft Reset? 3-10
Hard Reset? 3-10
Enter bootblock? 3-11
The Boot Block's Back Door 3-11
EQ Button 3-12
Tap (Tempo) Button 3-13
Setting Durations in Beats-Per-Minute (BPM) 3-13
MIDI 3-14
Digital Lock 3-14
Contrast Knob 3-14
Bank Knob 3-15
Preset Knob....3-16
Cuing Effects. 3-16
Load Button.... 3-16
Store Button 3-17
Renaming Presets 3-17
Parameter Knobs: Select and Value 3-18
Backing Up Your Presets using MIDI SysEx. 3-19
Restoring Your Presets 3-19
Troubleshooting 3-20
Effects Tables. A-1
Rumour Effects....A-2
Mangler Effects....A-4
Specifications...... B-1
Dimensions B-1
Inputs......B-1
Analog....B-1
Digital....B-1
Outputs B-2
Analog......B-2
Digital B-2
MIDI B-2
Power Supply B-2
MIDI Implementation Chart.... C-1
Index.... Index-1
Chapter 1 Getting to Know Rumour & Mangler
Overview
Rumour and Mangler are based on the effects found in the KSP8, Kurzweil's flagship multi-channel effects processor, and offer easy-to-use effect presets for any environment. Both models are single rack space units featuring 192 effects presets, 64 locations for user-created presets, balanced stereo analog inputs and outputs, S/PDIF digital I/O, and pre-effect EQ.
Each product offers its own unique palette of effects:
Rumour features a comprehensive set of Kurzweil's finest reverbs and reverb variations, including gated, reverse, and reverb/compression combinations, along with Kurzweil's unique LaserVerb®, and chorus/flange+delay+reverb combinations.
Mangler focuses on effects other than, but not excluding, reverb. These include chorus, flanger, phaser, tremolo, rotary speaker, panner, delay, filters, LaserVerb, Pitche®, synth trigger, ring modulation, distortion, and compression effects, and many combinations.
Quick Start
Take your new Rumour or Mangler out of the box and plug it into a wall socket with the included power supply. The LED in the TAP button will blink to show the current System Tempo. If you don't want this blinking at you, change the setting of the Tap Tempo LED Master parameter, as described on page 3-13.
Turn the INPUT LEVEL and OUTPUT LEVEL knobs on the far left side of the front panel all the way down (fully counterclockwise, that is).
Make your digital or analog cable connections on the back panel of the device. Refer to "Audio Inputs and Outputs" on page 2-1 if you have questions at this point. If you are using the analog outputs, be sure to read the section on page 2-2 about the -10 dBV / +4 dBU switch on the back panel.
Setting Levels
After making audio cable connections to the unit, send audio from your source device to the Rumour or Mangler. Set input source on the Master menu:
- Press the MASTER button on the front panel of your unit.
- Turn the SELECT knob until the screen displays "Input Source".
Input Source: Analog
Use the VALUE knob to select "Analog" or "Digital", depending on your input source. If your input source is analog, the Digital Clock parameter (described on page 3-5) should be set to one of the internal clock settings (which it will be by default). For digital inputs, you may need to change the setting of the Digital Clock parameter, depending on your configuration.
For analog input sources, turn the INPUT LEVEL knob until the peaks in the signal cause the yellow LED over the INPUT LEVEL knob to light. Remember to calibrate the input level with the loudest source material that you plan to send to the unit. Also, to get the best signal-to-noise ratio with an analog input, the signal should be as hot as possible (without clipping).
- After setting the input level, turn the OUTPUT LEVEL knob clockwise to set a useful level for the audio coming out of the Rumour or Mangler (digital and analog). As you turn the knob, the screen will display the output level. A good starting level is 0.0 dB (unity gain). You will, of course, need to coordinate this level with the input level on the receiving device.
The CLIP LED above the OUTPUT LEVEL knob will light to alert you of excessive signal levels.
Choosing Effects
You can access all of the effects in your Rumour or Mangler using the BANK and PRESET knobs on the front panel. Turn the BANK knob to select the general type of effect, for example Small Rooms on the Rumour, or Distortion on the Mangler. Then turn the PRESET knob to display the 16 different effects in the current bank. Appendix A provides a list of the effects included with each unit.
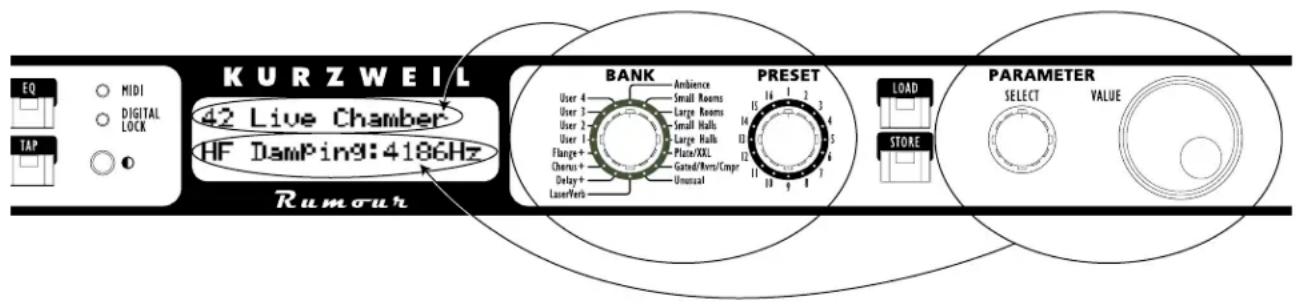
When you start customizing effects, you'll be able to store them in the banks labeled User 1 through User 4. Like the other banks, each of the User banks can store 16 different effects.
The banks provided with each unit are listed on page 3-15.
Editing Effects
Each of the 192 effects provided with your Rumour or Mangler sounds great right out of the box, and is ready to handle whatever live or studio application you throw at it. However, since each effect is based on Kurzweil's highly-regarded KDFX algorithms (which you may know from the K2500, K2600, or KSP8), you also can control a huge variety of editable parameters for each effect. These parameters are shown on the second line of your unit's display, underneath the name of the current effect. The Concert Hall reverb on the Rumour, for example, has Wet/Dry as its first parameter (set to a level of 50%, which basically means that the effect level is turned up halfway):
065 Concert Hall Wet/Dry : 50% wet
Use the SELECT knob to scroll through parameters, and the VALUE knob to change parameter values.
To keep things manageable, we've taken the most commonly tweaked parameters for each effect (up to 16 per) and put them right at your fingertips as "Basic" FX Parameters. This means that they are the first parameters you will see as you scroll through the list for each effect. These parameters are also directly controllable using MIDI Continuous Controllers (CCs) 1–16. (To see the full range of parameters for your unit's effects, set Show FX Parameters to "Extended" in the Master menu, as described on page 3-7).
The algorithm number for each preset is listed in Appendix A of this manual. You can download the complete (and hefty) documentation for all KDFX algorithms and their parameters from the www.kurzweilmusicsystems.com web site.
Using Equalization
The Rumour and Mangler offer pre-effect EQ that you can set globally for your unit. Press the EQ button on the front panel to access the first EQ screen, then use the SELECT knob to move between parameters and the VALUE knob to change the settings of the parameters. When you make EQ changes, they take place immediately.
Equalization is explained in greater detail on page 3-12.
Quick Start
Chapter 2 Making Connections
This chapter explains how to make all power, audio, MIDI, and pedal connections on the rear panel of your Rumour or Mangler. Both devices offer the same I/O options, described in detail in this chapter.
The Rear Panel
Below is a picture of the Mangler's rear panel. The Rumour offers all of the same connectors.

Power
The power supply is a standard 9V AC 2-amp external supply. There is no power switch; your Rumour or Mangler will be ready to use as soon as you plug it in.
Audio
You can attach both analog and digital input cables to the unit, although you can use only one type of input at a time. Set the Input Source parameter on the Master menu (see page 3-5) to tell the unit which inputs it should use.
Also, you may want to check the setting of the Wet/Dry Mode parameter (see page 3-4), depending on whether you've connected the unit to your mixer as a direct insert or as a send/return (bus) effect.
Analog and Digital outputs are always available, so that you can use both at the same time.
Audio
Analog Inputs and Outputs
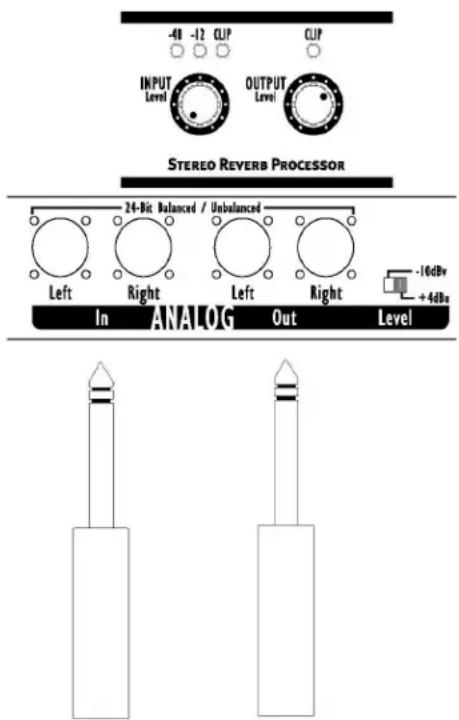
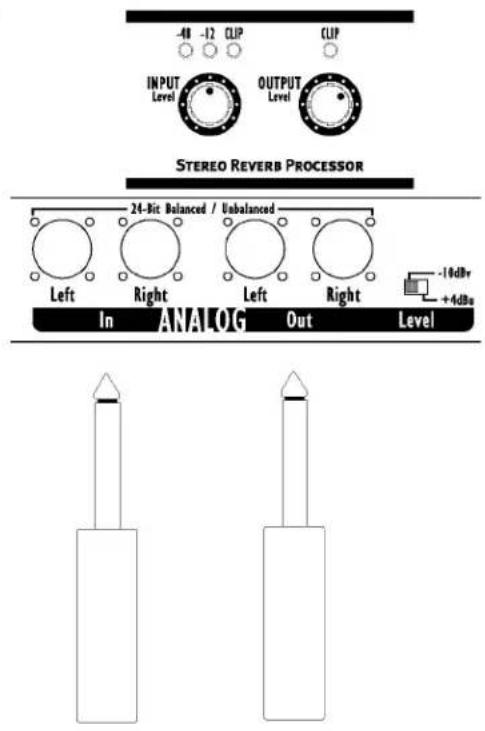
Stereo analog inputs and outputs are balanced 1/4" jacks that will accept either balanced TRS (tip-ring-sleeve) or unbalanced TS (tip-sleeve) connectors, as shown below:
1/4" TRS plug for balanced connections 1/4" TS plug for unbalanced connections

natural_image
Two schematic diagrams of cylindrical electronic components with no text or symbolsWhen you plug a single cable (i.e., a mono signal) into either analog input, the unit sends that signal to both input channels (provided that Input Source is set to Analog, of course).
Set the analog input level using the knob on the front panel of the unit (see page 3-1).
Setting Levels for Analog Outputs
The -10 dBV / +4 dBU switch on the rear panel selects between pro (+4 dBU Balanced) and consumer (-10 dBV Unbalanced) signal levels for the analog outputs. When you set this switch to -10dBV, the unit gives unity gain with an unbalanced output (with a -10dBV input and level settings). Setting the switch to +4 dBU gives unity gain with a balanced output (given a +4dBU input and level settings).
Here are two examples of how to set Rumour or Mangler for unity gain with analog inputs and outputs:
For +4 dBU balanced analog input and output:
- Use balanced audio input (TRS cables).
- Set Input Level to minimum.
- Set Output Level set to 0dB.
- Set Output Level switch set to +4dBU.
- Use balanced audio output (TRS cables).
For -10dBV unbalanced analog input and output:
- Use unbalanced audio input (TS cables).
- Set Input level to approximately half way.
- Set Output level set to 0dB.
- Set Output level switch to -10dBV.
- Use Unbalanced audio output (TS cables).
Digital Inputs and Outputs
Make S/PDIF Digital input and output connections with the RCA-style jacks on the back panel.
For digital signals, set the level by adjusting the output level on the sending device. The setting of the EQ gain parameter (see page 3-12) will also have a bearing on the digital signal level coming into the effects section of the unit.
You can set Digital Clock to an internal or an external source (see page 3-5).
Footpedal
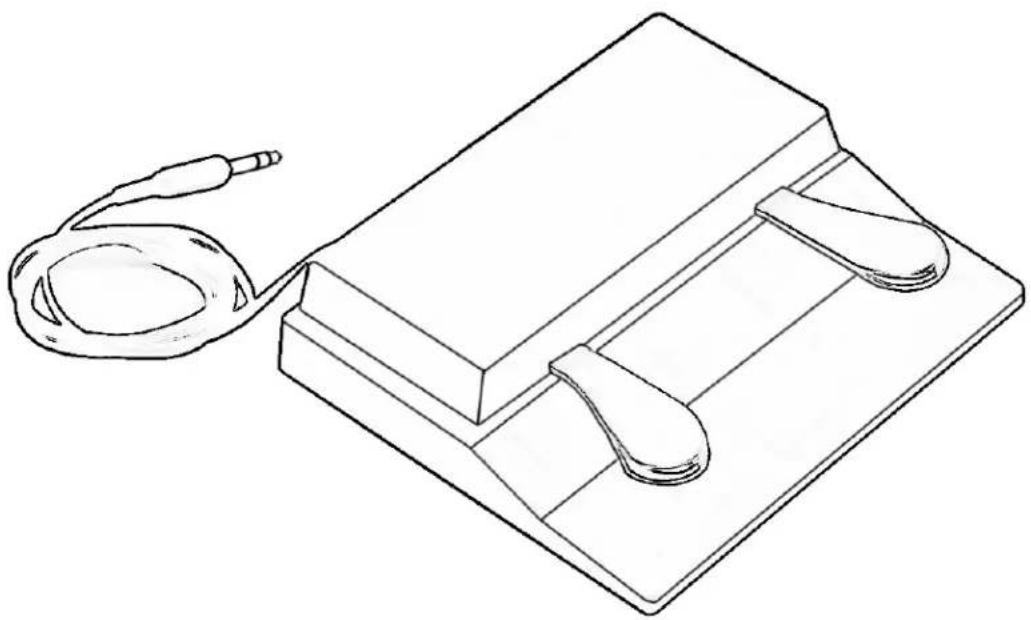
Plug either a single or double pedal into your Rumour or Mangler's Pedal jack for a convenient way to tap in a system tempo and perform effects bypass.
To use a pedal for tapping a tempo, you must first press the TAP button on the front panel.
With a single pedal you can tap a system tempo for use by time-based effects (see page 3-13 for information on Tap Tempo). If you plug the pedal halfway in, it works just like the BYPASS button on the front panel of your unit (see page 3-3).
With two footpedals (either a double pedal with a single TRS plug – such as the KFP-2S available from Kurzweil, or two regular pedals and a Y-cable with jacks for each pedal and a TRS plug) you will have bypass and tap tempo pedals available. The connector on the back panel of your unit is wired as follows:
Tip = Tempo
• Ring = Bypass
natural_image
Line drawing of a medical device with a coiled cable and two connectors (no text or symbols)MIDI
There are two MIDI jacks: MIDI In and MIDI Out. The MIDI Out jack also doubles as MIDI Thru; use the Thru/Out switch on the rear panel to change the setting of this jack. When you set this switch to MIDI THRU, however, you need to keep in mind that MIDI data generated by your Rumour or Mangler (such as program change commands, MIDI clock, and SysEx) will not be merged with the external MIDI data being passed through. In this case, only the external MIDI data will be sent out the MIDI Out/Thru port.
If you ever need to update your unit's software, you'll do this using MIDI, as described on page 3-11.
You can also use MIDI for SysEx storage of any presets you create. See page 3-8.
Chapter 3
Using Your Rumour or Mangler
The Front Panel
Let's examine the front panels of the Rumour and Mangler, from left to right:


Input Level Knob & Input Meters
On the far left is the INPUT LEVEL knob, which controls the analog input gain. The range of the input control has a range of 18dB, allowing for signal levels from +4dBU to +22dBU, and is wide enough to support +4 dBU or -10 dBV operation. Being an analog input level, this knob does not affect the digital input.
Turn the knob all the way to the left (counterclockwise) to set the input gain to the minimum level; this is a good place to start for +4dBu "pro" level signals. (Note that turning the input level knob all the way "down" in this way does not turn off the input.) For -10dBV level signals, turn the knob clockwise and use the LEDs, as described below.
Input Level LEDs
The three LEDs (green, yellow, red) above the INPUT LEVEL knob measure the analog or digital input signal.
The green light comes on for signal levels from -48dB up to -12dB.
The yellow light comes on for signals between -12dB and 0dB.
The red light comes on for signals 0 dB or greater. This means the incoming signal is too loud, and has digital distortion in the form of “clipping,” which may not have a pleasant effect on the sound.
A good, nominal input signal level for the device is about -10dB. The rule of thumb is that mostly green with flashes of yellow for peaks is ideal. (Or in the case of purposeful, consistently loud levels mostly yellow with some green is OK too.)
Output Level Knob

You must set the input signal level carefully, especially with the Mangler. We recommend that you try to set the level as close to -10 dBV as possible. Otherwise, scrolling through effects may cause volume jumps from effect to effect (due to the differing amounts of compression used on effects).
Output Level Knob
Next to the INPUT LEVEL knob is the OUTPUT LEVEL knob, which controls the master output level. This output control has a range of 98dB, and allows a boost of up to 18dB and a potential cut of -79.5dB.
Like the input level control, the range of the output level control is wide enough to support +4 dBU and -10 dBV operation. Use the -10 dBV/+4 dBU switch on the back panel to match levels with your mixer to yield the best resolution.
The red LED above the OUTPUT LEVEL knob indicates that the output signal is clipping, just like the red LED above the INPUT LEVEL knob does the input signal.
When you turn the knob, the display briefly shows the value of the Master Output Level parameter:
Master Output Level: -6.0dB
If you find you cannot turn the level up anymore before the top end of the knob's physical range, you are most likely programming your user effects too hot and running the input to your mixer (effect return) too soft. In this case, factory programs should appear too quiet at the same master output level. You should pay attention to the Out Gain parameter in each individual effect, and make sure that if you change a parameter which adds gain to the overall effect, that you compensate by lowering that effect's Out Gain parameter. Match the levels of your own effects more closely with the factory effects, and turn up the return level on your mixer.
The output level knob controls both the analog and digital output levels of the device. The -10 dBV/+4 dBU switch on the rear panel, however, only affects the analog output.
Bypass Button
The BYPASS button lets you bypass both the active effect and the EQ section.
Press the BYPASS button once to engage bypass; the red LED in the button will light up, and the display will briefly show this message:
Effect & EQ bypassed
Press the button again to disengage the bypass, and the light goes out. This message will briefly display:
Effect & EQ enabled
The Bypass Mode master parameter (described on page 3-7) determines whether the EQ is bypassed or not. A setting of “Effect & EQ” (this is the default) means that the effect and EQ are bypassed together. A setting of “Effect only” means that the EQ remains active while the effect is toggled on and off. When the Bypass Mode is Effect only, the two messages shown above will be different, as shown below:
Effect bypassed
Effect enabled
Master Button
Pressing the MASTER button displays the first Master menu parameter. The red LED in the MASTER button will be on when you are in the Master menu. Use the SELECT knob to select a master parameter to change, then use the VALUE knob to change the value of that parameter. Master menu settings are saved across power cycles.
For example, to change Bypass Mode from "Effect & EQ" to "Effect only":
-
Press the MASTER button. Note that the red LED in the button lights.
-
Turn the Select knob until the Bypass Mode parameter displays on the screen, as shown below:
Bypass Mode: Effect & EQ
- Turn the Value knob one click to the right to change Effect & EQ to Effect only:
Bypass Mode: Effect only
Some menu items will indicate that a button press is required to make your choice. For example, the Soft Reset screen says "Load=Yes", telling you that you should press the LOAD button to proceed with the Soft Reset. If you do not want to perform the Soft Reset, all you need to do is turn one of your unit's knobs or press any button other than LOAD.
Rumour and Mangler are designed to allow you to work quickly, so it's usually possible to move directly from one part of the interface to another simply by performing a different function (e.g., using the BANK and PRESET knobs to select a preset will immediately take you out of the Master menu). You can also press the MASTER button at any time to exit the Master menu. The LED in the MASTER button will go out when you leave the Master menu.
The items on the Master menu are described below:
Wet/Dry Mode
Wet/Dry Mode: Insert, Send/Return
When set to "Insert," the wet/dry value of the effect is that of the saved preset; use this setting when your Rumour or Mangler is directly connected as a channel insert.
"Send/Return" sets the preset's Wet/Dry parameter to 100% Wet. You'll usually use this setting when you have the unit connected to an auxiliary bus and effect returns on your mixer. In this case you will adjust effect levels with the bus sends on your mixer. You can still temporarily change the wet/dry value of a preset, but the value will revert to 100% on save. The changed wet/dry value will be remembered, however, and will be the wet/dry value if you change Wet/Dry Mode back to "Insert."
Although most effects have a Wet/Dry parameter, some (like compressors) do not. The setting of Wet/Dry Mode, therefore, is not applicable to these effects.
Input Source
Input Source: Analog, Digital
Selects between the analog inputs and the S/PDIF digital input.
You can connect a single analog input to either the left or the right analog input. The unit will automatically detect the mono signal and sum it to both channels equally so that stereo effects are available.
Digital Clock
Digital Clock: 44.1kHz Internal, 48kHz Internal, External
When you connect your Rumour or Mangler to other digital devices through S/PDIF, you need to choose which device will generate the master clock (to which other devices will “slave”). This parameter sets the Rumour/Mangler digital clock source to Internal or External, and sets the clock frequency when Internal is selected. If you are using only analog inputs and outputs, you must keep this parameter set to one of the internal clocks. When you set Digital Clock to External, then your Rumour or Mangler will slave to the clock sent by another digital device attached to the S/PDIF input.
The DIGITAL LOCK LED lights to indicate that the device has sensed and locked to an external digital clock. It flashes if lock has not been achieved or if lock has been lost.

Since connected devices may respond unexpectedly when you switch digital clock source, make sure you turn audio down before switching the clock.
Digital Word Length
Dig Word Length: 16 bits, 20 bits, 24 bits
Sets the bit depth of the digital output. The default is "24 bits." Lower bit depths will include dithering for best-sounding results.
MIDI Channel
MIDI Channel: None, 1-16
Sets the MIDI channel on which the unit will receive and transmit MIDI data. MIDI data can include program change commands or any of the 16 MIDI continuous controllers that let you remotely edit effect parameters. The default is Channel 1. None turns MIDI transmission and reception off.
Program Change Receive
Prog Chg Receive: On, Off
Selects whether or not the unit will respond to incoming MIDI program change commands. Rumour and Mangler respond to MIDI Bank Select Controller 32; see page 3-14 for more information on using MIDI.
Program Change Transmit
Prog Chg Transmit: On, Off
Selects whether or not the unit will transmit MIDI program change commands when you move the BANK and PRESET knobs. The MIDI OUT/THRU switch must be set to OUT for program changes to be transmitted.
If Effect Cuing is enabled (see the Change Effect parameter on page 3-7) you will also have to press the LOAD button in order to transmit the program change message. The default is "Off."
System Tempo
System Tempo: System Tempo: 120 BPM (Internal) 152 BPM (External)
The behavior of this parameter depends on whether the MIDI Clock Source parameter is set to Internal or External. When MIDI Clock Source is Internal, use either the VALUE knob to set the system tempo, from 1-255 BPM, or use the TAP button (see page 3-13) to enter a tempo. The value changes whenever a new tempo is calculated. When MIDI Clock Source (described below) is set to “External,” the calculated incoming tempo (as set on the external device) is displayed here, and neither the VALUE knob nor the TAP button change the value.
MIDI Clock Source
MIDI Clock Source: Internal, External
Selects whether the system tempo is set internally by System Tempo (see above) or externally, by locking to an incoming MIDI clock source.
Transmit MIDI Clock
Transmit MIDI Clock: On, Off
Selects whether or not MIDI Sync messages generated by the Rumour/Mangler are transmitted out the MIDI OUT port.
You can get an external MIDI clock to pass through the Rumour or Mangler by changing the switch on the back panel from MIDI "OUT" to MIDI "THRU." If you do this, however, MIDI events generated by your Rumour or Mangler will not be sent out the MIDI OUT/THRU port.
Tap Tempo LED
Tap Tempo LED: Blink Tempo, Don't blink
Selects whether or not the Tap Tempo LED blinks in time with the system tempo.
Change Effect
Change Effect: Load automatically, Cue next effect
Change Effect lets you “cue” effects, which means that you can select the next effect to load before you actually change to that effect. This offers a smooth way to move between effects without scrolling through the list of effects.
The default is "Load automatically" (i.e., cuing is off), which means that when you turn the BANK and PRESET knobs the current effect will change as you turn the knobs. The name of the newly-chosen effect will be displayed on the screen, just as you would expect. If you're in "Load automatically" mode, pressing the LOAD button resets the current preset to its un-edited settings.

When cuing is on ("Cue next effect"), you use the BANK and PRESET knobs to select an effect to cue. The unit will briefly display the name of the cued effect, then will resume displaying the name of the current effect. Press the LOAD button (which blinks when an effect is cued) to engage the selected effect. See page 3-16 for more information about cuing effects.
Program Change commands received through MIDI are ignored when Change Effect is set to "Cue next effect."
Bypass Mode
Bypass Mode: Effect & EQ, Effect only
Selects whether or not the EQ is bypassed along with the effect when the BYPASS button is pressed. The default is "Effect & EQ," which means that the EQ is bypassed with the effect. "Effect only" means that the EQ remains active and only the effect is bypassed. You can still bypass the EQ when Bypass Mode is set to "Effect only", however, by using the EQ In/Out parameter (see page 3-12).
Show FX Parameters
Show FX Parameters: Basic, Extended
Controls the number of effect parameters that you can edit. In "Basic" mode, only the first 16 parameters appear. In "Extended" mode, all the algorithm parameters for the selected preset, up to 44 of them, are shown.
Master Button
SysEx ID
SysEx ID: 0,1,2...
Sets the SysEx ID of the unit. Valid values are 0–127. When you dump objects, the SysEx ID is sent as part of the dump message. Only units with the same SysEx ID will receive the dump. The exception is ID 127, which will "broadcast" to all units.
SysEx Object Dump?
SysEx Object Dump?
User1-4 Load=Dump
This offers a way to back up your presets, by dumping them via SysEx to an external MIDI sequencer. Select this master parameter, then use the VALUE knob to select between the following options to specify what is to be dumped:
-User1-4
-User1
-User2
-User3
-User4
When you press the LOAD button the unit will dump the presets, displaying a screen like this for a few seconds:
Bank(s) User1-4 have been dumped
See page 3-19 for more information about backing up and restoring your presets.
Erase User Banks?
Erase User Banks? User1-4 Load=Erase
Use this option to delete the contents of the user banks. You can erase all four banks in one fell swoop, or you can choose to erase individual banks. You cannot, however, delete a single preset (although you can overwrite it with a new one). The VALUE knob lets you select between the following options to specify what is to be erased:
•User1-4
.User1
.User2
.User3
•User4
Press the LOAD button to bring up the confirm dialog:
Erase User1-4! OK? Tap=OK Store=No
At this point, press TAP to erase the selected bank(s). A screen such as the one shown below will display for a few seconds. Press STORE to return to the Erase User Banks master parameter page.
Bank(s) User1-4 have been erased.
Master Button
Soft Reset?
Soft Reset?
Load=Yes
This master parameter is for soft-resetting the unit. A soft reset initializes your device without erasing your presets or master parameter settings. If your Rumour or Mangler seems to have gotten into an unexpected state, you can always soft reset without losing any data.
Press LOAD to bring up this confirm dialog:
Soft Reset! OK?
Tap=OK Store=No
Pressing TAP executes the soft reset; pressing STORE cancels back to the Soft Reset master parameter page.
Hard Reset?
Hard Reset?
Load=Yes

When you hard-reset your unit, all master parameters are restored to their default settings, and all user banks are erased (so be careful!). Press LOAD to bring up this confirm dialog:
Hard Reset! OK?
Tap=OK Store=No
Press TAP to execute the hard reset, or STORE to cancel.
Enter bootblock?
Enter bootblock? Load=Yes
This is where you access your unit's Boot Block, the place you'll go if you ever need to update the operating system or other software. Software updates of this sort are posted on the www.kurzweilmusicsystems.com website as MIDI files that you "play" on a MIDI sequencer into your unit.
We recommend that you use SysEx to backup any presets you've created before updating your Rumour or Mangler software. See page 3-19 for more information about backing up and restoring your presets.
Pressing LOAD brings up a confirm dialog:
Enter bootblock! OK? Tap=OK Store=No
Press TAP to enter the Boot Block. Press STORE to cancel the operation. The first option you will see when you enter the Boot Block looks like this:
Install FlashROM via MIDI Load=Yes
When this screen is displayed on your unit, you're ready to install FlashROM (which means the unit's operating system, effects objects, or Boot Block software). First connect the MIDI OUT of your sequencer to the MIDI IN of the Rumour or Mangler. Press the LOAD button to make your unit ready to receive the new software, then "play" the new software (which is provided as a .MID file) on your sequencer. While you are loading the new software, you should not use the unit, or send any MIDI to it other than the software being loaded.
After you've loaded new software, click the SELECT knob to the right until it says, "Exit MIDI install." Then press LOAD. You will be returned to the "Install FlashROM via MIDI" screen. Turn the Select knob clockwise to display the "Exit bootblock" option, then press LOAD to resume normal operations.
There are other options in the Boot Block intended only for service technicians; therefore these options are not documented here.
The Boot Block's Back Door
Under normal circumstances you should always be able to access the Boot Block through the Master Menu. If your software is not functioning properly, however, hold down both the LOAD and STORE buttons as you restart your unit (i.e., unplug it then plug it back in). This will take you straight to the Boot Block, allowing you to reload your unit's software using the procedure described above.
EQ Button
The EQ button accesses your Rumour or Mangler's dedicated 3-band equalization. The EQ is performed on the signal before it goes to the effect. Also, when you set the EQ on your unit, that setting is used "globally"; it will not change when you select a different effect, and it will be saved across power cycles.
Press the EQ button. The LED comes on, and the display shows the EQ parameters, two at a time, one on the top line, and one on the bottom. Use the SELECT knob to select the parameter and the VALUE knob to change the value of the selected parameter. If you add gain in the EQ, you should probably use the EQ Gain parameter to compensate for the overall level boost.
Balance and Width controls are also in the EQ menu. Press the EQ button a second time to exit the EQ menu.
The EQ parameter list (with default values) is shown below:
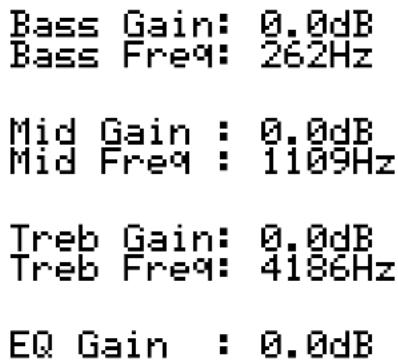
EQ Gain lets you boost or cut the signal as it leaves the EQ section of the device. Here's a useful tip: You can use EQ Gain to adjust the level of digital signals coming from a device that lacks its own external level control.
EQ In/Out:In, Out
Use EQ In/Out to add or remove equalization from the signal path. If Bypass Mode is set to "Effects only", then this parameter serves as the manual EQ bypass.
Balance/Pan : 0%
The "Balance/Pan" parameter functions as a balance control when there is a stereo input and as a pan control when there is a mono input. Since the unit's S/PDIF inputs are always stereo, only an analog input can be mono. An analog input will be mono when you connect a single input cable to the unit.
Either Balance or Pan can be set to a level from -100% (Left) to 100% (Right). Balance changes the relative volume of the left and right output channels, and works in conjunction with the Width parameter. Pan allows you to move the sound image from side to side within the stereo field.
Stereo Width: 100%
Stereo Width works with the Balance control and has no effect on Pan. A width of 100% is the normal stereo image; 0% collapses the image to mono; -100% reverses the left and right inputs.
Tap (Tempo) Button
Tap Tempo allows you to enter a system tempo by repeatedly pressing the TAP button. When you press the TAP button, the display shows a System Tempo page, as in the Master menu:
System Tempo: System Tempo: 120 BPM (Internal) 152 BPM (External)
When the MIDI Clock Source parameter is set to Internal, you can tap the button four or more times to set a System Tempo. The system averages your tapping speed and the calculated tempo becomes the System Tempo. You can also use the VALUE knob or an attached footpedal (see page 2-4) to change the System Tempo.
When the MIDI Clock Source parameter is set to External, pressing the TAP button will still display this page, but the tempo remains fixed at the incoming tempo (i.e., Tapping will not change the tempo). Effects with tempo parameters set to "System" will sync to the System Tempo. ("System" is the default for most presets, although you can set the tempo specifically for an effect if you want, disregarding the System Tempo). The TAP button LED will flash at the current tempo, unless the Tap Tempo LED parameter in Master menu is set to "Don't Blink."
Setting Durations in Beats-Per-Minute (BPM)
Tempo is expressed in beats-per-minute. MIDI Sync and Kurzweil's BPM-based algorithms use units of 24ths of a beat, since we don't know what you are calling "a beat."
So what are the corresponding standard musical durations in 24ths of a beat? Assuming the 'beat' is a quarter note, then:
4 beat (bts) = whole note
2 bts = half note
1 bts = quarter note
12/24 bts = (1/2 of a quarter note) = eighth note
6/24 bts = (1/4 of a quarter note) = sixteenth note
3/24 bts = (1/8 of a quarter note) = thirty-second note
16/24, 18/24, 2 bts = (1/3, 2/3, 3/3 of a half note) = quarter-note triplets
8/24, 16/24, 1 bts = (1/3, 2/3, 3/3 of a quarter note) = eighth-note triplets
4/24, 8/24, 12/24, 16/24, 20/24, 1 bts
= (1/6, 2/6, 3/6, etc., of a quarter note)
= sixteenth note triplets ("six-tuplets")
MIDI
The red MIDI LED, to the left of the display, flashes to indicate that the device is receiving MIDI data.
To change presets remotely, send your Rumour or Mangler program change information on the MIDI channel specified in the Master menu. The Rumour or Mangler display will show the name of any remotely selected presets; the position of the BANK and PRESET knobs, however, will not change to reflect the bank and preset number. Program Change commands received through MIDI are ignored when Change Effect is set to "Cue next effect."
Although Rumour and Mangler organize their presets into "banks" of 16 effects each, for MIDI purposes presets are organized into banks of 100 objects each. These groupings are based strictly on preset numbers, and do not group the effects by type. The 100's bank, for example, comprises the presets numbered 100 through 199, with preset number 199 being object 99 in the 100's bank.
For bank selection via MIDI, the Rumour and Mangler respond to MIDI Bank Select Controller 32 (followed by a program change). For example, to remotely select preset 143, send controller 32 with a value of 1, followed by a program change with a value of 43.
The devices also respond, on the specified channel, to 16 MIDI controller numbers, CC#s 1 – 16 as a way to remotely change the value of the 16 "Basic" effect parameters. You must be in the Preset menu of the Rumour or Mangler to use this feature. You will also need to keep in mind that the "entry value" when you send continuous controller information to the Rumour or Mangler will be whatever value your controller is sending (a slider pulled all the way down, for example, will send a value of 0). So you should be prepared for the parameter's setting to jump from its current setting to a new value being sent from your controller.

After sending a program change to Rumour or Mangler, you should wait 500 milliseconds before sending any of the CCs. This allows the preset time to start. If your sequencer is set to 120 BPM, for example, one beat equals 500 milliseconds.
Digital Lock
The green DIGITAL LOCK LED, below the MIDI LED, comes on steady to indicate that the device has sensed and locked to an external digital clock, at either 44.1 or 48 kHz sampling rate. It flashes if lock has not been achieved or if lock has been lost.
Contrast Knob
Turn the contrast knob to adjust the appearance of your Rumour or Mangler's display. Different viewing angles may require you to adjust the display contrast for optimal readability.
If your device's display doesn't seem to be working, you may just need to turn the contrast knob to change the contrast setting.
Bank Knob
The BANK knob lets you choose the bank for the type of effect you wish to use. Use it in conjunction with the PRESET knob to quickly get to any of the 256 possible effects in the device. When you turn the BANK knob, the name of the current bank will be shown briefly on the top line of the display.
There are 16 banks of 16 effects each. The first 12 banks are known as ROM banks, since they are stored in the device's Read-Only Memory and you cannot change them. The four remaining banks are reserved for the presets that you create, so they are called User banks. All in all, there are 192 ROM effects and 64 user effects. The 16 banks for each device are:
| Rumour Mangler | |
| 1. Ambience 1. Chorus | |
| 2. Small Rooms 2. Flange | |
| 3. Large Rooms 3. Phase/Tremolo | |
| 4. Small Halls 4. Rotary/Panner | |
| 5. Large Halls 5. Delay | |
| 6. Plate/XXL 6. LaserVerb | |
| 7. Gated/Rvrs/Cmpr 7. Filters | |
| 8. Unusual 8. Pitcher/Synth | |
| 9. LaserVerb 9. Freq Shifters | |
| 10. Delay+ 10. Distortion | |
| 11. Chorus+ | 11. Distortion+ |
| 12. Flange+ | 12. Compression |
| 13. User 1 | 13. User 1 |
| 14. User 2 | 14. User 2 |
| 15. User 3 | 15. User 3 |
| 16. User 4 | 16. User 4 |
Preset Knob
The PRESET knob selects among the 16 presets (effects) in each bank. Appendix A of this manual provides complete lists of the presets included with Rumour and Mangler. Unoccupied user locations have
There are two ways to select effects with the BANK and PRESET knobs. If the Change Effect master parameter is set to "Load automatically," the effect selected by moving the BANK and/or PRESET knob loads immediately. When you set the Change Effect master parameter to "Cue next effect," you can take advantage of the cuing feature, as described in the following section.
Cuing Effects
Rumour and Mangler have a cuing feature that lets you select an effect before you actually load it. This can be useful for studio or stage applications where you want to change to a pre-selected (cued) effect with a single button press.
Set the Change Effect master parameter to "Cue next effect" to enable cuing. Now, when you turn the BANK and/or PRESET knob to select a new effect, the current effect remains running and the newly selected effect is cued. The LOAD LED blinks to indicate that there is an effect cued up (that is, selected but not loaded). After a few seconds, the display will again show the name of the active effect. Press the LOAD button when you are ready to change to the cued effect.
Since you use the BANK and PRESET knobs to cue an effect, keep in mind that the position of the knobs while an effect is cued does not reflect the currently active effect. Instead, the knobs are actually indicating the bank and preset number of the cued effect. To re-display the name of the cued effect, turn the PRESET knob one click to the right or left then back to its original position. The name of the cued effect will briefly appear on the display.
If you reselect the current effect with the BANK and/or PRESET knobs, the LED stops blinking and the previously selected effect is no longer cued.
Load Button
If the Change Effect master parameter is set to "Load automatically," (the default) the effect selected by moving the BANK and/or PRESET knob will load immediately; you do not need to press the LOAD button. If you press the LOAD button while you are editing a preset, however, the current preset will be re-loaded, throwing away any edits that you may have made.
If the Change Effect master parameter is set to "Cue next effect," the current effect remains active as you cue up a new effect with the BANK and/or PRESET knob. Press the LOAD button to engage the cued effect. When either the BANK or the PRESET knob is moved, the load LED blinks to indicate that you must press it to engage the new effect.
You can also use the LOAD button to re-engage the current preset to its un-edited settings. LOAD works this way if you're in "Load Automatically" mode, and also in "Cue next effect" mode if another effect is not currently cued.
Store Button
The LED in the STORE button will light any time you change an effect parameter. If you are editing one of the ROM effects (Banks 1–12), pressing the lighted STORE button lets you save the edited effect to one of the four User banks (User1–User4). If the preset you are editing is already in one of the User banks, pressing STORE lets you either replace the effect with the newly-edited version or save the newly-edited effect to a new User bank location.
The store dialog guides you through selecting a User bank and an effect slot, naming the effect, and finally confirming the store function.
The first screen looks like this:
Choose a User Bank/# Select/Value=Rename
(Pressing LOAD at this point cancels the operation.)
Move the BANK knob to select one of the User banks (labeled User1–User4), then use the PRESET knob to select a storage location in the selected User bank. The display changes to reflect the appropriate numbers and name. The top line will say either "Store" or "Replace," depending on whether or not a preset is already stored at the location. Press STORE to choose this location.
Store at User1/13? 205 Classic Chapel
If the chosen location already has a preset stored, the name of the stored preset will be displayed, giving you a chance to reconsider before replacing that preset:
Replace User1/13? 205 Oval Office
At this point you can press STORE to replace the preset at the selected location, use the BANK and STORE knobs to choose a different User bank location, or press LOAD to cancel.
Renaming Presets
You don't have to rename the presets you store in the User banks, since they are stored with unique bank and preset numbers. If you'd like, however, you can use the SELECT and VALUE knobs to rename your presets. You can even do this before choosing User bank locations. During the store operation, the bottom line of the display shows the object name; use the SELECT knob to move the cursor and the VALUE knob to change characters.
Choose a User Bank/# Plastic Chapel
If you decide to name the preset before storing it, the STORE LED will continue to blink, reminding you that you still need to select a location and save the preset.
Parameter Knobs: Select and Value
The two knobs in the parameter section, SELECT and VALUE, are used for a number of purposes in the device. Already discussed are the Master menu parameter selections, EQ menu parameter selections, and character selection in the naming dialog. Their main function is to adjust effect parameters and their values. So when you're looking at a preset, moving the SELECT knob will scroll through the list of its parameters.
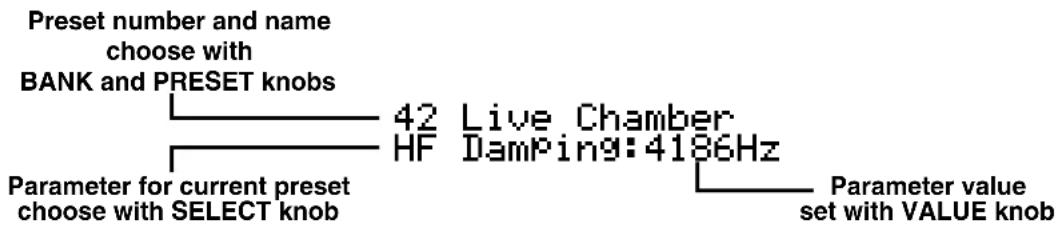
flowchart
graph TD
    A["Preset number and name choose with BANK and PRESET knobs"] --> B["42 Live Chamber"]
    C["Parameter for current preset choose with SELECT knob"] --> B
    B --> D["Parameter value set with VALUE knob"]
    B --> E["HF Damping: 4186Hz"]
Turn the VALUE knob to change the value of the currently shown parameter. When a value is changed, the STORE LED lights to indicate that a change has been made. As described in the previous section, you can press the STORE button at this point to save the preset with the changes you've made.
The first 16 parameters you'll see as you scroll through each preset's parameter list are the "Basic" FX parameters. By default, these are the only parameters that will be displayed. To scroll through ALL of the algorithm parameters (up to 44) of the active effect, set Show FX Parameters on the Master menu to "Extended," (see page 3-7). Complete documentation for every parameter of every effect is available at the www.kurzweilmusicsystems.com web site.
Backing Up Your Presets using MIDI SysEx
To make backup copies of the presets you've created and stored in User Banks 1–4, you'll need to have a MIDI sequencer attached via MIDI to your Rumour or Mangler. Here's what you need to do:
- Connect a MIDI cable from the MIDI OUT port on your Rumour or Mangler to the MIDI IN port of your sequencer.
• Make sure that the THRU/OUT switch on the back of your Rumour or Mangler is set to OUT.
- Your sequencer may have a special “Capture Dump” option for SysEx dumps. You can either use the “Capture Dump” feature (if available) or set your sequencer to record. When you are ready, select “SysEx Object Dump?” from the Rumour or Mangler Master menu and select the bank(s) to dump. Make sure your sequencer is recording, then press the LOAD button on the Rumour or Mangler, as prompted on the screen.
• The MIDI LED on your Rumour or Mangler will blink while the SysEx dump is taking place. When it has completed, give the dump a descriptive name, then save the MIDI file on your sequencer. This is the backup of your user presets. Instructions for restoring your presets from a SysEx dump are provided in the next section.
Restoring Your Presets

Before you restore presets to your Rumour or Mangler, make sure that you do not need the contents of the bank(s) to which you will be restoring. The presets you restore to the Rumour or Mangler will overwrite the presets currently in the bank(s).
To restore User Bank presets that you've previously backed up (as described in "Backing Up Your Presets using MIDI SysEx," above):
- Connect a MIDI cable from the MIDI OUT port on your sequencer to the MIDI IN port of your Rumour or Mangler.
- Set the BANK knob on your Rumour or Mangler to one of the ROM banks (i.e., any bank that does not begin with the word "User"). It doesn't matter which bank you select, so long as it is not one of the user banks.
- Your sequencer may have a special "Send Dump" option for SysEx dumps. You can either use the "Send Dump" feature (if available) or set your sequencer to play the MIDI file that contains your backup. Your Rumour or Mangler will be ready to receive the SysEx as soon as you play the file on your sequencer; you do not need to put the Rumour or Mangler into a special receive mode.
- The MIDI LED on the Rumour or Mangler will flash while it is receiving SysEx, and messages on the display will indicate which bank is being restored. When the LED stops flashing, your previously saved presets are restored.
Troubleshooting
This section describes a few things to check when your Rumour or Mangler doesn't do what you think it should.
First of all, you may want to re-initialize your unit with a soft or hard reset (described on page 3-10). Remember that a hard reset will expunge any presets you have created, so you should back up any presets in the User banks that you want to save (see page 3-19).
Here are a few other things to check:
- There is no sound at output when using analog
Check that the Digital Clock parameter is set to "Internal." See page 3-5.
• MIDI not transmitted (e.g., program changes, SysEx)
Check the position of the MIDI OUT/THRU switch on back panel. MIDI generated by Rumour or Mangler will only be sent out the MIDI port if the switch is set to OUT. See page 2-4.
- Software installation fails (e.g., OS upgrade)
Make sure no other MIDI events are being sent to unit while you are installing the new software.
.Wet/Dry level reverts to 100%
Check setting of Wet/Dry Mode parameter. See page 3-4.
• Effects don't change automatically
Check setting of Change Effect parameter. See page 3-7.
BANK/PRESET knobs and display are out of sync (i.e., the preset indicated by the knob settings is not the preset shown on the display screen)
This can happen during effect cuing, when the unit receives a program change command via MIDI, or if you cancel a Store operation after changing knob positions. The BANK/PRESET knobs and display will get back in sync after you move either knob.
- Something doesn't sound right / image collapses to mono / panning is wrong
Check settings on EQ menu. See page 3-12.
- There is audible clipping, but the clip LEDs do not light
The input LEDs show actual input level, not post-EQ, so gain added in the EQ section could result in audible clipping without any clip LEDs showing.
·MIDI CC commands don't seem to be getting to the unit
1) Make sure you are in the Preset menu of the Rumour or Mangler (i.e., a preset name is shown on the display screen, not a Master menu item or other item).
2) Make sure you are waiting a sufficient amount of time after sending a program change. You should wait at least 500 milliseconds after sending a program change before sending any of the CCs. See page 3-14.
Appendix A Effects Tables
This appendix lists the preset effects available in each bank of the Rumour and Mangler. Each preset includes the number of the algorithm on which it is based. You can download the complete algorithm reference manual at http://www.kurzweilmusicsystems.com. There you will find complete descriptions of the parameters in each algorithm.
Rumour Effects
| Ambience Small Rooms | ||||||||
| 1 | Small Closet alg 10 17 | BrightSmall | Room alg 1 33 Brt Empty Room alg 7 | |||||
| 2 | Tight Ambience alg 6 | 18 Small | Drum Room alg 1 34 In The Studio alg 4 | |||||
| 3 | Add More Air alg 10 | 19 Small | StudioRoom alg 4 35 Tabla Room | alg 12 | ||||
| 4 | Add Ambience | alg 1 | 20 | Drum Room | alg 12 | 36 | Brass Chamber | alg 1 |
| 5 | Small Wood Booth | alg 4 | 21 | Bassy Room | alg 1 | 37 | Sax Chamber | alg 1 |
| 6 | Standard Booth | alg 8 | 22 | Thick Room | alg 5 | 38 | Live Chamber | alg 11 |
| 7 | Natural Room | alg 5 | 23 | Sun Room | alg 5 | 39 | My Garage | alg 4 |
| 8 | NiceLittleBooth | alg 1 | 24 | The Real Room | alg 5 | 40 | Bigger Perc Room | alg 7 |
| 9 | With A Mic | alg 4 | 25 | Bathroom | alg 5 | 41 | Plebe Chamber | alg 1 |
| 10 | PrettySmallPlace | alg 4 | 26 | Utility Room | alg 5 | 42 | Med Large Room | alg 12 |
| 11 | Viewing Booth | alg 1 | 27 | Spitty Drum Room | alg 7 | 43 | ClassicalChamber | alg 7 |
| 12 | Small Dark Room | alg 12 | 28 | Genuine Room | alg 5 | 44 | Large Room | alg 7 |
| 13 | Intimate Room | alg 7 | 29 | Green Room | alg 7 | 45 | Sizzly Drum Room | alg 5 |
| 14 | White Room | alg 5 | 30 | Percussive Room | alg 1 | 46 | JudgeJudyChamber | alg 7 |
| 15 | Live Place | alg 8 | 31 | The Comfy Club | alg 9 | 47 | Bloom Chamber | alg 7 |
| 16 | A Distance Away | alg 6 | 32 | Stall One | alg 7 | 48 | Real Big Room | alg 5 |
| Small Halls | Large Halls | Plate / XXL | ||||||
| 49 | Small Hall | alg 5 | 65 | Concert Hall | alg 9 | 81 | Real Plate | alg 14 |
| 50 | Real Niceverb | alg 5 | 66 | Bob'sDiffuseHall | alg 9 | 82 | Bright Plate | alg 14 |
| 51 | Empty Stage | alg 7 | 67 | Abbey Piano Hall | alg 7 | 83 | Medm Warm Plate | alg 7 |
| 52 | Medium Hall | alg 1 | 68 | My Dreamy 481! | alg 9 | 84 | Bloom Plate | alg 9 |
| 53 | Elegant Hall | alg 1 | 69 | The Long Haul | alg 7 | 85 | Clean Plate | alg 9 |
| 54 | Opera House | alg 5 | 70 | Predclay Hall | alg 9 | 86 | Plate Mail | alg 11 |
| 55 | Mosque Room | alg 7 | 71 | Sweeter Hall | alg 7 | 87 | RealSmoothPlate | alg 9 |
| 56 | Spacious Hall | alg 5 | 72 | The Piano Hall | alg 7 | 88 | Classic Plate | alg 5 |
| 57 | Grandiose Hall | alg 1 | 73 | Bloom Hall | alg 9 | 89 | Weighty Platey | alg 5 |
| 58 | Short Hall | alg 13 | 74 | Recital Hall | alg 12 | 90 | Platey Room | alg 14 |
| 59 | Bright Hall | alg 1 | 75 | Generic Hall | alg 12 | 91 | Huge Tight Plate | alg 9 |
| 60 | Classic Chapel | alg 5 | 76 | Burst Space | alg 9 | 92 | Immense Mosque | alg 7 |
| 61 | Semisweet Hall | alg 5 | 77 | Real Dense Hall | alg 7 | 93 | Dreamverb | alg 10 |
| 62 | Reflective Hall | alg 5 | 78 | Pad Space | alg 11 | 94 | Splendid Palace | alg 5 |
| 63 | Smooth Hall | alg 5 | 79 | Standing Ovation | alg 11 | 95 | Big Gym | alg 11 |
| 64 | Ballroom | alg 1 | 80 | Flinty Hall | alg 7 | 96 | Huge Batcave | alg 12 |
| Gated / Rvrs / Cmpr Unusual LaserVerb | ||||||||
| 97 G | Gated Snare Rvrb alg 3 | 113 Non-Linear | Linear 1 alg 10 | 129 LaserVerb alg | 100 | |||
| 98 G | Gated Booth alg 3 114 N | Non-Linear 2 | alg 15 | 130 Laserwaves alg 100 | ||||
| 99 | Tight Gated Rvrb | alg 3 | 115 | Non-Linear 3 | alg 6 | 131 | Skinny LaserVerb | alg 101 |
| 100 | Gate Plate | alg 3 | 116 | Exponent Booth | alg 10 | 132 | Gated LaserVerb | alg 104 |
| 101 | Reverse Reverb 1 | alg 15 | 117 | Drum Latch 1 | alg 10 | 133 | LazerfazerEchoes | alg 102 |
| 102 | Reverse Reverb 2 | alg 15 | 118 | Drum Latch 2 | alg 10 | 134 | Simple LaserVerb | alg 102 |
| 103 | Reverse Reverb 3 | alg 15 | 119 | Diffuse Gate | alg 9 | 135 | Crystallizer | alg 100 |
| 104 | Vocal Room | alg 51 | 120 | Acid Trip Room | alg 10 | 136 | Spry Young Boy | alg 101 |
| 105 | Vocal Stage | alg 51 | 121 | ClassRoom | alg 5 | 137 | Drum Neurezonate | alg 102 |
| 106 | Room+Compression | alg 51 | 122 | HighSchool Gym | alg 7 | 138 | Growler | alg 104 |
| 107 | Room+SlowCompres | alg 51 | 123 | School Stairwell | alg 4 | 139 | Ringy Drum Plate | alg 104 |
| 108 | Chamber+Compress | alg 51 | 124 | Cool Dark Place | alg 11 | 140 | Oil Tank | alg 104 |
| 109 | Drum Comprs+Rvrb | alg 51 | 125 | Pitcher Hall | alg 383 | 141 | Wobbly Plate | alg 104 |
| 110 | Snappy Drum Room | alg 51 | 126 | DistantTVRoom | alg 383 | 142 | Timbre Taps | alg 105 |
| 111 | Roomitizer | alg 51 | 127 | Shaper+Reverb | alg 322 | 143 | LaserDelay+Rvrb1 | alg 105 |
| 112 | Live To Tape | alg 51 | 128 | Cabinet in room | alg 285 | 144 | LaserDelay+Rvrb2 | alg 105 |
| Delay+ | Chorus+ | Flange+ | ||||||
| 145 | Basic Delay 1/8 | alg 150 | 161 | Stereo Chorus | alg 408 | 177 | Big Slow Flange | alg 458 |
| 146 | Basic Delay 1/4 | alg 150 | 162 | Full Chorus | alg 408 | 178 | Squeeze Flange | alg 458 |
| 147 | Basic Dly 250ms | alg 190 | 163 | Everyday Chorus | alg 408 | 179 | Throaty Flange | alg 458 |
| 148 | Simple Slap 60ms | alg 190 | 164 | Dense Gtr Chorus | alg 408 | 180 | PseudoAnaGtrFlng | alg 458 |
| 149 | Wide Slapbk 76ms | alg 191 | 165 | Wide Chorus | alg 408 | 181 | Crystal Flange | alg 458 |
| 150 | Dub Delay 240ms | alg 190 | 166 | BasicChorusDelay | alg 408 | 182 | Flange Echo | alg 458 |
| 151 | 4-Tap Delay BPM | alg 150 | 167 | BroadRevSlapback | alg 408 | 183 | Slapback Flange | alg 458 |
| 152 | 4-Tap Dly Pan ms | alg 151 | 168 | Chorus Delay | alg 408 | 184 | Flange Delay | alg 458 |
| 153 | Room+Delay | alg 105 | 169 | RichChorusDelay | alg 408 | 185 | Flange Booth | alg 458 |
| 154 | Big Hall Delay | alg 105 | 170 | TheChorusCloset | alg 408 | 186 | Pewter FlangeVrb | alg 458 |
| 155 | Gunshot Verb | alg 105 | 171 | Chorus HiCeiling | alg 408 | 187 | Flange Room | alg 458 |
| 156 | Mountain Echo ms | alg 106 | 172 | Chorus Hall | alg 408 | 188 | FlgDly LargeHall | alg 458 |
| 157 | Sm Slap Room ms | alg 106 | 173 | CathedralChorus | alg 408 | 189 | SloFlangeDlyRoom | alg 458 |
| 158 | ShortPreDly Room | alg 11 | 174 | ChorDlyRvrb Lead | alg 408 | 190 | Flange Dly Hall | alg 458 |
| 159 | Long PreDly Hall | alg 11 | 175 | SwishyChDlyHall | alg 408 | 191 | Brite Rippleverb | alg 458 |
| 160 | Furbelows | alg 9 | 176 | DeepChorDlyRvrb | alg 408 | 192 | Glacial Canyon | alg 458 |
Mangler Effects
| Chorus Flange Phase / Tremolo | ||||||||
| 1 Stereo Chorus alg 201 | 17 Big Slow Flange alg 225 33 Slow Deep Phaser alg 251 | |||||||
| 2 Dense Gtr Chorus alg 201 18 PseudoAnaGtrFlng alg 225 34 Saucepan Phaser alg 253 | ||||||||
| 3 Chorusier alg 204 19 Ncd Flangers alg 225 35 Fast Phaser alg 251 | ||||||||
| 4 Everyday Chorus | alg 204 | 20 | Analogue Flanger | alg 226 | 36 | Circles | alg 250 | |
| 5 Thick Chorus | alg 205 | 21 | Wispy Flange | alg 225 | 37 | Wawawa...wawa | alg 253 | |
| 6 Wide Chorus | alg 205 | 22 | Gulp Flange | alg 225 | 38 | Fast&Slow Phaser | alg 250 | |
| 7 Chorus Fastback | alg 405 | 23 | TightSlapFlange | alg 455 | 39 | Slow Swish Phase | alg 253 | |
| 8 Chorused 4-Tap | alg 402 | 24 | Flange 4-Tap | alg 452 | 40 | Static Phaser 1 | alg 255 | |
| 9 Chorus Laserdly | alg 405 | 25 | Laserflange | alg 455 | 41 | Static Phaser 2 | alg 255 | |
| 10 Chorus Delay | alg 408 | 26 | Flange Echo | alg 458 | 42 | Hip Hop Aura | alg 256 | |
| 11 Chorus Dly Rvrb | alg 408 | 27 | FlangeDly LgHall | alg 458 | 43 | Woodenize | alg 256 | |
| 12 Chorus Hall | alg 408 | 28 | Flange Hall | alg 458 | 44 | Marimbafication | alg 256 | |
| 13 Chorus HiCeiling | alg 408 | 29 | Flange Plate | alg 458 | 45 | Tremolo 1/8 BPM | alg 270 | |
| 14 TheChorusCloset | alg 408 | 30 | SyntheticRmFlang | alg 458 | 46 | Fast Tremolo BPM | alg 270 | |
| 15 Standrd Gtr Chor | alg 408 | 31 | Throaty Flange | alg 458 | 47 | Fast Sqr Trem Hz | alg 271 | |
| 16 Full Chorus | alg 408 | 32 | Squeeze Flange | alg 458 | 48 | Tremolo Hz | alg 271 | |
| Rotary / Panner | Delay | LaserVerb | ||||||
| 49 | CleanRotors fast | alg 290 | 65 | Basic Delay 1/8 | alg 152 | 81 | LaserVerb | alg 100 |
| 50 | CleanRotors slow | alg 290 | 66 | Basic Dly 200ms | alg 153 | 82 | Laserwaves | alg 100 |
| 51 | CleanRotors Vb f | alg 290 | 67 | Simple Slap 60ms | alg 190 | 83 | Skinny LaserVerb | alg 101 |
| 52 | CleanRotors Ch f | alg 290 | 68 | Dub Delay 240ms | alg 190 | 84 | LazerfazerEchoes | alg 102 |
| 53 | SlightDstRotor f | alg 291 | 69 | 4Tap L>R Pan BPM | alg 152 | 85 | Spry Young Boy | alg 101 |
| 54 | Dirty Rotors f | alg 294 | 70 | 4Tap Rhythm BPM | alg 152 | 86 | Crystallizer | alg 100 |
| 55 | MoreDistRotor f | alg 293 | 71 | Astral Taps BPM | alg 155 | 87 | Gated LaserVerb | alg 104 |
| 56 | MoreDistRotor s | alg 293 | 72 | SpectraShapeTaps | alg 155 | 88 | Growler | alg 104 |
| 57 | HeavyDistRotor f | alg 294 | 73 | Ecko Plecks BPM | alg 169 | 89 | Drum Neurezonate | alg 102 |
| 58 | Widespread | alg 280 | 74 | Regen Echo ms | alg 168 | 90 | Oil Tank | alg 104 |
| 59 | Widener Mn->St | alg 281 | 75 | Ducked Delay | alg 174 | 91 | Wobbly Plate | alg 104 |
| 60 | Cabinet in Room alg 285 | 76 Drum + | Bass Zapper alg 174 | 92 Reverse | Reverb alg 15 | |||
| 61 | SquarePanner 1/4 | alg 279 | 77 | 3Band Drum Delay | alg 173 | 93 | Tight Gated Rvrb | alg 3 |
| 62 | Autopan BPM 1/8 | alg 279 | 78 | Delay Switcher | alg 172 | 94 | Timbre Taps ms | alg 106 |
| 63 | Square Panner Hz | alg 275 | 79 | Sm Slap Room ms | alg 106 | 95 | LaserDelay+Rvrb1 | alg 105 |
| 64 | Autopanner Hz | alg 275 | 80 | Gunshot Dly Rvrb | alg 105 | 96 | LaserDelay+Rvrb2 | alg 105 |
| Filters Pitcher / Synth Freq Shifters | ||||||||
| 97 Envelope Filter alg 360 | 113 Pitcher G3 | alg 382 | 129 Ring Modulator1 | alg 380 | ||||
| 98 Bass Env Filter alg 360 | 114 Pitcher C5 | alg 382 | 130 Ring Modulator2 | alg 380 | ||||
| 99 Synth Env Filter alg 360 | 115 Pitcher D | & A alg 382 | 131 Ring Modulator3 | alg 380 | ||||
| 100 LFO Sweep Filter alg | 362 116 Pitcher | C maj | alg 382 | 132 Ring Modulator4 | alg 380 | |||
| 101 | Soft Pulse Filt | alg 362 | 117 | Pitcher G maj | alg 382 | 133 | Too Fast Panner | alg 275 |
| 102 | Circle Bandsweep | alg 362 | 118 | NonHarm Vox Ptch | alg 382 | 134 | Frequency Shift | alg 385 |
| 103 | Trip Filter | alg 362 | 119 | HollowPolyPitchr | alg 382 | 135 | Drum Loosener | alg 385 |
| 104 | DoubleRiseFilter | alg 362 | 120 | Pitcher Hall | alg 383 | 136 | Drum Tightener | alg 385 |
| 105 | Trig Env Filter | alg 361 | 121 | DistantTVRoom | alg 383 | 137 | Feathers McGraw | alg 385 |
| 106 | Resonant Lowpass | alg 363 | 122 | Flange->Pitcher | alg 384 | 138 | LxR Vox Honker | alg 386 |
| 107 | Resonant Hipass | alg 363 | 123 | Pitcher+Chorus | alg 410 | 139 | Lollipop Kid | alg 387 |
| 108 | OddHarmSuppress | alg 374 | 124 | Pitcher+Flange | alg 460 | 140 | Drum Frightener | alg 387 |
| 109 | Ring Linger | alg 390 | 125 | Pitcher+Chor+Dly | alg 410 | 141 | Fallout | alg 387 |
| 110 | HiFreq Stimulate | alg 372 | 126 | Pitcher+Flng+Dly | alg 460 | 142 | Ascension | alg 387 |
| 111 | 2 Band Enhancer | alg 370 | 127 | DeepSquare Synth | alg 393 | 143 | 4th Stacker | alg 387 |
| 112 | 3 Band Enhancer | alg 371 | 128 | Sawtooth Synth | alg 393 | 144 | Bad Trip Vox | alg 387 |
| Distortion | Distortion+ | Compression | ||||||
| 145 | Classic Gtr Dist | alg 310 | 161 | Chr->GtrDst->Chr | alg 323 | 177 | HKCompressor 3:1 | alg 330 |
| 146 | Crunch Guitar | alg 310 | 162 | ODriveGtrLd DlCh | alg 323 | 178 | Snare After-ring | alg 330 |
| 147 | SaturatedGtrDist | alg 310 | 163 | Krazy Gtr Comper | alg 323 | 179 | Add Sustain | alg 331 |
| 148 | Mean 70'sFunkGtr | alg 310 | 164 | Flg->GtrDst->Chr | alg 325 | 180 | SKCompressor 9:1 | alg 331 |
| 149 | Blown Speaker | alg 390 | 165 | MildGtrOD+Dly+Fl | alg 326 | 181 | SKComprs FB 12:1 | alg 331 |
| 150 | Synth Distortion | alg 303 | 166 | LeadGtr Dly Flng | alg 324 | 182 | De-esser | alg 332 |
| 151 | Superphasulate | alg 169 | 167 | Tube Dist+Reverb | alg 327 | 183 | OptoCompressSCEQ | alg 334 |
| 152 | Dist Cab EPiano | alg 301 | 168 | Distortion+EQ | alg 304 | 184 | Compress/Expand+ | alg 342 |
| 153 | Burnt Transistor | alg 304 | 169 | Shaper->Flange | alg 321 | 185 | Gate w/SC EQ | alg 345 |
| 154 | A little dirty | alg 305 | 170 | Flange->Shaper | alg 321 | 186 | Mid Compressor | alg 335 |
| 155 | SuperShaper | alg 306 | 171 | Shaper->Reverb | alg 322 | 187 | Rvrb+Compression | alg 51 |
| 156 | Drum Shaper | alg 306 | 172 | Reverb->Shaper | alg 322 | 188 | BigRoom+Compress | alg 52 |
| 157 | 3 Band Shaper | alg 307 | 173 | Quantize+Flange1 | alg 309 | 189 | Drum Comprs+Rvrb | alg 51 |
| 158 | New3BandShaper | alg 307 | 174 | Quantize+Flange2 | alg 309 | 190 | Snappy Drum Room | alg 51 |
| 159 | Quantizer | alg 309 | 175 | Quantize+Alias1 | alg 308 | 191 | Roomitizer | alg 51 |
| 160 | Aliaser | alg 308 | 176 | Quantize+Alias2 | alg 308 | 192 | Live To Tape | alg 51 |
Effects Tables
Mangler Effects
Appendix B Specifications
Dimensions
Height: 1.8 inches (45 mm)
Width: 19 inches (482 mm)
Depth: 8.1 inches (205 mm)
Weight: 5 lbs. (2.27 Kg)
Inputs
Analog
Two analog inputs, balanced / unbalanced using 1/4" Tip-Ring-Sleeve jacks
Input impedance: 20K ohms balanced, 10K ohms unbalanced
A/D converter: 24 bit, 128x oversampling
Maximum analog input level: +22 dBU balanced
Minimum analog input level for 0 dBFS: +4 dBU unbalanced
Frequency response: 20 Hz - 20 kHz ± 0.1 dB
Dynamic range: >106 dB unweighted @ 1 kHz from 22 dBU
THD+N: <0.001% @ 1 kHz, +19 dBU
Crosstalk: < -104 dB @ 1 kHz, +21 dBU
Digital
Stereo S/PDIF digital input (IEC 60958-3)
Synchronizes to S/PDIF input clock or generates 48 or 44.1 kHz
Lock range with external clock: 37 kHz to 49 kHz
Impedance: 75 ohms
Input word length: up to 24 bits
Outputs
Analog
Two analog outputs, balanced / unbalanced using 1/4" Tip-Ring-Sleeve jacks
D/A converter: 24 bit, 128x oversampling
Maximum analog output level: +22 dBU balanced
Minimum analog output level for 0 dBFS: +10 dBU unbalanced
Output impedance: 400 ohms balanced, 200 ohms unbalanced
Output level switchable from -10 dBV unbalanced to +4 dBU balanced
Frequency response: 20 Hz - 20 kHz ± 0.1 dB
Dynamic range: >112 dB unweighted @ 1 kHz from 22 dBU
THD+N: <0.003% @ 1 kHz, +19 dBU
Crosstalk: < -111 dB @ 1 kHz, +21 dBU
Digital
Stereo S/PDIF digital output (IEC 60958-3)
Impedance: 75 ohms
Output word length: 16, 20, or 24 bits
MIDI
In and Out (switchable between Out/Thru)
Power Supply
9.5 Volt AC, 2 Amp
Appendix C MIDI Implementation Chart
Model: Rumour/Mangler
Manufacturer: Date: 5/13/03
Young Chang Version 1.0
Effects Processor
| Function Transmitted | Recognized Remarks | |||
| Basic Channel | Default 1 | 1 | ||
| Changed 1 | - 16 1 - 16 | |||
| Mode | Default | X | ||
| Messages X | ||||
| Altered | ||||
| Note Number | X | X | ||
| True Voice X | X | |||
| Velocity | Note ON X | X | ||
| Note OFF X | X | |||
| After Touch | K | e | y | s |
| Channels X | X | |||
| Pitch Bend X X | ||||
| Control Change | 32 | 1 - 16, 32 | 1 - 16 Effects Controllers32 Bank Select | |
| Program Change | O | O | ||
| True # 0 | - 99 0 - 127 | |||
| System Exclusive | O | O | ||
| System Common | Song Pos. X | X | X | |
| Song Sel. X | X | |||
| Tu | n | e | ||
| System Real Time | Clock | O | O | |
| Messages X | X | |||
| Aux Messages | Local Control X | X | ||
| All Notes Off X | X | |||
| Active Sense X | X | |||
| Reset X | X | |||
| Notes | ||||
O = yes
X=no
X
X
Index
Numerics
-10 dBV / +4 dBU switch 2-2
A
A N D Music Corp. contact information iii algorithms A-1
B
Backing Up Presets 3-19
Balance 3-12
Bank Knob 3-15
Bank selection 3-14
Basic FX Parameters 1-3
Bass
EQ settings 3-12
Boot Block 3-11
double button press 3-11
Bypass Button 3-3
Bypass Mode
Master parameter 3-7
C
Change Effect
Master parameter 3-7
CLIP LED 1-2
Contrast Knob 3-14
Cue next effect 3-7
Cuing Effects 3-16
D
Digital Clock
Master parameter 3-5
Digital Lock LED 3-14
Digital Word Length
Master parameter 3-5
E
effects algorithms A-1
Effects Tables A-1
Enter bootblock?
Master parameter 3-11
EQ button 1-3, 3-12
Equalization 1-3
Erase User Banks?
Master parameter 3-9
Extended FX Parameters 1-3
Extended mode 3-18
F
footpedals 2-4
Front Panel 3-1
H
Hard Reset?
Master parameter 3-10
|
Input Level Knob 3-1
Input Meters 3-1
Input Source
Master parameter 3-5
Inputs 2-2
K
Kurzweil website iii
L
LEDs 3-14
Load Button 3-16
M
Mangler Effects A-4
Master Button 3-4
Mid
EQ settings 3-12
MIDI 2-4
MIDI Bank Select Controller 3-14
MIDI Channel
Master parameter 3-5
MIDI Clock Source
Master parameter 3-6
MIDI control of parameter values 3-14
MIDI Implementation Chart C-1
MIDI LED 3-14
MIDI SysEx 3-19
0
operating system
updating 3-11
Output Level Knob 3-2
Outputs 2-2
P
Pan 3-12
Parameters
controlling via MIDI 3-14
power supply 2-1
Preset Knob 3-16
Presets
backing up 3-19
Mangler A-4
restoring 3-19
Rumour A-2
Program Change Receive
Master parameter 3-6
Program Change Transmit
Master parameter 3-6
R
Rear Panel 2-1
Replacing effects 3-17
Restoring presets 3-19
Rumour Effects A-2
s
S/PDIF 2-3
Saving effects 3-17
Select Knob 3-18
Show FX Parameters
Master parameter 3-7
Soft Reset?
Master parameter 3-10
software
updating through MIDI 3-11
Stereo Width 3-12
Store Button 3-17
SysEx 2-4, 3-19
SysEx ID
Master parameter 3-8
SysEx Object Dump?
Master parameter 3-8
System Tempo
Master parameter 3-6
setting with TAP button 3-13
T
Tap (Tempo) Button 3-13
Tap Tempo LED
Master parameter 3-7
Tempo-based effects 3-13
Transmit MIDI Clock
Master parameter 3-6
Treb
EQ settings 3-12
Troubleshooting 3-20
accessing Boot Block 3-11
U
updating
operating system 3-11
v
Value Knob 3-18
W
website iii
Wet/Dry Mode
Master parameter 3-4
Width 3-12
Y
Young Chang
contact information iii


- IMPORTANT SAFETY & INSTALLATION INSTRUCTIONS
- SAVE THESE INSTRUCTIONS
- Young Chang International Contacts
- RADIO AND TELEVISION INTERFERENCE
- NOTICE
- AVIS
- Making Connections.... 2-1
- Using Your Rumour or Mangler.... 3-1
- Chapter 1 Getting to Know Rumour & Mangler
- Overview
- Quick Start
- Setting Levels
- Input Source: Analog
- Choosing Effects
- Editing Effects
- Concert Hall Wet/Dry : 50% wet
- Using Equalization
- Chapter 2 Making Connections
- The Rear Panel
- Power
- Audio
- Analog Inputs and Outputs
- 1/4" TRS plug for balanced connections 1/4" TS plug for unbalanced connections
- Setting Levels for Analog Outputs
- For +4 dBU balanced analog input and output:
- For -10dBV unbalanced analog input and output:
- Digital Inputs and Outputs
- Footpedal
- MIDI
- Chapter 3
- Using Your Rumour or Mangler
- The Front Panel
- Input Level Knob & Input Meters
- Input Level LEDs
- Output Level Knob
- Bypass Button
- Effect & EQ bypassed
- Effect & EQ enabled
- Master Button
- Wet/Dry Mode
- Input Source
- Input Source: Analog, Digital
- Digital Clock
- Digital Clock: 44.1kHz Internal, 48kHz Internal, External
- Digital Word Length
- Dig Word Length: 16 bits, 20 bits, 24 bits
- MIDI Channel
- MIDI Channel: None, 1-16
- Program Change Receive
- Program Change Transmit
- System Tempo
- MIDI Clock Source
- Transmit MIDI Clock
- Tap Tempo LED
- Change Effect
- Bypass Mode
- Show FX Parameters
- SysEx ID
- SysEx Object Dump?
- Erase User Banks?
- Erase User Banks? User1-4 Load=Erase
- Erase User1-4! OK? Tap=OK Store=No
- Soft Reset?
- Hard Reset?
- Enter bootblock?
- Enter bootblock? Load=Yes
- Enter bootblock! OK? Tap=OK Store=No
- Install FlashROM via MIDI Load=Yes
- The Boot Block's Back Door
- EQ Button
- Tap (Tempo) Button
- System Tempo: System Tempo: 120 BPM (Internal) 152 BPM (External)
- Setting Durations in Beats-Per-Minute (BPM)
- Digital Lock
- Contrast Knob
- Bank Knob
- Preset Knob
- Cuing Effects
- Load Button
- Store Button
- Choose a User Bank/# Select/Value=Rename
- Store at User1/13? 205 Classic Chapel
- Replace User1/13? 205 Oval Office
- Renaming Presets
- Choose a User Bank/# Plastic Chapel
- Parameter Knobs: Select and Value
- Backing Up Your Presets using MIDI SysEx
- Restoring Your Presets
- Troubleshooting
- Appendix A Effects Tables
- Effects Tables
- Appendix B Specifications
- Dimensions
- Inputs
- Analog
- Digital
- Outputs
- Power Supply
- Appendix C MIDI Implementation Chart
- Model: Rumour/Mangler
- Index
- Numerics
- A
- B
- C
- D
- E
- F
- H
- |
- K
- L
- M
- 0
- P
- R
- s
- T
- U
- v
- W
- Y
Brand : Kurzweil
Model : Rumour
Category : Microphone