KM2240 - Home Automation Krüger&Matz - Free user manual and instructions
Find the device manual for free KM2240 Krüger&Matz in PDF.


| Product Type | Smart Home Controller / Gateway |
| Dimensions (W x H x D) | 120 x 65 x 25 mm |
| Weight | 150 g |
| Power Supply | 5V DC via Micro USB, 1A |
| Wireless Connectivity | Wi-Fi 802.11 b/g/n, Zigbee 3.0, Bluetooth 4.2 |
| Main Functions | Remote control of smart devices, automation routines, voice assistant compatibility, energy monitoring |
| Supported Protocols | Zigbee, Z-Wave, Wi-Fi, IR (built-in emitter) |
| Maximum Paired Devices | Up to 128 |
| Mobile App | Kruger&Matz Home (iOS & Android) |
| Voice Control | Amazon Alexa, Google Assistant |
| Maintenance & Cleaning | Wipe with dry cloth; avoid liquids |
| Safety Features | Overheat protection, encrypted communication |
| Spare Parts & Repairability | Power adapter available; no user-serviceable parts |
| Operating Temperature | 0°C to 40°C |
| Warranty | 2 years |
Frequently Asked Questions - KM2240 Krüger&Matz
User questions about KM2240 Krüger&Matz
0 question about this device. Answer the ones you know or ask your own.
Ask a new question about this device
Download the instructions for your Home Automation in PDF format for free! Find your manual KM2240 - Krüger&Matz and take your electronic device back in hand. On this page are published all the documents necessary for the use of your device. KM2240 by Krüger&Matz.
USER MANUAL KM2240 Krüger&Matz
Wi-Fi surveillance system KM2240
Extended manual
BEDIENUNGSANLEITUNG
DE
OWNER'S MANUAL
EN
INSTRUKCJA OBSŁUG
PL
MANUAL DE UTILIZARE
RO
natural_image
Close-up of a white surveillance camera with labeled parts (10, 11, 12), no visible text or symbols beyond labelsINSTALLATION
NVR
DE
Hauptmenü
Sicherung
Krüger&Matz
DE
Anzeige
12 1
DE
Krüger&Matz
Alarm
Zurücksetzen
Krüger&Matz
Webbrowser-Zugang
Krüger&Matz
Owner's manual Owner's manual
Krüger&Matz
SAFETY INSTRUCTIONS
- Before the installation make sure to read up on local restrictions about recording and surveillance systems.
- Protect the device from exposure to high or low temperatures.
- Protect the device from water and other liquids. Do not handle this device with wet hands.
- Do not use the device where it is prohibited to use 2.4 GHz band.
- Before cleaning the device, make sure that is unplugged from power.
- Clean this device regularly, with soft, dry cloth, without any abrasive agents.
- Do not disassemble or try to repair the device. In case of damage or malfunction, contact authorized service point.
PRODUCT DESCRIPTION
- Power indicator
- Network indicator
- HDD indicator
- Antenna
- Ethernet port
- VGA output
- HDMI output
- USB ports
- Power socket
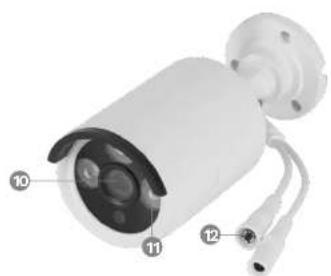
- Camera lens
- IR sensors
- Reset/pairing button

natural_image
Close-up of a white surveillance camera with labeled parts (10, 11, 12), no visible text or symbols beyond labelsEN
INSTALLATION
NVR
- Connect a monitor (or different display) to the VGA or HDMI output.
- Connect the mouse to the USB port.
- Connect the power adapter to power supply socket. Connect the power adapter to a power outlet.
- Optional: connect the Ethernet cable to the Ethernet port.
Camera
- Mount the camera on a place that you chose.
- Connect the power adapter to the camera and to the power outlet.
Hard drive
- Unscrew 4 screws that hold the case.
- Slide the cover to the back and lift it up.
- Connect the SATA plugs to the disk.
- Screw the disk down with provided screws.
- Put the cover back and screw it in.
OPERATION
- After connecting the power adapter to the power outlet, the NVR will turn on automatically.
- When you first turn on the NVR, the configuration wizard will be displayed.
- Log in to the admin account. The default password is: admin.
a. Set the date, time, language and resolution. Press the Next button.
b. The list with connected drives will be shown. You can perform a drive format (with the Format button) and set the action after filling the drive. Press the Next button.
c. Scan the QR code and download the Tuya app.
d. If the Tuya app has been configured, scan the provided QR code to gain access to the camera preview in the app. To do this, check the "App pairing" paragraph. Press the Finish button. The NVR is ready to use. - Click a camera preview twice to set it to full scree Click twice again to close it.
- Click the right mouse button on the camera preview to open the context menu.
a. To turn off the device, open the context menu, press the Shutdown, then Shutdown button. After a moment, you can disconnect the power supply.
Krüger&Matz
Owner's manual Owner's manual
Krüger&Matz
CONTEXT MENU
Camera pairing
This menu allows to browse, pair and delete the cameras.
- To disconnect the camera from the NVR, press the Delete button.
- To pair a new camera to the NVR, press the Pair button. On the camera, press and hold the pairing button until the NVR displays the information about successful pairing.

EN
Main menu
Check the "Main menu" paragraph for details.
Playback
- Select a day
- Select an hour
- Select a camera
- Playback control
- Timeline

Recording mode
In this menu you can change the record mode in set time. To do this:
- Select a camera (or all of them).
- Select the record mode:
a. Continuous recording (blue)
b. Recording after detecting a motion (green) c. No recording (white) - Click or drag across the grid, to set the record mode.
- If you want to copy recording schedule to another camera, select a camera, and press the Copy button.
Krüger&Matz
Owner's manual Owner's manual
Krüger&Matz

Backup
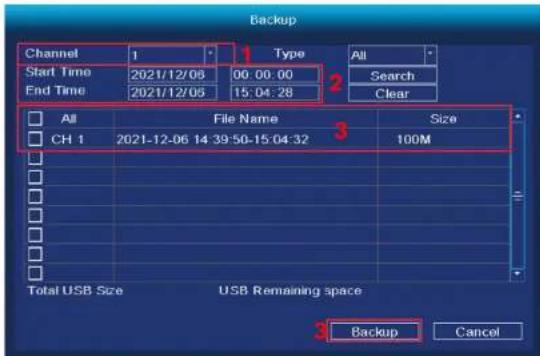
In this menu you can make backup of recordings to an external hard drive. Connect the external hard drive to the USB port.
- Select a camera (or all of them).
- Select date and time. Press the Search button.
- The list of recordings will be shown. Select the recording that you want to backup and press the Backup button.
- Progress of the backup is shown on the bottom of the window.
IPC Config
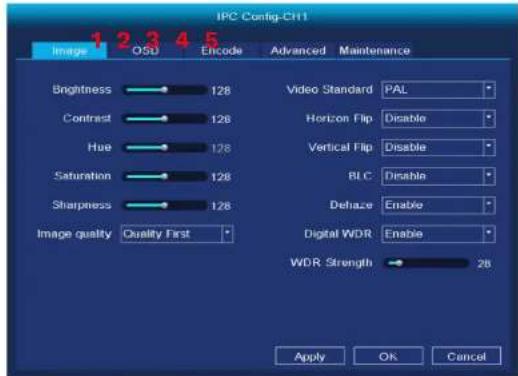
- Color configuration
- Setting the camera name
- Codecs
- Advanced settings
- Updates
EN
Krüger&Matz
Owner's manual Owner's manual
Krüger&Matz
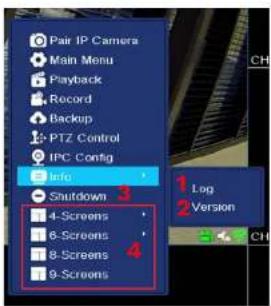
About
- LOG- view the events log
- Info- view the software info
Switching off
- View the number of previews on one screen.
EN
SYSTEM SETTINGS
General
- Date and time:
- Language
- Resolution
- Auto logout time (in minutes)
- Daylight saving time
- NTP protocol settings
- Synchronizing with IPC
- Guide during boot up
- Dual-stream

EN
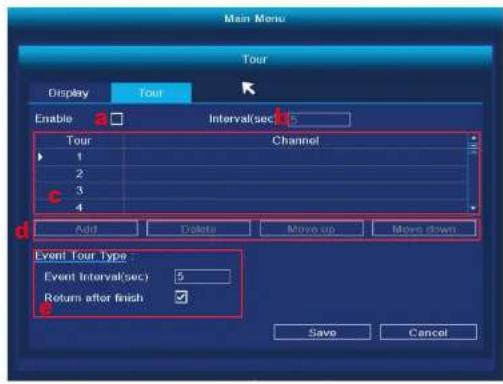
Display
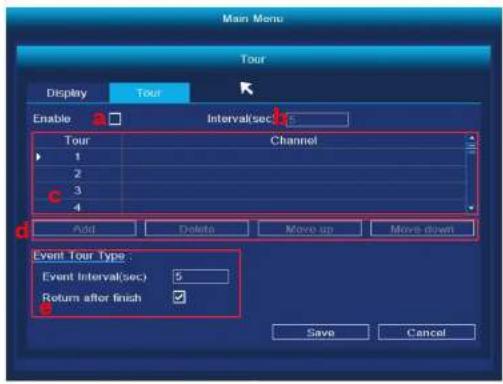
- Changing the channel title
- Viewing info on preview
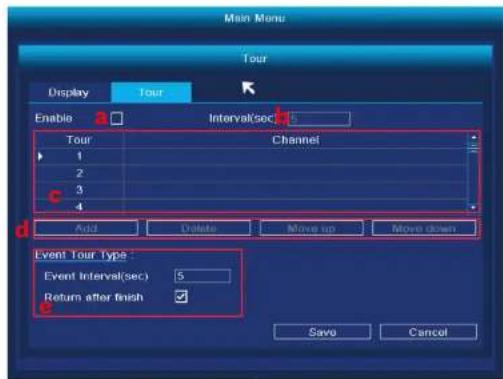
- Cycle through previews
a. Turning on the cycle
b. Cycle time (in seconds)
Krüger&Matz
Owner's manual Owner's manual
Krüger&Matz
c. Cycle channels
•For cycle to work properly, assign a preview to every channel. If you want to display every preview one by one, assign one preview to every channel.
d. Adding, deleting and modifying channels
e. Working after detecting the alarm

Network configuration
- Select the network card
- IP configuration
- Tuya settings
- Advanced

HDD management
- Connected disks list
- Formatting the hard drive
- Disk behavior when full
- Data limit (in days)

Krüger&Matz
Owner's manual Owner's manual
Krüger&Matz
Accounts
- Adding new user
- When adding a new user, set the name, password and permissions. Adding accounts is only available when the admin account is active.
- Deleting and modifying users.

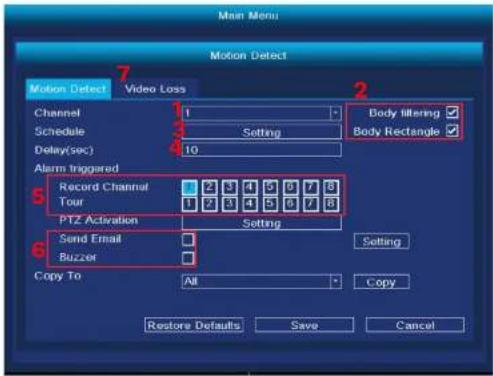
Alarm
- Select the camera to modify.
- Set the motion detection
- Set the motion detection range
- Delay
- Save channel/channel cycle
- Setting the alarm
- Set the behavior after signal loss
Change the display mode
In this menu you can change the number of previews one screen. Caution: after each change of this setting, the system will restart and delete all of the cameras.

EN
EN
Krüger&Matz
Owner's manual Owner's manual
Krüger&Matz
Reset to Default
In this menu you can select which one of the setting you want to reset to default (or select all of them).

Software Update
- Select the update source, update file and press the Upgrade button.
- If the NVR is connected to the network, press the Check updates button.

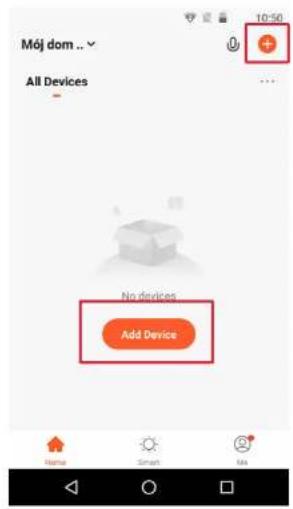
APP PAIRING
Attention: pairing requires an account in the Tuya app
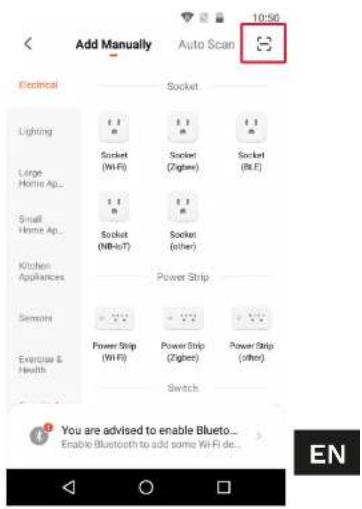
- Press the Add device button.
- Select pairing with the QR code.
- In the DVR, open the Tuya settings menu. Scan the P2P OR code.
- After a moment, the NVR will be added to the app
- To view the previews, select the NVR from the ma screen of the app.
EN
36 3
Krüger&Matz
Owner's manual
Owner's manual
Krüger&Matz
Web browser access
Feed from the camera is available only in Google Chrome.
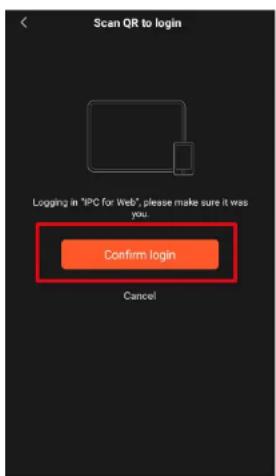
- Open the browser and type ipc-eu.ismartlife.me/login in the address bar.
- Open the Tuya app on your smartphone.
- Go to the "Me" menu.
- Press the icon in the top right.
- Scan the QR code from the browser.
- Press the button, to authorize the login.
- The feed from the camera will be shown in the browser.

SPECIFICATION
• Recording after motion detection
• Scheduled recordings
- Motion and face detection
- Works with Tuya app
• Web-browser access
- Range up to 300 m (without any obstruction)
- Simultaneous preview from 4 cameras
• Wi-Fi Communication (2,4 GHz)
• Support for external hard drives
• Automatic pairing with cameras
NVR specification
- Operating system: Linux
• Video output: 1080p - Communication protocols: TCP/IP, HTTP, DHCP, UDP, RTP, RTSP, FTP, NTP, P2P
• Maximum disk capacity: 4 TB - Antennas: 2x 5 dB
- Ports: VGA, HDMI, RJ-45, 2x USB
• Power consumption: 3 W (without a hard drive)
• Power supply: 12 V / 2 A
• Working temperature: -10ircC 55ircC
• Working humidity: 10% \~ 90%
• Dimensions: 258 x 230 x 41 mm - Weight: 605 g
Camera specification
- Sensor: CMOS
- Lens: 3,6 mm
• Resolution: 2 Mpx (1080p) - Framerate: 20 FPS
• Viewing angle: 75,7°
• Compression: H.265
• IR diodes range: 30 m
• Protection class: IP66
• Power supply: 12 V / 1 A
EN
Krüger&Matz
Owner's manual
• Working temperature: -30°C \~ 50°C
• Working humidity: 0% \~ 90%
• Dimensions: 172 x 61 x 61 mm
- Weight: 313 g
- In set: NVR unit, NVR power supply, camera (4 pcs.), camera power supply (4 pcs.), mouse
- OSD languages: portuguese, russian, spanish, italian, french, czech, german, finnish, bulgarian, swedish, romanian, greek, vietnamese, turkish
Lechpol Electronics Leszek Sp.k. hereby declares that the Wi-Fi surveillance system KM2240 is consistent with directive 2014/53/UE.
Full text of the EU Declaration of Conformity is available at following Internet address: www.lechpol.pl.

English
Correct Disposal of This Product
(Waste Electrical & Electronic Equipment)
(Applicable in the European Union and other European countries with separate collection systems) This marking shown on the product or its literature, indicates that it should not be disposed with other household wastes at the end of its working life. To prevent possible harm to the environment or human health from uncontrolled waste disposal, please separate this from other types of wastes and recycle it responsibly to promote the sustainable reuse of material resources. Household users should contact either the retailer where they purchased this product, or their local government office, for details of where and how they can take this item for environmentally safe recycling. Business users should contact their supplier and check the terms and conditions of the purchase contract. This product should not be mixed with other commercial wastes for disposal.
Made in China for LECHPOL ELECTRONICS Sp. z o.o. Sp.k., ul. Garwolińska 1, 08-400 Miętne.
Instrukcja obsługi
Krüger&Matz
KWESTIE BEZPIECZEŃSTWA
natural_image
Close-up of a white surveillance camera with labeled components (no text or symbols beyond numbers)INSTALACJA
Rejestrator
Menu główne
Kopia zapasowa
Krüger&Matz
PL
Wyświetlanie

Krüger&Matz
Alarm
Krüger&Matz
INSTRUCTIUNI PRIVIND SIGURNATA
natural_image
White surveillance camera with labeled components (no text or symbols beyond numbers)RO
60 6
INSTALARE
NVR
Meniu principal
Copie de rezervă
RO
SETĂRI SISTEM
Generale
Ecran
Configurare retea
Alarmă
Schimbați modul de afişare
Krüger&Matz
Manual de utilizare Manual de utilizare
Krüger&Matz
Actualizare Software
ASOCIERE APLICATIE
RO
RO
74
Krüger&Matz
Manual de utilizare
Manual de utilizare
Krüger&Matz
Acces la browserul web

SPECIFICATII
- Wi-Fi surveillance system KM2240
- INSTALLATION
- NVR
- Hauptmenü
- Sicherung
- Anzeige
- Krüger&Matz
- Alarm
- Zurücksetzen
- Webbrowser-Zugang
- Owner's manual Owner's manual
- SAFETY INSTRUCTIONS
- PRODUCT DESCRIPTION
- Camera
- Hard drive
- OPERATION
- CONTEXT MENU
- Camera pairing
- EN
- Playback
- Recording mode
- Backup
- IPC Config
- About
- Switching off
- SYSTEM SETTINGS
- General
- Display
- c. Cycle channels
- Network configuration
- HDD management
- Accounts
- Reset to Default
- Software Update
- APP PAIRING
- Owner's manual
- Web browser access
- SPECIFICATION
- NVR specification
- Camera specification
- English
- Correct Disposal of This Product
- (Waste Electrical & Electronic Equipment)
- Instrukcja obsługi
- KWESTIE BEZPIECZEŃSTWA
- INSTALACJA
- Rejestrator
- Kopia zapasowa
- PL
- Wyświetlanie
- INSTRUCTIUNI PRIVIND SIGURNATA
- INSTALARE
- Copie de rezervă
- SETĂRI SISTEM
- Generale
- Ecran
- Configurare retea
- Alarmă
- Schimbați modul de afişare
- Manual de utilizare Manual de utilizare
- Actualizare Software
- ASOCIERE APLICATIE
- Manual de utilizare
- Acces la browserul web
- SPECIFICATII
Brand : Krüger&Matz
Model : KM2240
Category : Home Automation