
KM 5773 - Hob MIELE - Free user manual and instructions
Find the device manual for free KM 5773 MIELE in PDF.

| Product type | Induction hob |
| Brand | MIELE |
| Model | KM 5773 |
| Number of cooking zones | 4 |
| Dimensions (W x D x H) | 60.2 cm x 52.0 cm x 4.8 cm |
| Weight | 12.5 kg |
| Electrical supply | 230 V / 50 Hz, total power 7.5 kW |
| Control type | Touch controls with digital display |
| PowerBoost function | Yes, per zone |
| Keep warm function | Yes |
| Automatic shut-off function | Yes, depending on power level |
| Timer | Yes, with programmable automatic shut-off |
| Safety lock | Yes, anti-inadvertent start |
| Pan detection | Yes, automatic shut-off if no pan |
| Cooking surface | Black ceramic glass |
| Cleaning | Ceramic glass cleaner and soft cloth |
| Repairability index | 8.9/10 |
| Spare parts available | Yes, via Miele after-sales service |
Frequently Asked Questions - KM 5773 MIELE
User questions about KM 5773 MIELE
0 question about this device. Answer the ones you know or ask your own.
Ask a new question about this device
Download the instructions for your Hob in PDF format for free! Find your manual KM 5773 - MIELE and take your electronic device back in hand. On this page are published all the documents necessary for the use of your device. KM 5773 by MIELE.
USER MANUAL KM 5773 MIELE
Operating and Installation instructions
natural_image
Illustration of a cooking scene with a pot, cooking utensils, and a cooking pot (no text or symbols)Ceramic Cooktop with induction KM 5773
To prevent accidents and appliance damage, read these instructions before installation or use.

M.-Nr. 06 733 330
Contents
Guide to the cooktop 4
Cooktop 4
Control panel 4
Burner indicator 5
Timer/Memory display 6
Burner data 6
IMPORTANT SAFETY INSTRUCTIONS 7
Before using for the first time....13
Heat the cooktop 13
Touch controls 13
Resetting the touch controls 14
Induction....15
Function 15
Sounds....16
Selecting cookware 17
Using the cooktop 18
Turning on the cooktop 18
Turning on a burner 18
Settings 19
Auto-heat 20
Cooking without auto-heat....21
Booster function....22
Turning the cooktop off 23
Timer and Memory function 24
Introduction 24
Setting the timer....24
Switching a burner off automatically 25
Timer starting value 25
Memory function 26
Combi operation 28
Safety features 29
Child Safety Lock....29
Stop and Go....30
Safety cut-out feature....31
Overheating protection 32
Cooktop care 33
Programming 34
Frequently asked questions 37
Technical Service 40
Installation instructions 41
IMPORTANT SAFETY INSTRUCTIONS 42
Installation 44
Electrical connection 48
Help protect our environment 49
Cooktop
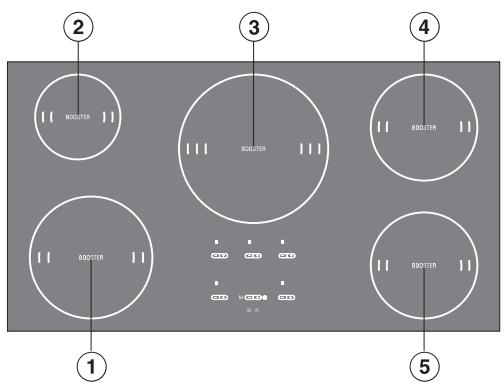
①②③④⑤ burners
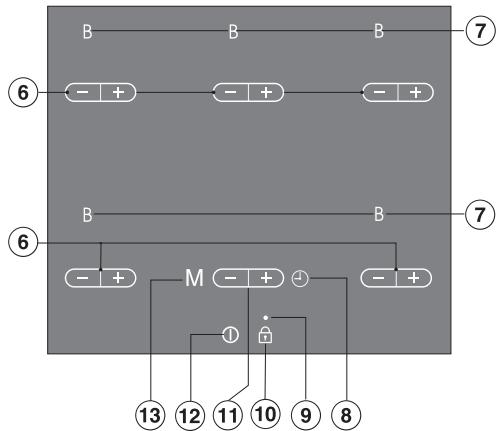
Control panel
flowchart
graph TD
    A["⑥"] --> B["- +"]
    B --> C["- +"]
    C --> D["- +"]
    D --> E["⑦"]
    F["⑥"] --> G["- +"]
    G --> H["M"]
    H --> I["- +"]
    I --> J["- +"]
    J --> K["⑧"]
    L["⑪"] --> M["⊕"]
    N["⑩"] --> O["⊕"]
    P["⑨"] --> Q["⊕"]
    R["⑬"] --> S["⊕"]
Sensors
⑥ Power selector
⑦ Booster
⑧ Turning on the timer, switching between the functions, selecting a burner
⑩ Child Safety Lock
⑪ Setting the time / Selecting the memory program
⑫ Cooktop ON/OFF
⑬ Memory function
Indicator:
⑨ Lock
Burner indicator

⑭ Display:
0 = Burner is ready for use
1 to 12 = Power level
≡ = Residual heat
U = Missing or not suitable cookware (see "Induction")
F = Error/Fault (see "Safety turn off")
R = Auto-heat with extended power level range
PO etc. = Program (see "Programming")
50 etc. = Status (see "Programming")
⑮ Indicator for extended power level (see "Programming")
⑯ Lighting circle
The number of segments lit corresponds to the selected power setting (exception: see "Auto-heat").
⑰ Segment for booster
Timer/Memory display
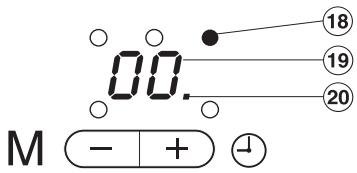
⑱ Indicator for burner assignment, e.g. rear right burner
⑲ Display for time/memory program
00 to 99= time
P1 to P5 = memory program
⑳ Indicator for taken memory program
Burner data
| Burner | KM 5773 | |
| minimum to maximum in cm* | Power in watts at 230 V** | |
| 16 -23 | normal: 2300with booster: 3200 | |
| 10 - 16 | normal: 1400with booster: 1800 | |
| 18 - 28 | normal: 2400with booster: 3200 | |
| 14 - 20 | normal: 1850with booster: 2500 | |
| 14 - 20 | normal: 1850with booster: 2500 | |
| All burners 10600 | ||
* Pots with a bottom diameter in the stated range.
** The stated power may vary depending on the size and material of the cookware.
READ THE OPERATING INSTRUCTIONS CAREFULLY BEFORE USING THE COOKTOP
WARNING -
This appliance is only intended for residential cooking. The manufacturer cannot be held responsible for damage or injury caused by improper use or for uses other than those for which this appliance is intended.
When using your appliance follow basic safety precautions including the following:
Persons which lack ability, experience or knowledge of the machine must be supervised or instructed by a responsible person.
Installation
Be certain your appliance is properly installed and grounded by a qualified technician in accordance with national and local safety regulations. All electrical work should be completed by a licensed electrician, in strict accordance with national and local safety regulations and standards. The manufacturer cannot be held responsible for damage caused by an incorrect installation or connection.
To guarantee the electrical safety of this appliance, continuity must exist between the appliance and an effective grounding system. It is imperative that this basic safety requirement be met. If there is any doubt, have the electrical system of the house checked by a qualified electrician. The manufacturer cannot be held responsible for damages caused by the lack, or inadequacy, of an effective grounding system.
IMPORTANT SAFETY INSTRUCTIONS
Do not connect the appliance to the main electrical supply using an extension cord. Extension cords do not meet the safety requirements of this appliance.
Before servicing, disconnect the appliance from the main power supply.
Never open the outer casing of the appliance.
Tampering with electrical connections or components and mechanical parts is dangerous and can cause machine damage.
Only for frame/facet cooktops: A small gap will be visible between cooktop and countertop for the first days after installation. The gap will decrease as the cooktop is used. The electrical safety of your appliance is warranted despite the small gap.
Use
Do not use the appliance until it is properly installed in the countertop. This is necessary to ensure that all electrical components are shielded.
This appliance is equipped with an overheating protection feature. See "Overheating protection" for more details.
If the cooktop is installed above a pyrolytic oven it should not be used during the pyrolytic process. The overheating protection of the cooktop might be activated.
Child Safety
Use the Child Safety Lock to prevent children from turning on the burners or changing the settings. See "Safety lock" for more information.
Children should not be left alone or unattended in an area where a cooktop is in use. Never allow children to sit or stand on any part of the cooktop.
Do not allow children to operate or play with the appliance.
The burners become very hot when in use and during the cool down phase. Keep children away from the cooktop.
Do not store items of interest to children in cabinets above the cooktop. Children climbing on the cooktop to reach these items could be injured. Danger of burning!
- Keep all pots and pans out of reach of children. Danger of burning or scalding. Special cooktop/stove guards are available from retail outlets.
Before discarding an old appliance, switch it off and disconnect it from the power supply. Cut off and render the plug useless. Cut off the cable directly behind the appliance to prevent misuse.
IMPORTANT SAFETY INSTRUCTIONS
Damage protection
Do not drop anything on the ceramic surface of the cooktop. Even lightweight objects could cause damage to the ceramic glass pane.
Do not use pots or pans with pronounced edges or ridges on the ceramic cooktop. These could scratch the cooktop permanently. See "Selecting cookware" for more information. Grains of salt and sand can also scratch. Make sure that the bases of any pots and pans are clean, free of any fat or oils and are dry.
Do not allow solid or liquid sugar, or pieces of plastic or foil to fall on the burners when they are hot. If these residues are allowed to cool on the ceramic surface pitting or even cracking could occur. If sugar, plastic or foil gets on the ceramic surface, turn the cooktop off. Clean the surface immediately with a shielded scraper blade while still hot.
Caution: Danger of burns! Clean the burners throughly when cooled.
Do not use a steam cleaner to clean this appliance. Pressurized steam could penetrate electrical components and cause a short circuit. Pressurized steam could cause permanent damage to the surface and to components, for which the manufacturer cannot accept responsibility.
Never place hot pots or pans over the touch controls, as the underlying electronics may be damaged.
If a drawer is installed beneath the cooktop, a sufficient distance between the contents of the drawer and the bottom of the cooktop must exist. Otherwise the venting of the cooktop is not guaranteed.
Personal safety
When in use, the appliance may become very hot and remain so for a while after the cooktop has been turned off. There is a danger of burning until the residual heat indicators go out.
Use potholders when working with a hot appliance. Use only dry, heat resistant potholders. Moist or damp potholders used on hot surfaces can result in steam burns.
Do not heat unopened food cans on the cooktop. Built-up pressure may cause the container to burst and result in injury.
Do not place objects other than pots and pans on the cooktop. Be especially careful not to place knives, forks or spoons etc, or other metallic items on the cokktop. If the cooktop is switched on, or if there is residual heat present, the metallic items can heat up and cause burning. Remember that metallic items can cause the burner to heat up unintentionally! Depending on material, other non-metallic items can melt or burn if placed on the cooktop. Switch the cooktop off after use.
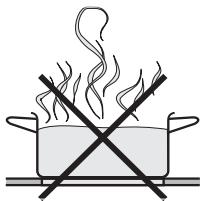
Never cover the cooktop with a cloth or foil. Danger of fire!
Never leave the cooktop unattended when cooking with oil or fat. Overheated fat or oil could ignite and set the venting hoods on fire. Always heat oil slowly, monitoring it as it heats. This is a fire hazard.
Do not use water on grease fires. Smother any fire or flame, or use a dry chemical or foam-type extinguisher.
Do not flambé under an exhaust hood. Flames could be drawn up into the hood by the suction or the grease filter may ignite.
■ Pot and pan handles should be turned inward and not extend over the countertop to reduce the risk of burns, ignition of flammable materials, and spills.
Be aware of loose fitting or hanging garments when operating the cooktop, they may present a hazard.
When frying food make sure that the food is as dry as possible before placing it in hot oil. Moisture can cause oil to splatter and boil over. At high settings, be cautious of splattering grease or boiling over liquids which may produce smoke.
To prevent burns and breathing difficulty, allow the cooktop to cool before cleaning. Some cleaners may produce toxic fumes if applied to a hot surface.
When wiping spills on a hot cooktop with a wet sponge or cloth, be careful to avoid steam burns.
Do not let flammable materials, i. e. cooking grease, accumulate on the appliance.
IMPORTANT SAFETY INSTRUCTIONS
Appliance safety
In the event of damage or a defect, turn off the appliance immediately, isolate it from the main power supply. If the appliance has a plug, pull the plug from the outlet. Grasp the plug not the cord. Contact the Miele Technical Service Department.
Ensure that power is not supplied to the appliance during maintenance or repair work.
Do not cook on a broken cooktop. Any breakages or cracks in the ceramic surface of the appliance are defects and must be treated as such. If the cooktop should break, cleaning solutions and spills may penetrate the broken cooktop and create a risk of electric shock. Do not use the appliance until it has been repaired.
Repairs should only be performed by qualified technicians to ensure safety. Repairs and other work by unqualified persons could be dangerous. Under no circumstances open the outer casing of the appliance.
While the appliance is under warranty repairs should only be performed by an authorized service technician. Otherwise the warranty is void.
Further safety notes
Only for persons with a pacemaker:
Please be advised, that in close proximity of the turned on cooktop an electromagnetic field exists. An interference of the pacemaker is not likely. However, if in doubt consult your doctor or the pacemaker manufacturer.
Take care that the cookware is placed in the middle of the burner to cover the electromagnetic field.
Make certain that the power cords of small appliances do not come in contact with the cooktop. The insulation on the cable could become damaged. Danger of electric shock!
■ Magnetizable items like credit cards, disks, calculators should not be placed onto or next to the turned on cooktop. They may be damaged.
If there is a drawer directly underneath the appliance without any wooden base in between, ensure that no aerosols, combustible liquids or other easily flammable materials are kept in it. If cutlery inserts are to be placed in the drawer, they must be made of a heat-resistant material.
SAVE THESE INSTRUCTIONS AND REVIEW THEM PERIODICALLY
Clean the cooktop
■ Before using for the first time, clean the appliance with a damp cloth and dry with a soft cloth.
Heat the cooktop
Metal components of the cooktop have a protective coating which may give off a slight odor the first time the appliance is heated.
The smell will dissipate after a short time and does not indicate a faulty connection or appliance defect.
Touch controls
This cooktop has electronic touch controls activated by a finger. A tone sounds to indicate that contact has been made with a control.
Keep the control area clean and do not rest items on it. The touch control sensors could mistake an item or debris for a finger contact, turning the cooktop on or off.
To prevent damage to the electronics never place hot pans on the control panel.
Automatic reset
To ensure the cooktop functions properly the touch controls will automatically reset:
- when the cooktop is connected to the electrical supply.
- if there is an interruption to the electrical supply, and
– during use in response to changing light conditions.
During the automatic reset of the touch controls the Child Safety Lock indicator illuminates and the cooktop cannot be turned on.
If the automatic reset could not be completed an R will light in the burner displays front left and right, and a F in the rear left burner display. The right rear burner display and the timer display will show numbers.
In this case the touch controls must be manually reset.
Manual reset
■ Make sure no direct light (sun or artificial) beams on the cooktop. The surrounding area of the cooktop should not be completely shaded or brightly lit.
■ Make sure the cooktop and the touch controls are not covered. Remove all pots and pans and clean the cooktop if necessary.
- Trip the circuit breaker to the cooktop or turn off the power main for 1 minute.
The touch controls will automatically reset when the power is restored.
If the problem persists, call Miele Technical Service.
Function
An induction coil is installed beneath each burner. If a burner is turned on, the coil produces a magnetic field, which operates directly on the cookware bottom and heats it. The burner is indirectly heated by the heat radiated from the pot.
Burners with induction operate only when cookware with a magnetizable bottom is placed on them, see "Selecting cookware".
The induction considers automatically the size of the placed cookware, which means it operates only in the area of the surface covered by the cookware bottom.
The burner does not operate
- when turned on without or with unsuitable cookware (cookware without magnetizable bottom).
- when the bottom diameter of the placed cookware is too small.
- when the cookware is removed from a turned on burner.
The symbol alternating with or the last set power level will flash in the burner display.
If suitable cookware is placed on the burner within 3 minutes, the ⚪ symbol goes out.
If no or unsuitable cookware is used, the burner and cooktop are turned off automatically after 3 minutes.
Do not place knives, forks or spoons etc., or other metallic items on the cooktop. If the cooktop is switched on, or if there is residual heat present, the metallic items can heat up and cause burning. Remember that metallic items can cause the burner to heat up unintentionally! Switch the cooktop off after use.
Sounds
When operating induction burners, the following sounds can occur depending on the material of the cookware base:
- Buzzing can be heard at high power levels. It will quiet down or go out, when the power level is turned down.
- Crackling occurs when the cookware has a base made from several materials, e.g. sandwich bottom.
- Whistling can occur, when connected burners (see "Booster function) are operated on the highest power level and cookware with a base made from several materials are used.
- Clicking can occur during electronic switching operations, especially at lower power levels.
- Whizzing: To extend the electronic durability, the appliance is fitted with a cooling fan. If the cooktop is intensively used, the fan is turned on and a whirring sounds. The cooling fan will continue to run after the cooktop was turned off.
Suitable cookware
- Stainless steel with magnetizable bottom
- Enameled steel
- Cast iron
Unsuitable cookware
- Stainless steel with non magnetizable bottom
- Aluminum, copper
- Glass, ceramic, earthenware
If in doubt, whether cookware is suitable for use on the induction, check by holding a magnet on the cookware bottom. If the magnet sticks, the cookware is suitable.
To prevent damage to the cooktop do not use pots and pans with thin bases on this cooktop. Never heat an empty pan unless the pan manufacturer states that you can do so.
Cookware size
For optimum burner use, select the size of the cookware so it fits between the inner and outer marking of the burner. If the pot is smaller than the inner marking, the induction may not operate. The burner reacts, as if no cookware was placed on it.
Please note that cookware diameters given by the manufacturer are usually the maximum/upper diameter. For use on the burner the (usually smaller) bottom diameter is important.
Energy saving tips
Using a lid while cooking will minimize the loss of heat and decrease cooking time.
natural_image
Simple line drawing of a pot with steam rising and crossed out by a diagonal line (no text or symbols)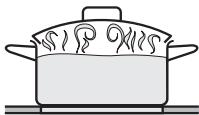
natural_image
Simple line drawing of a cooking pot on a stove (no text or symbols)Turning on the cooktop
The cooktop must be turned on before any of the burners can be used.
■ Touch the ① "ON / OFF" touch control for the cooktop.
A 0 will appear in each of the burner displays and 00 will appear in the timer display.
The cooktop is now on and the burners are ready for use. The burners will not heat until a power setting has been chosen.
If a setting is not chosen within 30 seconds the cooktop will turn itself off as a safety measure.
Turning on a burner
■ Once the cooktop is turned on, touch the ① "ON/OFF" control of the burner you wish to use.
A ☐ will appear in the burner display.
■ Select the desired setting between 1 and 12 by touching the - or + touch controls.
When turning on the cooktop you can decide whether you want to cook with auto-heat (see, "Auto-heat" for more information) or not:
Turn on with + to:
Cook without auto-heat
Turn on with - to:
Cook with auto-heat
To turn on another burner where 0 has gone out, touch - or +. The 0 shows again and the power level can be selected.
Settings
| Use for | Power level* | |
| default(12 Power levels) | extended(23 Power levels) | |
| Melting butter,dissolving gelatin | 1 - 2 | 1 - 2. |
| Heating small volumes of liquidWarming dishes, which easily burnCooking riceDefrosting frozen vegetables | 3 | 3 - 3. |
| Warming liquid and half-set foodsThickening sauces, e.g. HollandaiseCooking rice pudding, omelette, eggs | 4 - 5 | 4 - 5 |
| Defrosting frozen foodSteaming vegetables, fish | 6 | 5. - 6. |
| Boiling and continued cooking of large quantities of food,e.g. stewCooking pasta | 7 - 8 | 7 - 8 |
| Gentle frying (without overheating the fat) of fish, sausages,fried eggs, etc. | 9 - 10 | 8. - 10. |
| Frying pancakes, etc. | 11 | 11 - 11. |
| Boiling a large volume of waterAuto-heat | 12 | 12 |
* These settings are recommendations for 4 portions. With large pots, large quantities or cooking without the lid, a higher setting is needed. With smaller quantities select a lower setting.
** If a more defined setting of the power level is desired, the range of the power level can be extended. See "Programming". The intermediate stage will be indicated by a dot lit next to the power level number.
Auto-heat
When auto-heat has been activated, the burner turns on automatically at the highest setting and then changes to the selected power level. The auto-heat time depends on which power level has been chosen (see table).
If the cookware is removed during auto-heat, the auto-heat phase will be interrupted. It will be continued, when the cookware is replaced on the burner (within 3 minutes).
* The power levels with a period are only available if the power levels were extended. See "Programming".
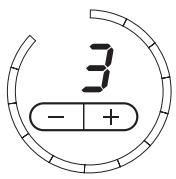
To activate auto-heat
■ If 0 shows in the display, touch - until the continued power level is displayed, e.g. 3.
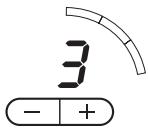
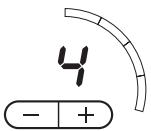
12 segments will light in the lighting circle during the auto-heat time. After the auto-heat time has elapsed, only the number of segments will light which correspond to the selected power level.
Example:
during the Auto-heat:
during the continued cooking time:
The power level can be increased or decreased during the auto-heat with the -/+ controls. The auto-heat time changes accordingly.
Cooking without auto-heat
■ Turn the burner on with +. Touch the + sensor until the desired time is displayed, e.g. 4.
Additionally the power level is indicated by the number of segments in the lighting circle. For example: Power level 4 shows four segments.
Booster function
All burners are equipped with a booster function. If the booster function (a power boost) is selected, the burners will operate for 10 minutes on the highest power level (12). The booster function is designed to boil large volumes of water quickly, e.g. to cook pasta. Two booster functions can be used at the same time.
If the cookware is removed during auto-heat, the auto-heat phase will be interrupted. It will be continued, when the cookware is replaced on the burner (within 3 minutes).
The booster power can only be provided, by taking power from other burners during the booster time. Therefore two burners are networked as shown:
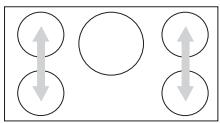
natural_image
Simple diagram with four circles and two downward arrows, no text or symbols presentTurning the booster on causes:
- a selected auto-heat on the networked burners to be turned off.
- The power level of the related burner will be reduced. The selected and the reduced power level flash alternately until the booster function has turned off. The reduced power level is also shown by the number of segments in the lighting cycle.
Turning the booster on
■ Touch the sensor B of the respective burner.
The burner display shows power level 12 and the booster indicator lights.
After 10 minutes the power level will automatically reduced to power back to level 12 again.
To turn off the booster ahead of time
■ Touch the sensor B or - of the respective burner.
If a power level is selected first and the booster is selected second. The power level will then be reduced to the selected power level.
Turning the cooktop off
Turning off a burner
■ Touch the sensors -/+ of the desired burner at the same time.
The display shows 0 for a few seconds. If the burner is still hot, the residual heat indicator is shown.
Turning off the cooktop
■ Touch the ① On/Off cooktop sensor.
All burners are turned off. For the burners which are still hot the residual heat indicator shows in the respective display.
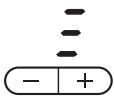
Residual heat indicator
The bars in the residual heat indicator go out one after another while the burner cools. The last residual heat indicator will go out when the burner is cool enough to touch.
The residual heat displays are also activated, when hot cookware is set on a turned off burner.
While the residual heat indicators are lit: Do not touch the burners and do not set items which could get damaged by heat on the burners. Danger of burns and fire!
Please note, that the residual heat indicators will not light during a fault, even if the burners are still hot.
Introduction
The hob is fitted with:
- Timer function
- Automatic switch-off for the burners zones (Timer function)
- Memory function.
These functions are described one by one on the following pages. The Combi mode is described in the section of that name.
You can set a time of 1 to 99 minutes using the Timer function. Use the - sensor to reduce the time from 99 to 00 and the + sensor to increase the time from 00 to 99. The display can be put back to 00 by touching - and + at the same time.
On all functions, 00 will appear in the display for a few seconds at the end of the time, and an audible tone will sound at the same time. To turn the audible tone off before it has finished, touch the ⏻ sensor.
Setting the timer
The timer can be used with the hob switched on or off. It works like a manual kitchen timer.
■ Touch the ⏻, - or + sensor.
00 will show in the Timer/Memory display.
■ Touch the - or + sensor until the time you require appears in the display, e.g. 15 minutes.

The time then counts down in minutes. The time remaining can be seen in the display and changed at any time by touching - or +.
Switching a burner off automatically
You can set a time at the end of which a given burner will switch off automatically. This automatic switch-off function can be used on all of the burners at the same time.
■ Select a power level for the zone you require, e.g. back right, in the usual way.
■ Touch the ⏻ sensor until the indicator lamp for the selected zone flashes (back right).
If more than one burner is switched on, the indicator lamps will light up clockwise beginning with the front left zone.
■ Touch the - or + sensor until the time you require appears in the display, e.g. 15 minutes.
15
M - + ⏰
The time then counts down in minutes. The time remaining can be seen in the Timer/Memory display and changed at any time by touching - or +.
If you want to set another burner to switch off automatically, follow the same steps as described above.
If more than one switch-off time is programmed, the shortest time remaining will show in the display, and the indicator lamp for that particular burner will flash. All the other indicator lamps will light up constantly. If you want to check on the remaining time for another zone, touch the ⏻ sensor until the indicator lamp for the zone you require flashes.
Timer starting value
The timer is set at the factory to start at 00 when the + or - sensor is touched.
This setting can be adjusted so that the time you last used appears in the display when you press + or - (see "Programming - P14.").
Example:
If P14, S1 is programmed, and the last time thetimer was used was for 5 minutes, 00 will appear in the display when you switch on the Timer; when you then touch + or -, the display will change to 05.
You can still select any time you want, even if you have adjusted the timer default setting.
Memory function
All settings, which are set to a burner from turning on until turning off, can be recorded in a memory program. 5 frequently used operations can be recorded, but only one at a time can be recorded and used.
Memory programs can be recorded for all burners.
Multiple programs can be recorded for one burner.
Taken programs are marked with a period after the number.
Example.
P1 program not taken
P1. program taken.
To record a new program when all 5 programs are taken, one program must be deleted.
Recording a memory program
The memory program is selected first and then the burner is used as usual.
The maximum saving time is 99 minutes and a maximum of 10 changes to the power level can be made.
■ Turn the cooktop on.
■ Touch the M sensor.
P 1 shows in the timer/memory display.
■ Touch the sensor + until the desired program number shows.
■ Touch the sensor M until a long signal sounds.
■ Turn the desired burner on within 10 seconds.
The recording starts.
The burner indicator and the program number light during the recording in the timer/memory display.
The recording is automatically saved when the burner is turned off or by touching M until a long signal sounds. The program sequence will be shown after saving it.
The display shows the time rounded up to full minutes, during the operation the display shows the exact time.
Using a memory program
To have the same result when using the memory program while it was recorded, the same pot must be used. Amount and size of the food must also be the same.
■ Turn the cooktop on.
■ Touch the M sensor.
P 1 shows in the timer/memory display.
■ Touch the sensor + until the desired program number shows.
■ Touch the sensor M until a long signal sounds.
The assigned burner turns on and after the saved program has elapsed, it will turn off. During the cycle the burner indicator flashes in the timer/memory display. The program number and remaining time are shown alternately.
Showing the memory program cycle
■ Turn the cooktop on.
■ Touch the M sensor.
■ Touch the sensor + until the desired program number shows.
The respective burner display shows the respective power setting. The assigned burner indicator flashes in the timer/memory display and the time assigned to the power level is shown. The display shows the time rounded up to full minutes, during operation the display shows the exact time.
Deleting a memory program
■ Turn the cooktop on.
■ Touch the M sensor.
■ Touch the sensor - or + until the desired program number shows.
■ Touch the -/+ sensors at the same time until a long signal sounds and the period after the number goes out.
Combi operation
The functions timer, automatic turn off and memory function can be used at the same time.
Additionally using the timer:
■ Touch the sensor ⏻ until the indicators of the programmed burners light and the timer/memory display shows 00.
Programming additionally one or more turn off times:
■ Touch the sensor ⏻ until the desired burner indicator flashes.
Using additionally the memory function:
■ See "Memory function" for more information.
Shortly after the last entry, the timer/memory display switches to the function with the shortest remaining time.
Exception: When recording a memory program, all entered times (timer, automatic turn off) run in the background. They briefly show 00 when they have elapsed.
Functions and remaining times which are run in the background, can be shown.
■ Touch the sensor ⏻ until the desired indicator flashes (memory function or automatic turn off) and the indicators illuminate (timer).
Starting from the displayed (shortest) remaining time, all turned on burners and the timer are selected in a clockwise direction.
Exception: Recording a memory program.
Child Safety Lock
Keep children away from the cooktop for their own safety.
The cooktop has a Child Safety Lock to prevent children from turning on the burners or changing the settings.
The Child Safety Lock can be activated while the cooktop is on or off.
Activating the Child Safety Lock during cooktop use
- The settings for the burners and for the timer cannot be altered.
- The burners and cooktop can still be turned off but once turned off cannot be turned on again.
Activating the Child Safety Lock when the cooktop is turned off
- The cooktop cannot be turned on.
To activate the Child Safety Lock
■ Press and hold the 🔒 Child Safety Lock control until the respective indicator lights.
The indicator will go out after a short time.
If you touch the 🔒 Child Safety Lock control or select a setting, the indicator will come on again to show that the Child Safety Lock has been activated.
To deactivate the Child Safety Lock
■ Press and hold the ⏻ Child Safety Lock control until the indicator goes out.
In the case of a power failure the Child Safety Lock will be deactivated.
The setting can be changed from a one-finger-lock to a three-finger-lock. See "Programming - P 4" to make operating more difficult for children.
Stop and Go
Stop and Go is a feature which reduces the power of all turned on burners. You can leave the cooktop for a short time without supervision and don't have to worry about boilovers.
To activate Stop and Go:
■ Touch the sensor 🔒 until you hear two signals in quick succession. Do not touch the sensor 🔒 too long or the Child Safety Lock will be activated.
The Child Lock indicator will flash. The power for the activated burners will reduce to power level 1. The respective burner displays show 1.
When activating "Stop and Go":
- the elapsing of the set time will be interrupted for the automatic turn off. When deactivating "Stop and Go", the countdown will continue.
– the timer will continue without interruption.
– the recording of a memory program will be canceled.
To deactivate Stop and Go:
■ Touch the control 🔒 until the indicator goes out.
The burners will operate with the last set power level.
Safety cut-out feature
Covered touch controls
The cooktop will turn off automatically if any of the touch controls are covered for more than 10 seconds, e.g. by finger contact, food boiling over or by an object such as an oven mitt or towel. A tone will also sound every 30 secs. for a maximum of 10 min and the display will show a flashing F.
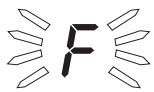
■ Clean the touch controls or remove the object covering it.
This will turn off the signal tone and the displayed F will go out.
■ Turn the cooktop on again with the ① touch control. The burners can now be used.
The cooktop is on too long
The cooktop has a safety cut-out feature in case it is not turned off after use.
If one of the burners is heated for an unusually long period of time (see table), and the power level settings are not adjusted, the cooktop will turn itself off automatically and the residual heat indicator will light.
| Power level* | Maximum operating hours |
| 1/1. | 10 |
| 2/2. | 5 |
| 3/3. | 5 |
| 4/4. | 4 |
| 5/5. | 4 |
| 6 | 4 |
| 6. | 3 |
| 7/7. | 3 |
| 8/8. | 3 |
| 9/9. | 2 |
| 10/10. | 2 |
| 11/11. | 2 |
| 12 | 1 |
* The power level with period are only available when the range is extended, see "Programming".
■ If you wish to use the burners once again, turn the cooktop on in the usual way.
Overheating protection
All induction coils and the cooling system of the electronic are designed with an overheating protection feature. Before overheating of the induction coils or the cooling system, the overheating protection takes the following actions at the burner/cooktop:
- If the booster function is turned on, it will be canceled.
- If the power level is set between 10 and 12, it will be reduced. The set and the reduced power level flash alternately. The reduced power level is additionally shown by the number of segments in the lighting cycle.
- If an induction coil is affected, the burner will automatically turn off. A 0 and the residual heat symbol is shown in the display.
Once the burner has sufficiently cooled, you can used it as usual.
- If the cooling system is affected, all burners will automatically turn off, and the display will show 0 alternating with the set power level.
Once the cooling system has sufficiently cooled, the burners will automatically operate with the originally set power level.
The overheating protection will be activated if:
- empty cookware is heated.
- grease or oil is heated at a high power level.
– the bottom of the cooktop is not sufficiently vented.
If the overheating protection still activates, call Technical Service.
When cleaning the cooktop, make sure the cooktop is "Off", and be careful not to accidentally turn it "On".
Under no circumstances should a steam cleaner be used to clean this appliance. Pressurized steam could cause permanent damage to the surface and to components for which the manufacturer cannot accept responsibility.
Do not use any sharp pointed objects which could damage the seal between the ceramic surface, the surrounding frame and the countertop.
Never use scouring agents, pads, abrasive cleaning agents or strong cleaners, e.g. oven sprays, stain or rust removers, as these could damage the surface of the appliance.
After cleaning, thoroughly dry the ceramic surface with a soft cloth to prevent a build up of limescale deposits.
■ The ceramic surface should be cleaned regularly with a cleaner for ceramic surfaces. Follow the ceramic cleaner manufacturer's instructions. If you have difficulty locating a suitable product contact Miele.
■ Before cleaning allow the cooktop to cool. Wipe spills using a damp sponge. Stubborn spills are best removed with a shielded scraper blade.
■ To remove any limescale deposits or metallic residue apply ceramic cleanser using a soft cloth or use a shielded scraper blade if necessary.
■ A cleaner with a special additive to prevent water marks and smears on the ceramic surface may be used.
■ After cleaning, wipe the ceramic surface with a damp cloth to remove any residue. Cleaner residues could damage the cooktop or create toxic fumes when heated. Finally, dry the cooktop with a clean soft cloth.
■ Any melted solids (e.g. sugar, plastic, syrup, aluminum foil, etc.) should be removed as quickly as possible and while the burner is still warm. If they are allowed to harden, the cooktop may become pitted. Scrape the melted item off the cooktop using a shielded scraper blade. Once the cooktop has cooled, remove any remaining residue using a ceramic cooktop cleaner.
The cooktop programming can be adjusted (see table).
■ While the cooktop is turned off, touch the ON/OFF ① and Child Safety Lock control 🔒 at the same time until the Child Safety Lock indicator flashes.
The burner display shows P (Program) and S (Status) with a number. They show the current setting.
To set the desired program:
■ Touch the + or - sensor of the front left burner.
To set the status (see table):
■ Touch the + or - sensor of the front right burner. Several programs can be changed this way.
Saving the settings
■ Touch the ON/OFF control ① until the displays go out.
Not saving the settings
■ Touch the control for the Child Safety Lock 🔒 until the displays goes out.
| Program* | Status** | Settings | |
| P 0 | Demonstration mode and factory settings | S 0 | Demo mode on |
| S 1 | Demo mode off | ||
| S 9 | Reset the default settings | ||
| P 1 | Keytone | S 0 | off |
| S 1 | on | ||
| P 2 | Signal tone induction at missing or unsuitable cookware. | S 0 | off |
| S 1 | on | ||
| P 3 | Timer tone | S 0 | off |
| S 1 | Continued tone 10 seconds | ||
| S 2 | Continued tone 4 minutes | ||
| P 4 | Child Safety Lock | S 0 | One-touch-lock by 🔒 |
| S 1 | Three-finger-lock by 🔒 and + of the two right burners | ||
| P 5 | Stop and Go | S 0 | off |
| S 1 | on | ||
| P 6 | Volume Keytone/Timer tone | S 0 | quiet |
| S 1 | middle | ||
| S 2 | loud | ||
| P 10 | Power level when turning the burner on | S 0 | 0 |
| S 1 | 5 (only selectable if auto-heat active) | ||
* Programs / status not shown are not allocated
** The factory setting is printed in bold.
| Program* | Status** | Settings |
| P 12 Auto-heat | S 0 | off |
| S 1 | Activating by setting the power level with -. | |
| S 2 | Activating by setting the power level with +. | |
| S 3 | Activating with every turn on | |
| P 13 Residual heat indicator | S 0 | H as Residual heat display |
| S 1 | as Residual heat display | |
| P 14 Timer Start value | S 0 | 00 |
| S 1 | Time last set (see "Timer start value") | |
| P 15 Timer function | S 0 | Only Timer function |
| S 1 | Only Turn off function | |
| S 2 | Timer and Turn off function | |
| P 16 Extended power level | S 0 | 12 Power levels (1, 2, 3 ... to 12) |
| S 1 | 23 power level (1, 1., 2, 2., 3 ... to 12) Therefore: Display of auto-heat by flashing the power level alternating with R . |
* Programs not shown are not allocated
** The factory setting is printed in bold.
⚠️ Repairs should only be carried out by an authorized technician in accordance with local and national safety regulations. Unauthorized repairs could cause injury or appliance damage. The manufacturer cannot be held responsible for unauthorized work.
| The cooktop or the burners cannot be turned on. | |
| Possible fault | Fix |
| The cookware is not suitable. | See "Selecting cookware". |
| The Child Safety Lock is activated. | Deactivate the Child Safety Lock.See "Child Safety Lock". |
| The main fuse has blown. | Check the main fuse.Remove the fuse or "trip" the circuit breaker.If neither of the above is the case, disconnect the appliance from the electrical supply for 1 minute.Reconnect the power and turn the appliance on. If it still does not heat, contact the Miele Technical Service. |
| The burners do not heat but can be turned on and a power setting can be selected. | |
| Possible fault | Fix |
| The cooktop is in the demo mode. | See "Programming". |
| The burner display shows u. | |
| Possible fault | Fix |
| The burner is turned on but no cookware is placed on it. | Turn the burner off or place suitable cookware on the burner. |
| The placed cookware might not be induction suitable and sufficient in size. | See "Selecting cookware" for information on type and size of cookware. |
| A single burner or the cooktop turns automatically off. | |
| Possible fault | Fix |
| The overheating protection has reacted. | See "Overheating protection". |
| One of the following errors occurs: - The booster function turns off automatically ahead of time. - The selected power level 10, 11 or 12 flashes alternating with a lower power level in the burner display. The lower power level is additionally shown by the number of segments in the lighting cycle. | |
| Possible fault | Fix |
| The overheating protection has reacted. | See "Overheating protection". |
| The food does not cook when using auto-heat. | |
| Possible fault | Fix |
| Large amounts of food are cooked. | Select a higher power level or start cooking on the highest power level and reduce the power manually. |
| The pot or pan does not transfer the heat properly. | |
| The cooling fan continues to run after the cooktop was turned off. | |
| Possible fault | Fix |
| This is not a fault. | The fan continues to run until the appliance has sufficiently cooled. It will turn off automatically. |
| The cooktop is turned off, the timer display shows numbers and the burner displays show R, F and numbers. | |
| Possible fault | Fix |
| The touch controls could not be reset automatically. | They must be reset manually, see "Resetting the touch controls - Manual reset".If the problem persists, call Technical Service. |
| The rear burner display shows F, the front burner display E and the timer shows numbers. | |
| Possible fault | Fix |
| An error occurred. | Trip the circuit breaker to the cooktop or disconnect the appliance from the main power supply for 1 minute.If the problem persists, call Technical Service. |
Technical Service
In the event of a fault which you cannot easily fix yourself, please contact the Miele Technical Service Department at the address on the back of this booklet.
When contacting Technical Service please quote the serial number and model of the cooktop. This information is visible on the silver data plate supplied with the cooktop.
Adhere data plate sticker here:
natural_image
Diagram showing a screw and a mechanical component with motion arrows (no text or symbols)Installation Instructions
IMPORTANT SAFETY INSTRUCTIONS
Note to the installer:
Please leave this instruction book with the consumer for the local electrical inspector's use.
The minimum distances given in these Installation Instructions must be observed in order to ensure safe operation. Failure to do so increases the risk of fire.
The cabinetry and venting hood should be installed first to prevent damage to the cooktop.

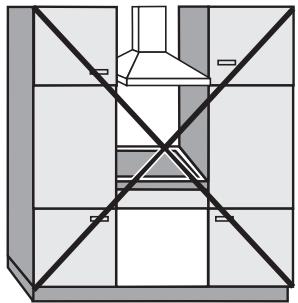
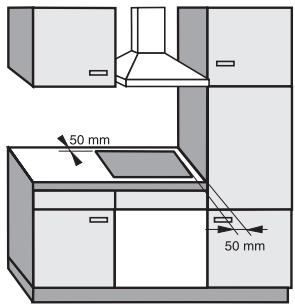
The cooktop should only be installed as shown in the
illustrations while maintaining the required safety distances shown. Do not install the cooktop between two tall cabinets, this is a fire hazard.
A minimum distance of 2" (50 mm) from the cooktop to the rear wall and a side wall must be maintained for safety.

The countertop must be bonded with heat resistant (212°F/100°C)
adhesive to prevent distortion or dissolving.
natural_image
Architectural diagram of a double door frame with diagonal braces and no text or symbolsrecommended
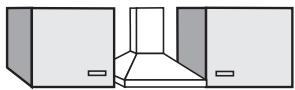
natural_image
Simple line drawing of a kitchen cabinet with a chimney and two side cabinets (no text or symbols)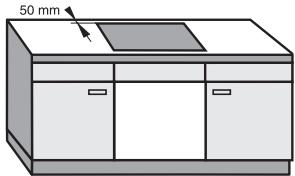
natural_image
Simple line drawing of a kitchen cabinet with a 50 mm scale indicator (no text or symbols on the cabinet itself)not recommended
not allowed
The cooktop must not be installed over a dishwasher, washer, dryer, refrigerator or freezer. Heat radiated by the cooktop may damage them.
These cooktops must not be installed above an oven without cooling fan.
This appliance is not designed for maritime use or for use in mobile installations such as caravans or aircraft. However, under certain conditions it may be possible for an installation in these applications. Please contact the Miele Technical Service Department with specific requirements.
Make sure that the power cord to the cooktop does not come into contact with any mechanical parts once the cooktop has been installed.
If a cabinet base is installed beneath the appliance, the minimum distance from the countertop surface to the base must be 5 7/8" (150 mm) to vent the cooktop properly.
The cooktop must not be permanently sealed into the countertop when installed. The sealing strip under the edge of the top part of the cooktop provides a sufficient seal for the countertop. See "Sealing".
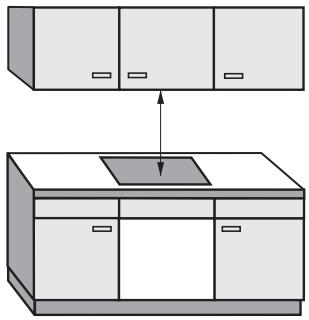
Safety distances above the appliance
natural_image
Diagram showing two cabinet setups with a central display and an upward arrow, no text or symbols present.As a general rule there must be a safety distance of at least 30" (760 mm) between the appliance and any objects above it, e.g. cabinetry, venting hood, etc. If the manufacturer of these items states a different figure, always adhere to the greater distance. Their measurements should be given in their operating and installation instructions.
If there is more than one appliance beneath a hood, e.g. wok burner and electric cooktop, and they have different minimum safety distances always select the greater distance.
Cooktops flush with the countertop
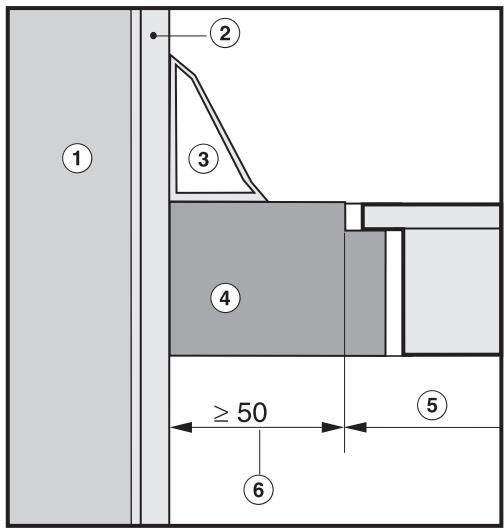
Frame/Facet cooktops
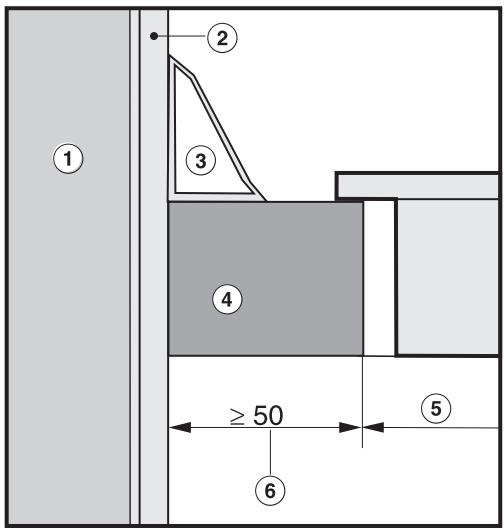
① Wall
② Wall covering
③ Back splash strip
④ Countertop
⑤ Countertop cut-out
⑥ 2" (50 mm) minimum distance
Installation dimensions
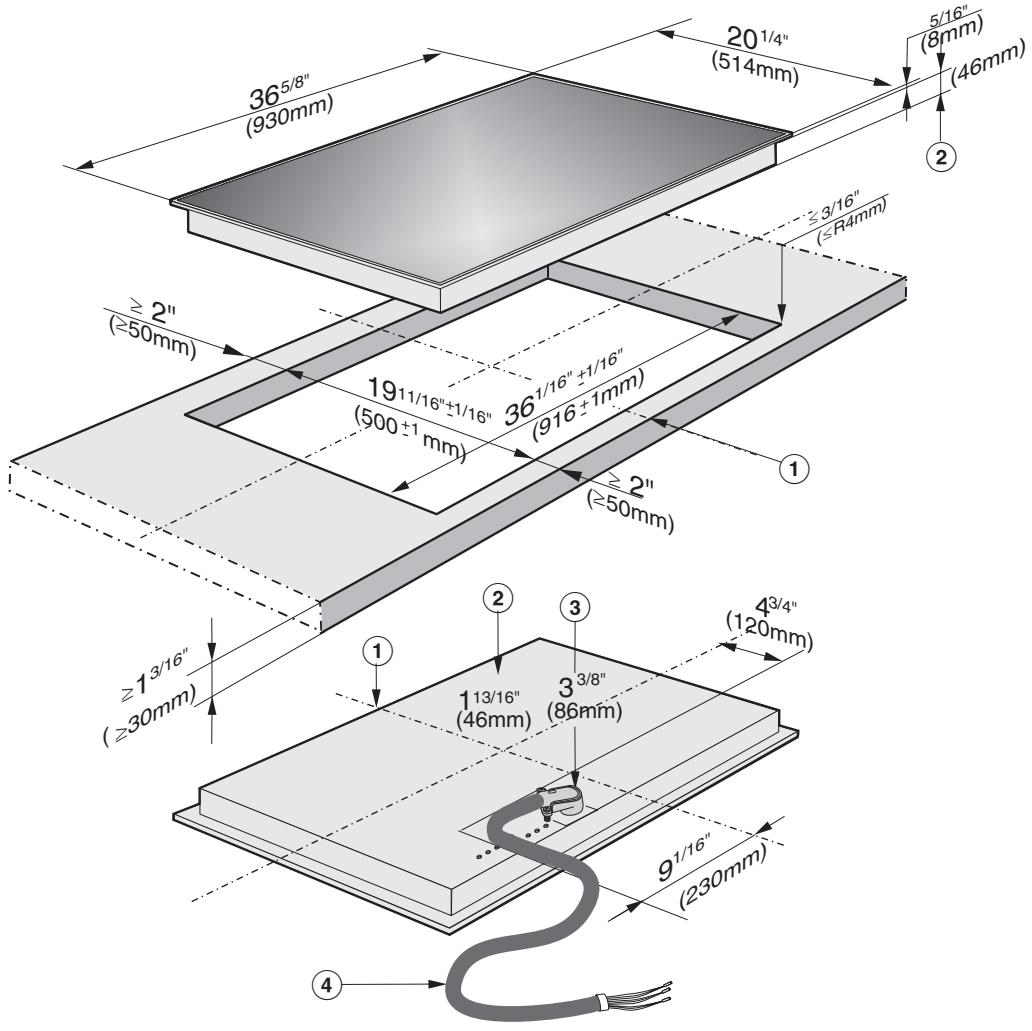
① Front
② Installation height
③ Installation height power cord
④ Power cord
Cut out
■ Make the countertop cut-out following the dimensions given in the illustration.
Remember to maintain a minimum distance of 2" (50 mm) between the rear wall on the right or left side. See also "IMPORTANT SAFETY INSTRUCTIONS".
■ Seal the cut surfaces with a suitable sealant to avoid damage caused by moisture.
The materials used must be heat resistant.
If, during installation, the seal around the frame does not sit flush with the countertop on the corners, the corner radius (maximum 3/16", 4 mm) can be carefully filed down to fit. A respective seal tape ensures a non-slip fit of the cooktop in the cut-out. The gap between frame and cooktop will be reduced over time.
Installing the cooktop
■ Feed the power cord down through the cut-out and connect the appliance to the power supply.
■ Insert the cooktop in the middle of the cut-out. When doing so make sure that the cooktop seal sits tightly on the countertop to ensure a correct seal is provided. Do not use sealant.
■ Connect the cooktop to the power supply.
■ Check the cooktop by turning it on.
Sealing

natural_image
Illustration of a hand using a tool to mark a cross symbol on a screen (no text or symbols present)The cooktop must not be permanently sealed into the countertop when installed. The sealing strip under the edge of the cooktop provides a sufficient enough seal.
If the cooktop is sealed into position, the countertop or the appliance may be damaged if the cooktop needs to be removed for maintenance or service.
⚠️ CAUTION: Before installation or servicing, disconnect the power supply by either removing the fuse, shutting off the power main or manually "tripping" the circuit breaker.
Installation work and repairs should only be performed by a qualified technician in accordance with all applicable codes and standards. Repairs and service by unqualified persons could be dangerous and the manufacturer will not be held responsible.
Before connecting the appliance to the power supply, make sure that the voltage and frequency listed on the data plate correspond with the household electrical supply. This data must correspond to prevent appliance damage. Consult an electrician if in doubt.
Only operate the cooktop after it has been installed into the countertop.
Installer:
Please leave these instructions with the consumer.
Power supply
■ Make sure your electrical supply matches the data plate.
Connection
The cooktop is ready for connection to a grounded power supply.
240 V, 60 Hz, 50 A fuse rating.
Connect as following:
Black wire: connect to L1 (hot)
Red wire: connect to L2 (hot)
Green wire: connect to GND (ground)

A dedicated line and junction box should be used to connect the cooktop to a 50 A circuit.
For further information, see the wiring diagram provided with the appliance.
WARNING:
THIS APPLIANCE MUST BE GROUNDED!
Disposal of packing materials
The cardboard box and packing materials are biodegradable and recyclable. Please recycle.
Ensure that any plastic wrappings, bags, etc. are disposed of safely and kept out of the reach of children. Danger of suffocation!
Disposal of an old appliance
Old appliances contain materials that can be recycled. Please contact your local recycling authority about the possibility of recycling these materials.
Before discarding an old appliance, disconnect it from the electrical supply and cut off the power cord to prevent it from becoming a hazard.
Miele Limited
Headquarters and Showroom
161 Four Valley Drive
Vaughan, ON L4K 4V8
Phone: 800-643-5381
905-660-9936
Fax: 905-532-2290
www.miele.ca
info@miele.ca (general enquiries)
professional@miele.ca (commercial enquiries)
MieleCare National Service
Phone: 800-565-6435
905-532-2272
Fax: 905-532-2292
service@miele.ca (technical enquiries)
- Operating and Installation instructions
- Ceramic Cooktop with induction KM 5773
- Contents
- Guide to the cooktop 4
- IMPORTANT SAFETY INSTRUCTIONS 7
- Before using for the first time....13
- Resetting the touch controls 14
- Induction....15
- Selecting cookware 17
- Using the cooktop 18
- Timer and Memory function 24
- Safety features 29
- Cooktop care 33
- Programming 34
- Frequently asked questions 37
- Technical Service 40
- Installation instructions 41
- IMPORTANT SAFETY INSTRUCTIONS 42
- Installation 44
- Electrical connection 48
- Help protect our environment 49
- Cooktop
- Control panel
- Sensors
- Indicator:
- Burner indicator
- Timer/Memory display
- READ THE OPERATING INSTRUCTIONS CAREFULLY BEFORE USING THE COOKTOP
- WARNING -
- Installation
- IMPORTANT SAFETY INSTRUCTIONS
- Use
- Child Safety
- Damage protection
- Personal safety
- Appliance safety
- Further safety notes
- Clean the cooktop
- Heat the cooktop
- Touch controls
- Automatic reset
- Manual reset
- Function
- The burner does not operate
- Sounds
- Suitable cookware
- Unsuitable cookware
- Cookware size
- Energy saving tips
- Turning on the cooktop
- Turning on a burner
- Turn on with + to:
- Turn on with - to:
- Auto-heat
- To activate auto-heat
- Cooking without auto-heat
- Booster function
- Turning the booster on
- To turn off the booster ahead of time
- Turning the cooktop off
- Turning off a burner
- Turning off the cooktop
- Residual heat indicator
- Introduction
- Setting the timer
- Switching a burner off automatically
- Timer starting value
- Memory function
- Recording a memory program
- Using a memory program
- Showing the memory program cycle
- Deleting a memory program
- Combi operation
- Additionally using the timer:
- Programming additionally one or more turn off times:
- Using additionally the memory function:
- Child Safety Lock
- Activating the Child Safety Lock during cooktop use
- Activating the Child Safety Lock when the cooktop is turned off
- To activate the Child Safety Lock
- To deactivate the Child Safety Lock
- Stop and Go
- To activate Stop and Go:
- To deactivate Stop and Go:
- Safety cut-out feature
- Covered touch controls
- The cooktop is on too long
- Overheating protection
- To set the desired program:
- To set the status (see table):
- Saving the settings
- Not saving the settings
- Technical Service
- Note to the installer:
- Please leave this instruction book with the consumer for the local electrical inspector's use.
- Safety distances above the appliance
- Cut out
- Installing the cooktop
- Sealing
- Installer:
- Power supply
- Connection
- WARNING:
- Disposal of packing materials
- Disposal of an old appliance
- Miele Limited
- Headquarters and Showroom
- MieleCare National Service
Brand : MIELE
Model : KM 5773
Category : Hob