
IS67V5KHW/UK - Cooker INDESIT - Free user manual and instructions
Find the device manual for free IS67V5KHW/UK INDESIT in PDF.
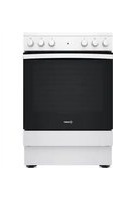


| Type de produit | Free-standing electric cooker |
| Marque | Indesit |
| Modèle | IS67V5KHW/UK |
| Categorie | Cooker |
| Dimensions (approx.) | Width 600 mm, Depth 600 mm, Height 900 mm |
| Poids (approx.) | 55 kg |
| Alimentation électrique | 230 V ~ 50 Hz, 8.5 kW, must be earthed |
| Type de table de cuisson | Glass ceramic hob with radiant heating elements |
| Nombre de zones de cuisson | 4 |
| Puissance des zones | Front left/right: 1800 W (ø180 mm); Back left/right: 1200 W (ø140 mm) |
| Fonctions du four | Light/Fast preheat, Conventional, Convection bake, Grill, Turbo grill, Bottom heat, Defrost, Salty cake |
| Capacité du four | Approx. 70 L (not specified, typical for this size) |
| Éclairage du four | Yes, 40W G9 bulb |
| Sécurité | Safety chain to prevent tipping; child lock (not specified); residual heat indicators on hob |
| Nettoyage | Steam-assisted oven cleaning; removable door glass; ceramic hob cleaner required |
| Accessoires fournis | Wireshelf, baking tray, drip tray |
| Installation | Freestanding; must be secured to wall with safety chain; require 600 mm cabinet gap |
| Pièces détachées | Available from authorized service centers; use original spare parts |
| Réparabilité | Service by qualified technician; user can replace oven light bulb |
| Informations générales | Energy class: not stated; complies with EU regulations 66/2014, 65/2014; UK regulations |
Frequently Asked Questions - IS67V5KHW/UK INDESIT
User questions about IS67V5KHW/UK INDESIT
0 question about this device. Answer the ones you know or ask your own.
Ask a new question about this device
Download the instructions for your Cooker in PDF format for free! Find your manual IS67V5KHW/UK - INDESIT and take your electronic device back in hand. On this page are published all the documents necessary for the use of your device. IS67V5KHW/UK by INDESIT.
USER MANUAL IS67V5KHW/UK INDESIT
EN ENGLISH
Health and Safety guide 3
Quick guide 5
Installation guide 25

AR
Before using the appliance, read these safety instructions. Keep them nearby for future reference.
These instructions and the appliance itself provide important safety warnings, to be observed at all times. The manufacturer declines any liability for failure to observe these safety instructions, for inappropriate use of the appliance or incorrect setting of controls.
WARNING: The appliance and its accessible parts become hot during use. Care should be taken to avoid touching heating elements. Children less than 8 years of age must be kept away unless continuously supervised.
WARNING: If the hob surface is cracked, do not use the appliance – risk of electric shock.
WARNING: Danger of fire: Do not store items on the cooking surfaces.
CAUTION: The cooking process has to be supervised. A short cooking process has to be supervised continuously.
WARNING: Leaving the hob unattended when cooking with fat or oil can be dangerous – risk of fire. NEVER try to extinguish a fire with water, but switch off the appliance and then cover the flames e.g. with a lid or a fire blanket.
Do not use the hob as a work surface or support. Keep clothes or other flammable materials away from the appliance, until all the components have cooled down completely – risk of fire.
Very young children (0-3 years) should be kept away from the appliance. Young children (3-8 years) should be kept away from the appliance unless continuously supervised. Children from 8 years old and above and persons with reduced physical, sensory or mental capabilities or lack of experience and knowledge can use this appliance only if they are supervised or have been given instructions on safe use and understand the hazards involved. Children must not play with the appliance. Cleaning and user maintenance must not be carried out by children without supervision.
WARNING: The appliance and its accessible parts become hot during use. Care should be taken to avoid touching heating elements. Children less than 8 years of age must be kept away unless continuously supervised.
⚠️ Never leave the appliance unattended during food drying. If the appliance is suitable for probe usage, only use a temperature probe recommended for this oven - risk of fire.
⚠️ Keep clothes or other flammable materials away from the appliance, until all the components have cooled down completely - risk of fire. Always
be vigilant when cooking foods rich in fat, oil or when adding alcoholic beverages - risk of fire. Use oven gloves to remove pans and accessories. At the end of cooking, open the door with caution, allowing hot air or steam to escape gradually before accessing the cavity - risk of burns. Do not obstruct hot air vents at the front of the oven - risk of fire.
⚠️ Exercise caution when the oven door is in the open or down position, to avoid hitting the door. PERMITTED USE
⚠️ CAUTION: The appliance is not intended to be operated by means of an external switching device, such as a timer, or separate remote controlled system.
This appliance is intended to be used in household and similar applications such as: staff kitchen areas in shops, offices and other working environments; farm houses; by clients in hotels, motels, bed & breakfast and other residential environments.
⚠️ No other use is permitted (e.g. heating rooms).
This appliance is not for professional use. Do not use the appliance outdoors.
Do not store explosive or flammable substances (e.g. gasoline or aerosol cans) inside or near the appliance - risk of fire.
INSTALLATION
The appliance must be handled and installed by two or more persons - risk of injury. Use protective gloves to unpack and install - risk of cuts.
⚠️ Installation, including water supply (if any), electrical connections and repairs must be carried out by a qualified technician. Do not repair or replace any part of the appliance unless specifically stated in the user manual. Keep children away from the installation site. After unpacking the appliance, make sure that it has not been damaged during transport. In the event of problems, contact the dealer or your nearest Aftersales Service. Once installed, packaging waste (plastic, styrofoam parts etc.) must be stored out of reach of children - risk of suffocation. The appliance must be disconnected from the power supply before any installation operation - risk of electric shock. During installation, make sure the appliance does not damage the power cable - risk of fire or electric shock. Only activate the appliance when the installation has been completed.
Do not remove the appliance from its polystyrene foam base until the time of installation.
⚠️ Do not install the appliance behind a decorative door - risk of fire.
If the range is placed on a base, it must be leveled and fixed to the wall by the retention chain provided, to prevent the appliance slipping from the base.

WARNING: To prevent the appliance from tipping, the retention chain provided must be installed. Refer to the installation instructions.
ELECTRICAL WARNINGS
⚠️ The rating plate is on the front edge of the oven (visible when the door is open).
⚠ It must be possible to disconnect the appliance from the power supply by unplugging it if the plug is accessible, or by a multi-pole switch installed upstream of the socket in accordance with the wiring rules. The appliance must be earthed in conformity with national electrical safety standards.
Do not use extension leads, multiple sockets, or adapters. The electrical components must not be accessible to the user after installation. Do not use the appliance when you are wet or barefoot. Do not operate this appliance if it has a damaged power cable or plug, if it is not working properly, or if it has been damaged or dropped.
⚠️ If the supply cord is damaged, it must be replaced with an identical one by the manufacturer, its service agent, or similarly qualified persons in order to avoid a hazard - risk of electric shock.
⚠️ If the power cable needs to be replaced, contact an authorized service center.
⚠ WARNING: Ensure that the appliance is switched off before replacing the lamp to avoid the possibility of electric shock.
CLEANING AND MAINTENANCE
⚠ WARNING: Ensure that the appliance is switched off and disconnected from the power supply before performing any maintenance operation; never use steam cleaning equipment - risk of electric shock.
Do not use harsh abrasive cleaners or metal scrapers to clean the door glass since they can scratch the surface, which may result in shattering of the glass.
Do not use abrasive or corrosive products, chlorine-based cleaners, or pan scourers.
⚠️ Make sure the appliance has cooled down before cleaning or performing maintenance. - risk of burns.
⚠ WARNING: Switch off the appliance before replacing the lamp - risk of electric shock.
DISPOSAL OF PACKAGING MATERIALS
The packaging material is 100% recyclable and is marked with the recycle symbol. The various parts of the packaging must therefore be disposed of responsibly and in full compliance with local authority regulations governing waste disposal.
DISPOSAL OF HOUSEHOLD APPLIANCES
This appliance is manufactured with recyclable or reusable materials. Dispose of it in accordance with local waste disposal regulations.

For further information on the treatment, recovery and recycling of household electrical appliances, contact your local authority, the collection service for household waste or the store where you purchased the appliance. This appliance is marked in compliance with European Directive 2012/19/EU, Waste Electrical and Electronic Equipment (WEEE) and with the Waste Electrical and Electronic Equipment Regulations 2013 (as amended).
By ensuring this product is disposed of correctly, you will help prevent negative consequences for the environment and human health. The symbol on the product or on the accompanying documentation indicates that it should not be treated as domestic waste but must be taken to an appropriate collection centre for the recycling of electrical and electronic equipment.
ENERGY SAVING TIPS
Only preheat the oven if specified in the cooking table or your recipe. Use dark lacquered or enamelled baking trays as they absorb heat better.
DECLARATIONS OF CONFORMITY
This appliance meets: Ecodesign requirements of European
Regulation 66/2014; Energy Labelling Regulation 65/2014;
Ecodesign for Energy-Related Products and Energy Information
(Amendment) (EU Exit) Regulations 2019, in compliance with the European standard EN 60350-1.
This appliance meets Ecodesign requirements of European Regulation 66/2014 and The Ecodesign for Energy-Related Products and Energy Information (Amendment) (EU Exit) Regulations 2019 in compliance with the European standard EN 60350-2.
PRODUCT DESCRIPTION

- Glass ceramic hob
- Control panel 3. Wire shelf
- Tray
- Door
- Guide rails for the sliding racks
- Position 1 8. Position 2
- Position 3 10. Position 4
- Position 5
CONTROL PANEL
INSTALLATION
Before operating your new appliance, please read this instruction booklet carefully. It contains important information concerning the safe installation and operation of the appliance.
Please keep these operating instructions for future reference. Make sure that the instructions are kept with the appliance if it is sold, given away, or moved. The appliance must be installed by a qualified professional according to the instructions provided.
Any necessary adjustment or maintenance must be performed after the appliance has been disconnected from the electricity supply.
Positioning and levelling
It is possible to install the appliance alongside cupboards whose height does not exceed that of the hob surface.
This cooker should be installed directly on the floor. Do not install this cooker on an artificial base of any kind. Make sure that the wall in contact with the back of the appliance is made from a non-flammable, heat-resistant material (T 90°C).
Important: Do not install this appliance adjacent to a door or other means of access to minimise the likelihood of persons using the door making contact with pans on the hob surface.
The appliance must not be installed behind a decorative door in order to avoid overheating.
This appliance must not be fitted on a platform.
The cooker is designed to fit between kitchen cabinets spaced 600mm apart. The space either side need only be sufficient to allow withdrawal of the cooker for servicing. It can be used with cabinets on one side or both, as well as in a corner setting. It can also be used free-standing.
Adjacent side walls which project above hob level must not be nearer to the cooker than 150mm and should be protected by heat resistant material. Any overhanging surface or cooker hood should not be nearer than 650mm.
a. The cooker may be located in a kitchen, a kitchen/diner or bed sitting room, but not in a bathroom or shower room. b. The hoods must be installed according to the requirements in the hood handbook. c. The wall in contact with the back of the cooker must be of flameproof material. d. The cooker is fitted with a safety chain that must be attached to a hook, secured to the wall behind the appliance.
Before moving your cooker check that it is cool, and switched off at the cooker control unit. Movement of your cooker is most easily achieved by lifting the front as follows:

Fig. A
Open the grill door sufficiently to allow a comfortable grip on the underside front edge of the oven roof, avoiding any grill elements (FIG A). Do not take all this cooker on an official base of any kind.
Take care in moving the cooker as it is heavy. Take care to ensure that any floor covering is not damaged.
Do not install this appliance. The following instructions should be read by a qualified technician to ensure that the appliance is installed, regulated and technically serviced correctly in compliance with current regulations.
WARNINGS: THIS APPLIANCE MUST BE EARTHED.
The cooker must be connected to the mains by a switched (double pole) cooker outlet correctly fused with a capacity appropriate to that shown on the cooker Rating Plate. All electrical wiring from the consumer unit to the cooker, via the switched double pole cooker outlet, must be of an acceptable type and current rating as above.
The supply cable must be positioned so that it
never reaches at any point a temperature 50°C higher than the room temperature. The cable must be routed away from the rear vents.
Safety Chain
In order to prevent accidental tipping of the appliance, for example by a child climbing onto the oven door, the supplied safety chain MUST be installed!
The cooker is fitted with a safety chain to be fixed by means of a screw (not supplied with the cooker) to the wall behind the appliance, at the same height as the chain is attached to the appliance.
Choose the screw and the screw anchor according to the type of material of the wall behind the appliance. If the head of the screw has a diameter smaller than 9mm, a washer should be used. Concrete wall requires the screw of at least 8mm of diameter, and 60mm of length.
Ensure that the chain is fixed to the rear wall of the cooker and to the wall, as shown in figure, so that after installation it is tensioned and parallel to the ground level.
USING THE GLASS CERAMIC HOB
The glue applied on the gaskets leaves traces of grease on the glass. Before using the appliance, we recommend you remove these with a special nonabrasive cleaning product. During the first few hours of use there may be a smell of rubber which will disappear very quickly.
COOKING ZONES
The hob is equipped with electric radiant heating elements. When they are in use the following items on the hob become red.

A. The cooking zone.
B. The residual heat indicator light: this indicates that the temperature of the corresponding cooking zone is greater than 60°C , even when the heating element has been switched off but is still hot.
SWITCHING THE COOKING ZONES ON AND OFF
To switch on a cooking zone turn the corresponding knob in a clockwise direction, to a position between 0 and 6.
To switch it off again, turn the knob in an anticlockwise direction until it is in the "0" position.
Heating only occurs within the marked circular cooking zones. The zones heat up and cool down quicker, providing greater controllability for sensitive foods. Each heating zone is equipped with a thermal limiter which is a safety cut-out which prevents the ceramic glass from overheating. After several minutes at full power without a pan on the heating zone the thermal limiter will switch the heating elements off and on automatically to avoid any damage to the ceramic glass
| Setting | Normal or Fast Plate |
| 0 | Off |
| 1 | To cook fish |
| 2 | To cook potatoes (steam), soup,chickpeas,beans |
| 3 | To continue cooking large quantities of food,vegetable, soup |
| 4 | To roast (medium) |
| 5 | To roast (well done) |
| 6 | To brown or quickly bring to a broil |
PRACTICAL ADVICE ON USING THE HOB
- Use pans with a thick, flat base to ensure that they adhere perfectly to the cooking zone.

- Always use pans with a diameter that is large enough to cover the hotplate fully, in order to use all the heat produced.

- Always make sure that the base of the pan is completely clean and dry: this ensures that the pans adhere perfectly to the cooking zones and that both the pans and the hob last for a longer period of time.
- Avoid using the same cookware that is used on gas burners: the heat concentration on gas burners may have warped the base of the pan, causing it not to adhere to the surface correctly.
- Never leave a cooking zone switched on without a pan on top of it, as doing so may cause the zone to become damaged.
| Ratings of Cooking Zones | |||
| Front Left Front Right | Back Left Back Right | ||
| Ceramic1800 W180 mm diameter(pos.0-6) | Ceramic1200 W140mm diameter(pos.0-6) | Ceramic1200 W140mm diameter(pos.0-6) | Ceramic1800 W1800 W180 mm diameter(pos.0-6) |
! The first time you use your appliance, heat the empty oven with its door closed at its maximum temperature for at least half an hour. Ensure that the room is well ventilated before switching the oven off and opening the oven door. The appliance may emit a slightly unpleasant odour caused by protective substances used during the manufacturing process burning away.
Using the oven
- Select the desired cooking mode by turning the SELECTOR knob.
- Select the recommended temperature for the cooking mode or the desired temperature by turning the THERMOSTAT knob. A list detailing cooking modes and suggested cooking temperatures can be found in the relevant table (see COOKING TABLE).
During cooking it is always possible to:
- Change the cooking mode by turning the SELECTOR knob.
- Change the temperature by turning the THERMOSTAT knob.
- Set the total cooking time and the cooking end time.
- Stop cooking by turning the SELECTOR knob to the "0" position.
! Never put objects directly on the bottom of the oven; this will avoid the enamel coating being damaged.
! Always place cookware on the rack(s) provided.
THERMOSTAT INDICATOR LIGHT
When this is illuminated, the oven is generating heat. It switches off when the inside of the oven reaches the selected temperature. At this point the light illuminates and switches off alternately, indicating that the thermostat is working and is maintaining the temperature at constant level.
OVEN LIGHT
This is switched on by turning the SELECTOR knob to any position other than "0". It remains lit as long as the oven is operating. By selecting with the knob, the light is switched on without any of the heating elements being activated.
1. SELECT A FUNCTION
To select a function, turn the selection knob to the symbol for the function you require.
 | LIGHT/FAST PREHEATFor switching one the oven light.For preheating the oven quickly. |
 | CONVENTIONALFor cooking any kind of dish one one shelf only. |
 | CONVENTIONAL BAKETo cook on a maximum of two shelves at the same time.It is a good idea to swap the position of the baking trays halfway through cooking. This function enables you to cook different foods (such as fish and vegetables) on different shelves at the same time. |
 | GRILLFor grilling steaks, kebabs and sausages, cooking vegetables au gratin or toasting bread. When grilling meat, we recommend using a drip tray to collect the cooking juices: Position the pan on any of the levels below the wire shelf and add 200 ml of drinking water. |
 | TURBO GRILLFor roasting large joints of meat (legs, roast beef, chicken). We recommend using a drip tray to collect the cooking juices: Position the pan on any of the levels below the wire shelf and add 200ml of drinking water. |
 | BOTTOMThis function can be used to finish cooking filled pies or to thicken soups. Use this function for the last 10/15 minutes of cooking. |
 | DEFROSTFor accelerating the defrosting of food. |
 | SALTY CAKETo cook vegetable pie, quiche with liquid filling (savoury or sweet) on a single shelf. This function delivers an even, golden, crisp top and base, use the 2nd shelf.Preheat the oven to the required temperature and place the food in it when the set temperature is reached. |
ACCESSORIES
The number and type of accessories may vary depending on which model is purchased. Other accessories that are not supplied can be purchased separately from the After-sales Service.
INSERTING WIRESHELVES AND OTHER ACCESSORIES INTO THE OVEN
- Insert the wire shelf horizontally, with the raised part "A" upwards (Fig. 1A, Fig. 1B)
- Other accessories, such as the drip tray and baking tray, are inserted in the same way as the wire shelf (Fig. 2).

Fig. 1A

Fig. 1B

Fig. 2
The table lists the best function, accessories and level to use to cook various types of food. Cooking times start from the moment food is placed in the oven, excluding preheating (where required). Cooking temperatures and times are approximate and depend on the amount of food and type of accessory used. Use the lowest recommended settings to begin with and, if the food is not cooked enough, then switch to higher settings. Use the accessories supplied and preferably dark-coloured metal cake tins and baking trays. You can also use Pyrex or stoneware pans and accessories, but bear in mind that cooking times will be slightly longer.
| RECIPE FUNCTION PREHEAT TEMPERATURE (°C) | DURATION(Min) | LEVEL (L-number) AND ACCESSORIES | ||
| Leavened cakes / Sponge cakes CONVENTIONAL YES 170 30 - 50 | L-2 | |||
| Leavened cakes / Sponge cakes CONVECTION BAKE YES 160 40 - 70 | L-4L-2 | |||
| Filled cake(cheese cake, strudel, fruit pie) | CONVENTIONAL YES | 160 - 180 40 - 60 | L-2 | |
| Filled cake(cheese cake, strudel, fruit pie) | CONVECTION BAKE YES | 150 - 170 40 - 70 | L-4L-2 | |
| Cookies / Shortbread CONVENTIONAL YES 140 30 - 60 | L-3 | |||
| Cookies / Shortbread CONVECTION BAKE YES 140 30 - 60 | L-4L-2 | |||
| Small cakes / Muffin CONVENTIONAL YES 160 - 180 20 - 50 | L-3 | |||
| Small cakes / Muffin CONVECTION BAKE YES 160 30 - 50 | L-4L-2 | |||
| Choux buns | CONVENTIONAL YES | 170 - 200 20 - 50 | L-3 | |
| Choux buns | CONVECTION BAKE YES | 160 - 180 20 - 50 | L-4L-2 | |
| Meringues | CONVENTIONAL | YES | 80 - 100 | 120 - 200 |
| Meringues | CONVECTION BAKE | YES | 80 - 100 | 120 - 200 |
| Pizza / Bread / Focaccia | CONVENTIONAL YES | 190 - 250 15 - 50 | L-2 | |
| Pizza / Bread / Focaccia | CONVECTION BAKE YES | 190 - 230 20 - 50 | L-4L-1 | |
| Savoury pies (vegetable pie, quiche) | SALTY CAKE | YES 180 - 30 - 60 | L-3 | |
| Savoury pies (vegetable pie, quiche) | CONVECTION BAKE | YES | 170-180 | 30 - 70 |
| Savoury pies (vegetable pie, quiche) | SALTY CAKE | YES 180 - 30 - 70 | L-3L-1 | |
| Vols-au-vent / Puff pastry crackers | CONVENTIONAL YES | 170 - 190 15 - 40 | L-3 | |
| Vols-au-vent / Puff pastry crackers | CONVECTION BAKE YES | 160 - 180 15 - 40 | L-3L-1 | |
| Lasagne / Flans / Baked pasta / Cannelloni | CONVENTIONAL YES | 180 - 200 30 - 65 | L-3 | |
| Lamb / Veal / Beef / Pork 1 kg | TURBO GRILL | - | 190 - MAX | 40 - 90 |
| Chicken / Rabbit / Duck 1 kg | TURBO GRILL | YES | 230 - MAX | 50 - 100 |
| Chicken / Rabbit / Duck 1 kg | TURBO GRILL | - | 230 - MAX | 50 - 100 |
| Turkey / Goose 3 kg | TURBO GRILL | - | 160 - MAX | 130 - 170 |
| Fish fillets / Steaks | GRILL | - | 230 - MAX | 10 - 30 |
| Stuffed vegetables (tomatoes, courgettes, aubergines) | TURBO GRILL | - | 230 - MAX | 30 - 60 |
| Vegetable gratin | GRILL | - | 230 - MAX | 10 - 30 |
| Toast | GRILL | 5' | MAX | 1 - 2 |
| Sausages / Kebabs / Spare ribs / Hamburgers | GRILL | - | 230 - MAX | 15 - 30 |
| Roast potatoes | TURBO GRILL | - | 230 - MAX | 30 - 60 |
| Leg of lamb / Shanks | TURBO GRILL | - | 200 - MAX | 50 - 100 |
| ACCESSORIES | |||||
| Wire shelf | Baking dish or cake tin on the wire shelf | Baking tray/Drip tray or Baking dish on the wire shelf | Drip tray / Baking tray | Drip tray / Baking tray with 200 ml of water |
CLEANING AND MAINTENANCE
TURN OFF THE MAIN SWITCH AND ENSURE THE COOKER IS COLD BEFORE CLEANING. BEFORE SWITCHING ON AGAIN, ENSURE THAT ALL CONTROLS ARE IN THE OFF POSITION.
Do not use steam cleaning equipment.
Use protective gloves during all operations.
Carry out the required operations when the oven is cold.
Disconnect the appliance from the power supply.
Do not use wire wool, abrasive scourers or abrasive/corrosive cleaning agents, as these could damage the surfaces of the appliance.
Disconnect the appliance from the power supply
CLEANING THE CERAMIC HOB
- Do not use abrasive sponges or scouring pads as they may damage the glass. • After each use, clean the hob (when it is cool) to remove any deposits and stains from food residue.
- A surface that is not kept suitably clean may reduce the sensitivity of control panel buttons.
- Use a scraper only if residues are stuck to the hob. Follow the scraper manufacturer's instructions to avoid scratching the glass.
- Sugar or foods with a high sugar content can damage the hob and must be immediately removed.
- Salt, sugar and sand could scratch the glass surface.
- Use a soft cloth, absorbent kitchen paper or a special hob cleaner (follow the Manufacturer's instructions). • Spills of liquid in the cooking zones can cause the pots to move or vibrate. • After cleaning the hob, dry thoroughly.
EXTERIOR SURFACES
- Clean the surfaces with a damp microfibre cloth. If they are very dirty, add a few drops of pH-neutral detergent. Dry them with a dry cloth.
- Do not use corrosive or abrasive detergents. If any of these products inadvertently comes into contact with the surfaces of the appliance, clean immediately with a damp microfibre cloth.
Do not use alcohol-based products such as denatured alcohol.
MOVING THE TOP HEATING ELEMENT
- Remove the side accessory holder grills.
- Pull the heating element out a little (Fig. 1) and lower it (Fig. 2).
- To reposition the heating element, lift it up, pulling it slightly towards you, making sure it comes to rest on the lateral support.

Fig. 1

Fig. 2
INTERIOR SURFACES
- After every use, leave the oven to cool and then clean it, preferably while it is still warm, to remove any deposits or stains caused by food residues. To dry any condensation that has formed as a result of cooking foods with a high water content, let the oven cool completely and then wipe it with a cloth or sponge. - Clean the glass in the door with a suitable liquid detergent.
ACCESSORIES
Soak the accessories in a washing-up liquid solution after use, handling them with oven gloves if they are still hot. Food residues can be removed using a washing-up brush or a sponge.
REPLACING THE LIGHT
- Disconnect the oven from the power supply.
- Unscrew the cover from the light, replace the bulb and screw the cover back on the light.

- Reconnect the oven to the power supply. Note: Use 40W/230V type G9
The bulb used in the product is specifically designed for domestic appliances and is not suitable for general room lighting within the home (EC Regulation 244/2009). Light bulbs are available from our After-sales Service.
-Do not handle bulbs with your bare hands as your fingerprints could damage them. Do not use the oven until the light cover has been refitted.
TEAM-ASSISTED OVEN CLEANING
This method of cleaning is recommended especially after cooking very fatty (roasted) meats.
This cleaning process allows to facilitate the removal of dirt from the walls of the oven by the generation of steam that is created inside the oven cavity for easier cleaning. Important! Before you start steam-cleaning:
- Remove any food residue and grease from the bottom of the oven.
- Remove any oven accessories (grids and drip pans). Perform the above operations according to the following procedure:
- Pour 250 ml of drinking water into the baking tray in the oven, placing it on the bottom shelf. In models where the drip pan is not present, use a baking sheet and place it on the grill at the bottom shelf.
- Select the function of the oven and set the temperature to 90°C.
- Keep it in the oven for 35 minutes.
- Turn off the oven.
- Once the oven has cooled, you can open the door to complete the cleaning with water and a damp cloth.
- Eliminate any residual water from the cavity after finishing cleaning.
When the steam-cleaning is done, after cooking especially fatty foods, or when grease is difficult to remove, you may need to complete the cleaning with the traditional method, described in the previous paragraph. Perform cleaning only in the cold oven!

CONVENTIONAL
REMOVING AND REFITTING THE OVEN DOOR GLASS
- To remove the door, open it fully and lower the catches until they are in the unlock position.

- Close the door as much as you can.
Take a firm hold of the door with both hands – do not hold it by the handle.
Simply remove the door by continuing to close it while pulling it upwards (a) at the same time until it is released from its seating (b).

Put the door to one side, resting it on a soft surface.
- Refit the door by moving it towards the oven, aligning the hooks of the hinges with their seating and securing the upper part onto its seating.
- Lower the door and then open it fully. Lower the catches into their original position: Make sure that you lower them down completely.
- Try closing the door and check to make sure that it lines up with the control panel. If it does not, repeat the steps above.
TROUBLESHOOTING
| What to do if... | Possible reasons | Solutions |
| The oven is not working. | Power cut.Disconnection from the mains | Check for the presence of mains electrical power and whether the oven is connected to the electricity supply.Turn off the oven and restart it to see if the fault persists. |
AFTER-SALES SERVICE
To receive assistance, call the number given on the warranty leaflet enclosed with the product or follow the instructions on our website. Be prepared to provide:
• a brief description of the problem; • the exact model type of your product; • the assistance code (the number following the word SERVICE on the identification plate attached to the product, which can be seen on the inside edge when the oven door is open); • your full address; • a contact telephone number.
CLICK TO CLEAN - CLEANING THE GLASS
- After removing the door and resting it on a soft surface with the handle downwards, simultaneously press the two retaining clips and remove the upper edge of the door by pulling it towards you.

- Lift and firmly hold the inner glass with both hands, remove it and place it on a soft surface before cleaning it.
- When reassembling the inner door glass, insert the glass panel correctly so that the text written on the panel is not reversed and can be easily legible.

- Refit the upper edge: a click will indicate correct positioning. Make sure the seal is secure before refitting the door.
Solutions
| Check for the presence of mains electrical power and whether the oven is connected to the electricity supply. Turn off the oven and restart it to see if the fault persists. |


Please note: If repairs are required, contact an authorised service centre that is guaranteed to use original spare parts and perform repairs correctly. Please refer to the enclosed warranty leaflet for more information on the warranty.
A complete product specification, including the energy efficiency ratings for this oven, can be read and downloaded from our website www.indesit.com


Interior surfaces

2
3

| 'A' | 'B' | 'C' | 'D' | 'F' |
| 420mm Min | 150mm Min | 650mm Min | 150mm Min | 600mm Min |
4

max. 15 mm


5

6 6.1
6.2
6.3
6.4

6.5
7


- EN ENGLISH
- AR
- INSTALLATION
- ELECTRICAL WARNINGS
- CLEANING AND MAINTENANCE
- DISPOSAL OF PACKAGING MATERIALS
- DISPOSAL OF HOUSEHOLD APPLIANCES
- ENERGY SAVING TIPS
- DECLARATIONS OF CONFORMITY
- PRODUCT DESCRIPTION
- POSITIONING AND LEVELLING
- THE APPLIANCE MUST NOT BE INSTALLED BEHIND A DECORATIVE DOOR IN ORDER TO AVOID OVERHEATING
- THIS APPLIANCE MUST NOT BE FITTED ON A PLATFORM
- WARNINGS: THIS APPLIANCE MUST BE EARTHED
- USING THE GLASS CERAMIC HOB
- COOKING ZONES
- SWITCHING THE COOKING ZONES ON AND OFF
- PRACTICAL ADVICE ON USING THE HOB
- USING THE OVEN
- THERMOSTAT INDICATOR LIGHT
- OVEN LIGHT
- SELECT A FUNCTION
- ACCESSORIES
- INSERTING WIRESHELVES AND OTHER ACCESSORIES INTO THE OVEN
- CLEANING THE CERAMIC HOB
- EXTERIOR SURFACES
- MOVING THE TOP HEATING ELEMENT
- INTERIOR SURFACES
- REPLACING THE LIGHT
- TEAM-ASSISTED OVEN CLEANING
- CONVENTIONAL
- REMOVING AND REFITTING THE OVEN DOOR GLASS
- AFTER-SALES SERVICE
- CLICK TO CLEAN - CLEANING THE GLASS
Brand : INDESIT
Model : IS67V5KHW/UK
Category : Cooker