
HGNVK49004 - Security Camera iGET - Free user manual and instructions
Find the device manual for free HGNVK49004 iGET in PDF.


| Product Type | All-in-One Wireless HD CCTV Kit |
| Model | HGNVK49004 |
| Display Size | 12-inch LCD Monitor |
| Camera Resolution | 960p (HD) |
| Number of Cameras | 4 (for this model) |
| Wireless Connectivity | WiFi (2.4GHz) |
| Recording Method | Manual, Motion, Timing (24/7) |
| Hard Drive Support | 2.5-inch SATA HDD (optional, not included) |
| Power Input (NVR/Monitor) | 12V DC, 2A |
| Power Input (Camera) | 12V DC, 1A |
| Remote Viewing | Via App (Homeguardlink) or PC (IE/CMS) |
| Mobile App Compatibility | iOS and Android |
| Default Login | Username: admin, Password: 123456 |
| Ports | LAN (Ethernet), USB, WiFi Antenna |
| Operating Temperature | Standard room temperature and humidity |
| Warranty | 24 months from date of invoice |
| Safety Certifications | CE, FCC (implied) |
Frequently Asked Questions - HGNVK49004 iGET
User questions about HGNVK49004 iGET
0 question about this device. Answer the ones you know or ask your own.
Ask a new question about this device
Download the instructions for your Security Camera in PDF format for free! Find your manual HGNVK49004 - iGET and take your electronic device back in hand. On this page are published all the documents necessary for the use of your device. HGNVK49004 by iGET.
USER MANUAL HGNVK49004 iGET
All-in-One Wireless HD CCTV Kit
4CH/8CH Security System with 12" Monitor & 960p Wireless Cameras
Quick Start Guide

natural_image
Modern security camera setup next to a computer monitor displaying multiple video feeds (no visible text or symbols)MODELS: HGNVK-49002/49004/89004/89008

www.iget.eu

CAUTION
RISK OF ELECTRIC SHOCK DO NOT OPEN

TO REDUCE THE RISK OF ELECTRIC SHOCK, DO NOT REMOVE THE COVER.
NO USER SERVICABLE PARTS INSIDE.
REFER SERVICING TO QUALIFIED PERSONNEL.

The lightning flash with arrowhead symbol, within an equilateral triangle, is intended to alert the user to the presence of non-insulated "dangerous voltage" within the product's enclosure that may be of sufficient magnitude to constitute a risk of electric shock.

The exclamation point within an equilateral triangle is intended to alert the user to the presence of important operating and maintenance (servicing) instructions in the literature accompanying the appliance.
WARNING:
TO PREVENT FIRE OR SHOCK HAZARD, DO NOT EXPOSE THIS UNIT TO RAIN OR MOISTURE
CAUTION:
TO PREVENT ELECTRIC SHOCK, ENSURE THE PLUG IS FULLY INSERTED INTO A MAINS SOCKET

IMPORTANT SAFEGUARD

All lead-free products offered by the company comply with the requirements of the European law of the Restriction of Hazardous Substances (RICH) directive, which means our manufacturing processes and products are strictly "lead-free" and without the hazardous substances cited in the directive.

The crossed-out wheeled bin mark symbolizes that within the European Union the product must be collected separately at the product's end-of-life. This applies to your product and any peripherals marked with this symbol. Do not dispose of these products as unsorted municipal waste. Contact your local dealer for procedures for recycling this equipment.
DISCLAIMER
We reserve the right to revise or remove any content in this manual at any time. We do not warrant or assume any legal liability or responsibility for the accuracy, completeness, or usefulness of this manual. The content of this manual is subject to change without notice.
RECOMMENDATIONS
• AVOID DUSTY LOCATIONS:
• INSTALL IN VENTILATED SPACE:
• DO NOT EXPOSE TO MOISTURE:
• DO NOT DROP:
• DO NOT OPEN CHASSIS:
Excessive build-up of dust may cause the unit to fail.
Ensure adequate airflow around the DVR to prevent overheating.
Exposing the unit to water poses high risk of electric shock.
Doing so could damage internal components.
No user-serviceable parts inside.
TRADEMARKACKNOWLEDGEMENTS
- Internet Explorer™, Microsoft™ & Windows™ are registered trademarks of Microsoft Corporation.
- Apple™, iPhone™, iPad™ and iTunes™ are registered trademarks of Apple Computer, Inc.
- Android™ and Google Play™ are registered trademarks of Google Inc.
DEFAULT PASS CODE INFORMATION
Username: admin
Password: 123456
WARRANTY AND TECHNICAL SUPPORT
To help you make the most of this product you'll find a host of information including full-product manuals, FAQ, troubleshooting guides and a support service if you have specific questions, available at our support website: homeguardworld.com/support.

Contents
Introduction 4
Setup the System 5
Record video 6
Playback video on NVR 7
Backup the video for memory or evidence 7
View on Mobile 7
Playback on mobiles 9
View on PC via IE (Internet Explorer) 9
Homeguard CMS PC Client Software 11
NVR 11
MENU - Do What 12
System Setup 13
Troubleshooting 13
Warranty & Support 14


Introduction
STATEMENT
Thank you for purchasing our product! This quick start guide will talk about main usages of the product. More information can be found on our website and the help center. This user guide may contain inaccurate content due to hardware and software upgrade. It is subject to change without previous notice.
SAFETY CAUTION
- Please do not put any fluid container on the product.
- Please use the product in ventilated environment and prevent blocking the vents.
- Please use included power supply with the product to prevent damage to the product.
- Please use the product under its standard working temperature and humidity. (advised in this manual or distributor's website)
- Dust on PCB may cause short circuit. It is suggested to clean the dust on PCB timely to make the product work properly.
- Please obey the regulation and policy in your country and area during the installation of this.
OUT OF BOX AUDIT
After receiving the product, please check all products and accessories according to distributor's Package Includes information. If any is missed or damaged, please contact the distributor.
BEFORE INSTALLATION
This product may require cabling. We suggest to test all products & parts before installation and cabling.
APPLICATIONS
- By adding a 2.5" SATA hard drive to the recorder, you can record videos.
- By connecting the NVR to the Internet, you can view the camera footage from anywhere anytime.

Setup the System
Get all the capabilities of a full surveillance system to go. View live and recorded video from your cameras on a stylish all-in-one 12" LCD monitor and recorder. Enjoy the performance of a premium surveillance system with simplified installation and secure wireless video. The solution is flexible and easy to install with no need for messy cables. The camera & network video recorder with monitor all connect wirelessly in minutes. With the ability to view live footage through your smartphone, tablet, computer, the Homeguard All-in-one Wireless HD CCTV Kits will offer you peace of mind, wherever you are in the world.
Steps to setup the system
1 Install antennas for cameras and NVR.
2 Plug the NVR to power (use 12V 2A power adapter).
3 Please press the screen on/off button on the back of NVR to open the screen.
4 Plug cameras to power (use 12V 1A power adapters).
5 Within seconds, you should see cameras' images on the screen.
6 Plug the mouse (included) to an USB port on the back of NVR. You shall then be able to operate on the system.
In the OS you can find fullest functionalities including live view, record, playback, video backup and all settings.
Default ID: admin Password: 123456

natural_image
Computer monitor displaying four video content thumbnails: a man in a kitchen, a woman in a house, a child reading, and a woman in a home (no visible text or symbols)Tips: To protect your privacy, please set your password at earliest convenience. Right click the mouse - Go to System Setup - System Admin - User Management to set password.


Record video
The system may not include hard disk depending on the kit you selected. The NVR works with most 2.5" SATA HDD.
Steps to install a hard drive (if your system has preinstalled HDD, please skip this step)
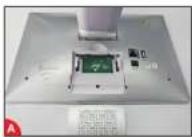
Push down the plate, then open the HDD compartment

Ensure HDD SATA port on the same position as NVR SATA port before install HDD
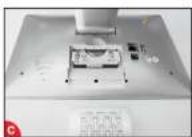
Insert the HDD and ensure HDD SATA port to connect with NVR SATA port

push up the plate and close the HDD compartment
2 Record video
Record videos is very easy on Homeguard camera system.
⑤ Timing Record, set time periods you want the NVR to record. Click right button → System Setup → Record Setup → Record Plan; here you can setup periods you want the NVR to record. Everyday 0:00:00-23:59:59 means 24x7 recording. The system records 24x7 by default when it detects hard disk.
- Manual Record, the shortcut to turn on record. Click right button → Manual Record; you can turn ON or turn OFF the record of certain channels. Red dot on right above corner means manual record is ON.
Motion Record. Motion Record means certain channel(s) will be recorded only when movement is detected. Click right button → System Setup → Record Setup → Record Plan; by unselecting Time and selecting Motion, the channel will record only when motion detected.

Playback video on NVR
In the NVR system, right click the mouse → Choose Video playback → Choose Manual search; you will enter the Video Playback system. Specify channels and time, you can search out videos. Click playback to start play recorded videos.

natural_image
Composite image showing a modern residential house, a modern kitchen interior, and a close-up of a single apartment (no visible text or symbols)
Backup the video for memory or evidence
You can backup the video with USB flash disk.
Plug an USB flash disk to your NVR's USB port → Click right button → Choose Video back up → choose the channel and time period → Search → Choose the video clips you want to backup → Click Backup.

View on Mobile
1 Get the NVR ONLINE
Connect the NVR's WAN port to the Internet (e.g. router) with an Ethernet cable Click right button on mouse, go to System Setup → Network Setup; make sure the DHCP is CHECKED. Within minutes you should see the NVR obtains IP and goes ONLINE automatically. If it does not go ONLINE, your router settings might be stopping the NVR from connecting. Please allocate IP to the NVR manually or contact your network administrator for help. (e.g. port 80 need to be opened on the router)

natural_image
Modern kitchen interior with white appliances and large windows (no visible text or symbols)
2 Download the App
You can either scan the QR-Code below to find the free mobile app, or search Homeguardlink on App Store / Google Play to find it. Download and install it. Then run the App and spend minutes to register an account.

App

iOS

Android
3 Add the NVR system to your App device list
Run the Homeguardlink App, login with your account or choose Trial → Click "-" to Add device by ID → Input Device ID (find it in the NVR's Network Setup, or right bottom corner on screen), Description (e.g. Home Camera). User name (default user name is "admin") and Password (default is 123456) → Submit to get back to your device list → Click the device to view the cameras.


natural_image
Interior layout of a modern residential area with houses, landscaping, and kitchen furniture (no visible text or symbols)Tips: If you've set a password on your NVR system, please update your password on App to view.

Playback on mobiles
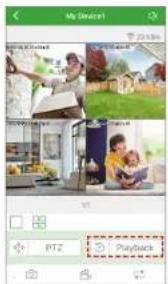
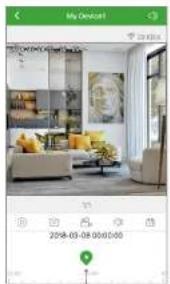
In the App while viewing live video of the system click Playback, you will enter the remote playback menu. The App automatically playback camera 1, you can switch channels by choose the CH.
natural_image
Interior view of a modern living room with yellow furniture and large windows (no visible text or symbols)Tips: Video in playback are HD @ real time which requires very good transmission condition. We suggest to playback in LAN. Remote playback out of LAN may not 100% work due to connection & network condition.

View on PC via IE (Internet Explorer)
When your PC is in same LAN with the NVR (normally means they are connected to the same router)
Step1: Find the IP address and port # of your NVR (IP address can be found in System Setup → Network Setup).


Step2: Enter the NVR's IP address in your IE browser in format http://your ip address, for example: http://10.0.0.37 (if the default WEB port 80 has been changed e.g. to 100, you'll need to add new port number when input IP address in the browser, for example: http://10.0.0.37:100)

2 When your PC is out of local area network with the NVR (For example: view your home cameras from your office PC)
Access with Device Cloud ID
Step1: Open your Internet Explorer(IE) browser and visit www.homeguardlink.com
Step2: Input Device ID, User name and Password to login
(Device ID can be found at the right bottom corner of the NVR monitor, status should be "ONLINE", default User name is 'admin', and default Password is '123456')
Step3: If it's 1st time you use it, please download and run the WebClient.exe control follow the pop out message. Repeat step1 and 2 you shall see the videos.
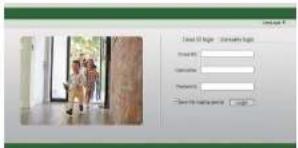
Note: If for the first time use and software cannot load automatically, you'll need to change some activeX settings in Internet Explorer. (This will need to be done on EVERY computer you use to access the system.)


Access with User ID
Choose 'User name login', enter your App username and password to login. You should see all your devices.
Step1: Click "Tools" → "Internet Options" → "Security" → "Internet" → "Custom Level"
Step2: Scroll down until you see ACTIVEX CONTROLS AND PLUG-INS.
(If you have Internet Explorer 9 or 11, change ALLOW ACTIVEX FILTERING to DISABLE. Other versions of IE will not have this option.)
Step3: Change the follow ACTIVEX controls to PROMPT:
Download signed ACTIVEX controls
Download unsigned ACTIVEX controls
Initialize and script ACTIVEX controls not marked as safe for scripting
Step4: When done click OK, and exit the Security Settings Menu.

Homeguard CMS PC Client Software
Excepted for IE, you can also download and install the CMS software on your PC to view the system. The CMS software can found at included CD.

NVR
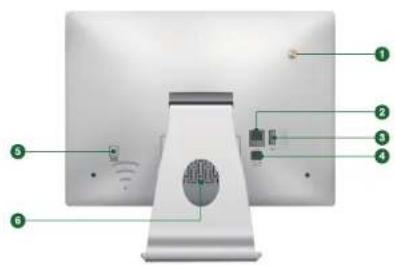
1 WiFi Antenna Ports: Antenna to extend WiFi range
2 LAN Port: Connect your NVR to the Internet
3 USB Port: For mouse and backup
4 Power Input
5 Screen On/Off Button
6 Hard Drive compartment

MENU - Do What
Click right button you can enter the main menu; click right button again you can exit the current menu or return.
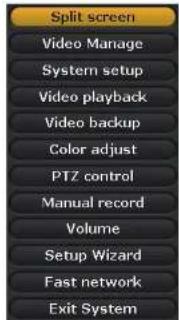
- Split screen: Change status of live view. You can choose to view multiple cameras or any single camera.
• Video Manage: Manage IP cameras and NVR channels
• System setup: All system settings
• Video playback: Playback recorded videos
• Video backup: Backup recorded videos
• Color adjust: Adjust the image settings of each camera
• PTZ control: Control PTZ cameras or preset them. (works only for PTZ cameras) - Manual record: Shortcut to change the record settings
• Volume: Adjust volume of audio cameras (works only for audio cameras) - Setup Wizard: Step by step guide of 1st time general settings
• Fast Network: Shortcut to network settings - Exit System: Logout, reboot, close screen output and shut down the system

System Setup
Click right button → Choose System setup; you then shall enter the menu that enables you to do all settings related to this system.
- General setup
(This enables you to set)
Language
Time
Display resolution
- Channel setup
(This enables you to set)
Manage channels and cameras
Name each camera
Auto switch from1 camera to another
- System admin
(This enables you to set)
System version
System maintenance including system upgrade
User and password management
Restore to default settings
System log
HDD information
IPC maintenance
- Record setup
(This enables you to set)
Record plan for each channel
Video detection
• Network setup
(This enables you to set)
All network related settings

Troubleshooting
Q: Why I can not get any display on NVR screen?
A: Please check if NVR connect with power adaptor. Please press the screen on/off button on the back of NVR to open the screen.
Q: Why some buttons on the App do not function?
A: The App is developed not only for the model you purchased, so it has to cover all functionalities which your model may not have. This also means you might be able to add new add-on devices to the system in future.
Q: Does my wireless NVR have to be connected to the Internet to work?
A: No, your wireless NVR does not have to be connected to the Internet to work. You can view live feed and recordings on NVR screen.


Warranty & Support
All the products sold are covered by 24 months warranty from the date of invoice.
Warranty instructions:
-
Please contact us when the product is caused by its own fault within 2 year warranty.
-
Please mail us your written warranty card as soon as possible after purchasing our products so that we can repair or replace this product to its original operation condition. Or the company will not deal with it.
-
Please write the truth on the warranty card.
-
Paid for repairing as follows:
A. Equipment failure caused by human operation
B. Equipment failure caused by not conforming to the using environment
C. No warranty card
D. Warranty expired
Product model: ____
Product serial number: ____
Purchase date: ____
User name: ____
Contact person: ____
Telephone: ____
CE FC ⊙ X

Note: Please keep the warranty card for the better service.
For technical support, please contact us www.iget.eu


- All-in-One Wireless HD CCTV Kit
- CAUTION
- IMPORTANT SAFEGUARD
- DISCLAIMER
- RECOMMENDATIONS
- TRADEMARKACKNOWLEDGEMENTS
- DEFAULT PASS CODE INFORMATION
- WARRANTY AND TECHNICAL SUPPORT
- Contents
- Introduction
- STATEMENT
- SAFETY CAUTION
- OUT OF BOX AUDIT
- BEFORE INSTALLATION
- APPLICATIONS
- Setup the System
- Steps to setup the system
- Record video
- Playback video on NVR
- Backup the video for memory or evidence
- View on Mobile
- Playback on mobiles
- View on PC via IE (Internet Explorer)
- Access with Device Cloud ID
- Access with User ID
- Homeguard CMS PC Client Software
- NVR
- MENU - Do What
- System Setup
- Troubleshooting
- Warranty & Support
- Warranty instructions:
Brand : iGET
Model : HGNVK49004
Category : Security Camera