
MP901600 - Scale ADE - Free user manual and instructions
Find the device manual for free MP901600 ADE in PDF.


| Product Type | Bathroom Scale |
| Model | MP901600 |
| Brand | ADE |
| Display | LCD, 4-digit |
| Units of Measurement | kg / lb / st |
| Maximum Capacity | 180 kg (396 lb) |
| Graduation | 0.1 kg |
| Dimensions | 30 x 30 x 3 cm |
| Weight | 1.5 kg |
| Power Supply | 2 x AAA batteries (included) |
| Auto On/Off | Yes |
| Tare Function | Yes |
| Low Battery Indicator | Yes |
| Overload Indicator | Yes |
| Material | Tempered glass platform |
| Cleaning | Wipe with damp cloth; do not immerse |
| Safety | Use on flat, hard surface; avoid impact |
| Battery Replacement | User-replaceable |
| Spare Parts | Not available; replace whole unit |
| Manual Languages | English (PDF download) |
Frequently Asked Questions - MP901600 ADE
User questions about MP901600 ADE
0 question about this device. Answer the ones you know or ask your own.
Ask a new question about this device
Download the instructions for your Scale in PDF format for free! Find your manual MP901600 - ADE and take your electronic device back in hand. On this page are published all the documents necessary for the use of your device. MP901600 by ADE.
USER MANUAL MP901600 ADE
natural_image
Digital ADE digital balance scale with a bowl on top, showing measurement display and control buttons (no readable text or symbols beyond branding)Portion Scale – Model 90612-30
(MP901600-211214-Rev006-UM-en)
Contents
Contents 1
Components and Features 2
Key function....2
Display symbols 2
Installation and use of scale 3
Check carton contents 3
Safety precautions 3
Power supply of the scale 4
Positioning of the scale 4
Use of the scale....5
Switch on the scale 5
Switch off the scale 5
Zeroing 5
Weighing 5
Tare Function 5
Unit function 6
Setting of backlight and Unit function....6
Cleaning & Maintenance 7
Cleaning 7
Display- and Error indication 7
Safety instructions....7
Storage and Transport 8
Disposal....8
Warranty 8
Technical data 9
CE marking and Declaration of Conformity 10
Components and Features
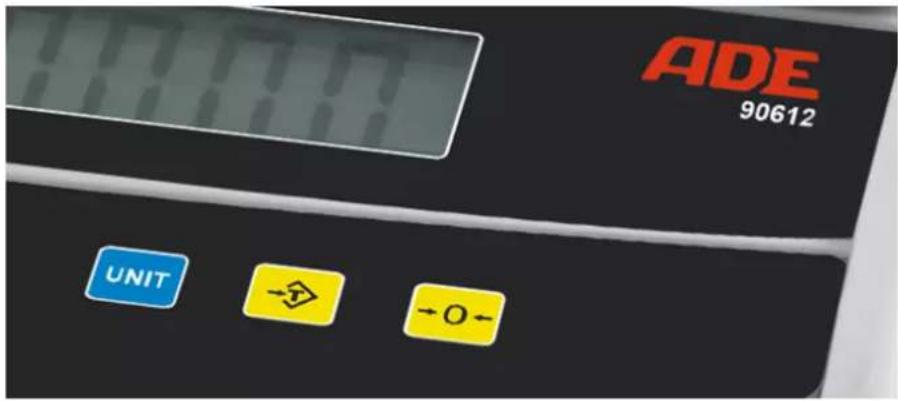
Key function
Attention: The power switch is underneath the base of the right hand side of the scale.
| Symbol Indication | Function | ||
 | ZERO To set scale to zero. | ||
 | TARE To tare any requested value. | ||
 | UNIT To change the weighing unit (kg, lb). | ||
Display symbols
| Symbol Indication | |
| GROSS Indication of weight taken (gross weight).. | |
| NET/ZERO | TARE – Indication that a tare value has been keyed in and is active. |
| ZERO Indication that scale has been set to zero manually. | |
 | Indication that a stable value has been reached. |
 | Indication that battery is low. |

This symbol means: "Consult operating instructions". To achieve accurate results, read the instructions for use carefully before use and follow all instructions provided therein. Keep the instructions for use for future reference.
Your ADE Portion scale is a quality product.
It is a precision instrument and must be treated accordingly. Therefore kindly read and follow the Operating Manual in all respects.
Check carton contents
- Scale including protection cover
- Stainless steel bowl
- Mains Connection Cable
- Operating Manual including Certificate of Conformity
Safety precautions

Avoid impacts on the weighing platform and do not overload the scale. Take care when the scale is being transported. Please note that your ADE control scale is a precession instrument.
Do not expose the scale to elevated temperatures neither sun insulation nor adjoining devices. The liquid crystal display may be damaged.
Electronic scales should not come into contact with water. Operate the scale in a dry area. Clean the scale with a damp cloth. In case there a intrusion of water switch the scale off immediately and let it dehumidify.
Do not clean the scale with aggressive cleaning detergents. The casing will lose its brilliant surface, and gets more vulnerable to dirt.
In case the scale is not used for a longer period, it should be cleaned and stored in a protection cover.
As soon as the charge condition symbol 📄pears, the accumulator needs to be recharged.
Before connecting the mains cable with the scale make sure that the type of current is corresponding with the type of current mentioned on the type label.
In case of non-using the scale for a longer period the accumulator needs to be recharged every month or the accumulator has to be disassembled. After using the scale should be charged again.
A storage of the scale with discharged accumulator leads to a reduced lifespan of the accumulator.
Power supply of the scale
The power supply of the scale is done with the integrated rechargeable battery or the IEC Power Connector. Before connecting the mains cable with the scale make sure that the type of current is corresponding with the type of current mentioned on the type label.
- The battery pack is already installed in the base of the scale.
- Charge the power-pack by using the mains adapter and connect the jack firmly. Complete first charging of power-pack needs 24 hours.
- The full battery life is approx. 100 hours.
- If power-pack needs recharging there will be an arrow above the low battery symbol on the display. Still the scale will operate for about 10 hours after which it will automatically switch off to protect the battery.
- You can also identify status of battery charging by the colour of the LED control light placed in the right hand corner above the display. When the scale is plugged into mains the power pack will be recharged automatically. LED is illuminated green the batteries have full charge. If it is red the battery is nearly discharged and yellow indicates the battery is under charge.
- Battery life becomes weaker if lifetime after charging becomes shorter. In this case contact your local dealer or service partner.
- Please make sure the local voltage supply corresponds to the indication printed on the adapter.
Positioning of the scale
Take the scale out of the packaging and place the scale on a plane and stable surface. The surrounding has to be clean and dry. The scale should not be placed near to open windows or doors, air conditioning systems or fan heaters, because draught could influence the measuring results.
Place the plastic tray platform on the scale by placing the four pins in the appropriate holes. Then place the stainless steel weighing platform on the platform.
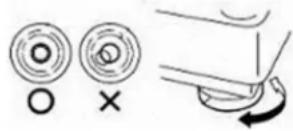
Make sure all four feet of the platform have direct contact to the surface.
The spirit level of the scale is an additional tool to make sure the scale is carefully positioned and offers best results when the air bubble is centered.

The alignment of the scale must be checked and corrected every time the location of the scale is changed!
Switch on the scale
Remove all goods from the weighing platform and place the organ tray onto the platform BEFORE switching on the device. This way a later taring of the organ tray is not necessary. Switch on the scale. On/Off switch is placed underneath the scale on the right hand side. After switch-on the scale is running an automatic functions test ending with showing "0.000" in the display. The scale is now ready for weighing.
After changing the location of the scale especially with temperature fluctuations please wait for 15 minutes after switch-on to warm up inside the scale. This helps stabilizing measuring results of weighing.
Switch off the scale
Switch off the scale with switch, which is on the right hand side underneath the scale.
Zeroing
By using the -0 -key eventual irregularities occurred after start up the scale can be compensated by setting the display back to zero for all subsequent weighing procedures.
Weighing
Place the weighing object on the platform and the display will show the weight.
A stable value will be shown on the left of the display with symbol O.
If there's an underload display shows „----“ and an acoustic warning signal appears. Remove all objects from the weighing platform, adjust it and restart weighing process.
If there's an overload display shows „--OL--“. In this case remove all objects to avoid irreparable damages.
If display of the scale shows a value without objects on the platform, press to set zero manually.
Tare Function
This function enables the user to weigh objects together with others (e.g. container, foil or paper cloth) without the additional weight influencing the weighing result.
- Switch on the scale.
- If necessary use the manual zero function by pressing if necessary. The ZERO indication appears on display.
- Place the object (e.g. container, foil or paper cloth) on the tray.
- Press key to come back to zero. Display now shows '0.000' and NET and ZERO symbol will appear.
- Put the object to be weighed on the platform.
- The weight of object can be read from the display. In display NET appears.
If the object to be tared remains always the same you may continue weighing another object. The scale will tare automatically the stored value and will show only the net weight of the individually weighed object. In case the scale is shut off automatically (e.g. in battery operating mode) the stored value is cleared. If the value to be tared should be changed during operation

of the scale, remove all objects from the scale. Then press again to return to normal weighing mode.
Unit function
By using UNIT you may select the weighing mode.
Setting of backlight and Unit function
The user has the possibility to activate or deactivate the backlight.
Activated backlight makes it easier to read the weighing results from the display, but it also needs more power consumption.


For setting the backlight parameter press same time buttons and . Display shows "inC" (graduation). In this parameter you must not make any changes, because otherwise it'll change metrological parameter which could lead to wrong measuring results.

To pass to the next parameter just press
Display shows "EL" for setting the backlight.
| Indication in Display | Option |
| EL Au Backlight on, only if weighing platform is loaded. | |
| EL Off Backlight is deactivated and permanently out. | |
| EL On Backlight is activated and permanently on. | |

By pressing you can change between the different indications.

To confirm your choice press
Now display shows "A2". In this parameter you must not make any changes, because otherwise it'll change metrological parameter which could lead to wrong measuring results.

To pass to the next parameter just press
Display now shows "Ut" for setting the units.
In sequence it will be shown units g (grams), t (Tola), lb (pound), and oz (ounce), which can be individually activated or deactivated.

If a unit, e. g. g for grams, is shown, press to activate/deactivate unit. If display shows "on", unit is activated. If display shows "off", unit is deactivated.
By pressing -0 you'll pass to next unit. Please repeat this step for each unit.
After setting the last unit (oz) and finalising with -0 , display will show CAL (with G value).
In this parameter you must not make any changes, because otherwise it'll change metrological parameter which could lead to wrong measuring results.
Just press 0
The scale turns automatically in weighing mode and is now ready for weighing with new parameter settings.
After switch-off the scale parameter settings will be stored.
Cleaning & Maintenance
Cleaning
Before cleaning make sure the scale has been disconnected from the socket. For cleaning just use a damp cloth or common disinfection products. Do not use any aggressive cleaning fluids.

Make sure no water or cleaning fluid penetrates the scale, because it could damage the scale irreparably!
The scale must not be cleaned with high-pressure cleaner!
Display- and Error indication
| Symbol | Indication | |
| Reload accumulator with IEC Power Connector. | ||
| --OL-- | Overload: Scale ist overloaded, the weight of object is higher than capacity.Remove the object immediately from the weighing platform. | |
| ---- | Underload: If there's a container on the platform when switch-on the scale and if then the container will be removed, from the platform, display will show an underload and an acoustic warning signal appears. Switch-off the scale and switch-on again for following up weighing process. | |
| Err 4 | Zero error: The scale is above zero range (4% of maximum). Remove the object from the weighing platform and restart the scale. If the error still occurs, contact your local service partner or dealer for re-calibrating the scale. | |
| Err 5 | Keyboard error. | Contact your local service partner or dealer. |
| Err 6 | A/D-converter out of regularly range | |
Safety instructions
Do NOT use the scale:
- If the mains plug or cable shows visible damages
- If the IEC Power Connector is not working regularly.
• After long storage in humid places
In those cases contact your local dealer or service partner.

It is not allowed to use other IEC Power Connectors and rechargeable batteries than original ones. Otherwise there's the possibility of danger for the scale or users.
Storage and Transport
Keep all original parts and pieces for an eventual sending back of the scale in order to avoid any possible damage during transport which automatically leads to no warranty.
Disconnect all cables before transport to avoid unnecessary damages.
Disposal

Waste electrical equipment do not belong in household waste. Devices with this marking may not be disposed of as residual waste, but must be recycled.
Remove (if possible) all batteries and rechargeable batteries from the devices and send them to the battery disposal.
Make sure that only depleted batteries or batteries with insulated poles are disposed of so that there is no short circuit!
Warranty
A one years' warranty period from date of purchase will be guaranteed for either repair or replacement once it is proven that the defects are caused by poor material or poor workmanship (please keep the receipt for presentation). All moveable parts such as batteries, cables, plug-in power supply units, rechargeable batteries etc. are excluded. Warranty does not apply to normal appearance of usage or sign of wear or any damages caused by accidents or misuse. Products which have been opened by unauthorized persons are automatically out of warranty.
Customers abroad are requested to contact their local dealers in the event of any warranty becoming applicable.
Technical data
Model
MP901600
Art. No. MP901600
Non approved
Capacity:
30kg / 60 lb
Graduation:
1g / 0.002 lb
Environmental conditions: -10^ - +40^
Display:
Large LCD Display, 25 mm high digits, with backlight
Housing:
Solid plastic housing
Easy-care keyboard
Stainless steel
Weighing platform:
Safety cover for keyboard and housing
Tare adjustment and minus weighing mode to determine the weight of the amount taken
Dimension weighing platform:
295 x 220 mm
Dimension:
315 x 330 x 205 mm
Dead weight:
4,1 kg
Packing weight: 5 kg
Power supply:
Mains and rechargeable battery for 230 V AC, rechargeable battery with approx. 100 h working hours
CE
Declaration of conformity by the manufacturer
These scales have been manufactured in accordance with the harmonised European standards. They conform to the regulations of the EC-directives listed below:
- EMC Directive 2014/30/EC
– Low Voltage Directive 2014/35/EC
– RoHS Directive 2011/65/EC
in the currently valid versions.
This declaration loses its validity if modifications are made to the scale without our approval.
Hamburg, Decembre 2021
ADE Germany GmbH
- Portion Scale – Model 90612-30
- Contents
- Components and Features
- Key function
- Display symbols
- Check carton contents
- Safety precautions
- Power supply of the scale
- Positioning of the scale
- Switch on the scale
- Switch off the scale
- Zeroing
- Weighing
- Tare Function
- Unit function
- Setting of backlight and Unit function
- Cleaning & Maintenance
- Cleaning
- Safety instructions
- Storage and Transport
- Disposal
- Warranty
- Technical data
- Model
- MP901600
- CE
- Declaration of conformity by the manufacturer
- ADE Germany GmbH
Brand : ADE
Model : MP901600
Category : Scale