JS-20 - Security Camera Jablotron - Free user manual and instructions
Find the device manual for free JS-20 Jablotron in PDF.


| Product Type | Security Camera |
| Model | JS-20 |
| Brand | Joblotron |
| Resolution | 1080p Full HD |
| Field of View | 110° |
| Night Vision | Up to 30 ft (IR LEDs) |
| Connectivity | Wi-Fi 802.11 b/g/n, Ethernet |
| Power Supply | DC 12V, 1A (included) |
| Dimensions | 7.5 x 6.2 x 4.8 cm |
| Weight | 320 g |
| Weather Resistance | IP65 (outdoor use) |
| Storage | MicroSD up to 128 GB, cloud support |
| Motion Detection | Yes, with push notifications |
| Two-Way Audio | Built-in microphone and speaker |
| Mounting | Wall or ceiling mount included |
| Maintenance | Clean lens with soft dry cloth; check connections |
| Safety | Complies with CE, RoHS; use only supplied adapter |
| Spare Parts | Replacement mounts and power adapters available |
| Repairability | Self-service via online guides; professional service recommended |
Frequently Asked Questions - JS-20 Jablotron
User questions about JS-20 Jablotron
0 question about this device. Answer the ones you know or ask your own.
Ask a new question about this device
Download the instructions for your Security Camera in PDF format for free! Find your manual JS-20 - Jablotron and take your electronic device back in hand. On this page are published all the documents necessary for the use of your device. JS-20 by Jablotron.
USER MANUAL JS-20 Jablotron
This P.I.R. motion detector is used to protect interiors. It detects any movement of objects with a temperature close to that of the human body.
The signal from the sensor is electronically analyzed. This ensures that the detector provides excellent sensitivity and at the same time false alarms are basically eliminated. The detection analysis rate can be adjusted to increase its immunity if the JS-20 is installed in a problematic location.
The standard lens in the detector can be replaced with an optional corridor or pet immune lens. Extra terminals (GBS) can be used to facilitate wiring of the detector.
The JS-20 distinguishes itself with excellent RF immunity.
It can be mounted on a flat wall or in a corner.
Installation
This detector is designed for
indoor applications. It can be mounted on a flat wall or in a corner. Do not place the detector close to any heating/cooling vents or near any other object that often change temperature. The detector must have an unobstructed view of the protected area.
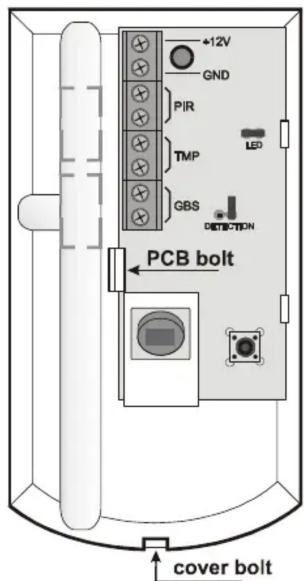
- Open the cover of the detector (press in the plastic tab on the bottom part of the detector's housing with a screwdriver).
- Remove the PCB by pressing the flexible tab inside the housing.
- Punch through the pre-formed holes for cables and screws.
- Attach the housing to the wall (2.5 meters above the floor).
- Return the PCB into the rear housing and connect the cable wires to the terminals.
- Attach the cover.
Note: Avoiding touching or scratching the PIR sensor!
Terminals
+12V, GND power supply
PIR, PIR PIR alarm output (normally closed)
TMP, TMP TAMPER output (normally closed)
GBS, GBS auxiliary terminals – useful when wiring (see examples)
Jumpers
LED the LED indicator can be disabled by opening this jumper
DETECTION by opening this jumper you can set a higher rate of analysis and increase the immunity of the detector. This setting is suitable for problematic locations with sudden temperatures changes or electromagnetic interference. Reaction of the detector will be slightly slower in this setting.
Detector testing
- After switching on the power, wait for 1 minute. During this period the detector initializes and stabilizes its parameters (LED will be on if not disabled).
- Each detected movement will be indicated by the detector's LED (if not disabled)
- Confirm that the detector covers the protected area as you expected.
Lenses
Standard lens that is supplied with the JS-20 Largo detector covers an area of 120 degrees / 12 meters.

area
| x [m] | y | |-------|-------| | 0 | 0 | | 2 | 2 | | 4 | 4 | | 6 | 6 | | 8 | 8 | | 10 | 8 | | 12 | 8 |For special applications other lenses can be used. Optional lenses for long corridors and areas with small animals are supplied separately.
The Pet lens is marked JS-7910. This lens prevents animals smaller than 40 cm to be detected by the detector. The working range of this lens is reduced to 7 meters. It is recommended to test this lens carefully with the animal when installing the system, in order to prevent false alarms.
The Corridor lens is marked JS-7904. The working range of this lens is 25 meters long and only 3 meters wide. It is recommended to test the detector's sensitivity carefully when installing it into a corridor.
The curtain lens is marked JS-7902. By using this lens the PIR detector's working range is restricted to a "curtain". After using this lens, it is for example possible to secure part of a room etc. During the installation it is necessary to test the working range very carefully.
Lens characteristic diagrams can be seen in documents supplied with the lens or on the Jablotron website www.jablotron.com.
Note: Although this product does not contain any harmful materials we suggest you to return the product to the dealer or directly to the producer after usage.
Specification
Power supply: 12 V DC ± 25%
Power consumption (LED off):
Maximum consumption (LED on):
Terminals size:
Mounting height:
Detection range:
Initialization:
Alarm output:
Tamper output:
Environment - class
Operating temperatures
Security level
EMC
| max. 10 mA | |
| max. 35 mA | |
| max. 1 mm ^2 | |
| 2.5 m above floor | |
| 120° / 12 m (standard lens) | |
| aprox. 1 minute | |
| normally closed, max. 60V / 50 mA, internal resistance max.30 Ohm | |
| normally closed, max. 60 V / 50 mA, internal resistance max.16 Ohm | |
| II. – general indoor, (EN 50131-1) -10 to +40 °C | |
| grade 2, EN 50131-1, EN 50131-2-2 | |
| EN 50130-4, EN 55022 | |

JABLOTRON ALARMS a.s. hereby declares that the JS-20 is in compliance with the essential requirements and other relevant provisions of Directive 2004/108/EC. The original of the conformity assessment can be found on the web site www.jablotron.com, Technical Support section.

Note: Although this product does not contain any harmful materials we suggest you return the product to the dealer or directly to the manufacturer after use.

TAMPER
EOL
R = value of end-of-line resistor

DOUBLE EOL
parallel combination of resistors
R/2 = value of end-of-line resistor
Examples of wiring the JS-20 Largo detector using end-of-line resistors and double end-of-line resistors
(Auxiliary GBS terminals are used to facilitate the wiring)

flowchart
graph TD
    A["POWER SUPPLY"] --> B["1. DETECTOR POWER SUPPLY"]
    B --> C["2. +12V GND"]
    C --> D["3. +12V GND"]
    D --> E["R"]
    E --> F["The last detector in the loop parallel combination of resistors R/2 = value of end-of-line resistor"]
    style A fill:#f9f,stroke:#333
    style B fill:#ccf,stroke:#333
    style C fill:#cfc,stroke:#333
    style D fill:#fcc,stroke:#333
    style E fill:#ffc,stroke:#333
    style F fill:#cff,stroke:#333
Example of wiring of several JS-20 Largo detectors into the double EOL loop
(Auxiliary GBS terminals are used to facilitate wiring)

flowchart
graph TD
    A["POWER SUPPLY"] --> B["1. DETECTOR POWER SUPPLY"]
    B --> C["2. +12V GND"]
    C --> D["3. The last detector in the loop"]
    subgraph Power Supply
        E["+12V GND"] --> F["PIR"]
        F --> G["TMP"]
        G --> H["LED"]
        H --> I["GBS"]
        I --> J["DETECTION"]
        J --> K["ALARM LOOP"]
        L["TAMPER LOOP"] --> M["ALARM LOOP"]
    end
    subgraph Detector
        N["+12V GND"] --> O["PIR"]
        O --> P["TMP"]
        P --> Q["LED"]
        Q --> R["GBS"]
        R --> S["DETECTION"]
        T["R"] --> U["+12V GND"]
        V["R"] --> W["TMP"]
        X["R"] --> Y["GBS"]
        Z["R"] --> AA["DETECTION"]
    end
    subgraph End-Loop
        AB["The last detector in the loop R = value of end-of-line resistor"]
    end
Example of wiring of several JS-20 Largo detectors into the EOL loop
(Auxiliary GBS terminals are used to facilitate the wiring)
Brand : Jablotron
Model : JS-20
Category : Security Camera