
DG2661 - Steam oven MIELE - Free user manual and instructions
Find the device manual for free DG2661 MIELE in PDF.

| Product type | Built-in steam oven |
| Brand | MIELE |
| Model | DG2661 |
| Dimensions (H x W x D) | 350 x 595 x 382 mm (approx) |
| Weight | Approx 25 kg |
| Power supply | 240 V, 15 A, 60 Hz, 1.8 m cable with NEMA 6-15P plug |
| Power | Not specified |
| Capacity | 6 to 8 portions |
| Main functions | Universal cooking, vegetable cooking, fish cooking, meat/poultry cooking, reheating, defrosting, descaling, settings |
| Temperature range | 40 to 100 °C (depending on function) |
| Control type | Left and right rotary knobs with display |
| Cavity material | Stainless steel |
| Included accessories | Drip tray (2 L), rack, 2 perforated cooking containers (1.5 L), slides, silicone lubricant |
| Child safety | Yes, child lock can be activated |
| Maintenance and cleaning | Cleaning after each use; descaling with citric acid-based agent or Miele tablets; do not use vinegar or steam cleaner |
| Descaling | Automatic program with recommended Miele tablets |
| Repairability | Repairs by authorized Miele technician only; spare parts available |
| General information | Instruction and installation manual included; warranty subject to conditions |
Frequently Asked Questions - DG2661 MIELE
User questions about DG2661 MIELE
0 question about this device. Answer the ones you know or ask your own.
Ask a new question about this device
Download the instructions for your Steam oven in PDF format for free! Find your manual DG2661 - MIELE and take your electronic device back in hand. On this page are published all the documents necessary for the use of your device. DG2661 by MIELE.
USER MANUAL DG2661 MIELE
Operating and Installation Instructions
Steam oven DG 2661
To prevent accidents and machine damage read these instructions before installation or use.
IMPORTANT SAFETY INSTRUCTIONS 4
Guide to the steam oven 8
Overview 8
Control panel 9
Accessories 10
Optional accessories 11
Before the first use 13
Selecting the language 13
Setting the water hardness 14
Setting the altitude. 15
Suitable containers 16
Using the steam oven 17
Before each use. 17
Functions overview 18
Turning the oven on 19
Confirming the default temperature 20
Changing the default temperature 20
Setting the duration 21
Starting a function 21
After the start 22
Interrupting the cooking process. 23
Water level low. 23
Adjusting a function during operation 23
At the end of the cooking process 25
After use. 25
Child Safety Lock. 26
Cooking tips 28
Steaming 28
Reheating. 31
Defrosting. 32
Meal planning 34
Special uses 35
Canning 35
Blanching 36
Making Yogurt 36
Disinfecting baby bottles 37
Settings 38
Cleaning and Care 39
General 39
Connection valve 42
Descale 43
Frequently asked questions 45
After sales service 48
Installation instructions 49
IMPORTANT SAFETY INSTRUCTIONS 50
Installation 52
Product and Cutout dimensions 52
Installing the feet 56
Installing the appliance 57
Electrical connection 58
Caring for our environment 59
IMPORTANT SAFETY INSTRUCTIONS
WARNING - When using your appliance follow basic precautions, including the following:
To prevent injury and appliance damage read all instructions before installation or use of the steam oven.
Use the steam oven only for its intended purpose. This appliance is intended for residential cooking only.
This appliance conforms to all uniform safety codes and regulations. The manufacturer cannot be held responsible for damage or injury caused by improper use of this appliance.
Keep these operating instructions in a safe place and pass them on to any future user.
SAVE THESE INSTRUCTIONS
Technical Safety
Before installation make sure that the voltage and frequency listed on the data plate correspond with the household electrical supply. This data must correspond in order to avoid risk of damage to the appliance. If in doubt, consult a qualified technician.
Be certain your appliance is properly installed and grounded by a qualified technician. To guarantee the electrical safety of this appliance, continuity must exist between the appliance and an effective grounding system. It is imperative that this basic safety requirement be met. If there is any doubt, have the electrical system of the house checked by a qualified electrician. The manufacturer cannot be held responsible for damage caused by the lack, or inadequacy, of an effective grounding system.
Installation, repair and maintenance work should be performed by a Miele authorized service technician. Work by unqualified persons could be dangerous and may void the warranty. This data must correspond to prevent injury and appliance damage. If in doubt consult a qualified electrician.
Do not use an extension cord to connect this appliance to electricity. Extension cords do not guarantee the required safety of the appliance, e.g. danger of overheating.
Never open the outer casing of the appliance. Tampering with electrical connections or components and mechanical parts is dangerous and could cause machine damage.
IMPORTANT SAFETY INSTRUCTIONS
Use
This appliance must only be operated after it has been correctly installed into cabinetry. This is necessary to ensure that all electrical components are shielded.
This appliance is intended for residential cooking and is not to be used for commercial purposes. Any other use is at the owner's risk and could be dangerous.
Do not submerge the plug, cord or steam generator (water tank) into water or attempt to wash the steam generator in the dishwasher. Danger of electric shock!
Empty the steam generator after each use for hygienic purposes and to avoid condensate water in the appliance.
Wipe the appliance dry after each use and leave the door open until the moisture in the cooking compartment has evaporated.
If the oven is not used for an extended period of time, clean it thoroughly to avoid odors. See "Cleaning and Care". Leave the door open after cleaning.
Children
When in use the oven, particularly the inside of the door as well as the outer side by the vent, may become very hot and remain so for a while after the oven has been turned off. Keep children at a safe distance.
Use the Child Safety Lock to prevent children from turning on the appliance or changing its settings.
Close supervision is necessary when any appliance is used by or near children.
Do not allow children to stand or hang on the appliance door.
To reduce the risk of injury, do not allow children to play in, on or near the steam oven.
Ensure that any plastic wrap is disposed of safely and kept out of the reach of children. Danger of suffocation!
IMPORTANT SAFETY INSTRUCTIONS
Appliance safety
Do not heat unopened food containers. Pressure can build up causing an explosion that will damage the cooking compartment. Danger of personal injury and scalding.
To prevent condensation which could corrode the appliance, do not leave cooked foods in the oven for an extended period of time.
Do not use items in the steam oven which might rust. This can lead to corrosion of the appliance.
When descending the appliance, only use descending agents with a citric acid base or the descending tablets available from Miele. Do not use vinegar, it will damage the appliance. Follow the manufacturer's instructions.
- Do not use a steam cleaner to clean this appliance. Steam could penetrate electrical components and cause a short circuit.
The appliance is programmed so that after each use residual water will remain in the steam generator. If there is no residual water, there is a fault. Contact the Miele Technical Service Department.
In the event of damage or defect, turn off the appliance immediately. After it has been turned off, isolate it from the main power supply and contact the Miele Technical Service Department. Ensure that power is not restored to the appliance during maintenance or repair work.
Repairs should only be carried out by a Miele authorized service technician in accordance with local and national safety regulations. Repairs and other work by unqualified persons could be dangerous and may void the warranty.
Personal safety
The steam oven should be installed at a safe height for the user to safely access all cooking levels and containers. Otherwise spills could cause burns or scalding and children may be put at risk by the hot appliance door.
Take care when opening the door. The door hinges, edges and corners of the appliance could be hazardous.
Avoid hot steam, serious burns and scalds could result.
Use caution when handling the steam generator. Danger of scalding.
Take care that the hot water in the channel does not spill when opening the door.
When handling cooking containers take care not to let the contents spill.
Use potholders when working with a hot appliance.
Before discarding an old appliance, switch off and disconnect it from the power supply. Cut off and render any plug useless and remove any doors to prevent hazards.
Further safety notes
Be sure that electrical cords of other electrical appliances do not come in contact with the appliance door. The insulation of the cords could become damaged creating a hazard.
Do not use plastic containers. They may melt at high temperatures in the oven.
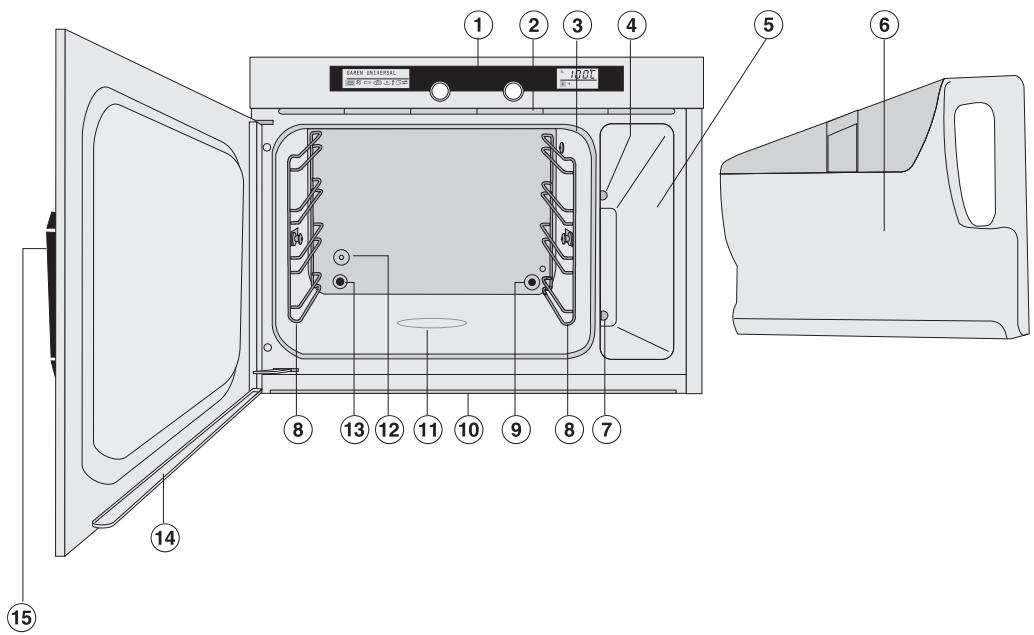
Overview
① Control panel
(2) Vent for moist air
③ Door gasket
④ Steam channel
⑤ Steam generator compartment
⑥ Steam generator (with insert)
⑦ Steam generator outlet
Side runners with 4 levels
⑨ Steam inlet
Interior drip channel
Bottom heating element
12 Temperature sensor
③ Air outlet
14 Door drip channel
15 Door release
Control panel

16 Left display with symbols:
Cook Universal
Cook Vegetables
Cook Fish
Cook Meat/Poultry
Reheat
* Defrost
Descale
Settings
17 Left jog shuttle
Press this jog shuttle to turn the machine on and off.
Turn it to select the desired function.
18 Right jog shuttle
Turn this jog shuttle to adjust the default temperature and durations.
Press it to confirm the selection.
19 Right display with symbols:
Low water level
Dscaling
Temperature
Duration
Start
Stop
Child Safety Lock
Accessories
All accessories can be reordered if necessary.
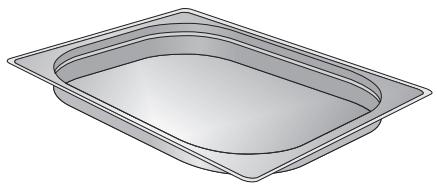
Drip tray 4.2 pt (2 l)
For catching excess liquids
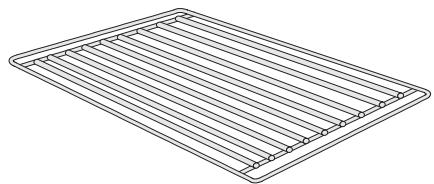
Rack
To support cookware

2 cooking containers, perforated 3.17 pt (1.5 l)
For steaming
Runners
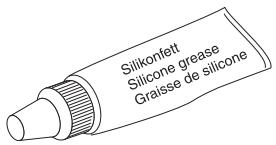
Silicone grease
Countertop casing DGSG
For lubricating the O-Ring on the connection valve of the steam generator
Built under casing DGUG
(select models)
(select models)
Optional accessories
Stainless steel cooking containers
| Labeling | Application | Capacity in pt (l) | |
| DGG 2 solid container | To cook food in sauscs, marinades or gravy, also for pasta and rice | 4.2 (2.0) | |
| DGG 3 solid container | same as DGG 2, but deeper | 6.5 (3.1) | |
| DGGL 4 perforated container | To cook vegetables, fish and meat when not cooked in a sauce | 6.5 (3.1) | |
| DGGL 5 perforated container | To cook vegetables, fish and meat and potatoes | 4.2 (2.0) | |
| DGGL 6 perforated container | To blanch or cook vegetables | 6 (2.8) | |
| DGG 7 solid container | To cook soup or stew | 6 (2.8) | |
| DGGL 8 perforated container | same as DGGL 4 but shallower | 3.6 (1.7) | |
| DGD | Lid for the solid containers DGG 2 and DGG 7 | - | |
Cleaning and Care
| Labeling | Application | |
| Descaling tablets 6 tablets | To descale Miele steam ovens and coffee systems. | |
| Stainless steel conditioner 205 ml | To prevent resoiling after cleaning. Also cleans water streaks, spots and finger prints on stainless steel surfaces. | |
| Sidol Stainless steel and Ceran cleaner 250 ml | To clean cooking spills from ceramic cooktops and stainless steel. | |
To purchase these products contact Miele at the phone numbers on the back of this manual or go to www/store.miele.com.
Selecting the language
The oven comes factory set to German.
The desired language must be set.
Press the left jog shuttle to turn the appliance on.
A welcome screen shows.

The display changes to the language setting.
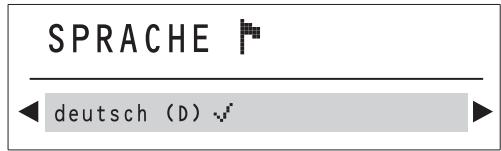
Turn the left jog shuttle to select the desired language.
Press the left jog shuttle to confirm the setting.
The left display shows:
Setting the water hardness
The steam oven is factory set to water hardness setting IV (4).
Set the steam oven to your local water hardness.
The water hardness can be tested with the supplied test strip or call your local water authority.
The water hardness is given in hardness levels (I to IV) or in German hardness (1 to >21^ ).
| Hardness level | Display | Hardness levels |
| Ⅰ | soft 1 | 1-7 °dH |
| Ⅱ | medium 2 | 8-14 °dH |
| Ⅲ | hard 3 | 15-21 °dH |
| Ⅳ | very hard 4 | >21 °dH |
SETTINGS


Turn the button to the symbol and press to confirm.
LANGUAGE


Turn the button to the symbol
PROGRAMMING


Press to confirm.
WATER HARDNESS


Press to confirm.
WATER HARDNESS

ry hard 4
Turn the button to the desired setting, e.g. "Medium 2", and confirm.
The display changes to "Back".
Confirm twice and turn to to get back to the Start display.
Setting the altitude
This process rinses the water lines and sets the unit to the water boiling temperature which varies depending on the altitude in your area.
- Open the door by pushing on the left side of the door release.
The door opens.
Take the steam generator from the appliance and take the insert out, see "Cleaning and Care". - Rinse the steam generator and insert with hot water. Do not use soap.
Do not wash the steam generator or the insert in a dishwasher!
Do not submerge the steam generator in water!
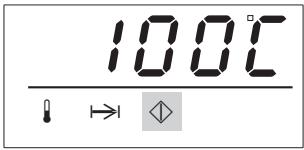
Start the cooking program "Cook Universal" 212^ F ( 100^ C ) and run for 15 minutes. Proceed as described in "Using the steam oven".
Relocating
When relocating to a new area, reset the unit's water boiling temperature by descending the appliance. See "Cleaning and Care" for more information.
Setting the altitude for the first time and after relocation will produce more steam than usual. This is not a fault.
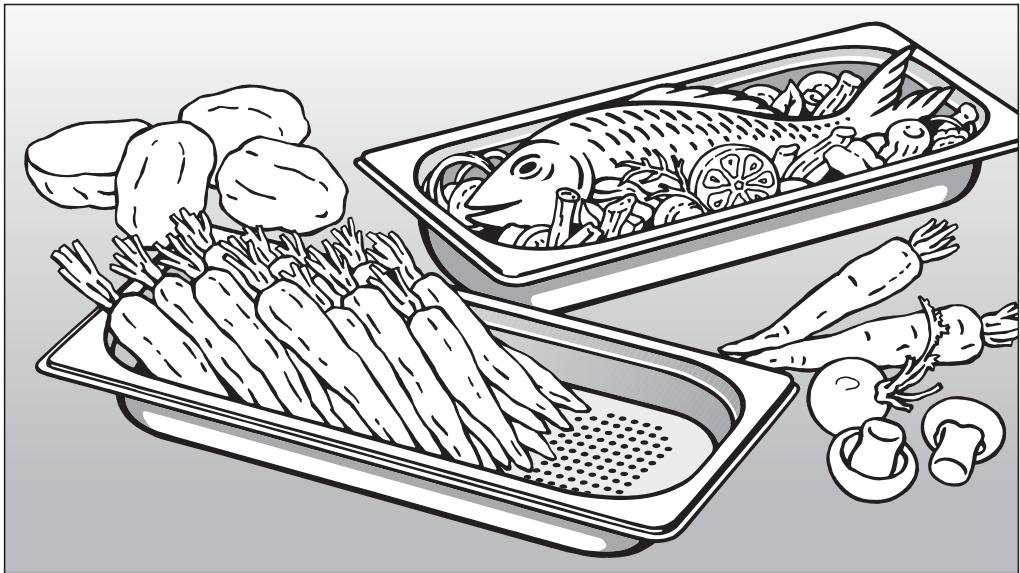
Stainless steel cooking containers are supplied with the appliance. Other containers are available in a variety of sizes, perforated or solid, as optional accessories.
Please note when selecting cookware:
- Use the perforated cooking containers whenever possible, e.g. for cooking vegetables. The steam can reach the food from all sides and cook evenly.
- For thicker items, e.g. potatoes, build larger spaces between them. It is best to space food as much as possible so steam can surround each piece. Larger and deeper containers can be used for larger items.
-
Dense dishes such as casseroles or food such as peas or asparagus which have little space between them will take longer to cook because the steam has less space to work in. The cooking time will be longer the more of this kind of food is filled in the container. It is best to use 2 or 3 shallow containers for these foods. The recommended cooking times are for shallow containers. For larger fill heights the cooking time is extended.
-
When cooking with several containers at a time, use only one large container for best results.
- The capacity of the steam oven is for about 6 - 8 portions. Do not cook more portions at a time.
See "Cooking tips" for more information.
You can also use your own containers and dishes. However, please note the following:
- The container must be heat resistant to 212^ F ( 100^ C ). Heat resistant glass, ceramics, porcelain (chinaware), plastics, stainless steel or enamel dishes are all suitable.
- Food will take longer to cook in a dish with thick sides.
- Place the dish on the supplied rack.
- Ensure that there is a gap of at least 1'' (3 cm) between the upper rim of the container and the top of the cooking compartment to allow sufficient steam to enter the container.
Before each use
Insert the drip tray in the lower level when using a perforated container.
Fill the water tank.
The insert can remain inside.
Only use tap water, do not use distilled or mineral water!
The water level must be between the min. 0.75 l, and max. 1.2 l marks. The marks are on the outside and inside of the steam generator.
Do not exceed the "max" level marker.
To shorten the heating phase, use hot water. Use caution when handling the water tank.
Push the steam generator into the machine until it engages.
If the water tank is not properly engaged, the oven will not heat and the display will show F20. See "Frequently asked questions".
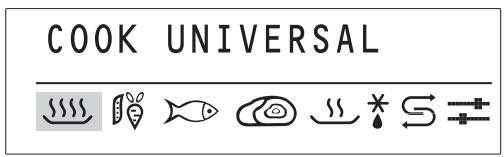
Functions overview
| Symbol | Function | Default temperature in °F / °C | Adjustable temperature range in °F / °C |
| S S S S | COOK UNIVERSAL | 212 / 100 | 105 - 212 / 40 - 100 |
| S S S S P | COOK VEGETABLES | 212 / 100 | 195 - 212 / 90 - 100 |
| S S S S R | COOK FISH | 185* / 85* | 165 - 212 / 75 - 100 |
| S S S S O | COOK MEAT/POULTRY | 212 / 100 | 195 - 212 / 90 - 100 |
| S S | REHEATING | 212 / 100 | 175 - 212 / 80 - 100 |
| * | DEFROSTING | 140 / 60 | 125 - 145 / 50 - 60 |
| S | DESCALE | - | - |
| = | SETTINGS | - | - |
- Increase the default temperature to 212^ ( 100^ ) when cooking fish in a solid container with liquid.
Turning the oven on
Press the left jog shuttle to turn the steam oven on.
COOK UNIVERSAL

The left display shows COOK UNIVERSAL. The "xxxxxxxx" symbol is highlighted.
Setting a function
If a function and duration is not confirmed within 15 minutes, the oven will turn off.
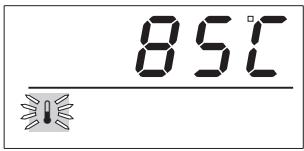
COOK FISH

Turn the left jog shuttle to the desired function, e.g. Cook Fish.
The left display shows COOK FISH and the respective symbol is highlighted.
Press the left jog shuttle to confirm the setting.
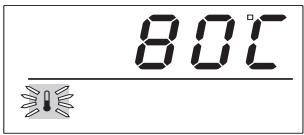
Confirming the default temperature
Once the function is confirmed, the right display shows the default temperature, e.g. 185^ F / 85^ C , and the temperature symbol flashes.
Press the right jog shuttle.
The default temperature is confirmed and the symbol illuminates.
Changing the default temperature
The default temperature can be changed in 10^ / 5^ increments. The default temperatures and the temperature range are shown in the table "Functions overview".
Adjusting temporarily
■ While the temperature symbol ! flashes, turn the right jog shuttle to the desired temperature, e.g. 80^ C .
Press the right jog shuttle.
The selected temperature is confirmed and the symbol lights.
The display adjusts to allow for the duration to be changed.
Adjusting permanently
To adjust the default temperature permanently, the factory setting must be adjusted. See "Settings".
Setting the duration
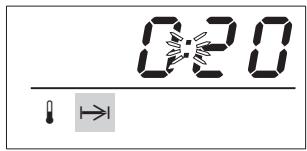
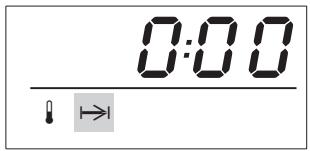
Once the temperature is confirmed, the display shows 3 zeros and the duration symbol flashes.
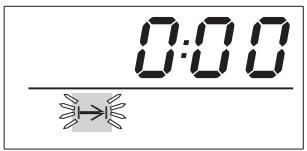
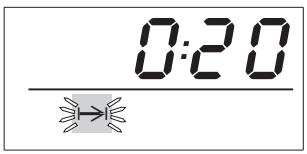
Turn the right jog shuttle to the desired duration, e.g. 20 minutes.
Select a duration between 1 minute (0:01) and 4 hours 59 minutes (4:59).
Press the right jog shuttle.
The selected time is confirmed and the symbol highlights.
The cooking times (duration) for the food are shown in "Cooking tips". The cooking time depends on the size of the food not on the amount.
Example: Potatoes with a large diameter need a longer cooking time than ones with a smaller diameter.
The default times are stated for an overall amount of 6 - 8 portions. Use suitable cookware. See "Suitable containers" for more information.
Starting a function
The oven is factory set so that it starts automatically once the duration is confirmed.
See "Settings" for more information on setting a manual start.
Manual start
After confirming the duration, the right display highlights the start symbol
Press the right jog shuttle to confirm the start.
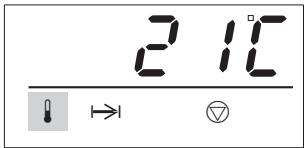
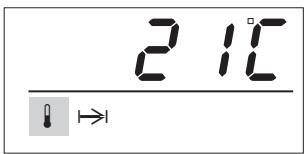
The start symbol goes out. The stop symbol and the current interior temperature, e.g. 21^ , are shown.
After the start
After a cooking process is started, a fan noise is heard and the symbols in the left display go out. The selected function, e.g. Cook Fish, is shown until the end of the duration set.
COOK FISH
The right display shows the function phase.
During the heating phase the temperature symbol is highlighted and the rising temperature is shown.
When cooking cooled or frozen food, the interior temperature is lowered first then rises very slowly.
Once the selected temperature is reached, the cooking phase begins and the duration will elapse.
During the cooking phase the time symbol is highlighted and the elapsing time is shown.
The overall time, which means from start to finish of the function, adds up from the heating time and the selected duration. The heating and cooking time depends on the food amount and temperature.
Interrupting the cooking process
The cooking process can be interrupted at any time by opening the door.
The heat is turned off and the remaining time is stopped.
Hot steam will escape when the door is opened. Use caution when taking containers out of the oven. Spilled liquids, steam and the interior walls are hot. Danger of burns!
- Close the oven door to continue the cooking process.
The appliance heats and displays the rising interior temperature. Once the selected temperature is reached, the display changes and the remaining time elapses.
Water level low
Low water level is signaled with a flashing symbol in the right display. During use a tone sounds.
Check and refill the water tank.
Push the steam generator into the machine until it engages.
Close the door.
The cooking process continues.
Adjusting a function during operation
A function cannot be changed during the heating or cooking phase. Turn the steam oven off then on again to start a new function.
Changing the temperature during the heating phase
Press the right jog shuttle.
The right display shows the selected temperature. The temperature symbol flashes briefly.
While the symbol flashes, turn the right jog shuttle to the desired temperature.
The adjusted temperature is automatically saved and the display changes after a few seconds to the current interior temperature.
Changing the temperature during the cooking phase
Turn the right jog shuttle to highlight the temperature symbol
The set temperature shows.
Press the right jog shuttle.
The symbol flashes briefly.
While the symbol flashes, turn the right jog shuttle to the desired temperature.
The adjusted temperature is automatically saved and the display changes after a few seconds to the remaining duration.
Changing the duration during the heating phase
Turn the right jog shuttle to highlight the symbol. The set duration shows.
Press the right jog shuttle.
The symbol flashes briefly.
While the symbol flashes, turn the right jog shuttle to the desired duration.
The adjusted temperature is automatically saved and the display changes after a few seconds to the current interior temperature.
Changing the duration during the cooking phase
Press the right jog shuttle.
The symbol flashes briefly.
While the symbol flashes, turn the right jog shuttle to the desired duration.
The adjusted duration is automatically saved and the display changes after a few seconds to the remaining duration.
At the end of the cooking process
Once the selected duration has elapsed, a tone sounds and the time/temperature display shows 3 zeros.
To turn the steam oven off, press the left jog shuttle until the right display goes out.
Empty the drip tray
The left display shows "Empty the drip tray".
The left display goes out automatically. The fan will run to cool down the oven for a short period after the oven is turned off. The fan running time can be shortened by taking out the water tank immediately after the oven is turned off.
Use caution when taking containers out of the oven. Do not touch hot surfaces. Avoid hot steam, serious bur scalds could result.
After use
Remove and empty the drip tray.
Remove and empty the steam generator.
Clean and dry the appliance after each use. See "Cleaning and Care".
- Leave the door open until the moisture in the cooking compartment has evaporated.
The appliance is set that after each use residual water remains in the steam generator. If there is no residual water, there is a fault. Contact the Miele Technical Service Department.
Child Safety Lock
The appliance has a Child Safety Lock to prevent it from being turned on accidentally by children.
The machine is factory set to "locked" while not in use.
To generally lock the oven during operation (to prevent accidental changing of the duration and temperature), change the setting "In Operation Lock" to possible. See "Settings".
The right display will show after starting a function.
To activate the Child Safety Lock while the oven is off
Turn the right jog shuttle and press to confirm.
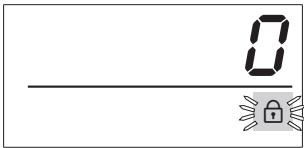
The symbol flashes and "0" shows.
While the symbol flashes, turn the right jog shuttle to "1" and confirm.
The display goes out, the lock is activated.
To deactivate the Child Safety Lock while the oven is off
Turn the right jog shuttle and press to confirm.
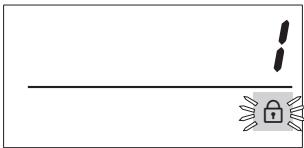
The symbol flashes and "1" shows.
While the symbol flashes, turn the right jog shuttle to "0" and confirm.
The display goes out, the lock is deactivated.
To activate the Child Safety Lock while the oven is turned on
After the start turn the right jog shuttle to the lock symbol and confirm.
The symbol flashes and "0" shows briefly.
While the symbol flashes, turn to "1".
The lock is automatically saved and the display changes after a few seconds to the current interior temperature.
The duration and temperature cannot be changed. The oven can be turned off and on, but cannot be used.
To deactivate the Child Safety Lock while the oven is turned on
Turn the right jog shuttle to highlight the lock symbol and confirm.
The symbol flashes and "1" shows briefly.
While the symbol flashes, turn to "0".
The lock is deactivated.
Steaming
| Food | Function | Temperature in °F (°C) | Time in minutes |
| Vegetables | |||
| Cauliflower, florets | COOK | 212 (100) | 6-8 |
| VEGETABLES | |||
| Green beans | " | 212 (100) | 8-10 |
| Broccoli, florets | " | 212 (100) | 4-6 |
| Peas | " | 212 (100) | 3-5 |
| Carrots, cut | " | 212 (100) | 6-8 |
| Potatoes, peeled and halved | " | 212 (100) | 20-25 |
| Potatoes, unpeeled | " | 212 (100) | 25-28 |
| Brussels sprouts | " | 212 (100) | 12-14 |
| Asparagus | " | 212 (100) | 10-14 |
| Turnips, cubed | " | 212 (100) | 7-10 |
| Meat or Deli | |||
| Sausage | COOK MEAT | 194 (90*) | 2-4 |
| Smoked pork chops | " | 212 (100) | 6-8 |
| Chicken | " | 212 (100) | 50-60 |
| Fish | |||
| Salmon filet | COOK | 212 (100) | 4-6 |
| UNIVERSAL | |||
| Flounder fillet | COOK FISH | 185 (85) | 5-7 |
- This temperature does not reflect the default temperature.
| Food | Function | Temperature in °F (°C) | Time in minutes |
| Casserole | |||
| Meat casserole | COOK UNIVERSAL | 212 (100) | 10-12 |
| Rice casserole | " | 212 (100) | 20-25 |
| Legumes | |||
| Beans, soaked | COOK UNIVERSAL | 212 (100) | 20-60 |
| Peas, soaked | " | 212 (100) | 20-40 |
| Lentils, not soaked | " | 212 (100) | 20-25 |
| Rice and Grain | |||
| Soaking grains, whole | COOK UNIVERSAL | 212 (100) | 16-35 |
| Soaking grains, ground | " | 212 (100) | 10 |
| Parboiled Rice | " | 212 (100) | 20 |
| Eggs | |||
| Eggs, soft | COOK UNIVERSAL | 212 (100) | 3-4 |
| Eggs, medium | " | 212 (100) | 5-6 |
| Eggs, hard | " | 212 (100) | 8-10 |
| Fruit | |||
| Apple/Pear pieces | COOK UNIVERSAL | 212 (100) | 3-5 |
| Rhubarb | " | 212 (100) | 1-3 |
| Cherries | " | 212 (100) | 2-4 |
Tips for steaming
- The duration for cooking with steam is almost the same as cooking in a pot.
- The steam prevents the food from drying out and the disadvantages coming with it. The food stays moist and juicy. The same is true not only for vegetables but also for desserts, fish and meat recipes.
- You can cook on any level or on multiple levels at the same time. The duration will not change.
- The food will not brown and does not get a crust. The food is gently steamed, not fried or baked. Cheese will melt but not brown. Steaming food is healthy and accentuates its flavor.
- When cooking frozen food, e.g. vegetables, break up large clumps so they cook evenly. The duration is approximately the same as for fresh vegetables.
- Frozen and fresh vegetables with the same duration can be steamed together.
- Since steaming retains flavor so well, food should not be seasoned until after it has been cooked.
-
When cooking with liquids only fill the containers 3 / 4 of the way.
-
Food like noodles or rice need to be cooked in fluids. Noodles should be well covered with fluid. Rice, beans and cereals need to be cooked in equal amounts of food and water.
- Follow the cooking time for pasta on the packaging.
- The cooking liquid gets absorbed by some food (e.g. rice). With other food it can be used for gravy or sauces.
- You can prepare gravy in the steam oven by adding flour and butter to the liquid.
- Grease the perforated container when cooking fish. Grease the solid container when cooking eggs, e.g. scrambled eggs.
- To avoid any transfer of tastes caused by moisture dripping from above, perforated containers should be inserted in the lower runner and the solid containers should be placed on the rack on an upper level.
- Yeast dough can be proofed in the steam oven. Select the "Cook Universal" function and lower the default temperature to 105^ F ( 40^ C ). Cover the dough.
Reheating
| Function REHEATING | |
| Food to be reheated | Time in minutes |
| Vegetables | |
| Cauliflower, Beans | 2 |
| Turnips, Carrots | 2 |
| Side dishes | |
| Potatoes (cut lengthwise) | 3 - 4 |
| Pasta, Rice | 2 - 3 |
| Meat and poultry | |
| Roast in slices | 3 - 5 |
| 1/2" (1.5 cm) thick | |
| Chicken breast | 3 - 5 |
| Meatballs | 3 - 5 |
| Roulades, slices | 3 - 5 |
| Fish | |
| Fish fillets | 2 - 3 |
| Fish roulade, halved | 2 - 3 |
| Complete dish | |
| Chicken fricassee with rice | 3 - 5 |
| Pork roast with potatoes and vegetables | 3 - 4 |
| Spaghetti with tomato sauce | 2 - 3 |
| Soups/Stews | |
| Stew | 4 - 5 |
| Vegetable, Cream | 2 - 3 |
The steam oven can be used to reheat dishes.
- Place the food on a flat plate and cover it with a deeper plate or aluminum foil.
- Select the function "Reheat" and confirm.
- Select the time (see table) and confirm.
Tip
Reheat gravity in a separate, covered container.
Defrosting
| Function DEFROSTING | ||||
| Food to be defrosted | Weight in ounces (grams) | Temperature in °F (°C) | Thaw time in minutes | Compensation time in minutes |
| Meat | ||||
| Ground meat | 9 (250) | 122 (50) * | 15-20 | 10-15 |
| Cutlets, Sausage | 28 (800) | 140 (60) | 25-35 | 15-20 |
| Poultry | ||||
| Chicken | 35 (1000) | 140 (60) | 40 | 15-20 |
| Chicken drumsticks | 5.5 (150) | 140 (60) | 20-25 | 10-15 |
| Chicken breast | 17.5 (500) | 140 (60) | 25-30 | 10-15 |
| Fish, Seafood | ||||
| Fish fillets | 14 (400) | 140 (60) | 15 | 10-15 |
| Shrimp | 10.5 (300) | 140 (60) | 4-6 | 5 |
| Vegetables | ||||
| Frozen in a block | 10.5 (300) | 140 (60) | 20-25 | 10-15 |
| Frozen in small portions | 12.5 (350) | 140 (60) | 15 | 8-10 |
| Fruit | ||||
| Apple sauce | 9 (250) | 140 (60) | 20-25 | 10-15 |
| Berries | 10.5 (300) | 140 (60) | 8-10 | 10-12 |
| Dairy products | ||||
| Cheese | 5 (100) | 140 (60) | 15 | 10-15 |
| Heavy cream | 9 (250) | 140 (60) | 20-25 | 10-15 |
| Cookies | ||||
| Pastries | - | 140 (60) | 10-12 | 10-15 |
| Yeast dough pastries | - | 140 (60) | 10-12 | 10-15 |
| Function COOK UNIVERSAL | ||||
| Bread | 9 (250) | 212 (100) | 10-15 | 10-15 |
| Bread rolls | - | 212 (100) | 6-7 | 1-2 |
- This temperature does not reflect the default temperature.
When defrosting frozen foods in the steam oven, the defrosting time is much shorter than defrosting at room temperature.
Insert the food in a container or on the rack.
Select the function "Defrosting" and confirm.
If desired adjust the default temperature (see table) and confirm.
- Select the defrosting time (see table) and confirm.
Tips for defrosting
Do not cook with defrosting liquids.
- When defrosting poultry, set the food on the rack and insert the drip tray beneath it. This way the food will not lay in its defrosting liquid.
- Food which will not release defrosting liquid can be placed on the rack or in a container.
- Fish does not need to be fully defrosted before cooking. Defrost it so that the surface is sufficiently thawed to take herbs and seasoning. Fish coated with breadcrumbs should be fully defrosted so that the coating sticks.
- Turn, stir or separate food about halfway through the defrosting process.
- Allow food to stand at room temperature after defrosting. This compensation time (see table) is necessary to ensure that the food is fully defrosted.
- Do not refreeze food once it has been defrosted.
- Defrost deep frozen, precooked meals according to the manufacturer's instructions.
- Defrost baked items such as pastry or cakes in a closed freezer bag.
With some planning, an entire meal can be cooked in the steam oven.
- Place cooking containers on different levels or side by side on the rack.
Since different foods cook differently, they must be inserted at different times.
Example:
Rice 20 minutes
Fish 6 minutes
Broccoli 4 minutes
Insert the food with the longest cooking time (rice) first.
Set the difference in time until inserting the next food, here 14 minutes, and confirm.
Once the 14 minutes are up, insert the second food (fish) in the oven.
- Set the difference in time until the third food, here 2 minutes, and confirm.
Once the 2 minutes are up, insert the third food (broccoli) in the oven.
- Set the difference in time until the fourth food needs to be inserted or the meal is complete, here 4 minutes, and confirm.
At the end of the cooking duration you can remove all the dishes at the same time.
Canning
| Function COOK UNIVERSAL | ||
| Canning food | Temperature in °F (°C) | Time in minutes |
| Fruit | ||
| Apples | 194 (90*) | 50 |
| Apple sauce | 194 (90*) | 65 |
| Currants | 176 (80*) | 50 |
| Stone fruit | 185 (85*) | 55 |
| Vegetables | ||
| Beans | 212 (100) | 120 |
| Cucumbers | 194 (90*) | 55 |
- This temperature does not reflect the default temperature.
The given times are for 1 liter jars. For 12 liter jars shorten the times by 15 minutes, for 14 liter jars shorten the time by 20 minutes.
To can food use the function "Cook Universal".
Insert the drip tray into the lowest level runner and insert the rack.
- Place up to 4 jars (even in size) on the rack. Be sure that they do not touch each other so that steam can surround each jar.
Select the function "Cook Universal" and confirm.
If desired adjust the default temperature (see table) and confirm.
- Select the time (see table) and confirm.
Use the residual heat by leaving the jars in the oven for another 30 minutes after turning the oven off.
- Cover the jars with a towel and allow them to cool for 24 hours.
Blanching
The steam oven can also be used to blanch vegetables and fruit to prepare them for freezing.
- Put the prepared vegetables/fruit (cleaned, washed, chopped, etc.) into a perforated container.
- Select the function "Cook Vegetables" and confirm. Confirm the default temperature (100 °C / 212 °F).
Set a time of 1 minute and confirm.
Once blanched, plunge the vegetables/fruit into ice water.
Once they have dried thoroughly they can be frozen.
Making Yogurt
Ingredients: 3.5 oz (100 g) yogurt (with live cultures) and 1 quart (1 l) of pasteurized or fresh whole milk. Yogurt and milk must have the same fat contents.
Heat (do not boil) fresh milk to 194^ F (90^ C) .
Once cool, mix the milk together with the yogurt. This will give the yogurt a firm texture.
- Fill 6 yogurt jars with the mixture and cover with aluminum foil.
Set the covered jars on the rack.
■ Select "Cook Universal" and lower the default temperature to 104^ (40^)
Set a duration of 4 hours 59 min.
- Let the yogurt cool and store it in the refrigerator.
Once the yogurt has completely cooled it will have a firm texture.
Disinfecting baby bottles
The steam oven can be used to disinfect baby bottles and other dishware. Check beforehand that all parts are heat resistant up to 212^ F (100 °C).
- Place the drip tray on the lowest runner level and place the rack above it.
- Dismantle, clean and thoroughly rinse the bottles. Space the individual parts out on the rack, ensuring that they do not touch each other. This allows the hot steam to reach all sides.
Select the function "Cook Universal" and confirm.
Confirm the default temperature (100 °C / 212 °F).
Set a time of 15 minutes and confirm. - Allow the items to dry naturally and use as soon as possible after disinfection.
All parts of the bottles must be completely dry before they are reassembled.
The basic settings in the table can be changed.
The settings are changed with the left jog shuttle. Follow the steps in the display.
Multiple settings can be changed at a time.
| Setting | Options * | |
| Select ⇌ SETTINGS for: | ||
| F | LANGUAGE | English, German, etc. |
| ◇ | PROGRAMMING | |
| I | TEMPERATURES All functions allow you to permanently adjust the default temperature within a certain range. See the "Functions overview". | |
| M | FACTORY DEFAULT | X (No) Yes (Reset all factory settings) |
| Select ⇌ PROGRAMMING for: | ||
| ×× | WATER HARDNESS | Soft 1, Medium 2, Hard 3, Very hard 4 |
| ➀ | DISPLAY CONTRAST | 17 levels |
| ü | BUZZER TONES | continuous tone, interrupted tone |
| ü+ | BUZZER VOLUME | 11 levels |
| ü | IN OPERATION LOCK | possible, not possible |
| ◇ | START | Manual, Automatic |
| ® | SELECT °C/°F | Celsius C, Fahrenheit F |
| ### | DEMO MODE | On, Off |
- The factory setting is in bold print.
General
Clean and dry the steam oven after each use. Let the appliance cool before cleaning.
- Close the door only after the cooking compartment is completely dry.
Do not use a steam cleaner to clean this appliance. Pressurized steam could penetrate electrical components and cause a short circuit.
Never use abrasive cleaners, scouring pads, steel wool or caustic (oven) cleaners on the appliance. Hard brushes or scouring cloths which still have abrasive materials on them should not be used. They will damage the surface.
Only use liquid dishwashing detergent.
Appliance front
Clean the front and the control panel with a solution of hot water and liquid dish soap applied with a soft sponge.
Dry with a soft cloth.
Glass surfaces
Use a glass cleaner.
Stainless steel surfaces
- Stainless steel surfaces can be cleaned using a non-abrasive stainless steel cleaner. This cleaner can be purchased from Miele.
- To help prevent resoiling, a conditioner for stainless steel can also be used. Apply sparingly with even pressure in the direction of the grain.
Oven interior
The cooking compartment including the ceiling, door gasket, drip channel, door interior and steam generator niche should be cleaned after each use.
- Most cooking residues can be easily removed using a sponge, liquid dish soap and warm water.
Wipe the interior with clean water and dry with a soft cloth.
The bottom heating element may become discolored over time from dripping liquids.
The discoloration can be removed with the Miele ceramic cooktop cleaner, which is also suitable for stainless steel. See "Optional Accessories".
Wipe with clean water until all cleaning residues are removed.
If the door gasket is damaged, it must be replaced. A door gasket can be purchased from Miele.
Drip tray, rack and cooking containers
- Wash and dry the drip tray, rack and cooking containers after each use either by hand or in a dishwasher.
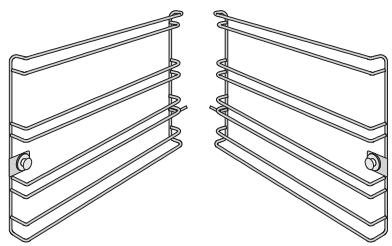
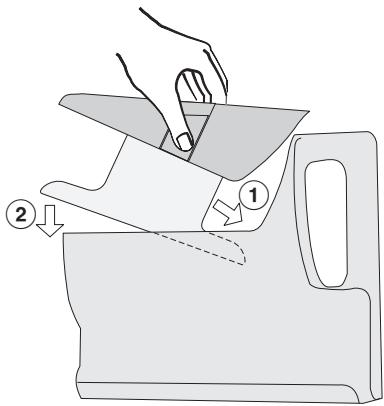
Runners
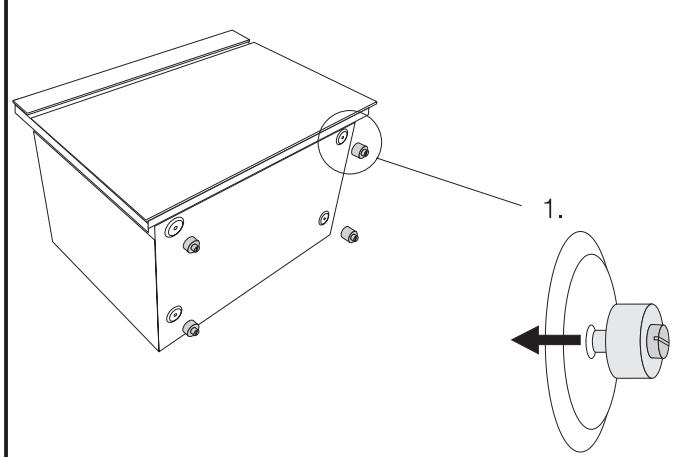
The side runners can be removed for better cleaning of the cooking compartment.
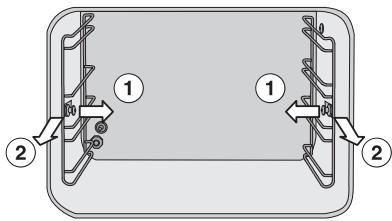
Pull on the knobs to release the runners ①. Then pull each runner out of the oven ②.
The runners can be cleaned with water and dish soap or in the dishwasher.
- To refit the runners, reverse the above steps. Insert them into the rear of the oven and push in at the sides.
Steam generator
Do not submerge the steam generator in water or wash it in the dishwasher.
Empty the steam generator after each use to avoid the build up of condensate water.
Do not use hard brushes or sponges for cleaning.

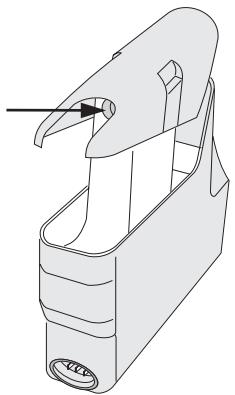
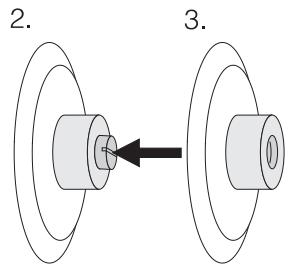
- Remove the steam generator after each use, empty and dry. Remove the insert before cleaning and drying.
- Remove the insert by pressing the handles together and lifting upwards at an angle.
- Place the insert back into the steam generator only when both parts are dry. Insert it at an angle ① and lower in the side with the opening ② .
Connection valve
If the steam generator becomes difficult to insert and remove or if the fault message F20 appears, the connection valve needs to be lubricated.
Lubricate the connection valve regularly with a very small amount of the supplied silicone grease, see "Accessories". Leave the valve on the connector while doing so.
Take care when using silicone grease :
- Remove any silicone grease from your skin by washing with soap and water.
- If silicone gets into the eyes flush with plenty of clean water.
- If silicone is swallowed seek medical attention.
If the connection valve becomes brittle, dried out or if a lot of water collects at the bottom of the steam connector niche, the valve needs to be replaced.
A valve can be purchased from Miele.
When lubricating the valve only use the silicone grease supplied. Never use margarine, oil, or any other grease or fat on the valve, they will cause deterioration.
Descale
When descending the oven, only use descending agents with a citric acid base or the descending tablets available from Miele. Follow the manufacturer's instructions. Do not use vinegar, it will damage the appliance.
The oven indicates when the steam generator needs to be descaled. The right display shows the descending symbol and the number 10.

The number indicates the uses before the oven will be locked if not descaled.
If the appliance is not descaled immediately, the display will show a 9 the next time the oven is turned on.
Once locked the appliance cannot be used until the descending program has been run.
The display shows "DESCALE".
- Dilute the descending agent with water to make 1 quart (1 liter) of solution in the steam generator. Follow the manufacturer's instructions.
DESCALE

- Set the descending function if it is not automatically shown with the left jog shuttle.
Press to confirm the setting.
Add descaling agent
The left display shows "Add descending agent".
Once the descending agent is added push the steam generator into the machine until it engages.
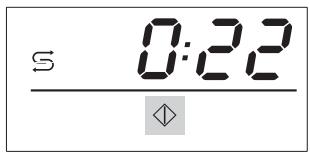
The right display shows the symbol, a duration of 22 minutes and the start symbol .
Press the right jog shuttle.
The descending starts and the elapsing time shows. The descending can be canceled during the first minute by pressing the left jog shuttle. After that the process cannot be stopped.
Do not turn the machine off during the descaling process or the descending will need to be restarted from the beginning.
Once the time has elapsed to 10 minutes, a signal sounds and the left display shows "Rinse the water tank".
Remove and empty the steam generator. Take the insert out.
- Rinse the steam generator and the insert.
- Replace the insert and fill the steam generator with 1 quart (1 liter) of fresh water and push it into the machine until it engages.
Push the right jog shuttle to continue descending.
At the end of the process
At the end of the descending, a tone sounds.
Open the door.
Be aware of escaping steam
Remove and empty the steam generator.
Turn the steam oven off and dry it thoroughly. Use caution: The interior of the oven and the condensate water will be hot.
Repairs should only be carried out by an authorized technician in accordance with local and national safety regulations. Unauthorized repairs could cause injury or appliance damage. The manufacturer cannot be held responsible for unauthorized work.
The oven cannot be turned on.
| Issue | Fix |
| There is no power to the steam oven. | Reset the circuit breaker if it has tripped. If this is not the case, disconnect the appliance from the power supply for 1 minute. Reconnect the power and turn the appliance on. If it still does not heat, contact Miele's Technical Service Dept. |
| The fan can still be heard after the appliance has been turned off. | |
| Issue | Fix |
| The appliance has a fan which removes steam from the oven. | The fan will continue to run for a while after the oven has been turned off. |
| The display shows ⋅ after turning the oven on. | |
| Issue | Fix |
| The lock is activated. | Deactivate the lock. See "Child Safety Lock". |
| The oven does not heat. | |
| Issue | Fix |
| Check if the oven is in "Demo Mode". | See "Settings". |
Frequently asked questions
| The steam generator is difficult to insert or remove. | |
| Issue | Fix |
| The connection valve at the steam connector needs to be lubricated. | Lubricate the connection valve with a small amount of the supplied silicone grease. See "Cleaning and Care - Connection valve". |
| The heating phase takes an unusually long time. | |
| Issue | Fix |
| Check the bottom of the steam generator. If there are calcium deposits, check the water hardness level setting. | Set the level to the water hardness in your area. See "Setting the water hardness". Descale the steam oven as described in "Descale".If the water hardness is set correctly or if the problem persists, call Technical Service. |
| The oven does not change from the heating to cooking phase after relocation. | |
| Issue | Fix |
| The oven must be reset to a new location and/or boiling temperature of the water. | See "Setting the altitude". |
| A great deal of steam comes out of the appliance while in use, or steam comes out of unusual locations. | |
| Issue | Fix |
| The door is not properly closed. | Close the door. |
| The door gasket does not fit properly. | Press it on, so it fits evenly. |
| The door gasket is damaged. | The gasket must be replaced. If the problem persists, call Technical Service. |
| The right display shows the符号 and a signal sounds. | |
| Issue | Fix |
| The steam generator is not engaged correctly. | Check if the steam generator is inserted all the way by removing it and inserting it again. |
| The water level is low. | The water level must be between the two marks. |
| After the start the right display shows S and a number between 1 - 10 or the left display shows S. | |
| Issue | Fix |
| The unit needs to be descaled. | See "Descale". |
| The right display shows an F with a number. | |
| Issue | Fix |
| F20: The oven does not heat. | Check if the steam generator is inserted all the way by removing it and reinserting it. Turn the steam oven off and on again. If the fault occurs again, lightly lubricate the connection valve of the steam generator with silicone grease, as described in "Cleaning and Care - Connection valve". If the problem persists, turn the appliance off and call Technical Service. |
| Other fault messages | Contact the Miele Technical Service Department. |
| The door hinges squeak. | |
| Issue | Fix |
| Lubricate the door hinges with the supplied silicone grease. | |
In the event of a fault which you cannot correct yourself please contact the Miele Technical Service Department at the phone numbers listed on the back of this booklet.
When contacting the Technical Service Department, please quote the model and serial number of your appliance. These are shown on the data plate.
Data Plate
Please attach the data plate in the space provided below.
MieleCare
MieleCare, our Extended Service Contract program, gives you the assurance of knowing that your appliance investment is covered by 5 years of worry free ownership.
MieleCare is the only Extended Service Contract in the industry that guarantees repairs by a Miele Authorized Service Provider using genuine Miele parts. Only genuine Miele parts installed by factory trained professionals can guarantee the safety, reliability, and longevity of your Miele appliance.
Please note that unless expressly approved in writing by Miele's Service department, Extended Service Contracts offered by other providers for Miele products will not be recognized by Miele. Our goal is to prevent unauthorized (and untrained) service personnel from working on your Miele products, possibly doing further damage to them, you and/or your home.
To learn more about MieleCare
Extended Service Contracts, please contact your appliance dealer or visit us online at:
www/store.miele.com
Installation Instructions
To prevent accidents and machine damage read these instructions
before
installation or use.
IMPORTANT SAFETY INSTRUCTIONS
WARNING - Read all instructions before installation or use of the steam oven to prevent injury and machine damage.
Before installation make sure that the voltage and frequency listed on the data plate correspond with the household electrical supply. This data must correspond to prevent injury and machine damage. Consult a qualified electrician if in doubt.
Installation, repair and maintenance work should be performed by a Miele authorized service technician. Work by unqualified persons could be dangerous and may void the warranty.
Before installation or service, disconnect the power supply to the work area by removing the fuse, "tripping" the circuit breaker or switching off the power main. Ensure that power is not restored to the appliance during maintenance or repair work.
Do not use an extension cord to connect this appliance to electricity. Extension cords do not guarantee the required safety of the appliance, (e.g. danger of overheating).
Do not operate any appliance with a damaged cord or plug or if the appliance has been damaged in any manner. Return the appliance to the nearest authorized service facility for examination, repair or adjustment.
Inspect the steam oven for shipping damage. Do not install or operate a damaged unit. Contact the place of purchase.
The steam oven should be installed at a safe height for users to safely access all cooking levels and containers.
This equipment is not designed for maritime use or for use in mobile installations such as recreational vehicles or aircraft. However, under certain conditions it may be possible for an installation in these applications. Please contact the nearest Miele dealer or the Miele Technical Service Department with specific requirements.
IMPORTANT SAFETY INSTRUCTIONS
This steam oven is designed for installation in cabinetry or beneath a countertop. This is necessary to ensure that all electrical components are shielded.
Be certain your appliance is properly installed and grounded by a qualified technician. To guarantee the electrical safety of this appliance, continuity must exist between the appliance and an effective grounding system. It is imperative that this basic safety requirement be met. If there is any doubt, have the electrical system of the house checked by a qualified electrician. The manufacturer cannot be held responsible for damage caused by the lack, or inadequacy, of an effective grounding system.
Do not tamper with electrical connections and components or mechanical parts. Never open the outer casing of the appliance.
Note to the installer:
Please leave these instructions with the consumer of the appliance for the local building inspectors use.
SAVE THESE INSTRUCTIONS
Product and Cutout dimensions
Installation in a tall cabinet
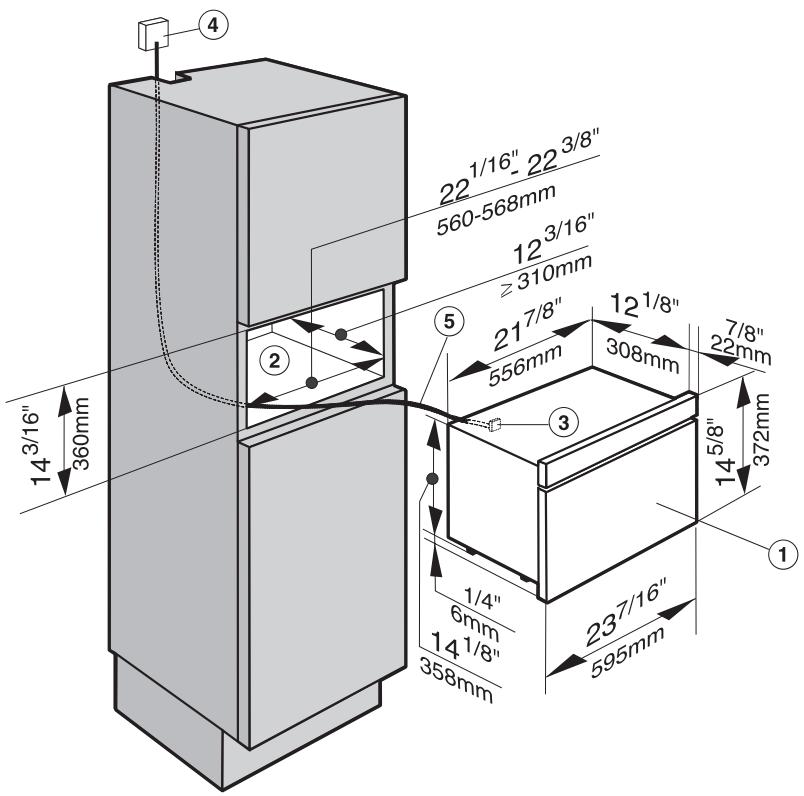
① Steam oven
② Cabinet opening
③ Terminal block
④ Outlet or junction box This should be accessible after the appliance has been installed.
⑤ Power cord
Installation in a cabinet
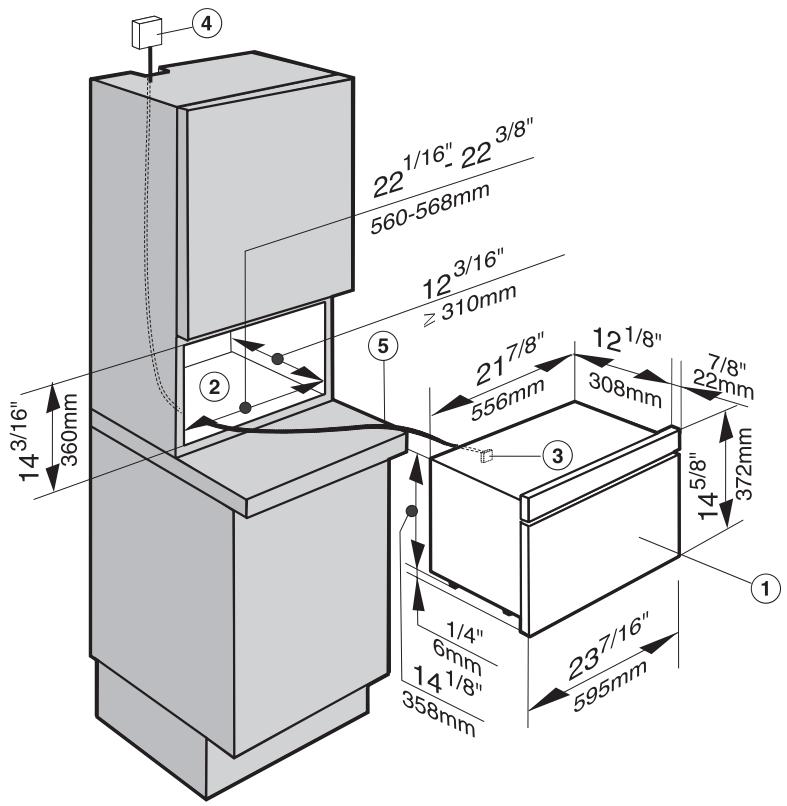
① Steam oven
② Cabinet opening
③ Terminal block
④ Outlet or junction box
This should be accessible after the appliance has been installed.
⑤ Power cord
Installation in a wall cabinet
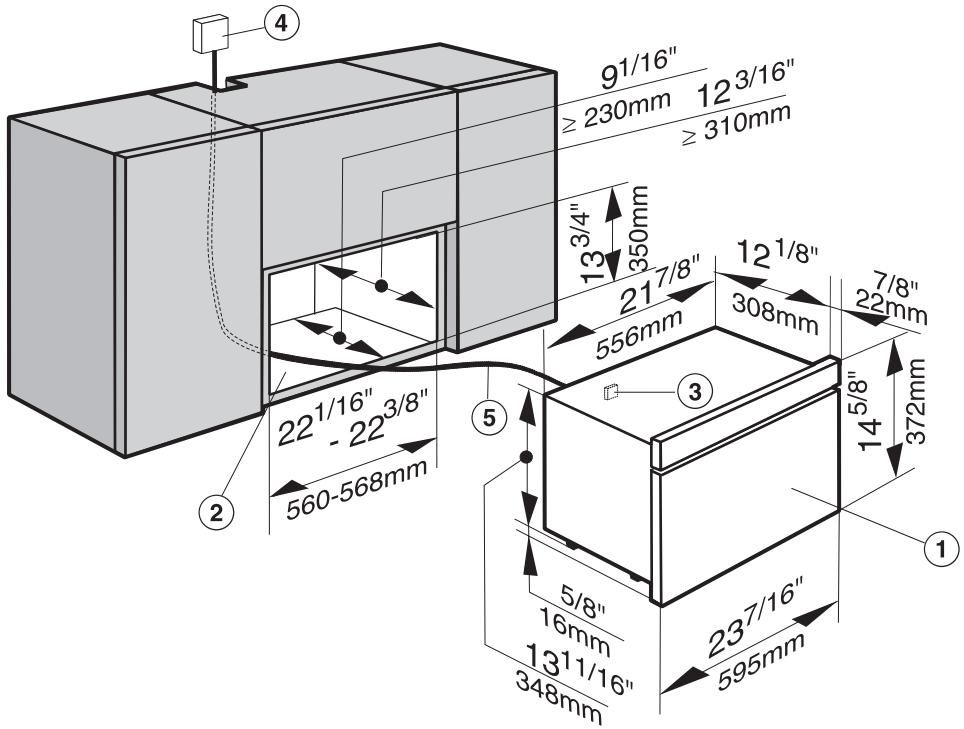
① Steam oven
② Cabinet opening
③ Terminal block
④ Outlet or junction box This should be accessible after the appliance has been installed.
⑤ Power cord
Installation under a countertop
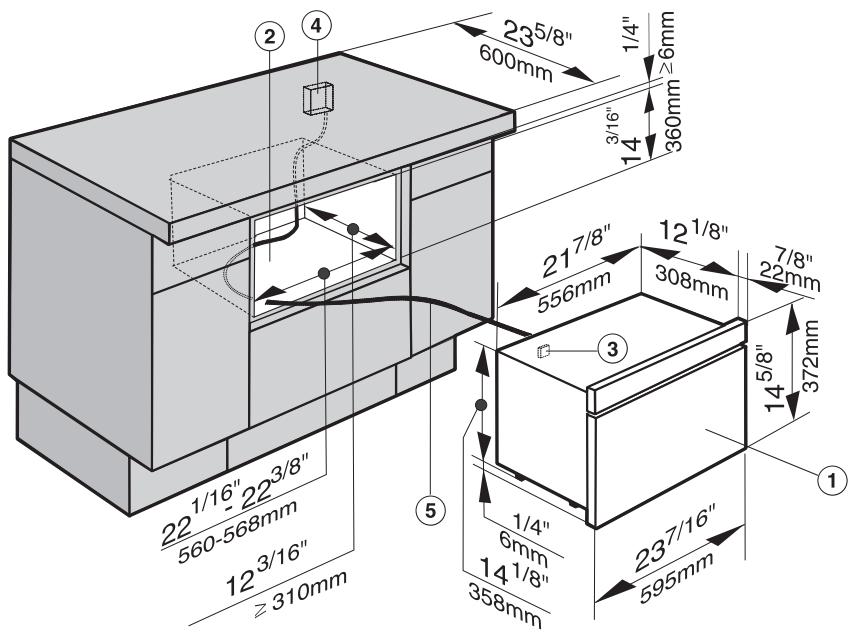
① Steam oven
② Cabinet opening
③ Terminal block
④ Outlet or junction box This should be accessible after the appliance has been installed.
⑤ Power cord
Installing the feet
Four feet are supplied with the appliance.
If the installation niche is 13^3 / 4 " (350 mm) high, the appliance will be installed without the feet.
If the niche is 14 316 (360 mm) high, the feet must be installed before the appliance is built in.
If the oven is built into a countertop or installed in casing, the feet must not be installed.
- Carefully lay the appliance on its rear side and install the four feet in the supplied holes (see illustration).
Installing the appliance
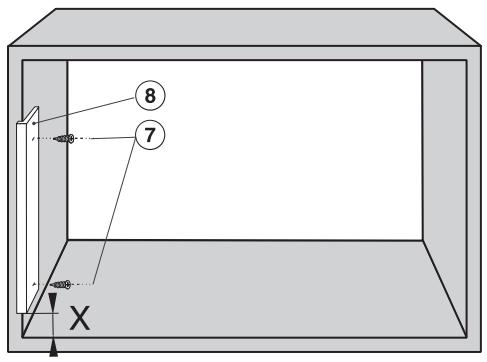
Install the supplied wooden strip ⑧ on the left side in the niche with the two supplied screws ⑦ 3 x 20 mm (see illustration).
The measure x is at a niche height of:
$$ \begin{array}{l} 1 3 ^ {3} / _ {4} ^ {\prime \prime} (3 5 0 m m) = \ 1 ^ {3} / _ {1 6} ^ {"} \pm^ {3} / _ {1 6} ^ {"} (3 0 \pm 5 m m) \ 1 4 ^ {1} / _ {1 6} ^ {\prime \prime} (3 6 0 m m) = \ 1 ^ {9} / _ {1 6} ^ {\prime \prime} \pm^ {3} / _ {1 6} ^ {\prime \prime} (4 0 \pm 5 \mathrm {m m}). \ \end{array} $$
Push the appliance into the niche.
Mark the holes.
Pull the oven out.
■ Drill two left fixing holes with a 1 / 16 " (2 mm) diameter bit.
Push the oven in and align.
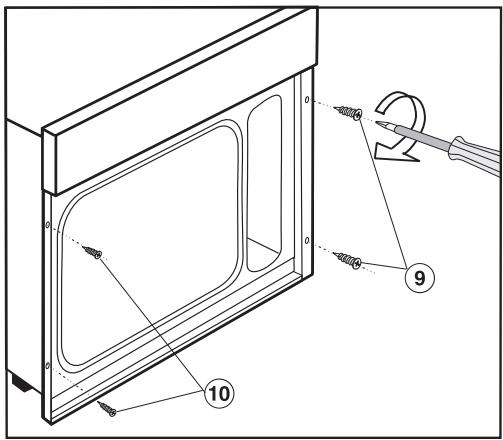
- Open the oven door and using the supplied screws ⑨ 3.5 x 25 mm right and ⑩ 3.0 x 20 mm left, secure it to the cabinet through the holes on either side of the vertical oven trim.
Installation, repairs and other work by unqualified persons could be dangerous. The manufacturer cannot be held responsible for unauthorized work.
The appliance comes equipped with a 6 ft (1.8 m) power cord with a NEMA 6-15P molded plug for connection to a 240 V, 15 A, 60 Hz power supply.
Connection should be made via a suitable isolator, with an on-off switch which should be easily accessible for servicing work.
Verify that the voltage, load and circuit rating information found on the data plate, match that of the household electrical supply before installing the appliance.
If there is any question concerning the electrical connection of this appliance to your power supply, please consult a licensed electrician or call Miele's Technical Service Department.
USA 1-800-999-1360
CDN 1-800-565-6535
WARNING: THIS APPLIANCE MUST BE GROUNDED
Disposal of packing material
The transport and protective packing materials are environmentally friendly for disposal and may be recyclable.
Ensure that any plastic wrap is disposed of safely and kept out of the reach of children. Danger of suffocation! Danger of suffocation!
Disposal of an old appliance
Old appliances may contain materials that can be recycled. Please contact your local recycling authority about the possibility of recycling these materials.
Before disregarding an old appliance ensure that it presents no danger to children while being stored for disposal. Unplug it from the outlet, cut off its power cor and remove any doors to prevent hazards.
Miele, Inc. USA
National Headquarters
9 Independence Way
Princeton, NJ 08540
Phone: 800-843-7231
609-419-9898
Fax: 609-419-4298
www.miele.com
Technical Service & Support Nationwide
Phone: 800-999-1360
Fax: 888-586-8056
Miele Limited CDN
Headquarters and Showroom
161 Four Valley Drive
Vaughan, ON L4K 4V8
Phone: 800-643-5381
905-660-9936
Fax: 905-532-2290
www.miele.ca
info@miele.ca (general enquiries)
professional@miele.ca (commercial
enquiries)
MieleCare National Service
Phone: 800-565-6435
905-532-2272
Fax: 905-532-2292
service@miele.ca (technical enquiries)