
PIN 30 TC - Cooker DELONGHI - Free user manual and instructions
Find the device manual for free PIN 30 TC DELONGHI in PDF.


| Product Type | Induction Built-in Cooktop |
| Brand | DeLonghi |
| Model | PIN 30 TC |
| Number of Cooking Zones | 2 |
| Cooking Zone 1 Diameter | 160 mm |
| Cooking Zone 1 Normal Power | 1200 W |
| Cooking Zone 1 Booster Power | 1400 W |
| Cooking Zone 2 Diameter | 200 mm |
| Cooking Zone 2 Normal Power | 2300 W |
| Cooking Zone 2 Booster Power | 3000 W |
| Power Levels | 9 levels + Booster (P) |
| Booster Function | Yes, max 5 minutes |
| Timer Function | Yes, up to 99 minutes |
| Child Lock | Yes |
| Residual Heat Indicator | Yes |
| Pan Detection | Yes |
| Auto Switch-Off | Yes, after 15 seconds if no zone selected |
| Power Supply Voltage | 220-240 V ~ |
| Power Supply Cable | H05V2V2-F 3x2.5 mm² |
| Cleaning Instructions | Use non-abrasive cleaners; avoid steel wool; clean when cold |
| Safety Certifications | CE, Low Voltage Directive 2006/95/EC, EMC Directive 2004/108/EC |
| Installation Requirements | Must be installed by authorized person; requires ventilation |
Frequently Asked Questions - PIN 30 TC DELONGHI
User questions about PIN 30 TC DELONGHI
0 question about this device. Answer the ones you know or ask your own.
Ask a new question about this device
Download the instructions for your Cooker in PDF format for free! Find your manual PIN 30 TC - DELONGHI and take your electronic device back in hand. On this page are published all the documents necessary for the use of your device. PIN 30 TC by DELONGHI.
USER MANUAL PIN 30 TC DELONGHI
natural_image
Symbol of a trash bin crossed with no text or numbers, representing waste sorting or disposal (no text present)
AVVERTENZE E CONSIGLI IMPORTANTI PER LA SICUREZZA
SPEGNIMENTO
Fig. 2.8

Fig. 2.9

BLOCCO DEI TASTI - SICUREZZA BAMBINI
MASSIMA POTENZA UTILIZZABILE PER LE ZONE DI COTTURA
natural_image
Illustration of a cooking pot with crossed black lines on a gas stove (no text or symbols)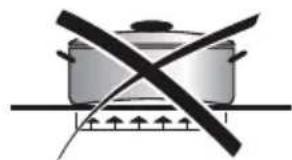
natural_image
Simple line drawing of a cooking pot with crossed pan and heating elements (no text or symbols)


natural_image
Simple line drawing of a cylindrical object with a black X mark, no text or symbols present
Fig. 2.11
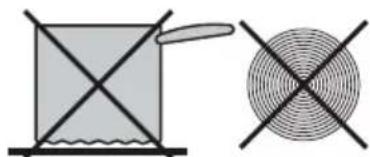
NON UTILIZZARE PENTOLE O PADELLE CON FONDO LAVORATO CON RIGATURE CIRCOLARI RUVIDE.
natural_image
Two abstract diagrams: a square with diagonal lines and a circular pattern with crosshairs (no text or symbols)Fig. 2.12
CONSIGLI GENERALI
natural_image
Illustration of a hand using a power tool to clean granular material in a circular container (no text or symbols)natural_image
Illustration of a hand using a tool to test a component labeled 'A' on a circuit board (no text or symbols beyond label)Fig. 5.1
natural_image
Technical line drawing of an open electrical fuse with labeled component 'F' (no text or symbols beyond label)Fig. 5.3
characteristics of the applications.
The manufacturer reserves the right to make all modifications to its products deemed necessarily for manufacturer commercial reasons at any moment and without prior notice, without jeopardising the essential functional and safety
present booklet.
The manufacturer cannot be held responsible for possible inaccuracies due to printing or transcription errors in the

WARNING: If the power supply cable is damaged, it must be replaced only by an authorised service agent in order to avoid a hazard.
(**) Connection with wall box connection
Type H05V2V2 - F 3 × 2. 5 mm ^ 2 ( ) Type H05R - F 3 × 2. 5 mm ^ 2 ( ) 2 2 0 - 2 4 0
FEEDER CABLE SPECIFICATIONS

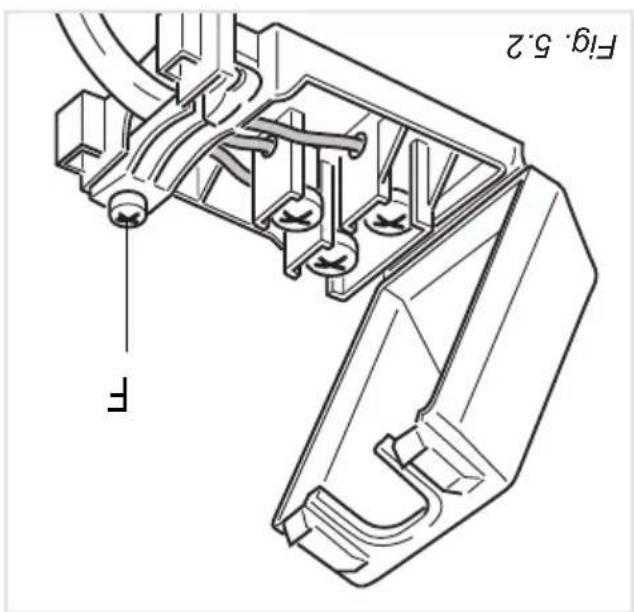
Turn the cooktop over and unlock the terminal board cover by inserting a screwdriver into the two hooks “A” (fig. 5.1). Open the cable gland by unscrewing screw “F” (fig. 5.2), unscrerw the terminal screws. The supply cable, of suitable type and section, is connected to the terminal board following the diagram in fig. 5.3.
Important! This cooktop must be connected to the electricity supply only by an authorised person.
CONNECTION/REPLACEMENT OF THE POWER SUPPLY CABLE
by the appliance.
In the event that installation should require modifications to the mains supply wiring system, it is recommended that a qualified technician be called to carry out substitution. He should also check that the domestic electrical system is suitable for the power absorbed.
N.B. For conceptions to the mains power supply, never use adaptors, reductions or multiple power points as these may overheat and catch fire.
position.
- Once the appliance has been installed, the switch must always be in a accessible
does not exceed 50°C above ambient.
• The power supply cable must not touch the hot parts and must be positioned so that it
mains.
• The appliance must be connected directly to the mains placing a two pole switch with minimum opening between the contacts of 3 mm between the appliance and the
the load specified on the plate.
• The appliance must be connected to the mains checking that the voltage corresponds to the value given in the rating plate and that the electrical cable sections can withstand
and following the appropriate safety regulations.
• Connection to the electric power supply must be carried out by a qualified technician
ELECTRICAL REQUIREMENTS
the After-Sales Service.
If the hob surface is discarded disconnect the appliance from the mains and contact
failure to comply with this rule.
Convection to a good earth wiring system is absolutely essential. The manufacturer accepts no responsibility for any inconvenience caused by
discogneted from the mains.
Before carrying out any work on the electrical section of the appliance, it must be
IMPORTANT: Installation must be carried out according to the manufacturer's instructions. Incorrect installation may cause harm and damage to people, animals or property, for which the manufacturer accepts no responsibility.


• Using a sharp cutter or trimmer knife, trim the excess sealing material around the edge of the cooktop. Take care not to damage the workbench.
• Tighten screws “S” until the cooktop is completely secured to the bench.
4.6).
• Put the backets "F" into place; tooth "A" of the backets should go into the hole (fig.
• Put the cooktop into the cutout and position it correctly.
the tabs so that the cooktop can be put into the cutout.
- “S” for the moment. Make sure that the tabs are mounted correctly, as shown. Rotate “Fasten the backets “F” to the appropriate socket holes, without tightening the screws
- Spread the seal "G" around the edge of the hub (fig. 4.5).
• Turn the hop upside down and rest the glass side on a soft surface.
• Cut the unit according to the dimensions in fig. 4.1.
The kit includes four "F" brackets and four self-threading screws "S" (fig. 4.6).
the cooktop to benches from 30 to 40 mm thick.
Each cooktop is provided with an installation kit including backsets and screws for fastening


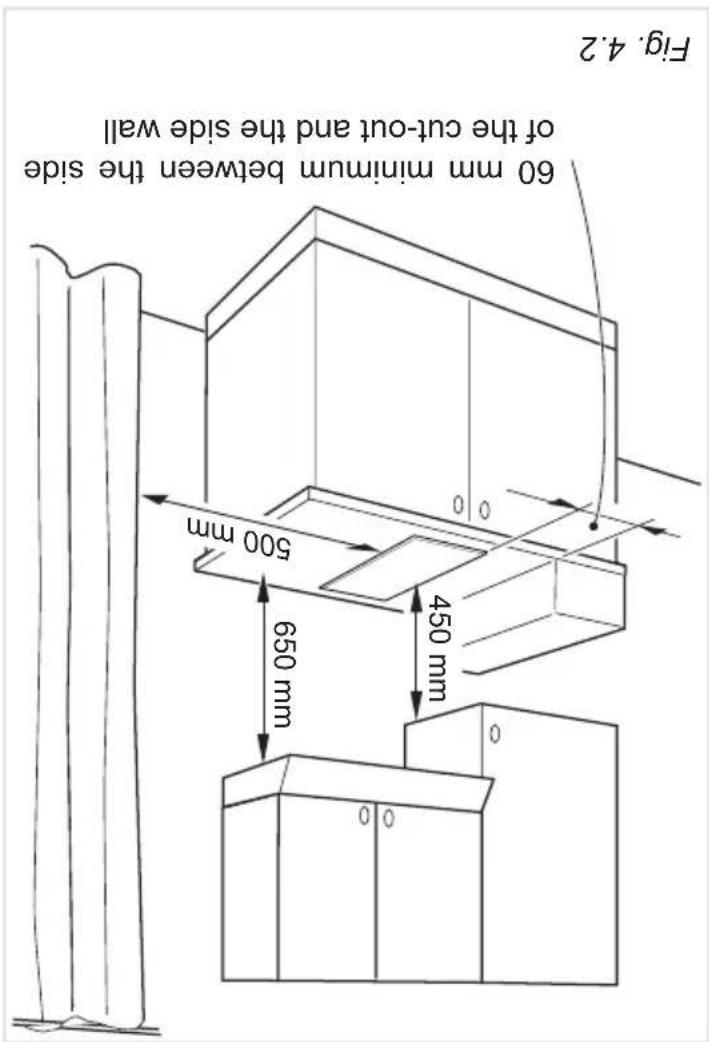
(1) at least 50 mm between the back side of the cut-out and the back of the counterop.
| A 68 mm | from the top of countertop to bottom of cooktop |

WARNING When correctly installed, your product meets all safety requirements laid down for this type of product category. However, special care should be taken around the underneath of the appliance as this area is not designed or intended to be touched and may contain share or rough edges, that may cause injury.
• The walls surrounding the cooktop must be made of heat-resistant material. Do not install the appliance near inflamable materials (eg. curtains).
• Do not seal the cooktop into the benchtop with silicone or glue; this makes future servicing difficult. The manufacturer will not cover the costs of removing the cooktop, or of damage caused by this removal.
• The walls of the units must be capable of resisting temperatures of 75 °C above room temperature.
• We would point out that the adhesive which bonds the plastic laminate to the furniture must withstand temperatures not less than 150°. C to avoid delamination.
• There must be a distance of at least 650 mm between the hob and any wall cupboard or extractor hood positioned immediately above (see tig. 4.2).
of figure 4.3 or 4.4.
- IMPORTANT WARNING! This cooktop requires adequate supply of fresh, cool air to fully function. The base of the cooktop must have direct unrestricted ventilation to the room where the cooktop is installed. Follow the requirements
• If the cooktop is installed above an oven, the oven shall be provided with cooling fan. The two appliances should be connected to the electrical supply with independent connections.
The cooktop shall not be installed directly above a dishwasher, fridge, freezer, washing machine or clothes dryer, as the humidity may damage the cooktop electronics.
This cooktop can be built into a working surface 30 to 40 mm thick and 600 mm deep. In order to install the ceramic hob into the kitchen fixture, a hole with the dimensions shown in figure 4.1 has to be made, keeping in consideration the following:
• This appliance must be installed in accordance with these installation instructions. • This appliance shall only be serviced by authorized personnel. • This appliance is to be installed only by an authorized person in compliance with the current electrical regulations and in observation of the instructions supplied by the manufacturer. Failure to comply with this condition will render the guarantee invalid. Incorrect installation, for which the manufacturer accepts no responsibility, may cause personal injury of damage. • Always disconnect the appliance from mains power supply before carrying out any maintenance operations or repairs.
CAUTION:
INSTALLATION

the installer
Advice for

natural_image
Illustration of a hand using a tool to brush or scrape material over a plate, with no visible text or symbols.permanenty.
• Do not use steel wool or an abrasive sponge which could scratch the surface
surface.
• Avoid using a knife or other sharp utensil as these may damage the ceramic
sugar syrup mixtures etc.
• Do not put articles on the hop which can melt: i.e. plastic, aluminum foil, sugar,
of the hob.
• If any of these products has melted on the ceramic surface, you should remove it immediately (when the surface is still hot) by using a proper scraper to avoid any permanent damage to the surface
the surface of the hob if left to burn on it.
This is especially true in the case of sugar/syrp mixtures which could permannently pit
- If they are allowed to harden they become increasingly difficult to remove.
• Dust, fat and liquids from food that has boiled over must be removed as soon as possible.
• All traces of the cleaner must be removed with a damp cloth.
or scouring powders can damage the glass surface of the hob.
• If you use a detergent, please make sure that it is not abrasive or securing. Abrasive
• Dust or food particles can be removed with a damp cloth.
• Remove spillages and other types of incrustations.
CLEANING THE CERAMIC HOB
When correctly installed, your product meets all safety requirements laid down for this type of product category. However special care should be taken around the underneath of the appliance as this area is not designed or intended to be touched and may contain share or rough edges, that may cause injury.
WARNING!
• Do not scratch the cooktop with cutting or sharp objects.
handling or cleaning of this appliance.
• Important: The use of suitable protective clothing/gloves is recommended when
make it unsafe.
• Do not use a steam cleaner because the moisture can get into the appliance this
• Avoid using cleaning products with a chlorine or acidic base.
• Avoid leaving alkaliene or acidic substances (lemon juice, vinegar, etc.) on the surfaces.
- It is advisable to clean when the appliance is cold.
and disconnected from the electrical power supply.
Before you begin cleaning, you must ensure that the appliance is switched off
GENERAL ADVICE
Fig. 2.12

natural_image
Three abstract geometric shapes: a circular grid, an X-shaped cross, and a square with a horizontal line and a small oval shape (no text or symbols)DO NOT USE PANS WITH ROUGH CIRCULAR MACHINED BASE.
Fig. 2.11

carefully.
• Follow the cleaning instructions
they are hot.
• Do not put aluminium foil or plastic objects on the cooking zones when
• Do not lean over the cooking zones when they are switched on. • Do not drop heavy or sharp objects on the glass ceramic cooktop. If the surface is broken or damaged disconnect the cooktop from the electrical power supply and contact the after-sales service.
• Do not leave wet or damp lids on the hob. • The glass-ceramic surface and pans must be clean. Carefully eliminate any food remains (especially containing sugar), dirt etc. with the aid of a cleaning agent. • Make sure that the handles of coolware do not stick out over the edge of the hob, to avoid them being knocked over by accident. This also makes it more difficult for children to reach the cooking vessels.
• Use cookware with flat and even bottoms. Uneven bottoms can scratch the glass ceramic surfaces. Be careful that the bottom is clean and dry. • Switching off. • Before switching on make sure that you have the correct cooking zone for the hotplate chosen. It is advisable to put the pan on the hotplate before switching on and to take it away after switching off.
ADVICE FOR SAFE USE OF THE HOB
| Error code Example What to do | |
| EXXor EX (not E2 or EH)ordisplay not operative | 1. Switch Off the cooktop and disconnect it from the mains. 2. Wait for about 1 minute, then receive the cooktop and turn on the cooking zones. 3. Wait for about 1 minute and if the cooking zones can be used. 4. If the error message does not appear again the cooking zones does not appear again the cooking zones does not appear again the cooking zones can be used. 5. If the problem continues do not use the inducition hob and contact your authorised Service Centre. |
| E2orEH | 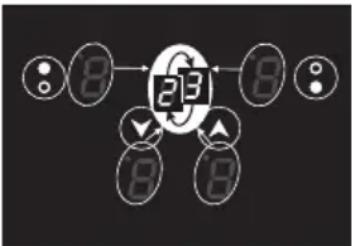 |
| ESorEH |  |
• Cooling fan motor of the induction unit switched On.
• One or more cooking zone switched off.
- „Booster” program deleted and power reduced.
electronic system:
In case of overheating, one of the following automatic functions could be started by the
each cooking zone from overheating.
The induction hob is fitted with safety devices to protect the electronic system and to protect
THEMAL PROTECTIONS
and the power reduced to the maximum power available.
- When setting a "Booster" programme for a zone and then another setting on the second zone, if the total power exceeds 3700 W the "Booster" programme is deleted
zone could be reduced to the remaining power available.
- When setting a "Booster" programme for the second zone, the setting for the other
This means for example that:
automatically displaying the new power level.
If this occurs, the cooking zone will display a flashing figure for about 3 seconds before
power available.
Should the cooking zones require more than 3700 W, the last selected power level has priority and the power of the other cooking zone is automatically reduced to the remaining
The power board manages a maximum total power of 3700 W.
Fig. 2.10
Child Lock is automatically reacted when switching off the appliance. Then, the product can be used until the touch control system is on; this means that the
- Touch simultaneously the front cooking zone selector key and the key.
- If the cooktop is switched off, touch the key until the touch control system is lit.
Temporary deactivation of the Child Lock
zones.
To deactivate the Child Lock, touch simultaneously the front cooking zone selector key and the key (A): then touch again the key until “D” lights up on the displays of the cooking
the same cooling zone selector key until " 7 " lights up.
Simultaneously touch the front cooling zone selector key and the key ⬆; then touch again
- If the cocktop is switched off, touch the key until the touch control system is lit.
• Ensure all cooking zones are switched off.
switching On the cooking zones.
When not using the induction hoc, set the Child Lock safety to prevent children from accidentally
CHILD LOCK SAFETY

Fig. 2.9
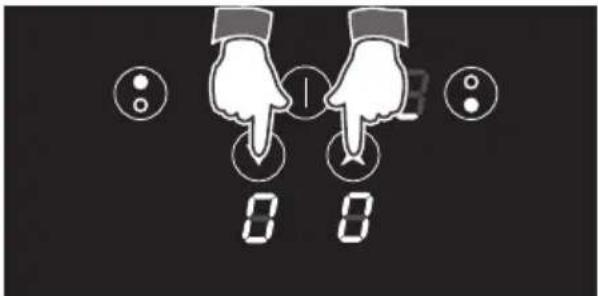
Fig. 2.8
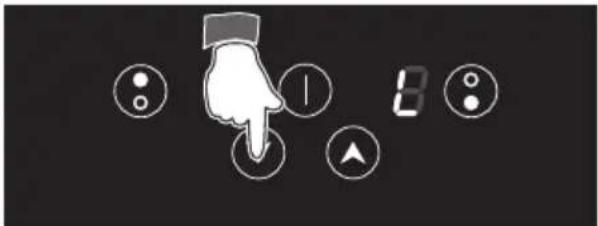
Fig. 2.7

Fig. 2.6
• IMPORTANT: Remember to switch Off the zone manually. • IMPORTANT: Remember to switch Off the same time. • by pressing the ▲ and ▼ key at the
- by resetting the timer to "oo".)
The program for automatic switch Off can be cancelled at any time:
“oo” will flash on the timer display and the “oo” will switch Off automatically, an acoustic signal (deep) will sound (for 2 minute only), zone will switch off automatically, an acoustic zone will end of the countdown the cooling is complete.
Now the program for automatic switching Off
• The time can be changed at any time following the same procedure here above indicated (selecting previously the cooking zone). • To program another cooking zone, repeat as described above. NOTE: The led indicating the cooking zone closest to the end of the program, is blinking. In the case of one programmed zone only, the led is blinking.
set the timer: By pressing the key is "0". By pressing the key is "30". A) the initial value
• Select the cooling zone and set the desired power level. • Within 8 seconds, touch the timer keys • and (the led indicating the programmed zone starts blinking) and
With the cooktop switched On:
This function permits to set a timer from "1" to "99" minutes for automatic turning Off the cooling zone/s.
3NOZ
SWITCHING OFF OF A COOKING
PROGRAM FOR AUTOMATIC
| 0 | Cooking zone not operating | ||
| 1 to 2 | Melting | Sauces, butter, chocolate, gelatinе | Dishes prepared beforehand |
| 2 to 3 | Simmering | Rice, pudding, sugar syrup | Dried vegetables, fish, frozen products |
| 3 to 4 | Steam Vegetables, fish, meat | ||
| 4 to 5 | Water | Steamed potatoes, soups, pasta, fresh vegetables | |
| 6 to 7 | Medium cooking | Meat, lever, eggs, sausages | Goulash, roulade, triple |
| 7 to 8 | Cooking Potatoes, fitters, waters | ||
| 9 | Frying, roasting | Steaks, omelettes, fried dishes | Water |
| P | Rapidly heat up large amount of water | ||
EXAMPLES OF COOKING POWER SETTING
| COOKING ZONE POWER LEVEL | COOKING ZONE ∅ 160 mm (Watt power) | COOKING ZONE ∅ 200 mm (Watt power) |
| 1 | 36 70 | |
| 2 | 60 120 | |
| 3 | 100 180 | |
| 4 | 140 276 | |
| 5 | 215 420 | |
| 6 | 336 645 | |
| 7 | 500 960 | |
| 8 | 770 1470 | |
| 9 | 1200 2300 | |
| 10 | 1400 3000 |
| POWER LEVEL OF COOKING ZONES | OPERATION TIME LIMIT |
| [KXD] | 480 minutes |
| [X2C] | 360 minutes |
| [CY3T] | 300 minutes |
 | 240 minutes |
| [G3F] | 90 minutes |
 | 90 minutes |
 | 90 minutes |
| [3W17] | 90 minutes |
 | 5 minutes |
value.
Each operation on the cooking hob by using the touch controls will reset the maximum operation time at its initial
illustrated in this schedule.
The maximum preset time limit depends on the set power level, as
time if no operation is performed.
Each cooking zone is automatically switched. Off after a maximum preset
THE COOKING ZONES
Fig. 2.5
Do not use this function for heating oil (e.g. deep fat frying).
The „Booster“ function is not suitable for use with non water based cooking.
•
IMPORTANT NOTES:
- Switch Off the cooktop.
OR
- Set a different power level on the selected cooling zone.
To deactivate the "Booster" function:
maximum power level („9“).
and "P" will flash if you try to activate. The cooking zone is automatically set to the
- Note: if a cooking zone is still hot, it is not possible to use the "Booster" function
to the power level "9."
- At the end of the "Booster" program (5 minutes) the cooling zone is automatically set
the relevant display shows "P" (fig. 2.5).
- Set the power level " 9" on the selected cooling zone, then just touch the key until
- The „Booster“ function is always limited to a maximum of 5 minutes.
up large amount of water.
This function allows the cooking zone to operate at the "Booster" maximum power (above the nominal power) for maximum 5 minutes; it could be used, for example, to rapidly heat
BOOSTER FUNCTION

Fig. 2.4

Fig. 2.3
any time.
• The power level can be modified at
selected level.
• The cooking zone display shows the
power level zero (0).
• To reset the power level press the key (A) and keep it pressed until
• Press the key and keep it pressed until the desired power level, ranging between 1 and 5 is set. As an alternative, press the key, the choice starts from level (maximum level) down to (minimum level).
to be used (fig. 2.3).
• Select a cooking zone by touching the relevant key of the cooking zone
To turn ON a cooking zone the cooktop must be switched ON (see section "HOW
3NOZ
ADJUSTMENT OF A COOKING
POWER IGNITION AND
If any cooking zones are turned On, they will be turned Off.
The cooktop may be switched. Off at any time by pressing the key ①.
Switching OFF

Fig. 2.2
• Auto switch-Off: If a cooking zone is not turned ON within 15 seconds, the cooktop will automatically switch off.
SAFETY)
- If the safety Child Lock protection is active, the cooktop can be used only after having deactivated this protection (see chapter CHILD LOCK
Notes:
Cooking zones read "0".
Touch the key ① until the touch control system is lit (fig. 2.2). The displays of the
Switching ON
HOW TO SWITCH ON/OFF THE COOKTOP
operation.
Note: Some types of pans could cause noise when used on an induction cooling zone. The noise does not mean any failure on the appliance and does not influence the cooling.
cooling zone.
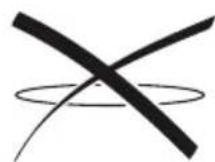
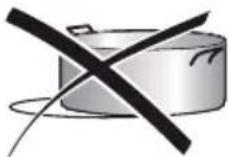
Always use pans with thick, completely flat bottom. Do not use pans with concave or convex bottom; these could cause overheating of the
.zones.
Pay attention: The pan shall always be centered over the middle of the cooling zone. It is possible to use oversized pans but the bottom of the pan cannot touch other cooling
Cooking zone ∅ 200 mm 145 mm
Cooking zone ∅ 160 mm 110 mm
Minimum pan diameter recommended (referred to the bottom of the pan)
Induction cooling zone
pan detection symbol will appear on the cooling zone display). To correctly use the cooling zones follow the indications given in the following table.
Important note: the cooking zones will not operate if the pan diameter is too small ( )
suitable.
pan on a cooling zone. Switch on the cooling zone: if the symbol is (pan detection) appears on the cooling zone display (instead of the power level), the pan is not
- if a magnet is not available, pour a small amount of water inside the pan and place the test the bottom of the pan with a magnet: if the magnet sticks, the pan is suitable.
To check if a pan is suitable or not:
• pure stainless steel, aluminum or copper without magnetic bottom.
- glass, wood, porcelain, ceramic, stoneware;
Pans made from the following materials are not suitable:
·(ued
The bottom of the pan has to be ferromagnetic to generate the electromagnetic field necessary for the heating process (meaning a magnet has to stick to the bottom of the
The induction cooling system OPERATES ONLY if using correct coolware suitable for
COOKWARE FOR INDUCATION COOKING
COOKING ZONE.
When the □ is lit on the display, it is still possible to start cooking again; just operate the cooking zone as indicated in the chapter POWER IGNITION AND ADJUSTMENT OF A

children.
Avoid touching the hob surface over the cooking area. Please pay special attention to
indicator lights up on the display to alert you of the hot surface.
When the temperature of a cooking zone is still hot, the relevant 18 premaining heat
REMAINING HEAT INDICATORS
zone switches Off automatically.
If the pan detection symbol appears on the display, your pan is not suitable and your induction hob will not operate. After 10 minutes without detecting any pan, the cooling
Your induction how operates only if a correct pan with the right features is placed on a cooking zone. Please refer to COOKWARE FOR INDUCATION COOKING.
loss between the induction hob and the food.
When your induction knob is switched On and a cooling zone has been selected, the electronic circuits produce induced currents that instantaneously heat the bottom of the pan which then transfers this heat to the food. Cooking takes place with hardly energy
INDUCTION COOKING SYSTEM
cooling zone.
Note: Each lit figure (excluding the "Automatic cooling timer" display) refers to the relevant
= Child Lock safety

= Pan detection indicator

= R e m a i n i n g h e a t i n d i c a t o r

= ^ Booster ^ function

= Power levels


= Cooking zone ON (activated but not operating). If all the zones are in zero setting, the touch control system switches off automatically (touch controls Off) after about 10 seconds.

= Cooking zone Off (not activated)

Fig. 2.1
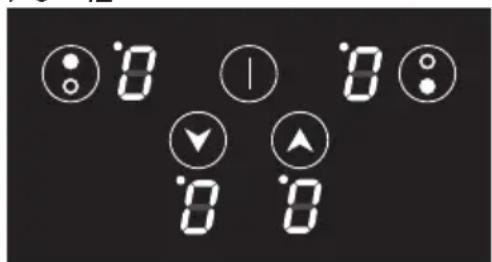
In the front central area of the hob, the displays of the touch control system indicate:
The ceramic hob is fitted with induction cooking zones. These zones, shown by painted disks on the ceramic surface, are controlled by a touch control system.
Attention: Detach the appliance from the mains if the ceramic glass is cracked and contact the After-Sales Service. Metallic objects such as knives, forks, spoons and kids should not be placed on the hob surface since they can get hot.
- if one or more keys are touched for more than 10 seconds;
• Each selection (by touching one of the keys) is indicated by an acoustic signal (deep). The touch control area is switched off automatically (and a warning deep sounds);
Notes:
-
Decreasing key (power or timer)
-
Increasing key (power or timer)
-
Aromatic cooking (timer) display
-
Rear cooling zone selector key
-
Front cooling zone selector key
-
Front cooling zone display
-
Rear cooking zone display
-
ON/OFF key
TOUCH CONTROLS

the pan set on the cooking zone.
Note: The Nominal and Booster Power may change depending on the size and material of
- Touch controls
Booster Power: 3000 W
- Induction cooling zone ∅ 200 mm Normal Power: 2300 W
Booster Power: 1400 W
- Induction cooling zone ∅ 160 mm Normal Power: 1200 W

Fig. 1.1
- IMPORTANT WARNING: The induction hub complies with European Standards for domestic cooking appliances. Therefore it should not interfere with other electronic units. Persons with cardiac pacemakers or any other electrical implants must check with their doctor if they can use an induction cooking system (and check any possible interferences with the implants).
- The heating of magnetic tens is forbidden! Close tens may explode by exceeding pressure while heating. There is a burning risk with open tens as well, because the integrated temperature protection
- Magnetic objects (e.g. credit cards, floppy disks, memory cards) and electronic instruments (e.g. computers) should not be placed - rear cooling zones.
of the cooling zone. - Do not use defective pans or pans with a curved bottom. - Please use suitable pans marked for induction cooling. - Please keep your distance from the electromagnetic fields by standing 5-10 cm from the cooling zones. When possible use the
use plastic or wood kitchen utensils. - Please use pans of recommended size (see minimum pan diameter recommended). It is not advisable to use pans smaller than the cooking zone. The pans have to be placed in the centre
- Metallic objects such as knives, forks, spoons and lids should not be placed on the hob surface since they can get hot. - Do not use metallic kitchen utensils (e.g. ladles). It is preferable to
INDUCTION HOBS:
WARNING: If the hob is carched or otherwise damaged by falling objects etc., disconnect the appliance from the electrical power supply to avoid the possibility of electric shock and call Customer Service.
WARNING: When correctly installed, your product meets all safety requirements laid down for this type of product category. However, as this area is not designed or intended to be touched and may contain sharp or rough edges, that may cause injury.
work surface.
WARNING: Danger of fire: do not store items on the cooking surfaces. Do not place or leave empty pans on the glass ceramic hob. Do not allow heavy or sharp objects to drop on the glass ceramic hob. Do not scratch the hob with sharp objects. Don't use the hob as a
lid or a fire blanket.
- Care should be taken to avoid touching heating elements on the hob. - To avoid burns and scalds, young children should be kept away. Make sure that electrical cables connecting other appliances in the proximity of the cooktop cannot come into contact with the hob. WARNING: Untended cooking on a hob with fat or oil can be dangerous and may result in fire. NEVER try to extinguish a fire with water, but switch off the appliance and then cover flame e.g. with a
hot; they remain hot for some time after use.
children without supervision. The manufacturer decides all liability for injury to persons or damage to property caused by incorrect or improper use of the appliance. WARNING: During use the appliance and its accessible parts become
Continuously supervised. This appliance can be used by children aged from 8 years and above and persons with reduced physical, sensory or mental capabilities or lack of experience and knowledge if they have been given supervision or instruction concerning use of the appliance in a safe way and understand the hazards involved. Children shall not play with the appliance. Cleaning and user maintenance shall not be made by
The various components of the appliance are recyclable. Dispose of them in accordance with the regulations in force in your country. If the appliance is to be scrapped, remove the power cord. After use, ensure that the controls are in the off position. Children less than 8 years of age shall be kept away unless
If you should decide not to use this appliance any longer (or decide to substitute another model), before disposing of it, it is recommended that it be made in appropriate manner in accordance to health and environmental protection regulations, ensuring in particular that all potentially hazardous parts be made harmless, especially in relation to children who could play with unused appliances.
Do not use the appliance whilst in barfoot.
Do not touch the appliance with wet or damp hands (or feet).
appilance this make it unsafe.
Do not use a steam cleaner because the moisture can get into the
supply.
without having previously discounted it from the electric power
Do not carry out cleaning or maintenance operations on the appliance
separate remote-control system.
Do not operate your appliance by means of an external timer or
of this condition.
responsibility for any inconvenience resulting from the independence
as this may become dangers to use. The manufacturer declines all
Do not attempt to modify the technical characteristics of the application
recommended when handling or cleaning this appliance.
IMPORTANT: The use of suitable protective clothing/gloves is
apppliance.
aluminum parts. This film must be removed before using
Some appliances are supplied with a protective film on steel and
as these may cause serious injuries.
straps, etc.) should not be left around within easy reach of children,
Packing elements (i.e. plastic bags, polystyrene foam, nails, packing
professionally qualified technician.
In case of doubt, do not use it and consult your supplier or a
дамаед.
After having unpacked the appliance, check to ensure that it is not
the appliance.
Read the instructions carefully before installing and using
commercial or communal environment.
within a non domestic environment I.e. a semi commercial,
The appliance guarantee will be void if the appliance is used
should not be used in a commercial environment.
not suitable for any non domestic application and therefore
solely for the cooking of domestic (household) food and is
IMPORTANT: This appliance is designed and manufactured
natural_image
Simple line drawing of a vehicle with crosshair and no text or symbolsAt the end of its working life, the product must not be disposed of as urban waste. It must be taken to a special local authority differentiated waste collection centre or to a dealer providing this service.
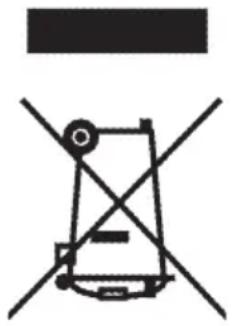
Disposing of a household appliance separately avoids possible negative consequences for the environment and health deriving from inappropriate disposal and enables the constituent materials to be recovered to obtain significant savings in energy and resources. As a reminder of the need to dispose of households appliances separately, the product is marked with a crossed-out wheeled dustbin.
IMPORTANT INFORMATION FOR CORRECT DISPOSAL OF THE PRODUCT IN ACCORDANCE WITH EC DIRECTIVE 2002/96/EC.
3D
- Requirements of EU Directive 2011/65/EU.
- Requirements of EU Directive 93/68/EEC;
- Protection requirements of EU Directive "EMC" 2004/108/EC;
- Safety requirements of EU Directive "Low Voltage" 2006/95/EC;
This cooker has been designed, constructed, and marketed in compliance with:
DECILARATION OF CE CONFORMITY
lingical use of the appliance. The manufacturer declines all responsibility in the event of damage caused by improper, incorrect or
This appliance must be used only for the task it has explicitly been designed for, that is for cooking foodstuffs. Any other form of usage is to be considered as inappropriate and therefore dangerous.
Please preserve this booklet carefully. It may be useful in future, either to yourself or to others in the event that doubts should arise relating to its operation.
features offered by your appliance.
The safety precautions and recommendations reported below are for your own safety and that of others. They will also provide a means by which to make full use of the
to our product.
Thank you for having purchased and given your preference
Dear Customer,
INDUCITION BUILT-IN COOKTOP
USERS OPERATING INSTRUCTIONS INSTALLATION INSTRUCTIONS
COOKING
DELONGHI

- AVVERTENZE E CONSIGLI IMPORTANTI PER LA SICUREZZA
- SPEGNIMENTO
- BLOCCO DEI TASTI - SICUREZZA BAMBINI
- MASSIMA POTENZA UTILIZZABILE PER LE ZONE DI COTTURA
- CONSIGLI GENERALI
- FEEDER CABLE SPECIFICATIONS
- CLEANING THE CERAMIC HOB
- Minimum pan diameter recommended (referred to the bottom of the pan)
- Induction cooling zone
- COOKWARE FOR INDUCATION COOKING
- REMAINING HEAT INDICATORS
- INDUCTION COOKING SYSTEM
- IMPORTANT INFORMATION FOR CORRECT DISPOSAL OF THE PRODUCT IN ACCORDANCE WITH EC DIRECTIVE 2002/96/EC.
- INDUCITION BUILT-IN COOKTOP
- USERS OPERATING INSTRUCTIONS INSTALLATION INSTRUCTIONS
Brand : DELONGHI
Model : PIN 30 TC
Category : Cooker