
KV-S7075C - Scanner PANASONIC - Free user manual and instructions
Find the device manual for free KV-S7075C PANASONIC in PDF.
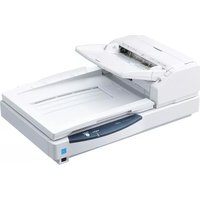


| Product Type | High Speed Color Scanner |
| Model | Panasonic KV-S7075C |
| Scanning Method | CIS (Contact Image Sensor) |
| Duplex Scanning | Yes |
| Optical Resolution | 600 dpi (Main/Sub: 100-600 dpi, 1 dpi step) |
| Scan Speed (Letter, Landscape, 200 dpi) | Simplex: approx. 95 ppm; Duplex: approx. 190 ipm |
| Scan Speed (A4, Portrait, 200 dpi) | Simplex: approx. 75 ppm; Duplex: approx. 150 ipm |
| Document Size (ADF) | Width 48-297 mm, Length 70-432 mm |
| Paper Thickness (ADF) | 40-127 g/m² |
| Hopper Capacity | 200 sheets (64 g/m²) |
| Interface | USB 2.0 |
| Dimensions (W x D x H) | 755 x 508 x 289 mm (29.7 x 20 x 11.4 in) |
| System Requirements | Intel Core 2 Duo 1.8 GHz, 1 GB RAM, 5 GB HDD, Windows 2000/XP/Vista |
| Roller Life Expectancy | 300,000 scans (paper feed roller module) |
| Accessories Included | Power cord, USB cable, roller cleaning paper, shading paper, CD-ROM, blower, installation manual |
| Optional Accessories | Roller exchange kit (KV-SS015), imprinter unit (KV-SS014), ink cartridge (KV-SS021), roller cleaning paper (KV-SS03) |
| Operating Environment | 15°C to 30°C (59°F to 86°F), 30% to 80% RH |
Frequently Asked Questions - KV-S7075C PANASONIC
User questions about KV-S7075C PANASONIC
0 question about this device. Answer the ones you know or ask your own.
Ask a new question about this device
Download the instructions for your Scanner in PDF format for free! Find your manual KV-S7075C - PANASONIC and take your electronic device back in hand. On this page are published all the documents necessary for the use of your device. KV-S7075C by PANASONIC.
USER MANUAL KV-S7075C PANASONIC
High Speed Color Scanner
Model No. KV-S7075C

These instructions contain information on operating the scanner. Before reading these instructions, please read the installation manual enclosed with this unit.
Please carefully read these instructions and the enclosed installation manual. Keep all documentation in a safe place for future reference.
Introduction
Thank you for purchasing a Panasonic High Speed Color Scanner.
■ About the documentation
The scanner documentation consists of 2 manuals: the Installation Manual and the Operating Manual. In addition, 3 software reference manuals are included.
| Installation Manual(printed documentation) | The Installation Manual explains the installation method and procedures. |
| Operating Manual(this manual) | The Operating Manual explains the part names, operations, features and maintenance of the unit. |
| Software Reference Manuals(electronic documentation) | PIE Reference ManualExplains the settings of the PIE (Panasonic Image Enhancement Technology) features using the ISIS and TWAIN drivers.RTIV Reference ManualExplains the features and settings for RTIV (Reliable Throughput Imaging Viewer). (You can view this manual by clicking the help button on RTIV.)User Utility Reference ManualExplains how to use the User Utility, which is used for scanner maintenance.(You can view this manual by clicking the help button on User Utility.) |
Abbreviations
- Windows® refers to the Microsoft® Windows® operating system (hereafter Windows).
- Windows® 2000 refers to the Microsoft® Windows® 2000 operating system (hereafter Windows 2000).
- Windows® XP refers to the Microsoft® Windows® XP operating system (hereafter Windows XP).
- Windows Vista® refers to the Microsoft® Windows Vista® operating system (hereafter Windows Vista).
Trademarks
- Microsoft, Windows, and Windows Vista are either registered trademarks or trademarks of Microsoft Corporation in the United States and/or other countries.
- ISIS and QuickScan Pro are registered trademarks or trademarks of EMC Corporation.
- IBM and AT are trademarks of International Business Machines Corporation in the United States, other countries, or both.
- Intel and Intel Core are trademarks of Intel Corporation in the U.S. and other countries.
- Adobe and Reader are either registered trademarks or trademarks of Adobe Systems Incorporated in the United States and/or other countries.
- All other trademarks identified herein are the property of their respective owners.
International ENERGY STAR Program

As an ENERGY STAR® Partner, Panasonic has determined that this product meets the ENERGY STAR guidelines for energy efficiency.
System Requirements
| Computer IBM | PC/AT or compatible machine with a CD-ROM drive |
| CPU Intel | Core TM 2 Duo, 1.8 GHz or higher |
| Operating System | Windows 2000 / Windows XP / Windows Vista |
| Interface USB 2.0 | |
| Memory 1 GB or higher | |
| Hard Disk 5 GB or more free space is required. |
Note
- The above system requirements may not satisfy the requirements of all operating systems.
- The scanning speed differs depending on the host computer's operating environment or the application used.
- Due to the slower speed of USB 1.1, it is recommended to use a USB 2.0 interface.
- If you connect the scanner to a USB hub, it is not guaranteed to work.
■ Federal Communications Commission Requirements (For United States only)
Note
This equipment has been tested and found to comply with the limits for a Class A digital device, pursuant to Part 15 of the FCC Rules. These limits are designed to provide reasonable protection against harmful interference when the equipment is operated in a commercial environment. This equipment generates, uses, and can radiate radio frequency energy and, if not installed and used in accordance with the instruction manual, may cause harmful interference to radio communications. Operation of this equipment in a residential area is likely to cause harmful interference in which case the user will be required to correct the interference at his own expense.
FCC Warning: To assure continued FCC compliance, the user must use only shielded interface cable and the provided power supply cord. Also, any unauthorized changes or modifications to this equipment would void the user's authority to operate this device.
For FRG Users (For Germany Only)
Note
Machine noise information regulation - 3.GPSGV, the maximum sound pressure level is 70 dB(A) or less, in conformity with EN ISO 7779.
This equipment is not for use at video display work stations according to BildscharbV.
Table of Contents
| Page | ||
| Before You Start | For Your Safety. | 5 |
| Precautions. | 9 | |
| Component Identification | 11 | |
| Power turn-on sequence | 13 | |
| About the power indicator (LED) | 13 | |
| Operation | Loading Documents on the ADF. | 14 |
| Notes about documents for scanning. | 15 | |
| Scanning documents with pages of same sizes | 16 | |
| Scanning documents with pages of different sizes | 20 | |
| Adjusting the left and right document guides to their original position | 23 | |
| Loading Documents on the Flatbed. | 24 | |
| When scanning with the flatbed | 24 | |
| Scanning thick documents | 25 | |
| Using Control Sheets. | 26 | |
| About Printing Control Sheets | 27 | |
| Printing control sheets | 27 | |
| Changing the Reference Plate Setting. | 28 | |
| ADF reference plate setting | 28 | |
| Flatbed sheet setting | 29 | |
| Care and Maintenance | Clearing Paper Jams | 30 |
| Removing paper jams from the paper slot | 30 | |
| Removing paper jams from the exit path | 31 | |
| Cleaning the Unit | 32 | |
| Outside of the scanner | 32 | |
| Inside the scanner | 32 | |
| Cleaning the paper feed roller, separation roller, and double feed prevention roller | 33 | |
| Cleaning the drive rollers and free rollers | 35 | |
| Cleaning the drive rollers, free rollers, and exit rollers | 36 | |
| Cleaning the reference plates and ADF glasses | 37 | |
| Cleaning the paper and waiting sensors, double feed detector | 38 | |
| Cleaning the starting, skew and ending sensors | 39 | |
| Cleaning the flatbed glass and document cover detector | 40 | |
| Replacing Consumable Roller Modules. | 41 | |
| Replacing paper feed roller modules | 41 | |
| Replacing Double Feed Prevention Roller | 43 | |
| Troubleshooting. | 45 | |
| Shading Adjustment. | 47 | |
| Appendix | Repacking Instructions | 48 |
| Specifications. | 49 | |
| Index | 51 | |
To prevent severe injury and loss of life, read this section carefully before using the unit to ensure proper and safe operation of your unit.
This section explains the graphic symbols used in this manual.

WARNING
Denotes a potential hazard that could result in serious injury or death.

CAUTION
Denotes hazards that could result in minor injury or damage to the unit.

This symbol is used to alert operators to a specific operating procedure that must be performed carefully.


These symbols are used to alert operators to a specific operating procedure that must not be performed.


These symbols are used to alert operators to a specific operating procedure that must be emphasized in order to operate the unit safely.
For Users

Power and Ground Connection

The power source voltage of this unit is listed on the nameplate. Only plug the unit into an AC outlet with the proper voltage. If you use a cord with an unspecified current rating, the unit or plug may emit smoke or become hot to the touch.

When you operate this product, the power outlet should be near the product and easily accessible.

To ensure safe operation, the power cord supplied must be inserted into a standard three-prong AC outlet which is effectively grounded (earthed) through the normal wiring.

The fact that the equipment operates satisfactorily does not imply that the power point is grounded (earthed) and that the installation is completely safe. For your safety, if in any doubt about the effective grounding (earthing) of the power point, consult a qualified electrician.

If the plug cannot be inserted into the AC outlet, contact a licensed electrician to replace the AC outlet with a properly grounded (earthed) one.

Do not defeat the grounding (earthing) plug (ex. do not use a conversion plug).

Plug the power cord firmly into an AC outlet. Otherwise, it can cause fire or electric shock.

Do not pull, bend, rest objects on, or chafe the power cord, and plug. Damage to the power cord or plug can cause fire or electric shock.

Do not attempt to repair the power cord, or plug. If the power cord or plug is damaged or frayed, contact an authorized service representative for a replacement.

Ensure that the plug connection is free of dust. In a damp environment, a contaminated connector can draw a significant amount of current that can generate heat, and eventually cause fire if left unattended over an extended period of time.

Never touch the plug with wet hands. Danger of electric shock exists.

Stop operation immediately if the unit emits smoke, excessive heat, abnormal smell, or unusual noise. These conditions can cause fire or electric shock. Immediately turn the unit off, and unplug the power cord, and contact your dealer for service.

When disconnecting the unit, grasp the plug instead of the cord. Pulling on a cord forcibly can damage it, and cause fire or electric shock.
Operating Safeguards

If metal fragments or water gets into the unit, turn the unit off, and unplug the unit immediately. Contact your dealer for service. Operating the contaminated unit can cause fire or electric shock.

Do not open covers, and do not attempt to repair the unit yourself. Contact your dealer for service.

Do not alter the unit or modify any parts. Alteration or modification can cause fire or electric shock.

During thunderstorms, do not touch the unit and plug. It may cause an electric shock.
Roller Cleaning Paper

Do not drink or inhale the roller cleaning paper fluid including isopropyl alcohol.

The roller cleaning paper may be harmful to sensitive skin. Please use protective gloves.

Do not use the roller cleaning paper near a heater or open flame.

CAUTION
Power

The unit should be used only with the power cord enclosed with the unit.

When the unit is not used over an extended period of time, switch it off, and unplug it. If an unused unit is left connected to a power source for a long period, degraded insulation may cause electric shock, current leakage, or fire.
Installation and Relocation Operating Safeguards

Do not position the unit in a location where it is unstable.

To prevent fire or shock hazard, do not expose this unit to rain or any type of moisture.

Do not place the unit in a hot, humid, or dusty environment. Prolonged exposure to these adverse conditions may cause fire or electric shock.

Do not block the air vents. Doing so can cause heat to build up, and may result in fire.

When moving the unit, be sure to unplug the power cord from the AC outlet. If the unit is moved with the power cord attached, it can cause damage to the cord which could result in fire or electric shock.

Move this unit with two persons, holding the four hollows on the front and rear sides. Dropping the unit can cause injury and damage to the unit.


Do not place printed materials containing magnetic ink characters or magnetic strip cards on the flatbed.
Magnets are located in the flatbed cover (flatbed sheet) and may damage data stored on printed materials and cards.

If the unit falls down or gets damaged, turn the unit off, and unplug the power cord. Otherwise, it may cause fire or electric shock.

Do not place any liquids or heavy items on the unit.
Accidental spillage of liquid into the unit may cause severe damage. If this occurs, turn the unit off, unplug the power cord, and contact your dealer for service.

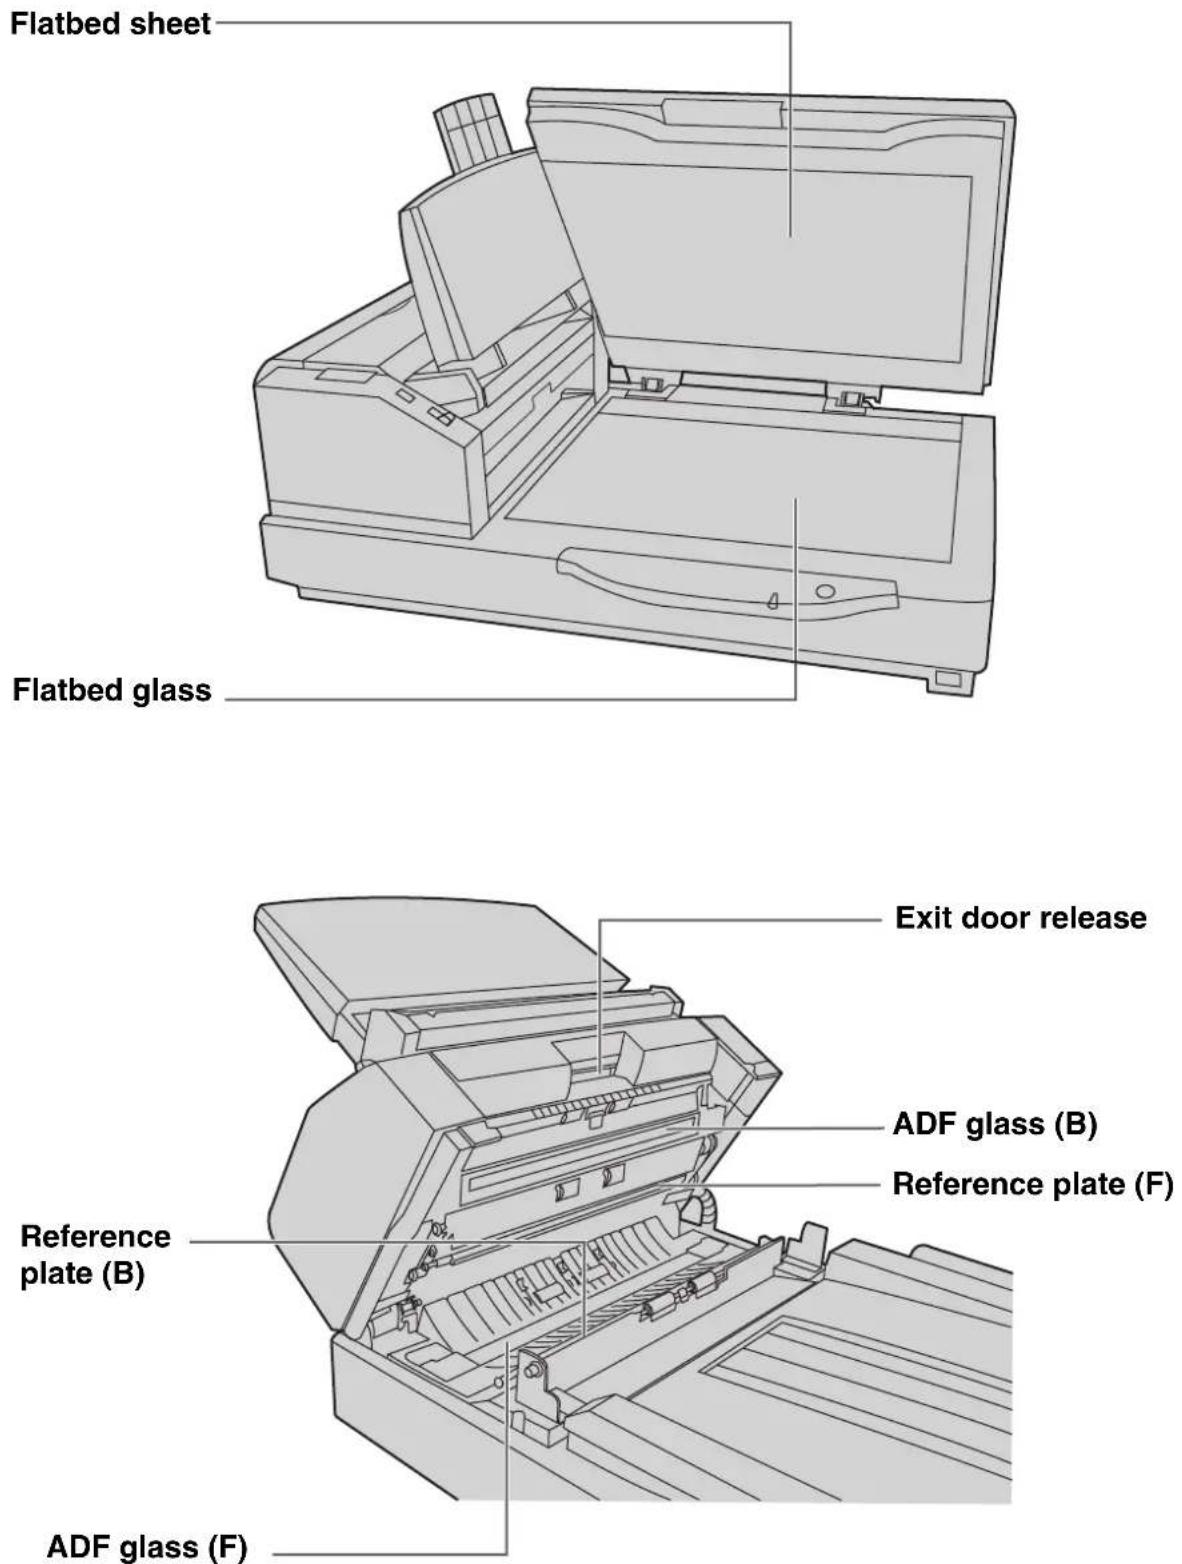
Be careful not to pinch your fingers when closing the exit door. It can cause injury.
LED LIGHT: DO NOT VIEW DIRECTLY WITH OPTICAL INSTRUMENTS. CLASS 1M LED PRODUCT
LED properties
LED radiation output: 12 mW max.
Wavelength: Red 630 nm typ.
Green 534 nm typ.
Blue 460 nm typ.
Emission duration: Continuous
Standard: IEC 60825-1:1993 +A1:1997 +A2:2001
■ Safety Information (For United Kingdom only)
This appliance is supplied with a moulded three pin mains plug for your safety and convenience. A 5 amp fuse is fitted in this plug. Should the fuse need to be replaced, please ensure that the replacement fuse has a rating of 5 amps and that it is approved by ASTA or BSI to BS1362. Check for the ASTA mark or the BSI mark on the body of the fuse. If the plug contains a removable fuse cover, you must ensure that it is refitted when the fuse is replaced. If you lose the fuse cover, the plug must not be used until a replacement cover is obtained. A replacement fuse cover can be purchased from your local Panasonic Dealer.
IF THE FITTED MOULDED PLUG IS UNSUITABLE FOR THE SOCKET OUTLET IN YOUR PREMISES, THEN THE FUSE SHOULD BE REMOVED AND THE PLUG CUT OFF AND DISPOSED OF SAFELY. THERE IS DANGER OF SEVERE ELECTRICAL SHOCK IF THE CUT-OFF PLUG IS INSERTED INTO ANY 13 AMP SOCKET.
If a new plug is to be fitted, please observe the wiring cord as shown below. If in any doubt, please consult a qualified electrician.
WARNING
THIS APPLIANCE MUST BE EARTHED.
IMPORTANT
The wires in this mains lead are coloured as follows:
Green-and-Yellow : Earth
Blue : Neutral
Brown: Live
As the colors of the wires in the mains lead of this apparatus may not correspond with the colored markings identifying the terminals in your plug, proceed as follows.
The wire that is colored GREEN-AND-YELLOW must be connected to the terminal in the plug that is marked with the letter E or by the Earth symbol or colored GREEN or GREEN-AND-YELLOW.
The wire that is colored BLUE must be connected to the terminal in the plug that is marked with the letter N or colored BLACK.
The wire that is colored BROWN must be connected to the terminal in the plug which is marked with the letter L or colored RED.
How to replace the fuse:
Open the fuse compartment with a screwdriver and replace the fuse and fuse cover.

Installation
- Do not place the unit in direct sunlight, in a cold draft, or near heating apparatus.
- Do not place the unit near apparatus which generate electronic or magnetic noise.
- Protect the unit from static electricity.
- Do not move the unit immediately from a cold place to a warm place. It may cause dew.
CD-ROM
- Do not write or stick paper on the front and/or back of CD-ROM.
- Do not touch the data side of the CD-ROM. When handling the CD-ROM, be careful not to leave fingerprints or otherwise damage the CD-ROM.
- Do not leave the CD-ROM where it is directly exposed to sunlight or near a heater for extended periods.
- Do not throw or bend the CD-ROM.
Roller Cleaning Paper
- Keep the roller cleaning paper out of reach of small children.
- Do not store the roller cleaning paper in direct sunlight or in a place with a temperature over 40 °C (104 °F).
- Only use the roller cleaning paper to clean the rollers and ADF glasses.
- For details about the roller cleaning paper, please refer to the Material Safety Data Sheet (MSDS). Please ask your Panasonic sales company about obtaining the Material Safety Data Sheet.
KEEP AWAY FROM FIRE.
Others
- Make sure to remove paper clips and staples from documents before scanning. Failing to do so can damage the unit, document, or both.
- Do not use thinner, benzine, or cleaners containing abrasives or surfactants, for cleaning the outside of scanner.
- Plug the power cord into an outlet from which you can easily unplug it.
■ Illegal Duplication ■ Security Notice
It is unlawful to make duplication of certain documents.
Duplicating certain documents may be illegal in your country/area.
Penalties of fines and/or imprisonment may be imposed on those found guilty. The following are examples of items that may be illegal to duplicate in your country/area.
- Currency • Bank notes and checks • Bank and government bonds, and securities
- Passports, licenses, official or private documents, identification cards, and the like
- Copyright materials, or trademarks without the consent of the owner
- Postage stamps, and other negotiable instruments
This list is not inclusive, and no liability is assumed for either its completeness or accuracy. In case of doubt, contact your legal counsel.
Notice
Install your machine near a supervised area to prevent illegal duplication from being made.
The management of documents and scanned data is the responsibility of the user. In particular, pay attention to the following points.
- Make sure you have the same number of pages for important documents both before and after scanning, and take care not to leave any pages in the scanner. • Periodically back up important data.
- When having your computer or hard disk serviced, or when disposing of your computer or hard disk, completely erase any stored image data.
■ Caution Labels

CAUTION

Be careful not to pinch your fingers when closing the door. It can cause injury.


■ Power turn-on sequence
1 Turn on the power of the scanner. • The power indicator (LED) will now light.

■ About the power indicator (LED)
The power indicator (LED) indicates the status of the scanner as follows:
| LED light Status | |
| Green Ready to scan or scanning | |
| Green (flashing) Sleep mode | |
| Orange Ready to scan or scanning with caution * 1 | |
| Orange (flashing) Initializing | |
| Red An error occurred * 2 |
*1 : The rollers need to be cleaned or replaced. Refer to Operating Instructions (CD-ROM) for the way of cleaning or replacing the rollers. *1, *2: Check the status of the scanner using the User Utility. The User Utility is included in the CD-ROM. Refer to "Installing Software" in the Installation Manual.
ADF (Auto Document Feeder) enables multiple sheet scanning.
Acceptable documents
Document size:

Paper thickness: 40–127 g/m 2
Smaller than A7 size: 127 g/m 4 (34 lbs.) only
Maximum number of sheets loadable on the hopper
| Page thickness (g/m2) | 40(11 lbs.) | 52(14 lbs.) | 64(17 lbs.) | 75(20 lbs.) | 80(21 lbs.) | 90(24 lbs.) | 104(28 lbs.) | 127(34 lbs.) |
| Maximum number of sheets | 320 | 260 200 | 170 160 | 140 120 | 100 |
- The number of sheets listed above is a guideline for when you are using fresh paper.
- The number of sheets depends on the paper quality. If a paper feed problem occurs, reduce the number of sheets of the document loaded on the hopper.
Recommendable paper: Plain paper
Documents must also meet the following conditions
| Curl |  |
| Folding |  |
For documents with mixed page sizes and thicknesses
| Document thickness | The ratio of page thickness between the thickest and thinnest pages must be less than 1.5. |
| Document size | The ratio of width and height between the largest page and smallest page must be less than 1.5. (The smallest page is A6.)Example: If the smallest page is A4 size, then the largest page can be up to A3 size, and if the smallest page is A6, then the largest can be A5. |
Unacceptable Documents
The following types of documents may not scan properly:
• Torn or frayed documents - Curled, wrinkled or folded documents - Carbon paper • Non-rectangular or irregularly shaped paper • Perforated or punched paper - Coated paper - Tracing paper - Thermal paper
Do not scan the following types of paper:
- Photographs
- OHP sheets, other plastic films, cloths, or metallic sheets
- Paper with irregularities such as paper clips, staples, paste, or glue
- Document with wet ink or cinnabar seal ink
- Thick or irregular documents such as envelopes, documents that are glued together, etc.
Notes about documents for scanning
- Depending on the paper type, scanning results may be poor when you scan unacceptable documents, or even documents that should be acceptable. If a paper jam or double feeding occurs, try scanning again after doing the following:
– Clean the rollers and sensors. - Reduce the number of sheets of paper loaded on the hopper. - Change the orientation of documents placed in portrait orientation to landscape orientation, or vice versa. - Scan the documents using manual feeding. - Set the feed speed to "Slow". - Scan the documents with the flatbed.
- Make sure to remove paper clips and staples from documents before scanning. Failing to do so can damage the unit, document, or both.

- Curled documents may cause a paper jam or damaging the document, therefore, set the document flat before scanning.
- When scanning important documents, confirm that the number of scanned images matches the number of pages in the document.
- Remove documents from the exit tray after they have been scanned.
■ Scanning documents with pages of same sizes
Cautions:
- Please remove any staples from the document before scanning.
- Glued or curled documents may cause a paper jam or damage the unit, so please scan using the flatbed.
1 Set the manual feed selector to [AUTO] or [MANUAL].
[AUTO]: Auto feeding [MANUAL]: Manual feeding
- When manually feeding a document, feed the document 1 page at a time.
- When scanning important documents or bound documents, feed them manually.
![[AUTO] Manual feed selector](/content/2026/05/847507/images/0e93266b42cd23ffa10c1d273f3a5ce0b9ababf2614e630560a1b9d6d2de30ca.jpg)
![[MANUAL] Manual feed selector](/content/2026/05/847507/images/e3218f97b2b0d75c7fc2007d5682f07636d9aa0e54e8fe7fe0150e09106b18e4.jpg)
2 Documents that have been stapled together or stacked together (as in a file folder) will need to be separated.
1 Fan the stack of documents to separate all the edges. 2 Hold both ends and bend the documents as shown in the illustration. 3 To flatten the documents, hold firmly and pull them apart as shown in the illustration.
Repeat these steps as necessary.

3 Carefully align the documents.
4 Adjust the document guides slightly larger than the actual size of the documents.

5 When using long paper, pull out the hopper extension tray from the hopper. Then raise and adjust the exit stopper to the position a little longer than the actual length of the document.

6
Place the documents on the hopper with the side to be scanned facing up. Then push them in the direction of the arrow until they stop.
- The amount of documents should not exceed the limit mark on the document guide. This may cause a paper jam or skew.


7 Adjust the document guide to the size of the document to be scanned. Adjust the exit stopper to the size of the document to be output.
- When scanning the document with the length between 420 mm (A3 size) or 432 mm (17 in.) and 2540 mm (100 in.) close the exit stopper.

8 Open your scanning application *1 and scan the documents.
*1 The software RTIV and QuickScan Pro demo, included with the scanner, can be used for scanning the documents.
■ Scanning documents with pages of different sizes
For conditions when scanning documents with mixed page sizes, see "For documents with mixed page sizes and thicknesses" (page 15).
- When scanning different size documents, scanned sheets may need to be reordered for optimum performance.
1 Set the manual feed selector to [AUTO].
![[AUTO] Manual feed selector](/content/2026/05/847507/images/d49db815d4b5627a7192d9a911092e2db17771748a955e57c18d15fdc393e5ab.jpg)
2 Documents that have been stapled together or stacked together (as in a file folder) will need to be separated.
①Fan the stack of documents to separate all the edges. ② Hold both ends and bend the documents as shown in the illustration. ③ To flatten the documents, hold firmly and pull them apart as shown in the illustration. Repeat these steps as necessary.

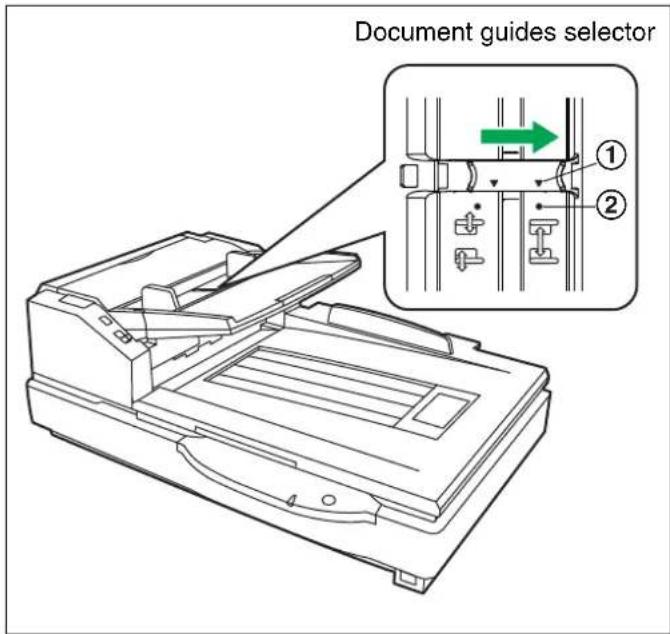
3 Unlock the document guide. Slide the document guides selector in the direction shown in the illustration until the ▼ (①) and ● (②) marks are aligned to unlock the document guide.

4 Align the document pages along one side.
![graph TD A["2"] --> B["2"] B --> C["2"]](/content/2026/05/847507/images/769e37139f56bffaeda6766ee2d8e87749867f3dd963df450b67cd0af1e6357c.jpg)
5 When using long paper, pull out the hopper extension tray from the hopper. Then raise and adjust the exit stopper to a position a little longer than the actual length of the document.

6 Align the document position so that the center of the smallest sheet will be fed to the center of the paper slot. If the document is not properly aligned, the pages will not be fed correctly.
- The amount of documents should not exceed the limit mark on the document guide. This may cause a paper jam or skew.
- Depending on the types of paper, the document may not be fed smoothly. In such case, reduce the number of sheets of the document.

7 Remove the document and lock the document guide.
Slide the document guides selector in the direction shown in the illustration until the ▼ (①) and ● (②) marks are aligned to lock the document guide.
8 Place the document on the hopper again and adjust the document guide according to the size of the document to be scanned.
• Make sure to align the document pages along one side. - Make sure that the center of the smallest sheet of the document will be fed to the center of the paper slot.
9 Open your scanning application *1 and scan the documents.
*1 The software RTIV and QuickScan Pro demo, included with the scanner, can be used for scanning the documents.
■ Adjusting the left and right document guides to their original position
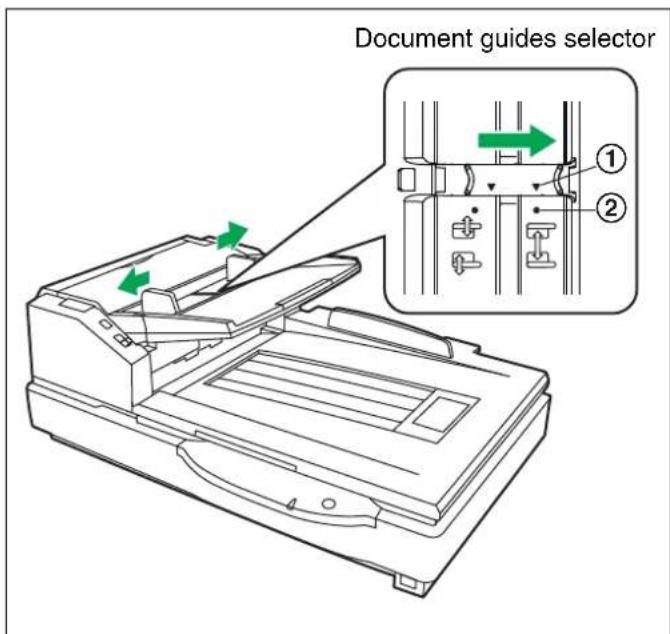
1 Unlock the document guide. Slide the document guides selector in the direction shown in the illustration until the ▼ (①) and ● (②) marks are aligned to unlock the document guide.

2 Completely spread apart the document guides.
3 Lock the document guide. Slide the document guides selector in the direction shown in the illustration until the ▼ (①) and ● (②) marks are aligned to lock the document guide.
Loading Documents on the Flatbed
One sheet or an entire book document can be scanned on the document glass. Scanning documents in this way is known as "scanning with the flatbed".
Caution
- Do not place printed materials containing magnetic ink characters or magnetic strip cards on the flatbed. Magnets are located in the flatbed cover (flatbed sheet) and may damage data stored on printed materials and cards.
■ When scanning with the flatbed
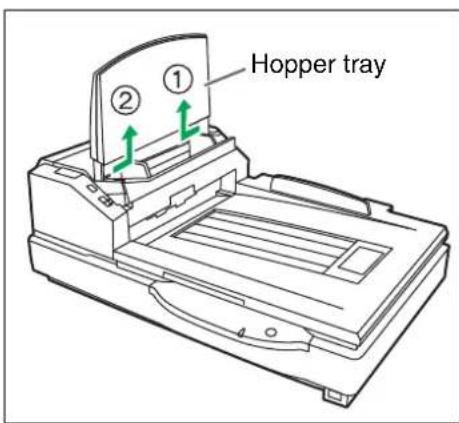
1 Raise the hopper tray.
2 Open the document cover.

3 Place the scanning side of the document face down on top of the flatbed glass towards the upper left corner.
- If the document is bent or folded, straighten it.
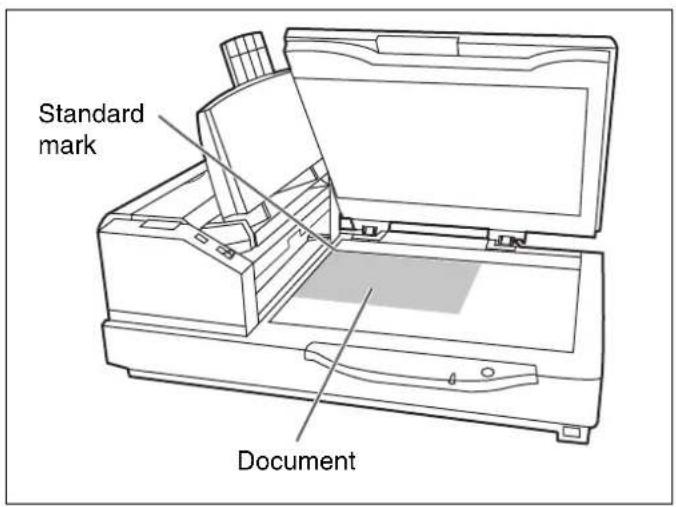
4 Match the shorter side of the document with the left edge of the flatbed glass.
5 Match the longer side of the document with the standard mark.
- If the document is slanted, it will not be scanned properly.

6 Close the document cover gently.
- If the document cover is slammed, the document will move and may not be scanned properly.
- Do not open or press down on the document cover during scanning.
- Be sure to close the document cover before use.
- After scanning, open the document cover and remove the document.

7 Open your scanning application *1 and scan the documents.
*1 The software RTIV and QuickScan Pro demo, included with the scanner, can be used for scanning the documents.
■ Scanning thick documents
When scanning thick documents such as a book, please note the following items:
- Please note that areas of the document which are not touching the flatbed glass will not be scanned properly.
- If the document moves during scanning, please note that it will not be scanned properly.
Using Control Sheets
By using control sheets, you can change the scanning conditions in the middle of scanning. Placing a control sheet in the middle of a document lets you change the scanning conditions for all pages scanned after the control sheet. Control sheets are located on the included CD-ROM.

Control sheet functions
Simplex, Duplex, Binary, 256 level gray, Color, Dynamic Threshold, Dither, Error diffusion, Function #1- #9, Separation Sheet
- Multiple control sheets can be used.
- To use control sheet functions, your scanning application must support control sheets. When using control sheets, refer to the instruction manual of your scanning application.
- Print out control sheets from the provided CD-ROM.
■ About Printing Control Sheets
- Print the control sheet at the specified size; do not enlarge or reduce the size.
- When printing the control sheet, make sure that the pattern is 25 mm (1 in.) from the top of the page and centered horizontally.

- Use the control sheet that is the same size as the document you are scanning.
- Be careful not to get the control sheet dirty. Do not fold or crease the control sheet. Scanning will not be performed properly.
- For details on control sheet and separation sheet, refer to section "2.40 Detect Control Sheet" in the PIE Reference Manual.
■ Printing control sheets
- In order to print control sheets, Adobe Reader must be installed on your computer.
- Refer to the instruction manual for your printer for details about changing print settings.
1 Insert the CD-ROM into the CD/DVD driver on your computer.
- If you have a feature called "Autorun" activated, the installation process will start automatically.
- The setup window will appear.
- If the AutoPlay dialog box is displayed in Windows Vista, select "CDRun.exe".
- If the program does not start automatically, from [My Computer] ([Computer] in Windows Vista), select the CD/DVD drive, and then double-click "CDRun.exe".
2 Select your scanner. 3 Select [Control Sheet] from the [Manuals] list on the right side of the screen. 4 Print the control sheets at the same size as your document.
Changing the Reference Plate Setting
You can choose a background color to be scanned from white (black) to black (white). The scanner comes from factory set to black. The reference plate (B), reference plate (F) and flatbed sheet setting must be changed simultaneously. Anytime the background color is changed from its previous setting, the shading adjustment must be performed. Please refer to page 47 for more information regarding the shading adjustment.
■ ADF reference plate setting
1 Turn off the scanner.
2 Pull the exit door release to open the exit door.

3 Using your finger, turn the reference plate (B) over.
- Confirm that the reference plate has changed and is locked in its proper position.

4 Using your finger, turn the reference plate (F) over.
- Confirm that the reference plate has changed and is locked in its proper position.
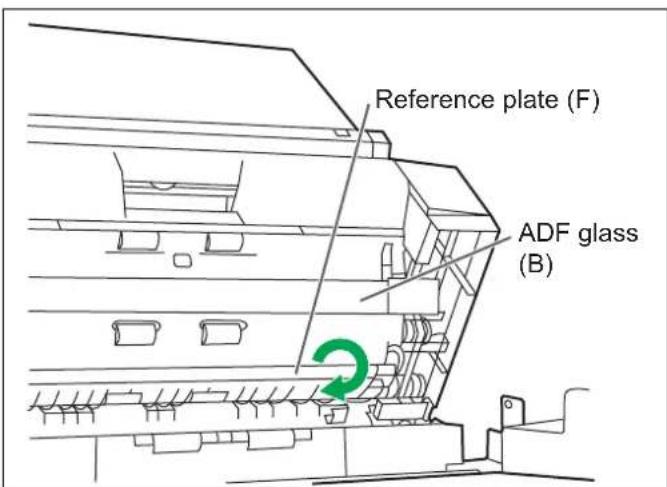
5 Close the exit door slowly until it clicks into place.

Flatbed sheet setting
1 Turn off the scanner. 2 Fold the hopper tray in the direction of the arrow (①). 3 Open the document cover (②) and remove the flatbed sheet from the flatbed cover (③).
- The flatbed sheet is attached to the document cover with magnets.

4 Turn the flatbed sheet over, and then place it in the upper left corner of the flatbed glass.
- Set the flatbed sheet to the left.

5 Close the document cover.
- When you close the document cover, close it securely until it is locked. The flatbed sheet will become magnetically attached to the document cover.
Torn documents, thin documents or documents that are creased on the top edge may cause paper jams. If a paper jam occurs, remove the jammed sheet according to the following procedure.
■ Removing paper jams from the paper slot
1 Push the ADF door release to open the ADF door.

2 Pull the jammed document towards the paper slot.
- When the jammed paper cannot be removed, remove it from the exit path. Refer to page 31.
- When only the bottom end of jammed paper is visible, open the exit door while leaving the ADF door open to remove the jammed paper. Pulling the jammed paper with the ADF door closed may damage the document.
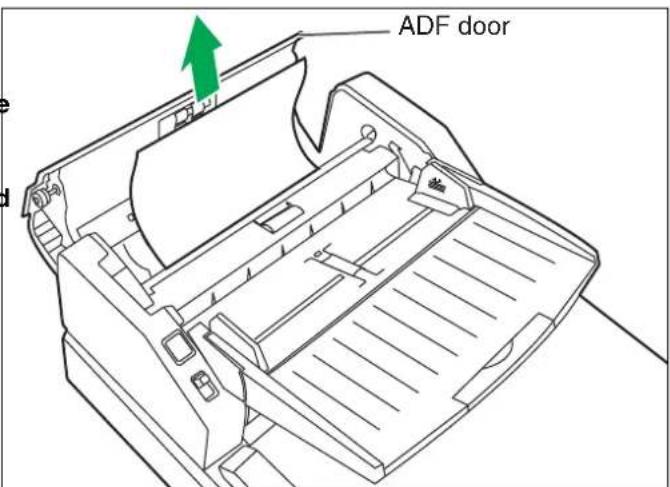
3 Close the ADF door.
- When you close the ADF door, close it securely until it is locked.

■ Removing paper jams from the exit path
1 Pull the exit stopper and raise the hopper tray.

2 Pull the exit door release, open the exit door and pull the jammed document.
- When the jammed paper cannot be removed, remove it from the paper slot. Refer to page 30.

3 Close the exit door.
- When you close the exit door, close it securely until it is locked.

■ Outside of the scanner
- Do not use thinner, benzine, or cleaners containing abrasives or surfactants, for cleaning the outside of scanner.
- Clean the unit at least once a month.
1 Turn the power off. 2 Clean the cover with a soft cloth.
- The ADF insertion and exit slots get dirty easily, therefore, proper cleaning is required.
3 Remove dirt and dust from the fan exhaust vent with a brush.

Inside the scanner
Clean the unit at least once a week or when 20,000 sheets have been scanned, whichever comes first.
- Clean the rollers, sensors and double feed detector if paper jamming or multiple-sheet feeding occurs frequently. (Refer to pages 33–39.)
- Clean the ADF glass, reference plate when black or white lines appear on the scanned images. (Refer to page 37.)
- Clean the flatbed glass and document cover detector. (Refer to page 40.)
- If the documents you scan are dirty, then the scanner components will also become dirty. To maintain proper scanning, clean the scanner components frequently.
- When scanning with the flatbed and black dots or white patches occurs, open the document cover, and clean the flatbed glass and flatbed sheet using the accessory roller cleaning paper.
Roller cleaning paper
Open the bag on the dotted line and take out the roller cleaning paper.
- If the roller cleaning paper bag is left opened for a long period of time before using it, the alcohol will evaporate. Please use the roller cleaning paper immediately after opening the bag.

※The roller cleaning paper (Model No. KV-SS03) is available from the dealer where you purchased your scanner. For supplies and accessories: Call 1-866-823-0002 (U.S.A. only) or your dealer.
■ Cleaning the paper feed roller, separation roller, and double feed prevention roller
1 Turn the power off. 2 Push the ADF door release to open the ADF door.

3 Use the roller cleaning paper (KV-SS03) to remove the dirt from the surfaces of the paper feed roller and separation roller.
Note:
- When wiping off the dirt on the roller surfaces, hold the rollers to prevent them from rotating, and wipe the roller all the way around them proceeding from one end to the other in the direction of the arrows shown in the figure.

4 Open the double feed prevention conveyor in the direction of the arrow shown in the figure by using the indent on the back side.

5 Use the roller cleaning paper (KV-SS03) to remove the dirt from the surface of the double feed prevention roller.
Note:
- When wiping off the dirt on the roller surfaces, hold the rollers to prevent them from rotating, and wipe the roller all the way around them proceeding from one end to the other in the direction of the arrows shown in the figure.

6 Close the double feed prevention conveyor in the direction of the arrow shown in the figure.
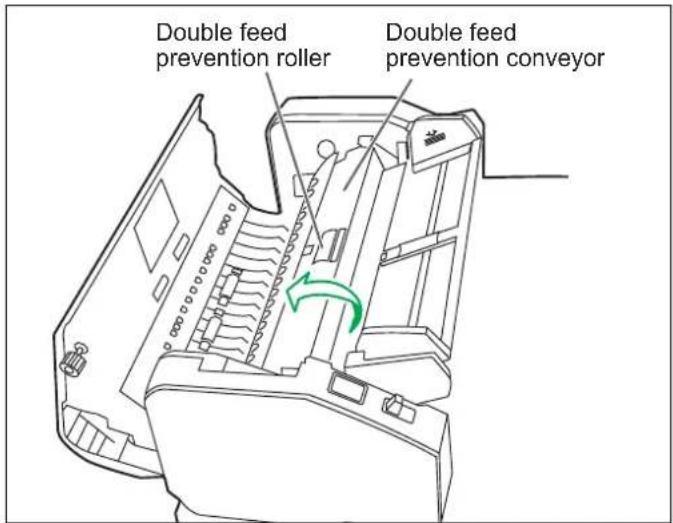
7 Close the ADF door.
- When you close the ADF door, close it securely until the door is locked.
8 Clear the roller cleaning counter with User Utility.
- After cleaning the above rollers, click [Clear Counter] button for [After Clean Roller] with User Utility.

■ Cleaning the drive rollers and free rollers
1 Turn the power off. 2 Push the ADF door release to open the ADF door. 3 Use the roller cleaning paper (KV-SS03) to remove the dirt from the surfaces of the 4 drive rollers.
- When wiping off the dirt on the roller surfaces, hold the rollers to prevent them from rotating, and wipe the roller all the way around them proceeding from one end to the other in the direction of the arrows shown in the figure.

4 Use the roller cleaning paper (KV-SS03) to remove the dirt from the surfaces of the 4 free rollers.
- When wiping off the dirt on the roller surfaces, hold the rollers to prevent them from rotating, and wipe the roller all the way around them proceeding from one end to the other in the direction of the arrows shown in the figure.
5 Close the ADF door.
- When you close the ADF door, close it securely until it is locked.

■ Cleaning the drive rollers, free rollers, and exit rollers
1 Turn off the scanner. 2 Pull the exit door release to open the exit door.

3 Use the roller cleaning paper (KV-SS03) to remove the dirt from the surfaces of the 4 drive rollers and the 2 exit rollers.
- When wiping off the dirt on the roller surfaces, hold the rollers to prevent them from rotating, and wipe the roller all the way around them proceeding from one end to the other in the direction of the arrows shown in the figure.

4 Use the roller cleaning paper (KV-SS03) to remove the dirt from the surfaces of the 6 free rollers.
- When wiping off the dirt on the roller surfaces, hold the rollers to prevent them from rotating, and wipe the roller all the way around them proceeding from one end to the other in the direction of the arrows shown in the figure.

5 Close the exit door.
- When you close the exit door, close securely until it is locked.

■ Cleaning the reference plates and ADF glasses
1 Turn off the scanner. 2 Pull the exit door release to open the exit door. 3 Clean the ADF glass (F) and reference plate (B) with the roller cleaning paper (KV-SS03).

4 Clean the ADF glass (B) and reference plate (F) with the roller cleaning paper (KV-SS03). 5 Close the exit door.
- When you close the exit door, close it securely until it is locked.

■ Cleaning the paper and waiting sensors, double feed detector
How to clean sensors (detectors) and reflectors.
Remove the brush from the accessory blower and blow off the dirt with the blower.

1 Turn off the scanner. 2 Push the ADF door release to open the ADF door. 3 Blow off the dirt on the surface of the paper sensor and waiting sensor with an accessory blower. 4 And also blow off the dirt on the surface of the reflector sheet for the waiting sensor with the accessory blower.

5 Blow off the dirt from the double feed detector (G) and double feed detector (R) with the accessory blower. 6 Close the ADF door.
- When you close the ADF door, close it securely until it is locked.

■ Cleaning the starting, skew and ending sensors
How to clean sensors (detectors) and reflectors.
Remove the brush from the accessory blower and blow off the dirt with the blower.

1 Turn off the scanner. 2 Pull the exit door release to open the exit door. 3 Blow off the dirt on the surface of the starting, skew (L), skew (R), and ending sensors with the accessory blower.

4 And blow off the dirt from the reflector sheets for the starting, skew (L), skew (R), and ending sensors with the blower. 5 Close the exit door.
- When you close the exit door, close it securely until it is locked.

■ Cleaning the flatbed glass and document cover detector
How to clean sensors (detectors).
Remove the brush from the accessory blower and blow off the dirt with the blower.

1 Turn off the scanner. 2 Fold the hopper tray in the direction of the arrow. 3 Open the document cover.

4 Clean up the surface of flatbed glass with the roller cleaning paper (KV-SS03) to remove the dirt. (Also clean up the surface of the flatbed sheet, as required.) 5 Blow off the dirt from the document cover detector. 6 Close the document cover and put back the hopper tray to the original position.

Replacing Consumable Roller Modules
■ Replacing paper feed roller modules
Recommended change: 300,000 scans
1 Turn the power off. 2 Push the ADF door release to open the ADF door.

3 Pull down the paper feed roller module in the direction of the arrow.

4 Remove the paper feed roller module as shown on the figure. 5 Open the optional roller exchange kit (KV-SS015), and take out the new paper feed roller module.

6 Install the new paper feed roller module.

7 Push the new paper feed roller module upwards in the direction of the arrow, so that it is locked by the magnets on both sides.
8 Close the ADF door. - When you close the ADF door, close it securely until it is locked.

■ Replacing Double Feed Prevention Roller
1 Turn the power off. 2 Push the ADF door release to open the ADF door.

3 Open the double feed prevention conveyor in the direction of the arrow shown in the figure by using the indent on the back side.

4 Remove the double feed prevention roller, pulling up the shaft in the direction of the arrow. 5 Take out the new double feed prevention roller in the optional roller exchange kit (KV-SS015).

6 Install the new double feed prevention roller by matching the groove of its shaft with the groove of the metal holder.

7 Close the double feed prevention conveyor. 8 Close the ADF door.
- When you close the ADF door, close it securely until it is locked. 9 Clear the roller replacing counter with User Utility.
- Click [Clear Counter] button for [After Replace Roller] with User Utility.
If a problem occurs while the unit is being used, check the following items and check the scanner status with the User Utility. If the unit still malfunctions, turn it OFF, unplug the power cord and call for service.
| Symptom Possible Cause Remedy | ||
| The power indicator (LED) does not light when the power switch is turned ON. | The power cord is not plugged in. Insert | the power plug firmly. |
| Problem with power supply. | Disconnect the scanner from the electric outlet and call for service. | |
| The computer does not recognize the scanner. | The scanner is not connected to the computer correctly. | Connect the cables correctly. |
| The scanner is not registered correctly. | Uninstall the scanner from the computer.Register the scanner hardware again.(Refer to "Installing Software" in the Installation Manual.) | |
| The USB interface of the computer is not installed correctly. | Check the computer whether the USB interface of your computer is installed correctly using the device manager's property. | |
| The scanner is connected via USB hub. | Do not connect via USB hub. | |
| There is a problem with the USB cable. | Use the included USB cable or a certified Hi-speed USB 2.0 cable. | |
| Scan speed is slow at USB connection. | The scanner is connected with USB 1.1. | Connect with USB 2.0. |
| The ADF does not open when the ADF door release is pushed. | The ADF door is not closed properly. | Push the ADF door release again after you close the ADF door until it is locked. |
| (ADF)The document has been loaded on the hopper tray.But the scanner does not start scanning. | The document is not loaded properly. | Load the document correctly.(See page 14.) |
| The sensor cannot detect the document as the edge of the document is curled. | Flatten the document and load it again. | |
| (ADF)Double feeding problems occurs frequently or the scanner stops loading while scanning. | The rollers are dirty. | Clean all of the rollers. (See page 33.) |
| The rollers have reached their life expectancy. | Replace the paper feed roller module and the double feed prevention roller module. (See page 41 and page 43.) | |
| The document is curled or folded. | Flatten the document and load it again after reducing the pages. | |
| The document is printed on an unsupported type of paper or thick paper. | Make a copy of the document on paper of an acceptable type and thickness (See page 14), and scan the copy. | |
| The document has a length of less than 70 mm (2.75 in.). | Make a copy of the document on paper of the specified size and scan the copy.(See page 14.) | |
| (ADF)Scanned image is aslant. | The document guides are not adjusted to the size of the document to be scanned. The document to be scanned is set aslant on the hopper tray. | Adjust the document guides properly to the size of the document to be scanned. |
| Right and left sides of the document to be scanned are not the same in height, because of curl and fold. | Remove curl and fold then reduce the amount of the document. | |
| (ADF)The scanned document is blank. | The document to be scanned was loaded face down (upside down). | Load the document correctly.(See page 18.) |
| Vertical lines appear on the scanned document. | The ADF glasses and flatbed glass are dirty. | Clean the ADF glasses and flatbed glass. (See page 37.) |
| The reference plate and flatbed sheet are dirty. | Clean the reference plate and flatbed sheet. (See page 37 and page 40.) | |
| The scanning density is uneven. | The ADF glass, reference plate, flatbed glass and flatbed sheet are dirty. | Clean the ADF glass, reference plate, flatbed glass and flatbed sheet. (See page 37 and See page 40.) |
| The quantity distribution of light varies. | Adjust shading. Please refer to section 4.6 of a user utility reference manual. | |
| The color of the scanned document is extremely different from the original document. | The settings of the computer monitor is wrong. | Adjust the computer monitor settings. |
| Dark spots or noise appear on the scanned documents. | The ADF glass, reference plate, flatbed glass and flatbed sheet are dirty. | Clean the ADF glass, reference plate, flatbed glass and flatbed sheet. (See page 37 and See page 40.) |
| Scanned image has moire fringes such as stripe or wavy pattern noise. | It is caused by printing pattern of the document and the congeniality of the scanning resolution. | Please use the moire reduction function or change the resolution and try to scan. |
If you still experience problems after following these suggestions, please contact our Technical Support Department at 1-800-726-2797 for further assistance. (U.S.A. only)
●What is the purpose of the shading adjustment?
The shading adjustment function corrects variations in the lamp intensity and pixel sensor sensitivity, and reduces unevenness in density in scanned images. It can be carried out by means of the User Utility using the special shading paper, which is provided with this scanner.
●When shading adjustment is required
Proceed with the compensation when the colors in some parts of the scanned images differ in the extreme, or when the image quality fails to be improved even after the inside of the scanner is cleaned.
●Before proceeding with the shading adjustment
Before proceeding, be absolutely sure to thoroughly clean the ADF glass (F) area, ADF glass (B) area, reference plate (F) and reference plate (B) as well as the transport path and drive rollers of the scanning unit. If the shading adjustment is carried out while these parts are still dirty, it will not be possible to eliminate the lines that form on the scanned images.
●Shading adjustment procedure
- Start the User Utility.
- Click "User Shading" on the main menu, and operate as the image display dictates. For further details, refer to section 4.6 in the User Utility Reference Manual.
Caution
If the scanned images are still lined after the shading adjustment has been performed and if these lines are not eliminated even after the ADF glass areas have been cleaned, it means that the shading has not been compensated properly. Clean the parts again, and then proceed with the shading adjustment.
Repacking Instructions
It is highly recommended that you keep the original carton and ALL packing materials. If you need to transport or ship your scanner, please follow these instructions:
- Use the original carton and all of the original packing materials.
- Improper repacking of the scanner may result in a service charge to repair the unit.
- The scanner should be handled in the correct (horizontal) position.
Materials Required:
• Original scanner carton & packing materials • Shipping tape and scissors
1 Turn the power switch off and disconnect your scanner from the electrical outlet and USB cable. 2 Remove the hopper tray and attach the protective sheets with tapes. 3 Pack the scanner.

| Item\Model No. | KV-S7075C | ||
| Scanner Scanning face Duplex scanning | |||
| Scanning method CIS (Contact-type color Image Sensor) | |||
| Readout speed*1(landscape)(Binary/color) | |||
| Flatbed | |||
| ADF | |||
| Simplex (200 dpi)Duplex (200 dpi)Letter: Approx. 95 pages/min.Letter: Approx. 190 images/min.A4: Approx. 95 pages/min.A4: Approx. 190 images/min.Simplex (300 dpi)Duplex (300 dpi)Letter: Approx. 82 pages/min.Letter: Approx. 164 images/min.A4: Approx. 82 pages/min.A4: Approx. 164 images/min. | |||
| Readout speed*1(portrait)(Binary/color) | |||
| Flatbed | |||
| ADF | |||
| Simplex (200 dpi)Duplex (200 dpi)Letter: Approx. 80 pages/min.Letter: Approx. 160 images/min.A4: Approx. 75 pages/min.A4: Approx. 150 images/min.Simplex (300 dpi)Duplex (300 dpi)Letter: Approx. 66 pages/min.Letter: Approx. 132 images/min.A4: Approx. 62 pages/min.A4: Approx. 124 images/min. | |||
| Resolution Flatbed/ADF | |||
| Main scanning direction: 100-600 dpi (1 dpi step)Sub-scanning direction: 100-600 dpi (1 dpi step)The optical resolution is 600 dpi. | |||
| Tonal gradation | |||
| Image control | |||
| Paper | |||
| Size for Flatbed | |||
| Size for ADF | |||
| Thickness for ADF | |||
| Weight for ADF | |||
| Hopper capacity 200 sheets [64 g/m2(17 lbs.)] | |||
| Unit External dimensions (Width × Depth × Height) | 755 × 508 × 289 mm (29.7 × 20 × 11.4 in.) | ||
| Operating Environment | Operating temperature and humidity | 15 °C to 30 °C (59 °F to 86 °F), 30 % to 80 % RH | |
| Storage Environment | Storage temperature and humidity | 0 °C to 40 °C (32 °F to 104 °F), 10 % to 80 % RH | |
| Option | Roller exchange kit (KV-SS015), Imprinter unit (KV-SS014), Ink cartridge (KV-SS021), Roller cleaning paper (KV-SS03) | ||
*1 The scanning speed differs depending on the host computer, operating system, application, the data quantity of the image, and paper type.
- “Weight in pounds” of paper represents the weight of 500 [432 × 559 mm (17 × 22 inches)] sheets.
A
AC inlet....11 Acceptable documents ..... 14 Accessories 32 ADF door 11,30,33 ADF door release 11, 30, 33 ADF glass.... 12,37
B
Back stopper.... 11 Blower....38, 39, 40
C
CD-ROM....9,48 Cleaning the unit.... 32–40 Component identification ..... 11 Computer 3 Control sheets. 26 CPU 3
D
Document cover 11, 29 Document cover detector 40 Document guide ..... 11, 17, 19, 21 Document guides selector ..... 11, 20, 23 Double feed detector 38 Double feed prevention conveyor. 33, 34, 43 Double feed prevention roller ..... 33, 43 Drive rollers. 35, 36
E
Ending sensors.... 39 ENERGY STAR 2 Exit door 11, 28, 31 Exit door release.... 12, 28, 39 Exit rollers.... 36 Exit stopper.... 11 Exit tray....11, 15 External dimensions 50
F
FAN exhaust vent 11,32 Flatbed....24, 29, 49 Flatbed glass 12, 32, 40 Flatbed sheet.... 12, 29, 40 Free rollers.... 35, 36
H
Hard disk 3 Hopper....11, 17, 21 Hopper extension tray ..... 11, 17, 21 Hopper tray 11,24
|
Image control 49 Imprinter door.... 11 Interface.... 3
L
Landscape 18 LED 13,45 Limit mark 18,21 Loading Documents.... 14, 24
M
Manual feed selector ..... 11, 16, 20 Memory 3 Mixed paper conditions 15
0
Operating Environment 50 Operating system.... 3 Option 50
Page Page
P
Paper 49 Paper feed roller....33, 41 Paper jams 30 Paper sensor 38 Paper slot 30 Portrait 18 Power consumption 50 Power cord 6, 11, 48 Power indicator.... 11, 13 Power requirement 50 Power switch.... 11, 13 Precautions....9
R
Reference plate 12, 28, 37 Repacking 48 Replacing Consumables 41 Roller cleaning paper 6, 9, 32
S
Separation roller 33 Shading 46, 47 Shading paper 48 Specifications 49 Start/Stop button 11 Starting sensor 39 System Requirements 3
T
Top cover 11 Troubleshooting 45
U
Unacceptable documents 15 USB connector 11 USB hub 3, 45 User utility 13, 34, 44, 47
W
Waiting sensor 38
Panasonic Communications Company of North America Unit of Panasonic Corporation of North America
One Panasonic Way, Secaucus, New Jersey 07094
Panasonic Canada Inc.
5770 Ambler Drive, Mississauga, Ontario, L4W 2T3
Panasonic Business Systems U.K.
A Division of Panasonic U.K. Ltd.
Willoughby Road, Bracknell, Berkshire, RG12 8FP
Panasonic Marketing Europe GmbH
Hagenauer Strasse 43, 65203 Wiesbaden, Germany
For information on compliance with relevant EU regulatory directives, contact the authorized representative:
Directives, Contact to Authorised Representative:
Panasonic Marketing Europe GmbH
Winsbergring 15, 22525 Hamburg, Germany
Panasonic Corporation
Web Site: http://panasonic.net
Web Site: http://panasonic.net


- HIGH SPEED COLOR SCANNER
- INTRODUCTION
- ABOUT THE DOCUMENTATION
- ABBREVIATIONS
- TRADEMARKS
- INTERNATIONAL ENERGY STAR PROGRAM
- SYSTEM REQUIREMENTS
- NOTE
- FEDERAL COMMUNICATIONS COMMISSION REQUIREMENTS (FOR UNITED STATES ONLY)
- FOR FRG USERS (FOR GERMANY ONLY)
- WARNING
- CAUTION
- FOR USERS
- POWER AND GROUND CONNECTION
- OPERATING SAFEGUARDS
- ROLLER CLEANING PAPER
- POWER
- INSTALLATION AND RELOCATION OPERATING SAFEGUARDS
- LED LIGHT: DO NOT VIEW DIRECTLY WITH OPTICAL INSTRUMENTS. CLASS 1M LED PRODUCT
- SAFETY INFORMATION (FOR UNITED KINGDOM ONLY)
- IMPORTANT
- HOW TO REPLACE THE FUSE
- INSTALLATION
- CD-ROM
- OTHERS
- ILLEGAL DUPLICATION ■ SECURITY NOTICE
- IT IS UNLAWFUL TO MAKE DUPLICATION OF CERTAIN DOCUMENTS
- NOTICE
- CAUTION LABELS
- POWER TURN-ON SEQUENCE
- ABOUT THE POWER INDICATOR (LED)
- ACCEPTABLE DOCUMENTS
- DOCUMENTS MUST ALSO MEET THE FOLLOWING CONDITIONS
- UNACCEPTABLE DOCUMENTS
- NOTES ABOUT DOCUMENTS FOR SCANNING
- SCANNING DOCUMENTS WITH PAGES OF SAME SIZES
- CAUTIONS
- SCANNING DOCUMENTS WITH PAGES OF DIFFERENT SIZES
- ADJUSTING THE LEFT AND RIGHT DOCUMENT GUIDES TO THEIR ORIGINAL POSITION
- LOADING DOCUMENTS ON THE FLATBED
- WHEN SCANNING WITH THE FLATBED
- SCANNING THICK DOCUMENTS
- USING CONTROL SHEETS
- CONTROL SHEET FUNCTIONS
- ABOUT PRINTING CONTROL SHEETS
- PRINTING CONTROL SHEETS
- CHANGING THE REFERENCE PLATE SETTING
- ADF REFERENCE PLATE SETTING
- FLATBED SHEET SETTING
- REMOVING PAPER JAMS FROM THE PAPER SLOT
- REMOVING PAPER JAMS FROM THE EXIT PATH
- OUTSIDE OF THE SCANNER
- INSIDE THE SCANNER
- CLEANING THE PAPER FEED ROLLER, SEPARATION ROLLER, AND DOUBLE FEED PREVENTION ROLLER
- CLEANING THE DRIVE ROLLERS AND FREE ROLLERS
- CLEANING THE DRIVE ROLLERS, FREE ROLLERS, AND EXIT ROLLERS
- CLOSE THE EXIT DOOR
- CLEANING THE REFERENCE PLATES AND ADF GLASSES
- CLEANING THE PAPER AND WAITING SENSORS, DOUBLE FEED DETECTOR
- HOW TO CLEAN SENSORS (DETECTORS) AND REFLECTORS
- CLEANING THE STARTING, SKEW AND ENDING SENSORS
- CLEANING THE FLATBED GLASS AND DOCUMENT COVER DETECTOR
- HOW TO CLEAN SENSORS (DETECTORS)
- REPLACING CONSUMABLE ROLLER MODULES
- REPLACING PAPER FEED ROLLER MODULES
- REPLACING DOUBLE FEED PREVENTION ROLLER
- ●WHAT IS THE PURPOSE OF THE SHADING ADJUSTMENT
- ●WHEN SHADING ADJUSTMENT IS REQUIRED
- ●BEFORE PROCEEDING WITH THE SHADING ADJUSTMENT
- ●SHADING ADJUSTMENT PROCEDURE
- REPACKING INSTRUCTIONS
- MATERIALS REQUIRED
- A
- B
- C
- D
- E
- F
- H
- L
- M
- PAGE PAGE
- P
- R
- S
- T
- U
- W
- PANASONIC COMMUNICATIONS COMPANY OF NORTH AMERICA UNIT OF PANASONIC CORPORATION OF NORTH AMERICA
Brand : PANASONIC
Model : KV-S7075C
Category : Scanner