
KV-S8127 - Scanner PANASONIC - Free user manual and instructions
Find the device manual for free KV-S8127 PANASONIC in PDF.


| Product Type | Document Scanner |
| Brand | Panasonic |
| Model | KV-S8127 |
| Scan Speed (Color/BW) | 120 ppm / 240 ipm |
| Optical Resolution | 600 x 600 dpi |
| ADF Capacity | 300 sheets |
| Dimensions (W x D x H) | 540 x 515 x 260 mm |
| Weight | 17 kg |
| Power Supply | AC 100-240 V, 50/60 Hz |
| Power Consumption (Operating) | 90 W |
| Interface | USB 3.0, Ethernet |
| Supported Media | Paper, ID cards, Plastic cards |
| Duplex Scanning | Yes, Built-in |
| Daily Duty Cycle | Up to 50,000 scans |
| Document Feeder Type | Automatic Document Feeder (ADF) |
| Operating Temperature | 15°C to 30°C |
| Humidity Range | 20% to 80% RH |
| Noise Level | < 60 dB (A) |
| Supported Operating Systems | Windows, Mac (limited) |
| Scanner Software | Panasonic Image Enhancement, ISIS/TWAIN drivers |
| Maintenance | Periodic cleaning of rollers and glass; replaceable roller kit available |
| Safety Standards | UL, CE, FCC Class A |
| Spare Parts Availability | Rollers, pick-up tires, separation pads, power adapter |
| Repairability | Authorized service centers recommended; user-replaceable consumables |
Frequently Asked Questions - KV-S8127 PANASONIC
Do not use abrasive cleaners.
User questions about KV-S8127 PANASONIC
0 question about this device. Answer the ones you know or ask your own.
Ask a new question about this device
Download the instructions for your Scanner in PDF format for free! Find your manual KV-S8127 - PANASONIC and take your electronic device back in hand. On this page are published all the documents necessary for the use of your device. KV-S8127 by PANASONIC.
USER MANUAL KV-S8127 PANASONIC
Operating Manual
Document Scanner
Model No. KV-S8147
KV-S8127
These instructions contain information on operating the scanner. Before reading these instructions, please read the Quick Installation Guide enclosed with this unit.
Keep all documentation in a safe place for future reference.
Current model availability depends on your country/area. Please contact your dealer.
Introduction
Thank you for purchasing a Panasonic Document Scanner.
Trademarks
- Microsoft®, Windows®, and Windows Vista® are either registered trademarks or trademarks of Microsoft Corporation in the United States and/or other countries.
- ISIS is a registered trademark or trademark of EMC Corporation in the United States and/or other countries.
- IBM® is a trademark of International Business Machines Corporation, registered in many jurisdictions worldwide.
- Intel® and Intel Core™ are trademarks of Intel Corporation or its subsidiaries in the U.S. and/or other countries.
- Adobe® and Reader® are either registered trademarks or trademarks of Adobe Systems Incorporated in the United States and/or other countries.
- All other trademarks identified herein are the property of their respective owners.
About the Descriptions in This Manual
- Windows refers to the Microsoft Windows operating system (hereafter Windows).
- Windows XP refers to the Microsoft Windows XP operating system (hereafter Windows XP).
- Windows Vista refers to the Microsoft Windows Vista operating system (hereafter Windows Vista).
- The screen shots used in this manual may differ from the screens displayed on your computer.
- Letter size: This is the standard paper size of 8.5 in. × 11 in. used in the United States and/or other countries.
- A4 size: This is a standard paper size of 210 mm × 297 mm.
- dpi (dots per inch): This is the number of dots per inch. This unit is used for scanning and printing resolution. The higher the dpi value is, the higher the resolution becomes.
- lb.: "Weight in pounds" of paper represents the weight of 500 (432 mm × 559 mm [17 in. × 22 in.]) sheets.
Note
- Locations represented with page numbers in ( ) include a link to that location. When using Adobe Reader (version 11), if you press the [Alt] key and the [←] key at the same time after moving to a referenced page, you can return to the previous page. For details about using Reader, see the Reader's help.
About the Documentation
The scanner documentation consists of 2 manuals: the Operating Manual (this manual), and the Quick Installation Guide.
| Operating Manual(this manual) | This manual provides information about the operation of the unit. |
| Quick Installation Guide | The Quick Installation Guide explains about safety precautions and other important information, and outlines brief installation procedures of the unit and software. |
About the Software Help
Each software contains help files.
For details about viewing the help files, see "4.4.2 To view the help" (page 19).
Software / Manual CD-ROM Contents
| Drivers | Device Driver |
| TWAIN | |
| ISIS | |
| Applications Image Capture Plus *1 | |
| Utilities | User Utility |
| Scan Button Setting Tool | |
| Documents*2 | Operating Manual |
| Control sheet*3 | |
*1 Image Capture Plus is a Panasonic original application for configuring advanced scanning settings. *2 Each document is a PDF document. To view documents correctly, install Adobe Reader. *3 For details about the control sheet, see "7.5 Using Control Sheets" (page 62).
System Requirements
| Computer IBM PC/AT or compatible machine with a CD-ROM drive | |
| CPU Intel Core 2 Duo 1.8 GHz or higher | |
| Interface USB 2.0 / USB 3.0 | |
Note
- For details about the system requirements, refer to [ Read me first] in the Software / Manual CD-ROM.
- The scanning speed differs depending on the host computer's operating environment or the application used.
- Due to the slower speed of USB 1.1, it is recommended to use a USB 2.0 / USB 3.0 interface.
- If you connect the unit to a USB hub, it is not guaranteed to work.
About Consumables and Optional Accessories
Consumables
| Part Name Part Number Notes | ||
| Roller exchange kit KV-SS064 | See "9.3 Replacing the Rollers" (page 77). | |
| Roller cleaning paper KV-SS03 | See "Roller Cleaning Paper" (page 9). | |
| Ink cartridge KV-SS021 | See "10.1 Installing the Imprinter Unit and Ink Cartridge" (page 83). |
Optional Accessories
| Part Name Part Number Notes | |
| Imprinter unit KV-SS014 |
Note
- To purchase separately sold items, contact your dealer.
Table of Contents
1 Feature Highlights 7
2 Before You Start 8
2.1 Precautions 8
2.2 Check the Accessories 10
3 Location of Controls 11
3.1 Main Unit 11
3.1.1 Front 11
3.1.2 Rear 12
4 Installation 13
4.1 Required Space Around the Scanner 13
4.2 Installing the Software 14
4.3 Installing the Unit 15
4.4 Viewing Operating Manual and Help Installed 19
4.4.1 To view the Operating Manual 19
4.4.2 To view the help 19
5 Operation Panel 20
5.1 About LED 22
5.2 Home screen of the LCD 23
5.3 Using operation panel 25
5.3.1 Home screen 26
5.3.1.1 Adjusting the height of the feed tray 27
5.3.1.2 Changing the paper thickness mode 28
5.3.2 Job screen 28
5.3.3 Menu screen 29
5.3.3.1 Function Setting screen 29
5.3.3.2 Counter screen 30
5.3.3.3 Maintenance screen 31
6 Basic Operations 32
6.1 Turning ON/OFF the unit's power 32
6.2 Returning from sleep mode 33
6.3 Opening the ADF door 33
6.4 Closing the ADF door 34
6.5 Opening the imprinter door 35
6.5.1 Opening the pre-imprinter door 35
6.5.1.1 When installing/uninstalling the imprinter unit and ink cartridge 35
6.5.1.2 When opening the pre-imprinter door for purposes other than installing/uninstalling the imprinter unit and ink cartridge 37
6.5.2 Opening the post-imprinter door 38
6.6 Changing the language used on the LCD 38
7 Using the Scanner 39
7.1 Preparing Documents 39
7.1.1 Compatible Paper 39
7.1.2 Incompatible Documents 41
7.1.3 Notes about Documents for Scanning 42
7.2 Scanning Documents 43
7.2.1 Switching the Background Color of Scanned Images 48
7.2.2 Using the Straight path (rear exit) 48
7.2.3 Using Manual feeding 49
7.2.4 Feeding method and paper path by document type 50
7.2.5 When Scanning Documents with Pages of Different Sizes at One Time 51
7.2.6 When using the attachment guide (R / L) 56
7.2.7 When feeding stiff or thick documents 57
7.3 Using Push Scan 58
7.3.1 Setting the scanning conditions 58
7.3.2 Selecting the behavior of push scan 58
7.3.2.1 Performing push scan 59
7.3.3 Checking events 60
7.4 Using Count Only Mode 61
7.5 Using Control Sheets 62
7.5.1 Control sheet functions 62
7.5.2 About Printing Control Sheets 63
7.5.2.1 Printing control sheets 63
8 Clearing Paper Jams 64
8.1 Clearing Paper Jams 64
9 Care and Maintenance 66
9.1 Cleaning the Outside of the Scanner 66
9.2 Cleaning the Inside of the Scanner 67
9.2.1 Cleaning the Conveyor and Scanning Glasses 68
9.2.2 Cleaning the Sensors 69
9.2.3 Cleaning the Rollers 70
9.2.4 Cleaning Mode 74
9.2.5 Clearing the Counter After Cleaning the Rollers 76
9.3 Replacing the Rollers 77
9.3.1 Clearing the Counter After Replacing the Rollers 82
10 Optional Imprinter Unit 83
10.1 Installing the Imprinter Unit and Ink Cartridge 83
10.1.1 Installing the imprinter as the pre-imprinter 84
10.1.2 Install the imprinter as the post-imprinter 86
10.2 Replacing the Ink Cartridge 88
10.2.1 How to Remove the Ink Cartridge 88
10.2.2 How to Install the Ink Cartridge 90
10.3 Printing 92
10.4 Cleaning the ink cartridge 94
11 Appendix 95
11.1 Troubleshooting 95
11.2 Error Messages 98
11.3 Shading Adjustment 99
11.4 Uninstalling the Software 100
11.5 Repacking Instructions 101
11.6 Specifications 102
1 Feature Highlights
High-speed Double Sided Scanning
- This scanner can scan documents at high speed, regardless of the image type (monochrome / color).
Background Color Switch Function
- Using the software, you can switch the background color of scanned images between white and black.
Double Feed Detection Function
- Double feeding can be detected even if you scan documents that contain paper of various thicknesses.
Double Feed Skip (DFS) Function
- If the scanning process stops because documents (such as envelopes or receipts attached to documents) are being detected as double fed, the double feed skip (DFS) function can be used to resume scanning.
Double Feed Retry Function (KV-S8147 only)
- If a double feed was detected, the double feed retry function will return the documents to the feed tray automatically and separate the double fed documents again and scan them.
Mechanical Deskew (KV-S8147 only)
- In addition to adjusting skewed documents via the software, this scanner supports the mechanical deskew function that detects skew in documents before they are scanned, and adjusts the document using the feeding mechanism.
Stapled Document Detection
- This scanner has a stapled document detection that detects documents that contain staples and stops scanning before any serious damage occurs.
Document Abnormal Noise Detection Function
- This function can stop scanning if the jam microphone detects abnormal noises during document feeding.
Count Only Mode
- Count Only Mode can count the number of documents without scanning images of the documents.
Push Scan
- If you register the scanning conditions for a job in advance, you can start scanning without operating the computer.
Other Features
• Supports color LCD.
- A high durability glass coating reduces paper dust adhering to the scanning glasses.
- The paper feed path can be opened widely to easily remove jammed paper and perform maintenance.
2 Before You Start
2.1 Precautions
Illegal Duplication
It is unlawful to make duplication of certain documents. Duplicating certain documents may be illegal in your country/area. Penalties of fines and/or imprisonment may be imposed on those found guilty. The following are examples of items that may be illegal to duplicate in your country/area.
- Currency • Bank notes and checks • Bank and government bonds, and securities • Passports, licenses, official or private documents, identification cards, and the like • Copyright materials, or trademarks without the consent of the owner
- Postage stamps, and other negotiable instruments
This list is not inclusive, and no liability is assumed for either its completeness or accuracy. In case of doubt, contact your legal counsel.
Notice
Install your machine near a supervised area to prevent illegal duplications from being made.
Installation
- Do not place the unit in direct sunlight, in a cold draft, or near heating apparatus.
- Do not place the unit near apparatus which generate electronic or magnetic noise.
- Protect the unit from static electricity.
- Do not move the unit immediately from a cold place to a warm place. It may cause condensation, which may damage the unit. Using the unit immediately will cause the document scanning to be imperfect. To avoid this, clean the inside rollers with a dry and soft cloth, leave the unit in a warm place for 1 or 2 hours, and then use the unit after you make sure that the inside of the unit has dried.
- When the unit is not used over an extended period of time, turn the unit off, and unplug the power cord. The unit consumes approximately 0.5 W of electricity even when the main unit is turned off.
- Do not turn ON the unit's power before installing the software.
CD-ROM
- Do not write or stick paper on the front and/or back of CD-ROM.
- Do not touch the data side of the CD-ROM. When handling the CD-ROM, be careful not to leave fingerprints or otherwise damage the CD-ROM.
- Do not leave the CD-ROM where it is directly exposed to sunlight or near a heater for extended periods.
- Do not throw or bend the CD-ROM.
Roller Cleaning Paper
Using a pair of scissors, open the bag along the dotted line (①) and take out the roller cleaning paper.

- Keep the roller cleaning paper out of reach of small children.
- Do not store the roller cleaning paper in direct sunlight or in a place with a temperature over 40 °C (104 °F).
- Only use the roller cleaning paper to clean the rollers.
- For details about the roller cleaning paper, please refer to the Safety Data Sheet (SDS). Please ask your Panasonic sales company about obtaining the Safety Data Sheet.
- If the bag is left opened for a long period of time before using it, the alcohol will evaporate. Please use the roller cleaning paper immediately after opening the bag.
- To purchase the roller cleaning paper (KV-SS03), please contact your dealer, or call our Supplies and Accessories department at 1-800-726-2797 (U.S.A. only).
KEEP AWAY FROM FIRE.
Security Notice
The management of documents and scanned data is the responsibility of the user. In particular, pay attention to the following points.
- Make sure you have the same number of pages for important documents both before and after scanning, and take care not to leave any pages in the scanner. • Periodically back up important data.
- When having your computer or hard disk serviced, or when disposing of your computer or hard disk, completely erase any stored image data.
Others
- Make sure to remove paper clips and staples from documents before scanning. Failing to do so can damage the unit, document, or both.
- Do not use thinner, benzine, or cleaners containing abrasives or surfactants, for cleaning the outside of scanner.
- Do not wear accessories, otherwise they may get caught in the machine or obstruct its operation. Long hair should be tied up.
- The feed tray and the exit tray move up or down depending on the scanner's status. Do not apply excessive force to the feed tray or the exit tray, and do not place anything under the trays.
- Pay attention that your fingers or anything do not get pinched in the feed tray or the exit tray.
2.2 Check the Accessories
Check that all accessories are included before installing the unit. In the event that an item is missing, please contact your dealer.
| Accessories Name Notes | ||
 | Power cord | Use the power cord appropriate for where you use the unit. |
 | USB cable — | |
 | Software / Manual CD-ROM | Drivers, Applications, Utilities, Documents |
 | Quick Installation Guide — | |
 | Double feed prevention roller — | |
 | Shading paper | See "11.3 Shading Adjustment" (page 99) when performing shading adjustment. |
 | Attachment guide (R / L) | For details, see "7.2.6 When using the attachment guide (R / L)" (page 56). |
Notice
- It is highly recommended to keep the original carton and all packing materials. They are necessary when repacking.
3 Location of Controls
3.1 Main Unit
3.1.1 Front

① Exit extension tray ② ADF door ③ ADF door release
▲: Pull the door up.
④ Document guides lock ⑤ Feed tray

Load the documents with the surface to be scanned facing up.

Make sure to remove paper clips and staples from documents.
⑥ Feed extension tray ⑦ Document guides ⑧ Power button (♪) ⑨ Operation panel
For details, see "5 Operation Panel" (page 20).
⑩ Document guides selector


: The left and right document guides move separately.

: The left and right document guides move together.
⑪ Pre-imprinter door
You open this door when installing the optional imprinter unit or ink cartridge. For details about installing the imprinter unit, refer to "10.1.1 Installing the imprinter as the pre-imprinter" (page 84).
⑫ Exit tray ⑬ Exit guides ⑭ Exit stoppers
Notice
- The feed tray (⑤) and the exit tray (⑫) move up or down depending on the scanner's status. Do not apply excessive force to the feed tray or the exit tray, and do not place anything under the trays.
3.1.2 Rear
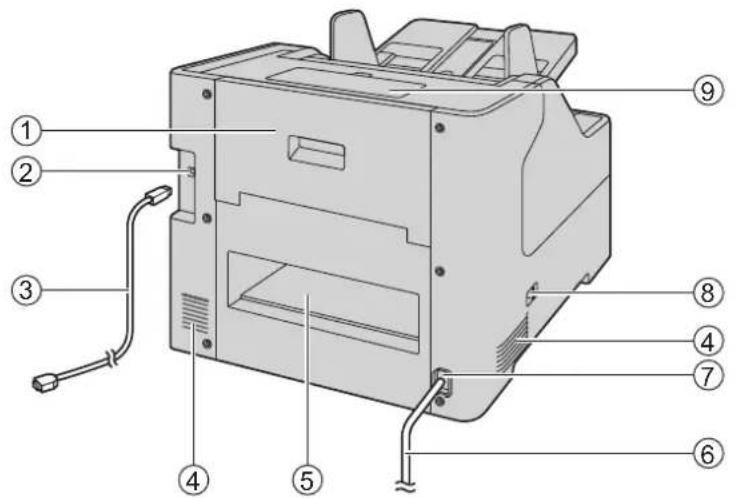
① Post-imprinter door
You open this door when installing the optional imprinter unit or ink cartridge. For details about installing the imprinter unit, refer to "10.1.2 Install the imprinter as the post-imprinter" (page 86).
② USB connector ③ USB cable ④ Fan exhaust vent ⑤ Straight path exit area ⑥ Power cord ⑦ AC inlet ⑧ Paper path selector
You can select the paper path for documents.
→: U-turn path (front exit) -8: Straight path (rear exit)
⑨ Accessory box
Use this box to store accessories such as the attachment guide (R / L), or the shipping screw.
4 Installation
4.1 Required Space Around the Scanner
In order to ensure proper operation, install the unit maintaining the proper distances from surrounding objects, as shown in the following illustration.
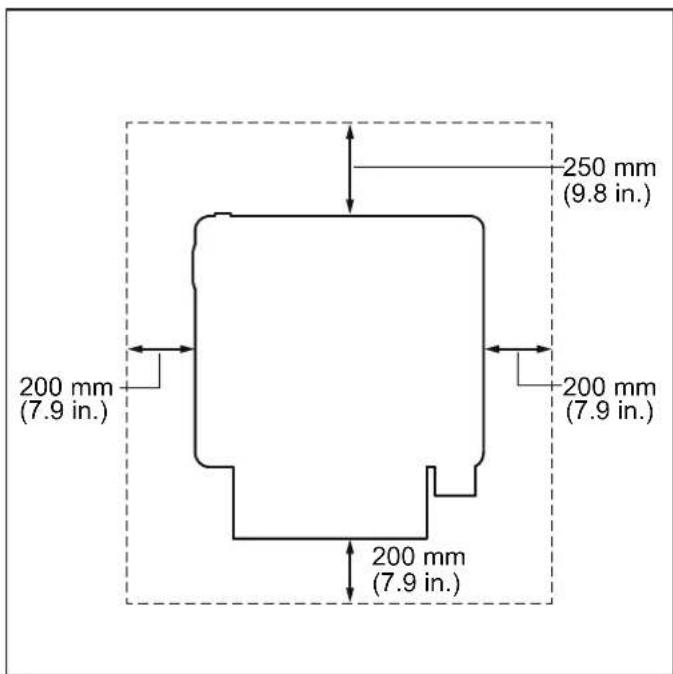
Front
Notice
- Do not move the unit immediately from a cold place to a warm place. It may cause condensation, which may damage the unit. Using the unit immediately will cause the document scanning to be imperfect. To avoid this, clean the inside rollers with a dry and soft cloth, leave the unit in a warm place for 1 or 2 hours, and then use the unit after you make sure that the inside of the unit has dried.
- If you use the straight path (rear exit) for documents, space behind the unit is required for documents to exit.
4.2 Installing the Software
Notice
- Make sure to connect the unit to your computer after installing the software. Connecting the unit to your computer and turning on the unit's power before installing the software may influence the software installation. If you connect the unit to your computer and turn on the unit's power before installing the software by mistake, install the software after disconnecting the unit from your computer.
- Make sure to log on as an administrator to install the software.
The software on the enclosed Software / Manual CD-ROM can be installed on your computer. You can select from the 2 installation methods below, depending on your needs.
a. Complete: Install all the drivers, applications, utilities and Operating Manual. b. Custom: Install only selected items.
Note
- Normally, it is recommended to select [Complete].
- Check that the unit has been turned off.
- If the power is turned on, turn off the unit's power (page 33).
- Insert the Software / Manual CD-ROM into the CD/DVD drive on your computer.
- The setup window will appear.
Note
- If the AutoPlay dialog box is displayed, select [CDRun.exe].
- If the setup window does not appear, double-click [CDRun.exe] in the Software / Manual CD-ROM.
- Check the [Read me first] file.
- Select the desired installation methods from "Software" on the left side of the screen.
- If you selected [Complete], continue to step 6.
- If you selected [Custom], continue to step 5.
- If you selected [Custom] for the installation type in step 4, select the item that you want to install.
Note
- If you select TWAIN or ISIS, Image Capture Plus will also be installed.
- Follow the instructions on the screen and complete the installation.
- Restart your computer if you are prompted to do so.
4.3 Installing the Unit
- Remove all packing tapes.
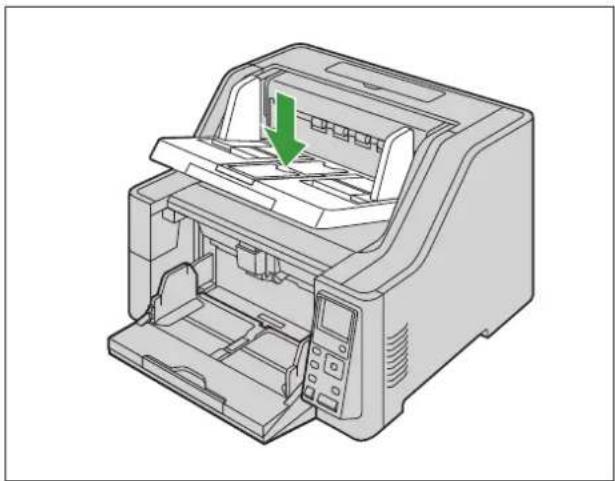
- Open the feed tray.

- Remove the shipping screw (①).
Location of the shipping screw.
- The ADF door will not open unless you remove the shipping screw.
Notice
- Store the removed shipping screw in the accessory box (②).
- Open the ADF door (page 33).
- Remove all tape and cushioning.
- Put your fingers on the indents (①) of the double feed prevention roller cover and pull it upwards to remove it.

- Install the new double feed prevention roller.
i. Press the lever (①) to the left side, and install the right hole (②) of the roller onto the shaft (③).

ii. Align the left side roller's hole ( ) with the shaft ( ). ⑤

iii. Return the lever ( ) to the original position, and insert the shaft into the hole.
iv. After you install the double feed prevention roller, rotate the roller until it can no longer turn freely.

Notice
- Make sure that the shafts are inserted into the left and right holes of the double feed prevention roller. If the roller is not installed correctly, it may cause double feeding or a paper jam.
- Insert the tabs, and close the double feed prevention roller cover by pushing it until it clicks into place.

- Make sure that the left and right rubber parts of the double feed prevention roller are located in the center of the holes of the double feed prevention roller cover.
- Make sure that the double feed prevention roller cover does not stick up. If the double feed prevention roller cover is not completely closed, damage or paper jams may occur.
- Close the ADF door (page 34).
- Plug in the power cord and connect the USB cable.
- Turn ON the unit's power (page 32).
• The Ready LED (Green) will flash and then turn on. - If the hardware wizard appears, follow the on-screen instructions to complete installation. - When turning on the unit's power for the first time, select the language used on the LCD using ▲ or ▼ of the cursor button, and then press the Enter button ( ) to complete your selection. - You can change the language used on the LCD. For details, see "6.6 Changing the language used on the LCD" (page 38).
Notice
- When the feed tray is closed and the unit's power is turned on, the feed tray will open automatically. Pay attention that your fingers or anything do not get pinched.

4.4 Viewing Operating Manual and Help Installed
You can view the Operating Manual and the software help installed on the computer.
4.4.1 To view the Operating Manual
- Select [All Programs] → [Panasonic] → [Scanner Manuals].
- Select the manual. • The manual will open.
Note
- In Windows 8, select the [Panasonic Document Scanner] section on the Apps screen.
4.4.2 To view the help
For Image Capture Plus
- Select [All Programs] → [Panasonic] → [Image Capture Plus] → [Image Capture Plus Help].
For User Utility or Scan Button Setting Tool
- Select [All Programs] → [Panasonic] → [Scanner Tools].
- Select that item's help.
Note
- In Windows 8, select the [Panasonic Document Scanner] section on the Apps screen.
For TWAIN or ISIS
- Click the help button on any driver screen.
5 Operation Panel

① LCD
Displays the unit's status, the Job screen and the Menu screen. For details, see "5.2 Home screen of the LCD" (page 23).
② Power button (1)
For details, see "6.1 Turning ON/OFF the unit's power" (page 32).
③ Ready LED (Green)
Shows the scanner's status. For details, see "5.1 About LED" (page 22).
④ Cursor button
Used to select items on the LCD screen. For details, see "5.3 Using operation panel" (page 25).
⑤ Menu button (☐)
Displays the Menu screen (page 29). You can access the Function Setting screen (page 29), the Counter screen (page 30) and the Maintenance screen (page 31) from the Menu screen.
⑥ Job button ( )123.
Displays the job screen (page 28).
⑦ Back button ( )
Returns the LCD to the previous screen.
⑧ Skip button (▶)
If you press this button after a double feed or a dog-eared document is detected and scanning has been paused, the document (or documents) detected as a double feed or the dog-eared document will be scanned, and then ejected from the scanner. Scanning will continue after the document is scanned and ejected.
⑨ Start/Stop button ( ◊/⊗)
- During scanning, pushing this button stops scanning.
- If you press this button after a double feed or a dog-eared document is detected and scanning has been paused, the document (or documents) detected as a double feed or a dog-eared document will be ejected from the scanner without being scanned. Scanning will stop.
- If you set [Wait Key] for "Manual Feed Mode" in your application software, pushing this button starts scanning. For details about "Manual Feed Mode", refer to the Image Capture Plus, TWAIN, or ISIS help.
⑩ Manual feed button ( )
Switches between manual and automatic feeding. For details, see "7.2.3 Using Manual feeding" (page 49).
⑪ Manual feed LED (Green)
Lights when manual feeding is selected. For details, see "5.1 About LED" (page 22).
⑫ Enter button (√)
Note
- For details about the functions assigned to each button, see "5.3 Using operation panel" (page 25).
5.1 About LED
| Ready LED (Green) Status | |
| OFF | Power OFF 1 Error 2 |
| ON | Ready mode or ScanningNotification mode |
| Blinking (Slow) Sleep mode | 3 or Cleaning mode |
| Blinking (Fast) Warming up | |
| Blinking (Fast, 2 times consecutively) | Double Feed Skip modeDog-ear Detection Skip modeExit tray full |
* If the power off feature in sleep mode is enabled, and if no operation is performed for a certain period of time, the scanner will be turned off automatically. Press the power button (☐) of the scanner to turn it on. You can enable/disable the power off feature, and change the time until the scanner turns off in User Utility. *2 For details about the error, refer to "11.2 Error Messages" (page 98) or check in User Utility. *3 If no operation is performed for 15 minutes or longer, the scanner will enter sleep mode automatically to conserve energy. Press any button (except the power button) on the scanner's operation panel to return to ready mode. The time until the scanner enters sleep mode can be changed in User Utility.
| Manual feed LED (Green) Status | |
| OFF Automatic feeding | |
| ON Manual feeding |
5.2 Home screen of the LCD
The unit's status is displayed on the LCD as shown below.
| LCD display Contents | |
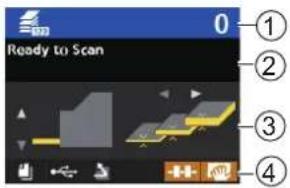 | 1 Counter display areaThe counter is displayed.Scan Counter:User Counter: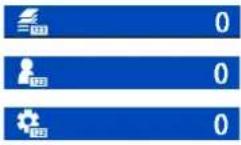 System Counter:2 Message display areaWhen a job is set:The group name is displayed on the first line, and the job name is displayed on the second line.When a job is not set:[Ready to Scan] is displayed.NoteMessages are also displayed depending on the scanner's status.Example: System Counter:2 Message display areaWhen a job is set:The group name is displayed on the first line, and the job name is displayed on the second line.When a job is not set:[Ready to Scan] is displayed.NoteMessages are also displayed depending on the scanner's status.Example: 3 Status display areaThe setting status is displayed for the position of the feed tray, the paper thickness mode, etc.4 Icon display areaThe unit's status is displayed using icons. 3 Status display areaThe setting status is displayed for the position of the feed tray, the paper thickness mode, etc.4 Icon display areaThe unit's status is displayed using icons. |
Note
- When the unit is in sleep mode, the LCD will turn off, and the Ready LED (Green) will blink slowly.
About icons (4)
| Icons Contents | |
 | Automatic feeding is set. |
 | Manual feeding is set. |
 | Scanner is connected to a computer. |
 | Scanner is not connected to a computer. |
 | U-turn path (front exit) is set. |
 | Straight path (rear exit) is set. |
 | Roller cleaning notification |
 | Roller replacement notification |
 | Glass cleaning notification |
5.3 Using operation panel
LCD display
| Home screen Second screen Third screen | ||
Home screen (page 26) If you press the Back button( when the Menu screen orthe Job screen is displayed, youwill return to the Home screen. If you press the Back button( when the Menu screen orthe Job screen is displayed, youwill return to the Home screen. | Error screen The Error screen is displayedwhen an error has occurred. The Error screen is displayedwhen an error has occurred. | — |
Job screen (page 28)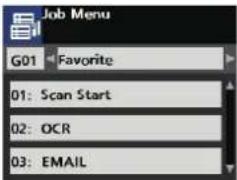 The Job screen is displayedwhen pressing the Job button(123). The Job screen is displayedwhen pressing the Job button(123). | ||
Menu screen (page 29) The Menu screen is displayedwhen pressing the Menu button( [☐]). The Menu screen is displayedwhen pressing the Menu button( [☐]). | Function Setting screen (page29) Counter screen (page 30) Counter screen (page 30) Maintenance screen (page31) Maintenance screen (page31) | |
5.3.1 Home screen
5.3.1 Home screen
If you press the Back button ( ) when the Menu screen or the Job screen is displayed, you will return to the Home screen.
Setting contents
Items Contents
| The height of the feed tray | Select using or of the cursor button.You can adjust the height of the feed tray in regards to the quantity of documents. For details, see "5.3.1.1 Adjusting the height of the feed tray" (page 27).You cannot make this selection while manual feeding is set. |
| Paper thickness mode | Select using or of the cursor button.Change the paper thickness setting when feeding thick paper causes double feeding or feeding errors. For details, see "5.3.1.2 Changing the paper thickness mode" (page 28).You cannot make this selection while manual feeding is set. |
| The height of the exit tray | The following functions are enabled only when the pre-imprinter is installed.After pressing of the cursor button for 1 second or more, the exit tray will move up.After pressing of the cursor button for 1 second or more, the exit tray will move down. |
5.3.1.1 Adjusting the height of the feed tray
When automatic feeding is set, and you start scanning, the feed tray automatically moves to a feeding position appropriate for the quantity of documents. If you adjust the height of the feed tray in advance, you can reduce the time required for the feed tray to move. When the Home screen is on the LCD, press or ▲ of the cursor button to adjust the height of the feed tray. The possible height adjustments of the feed tray are shown below.
| Height(Sheets*) | LCD display(Icons) | Settings Can | be enabled/disabled |
| 50 — Always enabled |  | ||
| 150 Tray Position 6 Y |  | *2 | |
| 250 |  | Tray Position 5 Yes | *2 |
| 350 Tray Position 4 |  | Yes*2(Enabled by default) | |
| 450 |  | Tray Position 3 Yes | *2 |
| 550 Tray Position 2 Y |  | *2 | |
| 650 Tray Position 1 Y |  | *2 | |
| 750 |  | — Always enabled | |
1 The number of sheets for 80g/m 2 (21 lb.) paper. *2 For details, see "Tray Position 1 - Tray Position 6" (page 29).
Note
- When manual feeding is set, you cannot change the position of the feed tray because the feed tray is fixed at the uppermost stage.
5.3.1.2 Changing the paper thickness mode
You can select the paper thickness mode depending on the thickness of the document to prevent double feeding or paper jams.
For details about operation panel, refer to "5 Operation Panel" (page 20).
When the Home screen is on the LCD, press ◀ or ▶ of the cursor button to select one of the paper thickness modes.
You can select one of the following paper thickness modes. The default setting is "Standard paper mode".
| Paper thickness mode LCD display Purpose | ||
| Thin paper mode (20 g/m2-50 g/m2) (5.2 lb.-13.3 lb.) |  | Use when scanning thin paper or paper with a rough surface. (carbonless paper, etc.) |
| Standard paper mode (40 g/m2-157 g/m2) (10.6 lb.-41.8 lb.) |  | Use when scanning paper of standard thicknesses. (copy paper, etc.) |
| Thick paper mode (157 g/m2-255 g/m2) (41.8 lb.-68 lb.) |  | Use when scanning thick paper or paper with a smooth or shiny surface. (post cards, drawing paper, etc.) |
| Automatic mode (20 g/m2-255 g/m2) (5.2 lb.-68 lb.) |  | Use when scanning paper of varying thickness. (The scanning speed will be slow.) |
Notice
- The paper thicknesses in the table above are based on high-quality woodfree paper. Documents may not feed correctly depending on the type of paper used. If that is the case, change the paper thickness mode, and scan again.
Note
- The paper thickness mode is enabled when automatic feeding is set.
5.3.2 Job screen
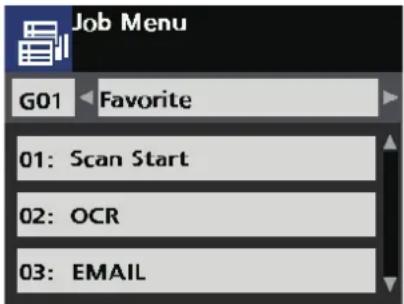
The Job screen is displayed when pressing the Job button (123.). For details about job selection, refer to steps 1 to 4 in "7.3.2.1 Performing push scan" (page 59).
5.3.3 Menu screen
The Menu screen is displayed when pressing the Menu button (☐)
Select [Function Setting], [Counter] or [Maintenance] using ▲ or ▼ of the cursor button. Press the Enter button ( ) to complete your selection.

5.3.3.1 Function Setting screen
Configures each function's setting. Use ▲ or ▼ of the cursor button to select items, and ⚫ to change their value. Press the Enter button ( ) to complete your selection.

Setting contents
| Items Contents | |
| USB ID Displays the scanner's USB serial number. | |
| Language Sets the language used on the LCD. | |
| Sleep (min.) Sets the time before entering sleep mode (1 to 240 min.). | |
| Auto Off Enables (On) or disables (Off) the power auto-off function. | |
| Auto Off (hour) Sets the time before the auto-off function activates (1 min. to 72 hrs.). | |
| Auto Off (min.) | |
| LCD Brightness Sets the back light brightness (5 levels). | |
| LCD Contrast Sets the LCD contrast (5 levels). | |
| Buzzer volume*1 | Sets the volume of the buzzer sound (OFF / 1 / 2 / 3 [maximum]). |
| Tray Position 1 - Tray Position 6 | Sets whether a specific height of the feed tray position can be selected using ▲ or ▼ of the cursor button. |
| Roller Cleaning Notification | Enables (On) or disables (Off) the roller cleaning notification. |
| Roller Replacement Notification | Enables (On) or disables (Off) the roller replacement notification. |
| Glass Cleaning Notification | Enables (On) or disables (Off) the glass cleaning notification. |
| Select Counter Selects the counter from [Scan], [System] or [User] that appears on the Home screen and the screen displayed during scanning. | |
| Count Only Mode Shortcut | Sets whether Count Only Mode (page 61) can be activated by holding the Menu button ( [≡ ] ) for 1 second or more. |
*1 Key buzzers, error buzzers etc.
5.3.3.2 Counter screen
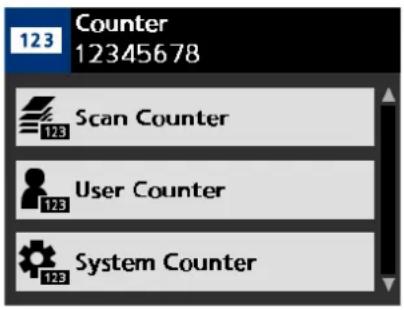
Select the counter using ▲ or ▼ of the cursor button, and press the Enter button ( ) to complete your selection. The types of selectable counters are shown below.
Setting contents
| Items Contents | |
| Scan Counter The number | of documents scanned during the scanning process. The scanned quantity is cleared each time you start scanning. |
| User Counter The number | of documents scanned until the counter is cleared by the user. |
| System Counter The number | ber of documents scanned by the scanner since it was shipped from the factory. |
| After Clean Roller Counter | The number of documents scanned since clearing the counter after cleaning the rollers. Clear after cleaning the rollers. |
| After Replace Roller Counter | The number of documents scanned since clearing the counter after replacing the rollers. Clear after replacing the rollers. |
| Clear User Counter Sets | the User Counter to zero (0). |
| Clear Clean Roller Counter | Sets the After Clean Roller Counter to zero (0). |
| Clear Replace Roller Counter | Sets the After Replace Roller Counter to zero (0). |
| Clean Roller Timing Displays the number of documents that can be scanned until the roller cleaning notification appears. | |
| Replace Roller Timing Displays the number of documents that can be scanned until the roller replacement notification appears. | |
5.3.3.3 Maintenance screen
Sets the following functions. Select an item using ▲ or ▼ of the cursor button, and press the Enter button ( ) to complete your selection.

Setting contents
| Items Contents | |
| Cleaning Mode Starts Cleaning Mode. For details, see "9.2.4 Cleaning Mode" (page 74). | |
| Pre-Imprinter setting Uses this feature when installing the pre-imprinter, and installing or removing the ink cartridge. For details, see "10.1.1 Installing the imprinter as the pre-imprinter" (page 84). | |
| Count Only Mode Starts Count Only Mode. For details, see "7.4 Using Count Only Mode" (page 61). | |
| User Utility Runs the computer's User Utility. | |
6 Basic Operations
6.1 Turning ON/OFF the unit's power
For details about the operation panel, refer to "5 Operation Panel" (page 20).
Turning ON the unit's power
- Press the power button (⏻).
- If the unit's power is turned on while the feed tray is closed, the feed tray will open automatically.

- When turning on the unit's power, the exit tray will move up or down depending on the scanner's status.

Turning OFF the unit's power
- Press and hold the power button (⏻) for 1 second or more until the Ready LED (Green) turns off.
• The exit tray will move down.
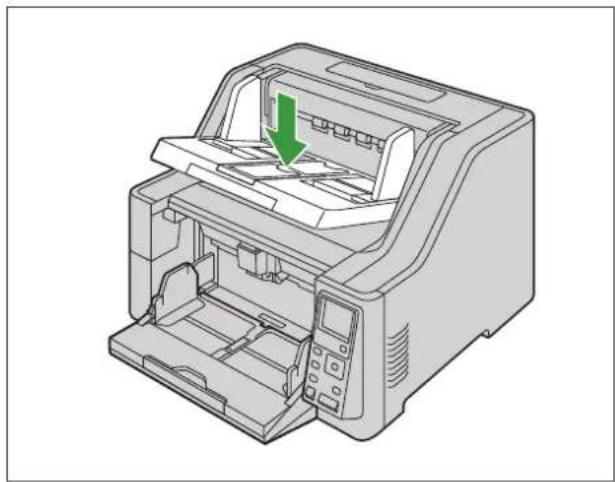
Notice
- Pay attention that your fingers or anything do not get pinched in the feed tray or the exit tray.
6.2 Returning from sleep mode
For details about the operation panel, refer to "5 Operation Panel" (page 20).
- Press any button other than the power button (⏻) on the operation panel.
6.3 Opening the ADF door
- Remove all documents from the exit tray.
- Pull the ADF door release (①) upwards, and open the ADF door (②).

6.4 Closing the ADF door
- Push both sides of the ADF door down slowly until it clicks into place.

Notice
- Pay attention that your fingers or anything do not get pinched.
6.5 Opening the imprinter door
6.5.1 Opening the pre-imprinter door
- The procedure for opening the pre-imprinter door varies by purpose.
- For details about operation panel, refer to "5 Operation Panel" (page 20).
6.5.1.1 When installing/uninstalling the imprinter unit and ink cartridge
- Remove all documents from the exit tray.
- Press the menu button (☐).
- Use the cursor button to select [Maintenance].
- Press the Enter button ( ) to complete your selection.
• The Maintenance screen is displayed.
- Use ▲ or ▼ of the cursor button to select "Pre-Imprinter setting".
- Press the Enter button ( ) to complete your selection.
- Press the Start/Stop ( ) button.
- The exit tray moves up, and the unit powers off automatically. Pay attention that your fingers or anything do not get pinched.
- Raise the exit tray (①).

- Open the pre-imprinter door.

6.5.1.2 When opening the pre-imprinter door for purposes other than installing/uninstalling the imprinter unit and ink cartridge
Follow the procedure below when changing the imprinter printing position, etc.
- Press the cursor button for 1 second or more.
- The exit tray will move up. Pay attention that your fingers or anything do not get pinched. - The exit tray will move up only when the pre-imprinter is installed.
- Raise the exit tray ( ①).

- Open the pre-imprinter door.

6.5.2 Opening the post-imprinter door
- Check that the unit has been turned off.
- Open the post-imprinter door.

6.6 Changing the language used on the LCD
You can change the language used on the LCD.
- Press the menu button (☐).
- Press the Enter button ( ) to complete your selection.
- Press ▼ of the cursor button once.
- Use the cursor button to select a language used on the LCD.
- Press the Enter button ( ) to complete your selection.
7 Using the Scanner
7.1 Preparing Documents
Notice
- Make sure to remove paper clips and staples from documents before scanning. Failing to do so can damage the unit, document, or both.
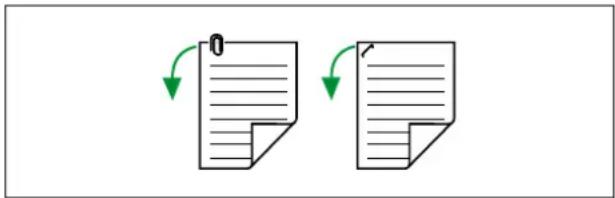
- Before feeding, ensure that the document is not creased or folded. If the document is creased or folded, a paper jam or damage to the document may occur.
7.1.1 Compatible Paper
Paper size:
The compatible paper sizes for this unit are as follows.
| Width 48 mm – 307 mm (1.9 in. – 12.09 in.) | |
| Length | Automatic feeding70 mm – 432 mm (2.8 in. – 17 in.)Manual feedingKV-S8147: 70 mm – unlimited (2.8 in. – unlimited) 1 KV-S8127: 110 mm – unlimited (4.3 in. – unlimited) 1 |
*1 Using "Long Paper", you can scan a long document to a series of split scanned images. For details about "Long Paper", refer to the Image Capture Plus, TWAIN, or ISIS help.
Paper basis weight:
| Automatic feeding | Thin paper mode 20 g/m2 | -50 g/m2(5.2 lb. - 13.3 lb.) |
| Standard paper mode 40 | g/m2-157 g/m2(10.6 lb. - 41.8 lb.) | |
| Thick paper mode 157 g/m2 | m2-255 g/m2(41.8 lb. - 68 lb.) | |
| Automatic mode 20 g/m2 | -255 g/m2(5 lb. - 68 lb.) | |
| Manual feeding | U-turn path (front exit) 20 | g/m2-255 g/m2(5 lb. - 68 lb.) |
| Straight path (rear exit) 20 | g/m2-550 g/m2(5 lb. - 146 lb.) |
Paper types:
• High-quality woodfree paper - Bond paper - Newspaper - Bank checks - Post cards
Note
• High-quality woodfree paper is the recommended paper type.
Curl and Folding:
Documents must also meet the following conditions:
| Curl | Less than 10 mm (0.4 in.) |  |
| Folding | Less than 10 mm (0.4 in.) |  |
Paper capacity for the feed tray:
| Number of sheets Conditions (size / paper basis weight / type) | |
| 500 A3 / 80 g/m2(21 lb.) / High-quality woodfree paper | |
| 750 A4 / 80 g/m2(21 lb.) / High-quality woodfree paper |
Note
- The maximum quantity of documents that can be loaded onto the feed tray is 6 kg (13.2 lb.).
- When using the attachment guide (R / L) (page 56), the maximum feeding capacity is 300 sheets (80 g/m² [21 lb.] / high-quality woodfree paper).
7.1.2 Incompatible Documents
Notice
Do not scan the following types of paper:
• Non-paper documents • Documents out of specified size, thickness, and weight • Thermal or photosensitive paper • Documents containing hard attachments such as metal or plastic (e.g., clips or staples) • Documents with wet ink or cinnabar seal ink • Torn, damaged, or notched documents • Non-rectangular or irregularly shaped paper • Bound or glued documents • Important documents such as vouchers or certificates • Photographs
The following types of documents may not be scanned properly:
- Curled, wrinkled, or folded documents
- Carbon paper • Perforated or punched paper
- Coated paper • Chemical paper such as carbonless copy paper • Paper with wood content
- Extremely smooth, shiny paper, or paper that is highly textured
- Documents without a consistent thickness (such as laminated documents)
Note
- Papers with a glossy surface such as coated papers are susceptible to damage such as scratching.
- If you feed the following types of documents, the rollers will need to be cleaned frequently and the lifetime of the rollers may be shortened.
- Documents with toner or graphite (pencil) powder – Documents treated chemically or containing impurities
- Coated paper
- Carbon paper
7.1.3 Notes about Documents for Scanning
- Depending on the paper type, scanning results may be poor when you scan incompatible documents, or even documents that should be compatible. If scanned images are skewed, or if paper jams or double feeding occurs, try scanning again after doing the following:
- Adjust the paper thickness mode. For details, see "5.3.1.2 Changing the paper thickness mode" (page 28).
- Clean the inside of the scanner. Refer to "9.2 Cleaning the Inside of the Scanner" (page 67).
- Reduce the number of sheets of paper loaded on the feed tray.
- Change the orientation (portrait/landscape) of the placed documents.
- In the scan settings, set "Feeding Speed" to [Slow].
- Scan the documents using manual feeding.
- Scan the documents using straight path (rear exit). *1 For details about configuring the scan settings, refer to the Image Capture Plus, TWAIN, or ISIS help.
- When scanning important documents, confirm that the number of scanned images matches the number of pages in the feed tray. Also, check the condition of the scanned documents.
7.2 Scanning Documents
- Adjust the document guides (①) slightly larger than the actual size of the documents.
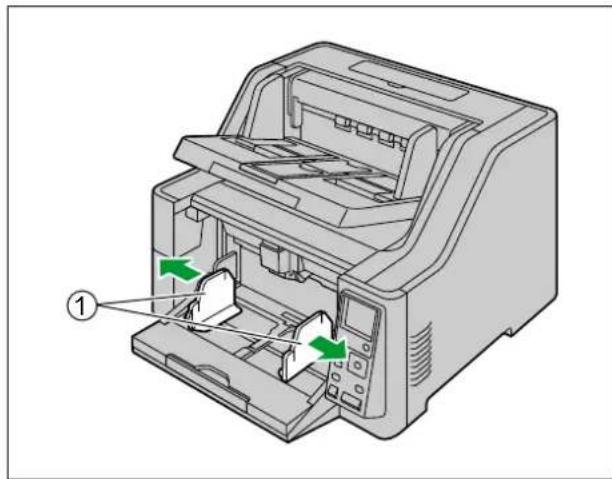
- Pull out the feed extension tray relative to the length of the documents.

- Fan the documents.
- Documents that have been stapled together or stacked together (as in a file folder) will need to be separated.
① Fan the stack of documents to separate all the edges. ② Hold both ends and bend the documents as shown in the illustration. ③ To flatten the documents, hold firmly and pull them apart as shown in the illustration.

Repeat these steps as necessary.
- Carefully align the documents.
- Place the documents on the feed tray (①) with the side to be scanned facing up. Then push the documents in the direction of the arrow until they stop.
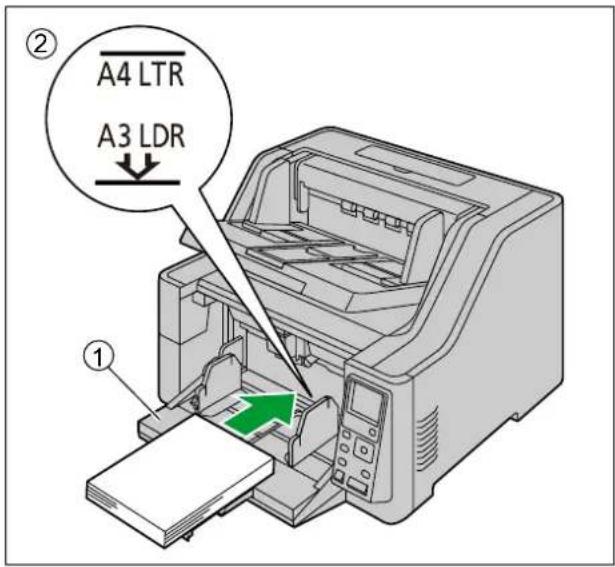
Notice
- The height of the documents should not exceed the limit mark ( ) on the document guide. Exceeding the limit mark may cause a paper jam or skewing.
- Slide the document guides ( ) to match the width of the document to be scanned.

- When scanning documents whose width is 70 mm (2.75 in.) or less, see "7.2.6 When using the attachment guide (R / L)" (page 56).
- When scanning documents with pages of different sizes at one time, see "7.2.5 When Scanning Documents with Pages of Different Sizes at One Time" (page 51). • To secure the document guides (①), lower the document guide lock (②)

- If the document guides are not high enough, pinch the top of the right and left document guides.

- Adjust the exit extension tray ( ) to match the size of the documents.

- Raise the exit stopper ( ,① ) according to the size of the documents.
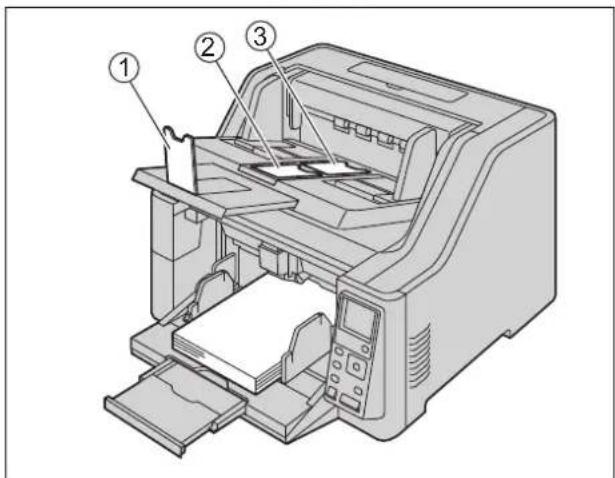
- Adjust the exit guides ① to be slightly larger than the actual size of the documents.

- Open your scanning application and scan the documents.
- For details about the application, refer to the help of each application.
- You can also start up applications automatically to scan documents (Push Scan). For details about Push Scan, see "7.3.2.1 Performing push scan" (page 59).
- Remove documents from the exit tray after they have been scanned.
- Feed tray moves upwards when scanning is started. Keep fingers away. In case of emergency, pull the ADF door release upwards.
- Do not apply excessive force to the feed tray or the exit tray.
7.2.1 Switching the Background Color of Scanned Images
Using the software, you can switch the background color of scanned images between white and black. For details, refer to the Image Capture Plus, TWAIN, or ISIS help.
7.2.2 Using the Straight path (rear exit)
You can select straight path (rear exit) with the paper path selector.
• ⬤: U-turn path (front exit)
• Straight path (rear exit)
Straight path (rear exit) is recommended for scanning stiff or thick documents.
U-turn path (front exit) is recommended for normal use.

Notice
If you select straight path (rear exit), please note the following:
- Enough space behind the unit is required for the documents to exit. • Post-imprinter is not available. • The order of the exited documents is reversed. • The order of the exited documents may be affected.
- Return the paper path selector to the U-turn path (front exit) after scanning the documents.
7.2.3 Using Manual feeding
When using manual feeding, the documents are scanned without separation. Place the documents on the feed tray one by one.
- Manual feeding is recommended to scan important documents or bound documents. • Automatic feeding is recommended for normal use.
- For details about operation panel, refer to "5 Operation Panel" (page 20).
Using manual feeding
- Press the Manual feed button (☐) for 1 second or more.
- Manual feed LED (Green) turns ON. • The feed tray will move up.
Note
- Double feed detection is not available when using manual feeding.
- Minimum length of documents is 110 mm (4.33 in.) when using manual feeding. (KV-S8127 only)
- When manual feeding is set, you cannot change the position of the feed tray because the feed tray is fixed at the uppermost stage. Exit tray capacity is 100 sheets. * When manual feeding is OFF (automatic feeding), exit tray capacity is 750 sheets (80 g/m² [21 lb.] / High-quality woodfree paper).
Switching back to automatic feeding
- Press the Manual feed button (☐) for 1 second or more.
- Manual feed LED (Green) turns OFF. • The feed tray will move down.
7.2.4 Feeding method and paper path by document type
Select the paper path and feeding method according to the document type.
| Feeding method Paper path Recommended Document type | ||
| Automatic feeding | U-turn path (front exit) Normal documents | |
| Straight path (rear exit) | Stiff or thick documentsDocuments that caused a paper jam in the U-turn path (front exit). | |
| Manual feeding | U-turn path (front exit) | Bound documentsImportant documents that require care in handling. |
| Straight path (rear exit) | Thick documentsEnvelopesThin bookletsDocuments that caused a paper jam in the U-turn path (front exit). | |
7.2.5 When Scanning Documents with Pages of Different Sizes at One Time
When scanning documents with pages of different sizes at one time, please note the following:
- Align the document pages along one side.
- Align the document position so that the center of the smallest sheet will be fed to the center of the paper feed roller, and adjust the document guides accordingly.
- Exiting sheets may become out of order on the exit tray. Documents may need to be reordered after they are scanned.
- It is recommended to enable "Deskew" and "Automatic Crop" because the document guides may not be functioning. Refer to the Image Capture Plus, TWAIN, or ISIS help.
- Slide the document guides selector in the direction shown in the illustration until the ◀ (①) and • (②) marks are aligned.

- The left and right document guides can be moved separately.
- Completely spread apart the document guides ( )①
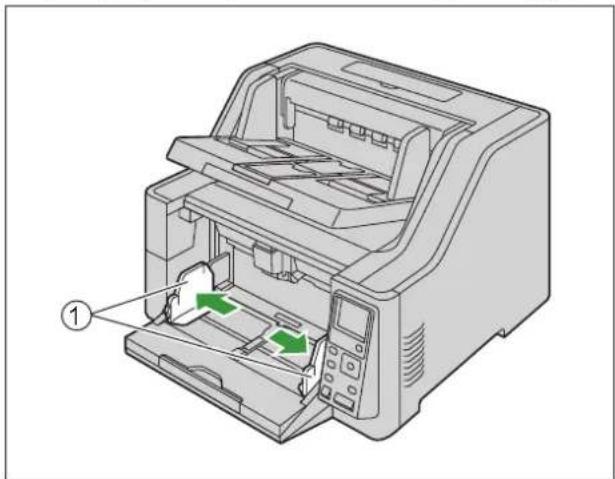
- Align the documents sheet by sheet at one corner as shown below. Documents that stick together, are not aligned correctly at one corner, or are at an angle cannot be fed correctly.
![graph TD A["A"] --> C["C"]](/content/2026/06/1336504/images/2569d8a2c467abf1b9e21cacb097576b6abfe63031e3e68d673bb2e47467aff8.jpg)
- Place the documents on the feed tray ( ) with the scanning side facing up.
- Align the document position so that the center of the smallest sheet will be fed to the center of the paper feed roller (2) If the document is not properly aligned, the pages will not be fed correctly.

Notice
- The height of the documents should not exceed the limit mark ( ) on the document guide. Exceeding the limit mark may cause a paper jam or skewing.
- Depending on the types of paper, the document may not be fed smoothly. In such case, reduce the number of sheets of the document.
- Adjust the left and right document guides ( ) to the width of the documents.

- Remove the document, and then slide the document guides selector in the direction shown in the illustration until the ◀ (①) and ● ( ) marks are aligned.

- Place the document on the feed tray again and adjust the document guide according to the size of the document to be scanned.
Notice
• Make sure to align the document pages along one side.
• Make sure that the center of the smallest sheet of the document will be fed to the center of the paper slot.
- To secure the document guides, lower the document guide lock.
Adjusting the left and right document guides to their original position
- Slide the document guides selector in the direction shown in the illustration until the ◀ (①) and • (②) marks are aligned.

- Completely spread apart the document guides.
- Slide the document guides selector in the direction shown in the illustration until the ◀ (①) and • (②) marks are aligned.

7.2.6 When using the attachment guide (R / L)
When scanning documents whose width is 70 mm (2.75 in.) or less, use the attachment guide (R / L). Install the attachment guide (R / L) as shown below.
- Install the attachment guide (L) to the left document guide.

- Install the attachment guide (R) to the right document guide.

Notice
• After using the attachment guide (R / L), put them back in the accessory box. - The height of the documents should not exceed the limit mark (①). Exceeding the limit mark may cause a paper jam or skewing.
7.2.7 When feeding stiff or thick documents
When feeding stiff or thick documents, please note the following:
- If the documents are curled, correct and flatten the documents.

- If paper is not feeding well when manual feeding and straight path (rear exit) are used, feed documents using the following procedure.
- Start scanning.
- Insert the document as shown in the illustration until the paper feed roller rotates.

- Insert the document further until the paper feed roller picks up the document, then let go of the document.
7.3 Using Push Scan
This scanner has a push scan function for starting scanning without operation through a computer.
7.3.1 Setting the scanning conditions
Scanning conditions are set on the setting screen of each application. For details about the setting screen of each application, refer to the manual or help for that application.
Note
- Press and hold the Enter button ( √ ) or Start/Stop button ( ×) more than 2 seconds to open the application setting screen.
- If the unit is in sleep mode, press any button (except the power button (⏻)) on the scanner's operation panel to return to ready mode first.
7.3.2 Selecting the behavior of push scan
Select the behavior of push scan using the Scan Button Setting Tool.
- Double click the ( ) icon in the notification area of the task bar to open the Scan Button Setting Tool.
- In Windows 8, open the Scan Button Setting Tool on the Desktop screen.
- Select [Touch Free Scanning] or [Single Touch Scanning].
Note
- In Image Capture Plus and Scan Button Setting Tool, [Single Touch Scanning] means performing push scanning using the LCD.
- For details about the Scan Button Setting Tool, refer to the Scan Button Setting Tool help.
7.3.2.1 Performing push scan
For details about the operation panel, refer to "5 Operation Panel" (page 20).
Note
- Register jobs in advance. For details about registering jobs, refer to the Image Capture Plus help.
- Press the job button ( 123.).
- Use ◀ or ▶ of the cursor button to select a group.
- Use or of the cursor button to select a job.
- Press the Enter button ( ) to complete the job selection.
- Place the documents on the feed tray.
- When [Touch Free Scanning] is selected, scanning will start.
- When [Single Touch Scanning] is selected, press the Start/Stop button ( ◊/▽) to start scanning.
7.3.3 Checking events
Check the following if an application does not start up after being set by the Scan Button Setting Tool.
- Display the Scan properties screen.
- If you are using Windows 10: Right-click [Start], select [Control Panel] → [Devices and Printers], right-click the scanner icon, and then display the [Scan properties] screen.
- If you are using Windows 8 / Windows 7: [Control Panel] → [View devices and printers], right-click the scanner icon to display the [Scan properties] screen.
- If you are using Windows Vista: [Control Panel] → [Scanners and Cameras], select the scanner icon, and then click the Properties button.
- If you are using Windows XP: [Control Panel] → [Scanners and Cameras], right-click the scanner icon to display the Properties screen.
- Click the [Events] tab.
- Check that Scan Button Setting Tool is selected as the program to start for each event.
- If an application other than Scan Button Setting Tool is selected, change the application to Scan Button Setting Tool.
- Click [OK].
- Restart the computer.
7.4 Using Count Only Mode
When using Count Only Mode, you can count the number of documents without scanning images of the documents. For details about the operation panel, refer to "5 Operation Panel" (page 20).
If Count Only Mode Shortcut is enabled, press the menu button (☐) for 1 second or more, and then follow the procedure from step 6.
- Press the menu button ().
- Use ▲ or ▼ of the cursor button to select "Maintenance".
- Press the Enter button () to complete your selection.
- Use ▲ or ▼ of the cursor button to select "Count Only Mode".
- Press the Enter button (√) to complete your selection.
LCD display:
![Count Only Mode Press [BACK] to return](/content/2026/06/1336504/images/85f5640d628e1722ab26f21510412fe97677af4e030b464238581426d35d5fa4.jpg)
- Set the documents on the feed tray.
- Press the Start/Stop button (◊/⊗).
- Begins document feeding and counting. The number of pages will be displayed on the LCD.
- Remove the documents from the exit tray.
- To count more documents, repeat steps 6 to 8.
- Press the Back button (↩) to exit Count Only Mode.
Notice
- If a paper jam or double feed error occurs, set the document on the feed tray again, and then repeat the procedure from step 6.
7.5 Using Control Sheets
Placing a control sheet in the middle of documents lets you change the scanning conditions for pages scanned after the control sheet. Also, you can change the folder used to save the scan data of documents scanned after the control sheet.
- Print out control sheets from the included CD-ROM.

7.5.1 Control sheet functions
Simplex, Duplex, Binary, 256 level gray, Color, Dynamic Threshold, Dither, Error diffusion, Function #1-#9, Separation Sheet
- For details about control sheets, refer to "Detect Control Sheet" in the Image Capture Plus, TWAIN, or ISIS help.
- For details about separation sheets, refer to "Detect Separation Sheet" in the Image Capture Plus, TWAIN, or ISIS help.
7.5.2 About Printing Control Sheets
- Print the control sheet at the specified size; do not enlarge or reduce the size.
- When printing the control sheet, make sure that the pattern is 25 mm (1 in.) from the top of the page and centered horizontally.

- Use the control sheet that is the same size as the document you are scanning.
- Be careful not to get the control sheet dirty. Do not fold or crease the control sheet. Scanning will not be performed properly.
- For details about control sheets, refer to "Detect Control Sheet" in the Image Capture Plus, TWAIN, or ISIS help.
7.5.2.1 Printing control sheets
- In order to print control sheets, Adobe Reader must be installed on your computer.
- Refer to the instruction manual for your printer for details about changing print settings.
- Insert the included CD-ROM into the CD/DVD drive on your computer.
- The setup window will appear.
Note
- If the AutoPlay dialog box is displayed, select [CDRun.exe].
- If the setup window does not appear, double-click [CDRun.exe] in the Software / Manual CD-ROM.
- Select [Control Sheet] from "Documents" on the right side of the screen.
- Print the control sheets at the same size as your document.
8 Clearing Paper Jams
8.1 Clearing Paper Jams
If a paper jam occurs, remove the jammed sheet according to the following procedure.
- Remove all documents from the exit tray.
- Close the exit extension tray.

- Open the ADF door (page 33).
- Remove the jammed document.
- If the document is jammed inside the scanner, remove it from the inside of the ADF door as shown in the illustration.

- If the document is jammed in the exit area, pull it forward as shown in the illustration.

- Close the ADF door after confirming that no documents remain inside the unit.
9 Care and Maintenance
9.1 Cleaning the Outside of the Scanner
Notice
- Before moving the unit, be sure to unplug the power cord and USB cable.
- Do not use commercially available cleaners, detergent, thinner, or benzine. (Doing so may cause deformation, discoloration or damage.)
- Clean the scanner at least once a month.
- Clean the outside of the scanner with a soft, slightly damp cloth.

- Remove dirt and dust from the fan exhaust vent with a brush.

9.2 Cleaning the Inside of the Scanner
Notice
- Before cleaning the unit, turn the unit off, and disconnect the power cord and the USB cable.
- Clean the inside of the scanner when approximately 30,000 sheets have been scanned. (This includes the number of sheets fed using Count Only Mode.) The time for cleaning may differ depending on documents you scan. To maintain proper scanning, clean the scanner parts frequently.
- Clean the rollers if paper jamming or double feeding occurs frequently.
- If double feed detection does not function properly, clean the double feed detectors.
- Clean the scanning glasses when vertical streaks appear on the scanned images.
- Be careful not to damage any parts of the unit.
- Do not use flammable aerosol cleaners.
- Prepare the following cleaning supplies.
| Soft and dry cloth(one that does not easily generate fibrous dust) | Used to clean the conveyor and scanning glasses. |
| Thin cotton swab Used to clean the sensors. | |
| Roller cleaning paper(KV-SS03) | Recommended for use in cleaning the rollers. If you do not have the roller cleaning paper, use a soft cloth with a small amount of isopropyl alcohol or water. Do not use commercially available cleaners, detergent, thinner, or benzine. (Doing so may cause deformation, discoloration or damage.) |
- Open the ADF door (page 33).
- Clean the conveyor, sensors, rollers, and scanning glasses.
- Clean the parts in the following order: conveyor and scanning glasses, sensors, rollers.
- For details about cleaning, refer to the following:
- "9.2.1 Cleaning the Conveyor and Scanning Glasses" (page 68)
- "9.2.2 Cleaning the Sensors" (page 69)
- "9.2.3 Cleaning the Rollers" (page 70)
- Close the ADF door (page 34).
- Turn ON the unit's power (page 32).
- Set the After Clean Roller Counter to zero (0).
- For details, see "9.2.5 Clearing the Counter After Cleaning the Rollers" (page 76).
9.2.1 Cleaning the Conveyor and Scanning Glasses
- With a soft and dry cloth, wipe off any dirt on the conveyor (①) and scanning glasses (②)
- If the dirt does not come off, use a soft, slightly damp cloth.
Location of the conveyor and the scanning glasses for cleaning
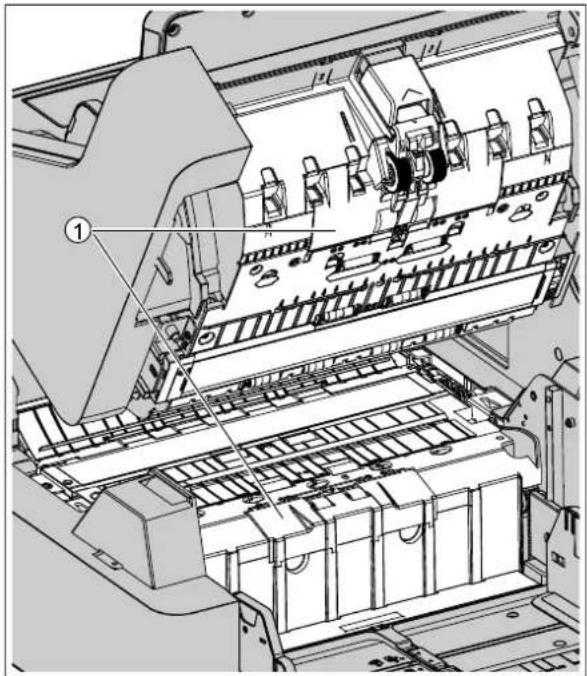

① Conveyor
② Scanning glasses
9.2.2 Cleaning the Sensors
- Remove dust from the sensors with a cotton swab.
Location of the sensors for cleaning


① Waiting sensor ② Skew sensor ③ Double feed detector ④ Slip detector sensor ⑤ Starting sensor ⑥ Paper sensor ⑦ Exit sensor ⑧ Jam sensor
9.2.3 Cleaning the Rollers
- Use the Roller Cleaning Paper (page 9) to wipe the dirt from the surfaces of all rollers.
Direction to wipe rollers

Double feed prevention roller, Separation roller

Other rollers
Notice
- After removing the double feed prevention roller, gently wipe dirt from the surface of the roller in the direction indicated by the arrows in the illustration. If you wipe too hard, you may damage or misalign the roller.
For instructions on how to remove the double feed prevention roller, see "9.3 Replacing the Rollers" (page 77).
- Wipe dirt off of the other rollers in the directions indicated by the arrows in the illustration. Use your finger to rotate the roller and wipe dirt off of the entire surface of the roller. If the roller rotates when wiping it, gently hold it in place with your finger.
Location of rollers


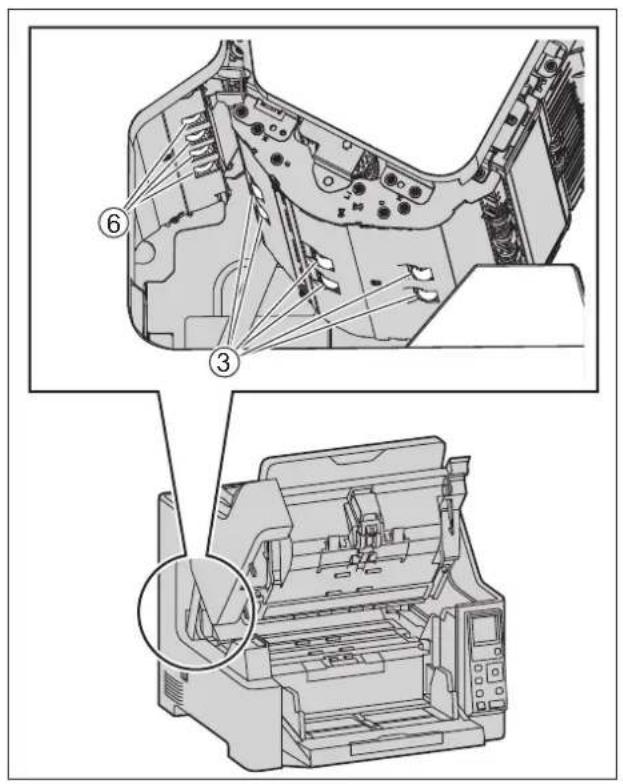
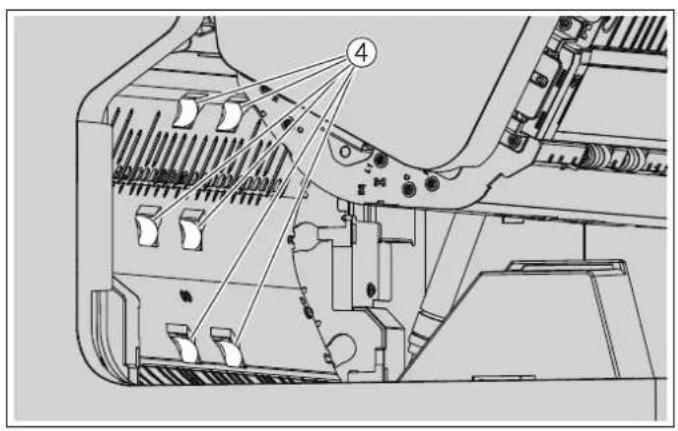

① Paper feed roller ② Separation roller ③ Free rollers ④ Conveyor rollers
- For details about cleaning the conveyor rollers, see "9.2.4 Cleaning Mode" (page 74).
⑤ Double feed prevention roller
⑥ Exit roller
- For details about cleaning the exit roller, see "9.2.4 Cleaning Mode" (page 74).
9.2.4 Cleaning Mode
Cleaning Mode can be used to help clean the conveyor rollers and exit roller. During Cleaning Mode, the conveyor rollers and exit roller rotate a small amount every time the Start/Stop button ( ◆/▽) on the scanner is pressed. So, you do not have to rotate the rollers by using your fingers in order to clean the entire surface of each roller.
For details about the operation panel, refer to "5 Operation Panel" (page 20).
Notice
- Do not touch the conveyor rollers and exit roller while they are rotating.
- Use Cleaning Mode only to clean the conveyor rollers and exit roller.
- Close the ADF door (page 34).
- Plug in the power cord.
- Turn ON the unit's power (page 32).
- Press the menu button (☐).
- Use ▲ or ▼ of the cursor button to select "Maintenance".
- Press the Enter button ( ) to complete your selection.
- Use ▲ or ▼ of the cursor button to select "Cleaning Mode".
- Press the Enter button (√) to complete your selection.
- Cleaning Mode will start.
- Open the ADF door (page 33).
- Clean the conveyor rollers and exit roller.
i. Use the Roller Cleaning Paper (page 9) to wipe the dirt from the surfaces of the rollers. ii. Press the Start/Stop button ( ◇/▽) on the scanner to rotate the rollers a small amount. iii. Repeat these steps until all surfaces of all rollers are cleaned.


- Close the ADF door (page 34).
- Press the back button (→) to exit Cleaning Mode.
Note
- Cleaning Mode can be started from User Utility. For details, refer to the User Utility help.
9.2.5 Clearing the Counter After Cleaning the Rollers
After cleaning the rollers, set the After Clean Roller Counter to zero (0) from the operation panel (page 20).
- Press the menu button (☐).
- Use ▲ or ▼ of the cursor button to select "Counter".
- Press the Enter button ( ) to complete your selection.
- Use ▲ or the cursor button to select "Clear Clean Roller Counter".
- Press the Enter button ( √ ) to complete your selection.
Note
- The After Clean Roller Counter can also be cleared from User Utility. For details, refer to the User Utility help.
9.3 Replacing the Rollers
As a rough guideline, we recommend replacing the paper feed roller, separation roller, and double feed prevention roller after scanning 600,000 sheets of paper. ("600,000 sheets" is based on scanning high-quality woodfree paper. This includes the number of sheets fed using Count Only Mode. Depending on the type of paper and other factors, the actual lifetime of the rollers may be shorter.) The number of sheets scanned can be checked on the LCD. For details, see "5.3.3.2 Counter screen" (page 30).
- Turn off the unit's power (page 33).
- Open the ADF door (page 33).
- To open the paper feed roller cover, grab it from both sides, and pull it towards you.

- Turn the notch of the roller (①) towards you, and with the notch open, remove the paper feed roller from the shaft.
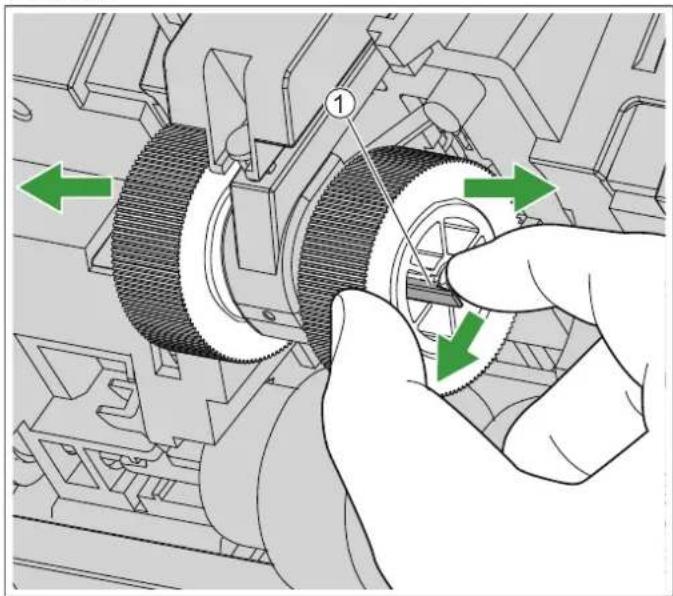
- Open the "Roller exchange kit (KV-SS064)" (optional) and take out the new paper feed roller.
- Line up the shaft with the hole of the roller, and push the shaft through until it clicks into place.

- Move the levers ( ) downwards.

- Move the levers ( ) outwards, and remove the separation roller ( ). ②

- Open the "Roller exchange kit ( KV-SS064)" (optional) and take out the new separation roller.
- Insert the new separation roller

- Move the levers (③) inwards so that the shaft (②) enters the holes (①) of the both sides of the roller.

- Move the levers ① upwards to fit the grooves.


- Slowly push the paper feed roller cover in the direction of the arrow until it clicks into place.

- Put your fingers on the indents (①) of the double feed prevention roller cover and pull it upwards to remove it.

- Push the lever ① to the left, and remove the double feed prevention roller.

Notice
- If part ( ) of the double feed prevention roller comes off, attach it as shown below.

- Open the "Roller exchange kit (KV-SS064)" (optional) and take out the new double feed prevention roller.
- Install the new double feed prevention roller.
- Refer to step 7 of "4.3 Installing the Unit" (page 16).
- Insert the tabs, and close the double feed prevention roller cover by pushing it until it clicks into place.

- Make sure that the left and right rubber parts of the double feed prevention roller are located in the center of the holes of the double feed prevention roller cover.
- Make sure that the double feed prevention roller cover does not stick up. If the double feed prevention roller cover is not completely closed, damage or paper jams may occur.
- Close the ADF door (page 34).
- Turn on the unit's power (page 32).
- After replacing the roller, set the After Replace Roller Counter to zero (0) (page 82).
9.3.1 Clearing the Counter After Replacing the Rollers
After replacing the rollers, set the After Replace Roller Counter to zero (0) from the operation panel (page 20).
- Press the menu button (☐).
- Use ▲ or ▼ of the cursor button to select "Counter".
- Press the Enter button () to complete your selection.
- Use ▲ or the cursor button to select "Clear Replace Roller Counter".
- Press the Enter button (√) to complete your selection.
Note
- The After Replace Roller Counter can also be cleared from User Utility. For details, refer to the User Utility help.
10 Optional Imprinter Unit
10.1 Installing the Imprinter Unit and Ink Cartridge
The imprinter unit can be used to print information such as a name, the date and time, or a serial number on the document after scanning. Depending on your goals, the imprinter can be used as a pre-imprinter or a post-imprinter.
- The pre-imprinter prints onto the face of the document prior to scanning. The printed information will also appear in the scanned image.
- The post-imprinter prints onto the reverse side of the document after scanning. The printed information will not appear in the scanned image.
Notice
- Do not use the imprinter to print on water-repellent documents such as film, coated paper, some kinds of copy paper, etc. These documents repel ink, and the ink may stain the inside of the scanner (for example, the rollers). If imprinter ink has stained parts of the scanner, clean them by using the Roller cleaning paper (KV-SS03). • The imprinter unit or ink cartridge should only be inserted or removed after the power is turned off.
Note
- The imprinter cannot be used when "Mechanical Deskew" is enabled. For details about "Mechanical Deskew", refer to the Image Capture Plus, TWAIN, or ISIS help.
- When replacing the ink cartridge or printing, see the label shown below for the ink cartridge position.
Position of the label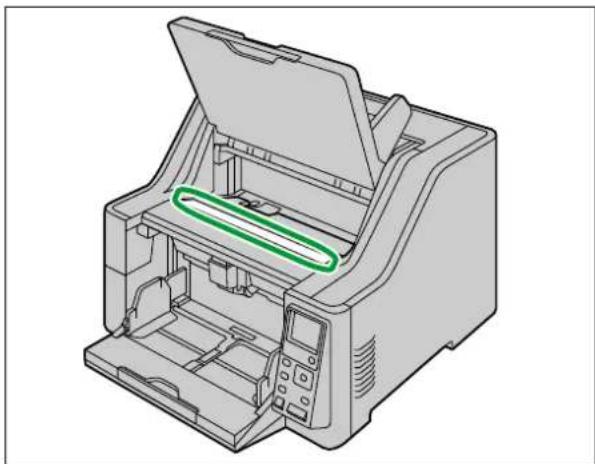

10.1.1 Installing the imprinter as the pre-imprinter
- Open the pre-imprinter door (page 35).
Note
- Move up the exit tray using the operation panel.
- Pass the cable through the opening of the pre-imprinter door.

- After aligning the pins (①) on both sides with the slits in the body of the scanner (②), insert the pins (③) until they are immobilized by the springs (④)

- Install the ink cartridge (page 90).
- Close the pre-imprinter door.

- Turn the flap up, and connect the cable.

Notice
- Check the orientation of the connector before insertion.
10.1.2 Install the imprinter as the post-imprinter
- Turn OFF the unit's power (page 33).
- Open the post-imprinter door (page 38).
- Connect the cable.

Notice
- Check the orientation of the connector before insertion.
- After aligning the pins (①) on both sides with the slits in the body of the scanner (②), insert the pins (③) until they are immobilized by the springs (④)

- Install the ink cartridge (page 90).
- Close the post-imprinter door.
10.2 Replacing the Ink Cartridge
10.2.1 How to Remove the Ink Cartridge
- Open the imprinter door.
- When removing the ink cartridge from the pre-imprinter, refer to "6.5.1.1 When installing/uninstalling the imprinter unit and ink cartridge" (page 35).
- When removing the ink cartridge from the post-imprinter, refer to "6.5.2 Opening the post-imprinter door" (page 38).
- Move the carriage to the ink cartridge exchange position.
- For the exchange position, see the label on the scanner (page 83).

- Pinch the ink cartridge adjustment lever ( ) and lift it.

- Remove the ink cartridge ( )①

- For details about installing a new ink cartridge, refer to "10.2.2 How to Install the Ink Cartridge" (page 90).
10.2.2 How to Install the Ink Cartridge
Notice
Check that the unit has been turned off.
- Remove the protective sheet.

- Move the carriage to the ink cartridge exchange position.
For the exchange position, see the label on the scanner (page 83).

- Insert the ink cartridge into the carriage.

- Lock the cartridge adjusting lever.
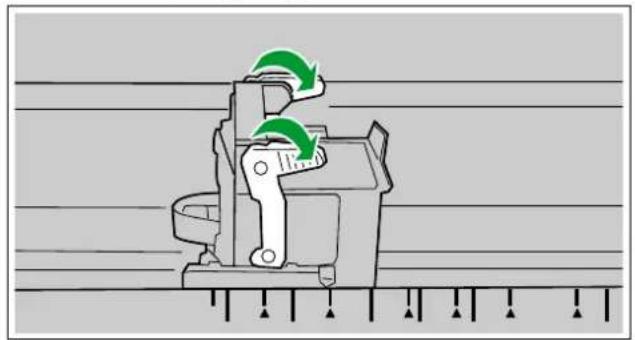
10.3 Printing
Adjusting the imprinter printing position
- Open the pre-imprinter door (page 37).
- Move the carriage to the desired printing position, and align the indicator (①) with the "▲" mark (②).
The "▲" mark indicates the printing position. Printing is not available in any other position.
For the printing position, see the label on the scanner (page 83).

- Close the pre-imprinter door.

- Press the cursor button for 1 second or more.
• The exit tray will move down.
Printing Position
Document size Document sizeCenter
Printing
Printing can be set from the Image Capture Plus software and the TWAIN and ISIS drivers. For details, refer to the Image Capture Plus, TWAIN, or ISIS help.
10.4 Cleaning the ink cartridge
If printing becomes faded, perform the following:
Cleaning by using the User Utility
Click the [Clean Imprinter] button on the User Utility program.
This will help remove clogging by ejecting ink from the print head.
Cleaning the dirt on the print head
Wipe and clean the print head with moistened tissue paper.
Do not use any material that includes alcohol. (e.g., Roller cleaning paper)

Notice
- Depending upon the type of paper you use, ink may stain the inside of the scanner (e.g., Rollers). In this case, clean it by using the Roller cleaning paper (KV-SS03).
11 Appendix
11.1 Troubleshooting
If a problem occurs while the scanner is being used, check the following items and check the scanner's status in User Utility. If the unit still malfunctions, turn it OFF, unplug the power cord and call for service.
| Symptom Possible | Cause Remedy | |
| The Ready LED (Green) does not light when the unit's power is turned ON. | The power cord is not plugged in. Insert the power plug firmly. | |
| The computer does not recognize the scanner. The scanner is not functioning correctly. | The scanner is not connected to the computer correctly. | Connect the USB cable correctly. |
| The software is not installed correctly. | Uninstall the software from the computer (page 100), and then install the software again (page 14). | |
| The scanner is connected via USB hub. | Do not connect via USB hub. | |
| There is a problem with the USB cable. | Make sure to use the included USB cable. | |
| The unit's power was turned OFF because no operation was performed for a certain period of time. | Turn ON the unit's power (page 32). | |
| Scan speed is slow. | The scanner is connected over a USB 1.1 connection. | Connect over USB 2.0 / USB 3.0. |
| The document has been loaded on the feed tray, but the scanner does not start scanning. | The document is not loaded properly. | Load the document correctly. (page 43) |
| The sensor cannot detect the document as the edge of the document is curled. | Flatten the document (page 40), and load it again (page 43). | |
| The ADF door cannot be opened. | The screw is not loosened. | Loosen the shipping screw. (page 15) |
| Double feeding occurs frequently. | The paper feed roller, separation roller, or double feed prevention roller is dirty. | Clean the paper feed roller, separation roller, or double feed prevention roller. (page 70) |
| The double feed detectors are dirty. | Clean the double feed detectors. (page 69) | |
| The paper feed roller, separation roller, or double feed prevention roller has become worn down. | Replace the paper feed roller, separation roller, and double feed prevention roller. (page 77) | |
| Right and left sides of the document to be scanned are not the same in height, because of curling or folding. | Flatten the document (page 40), and load it again after reducing the number of sheets. | |
| The document is printed on an unsupported type of paper or thick paper. | Make a copy of the document on paper of a compatible type and thickness (page 39), and then scan the copy. | |
| The length of the paper is too short. | Make a copy of the document on paper of a compatible size (page 39), and then scan the copy. | |
| The paper thickness mode is not appropriate for the documents. | Change the paper thickness mode. (page 28) | |
| The document is not aligned correctly. | Realign the document. (page 43) | |
| Too many sheets are set on the feed tray. | Remove sheets until the sheets on the feed tray are under the limit mark on the document guide. | |
| Documents are not being fed separately. | Manual feeding is selected. | Select automatic feeding. (page 49) |
| Paper jams occur frequently. | The paper thickness mode is not appropriate for the documents. | Change the paper thickness mode. (page 28) |
| The document is wrinkled. Smooth out | the document. | |
| The rollers are dirty. Clean the rollers. | (page 70) | |
| The sensors are dirty. Clean all of the | sensors. (page 67) | |
| The document is not aligned correctly. | Realign the document. (page 43) | |
| Too many sheets are set on the feed tray. | Remove sheets until the sheets on the feed tray are under the limit mark on the document guide. | |
| Scanned image is skewed. | The document guides are not adjusted to the size of the document to be scanned, or the document to be scanned is set slanted on the feed tray. | Adjust the document guides properly to the size of the document to be scanned. (page 43) |
| Right and left sides of the document to be scanned are not the same in height, because of curling or folding. | Flatten the document (page 40) and load it again after reducing the number of sheets. | |
| The image for a scanned document is blank. | The document to be scanned was loaded upside down. | Load the documents with the surface to be scanned facing up. |
| Vertical streaks appear on the scanned document. | The scanning glasses are dirty. | Clean the conveyor and scanning glasses. (page 68) |
| The scanning density is uneven. | The scanning glasses are dirty. | Clean the conveyor and scanning glasses. (page 68) If cleaning does not improve the scanning density, perform shading adjustment. (page 99) |
| The color of the scanned document is extremely different from the original document. | The settings of the computer monitor are wrong. | Adjust the computer monitor settings. |
| Depending on the documents scanned, the color of documents may not be scanned properly. For example, the color of a highlighter pen may be scanned lighter than it appears. | Setting the value for [Chroma] higher in the scanning conditions may solve this problem. | |
| Dark spots or noise appear on the scanned documents. | The scanning glasses are dirty. | Clean the conveyor and scanning glasses. (page 68) |
| There are noise or wave patterns (moire patterns) on the scanned image. | The scanning resolution settings, combined with patterns within the scanned image, may cause this problem. | Change the scanning resolution or turn the Moire Reduction function ON, and perform scanning again. About Moire Reduction function, refer to the Image Capture Plus, TWAIN, or ISIS help. |
| There is a noise louder than normal when a short document exits the unit. | The motor speed control may cause a louder noise when a short document exits the unit. This operation is normal. | — |
If you still experience problems after following these suggestions, please contact our Technical Support Department at 1-800-726-2797 for further assistance. (U.S.A. only)
11.2 Error Messages
Error codes and simple messages describing the scanner's condition are displayed on the LCD. For details about the error codes and messages, check in User Utility.
| Error Code Cause | Remedy | |
| U11 | The paper has jammed in the feed tray area. | Open the ADF door, and remove the paper. |
| The sensors are dirty. Clean the sensors. | ||
| U12U13U14U15U16 | A paper jam has occurred in the unit. | Open the ADF door, and remove the paper. |
| The sensors are dirty. Clean the sensors. | ||
| U18 | Paper has been left in the scanner. | Open the ADF door, and remove all the paper left inside. |
| The sensors are dirty. Clean the sensors. | ||
| U19 | A stapled or damaged document has been detected. | Open the ADF door, and remove all the paper left inside. |
| U23 A double- | feed error has occurred. | Open the ADF door, and remove the jammed paper. |
| U25U26 | A stapled document has been detected. | Open the ADF door, and remove all the paper left inside. |
| U28 The feed | tray is full. | Remove the documents from the tray, open the ADF door, and then close it. |
| U30 The ADF | door is open. Close the ADF door. | |
| U32U34 | The Imprinter door is open. Close the Imprinter door. | |
| Fxx A system | error has occurred. Contact your dealer. |
11.3 Shading Adjustment
When shading adjustment is required
- Perform shading adjustment when the density and brightness of sections of scanned images are considerably uneven, or when image quality does not improve after cleaning the inside of the scanner.
Before proceeding with the shading adjustment
- Before beginning shading adjustment, thoroughly clean the scanning glasses, conveyors in the scanning area (page 68), and all rollers (page 70). If you perform shading adjustment while these parts are dirty, lines will appear on scanned images.
Shading adjustment procedure
- Start User Utility.
- Click [User Shading...] on the main menu, and operate as the image display dictates.
Note
- For further details, refer to section "[User Shading]" in the help for User Utility.
Notice
- If the shading adjustment has not been performed properly, then lines might appear on scanned images even after adjusting the shading, or lines might not be eliminated even after cleaning the scanning glass. Clean the parts, and then adjust the shading again.
11.4 Uninstalling the Software
If you want to remove the software that is installed on your computer, follow the procedure below to uninstall it.
- In [Control Panel], open [Uninstall a program].
- In Windows XP, select [Add or Remove Programs].
- Uninstall the following software programs.
| Program Name Publisher | |
| Image Capture Plus Panasonic System Networks Co., Ltd. | |
| Scan Button Setting Tool Panasonic System Networks Co., Ltd. | |
| IDREngine Panasonic System Networks Co., Ltd. | |
| Panasonic Scanner Manuals Panasonic System Networks Co., Ltd. | |
| Panasonic Document Scanner Device Driver Panasonic System Networks Co., Ltd. | |
| MCD Panasonic System Networks Co., Ltd. | |
| KV-S8147 KV-S8127 ISIS Driver Panasonic System Networks Co., Ltd. | |
| Panasonic Document Scanner TWAIN Driver Panasonic System Networks Co., Ltd. | |
| Panasonic Scanner User Utility Panasonic System Networks Co., Ltd. | |
| OCREngine Panasonic System Networks Co., Ltd. | |
- Follow the instructions on the screen.
11.5 Repacking Instructions
It is highly recommended that you keep the original carton and ALL packing materials. If you need to transport or ship the scanner, please follow these instructions.
Notice
- Improper repacking of the scanner may result in a service charge to repair the scanner.
- Please use the original carton and all of the original packing materials.
- The scanner should be handled in the correct (horizontal) position.
Required Materials
• Original scanner carton and packing materials • Shipping tape and scissors
- Turn the unit off (page 33), unplug the power cord and disconnect the USB cable.
- Install the shipping screw.
- Refer to "Location of the shipping screw" (page 15).
- Pack the scanner.
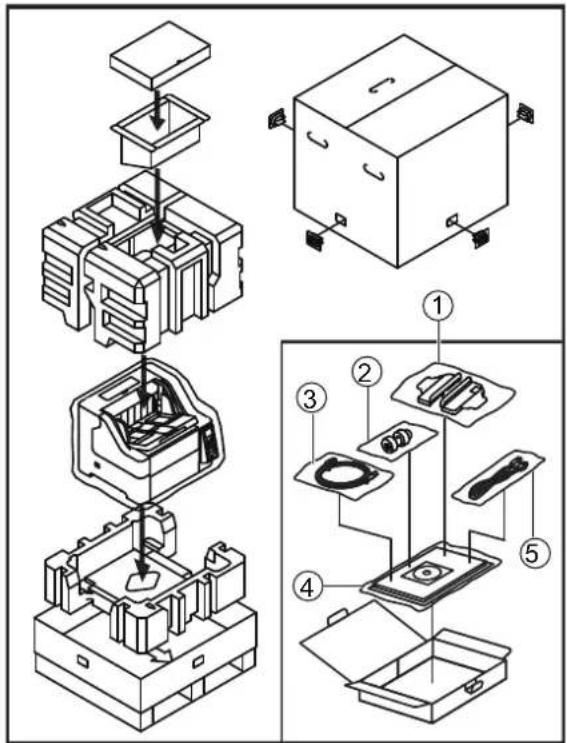
① Attachment guide (R / L) ② Double feed prevention roller ③ USB cable ④ Quick Installation Guide and Software / Manual CD-ROM ⑤ Power cord
11.6 Specifications
Scanning
| Item KV-S8147 KV-S8127 | |||
| Scanning face Duplex | |||
| Scanning method RGB3 Line Color CIS (600 dpi) | |||
| Scanning\ speed*1 • A4 / Letter• Binary / color• 200 dpi / 300 dpi• Landscape | Simplex 140 pages/min. 1 | 20 pages/min. | |
| Duplex 280 images/min. 2 | 40 images/min. | ||
| Scanning\ resolution*2 | 100 – 600 dpi (1 dpi step), 1,200 dpi (Interpolated)Optical: 300 dpi / 600 dpi (Automatic switch) | ||
| Paper*3 | Width 48 mm – 307 mm (1.9 in. – 12.09 in.) | ||
| Length | Automatic feeding:70 mm – 432 mm (2.75 in. – 17 in.) | ||
| Manual feeding:70 mm – unlimited (2.75 in. – unlimited) 4 | Manual feeding:110 mm – unlimited(4.33 in. – unlimited) 4 | ||
| Paper basis weight *5 | Automatic feeding:20 g/m2 – 255 g/m2 (5.2 lb. – 68 lb.)Manual feeding:20 g/m2 – 255 g/m2 (5.2 lb. – 68 lb.) (U-turn path [front exit])20 g/m2 – 550 g/m2 (5.2 lb. – 146 lb.) (Straight path [rear exit]) | ||
| Feed capacity | 750 sheets (80 g/m2 [21 lb.] A4 High-quality woodfree paper)500 sheets (80 g/m2 [21 lb.] A3 High-quality woodfree paper) | ||
| Roller replacement *6 | 600,000 sheets | ||
*1 The scanning speed differs depending on the host computer, the operating system, the application, the measuring method, the quantity of data in the image, and the paper type. The scanning speed depends on a measuring method of Panasonic.
*2 When scanning a document larger than A5 size at high resolutions over 600 dpi, the scanning may fail due to insufficient memory.
*3 For details, see "7.1.1 Compatible Paper" (page 39).
*4 Using "Long Paper", you can scan a long document to a series of split scanned images. For details about "Long Paper", refer to the Image Capture Plus, TWAIN, or ISIS help.
*5 Use "Thin paper mode" (page 28) when scanning the document less than 40g / m2 (10.6 lb.).
*6 For details, see "9.3 Replacing the Rollers" (page 77).
General
| Item KV-S8147 KV-S8127 | |||
| External dimensions (Width × Depth × Height) | 545 × 474 × 435 mm (21.46 × 18.66 × 17.12 in.) (Not including protruding parts) | ||
| Weight 44.4 kg (97.9 lb.) | |||
| Power requirement | AC100 – 120 V, 50/60 Hz, 2.7 A AC100 – 240 V, 50/60 Hz, 2.7 – 1.5 A | ||
| Power consumption | Scanning 140 W or less | ||
| Ready 35 W or less | |||
| Sleep 2 W or less | |||
| Power OFF 0.5 W or less | |||
| Environment*1 | Operating environment | Temperature: 5 °C – 35 °C (41 °F – 95 °F) Humidity: 20 % – 80 % RH | |
| Non-operating environment | Temperature: -20 °C – 60 °C (-4 °F – 140 °F) Humidity: 8 % – 95 % RH | ||
| Storage environment | Temperature: -10 °C – 50 °C (14 °F – 122 °F) Humidity: 8 % – 75 % RH | ||
| Interface USB 2.0 / USB 3.0 | |||
* About the environmental conditions of Imprinter Unit (KV-SS014), refer to the Installation Manual of Imprinter Unit. When printing in conditions outside of the imprinter unit's operating environment, the printing result may be faded or printing may not occur.


- OPERATING MANUAL
- DOCUMENT SCANNER
- INTRODUCTION
- TRADEMARKS
- ABOUT THE DESCRIPTIONS IN THIS MANUAL
- NOTE
- ABOUT THE DOCUMENTATION
- ABOUT THE SOFTWARE HELP
- SOFTWARE / MANUAL CD-ROM CONTENTS
- ABOUT CONSUMABLES AND OPTIONAL ACCESSORIES
- TABLE OF CONTENTS
- FEATURE HIGHLIGHTS
- BEFORE YOU START
- LOCATION OF CONTROLS
- INSTALLATION
- OPERATION PANEL
- BASIC OPERATIONS
- USING THE SCANNER
- CLEARING PAPER JAMS
- CARE AND MAINTENANCE
- OPTIONAL IMPRINTER UNIT
- APPENDIX
- HIGH-SPEED DOUBLE SIDED SCANNING
- BACKGROUND COLOR SWITCH FUNCTION
- DOUBLE FEED DETECTION FUNCTION
- DOUBLE FEED SKIP (DFS) FUNCTION
- DOUBLE FEED RETRY FUNCTION (KV-S8147 ONLY)
- MECHANICAL DESKEW (KV-S8147 ONLY)
- STAPLED DOCUMENT DETECTION
- DOCUMENT ABNORMAL NOISE DETECTION FUNCTION
- COUNT ONLY MODE
- PUSH SCAN
- OTHER FEATURES
- PRECAUTIONS
- ILLEGAL DUPLICATION
- NOTICE
- CD-ROM
- ROLLER CLEANING PAPER
- SECURITY NOTICE
- OTHERS
- CHECK THE ACCESSORIES
- MAIN UNIT
- FRONT
- REAR
- REQUIRED SPACE AROUND THE SCANNER
- INSTALLING THE SOFTWARE
- INSTALLING THE UNIT
- VIEWING OPERATING MANUAL AND HELP INSTALLED
- TO VIEW THE OPERATING MANUAL
- TO VIEW THE HELP
- FOR IMAGE CAPTURE PLUS
- FOR USER UTILITY OR SCAN BUTTON SETTING TOOL
- FOR TWAIN OR ISIS
- ⑨ START/STOP BUTTON ( ◊/⊗)
- ⑩ MANUAL FEED BUTTON ( )
- ⑪ MANUAL FEED LED (GREEN)
- ⑫ ENTER BUTTON (√)
- ABOUT LED
- HOME SCREEN OF THE LCD
- USING OPERATION PANEL
- HOME SCREEN
- SETTING CONTENTS
- ADJUSTING THE HEIGHT OF THE FEED TRAY
- CHANGING THE PAPER THICKNESS MODE
- JOB SCREEN
- MENU SCREEN
- FUNCTION SETTING SCREEN
- COUNTER SCREEN
- MAINTENANCE SCREEN
- TURNING ON/OFF THE UNIT'S POWER
- TURNING ON THE UNIT'S POWER
- TURNING OFF THE UNIT'S POWER
- RETURNING FROM SLEEP MODE
- OPENING THE ADF DOOR
- CLOSING THE ADF DOOR
- OPENING THE IMPRINTER DOOR
- OPENING THE PRE-IMPRINTER DOOR
- WHEN INSTALLING/UNINSTALLING THE IMPRINTER UNIT AND INK CARTRIDGE
- WHEN OPENING THE PRE-IMPRINTER DOOR FOR PURPOSES OTHER THAN INSTALLING/UNINSTALLING THE IMPRINTER UNIT AND INK CARTRIDGE
- OPENING THE POST-IMPRINTER DOOR
- CHANGING THE LANGUAGE USED ON THE LCD
- PREPARING DOCUMENTS
- COMPATIBLE PAPER
- PAPER TYPES
- CURL AND FOLDING
- INCOMPATIBLE DOCUMENTS
- NOTES ABOUT DOCUMENTS FOR SCANNING
- SCANNING DOCUMENTS
- SWITCHING THE BACKGROUND COLOR OF SCANNED IMAGES
- USING THE STRAIGHT PATH (REAR EXIT)
- USING MANUAL FEEDING
- SWITCHING BACK TO AUTOMATIC FEEDING
- FEEDING METHOD AND PAPER PATH BY DOCUMENT TYPE
- WHEN SCANNING DOCUMENTS WITH PAGES OF DIFFERENT SIZES AT ONE TIME
- ADJUSTING THE LEFT AND RIGHT DOCUMENT GUIDES TO THEIR ORIGINAL POSITION
- WHEN USING THE ATTACHMENT GUIDE (R / L)
- WHEN FEEDING STIFF OR THICK DOCUMENTS
- USING PUSH SCAN
- SETTING THE SCANNING CONDITIONS
- SELECTING THE BEHAVIOR OF PUSH SCAN
- PERFORMING PUSH SCAN
- CHECKING EVENTS
- USING COUNT ONLY MODE
- USING CONTROL SHEETS
- CONTROL SHEET FUNCTIONS
- ABOUT PRINTING CONTROL SHEETS
- PRINTING CONTROL SHEETS
- CLEANING THE OUTSIDE OF THE SCANNER
- CLEANING THE INSIDE OF THE SCANNER
- CLEANING THE CONVEYOR AND SCANNING GLASSES
- CLEANING THE SENSORS
- CLEANING THE ROLLERS
- DIRECTION TO WIPE ROLLERS
- LOCATION OF ROLLERS
- CLEANING MODE
- CLEARING THE COUNTER AFTER CLEANING THE ROLLERS
- REPLACING THE ROLLERS
- CLEARING THE COUNTER AFTER REPLACING THE ROLLERS
- INSTALLING THE IMPRINTER UNIT AND INK CARTRIDGE
- INSTALLING THE IMPRINTER AS THE PRE-IMPRINTER
- INSTALL THE IMPRINTER AS THE POST-IMPRINTER
- REPLACING THE INK CARTRIDGE
- HOW TO REMOVE THE INK CARTRIDGE
- HOW TO INSTALL THE INK CARTRIDGE
- PRINTING
- ADJUSTING THE IMPRINTER PRINTING POSITION
- CLEANING THE INK CARTRIDGE
- CLEANING BY USING THE USER UTILITY
- CLEANING THE DIRT ON THE PRINT HEAD
- TROUBLESHOOTING
- ERROR MESSAGES
- SHADING ADJUSTMENT
- WHEN SHADING ADJUSTMENT IS REQUIRED
- BEFORE PROCEEDING WITH THE SHADING ADJUSTMENT
- SHADING ADJUSTMENT PROCEDURE
- UNINSTALLING THE SOFTWARE
- REPACKING INSTRUCTIONS
- REQUIRED MATERIALS
- SPECIFICATIONS
Brand : PANASONIC
Model : KV-S8127
Category : Scanner