
DVR FULL HD PRO - Dash cam GOCLEVER - Free user manual and instructions
Find the device manual for free DVR FULL HD PRO GOCLEVER in PDF.


| Product Type | Dash Cam (High-Definition Digital Video Camcorder) |
| Brand | GoClever |
| Model | DVR FULL HD PRO |
| Display Screen | 2.5-inch LTPS (4:3) with 270° rotation |
| Camera Lens | 130° wide angle, A+ high resolution, 180° rotatable |
| Video Resolution | 1080p / 720p / 480p |
| Video Format | AVI |
| Photo Resolution | 12 MP / 8 MP / 5 MP / 3 MP |
| Photo Format | JPEG |
| Memory Card Slot | SD / SDHC (high-speed recommended) |
| Battery Type | BL-5C Lithium-ion rechargeable |
| Battery Charging | Via USB, supports recording while charging |
| Microphone | Built-in |
| Interfaces | USB 2.0, HDMI, TV out (AV) |
| Power Supply | 5V 500mA |
| System Requirements | Windows 2000/XP/Vista/7, Mac OS X 10.3.6+ |
| Loop Recording | 5 / 10 / 15 minutes |
| Motion Detection | Yes, on/off |
| Date Stamp | Yes (on/off) |
| Anti-shake | Yes |
| Digital Zoom | 4x |
| White Balance | Auto / Daylight / Cloudy / Tungsten / Fluorescent |
| Color Effects | Normal / Black-white / Sepia |
| Self-timer | 2s / 5s / 10s / Continuous |
| Face Detection | Yes (face and smile detection) |
| TV Output | NTSC / PAL selectable |
| Language Support | English, German, French, Spanish, Italian, Portuguese, TC, SC, Japanese, Russian |
Frequently Asked Questions - DVR FULL HD PRO GOCLEVER
User questions about DVR FULL HD PRO GOCLEVER
0 question about this device. Answer the ones you know or ask your own.
Ask a new question about this device
Download the instructions for your Dash cam in PDF format for free! Find your manual DVR FULL HD PRO - GOCLEVER and take your electronic device back in hand. On this page are published all the documents necessary for the use of your device. DVR FULL HD PRO by GOCLEVER.
USER MANUAL DVR FULL HD PRO GOCLEVER
natural_image
Abstract logo design with interlocking gray rings and a blue square (no text or symbols)GOCLEVER
INFINITE INVENTION
GOCLEVER
DVR FULL HD PRO
OWNER'S MANUAL
GOCLEVER
DVR FULL HD PRO
INSTRUKCJA OBSŁUGI
ODWIEDŹ NASZĄ STRONĘ
WWW.GOCLEVER.COM
ABY ZAPOZNAĆ SIĘ Z INNYMI PRODUKTAMI TAB, NAVIO, DVR, DVB-T
Thank you for purchasing this high-definition digital video camcorder, with mini refined appearance and a unique flip-screen feature that can match up the multi-function to achieve a wide angle photography. The user manual introduces the method of usage in detail, at the same time it also provides detailed information to you, including the usage, operation, installation considerations and technical specifications. Please carefully read and fully understand this user manual before your use the camcorder and keep it handy for future reference. We hope this camcorder can satisfy your need and make a service for you in a long term.
Product overview
This subminiature high-definition digital video camcorder is aimed at the market demand, with many leading functions as high definition digital video recorder, photograph, high-speed USB data transmission and USB charging.
Features
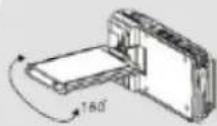
- Small Size, a perfect modular design of bug-eyed lens with 180-degree rotary tape and A+ high-resolution of 130-degree; the display screen of 270-degree rotary tape is more convenient to capture and record the high resolution videos from a wide angle in various occasions
- Built-in 1/3.2 inch sensitivity mode with low noise and high definition that can shoot in dimly lit places
- Switching from Day to night mode function
• Automatic exposure control function
• Built-in lithium battery, support the function charging and recording at the same time.
• Built-in microphone - Support for the SD (SDHC) card with high power capability
- Self-timer can preview by the screen to capture the ideal image
-
Anti-shake function
• Motion detection recording -
4X digital zoom
- A TV / HDMI interface can be directly connected with the high-definition television
Product Scheme
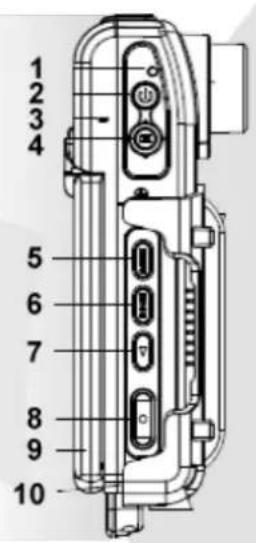
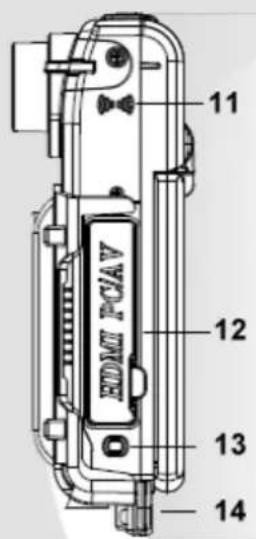
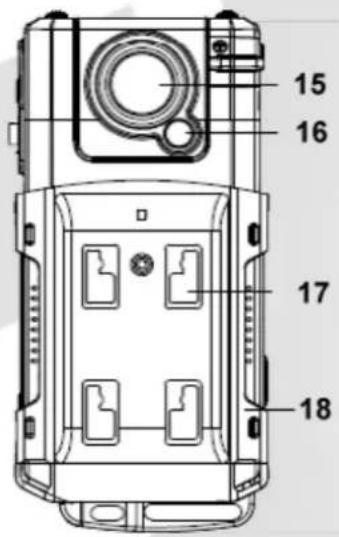

- LED monitor
- Power button
- Microphone port
- Five direction button: up button (Macro), down button (zoom)
left button (EV button), right button (flash compensation)
-
Menu button
-
Speaker
- HDMI interface, USB interface, TV interface,
- Reset button
- Bracket 1
- Lens
- Flash compensation
-
The battery cover (blow the bracket 2)
-
Mode button
- Playback button
- Video and camera button
- Display
-
Grip belt hook
-
Bracket 2
- SD card slot
- Tripod fixed end
Battery and Memory Card
Battery installation
- Turn the battery cover knob toward the mark to open the cover
- Insert the battery, and make sure that the plus-minus markings on the battery match those on the camcorder.
- The battery level display shows the amount of battery power remaining in the battery, and the reference is as follows.

Fully charged

Not fully charged
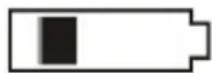
Low power
- Close the battery cover.
Charging the battery
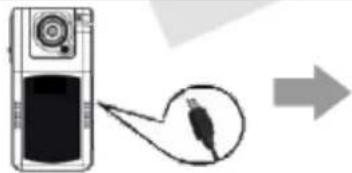
- To charge by directly linking the socket to the camcorder USB interface or turn the power off.
- USB charger, putting one of USB data cable connected to the computer and the other end with camcorder or you can turn the power off.
The installation and removing of the SD memory card
- Insert the SD memory card in the SD slot according to the indicative direction, until it softly clicks.
- When removing the SD memory card, push in the SD memory card and gently release to eject it.
Notes:
- Make sure the switch of SD memory card is open.
-
Make sure the SD memory card are facing the right way, if it is in the wrong direction, it may damage the camera and SD memory card.
-
When you insert the SD memory card into the camcorder, which will set the SD memory card as the storage devices, the original data in the SD memory card may not be read.
- If the SD memory card is incompatible with the camcorder, please try again or change other SD memory.
- Please use the high-speed SD memory card, as the SDHC cards.
User Guide
Turning the power on/off
- Press the power button about one second to turn the power on or off.
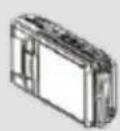
- Open the screen to turn the power on while closing it to turn off the power.
Switching the operation mode
- Press the mode button to switch the video and photography mode:

recording mode icon

photography mode icon
They are marked on the top left corner of the screen.
- Press playback button to enter into the playback.
How to enter into the system setting options
Press the MENU button twice to enter into the "System Settings" option, then it becomes the blue background.
- Date / Time: set the date and time;
- Auto Shutdown: set automatic shutdown time ;
- Beep Sound: turn on and off the sound of the buttons;
• Language: set the used language menu;
• Frequency: set 50Hz/60Hz current frequency
• TV mode: Set the NTSC / PAL; - Default: recover the factory settings;
• Version: Software version number
How to make a video recording, recording options
1. Recording
When the camcorder enters into the recording video mode and a mark like appears on the left of the screen, press the camera button to start recording video, the recording indicator will flash. When you press the camera button, the recording will stop and the recording indicator will disappear.
2. Selection of the white led
Under the recording mode, press the left button, you can use the switching function between day and night mode. The night mode is turning on white led with the indicator on the left bottom of the screen.
3. Settings of the recording options
- Press the MENU button to enter into the recording option settings
• Resolution: 1080p/720p/480p - Loop recording: 5 minutes/10 minutes/ 15 minutes
- Motion detection: on/off
- Date stamp: on/off
How to take a photo, photo options
- Turn the power on, press the mode button to select the photo mode, then the mark appear at the top left, at the time, the camcorder enter into the photo mode.
- Aim and focus. Adjust the camcorder to the ideal aperture, at the time, you need to grip the camcorder tightly to prevent from shacking.
- Press the photo button, and then the camera will make a "crack" sound, which means a photo is completed.
- Self-timer function.

In photo mode, press the Menu button to select the self-timer mode as single shot, two seconds timing, five seconds timing, ten seconds timing and continuous shooting.
-
Press the MENU button to enter into the photo selection setting.
-
Capture mode: single shot, timing with (two sec./five sec./, ten sec.) and continuous capture.
• Resolution: 12M/8M/5M/3M
• Quality: super fine, fine and normal - Sharpness: strong, normal and soft
- White balance: auto/daylight/cloudy/tungsten/fluorescent
• Color: normal/black-white/sepia
• ISO: auto/100/200/400 - EV:-2.0 - +2.0
- Face detection: face detection / smile detection
- Anti-shaking: off/ on
- Quick review: shut/ 2s/5s
- Date stamp: date/time
Playing back mode
- After the camcorder open the procedure and enter into the recording mode, press the playback button to the single playback mode, you can press the left or right button to review the audio and video data.
- Press the bottom button to the index mode and press the four-direction button, you can preview pictures and video data. Then press the OK button to the single mode to operate with
the picture video data. mark appears on the up left of the screen means the video data, if you want to play audio and video data, you can press OK button to play or pause. During the playing process, press left button to rewind, right button to fast forward, up button to increase the volume and bottom button to decrease the volume.
mark means the picture file, pressing the up button can enlarge the picture, then press the OK button to the mobile mode, using the four-direction button to move around the picture. And then press the OK button to exit the mobile mode, press the zoom button to shrink the picture.
- Deleting files.
In playback mode, press the Menu button, you can see the delete and formatting options, press the bottom button to display the file you want to delete, and then press the right button to choose the options of delete the current file of delete all. At last, press OK button to confirm.
Recording while charging mode
Connecting one end of the USB interface to the socket, the camcorder will enter into the recording while charging mode when it is open.
A

B
C

D

E
Screen Rolling
Information backup
USB Backup Mode.
Firstly, connect the camcorder with the computer by USB cable, and then press the power button, it will appear a picture as followings, select the storage and press OK button. Lastly, open the icon of My Computer on the desktop, a movable disk will appear, and find the needed picture from the DCIM document in the movable disk.
 | MEMORYPICTBRIDGECAMERA |  |
Remarks:
- Computer operating system: above the Windows 2000/XP/Vista/Windows 7, MAC OS x 10.3.6 above
- Select the camera to use it.
- Select PICBRIDGE to connect with the printer to print pictures.
- Removing the USB to power the camcorder off.
Connect to the TV to display videos
- Use the HDMI cable to connect with the high quality TV to play back.
- Use the TV cable to connect the TV to recording, taking a picture and browse the picture and video data.
Note: The removable disk can be used without the installer driver, when the camcorder is open.
Remarks: Suppose the camcorder is in dead halt due to the improper operation, you can press the reset button to boot the machine, which will return to normal!
Technical Specifications
| LCD screen | 2.5 LTPS (4:3) |
| Camera lens | 130° A+ level degrees high resolution lens |
| Language | English, German, French, Spanish, Italian, Portuguese, TC, SC, Japanese, Russian |
| Video | 1080p/ 720p/ 480p |
| Video format | AVI |
| Resolution | 12M/ 8M/ 5M/ 3M |
| Picture format | JPG |
| Memory card slot | SD |
| Microphone | Built-in |
| Capture mode | Single/self-timer (two seconds timer, five seconds timer, ten seconds timer) and sequence |
| Frequency | 50Hz/ 60Hz |
| Television | NTSC/ PAL |
| USB interface | USB 2.0 |
| Power | 5V 500MA |
| Battery | Use the BL-5C battery |
| System | Windows 2000/ XP/ Vista/ Seven, MAC OS x 10.3.6 or above |
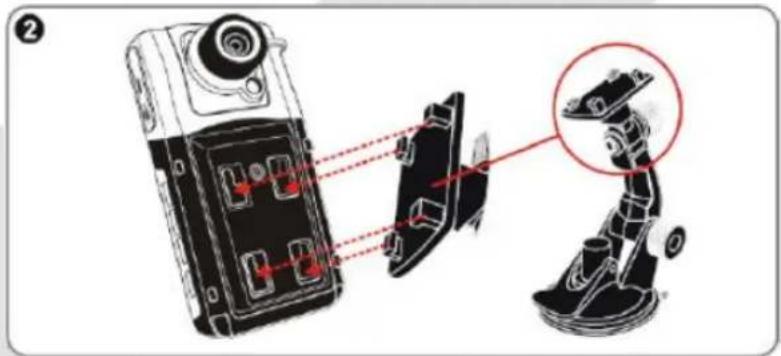
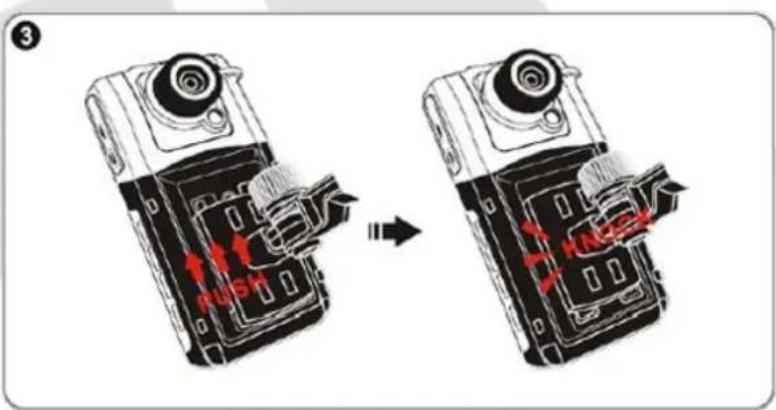
Rack Mounting
Installation steps




natural_image
Abstract logo design with interlocking gray rings and a blue square (no text or symbols)GOCLEVER
INFINITE INVENTION
DVR PRO
INSTRUKCJA OBSŁUGI
ODWIEDŹ NASZĄ STRONĘ
WWW.GOCLEVER.COM
ABY ZAPOZNAĆ SIĘ Z INNYMI PRODUKTAMI TAB, NAVIO, DVR, DVB-T
PAMIĘĆ STANDARDU PICTBRIDGE URZĄDZENIA

natural_image
Laptop displaying a video game with an icon of a USB flash (no text or symbols visible)Uwagi:


Warunki gwarancji
www.AUTORMA.GOCLEVER.com
67531 Jemnice, Czech Republic
servis@goclever.cz
Serbia
ET Servis d.o.o. Beograd
Member of Logo d.o.o.
Group Bulevar kralja Aleksandra 261
11000 Beograd. Srbija
+381 11 2042 109,+381 11 2042 101
www.etservis.rs
servis@etseivis.rs
Ukraina
Service Center "KROK-TTC"
Date and customer's signature
Repairs history
| Date | Confirmed defect | made repairs | Service sign and stamp |
- GOCLEVER
- INFINITE INVENTION
- DVR FULL HD PRO
- OWNER'S MANUAL
- INSTRUKCJA OBSŁUGI
- Product overview
- Features
- Product Scheme
- Battery and Memory Card
- Battery installation
- Charging the battery
- The installation and removing of the SD memory card
- Notes:
- User Guide
- Turning the power on/off
- Switching the operation mode
- How to enter into the system setting options
- How to make a video recording, recording options
- Recording
- Selection of the white led
- Settings of the recording options
- How to take a photo, photo options
- Playing back mode
- Recording while charging mode
- Information backup
- Remarks:
- Connect to the TV to display videos
- Rack Mounting
- DVR PRO
- Uwagi:
- Warunki gwarancji
- www.AUTORMA.GOCLEVER.com
- Serbia
- Ukraina
Brand : GOCLEVER
Model : DVR FULL HD PRO
Category : Dash cam