
ZOB 655 X - Oven ZANUSSI - Free user manual and instructions
Find the device manual for free ZOB 655 X ZANUSSI in PDF.


| Product Type | Built-in Electric Oven |
| Brand | Zanussi |
| Model | ZOB 655 X |
| Oven Capacity | 56 liters |
| Energy Consumption (Conventional) | 0.79 kWh |
| Energy Consumption (Fan Cooking) | 0.78 kWh |
| Heating Element Ratings | Bottom: 1000W, Top: 800W, Grill: 1650W |
| Total Power | 1875W |
| Voltage / Frequency | 230V ~ 50Hz |
| Oven Dimensions (H x W x D) | 335 x 405 x 410 mm |
| Recess Dimensions (H x W x D) | 593 x 560 x 550 mm (under top) / 580 x 560 x 550 mm (in column) |
| Cooking Modes | Conventional, Fan Cooking, Grill |
| Temperature Range | 50°C - 250°C |
| Timer | Minute Minder (up to 60 minutes) |
| Safety Features | Safety thermostat, cooling fan, automatic shut-off |
| Oven Light | 25W, replaceable (E14, 300°C resistant) |
| Cleaning | Enamel interior, removable oven door for easy cleaning |
| Accessories Included | 1 oven shelf, baking tray, grill pan |
Frequently Asked Questions - ZOB 655 X ZANUSSI
User questions about ZOB 655 X ZANUSSI
0 question about this device. Answer the ones you know or ask your own.
Ask a new question about this device
Download the instructions for your Oven in PDF format for free! Find your manual ZOB 655 X - ZANUSSI and take your electronic device back in hand. On this page are published all the documents necessary for the use of your device. ZOB 655 X by ZANUSSI.
USER MANUAL ZOB 655 X ZANUSSI
Apparecchiature in disuso
natural_image
Line drawing of a tablet device with no text or symbolsnatural_image
Line drawing of a rectangular metal tray with horizontal slats (no text or symbols)natural_image
Line drawing of a hand holding a tool, no text or symbols present
natural_image
Diagram of a refrigerator interior showing air intake and cooling mechanism (no text or labels)Fig. 9
Thank you for selecting our appliance
We wish you lots of enjoyment with your new appliance and we hope that you will consider our brand again when purchasing household appliances.
Please read this user manual carefully and keep it throughout the product life cycle as a reference document. The user manual should be passed on to any future owner of the appliance.
Contents
Warnings and Important Safety Information 27
Description of the appliance 29
Controls 30
Before using the oven for the first time 31
Using the Oven 32
Baking and Roasting Tables 35
Cleaning and Maintenance 37
If something is wrong 40
Technical Data 41
Instructions for the Installer 41
Instructions fo Building In 43
European Guarantee 44
Guide to using the user instructions

Safety instructions

Step by step instructions

Hints and Tips

This appliance conforms with the following ECC Directives:
- 2006/95 (Low Voltage Directive);
- 89/336 (EMC Directive);
- 93/68 (General Directive); and subsequent modifications.
English

Warnings and Important Safety Information
Always keep these user instructions with the appliance. Should the appliance be passed on to third persons or sold, or if you leave this appliance behind when you move house, it is very important that the new user has access to these user instructions and the accompanying information.
These warnings are provided for the safety of the users and those living with them. So read them carefully before connecting and/or using the appliance.
Installation
- The installation must be performed by a qualified person in accordance with the rules and regulations in force. The individual operations for installing the appliance are described under the instructions for the installer.
- Have the appliance installed and connected by a qualified person with specialist knowledge, who will carry it out in accordance with the directives.
- If any modifications to the power supply are required because of the installation, these should also be carried out by a qualified electrician.
Operation
- This oven is designed for cooking foodstuffs; never use it for other purposes.
- When opening the oven door during or at the end of cooking be careful of the stream of hot air, which comes out of the oven.
- Be very careful when using the cooker. The extreme heat of the heating elements makes the shelves and other parts very hot.
- If you should for whatever reason use aluminium foil to cook food in the oven, never allow it to come into direct contact with the floor of the oven.
- When cleaning the oven, proceed with care: never spray anything onto the grease filter (if fitted), the heating elements and the thermostat sensor.
- If is dangerous to make modifications of any kind to this appliance or to its specifications.
- During the baking, roasting and grilling process, the oven window and the other parts of the appliance get hot, so children should be kept away from the appliance. Take care, if connecting electrical appliances to sockets near the oven, that cables do not come into contact with hot rings or get caught in the oven door.
- Always use oven gloves to take hot oven-proof dishes or pots out of the oven.
- Regular cleaning prevents the surface material from deteriorating.
- Before cleaning the oven, either turn the power off or pull the mains plug out.
- Make sure that the oven is in the "OFF" position, when the oven is no longer being used.
- This oven was made as a single appliance or as a combination appliance with electrical hotplate, depending on the model, for single-phase connection to 230 V.
- The appliance must not be cleaned with a superheated steam cleaner or a steam jet cleaner.
- Do not use abrasive cleaners or sharp metal scrapers. These can scratch the glass in the oven door, which may result in the shattering of the glass.
Child Safety
- This appliance is intended for use by adults. It is dangerous to allow children to use it or play with it.
- Children should be kept away while the oven is working. Also, after you have switched the oven off, it remains hot for a long time.
- This appliance is not intended for use by children or other persons whose physical, sensory or mental capabilities or lack of experience and knowledge prevents them from using the appliance safely without supervision or instruction by a responsible person to ensure that they can use the appliance safely.
Customer Service
- Have checks and/or repairs carried out by the manufacturer's service department or by a service department authorised by the manufacturer and use only original spare parts.
- Do not attempt to repair the appliance yourself in the event of malfunctions or damage. Repairs carried out by untrained persons may cause damage or injury.
The symbol on the product or its packaging
indicates that this product is not to be treated as normal household waste. Instead it must be handed over to a collection point for the recycling of electrical and electronic equipment. The correct disposal of this product will help to protect the environment and human health. Environment and health are endangered by incorrect disposal. For more detailed information about recycling of this product, please contact your local town hall, your household waste disposal service or the shop where you purchased the product.
Description of the appliance

- Control panel
- Oven thermostat control knob
- Oven thermostat control light
- Minute minder
- Operating control light
-
Oven function control knob
-
Air Vents for Cooling Fan
- Grill
- Oven lamp
- Oven Fan
- Rating plate
Oven accessories
natural_image
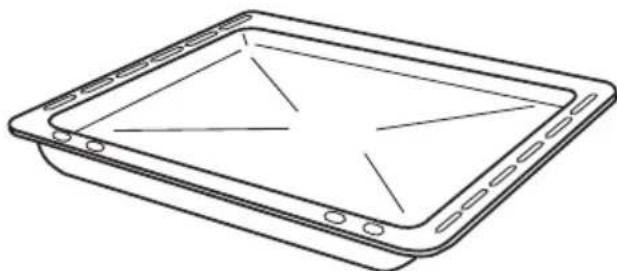
Line drawing of a rectangular electronic device with internal grid lines and mounting holes (no text or symbols)Baking Tray Anti-tip shelf

natural_image
Line drawing of a rectangular grid with parallel lines, no text or symbols presentControls
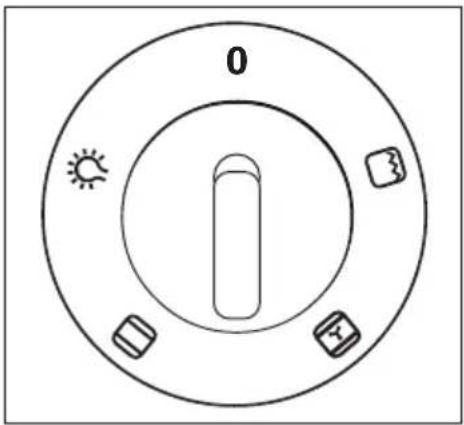
Oven Function Control Knob
0 The oven is off

Grill - The full grill element will be on

Fan cooking - This allows you to roast or roast and bake simoultaneously using any shelf, without flavour transference.

Conventional cooking - The heat comes from both the top and bottom element, ensuring even heating inside the oven

Oven light
Mains on Indicator
The mains on light will come on when the oven function control knob is set.
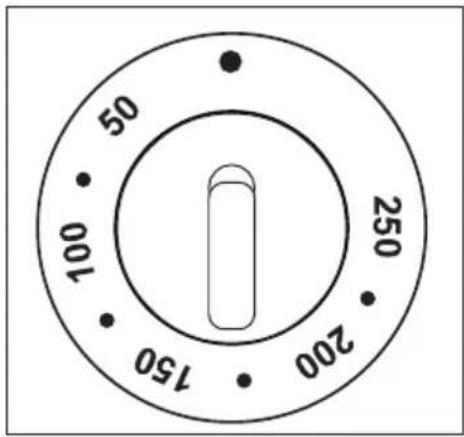
Thermostat Control Knob
Turn the thermostat control knob anti-clockwise to select temperatures between 50°C and 250°.
Thermostat Control Indicator
The thermostat control indicator will come on when the thermostat control knob is turned. The indicator will remain on until the correct temperature is reached. It will then cycle on and off to show the temperature is being maintained.
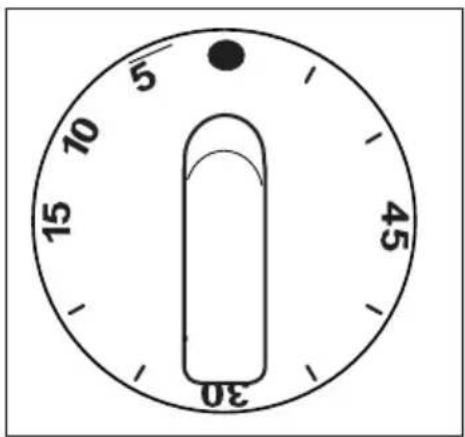
Minute Minder
The minute minder will mark the end of a timed period with an acoustic alarm. The maximum timing is 60 minutes. Turn the minute minder knob to the maximum time position, then turn it back to the required time. The minute minder will not affect in any way the oven operation, if it is in use.
Safety Thermostat
To prevent dangerous overheating (through incorrect use of the appliance or defective components), the oven is fitted with a safety thermostat, which interrupts the power supply. The oven switches back on again automatically, when the temperature drops.
Should the safety thermostat trigger due to incorrect use of the appliance, it is enough to remedy the error after the oven has cooled down; if on the other hand, the thermostat triggers because of a defective component, please contact Customer Service.
The cooling fan
The oven is provided with a cooling fan, meant to keep the front panel, the knobs and the oven door handle cool. The fan switches on automatically when the oven is activated. Warm air is blown out through the aperture near the oven door handle. The fan switches off when, after cooking, the oven function control knob is set to OFF position 0.
Before using the oven for the first time

Remove all packaging, both inside and outside the oven, before using the oven.
Before using for the first time, the oven should be heated up without food.
During this time, an unpleasant odour may be emitted. This is absolutely normal. It is caused by manufacturing residues.
Ensure the room is well ventilated.

- Switch the oven function control knob to fan cooking
- Set the thermostat control knob to 250^ .
- Open a window for ventilation.
- Allow the oven to run empty for approximately 45 minutes.
This procedure should be repeated with the full grill function for approximately 5-10 minutes.

Then let the oven cool down. Then dampen a soft cloth with warm water and a little mild washing-up liquid and use this to clean the oven cavity.

Before using for the first time, carefully wash the oven accessories as well.

natural_image
Line drawing of a hand holding a cylindrical object against a wall, with no text or symbols present.
To open the oven door, always hold the handle in the centre.
Using the oven
The oven is supplied with an exclusive system which produces a natural circulation of air and the constant recycling of steam.
This system makes it possible to cook in a steamy environment and keep the dishes soft inside and crusty outside. Moreover, the cooking time and energy consumption are reduced to a minimum. During cooking steam may be produced which can be released when opening the oven door. This is absolutely normal.

However, always stand back from the oven when opening the oven door during cooking or at the end of it to allow any build up of steam or heat to release.

Attention! - Do not place objects on the oven base and do not cover any part of the oven with aluminium foil while cooking, as this could cause a heat build-up which would affect the baking results and damage the oven enamel. Always place pans, heat-resisting pans and aluminium trays on the shelf which has been inserted in the shelf runners. When food is heated, steam is created, like in a kettle. When the steam comes into contact with the glass in the oven door, it condenses and creates water droplets.
To reduce condensation, always preheat the empty oven for 10 minutes.
We recommend you wipe the water droplets away after every cooking process.


Always cook with the oven door closed. Stand clear when opening the drop down oven door. Do not allow it to fall open - support the door using the door handle, until it is fully open.

The oven has four shelf levels, and is supplied with one shelf. The shelf positions are counted from the bottom of the oven as shown in the diagram.
It is important that these shelves are correctly positioned as shown in the diagram.
Do not place cookware directly on the oven base.
Fan cooking

- The food is cooked by means of preheated air force blown evenly round the inside of the oven by a fan set on the rear wall of the oven itself.
- Heat thus reaches all parts of the oven evenly and fast and this means that you can simultaneously cook different types of foods positioned on the various oven shelves. Fan cooking ensures rapid elimination of moisture and the dryer oven environment stops the different aromas and flavours from being transmitted from one food to another.
- The possibility of cooking on several shelf heights means that you can cook several different dishes at the same time and up to three tins of biscuits and mini pizzas to be eaten immediately or subsequently deep frozen.
- Naturally the oven can also be used for cooking on just one shelf. In this case you should use the lowest set of runners so that you can keep an eye on progress more easily.
- In addition, the oven is particularly recommended for sterilizing preserves, cooking home-made fruit in syrup, and for drying mushrooms or fruit.
Conventional Cooking

- The middle shelf position allows for the best heat distribution. To increase base browning simply lower the shelf position. To increase top browning, raise the shelf position.
- The material and finish of the baking trays and dishes used will affect base browning. Enamelware, dark, heavy or non-stick utensils increase base browning, while oven glassware, shiny aluminium or polished steel trays reflect the heat away and give less base browning.
- Always place dishes centrally on the shelf to ensure even browning.
- Stand dishes on suitably sized baking trays to prevent spillage onto the base of the oven and make cleaning easier.
- Do not place dishes, tins or baking trays directly on the oven base as it becomes very hot and damage will occur. When using this setting, heat comes from both the top and bottom elements. This allows you to cook on a single level and is particularly suitable for dishes which require extra base browning such as quiches and flans.
Gratins, lasagnes and hotpots which require extra top browning also cook well in the conventional oven.
Grilling

- Most foods should be placed on the grid in the grill pan to allow maximum circulation of air and to lift the food out of the fats and juices. Food such as fish, liver and kidneys may be placed directly on the grill pan, if preferred.
- Food should be thoroughly dried before grilling to minimise splashing. Brush lean meats and fish lightly with a little oil or melted butter to keep them moist during cooking.
- Accompaniments such as tomatoes and mushrooms may be placed underneath the grid when grilling meats
- When toasting bread, we suggest that the top runner position is used.
- The food should be turned over during cooking, as required.
i
Hints and Tips
- The middle shelf position allows for the best heat distribution. To increase base browning simply lower the shelf position. To increase top browning, raise the shelf position.
- The material and finish of the baking trays and dishes used will affect base browning. Enamelware, dark, heavy or non-stick utensils increase base browning, while oven glassware, shiny aluminium or polished steel trays reflect the heat away and give less base browning.
- Always place dishes centrally on the shelf to ensure even browning.
- Stand dishes on suitably sized baking trays to prevent spillage onto the base of the oven and make cleaning easier.
- Do not place dishes, tins or baking trays directly on the oven base as it becomes very hot and damage will occur.
On baking:
Cakes and pastries usually require a medium temperature (150°C-200°C) and therefore it is necessary to preheat the oven for about 10 minutes.
Do not open the oven door before 3/4 of the baking time has elapsed.
Shortcrust pastry is baked in a springform tin or on a tray for up to 2/3 of the baking time and then garnished before being fully baked. This further baking time depends on the type and amount of topping or filling. Sponge mixtures must separate with difficulty from the spoon. The baking time would be unnecessarily extended by too much liquid. If two baking trays with pastries or biscuits are inserted into the oven at the same time, a shelf level must be left free between the trays.
If two baking trays with pastries or biscuits are inserted into the oven at the same time, the trays must be swapped and turned around after about 2/3 of the baking time.
On Roasting:
Do not roast joints smaller than 1 kg. Smaller pieces could dry out when roasting. Dark meat, which is to be well done on the outside but remain medium or rare inside, must be roasted at a higher temperature (200°C-250°C).
White meat, poultry and fish, on the other hand, require a lower temperature (150°C-175°C). The ingredients for a sauce or gravy should only be added to the roasting pan right at the beginning if the cooking time is short. Otherwise add them in the last half hour.
You can use a spoon to test whether the meat is cooked: if it cannot be depressed, it is cooked through. Roast beef and fillet, which is to remain pink inside, must be roasted at a higher temperature in a shorter time.
If cooking meat directly on the oven shelf, insert the roasting pan in the shelf level below to catch the juices.
Leave the joint to stand for at least 15 minutes, so that the meat juices do not run out.
To reduce the build up of smoke in the oven, it is recommended to pour a little water in the roasting pan. To prevent condensation forming, add water several times. The plates can be kept warm in the oven at minimum temperature until serving.

Caution!
Do not line the oven with aluminium foil and do not place a roasting pan or baking tray on the floor, as otherwise the oven enamel will be damaged by the heat build-up.
Cooking times
Cooking times can vary according to the different composition, ingredients and amounts of liquid in the individual dishes.
Note the settings of your first cooking or roasting experiments to gain experience for later preparation of the same dishes.
Based upon your own experiences you will be able to alter the values given in the tables.
Baking and Roasting Table
Conventional Cooking


Timings do not include pre-heating.
The empty oven should always be pre-heated for 10 minutes.
| TYPE OF DISH | Conventional Cooking | Fan Cooking | Cooking times in minutes | NOTES | ||
| temp °C | temp °C | |||||
| CAKES | ||||||
| Whisked recpies 2 170 | 2 (1and3)* | 160 45-60 | In cake mould | |||
| Shortbread dough | 2 | 170 | 2 (1and3)* | 160 | 20-30 | In cake mould |
| Butter-milk cheese cake 1 | 175 2 165 | 60-80 In cake mould | ||||
| Apple cake (Apple pie) | 1 | 170 | 2lef+righ. | 160 | 90-120 | In cake mould |
| Strudel | 2 | 180 | 2 | 160 | 60-80 | In baking tray |
| Jam- tart | 2 | 190 | 2(1and3)* | 180 | 40-45 | In cake mould |
| Fruit cake | 2 | 170 | 2 | 150 | 60-70 | In cake mould |
| Sponge cake | 1 | 170 | 2(1and3)* | 165 | 30-40 | In cake mould |
| Christmas cake | 1 | 150 | 2 | 150 | 120-150 | In cake mould |
| Plum cake | 1 | 175 | 2 | 160 | 50-60 | In bread tin |
| Small cake | 3 | 170 | 2 | 160 | 20-35 | In baking tray |
| Biscuits | 2 | 160 | 2(1and3)* | 150 | 20-30 | In baking tray |
| Meringues | 2 | 135 | 2(1and3)* | 150 | 60-90 | In baking tray |
| Buns | 2 | 200 | 2 | 190 | 12~20 | In baking tray |
| Pastry: Choux | 2or 3 | 210 | 2(1and3)* | 170 | 25-35 | In braking tray |
| Plate tarts | 2 | 180 | 2 | 170 | 45-70 | In cake mould |
| BREAD AND PIZZA | ||||||
| White bread | 1 195 2 | 185 60-70 | ||||
| Rye bread | 1 | 190 | 1 | 180 | 30-45 | In bread tin |
| Bread rolls | 2 | 200 | 2(1and3)* | 175 | 25-40 | In baking tray |
| Pizza | 2 | 200 | 2 | 200 | 20-30 | In baking tray |
| FLANS | ||||||
| Pasta flan | 2 | 200 | 2(1and3)* | 175 | 40-50 | In mould |
| Vegetable flan | 2 | 200 | 2(1and3)* | 175 | 45-60 | In mould |
| Quiches | 1 | 210 | 1 | 190 | 30-40 | In mould |
| Lasagne | 2 200 2 200 25-35 In mould | |||||
| Cannelloni | 2 | 200 | 2 | 200 | 25-35 | In mould |
| MEAT | ||||||
| Beef | 2 190 2 175 50-70 On grid | |||||
| Pork | 2 180 2 175 100-130 On grid | |||||
| Veal | 2 | 190 | 2 | 175 | 90-120 | On grid |
| English roast beef | ||||||
| rare | 2 | 210 | 2 | 200 | 50-60 | On grid |
| medium | 2 | 210 | 2 | 200 | 60-70 | On grid |
| well done | 2 | 210 | 2 | 200 | 70-80 | On grid |
| Shoulder of pork | 2 | 180 | 2 | 170 | 120-150 | With rind |
| Shin of pork | 2 | 180 | 2 | 160 | 100-120 | 2 pieces |
| Lamb | 2 190 2 175 110-130 Leg | |||||
| Chicken | 2 | 190 | 2 | 200 | 70-85 | Whole |
| Turkey | 2 | 180 | 2 | 160 | 210-240 | Whole |
| Duck | 2 | 175 | 2 | 220 | 120-150 | Whole |
| Goose | 2 175 | 1 160 150-200 Whole | ||||
| Rabbit | 2 190 2 175 60-80 Cut in pieces | |||||
| Hare | 2 | 190 | 2 | 175 | 150-200 | Cut in pieces |
| Pheasant | 2 | 190 | 2 | 175 | 90-120 | Whole |
| Meat loaf | 2 | 180 | 2 | 170 | tot.150 | in bread pan |
| FISH | ||||||
| Trout/Sea bream | 2 | 190 | 2(1and3)* | 175 | 40-55 | 3-4 fishes |
| Tuna fish/Salmon | 2 | 190 | 2(1and3)* | 175 | 35-60 | 4-6 fillets |
(*) If you cook more than one dish at the same time, we recommend you place them on the levels quoted between brackets.
Grilling


Timings do not include pre-heating.
The empty oven should always be pre-heated for 10 minutes.
| TYPE OF DISH | Quantity | Grilling | Cooking time in minutes | |||
| temp.°CPieces g. | 1st side | 2nd side | ||||
| Fillet steaks 4 800 3 250 12~15 12~14Beef-steaks 4 600 3 250 10~12 6~8Sausages 8 / 3 250 12~15 10~12Pork chops 4 600 3 250 12~16 12~14Chicken (cut in two) 2 1000 3 250Kebabs 4 / 3 250 10~15 10~12Chicken (breast) 4 400 3 250 12~15 12~14Hamburger* 6 600 2 250 20-30*Preheat 5'00"Fish (fillets) 4 400 3 250 12~14 10~12Sandwiches 4~6 / 3 250 5~7Toast 4~6 / 3 250 | 250 12~15 12~14Beef-steaks 4 600 3 250 10~12 6~8Sausages 8 / 3 250 12~15 10~12Pork chops 4 600 3 250 12~16 12~14Chicken (cut in two) 4 / 3 250 10~15 10~12Chicken (breast) 4 400 3 250 12~15 12~14Hamburger* 6 600 2 250 20-30*Preheat 5'00"Fish (fillets) 4 400 3 250 10~12Sandwiches 4~6 / 3 250 5~7Toast 4~6 / 3 250 | 250 10~15 10~12 6~8Sausages 8 / 3 250 12~15 10~12Pork chops 4 600 3 250 12~16 12~14Chicken (cut in two) 2 1000 3 250Kebabs 4 / 3 250 10~15 250 Chicken (breast) 4 400 3 250 12~15 12~14Hamburger* 6 600 2 250 20-30*Preheat 5'00"Fish (fillets) 4 400 3 250 12~14 10~12Sandwiches 4~6 / 3 2250 Toast 4~6 / 3 250 | 250 10~15 10~12 6~8Sausages 8 / 3 250 12~15 10~12Pork chops 4 600 3 250 12~15 12~14Chicken (breast) 4 400 3 250 12~15 12~14Hamburger* 6 600 2 250 20-30*Preheat 5'00"Fish (fillets) 4~6 / 3 250 Toast 4~6 / 3 250 | 250 10~15 10~12 6~8Sausages 8 / 3 250 12~15 10~12Pork chops 4 600 3 250 Chicken (cut in two) 2 1000 3 250 Kebabs 4 / 3 250 Chicken (breast) 4 400 3 250 Chicken (breast) 4~6 / 3 250 Toast 4~6 / 3 250 | 30~35 25~30 | |

The temperatures quoted are guidelines. The temperatures may have to be adapted to personal requirements.
Cleaning and Maintenance

Before cleaning switch the oven off and let it cool down.
The appliance must not be cleaned with a superheated steam cleaner or a steam jet cleaner.
Important: Before carrying out any cleaning operation, the appliance must be disconnected from the power supply.
To ensure a long life for your appliance, it is necessary to perform the following cleaning operations regularly:
- Only perform when the oven has cooled down.
- Clean the enamelled parts with soapy water.
- Do not use abrasive cleaners.
- Dry the stainless steel parts and glass with a soft cloth.
- If there are stubborn stains, use commercially available for stainless steel or warm vinegar.
The oven's enamel is extremely durable and highly impermeable. The action of hot fruit acids (from lemons, plums or similar) can however leave permanent, dull, rough marks on the surface of the enamel. However such marks in the brightly polished surface of the enamel does not affect the operation of the oven. Clean the oven thoroughly after every use. This is the easiest way to clean dirt off. It prevents dirt being burnt on.
Cleaning materials
Before using any cleaning materials on your oven, check that they are suitable and that their use is recommended by the manufacturer.
Cleaners that contain bleach should NOT be used as they may dull the surface finishes. Harsh abrasives should also be avoided.
External cleaning
Regularly wipe over the control panel, oven door and door seal using a soft cloth well wrung out in warm water to which a little liquid detergent has been added.
To prevent damaging or weakening the door glass panels avoid the use of the following:
• Household detergent and bleaches
- Impregnated pads unsuitable for non-stick saucepans
- Steel wool pads
• Chemical oven pads or aerosols
- Rust removers
- Bath/Sink stain removers
Clean the outer and inner door glass using warm soapy water. Should the inner door glass become heavily soiled it is recommended that a cleaning product such as Hob Brite is used. Do not use paint scrapers to remove soilage.

DO NOT clean the oven door while the glass panels are warm. If this precaution is not observed the glass panel may shatter.

If the door glass panel becomes chipped or has deep scratches, the glass will be weakened and must be replaced to prevent the possibility of the panel shattering. Contact your local Service Force Centre who will be pleased to advise further.
Oven Cavity
The enamelled base of the oven cavity is best cleaned whilst the oven is still warm.
Wipe the oven over with a soft cloth soaked in warm soapy water after each use. From time to time it will be necessary to do a more thorough cleaning, using a proprietary oven cleaner.
Cleaning the Oven Door
Before cleaning the oven door, we recommend you to remove it from the oven.
Proceed as follows:
- open the oven door completely;
- find the hinges linking the door to the oven (Fig. A);
- unlock and turn the small levers located on the two hinges (Fig. B);
- handle the door by its left- and right-hand sides, then slowly turn it towards the oven until it is half-closed (Fig. C);
- gently pull the oven door off its site (Fig. C);
- place it on a steady plan;
Clean the oven door glass with warm soapy water and a softh cloth only. Never use harsh abrasives. Once the cleaning is carried out, refit the oven door, following the procedure in reverse.
Stainless steel or aluminium appliances:
We recommend that the oven door is only cleaned using a wet sponge and dried after cleaning with a soft cloth.
Never use steel wool, acids or abrasive products as they can damage the oven surface. Clean the oven control panel following the same precautions.

DO NOT clean the oven door while the glass panels are warm. If this precaution is not observed the glass panel may shatter.

If the door glass panel becomes chipped or has deep scratches, the glass will be weakened and must be replaced to prevent the possibility of the panel shattering. Contact your local Service Centre who will be pleased to advise further.
Replacing The Oven Light
Disconnect the appliance
If the oven bulb needs replacing, it must comply with the following specifications:
- Electric power: 15 W / 25 W,
- Electric rate: 230 V (50 Hz),
- Resistant to temperatures of 300^ C,
- Connection type: E14.
These bulbs are available from your local Service Force Centre.
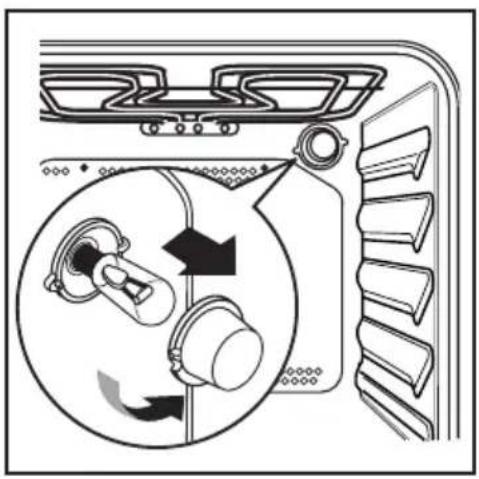
To replace the faulty bulb:
- Ensure the oven is isolated from the electrical supply.
- Push in and turn the glass cover anticlockwise.
- Remove the faulty bulb and replace with the new one.
- Refit the glass cover and restore the electrical supply.
natural_image
Diagram of a refrigerator interior showing airflow direction and component placement (no text or symbols)If something is wrong
If the appliance is not working correctly, please check the following before contacting the Electrolux Service Centre:
| PROBLEM | SOLUTION |
| ■ The oven is not switching on. | ◆ Check that both a cookingfunction and temperature have been selected or◆ Check whether the appliance is correctly connected and the socket switch or the mains supply to the oven is ON. |
| ■ The oven temperature light does not come on. | ◆ Select a temperature with the thermostat control knob or◆ Select a function with the oven function control knob. |
| ■ The oven light does not come on. | ◆ Select a temperature with the thermostat control knob or◆ Check the light bulb, and replace it if necessary (see "Cleaning the Oven") |
| ■ It takes too long to cook the dishes or they cook too quickly. | ◆ The temperature may need adjusting or◆ Following the advice contained in these instructions, especially the section “Practical Tips”. |
| ■ Steam and condensation settle on the food and in the oven cavity. | ◆ When the cooking process is completed, do not leave the dishes standing in the oven for longer than 15-20 minutes. |
Technical Data
Heating element ratings
| Bottom oven element 1000 W |
| Top heating element 800 W |
| Full oven (Top+Bottom) 1800 W |
| Grill 1650 W |
| Oven light 25 W |
| Cooling Fan 25 W |
| Convection cooking fan 25 W |
| Total rating 1875 W |
| Operating voltage (50 Hz) |
Dimensions of the recess
| Height under top mm 593 | |
| in column mm 580 | |
| Width mm 560 | |
| Depth mm 550 | |
| Oven | |
| Height | mm 335 |
| Width mm 405 | |
| Depth | mm 410 |
| Oven capacity | 56 l |
Instructions for the Installer

Installation and connection must be done in compliance with the regulations in force. Any interventions must be carried out when the appliance is switched off. Only accredited engineers may work on the appliance.
The manufacturer disclaims any liability if the safety measures are not observed.
Connecting to the electrical supply
Before connecting to the electrical supply, please make sure:
- The fuse and the domestic electrical installation must be designed for the max. load of the appliance (see rating plate).
- The domestic electrical installation must be equipped with a proper earth connection in accordance with the regulations in force.
- The socket or the multi-pole off switch must be easy to access after the appliance has been installed.
This appliance is delivered with an electric supply cable.
A proper plug, according to the electric load specified on the rating plate, must be fitted to the cable. The plug is to be inserted into a suitable wall socket. If you require a direct connection to the electric network (mains), it will be necessary to fit between the appliance and the mains an omnipole switch, with a minimum gap between contacts of 3 mm, suitable for the required load and in compliance with rules in force. The green & yellow ground wire must not be interrupted by the switch and it should be 2-3 cm. longer than the other cables.
The mains cable and plug as supplied are to be connected to a shockproof socket (230 V\~, 50 Hz). The shockproof socket must be installed in accordance with the regulations.
The following types of mains cable are suitable, taking the necessary rated cross section into account: H07 RN-F, H05 RN-F, H05 RR-F, H05 VV-F, H05 V2V2-F (T90), H05 BB-F.
The connection cable must in any case be laid out so that at no point does it reach 50^ C (over room temperature).
After the connection has been carried out, the heating elements must be tested by being operated for about 3 minutes.
Terminal block
The oven is fitted with an easily accessible terminal block which is designed to operate with a single-phase power supply of 230 V.
Letter L - Live terminal
Letter N - Neutral terminal

or E - Earth terminal

natural_image
Pure electrical connector diagram without any text, numbers, or symbolsInstructions for Building In
For problem-free functioning of the built-in appliance, the kitchen unit or the recess into which the appliance is built must have suitable dimensions.
In accordance with the regulations in force, all parts which ensure the shock protection of live and insulated parts must be fastened in such a way that they cannot be undone without tools.
These also include the fixing of any end walls at the beginning or end of a line of built-in units.
The shock protection must in any case be ensured by the building in of the appliance.
The appliance can be placed with its back or a side wall against higher kitchen units, appliances or walls. However, only other appliances or units of the same height as the appliance can be placed against the other side wall.
Oven dimensions (Fig. A)
Instructions for Building In
For problem-free functioning of the built-in appliance, the kitchen unit or the recess into which the appliance is built must have suitable dimensions (Fig. B-C).
Securing the Appliance to the Cabinet
- Open the oven door;
- asten the oven to the cabinet placing the four supplied distance holders (Fig.D - A) which fit exactly into the holes in the frame and then fit the four wood screws (Fig. D - B).
Fig. A
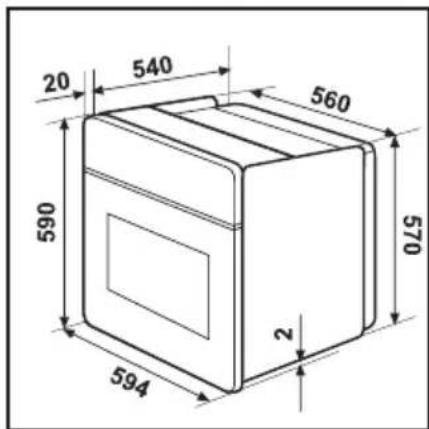

Fig. B
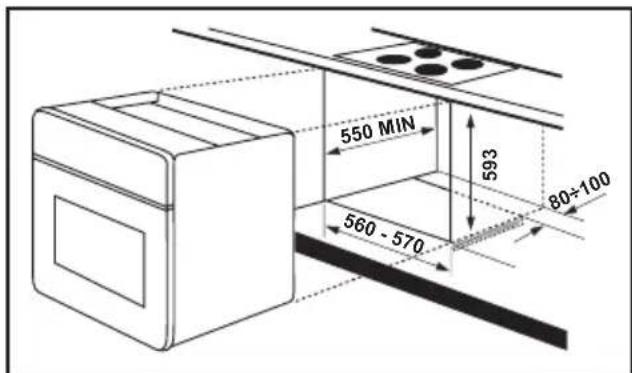
Fig. C

Fig. D
European Guarantee
This appliance is guaranteed by Electrolux in each of the countries listed at the back of this user manual, for the period specified in the appliance guarantee or otherwise by law. If you move from one of these countries to another of the countries listed below the appliance guarantee will move with you subject to the following qualifications:
- The appliance guarantee starts from the date you first purchased the appliance which will be evidenced by production of a valid purchase document issued by the seller of the appliance.
- The appliance guarantee is for the same period and to the same extent for labour and parts as exists in your new country of residence for this particular model or range of appliances.
- The appliance guarantee is personal to the original purchaser of the appliance and cannot be transferred to another user.
- The appliance is installed and used in accordance with instructions issued by Electrolux and is only used within the home, i.e. is not used for commercial purposes.
- The appliance is installed in accordance with all relevant regulations in force within your new country of residence.
The provisions of this European Guarantee do not affect any of the rights granted to you by law.
www.electrolux.com
| Albania | +35 5 4 261 450 | Rr. Pjeter Bogdani Nr. 7 Tirane |
| Belgique/België/Belgien | +32 2 363 04 44 | Bergensesteenweg 719, 1502 Lembeek |
| Česká republika | +420 2 61 12 61 12 | Budějovická 3, Praha 4, 140 21 |
| Danmark | +45 70 11 74 00 | Sjællandsgade 2, 7000 Fredericia |
| Deutschland | +49 180 32 26 622 | Muggenhofer Str. 135, 90429 Nürnberg |
| Eesti | +37 2 66 50 030 | Pärnu mnt. 153, 11624 Tallinn |
| España | +34 902 11 63 88 | Carretera M-300, Km. 29,900 Alcalá de Henares Madrid |
| France | www.electrolux.fr | |
| Great Britain | +44 8705 929 929 | Addington Way, Luton, Bedfordshire LU4 9QQ |
| Hellas | +30 23 10 56 19 70 | 4, Limnou Str., 54627 Thessaloniki |
| Hrvatska | +385 1 63 23 338 | Slavonska avenija 3, 10000 Zagreb |
| Ireland | +353 1 40 90 753 | Long Mile Road Dublin 12 |
| Italia | +39 (0) 434 558500 | C.so Lino Zanussi, 26 - 33080 Porcia (PN) |
| Latvija | +37 17 84 59 34 | Kr. Barona iela 130/2, LV-1012, Riga |
| Lietuva | +370 5 2780609 | Ozo 10A, LT 08200 Vilnius |
| Luxembourg | +352 42 431 301 | Rue de Bitbourg, 7, L-1273 Hamm |
| Magyarország | +36 1 252 1773 | H-1142 Budapest XIV, Erzsébet királyné útja 87 |
| Nederland | +31 17 24 68 300 | Vennootsweg 1, 2404 CG - Alphen aan den Rijn |
| Norge | +47 81 5 30 222 | Risløkkvn. 2 , 0508 Oslo |
| Österreich | +43 18 66 400 | Herziggasse 9, 1230 Wien |
| Polska | +48 22 43 47 300 | ul. Kolejowa 5/7, Warszawa |
| Portugal | +35 12 14 40 39 39 | Quinta da Fonte - Edificio Gonçalves Zarco - Q 35 -2774-518 Paço de Arcos |
| Romania | +40 21 451 20 30 | Str. Garii Progresului 2, S4, 040671 RO |
| Schweiz - Suisse - Svizzera | +41 62 88 99 111 | Industriestrasse 10, CH-5506 Mägenwil |
| Slovenija | +38 61 24 25 731 | Gerbičeva ulica 98, 1000 Ljubljana |
| Slovensko | +421 2 43 33 43 22 | Electrolux Slovakia s.r.o., Electrolux Domáce spotrebiče SK, Seberíniho 1, 821 03 Bratislava |
| Suomi | www.electrolux.fi | |
| Sverige | +46 (0)771 76 76 76 | Electrolux Service, S:t Göransgatan 143, S-105 45 Stockholm |
| Türkiye | +90 21 22 93 10 25 | Tarlabași caddesi no : 35 Taksim İstanbul |
| Россия | +7 495 937 7837 | 129090 Москва, Олимпийский проспект, 16, БЦ "Олимпик" |
| - | ES | DA | DE | EL | EN | FR | IT | NL | PT | SV | FI | |
| 1 | Fabricante | Maarke | Hersteller | Προμπίεντής | Manufacturer | Fabricant | Costruttore | Fabrikant | Fabricante | Leverantör | Tavarantoimitaja | ZANUSSI |
| 2 | Modelo | Model | Modell | Movtέλο | Model | Modèle | Modello | Model | Modelo | Modell | Malli | ZOB 655 |
| 3 | Classe de eficiencia energética | Relativt ener-gforbrug | Energieffizi-enzklasse | T&η εναγεικωής απόδοης | Energy efficiency class | Classement selon son efficatie énergétique | Classe di efficienza energetica | Energie-efficiëntiaklasse | Classe de eficiência energetica | Energielfektivitatsklass | Energiatehokkuusluokka | |
| 4 | - Calentamiento convencional | - Traditionel opvarmning | - Konventionelle Beheizung | - Σαβατακή | - Conventional | - Classique | - Convezione naturale | - Conventioneel | - Convencional | - Konventionell värming | - Yla-alalämpö | |
| 5 | - Convección forzada | - Varmluft | - Um/Heßluft | - Me καλασερία θερμού απο | - Forced air convection | - Convection forbola | - Convezione forzata | - Geforceerde luchtconvectie | - Conveção forçada de ar | - Vämmning med varmluft | - Kiertolima | |
| Consumo de energía Funócin de ca-lentamiento: | Energiforbrug Opvarmningsfunktion: | Energieverbrauch Beheizung: | Kατανίλυση ενάγγειας Αστοκργία δέρμανης | Energy consumption Heating function: | Consommation d'énergie Fonction chauffage: | Consumo di energia Funzione di riscalcimento: | Energieverbruk Vermittings-fundte: | Consumo de energía Função de aquacimento: | Energiörbrukning Vämnings-funktion: | Energan-kulitus Kuumennustapa. | ||
| 6 | - Calentamiento convencional | - Traditionel opvarmning | - Konventionelle Beheizung | - Σαβατακή | - Conventional | - Classique | - Convezione naturale | - Conventioneel | - Convencional | - Konventionell värming | - Yla-alalämpö | 0.79 kWh |
| 7 | - Convección forzada | - Varmluft | - Um/Heßluft | - Me καλασερία θερμού απο | - Forced air convection | - Convection forbola | - Convezione forzata | - Geforceerde luchtconvectie | - Conveção forçada de ar | - Vämmning med varmluft | - Kiertolina | 0.78 kWh |
| 8 | - Vapor | - Damp | - Dampf | - Ατμοα | - Steam | - Vapeur | - Vapore | - Stoom | - Vapor | - Anga | - Höyry | |
| 9 | Volumen netto (litros) | Netto-volumen (liter) | Netto-volumen (Liter) | Ωφέλμος ογκος (λιτρια) | Usable volume (litres) | Volume utile (litres) | Volume utile (librì) | Netto volume (liter) | Volume útil Litros | Användbar volýrn (liter) | Käyttötilavuus (litraa) | 56 |
| ●●●●●●●● | Tipo:- Pequeño-Medio- Grande | Type:- Lille-Mellemstart-Stort | Typ:- Klein-Mittel-Groß | Túπος-Maxpóς-Manuelos-Meynálos | Size:- Small-Medium-Large | Type:- Fable volume- Volume moyes- Grand volume | Tipo:- Piccolo-Media- Grande | Type:- Klein-Middelgroot-Croot | Tipo:- pequeno-médio-grande | Storlek:- Liten-Medelstor-Stor | Koko:- Pieri-Keskikokoinen-Suurf | |
| Tiempo de cocción con carga normal: | Tilberedningsüd ved standardbe-lastning: | Kochzeit bei Standard-beladung: | Xpēνος γπα νήσμο τιστοσιμμέσται φορτιος | Time to cook standard load: | Temps de cuisson en charge normale: | Tempo necessario por cottura carico normale: | Bereidings-tijd bij stan-daardbe-le-sling: | Tempo de cozedura da carga-pedrilo: | Tillagningstid för en stan-dardlast: | Paistoaka vakiokuormalla: | ||
| 10 | - Calentamiento convencional | - Traditionel opvarmning | - Konventionelle Beheizung | - Σαβατακή | - Conventional | - Classique | - Convezione naturale | - Conventioneel | - Convencional | - Konventionell värming | - Yla-alalämpö | 43 min. |
| 11 | - Convección forzada | - Varmluft | - Um/Heßluft | - Me καλασερία θερμού απο | - Forced air convection | - Convection forbola | - Convezione forzata | - Geforceerde luchtconvectie | - Conveção forçada de ar | - Vämmning med varmluft | - Kiertolma | 41 min. |
| 12 | Superficie de la placa de cocción de mayor tamaño | Areallet af den største bageplate | Größe des größten Backblechs | H μαρυκόσηη σταράνσεια υπηριματις ποσρεζίμανη | The area of the largest baking sheet | Aire de la surface de la plus grande plaque pour patisserie | Superficie del piano di cottura più grande | Oppervlakte van de groxtate bakplate | Área da superficie da maior placa de pastelaria | Ylan för den största bakpläten | Suurimman levinpelinala | 1130 cm2 |
| 13 | Ruido [dB (A) re 1 pW] | Lydeflekt-niveau dB (A) (Stej) | Geräusch (dB (A) re 1 pW) | Σαρβας [dB (A) ανὰ 1 pW] | Noise (dB (A) re 1 pW) | Bruit [dB (A) re 1 pW] | Rumore [dB (A) re 1 pW] | Geludens-νειαu dB (A) re 1 pW | Nivel de ruido dB (A) re 1 pW | Builernivå dB (A) | Äärni (dB (A) re 1 pW) | |
● Mas eficiente
Lavt forbanug
Niedriger Verf
The interests
More efficient
Économie
Basal consumi
Efficient
Más eficiente
Lig Förbeukrin
Värdar lučetava

Munos eficiente
Høj forbrug
Holter Verbrauch
Алого-отвотки
Less efficient
Pou economy
Alti consumi
Inefficient
Meros eficiens
Höse Sörbrukning
Pason kofulthra
(1) 2017年1月1日
| ●● | 12 | ≤Volumen neto|Nettavolumen|Ebo|Lipoc órpo:c|Usable volume/Volume utile/ | < 35 | |
| Netto volume/volume util/Användbar volvm/Kgvttöllävus |
| 35 | ≤Volumen neto|Nettinvolumen|Dor|usoc/ovo-|Usable volume|Volume utile( | < 65 | |
| ### | ### |
| Nedb volume/volume uiv/Anvandbar volym/Kayitiravuus. |
| ●●●● 651 $Volume neto/NettoVolume/Discaping (yko/Usable volume/volume utie/ |
| Netto volume/Volume util/Användbar volym/Käyttötiavuus | 2002/40/EC |
2002/40/EC
| - | HR SI PL CZ SK RO | HU | ||||||
| 1 | Proizvodač | Proizvajalec | Producent | Gyártó | Výrobce | Výrobca | Producátor | ZANUSSI |
| 2 | Model | Model | Model | Modell | Model | Model | Model | ZOB 655 |
| 3 | Klasa energejske djelotvornosti | Razred energijske učinkovitosti | Klasa energooszczedności | Energiahatékonysági osztaly | Třída energetické účinnosti | Třída energetické hospodámošti | Clasa de eficienjá energetica | [IMAGE] |
| 4 | - Konvencionalno | - Konvencionalno | - Tradycyjne | - Hagyományos | - Konvenční | - Konvenčné | - Convențional | |
| 5 | -Konvekcija s ventilatorom | -Z dodatno ogretim zrakom | -Konwekcja wymuszona | -Levegőkeringetáses konvěkcíos | -Konvenční s ventilátorem | -Vnútené prúdenie vzduchu | -Convectie fortata | [←] |
| Potrośnja električne energije (kWh) Funkcija grijanja: | Poraba električne energije (kWh) Ogrevanje: | Zużycie energii (kWh) Funkcja podgrzewania: | Energiafogyasztás (kWh) Melegítés funkció: | Spotřeba energie (kWh) Funkce ohřavu: | Spotreba energie (kWh) Funkcia pećenie: | Consum de energie (kWh) Funcția de încălzire: | ||
| 6 | -Konvencionalno | -Konvencionalno | -Tradycyjne | -Hagyományos | -Konvenční | -Konvenčné | -Convențional | 0.79 kWh |
| 7 | - Konvekcija s ventilatorom | -Z dodatno ogretim zrakom | - Konwekcja wymuszona | - Levegőkeringetáses konvěkcíos | - Konvenční s ventilátorem | - Vnútené prúdenie vzduchu | - Convectie fortata | 0.78 kWh |
| 8 | -Para | -Para | -Para | -Góz | -Pára | -Para | - Vapori | |
| 9 | Neto zapremina (litara) | Neto prostornina (v litrih) | Pojemność użyleczna (w litrach) | Hasznos tár fogat (liter) | Užitný objem (litry) | Vyuzitełný objem (litre) | Volum util (litri) | 56 |
| *** | Velidna:-Mala- Srednja- Velika | Velikost:-Mala- Srednja- Velika | Wielkość:-Mala- Srednia- Duża | Méret:- Kicsí- Közepes- Nagy | Velikost:-Mala- Střední- Velká | Velikost:-Mala- Středná- Velká | Dimensiuni:-MiC- Mediu-Mare | [←] |
| Vrijeme pačenja normalno punóg: | Čas kuhanja pri standardni obremenitvi: | Czas gotowianis standardowej wielkości potrawy: | Normál mennyiség sütéséhez szükséjes idő: | Čas pećení standardního množství: | Čas na upećenie pri štandardnej zataží: | Durata de coacere pentru încarcatura normala: | ||
| 10 | -Konvencionalno | -Konvencionalno | -Tradycyjne | -Hagyományos | -Konvenční | -Konvenčné | -Convențional | 43 min. |
| 11 | - Konvekcija s ventilatorom | -Z dodatno ogretim zrakom | - Konwekcja wymuszona | - Levegőkeringetáses konvěkcíos | - Konvenční s ventilátorem | - Vnútené prúdenie vzduchu | - Convectie fortata | 41 min. |
| 12 | Površina najvećeg pladnja za poćenje | Velikost najvećjega pekaća | Powierzchnia największej tacy do pieczenia | A legnagyobb sótolap terúlete | Plocha nejvetšího pećicího plechu | Plocha najväčšícho plechu na poćenie | Supratata távi de copt celci mai mari | 1130 cm2 |
| 13 | Buka (db (A) re 1 pw) | Hrup (db (A) re 1 pw) | Pozlom hałasu (db (A) re 1 pw) | Zaj (db (A) re 1 pw) | Hlučnost dB(A) re 1pW | Hlučnost (db (A) re 1 pw) | Zgomot (db (A) re 1 pw) | |
Veća djelulvarnosti
Večja učinkovitost
Większa sprawność
Haloikonyaba
Uspome
Viac úspomá
Mai efficient

Manja djelalvarnost
Manija učinkovltost
Mniejsza sprawność
Kovosné hatokany
Méné Úspome
Menej čspomá
Mai puin eficient
| ●● | 12 | ≤ Neto zapremina/Neto prostornina/Pojemność uzyteczna/Hasznos térlogat/ < 35 | Užitny objem/Využitefny objem/Volum util |
- Apparecchiature in disuso
- Thank you for selecting our appliance
- Contents
- Guide to using the user instructions
- English
- Warnings and Important Safety Information
- Installation
- Operation
- Child Safety
- Customer Service
- Description of the appliance
- Oven accessories
- Controls
- Oven Function Control Knob
- Mains on Indicator
- Thermostat Control Knob
- Thermostat Control Indicator
- Minute Minder
- Safety Thermostat
- The cooling fan
- Before using the oven for the first time
- Using the oven
- To reduce condensation, always preheat the empty oven for 10 minutes.
- Fan cooking
- Conventional Cooking
- Grilling
- i
- Hints and Tips
- On baking:
- On Roasting:
- Caution!
- Cooking times
- Baking and Roasting Table
- Cleaning and Maintenance
- Cleaning materials
- External cleaning
- Oven Cavity
- Cleaning the Oven Door
- Stainless steel or aluminium appliances:
- Replacing The Oven Light
- If something is wrong
- Technical Data
- Instructions for the Installer
- Connecting to the electrical supply
- Terminal block
- Instructions for Building In
- Oven dimensions (Fig. A)
- Securing the Appliance to the Cabinet
- European Guarantee
Brand : ZANUSSI
Model : ZOB 655 X
Category : Oven