
Krypton 500 - Mouse Natec - Free user manual and instructions
Find the device manual for free Krypton 500 Natec in PDF.


| Product Type | Gaming Mouse |
| Brand | Natec |
| Model | Krypton 500 |
| Sensor | PMW3325 optical sensor |
| Maximum DPI | 7200 DPI |
| Number of Buttons | 6 programmable buttons |
| Button Lifespan | 10 million clicks |
| Polling Rate | 1000 Hz (adjustable to 125, 250, 500 Hz) |
| Tracking Speed | 100 inches per second |
| Maximum Acceleration | 20G |
| Illumination | Adjustable RGB lighting modes |
| Software | Gaming software with profile and macro editor |
| Special Features | Snipe button, DPI profiles (up to 5), key combination assignment |
| Dimensions (Approx.) | 125 x 70 x 40 mm |
| Weight (Approx.) | 150 g |
| Power Supply | USB-powered |
| Compatibility | Windows (software required) |
| Safety Certifications | CE, RoHS compliant |
| Maintenance | Clean with dry cloth; avoid liquids and extreme temperatures |
| Warranty | Standard manufacturer warranty (details on website) |
Frequently Asked Questions - Krypton 500 Natec
User questions about Krypton 500 Natec
0 question about this device. Answer the ones you know or ask your own.
Ask a new question about this device
Download the instructions for your Mouse in PDF format for free! Find your manual Krypton 500 - Natec and take your electronic device back in hand. On this page are published all the documents necessary for the use of your device. Krypton 500 by Natec.
USER MANUAL Krypton 500 Natec
natural_image
Close-up of a black computer mouse with a glowing blue spiral logo on the handle (no text or symbols visible)Krypton ^500
EN - USER MANUAL
PL - INSTRUKCJA OBSŁUGI
CZ - NÁVOD K POUŽITÍ
SK - NÁVOD NA POUŽITIE
- Precise optical sensor (PMW3325) with 7200 DPI resolution,
• Gaming software with profile/macro editor,
• 6 programmable buttons, - Main button switches with lifetime 10 mil. clicks
- Adjustable illumination modes,
- Polling rate 1000 Hz,
- Tracking speed: 100 inch/sec.
• Maximum acceleration: 20G
INSTALLATION
- Connect mouse to the USB port, for first time usage wait around 15 seconds until drivers will be installed.
- Open the installation folder, double click the icon setup.exe.
- Follow the instruction to install the program.
- When the installation has been completed successfully the icon at taskbar will be displayed.
-
Double click the icon to pop up setting interface
-
To set the programmable buttons and DPI settings you need to download and install the latest software version from our website www.genesis-zone.com,

MAIN SETTINGS
Key setting
Key assignment tab allows you to assign individual functions to each button.
- Each button can be set individually by click on list of programmable buttons, after this action the pop-up window will show available functions which can be selected by left click.
- Select required function and click "Apply" to save the settings.
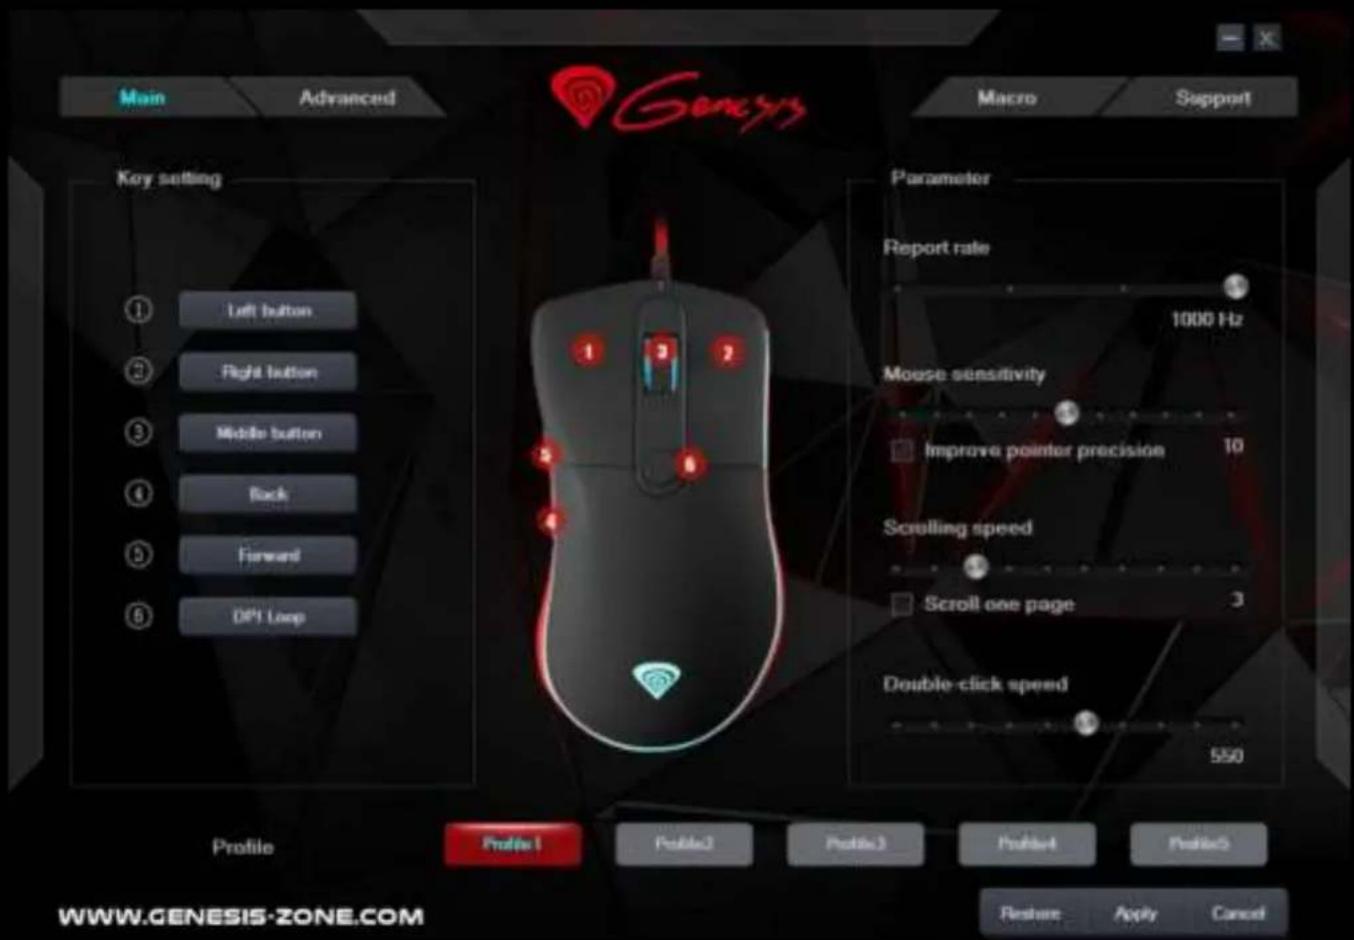
Snipe button
This feature allows to perform actions requiring high precision appreciated by FPS players. Holding down the button with assigned the function „Snipe button" decreases the sensitivity of mice to level 500 DPI, after releasing the button sensitivity returns to the previous setting.
Key combination
This function allows you to assign combination of buttons from your keyboard or mouse. Click on "Key combination", when the pop-up window will come out select required combination of buttons which you want to assign e.g. "Ctrl+Shift+Up+A", then click "OK" to finish and close the window. Click "Apply" to save settings.


Report Rate
To set Report rate select go to "Parameter" tab and choose one of 4 report rate options (125Hz, 250Hz, 500 Hz, 1000 Hz), then click "Apply" to save the settings.
System settings
In this settings you can adjust mouse sensitivity, scrolling speed and double click speed. To set these functions go to "Parameter" tab and select required speed for each function. Then Click "Apply" to save the settings.

ADVANCED SETTINGS
DPI settings
Gaming software allows you to predefine up to five DPI profiles, which can be switched "on the fly" using the DPI button. Each profile can be set individually in "DPI" tab. In these settings you can also set backlight color, backlight mode and resolution 500 – 3000 DPI. Click "Apply" to save the settings.

Macro and profile editor
Adding a macro
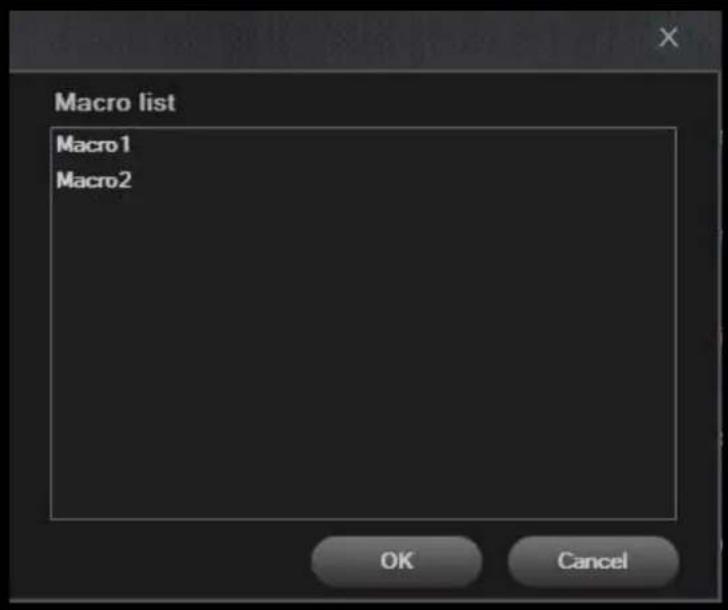
To add a macro click "Macro" tab, then click on "New macro". Enter name of macro and then select required macro in box "Macro list", e.g. "Macro1", click "Start record" for macro recording. Use the keyboard to enter a combination of buttons which you want to assign into this macro, e.g. "Shift+A+B", click "Stop record" to finish recording. Enter a number in box "Specified cycle times" to set how many times macro should be used after single button press. Click "Save" to save all settings.

Select macro
To select macro click "Key setting" tab and then click on box "Macro". In pop-up window select the name of previously recorded macro. and then click "OK" to finish and close the window. Then Click "Apply" to save the settings.


GENERAL INFORMATION
• Non-authorized repairs or taking the device to pieces make the warranty void and may cause the product damage.
- Do not use the product in low and high temperatures and in the dusty atmosphere.
- Safe product, conforming to the EU requirements.
- This product is made in accordance with RoHS European standard. The standard was issued in order to decrease the amount of the electronic and electrical waste emitted into the atmosphere.
- The WEEE symbol (the crossed-out wheeled bin) indicates that this product in not home waste. You protect the environment when you recycle hazardous waste appropriately. In order to get detailed information about recycling this product please contact your retailer or a local authority.


RoHS

VISIT OUR WEB SITE TO GET MORE INFORMATION: WWW.GENESIS-ZONE.COM
GENESIS KRYPTON 500 - INSTRUKCJA OBSŁUGI - PL
EN
PL
CECHY
Snipe button
Report Rate
USTAWIENIA ZAAWANSOWANE
Ustawienie DPI
Edytor makr i profili
Dodawania makr
Wybieranie makr
Snipe button
Report Rate
POKROČILÉ NASTAVENÍ
Nastavení DPI
Editor maker i profilü
Dodávání maker
Volba maker
Snipe button
Report Rate
POKROČILÉ NASTAVENIA
Nastavenie DPI
Editor makier i profilov
Dodávanie makier
Volba makier
EN
PL
CZ
SK
DE
RO
Snipe button
Report rate
Makros auswählen
WICHTIGE HINWEISE
EN
PL
CZ
SK
DE
RO
Snipe button
Report Rate (rata de raportare)
natural_image
Abstract spiral pattern with concentric black and gray concentric circles on a black background (no text or symbols)WWW.GENESIS-ZONE.COM




- Krypton 500
- INSTALLATION
- MAIN SETTINGS
- Key setting
- Snipe button
- Key combination
- Report Rate
- System settings
- ADVANCED SETTINGS
- DPI settings
- Macro and profile editor
- Adding a macro
- GENERAL INFORMATION
- GENESIS KRYPTON 500 - INSTRUKCJA OBSŁUGI - PL
- CECHY
- USTAWIENIA ZAAWANSOWANE
- Ustawienie DPI
- Edytor makr i profili
- Dodawania makr
- Wybieranie makr
- POKROČILÉ NASTAVENÍ
- Nastavení DPI
- Editor maker i profilü
- Dodávání maker
- Volba maker
- POKROČILÉ NASTAVENIA
- Nastavenie DPI
- Editor makier i profilov
- Dodávanie makier
- Volba makier
- Makros auswählen
- WICHTIGE HINWEISE
- Report Rate (rata de raportare)
Brand : Natec
Model : Krypton 500
Category : Mouse