
MNV-2545 - Dishwasher Concept - Free user manual and instructions
Find the device manual for free MNV-2545 Concept in PDF.


| Product Type | Built-in Dishwasher |
| Model | MNV-2545 |
| Brand | Concept |
| Voltage | 220-240 V ~ 50 Hz |
| Power Input | 1760-2100 W |
| Width | 448 mm |
| Height | 815 mm (+50 mm adjustable) |
| Depth | 570 mm |
| Weight | 39 kg |
| Capacity | 9 place settings |
| Noise Level | < 49 dB(A) |
| Water Supply Pressure | 0.04-1.00 MPa |
| Number of Programs | 6 (Intensive, Daily, ECO, Glass, 1 Hour, Rapid) |
| Water Consumption (Normal) | 9 liters |
| Maximum Water Supply Temperature | 60 °C |
| Water Softener | Yes, adjustable hardness settings H1-H6 |
| Salt Capacity | Approx. 1.2 kg |
| Rinse Aid Capacity | Approx. 140 ml |
| Double Safety System | Double-layer hose and Aqua Stop valve |
| Filter System | Main, rough, and soft filters |
| Upper Rack Height Adjustment | Yes, via side holders |
| Delay Start | 2, 4, 6, or 8 hours |
| Half Load Function | Yes |
Frequently Asked Questions - MNV-2545 Concept
User questions about MNV-2545 Concept
0 question about this device. Answer the ones you know or ask your own.
Ask a new question about this device
Download the instructions for your Dishwasher in PDF format for free! Find your manual MNV-2545 - Concept and take your electronic device back in hand. On this page are published all the documents necessary for the use of your device. MNV-2545 by Concept.
USER MANUAL MNV-2545 Concept
natural_image
Exterior view of a modern kitchen appliance with multiple dish units and a rack (no visible text or symbols)MNV2545
CZ SK
PLEN
PODĚKOVÁNÍ
natural_image
Technical line drawing of a mechanical assembly with no visible text or symbolsFull
3/4 full
1/2 full
1/4 full
○ Empty
obr. 4 obr. 5 obr. 6
natural_image
Technical line drawing of a vehicle chassis frame with structural components and a directional arrow (no text or labels)obr. 8
natural_image
Set of 10 grayscale illustrations of various household or dining objects arranged in a grid (no text or symbols)natural_image
Close-up of a white wire cage with diagonal hatching on a dark surface, no visible text or symbolsobr. 11
Příbory
natural_image
Technical line drawing of a mechanical assembly with multiple cylindrical components and a curved arrow indicating rotation (no text or symbols)obr. 13
natural_image
Close-up of a hand using a tool to adjust or install a mechanical component (no visible text or symbols)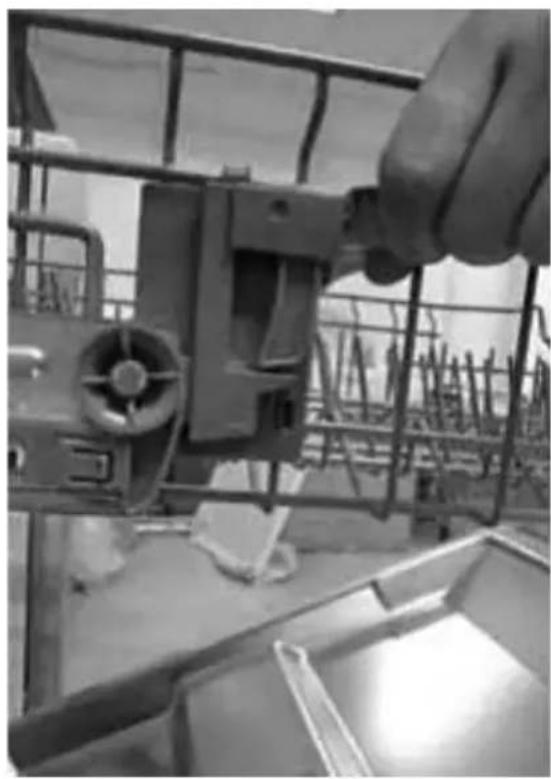
natural_image
Close-up of a hand using a tool to adjust or install a metal rack component (no visible text or symbols)Přehled programů
obr. 18 obr. 19
natural_image
Technical line drawing of a mechanical device with internal components and a magnified inset showing a component detail (no text or symbols)natural_image
Line drawing of a mechanical faucet assembly with a funnel and valve (no text or symbols)Systém dvojité ochrany Double safety
natural_image
Technical line drawing of a mechanical assembly with no visible text or symbolsFull
3/4 full
1/2 full
1/4 full
○ Empty
obr. 4 obr. 5 obr. 6
natural_image
Technical line drawing of a vehicle chassis frame with structural components and a directional arrow (no text or labels)obr. 8
natural_image
Close-up of a white wire cage with diagonal hatching on a dark surface, no visible text or symbolsobr. 11
Príbory
natural_image
Technical line drawing of a mechanical assembly with internal components and directional arrow (no text or symbols)obr. 13
natural_image
Close-up of a hand using a tool to adjust or install a mechanical component (no visible text or symbols)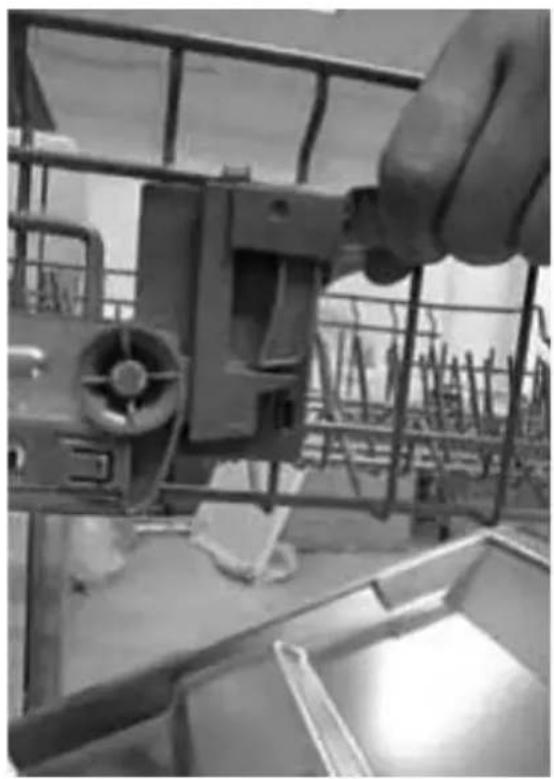
natural_image
Close-up of a hand using a tool to adjust or install a metal frame with a fan inside (no visible text or symbols)Prehl'ad programov
obr. 18 obr. 19
Nastavenie sily pružiny zdvíhania dvierok
natural_image
Technical line drawing of a mechanical device with internal components and a magnified inset showing a detail (no text or symbols)natural_image
Line drawing of a mechanical faucet assembly with a funnel and valve (no text or symbols)Systém dvojitej ochrany Double safety
obr. 24
Demontáž
natural_image
Technical line drawing of a mechanical device with a handle and internal components (no text or symbols)Uwaga:
Full
3/4 full
1/2 full
1/4 full
○ Empty
natural_image
Technical line drawing of a vehicle chassis frame with structural supports and a central mechanical component (no text or symbols)Rys. 8
natural_image
Close-up of a wire cage with diagonal hatching and a hand touching the side (no text or symbols visible)Rys. 11
Sztućce
natural_image
Technical line drawing of a mechanical assembly with internal components and directional arrows (no text or symbols)Rys. 13
natural_image
Close-up of a hand using a tool to adjust or install a mechanical component (no visible text or symbols)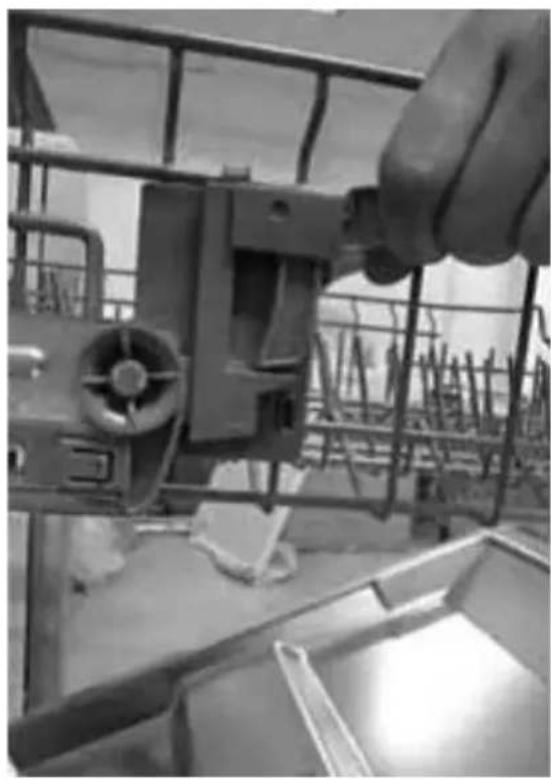
natural_image
Close-up of a hand using a tool to adjust or install a metal frame with a fan inside (no visible text or symbols)Rys. 15
Rys. 18 Rys. 19
natural_image
Technical line drawing of a mechanical device with internal components and a magnified inset showing a component detail (no text or symbols)natural_image
Illustration of a hand pump with a funnel and valve (no text or symbols)obr. 24
Demontáž
Thank you for purchasing a Concept product. We hope you will be satisfied with our product throughout its service life.
Please study the entire Operating Manual carefully before you start using the product. Keep the manual in a safe place for future reference. Make sure other people using the product are familiar with these instructions.
| Technical Parameters | 75 | How to Save | 81 |
| Important Safety Precautions | 76 | Unsuitable Dishes | 82 |
| Product Description | 77 | Loading the Dishwasher | 83 |
| Description of the Control Panel | 78 | Overview of Programs | 86 |
| Operating Instructions | 78 | Washing the Dishes - Procedure | 87 |
| Water Softening Device | 78 | Maintenance and Cleaning | 88 |
| Water Softening Device Settings | 78 | Connection and Assembly of the Dishwasher | 90 |
| Filling the Regeneration Salt | 79 | Installation of the Dishwasher | 94 |
| Filling the Rinse Aid in the Container | 80 | Troubleshooting | 96 |
| Setting the Rinse Aid Dosage | 80 | Servicing | 98 |
| Using the Dishwasher Detergent | 80 | Environmental Protection | 98 |
| Filling the Dishwasher Detergent | 81 |
| Technické parametry | |
| Voltage 220 - 240 V ~ 50 Hz | |
| Power input 1760-2100 W | |
| Width 448 mm | |
| Height 815 mm (+50 mm) adjustable | |
| Depth 570 mm | |
| Water supply pressure range 0,04 – 1,00 MPa | |
| Capacity 9 dish sets | |
| Water consumption (Normal prog.) 9 litrů | |
| Number of washing programs 6 | |
| Maximum temperature of supplied water 60 °C | |
| Weight 39 kg | |
| Noise level < 49 dB(A) | |
IMPORTANT SAFETY INSTRUCTIONS
Delivery
- Check the package and unit immediately after delivery for any damage that may have occurred during shipping.
- If the unit is damaged, do not operate it. Contact the supplier as soon as possible.
- Remove all the covering and marketing materials from the unit before the first use.
- Dispose of the packaging material properly.
Installation
- The appliance is designed to be built into kitchen furniture.
- Follow the instructions for the appliance connection and installation.
- Install based (integrated) or in-built dishwashers models only under compact worktops fixed to cupboards in order to ensure stability.
- The unit has to be disconnected from the power socket, and the water supply has to be closed during installation.
- Before the first operation of the appliance make sure that your local connection is earthed and compliant with all applicable regulations.
- Make sure the mains voltage and water supply pressure match the value mentioned in the operating instructions or marked on the rating plate.
- The wall outlet or circuit breaker as well as water shut-off and Aqua-Stop (if supplied) valves must be easily accessible after the installation.
- If the unit is not installed in a niche, and thus the side panel is accessible, the area of the door hinge shall be covered for safety reasons (danger of injury).
- Only an authorized technician may install and connect your appliance.
- Improper connection and/or incompetent installation may result in serious injury or death.
- The manufacturer takes no responsibility for any damage incurred due to improper electrical installation or use.
- CONCEPT appliance is not intended for commercial purposes and are intended for normal household use and similar areas such as: Staff kitchen areas in shops, offices and other working environments; farm houses; by clients in hotels, motels and other residential type environments; bed and breakfast type environments.
During normal operation
- Use the unit only as described in this operating manual.
- Use the dishwasher only in your household and solely to wash kitchenware.
- Knives and other objects with sharp edges shall be placed in the dish rack with the edges aiming down, or in a horizontal position.
- Do not sit or stand on the open door of the unit, it could be toppled.
- The water in the washing area is not for drinking.
- Do not put any solvents in the washing area. Danger of explosion.
- When a program is running, open the door carefully, as water may splash out.
- Follow the safety precautions and instructions on the package of washing and rinse aids.
- Do not touch hot surfaces or heaters during use or shortly after use of the unit.
- Do not store anything inside the unit.
- Do not touch the unit with wet or damp hands.
- Turn off the unit and disconnect the plug from the mains outlet in case of any failure.
- Check the appliance, power cord and water supply hose for damage regularly. Never switch on a damaged appliance.
- Turn off the unit and let it cool down for at least 30 minutes before cleaning.
- WARNING! A large volume of steam may be released, or water may splash out when you open the door. Be careful. There is a risk of scalding!
- Do not use the unit if the door or sealing is damaged. Have the unit repaired in an authorised service centre.
- Do not use the unit without properly installed covers or front panel.
-
Wash only dishes designed for use in a dishwasher. Prevent plastic dishes from coming into contact with the heaters.
-
Do not immerse the power cord or plug in water or any other liquid.
- The appliance is not intended for use by people with reduced physical, sensory or mental capabilities or lack of knowledge, unless under the supervision of an acquainted person responsible for their safety.
- When disconnecting the unit from the wall outlet, never pull the power cord; hold the plug instead.
- Do not immerse the power cord or plug in water or any other liquid.
- Use manufacturer-recommended accessories only.
- Make sure that all controls are in the OFF position when the appliance is not in use.
Children in the household
- Do not allow children or unskilled people to handle the unit. Use the unit out of the reach of these individuals.
• Take extra care when using the unit near children. - Do not allow use of the appliance as a toy.
- Hide washing and rinse aids from children.
- Do not allow children near open appliance, remnants of the washing agent could be inside.
WARNING!
Open the unit only for a short time to put in or take out dishes, so as to prevent injury caused e.g. by tripping. Children could lock themselves in the unit (risk of suffocation), or be exposed to other dangers.
Possible defects
- Only qualified personnel may repair and intervene in the unit.
- The unit should be disconnected from the electric network during repairs and interventions. Switch off the circuit breaker, or disconnect the plug of the supply cable.
- Never pull the cord to disconnect the plug from the socket; hold the plug instead.
Failure to follow the manufacturer's instructions may lead to refusal of warranty repair.
PRODUCT DESCRIPTION
- Upper rack
- Spray arm
- Lower rack
- Regenerative salt container
- Main fi Iter
- Dishwasher detergent container
- Extender
- Rack for cutlery
- Rough filter
- Rinse aid container
- Discharge hose connection
- Supply hose connection
- Lower cover
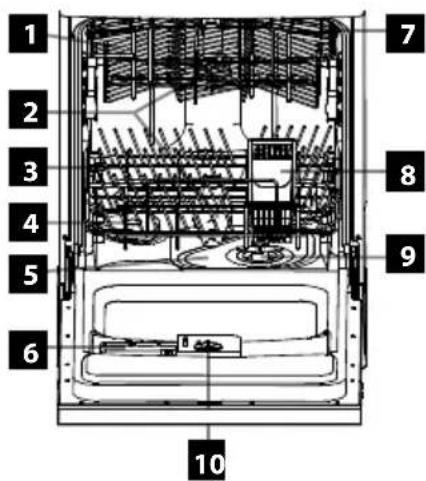
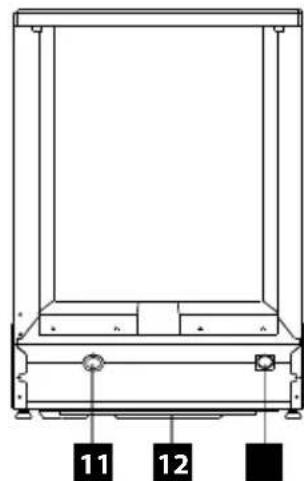
Front view Rear view
DESCRIPTION OF THE CONTROL PANEL
- Power On/Off button
- The wash program selection button
- Delay button (3,6,9 hours)
- Half load function button
-
Start / Pause button
-
Diode indicator of On/Off
- Diode indicator of the chosen wash program
- Diode indicator of the chosen delayed start
- Indicators half load and regeneration salt
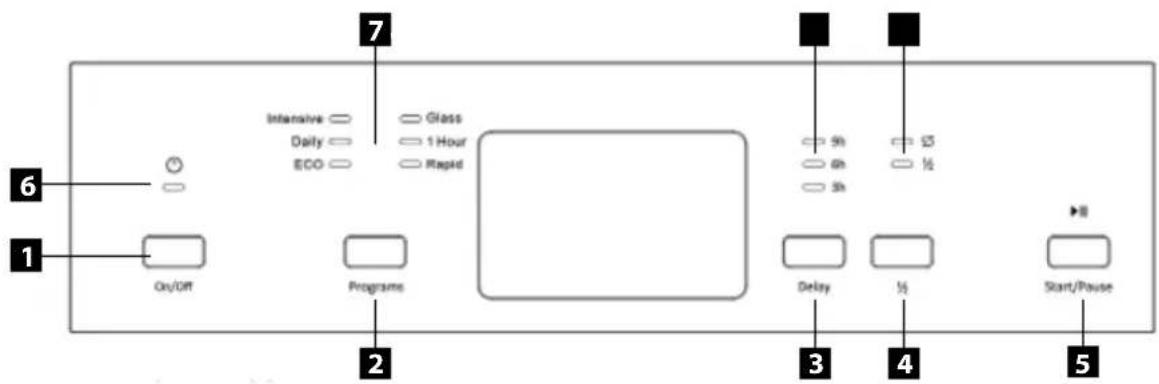
OPERATING INSTRUCTIONS
For the first washing, buy
- regeneration salt (according to the water hardness – see below)
- dishwasher detergent
- rinse aid
Use only products designed for dishwashers.
Water softening device
Soft water is needed for effective washing, i.e. water with a low calcium content; otherwise limescale is created on the dishes and inside the unit. Water from the mains that exceeds the given hardness level shall be softened for use, i.e. decalcified. This is done by the regenerative salt in the softening device. The settings and necessary volume of the salt depend on the tap water hardness. Water hardness is marked in equivalent levels, German °dH, French °TH and mmol/l (milimol per liter – international water hardness unit).
The softener should be set according to the hardness of the local water. You may get the information on the local water hardness from your local water utilities provider.
To set the water hardness, proceed as follows:
- Open the door and push the (1) button.
- Press the button (5) for 5 seconds
- Press the button (5) to switch between programs H1 - H6.
- These programs detected by a combination of lighted LEDs in the following table.
- Press the button (1) to save and exit setup.
| Water hardness | Indicator combination | salt consumption (gram / wash cycle) | Wash cycle / 1kg salt | |||
| °dH °fH | °Clarke mmol/l | |||||
| 0~5 0~9 | 0~6 0~0,9 | 4 H1 (Rapid) | 0 / | |||
| 6~11 10 | 20 7~14 1 | 0~2,0 H2 (1 Hour) | 20 60 | |||
| 12~17 2 | 1~30 15~21 | 2,1~3,0 H3 | (1Hour, Rapid) | 30 50 | ||
| 18~22 3 | 1~40 22~28 | 3,1~4,0 H4 | (Glass) 40 40 | |||
| 23~34 4 | 1~60 29~42 | 4,1~6,0 H5 | (Glass, Rapid) | 50 30 | ||
| 35~55 6 | 1~98 43~69 | 6,1~9,8 H6 | (Glass, 1Hour) | 60 20 | ||
Note: The dishwasher is factory set for medium water hardness H4.
Filling the regenerative salt
Effects of the salt
During the washing, salt is automatically washed out of the container into the softening device, where it dissolves calcium. The dissolved calcium is washed out of the unit. The water softening device is then ready for the next operation. This regenerative process works only if the salt dissolves.
- Pull out the lower rack.
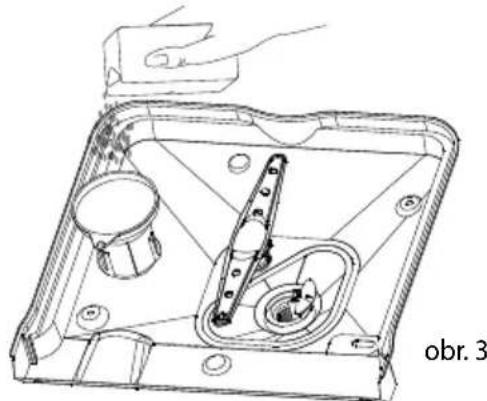
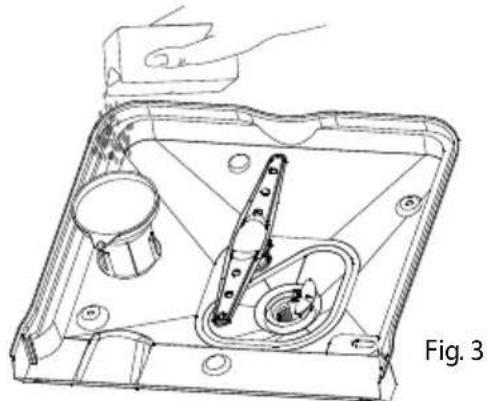
- Open the container closing (Fig. 2).
- Pour 0.5 l of water into the container before the first use.
- Put the supplied funnel on the container opening.
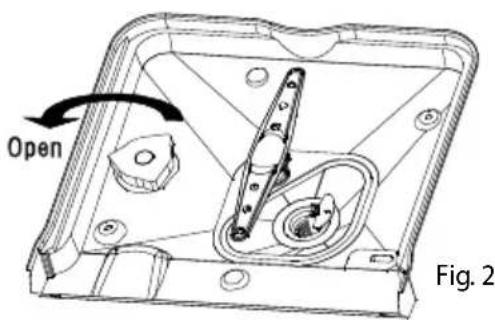
natural_image
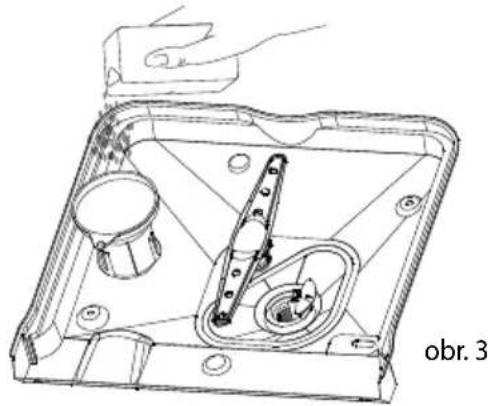
Technical line drawing of a mechanical assembly inside a transparent housing, showing internal components and mounting holes (no text or symbols)- Pour the regenerative salt slowly into the container (capacity about 1.2 kg). The salt will wash excess water out (Fig. 3).
WARNING!
Use only regenerative salt designed for dishwashers. Do not use kitchen salt!
Never use dishwasher detergent in the water softener container!
- Close the container and fasten the closing gently.
Note: Indication to add regenerative salt on the control panel will be illuminated first. It will go out after a while, when a sufficient salt concentration has been achieved.
Warning
Never put dishwasher detergent in the regenerative salt container. You could destroy the softening device.
Indication to add regenerative salt
The salt has to be added immediately before the next washing, when the respective indicator on the control panel is illuminated.
Filling the Rinse Aid in the Container
The rinse aid is used in the last stage of rinsing. It prevents water droplets from drying and creating stains on the surface during drying.
Fill the rinse aid before running the washing program, so that any spilled remnants of the agent are washed away immediately and don't increase the risk of corrosion of the internal parts!
- Open the door.
- Open the container closing (Fig. 4).
- Pour the rinse aid slowly into the container (Fig. 5); the capacity is about 140 ml.
WARNING! Use only rinse aid designed for dishwashers. Never put dishwasher detergent in the rinse aid container!
- Close the container and fasten the closing gently (Fig. 6).
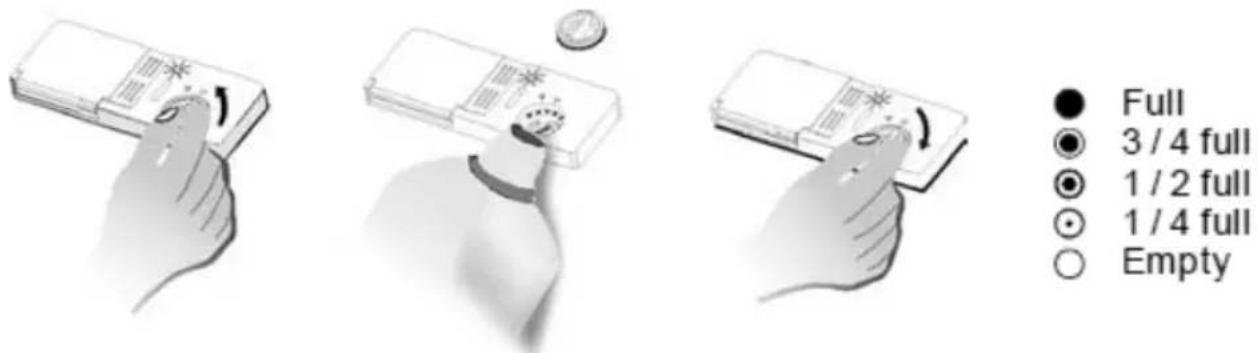
Full
3/4 full
1/2 full
1/4 full
○ Empty
The volume of rinse aid can be checked visually. If the window by the closing of the rinse aid container is black, there is enough of the agent. If the window is light, the container is empty.
Setting the Rinse Aid Dosage
There are several positions for dosage of the rinse aid. Before the first use, set the dosage to 2.
If there are stains from water on the dishes, add rinse aid.
If a sticky fi lm remains, reduce the volume of rinse aid.
- Open the door.
- Open the container closing (Fig. 4).
- Increase/reduce the dosage (position 1 - 6).
- Close the container and fasten the closing gently (Fig. 6).
If you use only dishwasher detergent integrated with rinse aid, leave the rinse aid container empty, or reduce the dosage to the minimum.
Using the Dishwasher Detergent
Dishwasher detergents can be divided by form into four groups:
a) Powdered
b) Liquid
c) Tablets
d) Combined (e.g. 3 in 1 tablets)
They can be divided into two groups by chemical composition:
a) Alkaline
b) With natural enzymes
We can further divide them into:
a) Phosphate and chlorine
b) Phosphate and chlorine-free
c) Phosphate-free and chlorine-free
When using phosphate-free agents in hard water, white sediment may appear on the dishes and internal walls. This can be prevented by higher amounts of dishwasher detergent.
Chlorine-free dishwasher detergents have less bleaching effect. This may lead to a higher visibility of tea stains or discolored plastic parts.
A stronger washing program, increased volume of dishwasher detergent or use of chlorine dishwasher detergent can help here.
You can find out whether the dishwasher detergent is suitable for silver by reading the package.
For further inquiries, contact the manufacturer of the dishwasher detergent.
Dishwasher detergent instructions
Use commonly supplied liquid or powder brand-name products for dishwashers, or tablets (do not use agents for hand washing
Dishwasher detergent container with dosage
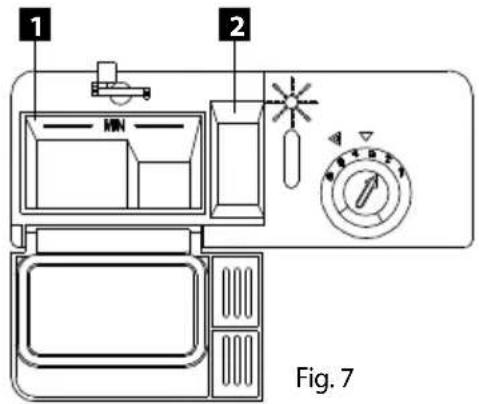
The doses in the container will help you pour in the correct volume of dishwasher detergent (Fig. 7). The container consists of a section for main washing (1) and pre-washing (2).
natural_image
Technical line drawing of a mechanical assembly with no visible text or symbolsFig. 8
Filling the Dishwasher Detergent
Pour in the dishwasher detergent when the door is fully open.
If the dishwasher detergent container remains closed, open it by pushing the closing lock.
- Fill the container with dishwasher detergent. For proper dosage, please follow the manufacturer's instructions.
Do not exceed the MAX level when pouring the dishwasher detergent.
Due to the different operation of washing tablets their washing power can sometimes be limited during short programs. For these programs, powder dishwasher detergents are more suitable. - Close the dishwasher detergent container and close the door.
How to Save
If the dishes are just slightly dirty, a lower volume of dishwasher detergent than specified should suffice.
WARNING!
Keep the washing agents in a safe and dry place, out of reach of children and disabled persons.
Find out what type of dishwasher detergent or combined dishwasher detergent you have!
Follow the operating manual or instructions on the package.
When using combined dishwasher detergents, you don't have to use regeneration salt only up to the water hardness values of 21^ (37 °TH, 3.7 mmol/l). For water hardness over 21^ (37 °TH, 3.7 mmol/l), the salt is required.
Note: Optimum washing and drying results can be achieved by using classic rinse aids combined with separate use of salt and rinse aid.
For the effectiveness of the combined dishwasher detergent it is crucial to follow the respective operating instructions.
Caution
Even when the rinse aid and/or salt level indicators are illuminated, a washing program using 3 in 1 tablets runs without defects.
Unsuitable Dishes
Do not wash:
- Cutlery and dishes containing parts made of wood. They get soaked in the dishwasher and lose their attractiveness. The glues used for wood are also unsuitable for temperatures inside a dishwasher.
- Finely decorated glasses and vases or priceless antiques. Such kitchenware was not made for use in dishwashers. Some types of glass may turn cloudy after several washing cycles.
- Plastic parts of dishes sensitive to hot water and dishes made from copper and tin. Aluminum or silver decorations on glass can change or lose color as well.
Absorbent materials, such as sponges or towels, do not belong in the dishwasher.
RECOMMENDATION:
Wash only dishes for which dishwasher suitability has been confirmed.
Caution
Dishes soiled by ash, wax, lubricating grease or paint should not be washed in the dishwasher.
Damage to glass and dishes
Causes:
- Type of glass and its manufacturing process.
• Chemical composition of the dishwasher detergent.
• Water temperature and time of the program.
RECOMMENDATION:
- Use glass and porcelain labeled by the manufacturer as suitable for washing in dishwashers.
- Use dishwasher detergents labeled by the manufacturer as dish-friendly. Inquire at the manufacturer's.
- Select programs with the shortest time.
• To prevent damage, remove the glass and cutlery as soon as possible after the program finishes.
Loading the dishwasher
Remove large remnants of food from the dishes. Rinsing under running water prior to washing is not necessary.
Put the dishes in as follows:
• cups, glasses, pots etc. bottoms up
- put convex or hollow dishes crossways to allow the water to drain
• the dishes shall stand firm and not sway
• the dishes shall not prevent the spray arms from rotating
Do not wash very small dishes in the dishwasher – they may fall out of the racks easily.
Removing the dishes
To prevent water from the upper rack dripping onto the dishes in the lower rack, we recommend removing the dishes from the lower rack fi rst.
Cups, glasses and saucers
Upper dish rack (Fig. 9).
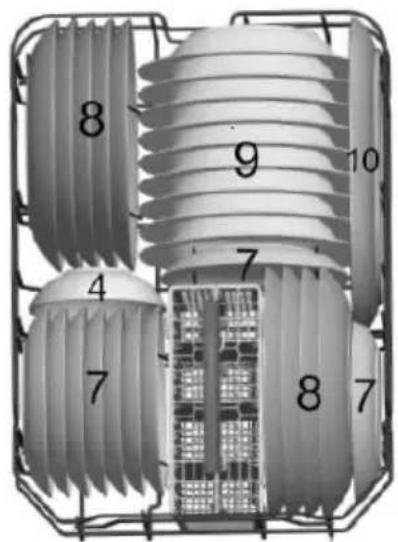
Pots
Lower dish rack (Fig. 10).
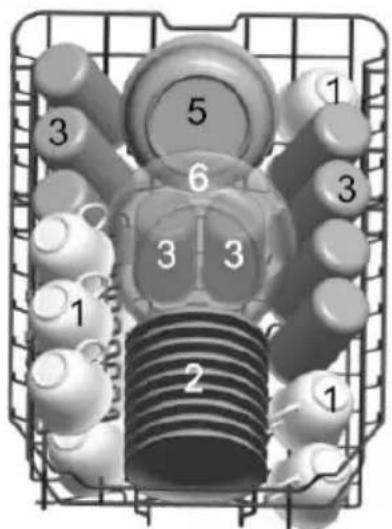
Fig. 9 Fig. 10
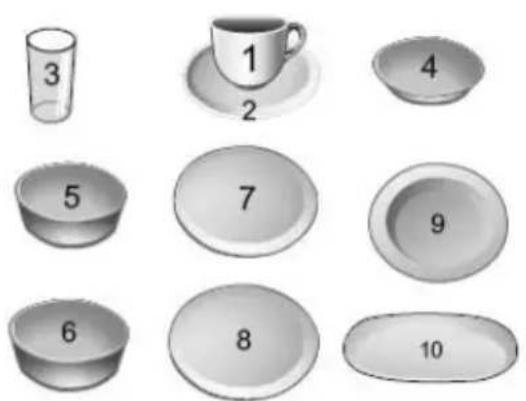
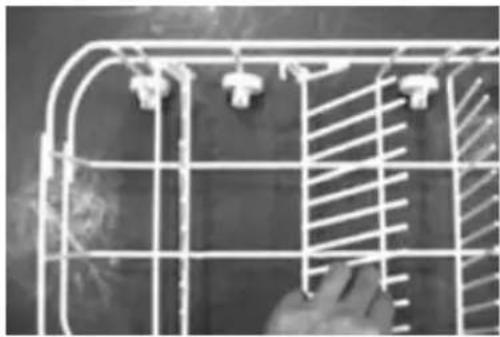
To wash bigger items (pots, pans etc.) collapse the plate holders in the lower rack (Fig. 11).
natural_image
Close-up of a white wire cage with diagonal hatching on a dark surface, no visible text or symbolsobr. 11
Cutlery
Insert the cutlery with the handles aiming downwards (Fig. 12a, 12b). Make sure they do not protrude under the rack, as they may prevent the motion of the spray arms. To prevent any risk of injury, put long and pointed objects and knives on the upper rack extender.
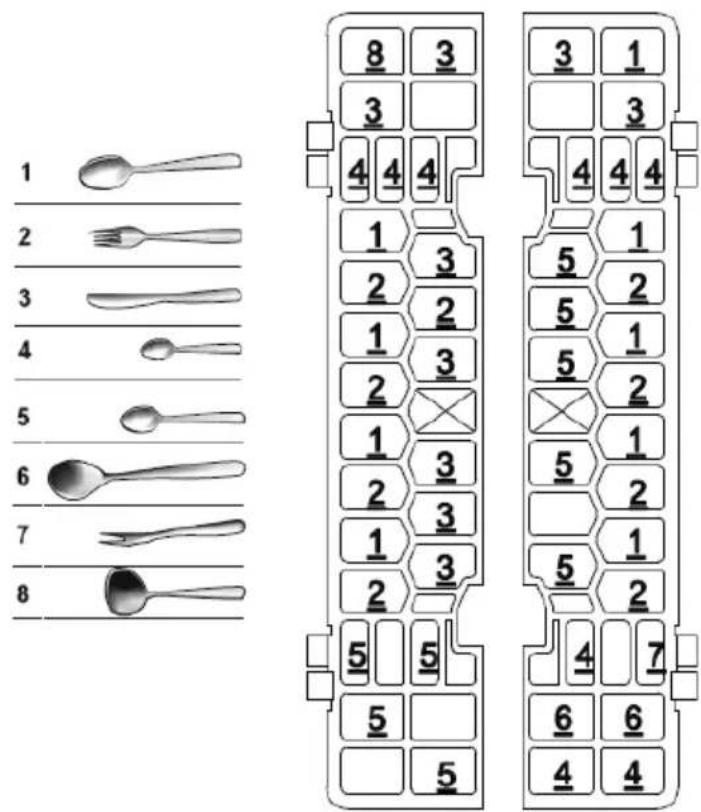
Fig. 12a Fig. 12b
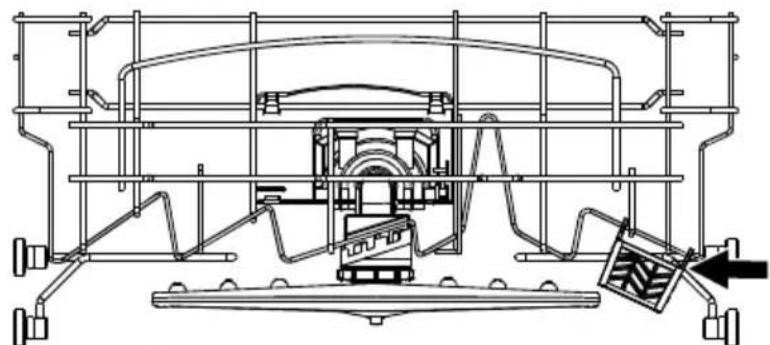
Extender
Lean stemmed and high glasses on the extender (not on other dishes).
Load long pieces, cutlery, ladles or knives so that they do not prevent the spray arms from moving. You may tip the extender as needed (Fig. 13).
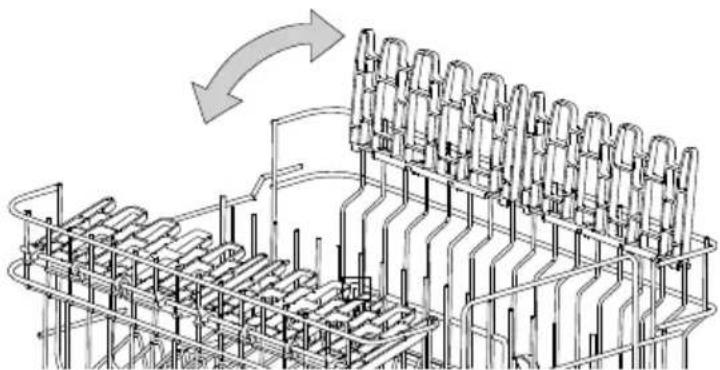
natural_image
Technical line drawing of a mechanical assembly with internal components and directional arrow (no text or symbols)obr. 13
Upper rack height adjustment
The height of the upper rack can be adjusted if you need more space for bigger items. Adjust the height by tipping over the holders on the sides of the upper rack. When tipping the holders make sure they click in the edge position.
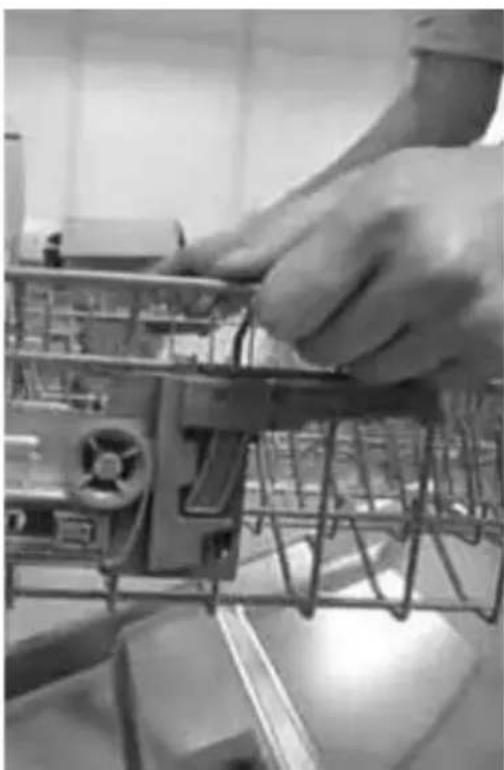
natural_image
Close-up of a hand using a tool to adjust or install a mechanical component on a metal rack (no visible text or symbols)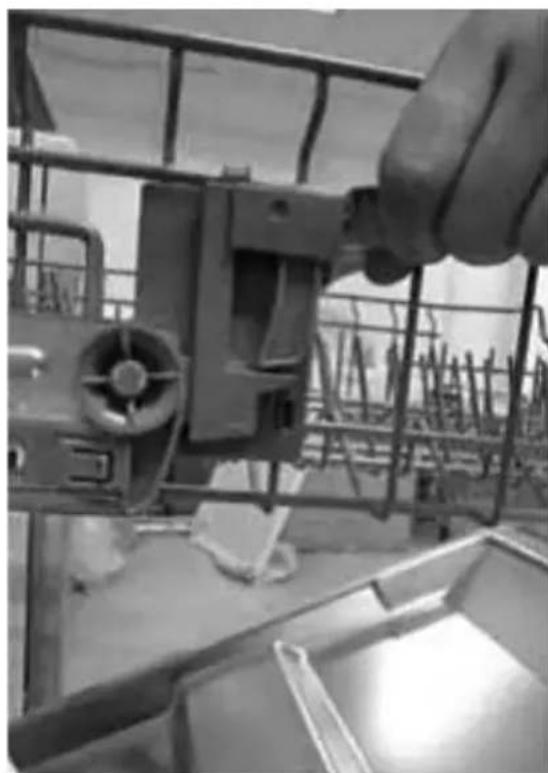
natural_image
Close-up of a hand using a tool to adjust or install a mechanical component inside a kitchen appliance (no visible text or symbols)Overview of Programs
| Program Type of soiling Program stage | Dishwasher detergent volumePre-wash/wash | Time of washing(min) | Energy consumption (kWh) | Water consumption (l) | ||
Intensive | Very dirty pots, pans, casseroles, and hard dried food leftovers | 1. Pre-wash (50°C)2. Pre-wash Wash (65°C)1. Rinse2. Rinse (55°C) Drying | 5/22 g 130 l | 2 16 | ||
Daily | For normal and less dirty dishes | Pre-wash (45°C)Wash (50°C)RinseRinse (60°C)Drying | 5/25 g 155 l | 07 13 | ||
| ECO | For less dirty dishes, plates, trays, glasses | Pre-washWash (50°C)Rinse (60°C)Drying | 5/25 g 175 0 | 78 9 | ||
 | For less dirty dishes, glasses, porcelain | Pre-washWash (40°C)Rinse (60°C)RinseDrying | 5/22 g 110 0 | 7 13 | ||
1Hour For  | dishes for which rinsing and slight drying is enough | Pre-wash (50°C)Wash (60°C)Rinse (60°C)Drying | 5/22 g 60 0 | 85 9 | ||
Rapid  | Accelerated program for less dirty dishes that do not require drying | Wash (40°C)1. Rinse2. Rinse (45°C) | 20 g 40 0 | 45 10 | ||
Note: If there is no temperature stated for a program, the dishwasher does not heat water at this stage.
When using 3 in 1 detergents (tablets) the washing program parameters can vary slightly. To achieve the best washing results, use the Intensive, Normal and Economy programs.
Note: When the dishwasher is not fully loaded it is sufficient to use the next weaker program.
Information for the programs
The stated data apply under normal conditions.
Major differences may occur due to:
• various amounts of dishes
• temperature of the supplied water
• water pressure in the mains
• surrounding temperature
• electric power network voltage tolerance
- differences due to the dishwasher's operation (e.g. temperature, volume of water, etc.)
Water consumption values relate to the water hardness in the medium position.
Washing the Dishes - Procedure
- Slide out, fill and slide in both racks.
- Check or add salt or rinse aid.
- Put the relevant amount of dishwasher detergent in the corresponding section of the container.
- Open the water tap fully.
- Keep pushing the door gently until it clicks to close it properly.
- Turn on the dishwasher by pushing the main switch (1). All the symbols and indicators on the display will be illuminated for a moment.
- If you need to delay the start of the washing, push the delayed ON button (3) repeatedly to set the required time of the delay (2, 4, 6, 8 hours).
- Select the required program by pressing the respective button (6).
- The program (or countdown function) starts in several seconds.
- After the program is complete the dishwasher will beep.
- Turn the dishwasher off by pressing the main switch (1).
- Close the water tap.
- Hot dishes are very fragile. We recommend waiting for about 15 minutes before you take out the dishes to let them cool down.
- Take out the dishes from the lower rack first, then from the upper rack to prevent water dripping from the upper to the lower dishes.
Note: If you decide to change the selected program, check to see if there is any dishwasher detergent in the container, or if it has been used and more should be added before launching a new program.
If you need to add dishes to the dishwasher when program is running
- Open the dishwasher door slightly; the running program will stop. Wait until the spray arms stop moving.
- Add the dishes to the dishwasher and close the door. The program will resume after a couple of seconds.
WARNING!
Proceed with caution when adding dishes. A large volume of steam may be released, or hot water may splash out when you open the door. Hot water with dishwasher detergent can be chemically aggressive in contact with skin or furniture.
MAINTENANCE AND CLEANING
By regular checking and maintenance you may prevent defects before they occur. Therefore, you should inspect the dishwasher carefully from time to time. To keep the dishwasher in perfect condition, we recommend using special dishwasher cleaner once every 4 - 6 months (e.g. Calgonit).
Overall condition
- Check the washing zone for sediments of fat and limescale. If there are sediments, fill the dishwasher detergent container and run the program at the highest temperature.
- Wipe the door sealing regularly with a wet cloth to remove sediments.
- Check the salt level indicator; add salt if needed.
- Check the rinse aid indicator. Add rinse aid if needed.
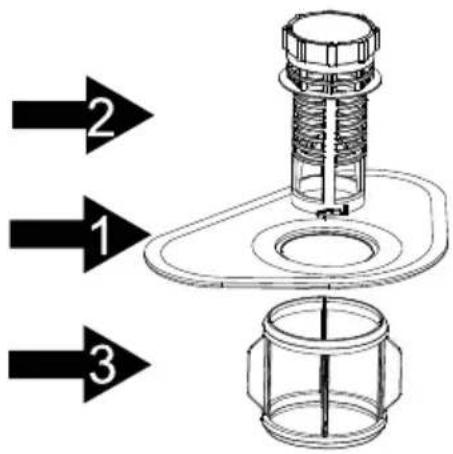
Fig. 14
Discharge fi Iters
The discharge fi Iters protect the pump against large particles from the washing water. These particles can clog the filters. The filtering system (Fig. 1) consists of the main fi Iter (1), rough fi Iter (2) and soft fi Iter (3).
Check the condition of the fl iters after each washing.
You can remove the filter system after unscrewing the rough filter drum. Remove sediments and clean the filters under running water. Follow the reverse steps to reinstall the fl iters.
Never use the dishwasher without a properly installed fi Iter system!
Spray arms
Calcium and dirt from the washing water can block the jets and bearings of the spray arms.
- Check the output jets of the spray arms for food remnants.
- If necessary, unscrew and remove the arms (Fig. 15). Rinse them under running water and reinstall them.
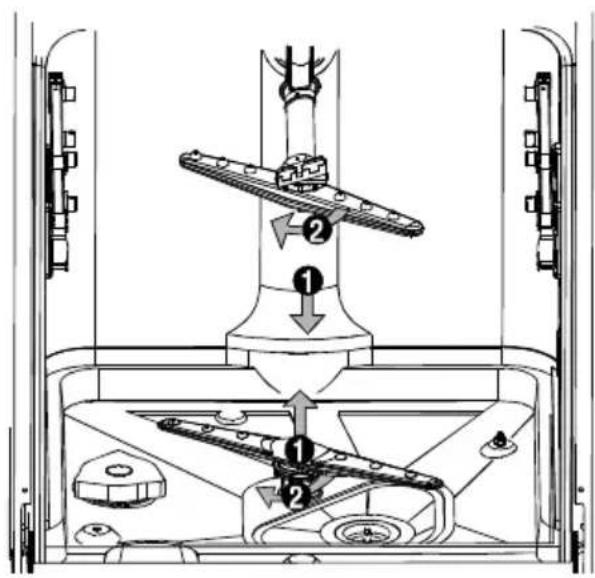
Fig. 15
Cleaning the control panel and surface of the dishwasher
Use a soft, wet cloth. Do not use rough or sharp objects or aggressive detergents.
Protect the door lock from water.
Protection from freezing
If you are not going to use the dishwasher for longer time, or you are going to store it in a place with a low temperature, you should proceed as follows:
- Disconnect the dishwasher from the power outlet.
- Disconnect the dishwasher from the water supply.
- Dismantle the supply hose and pour out the water. You may use a shallow tray to collect the water.
- Connect the supply hose back to the dishwasher.
- Remove the filter system on the bottom, and dry the remaining water (with a sponge).
Some tips for maintenance
- Close the water supply after each use, and leave the door slightly open to prevent dampness and smell from accumulating inside.
- Disconnect the power cable from the wall outlet before cleaning and maintenance.
- Do not use rough tools or hand-washing sponges. They could scratch the surface. Use a wet cloth soaked in water with detergent.
- If you are leaving your apartment for a longer period of time, run a washing program with the dishwasher empty; after completion disconnect the power supply cable, close the water tap and leave the door slightly open to prevent dampness and smell from accumulating inside. An open door also prolongs the life of the sealing.
- If you need to move the unit, keep it in the vertical position. If this is impossible, turn and move it on the back side.
• One of the sources of smell is dirt around individual seals. Check them and wipe with a wet cloth if necessary.
INSTALLATION AND ASSEMBLY OF THE DISHWASHER
General
Based and integrable dishwashers installed additionally as free-standing appliances must be protected from overturning. They should, for example, be screwed to a wall, or placed under a compact worktop fixed to cupboards.
The dishwasher has to be expertly connected to assure proper operation. The data for the water input and output and electric parameters shall correspond to the data mentioned in the technical parameters or assembly instructions.
Preparations for installation
For built-in version dimensions, see Fig. 16a (for model MNV 4045) and Fig. 16b (for model MNV 4060). Leave a minimum space around the open door of 50 mm.
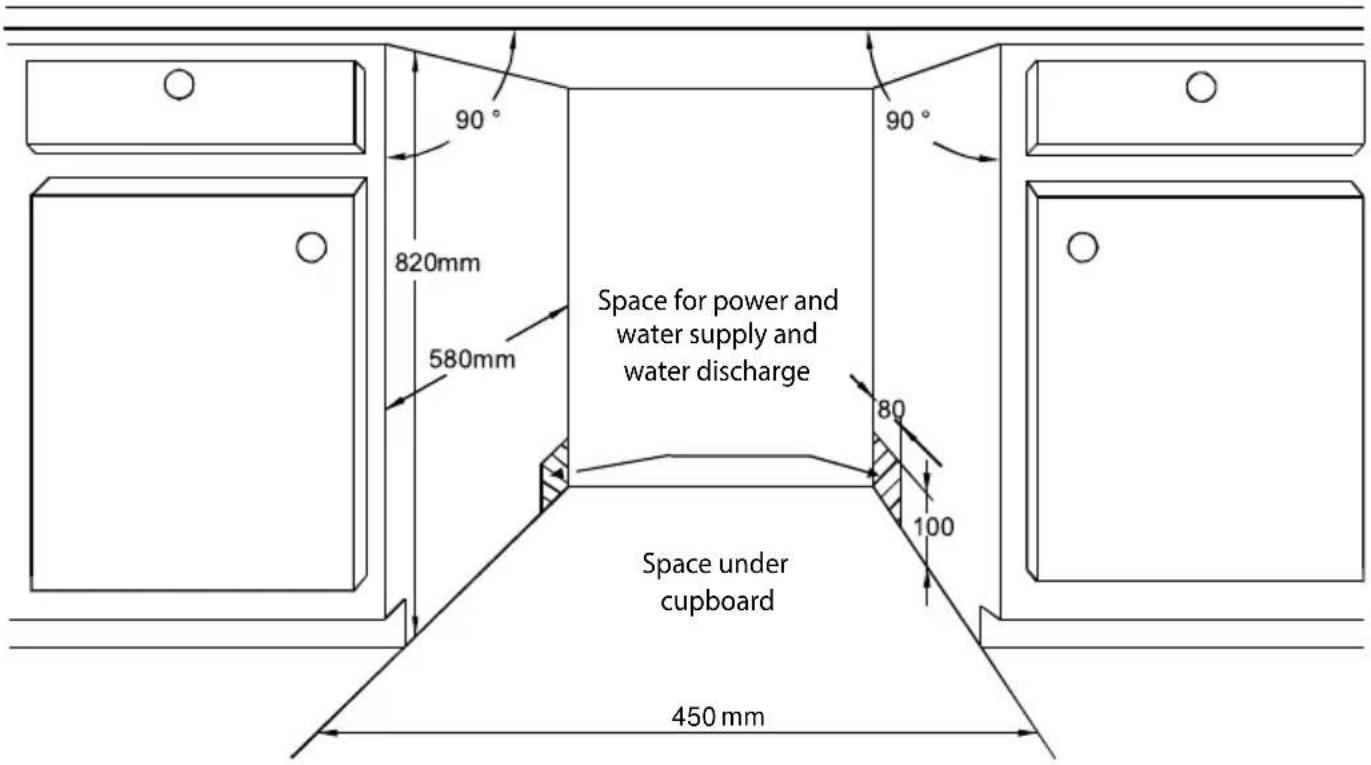
Fig. 16
Dimensions and fixing the cover plate to the door
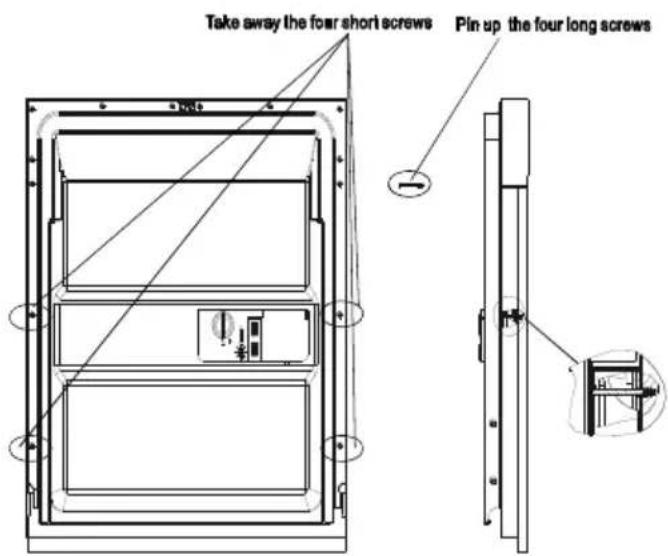
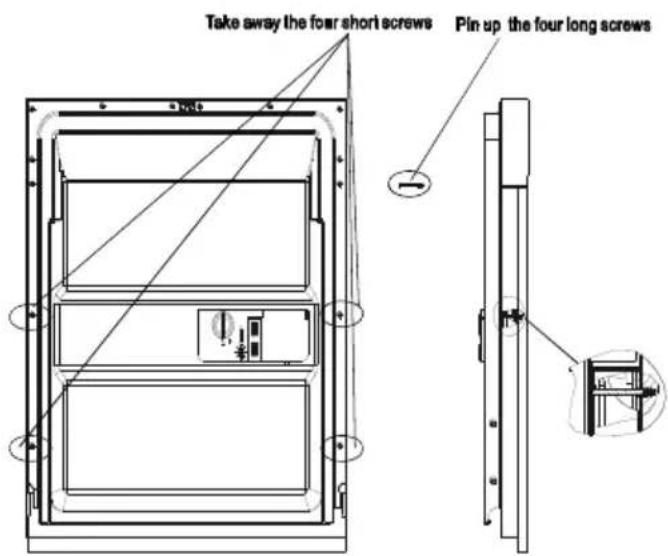
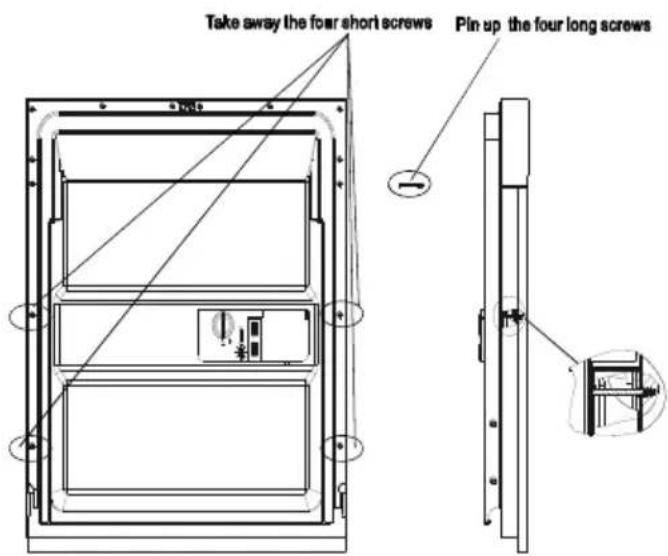
For the required dimensions and location of the holes on the cover plate, see Fig. 17
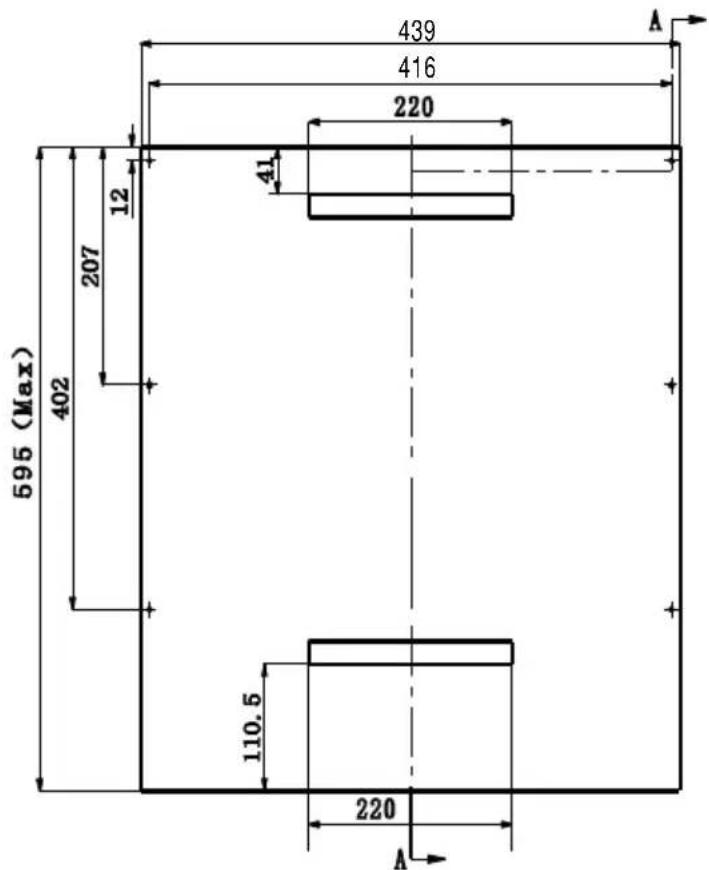
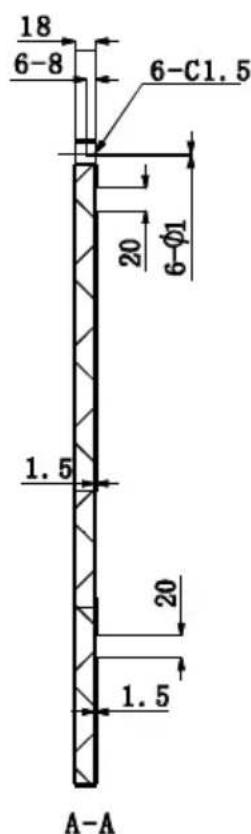
Fig. 17
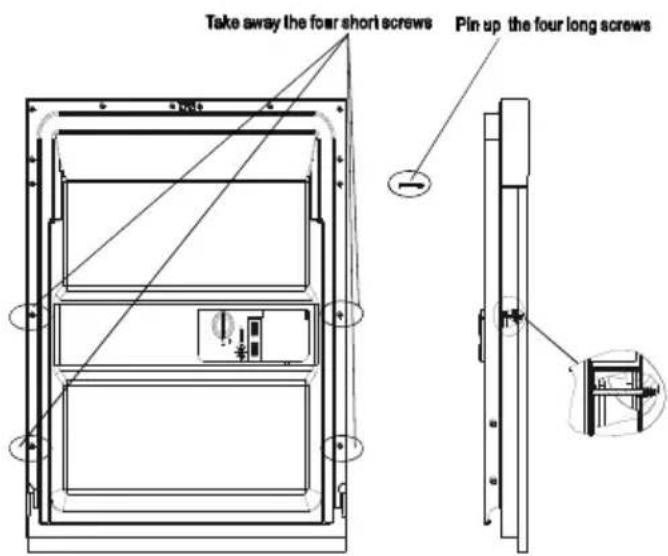
Fix the holder to the cover plate so that the fixing bolts have sunken heads and do not protrude from the back of the cover plate.
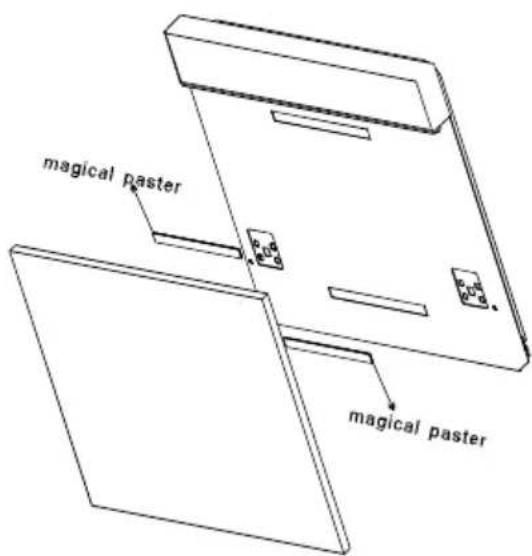
obr. 18 obr. 19
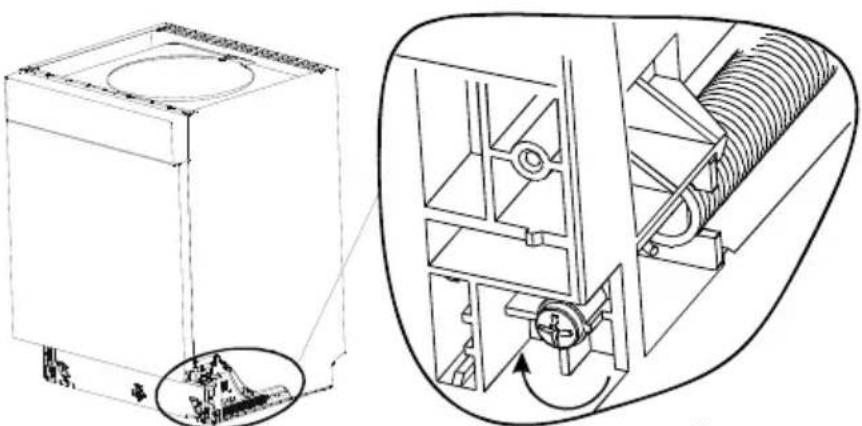
Door lifting spring strength adjustment
Due to the material used for the cover plate, the weight will differ accordingly. You may set the spring strength using screws (Fig. 20) on the front side so that the door holds in the open position, and close smoothly when lifted.
natural_image
Technical line drawing of a mechanical device with internal components and a magnified inset showing internal structure (no text or symbols)Fig. 20
Connection of the discharge hose
Connect the discharge hose:
a) to a discharge pipe with a diameter of 40 mm with a hole,
b) or use the supplied adapter that enables discharge into a basin or a bathtub. Note: If you use the adapter, it must be fixed properly. Otherwise, it can come loose and the water can spill on the floor.
c) Or use the siphon side hose of the sink or basin. Fix the hose to the lower side of the worktop. Thus, you will prevent the water from flowing back into the dishwasher.
The end of the discharge hose should be 400 – 1,000 mm (Fig. 21) above the floor, not immersed in water to prevent back flow.
Make sure the hose is not bent or jammed to prevent a reduced or stopped water supply.
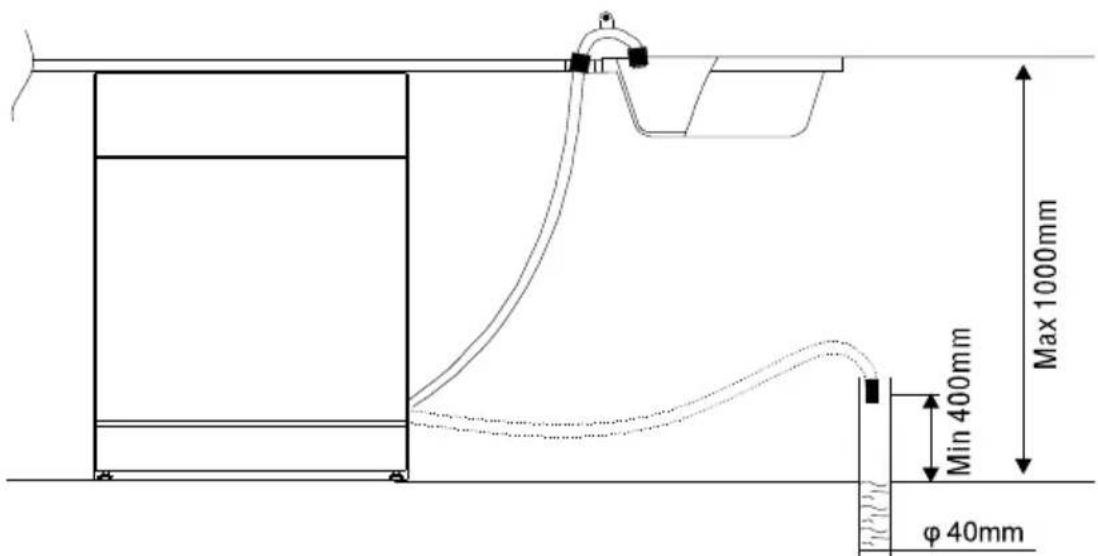
Fig. 21
Water supply connection
- Before you connect the supply hose to the water mains, make sure the pressure corresponds to the value range 0.01 – 1.00 MPa. In case of higher water pressure you should install a reduction pressure valve.
- The dishwasher can be connected to hot (maximum 60^ ) or cold water. We recommend connecting to cold water. A hot water supply is not necessarily effective with very dirty dishes, as it reduces the time of the washing program too much.
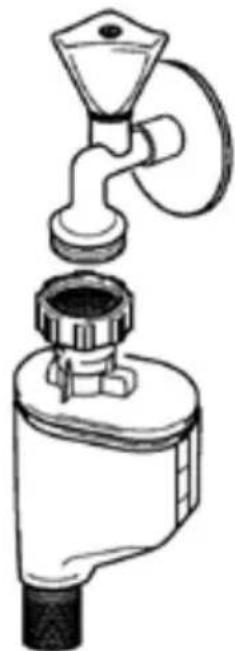
- Connect the supply hose to a water tap with a 2/4" thread (Fig. 22). Make sure the supply hose is not bent, pressed or tangled.
- When replacing the unit, a new supply hose shall always be used – do not use the old supply hose.
- If the water pipes are new, or have not been used for a long time, let a sufficient volume of water run out before you connect the supply hose to rinse the pipes and prevent possible sediment from getting into the dishwasher.
Fig. 22
natural_image
Line drawing of a laboratory funnel with a stopper and tubing (no text or symbols)Double safety system
The supply hose is equipped with a double safety system.
a) Double layer – prevents cracking.
b) The Aqua Stop safety valve is mounted to the water tap. In case of leakage during operation, the safety valve stops the water supply.
Connecting to the mains
• Make sure the mains voltage matches the value marked on the rating plate.
• Use grounded wall outlets only.
- Do not use adapter plugs, connectors or extension cables. They could create a risk of fi re due to overheating.
• The supply cable socket has to be freely accessible even after the installation.
- Only a qualified expert can perform connection changes.
INSTALLATION OF THE DISHWASHER
When installing the dishwasher, follow these instructions:
- Check the dishwasher after delivery.
Note: All the functions have been checked thoroughly during manufacture. Small water stains may be left after these tests. They will disappear after the first washing. - Fix the cover plate to the door.
- Adjust the door lifting spring strength.
- Connect the supply hose to the water mains.
- Connect the discharge hose to the drain pipe.
- Stick condensation strip on the lower edge of the worktop (supplied) to reduce the humidity permeating the worktop (Fig. 24).
- Connect the dishwasher to the electric power network.
- Put the dishwasher in the selected place.
- Adjust the dishwasher to a horizontal position using the feet. Adjust the height of the front feet with a wrench, adjust the height of the rear feet with a screwdriver (Fig. 24). Check the horizontal position using a level.
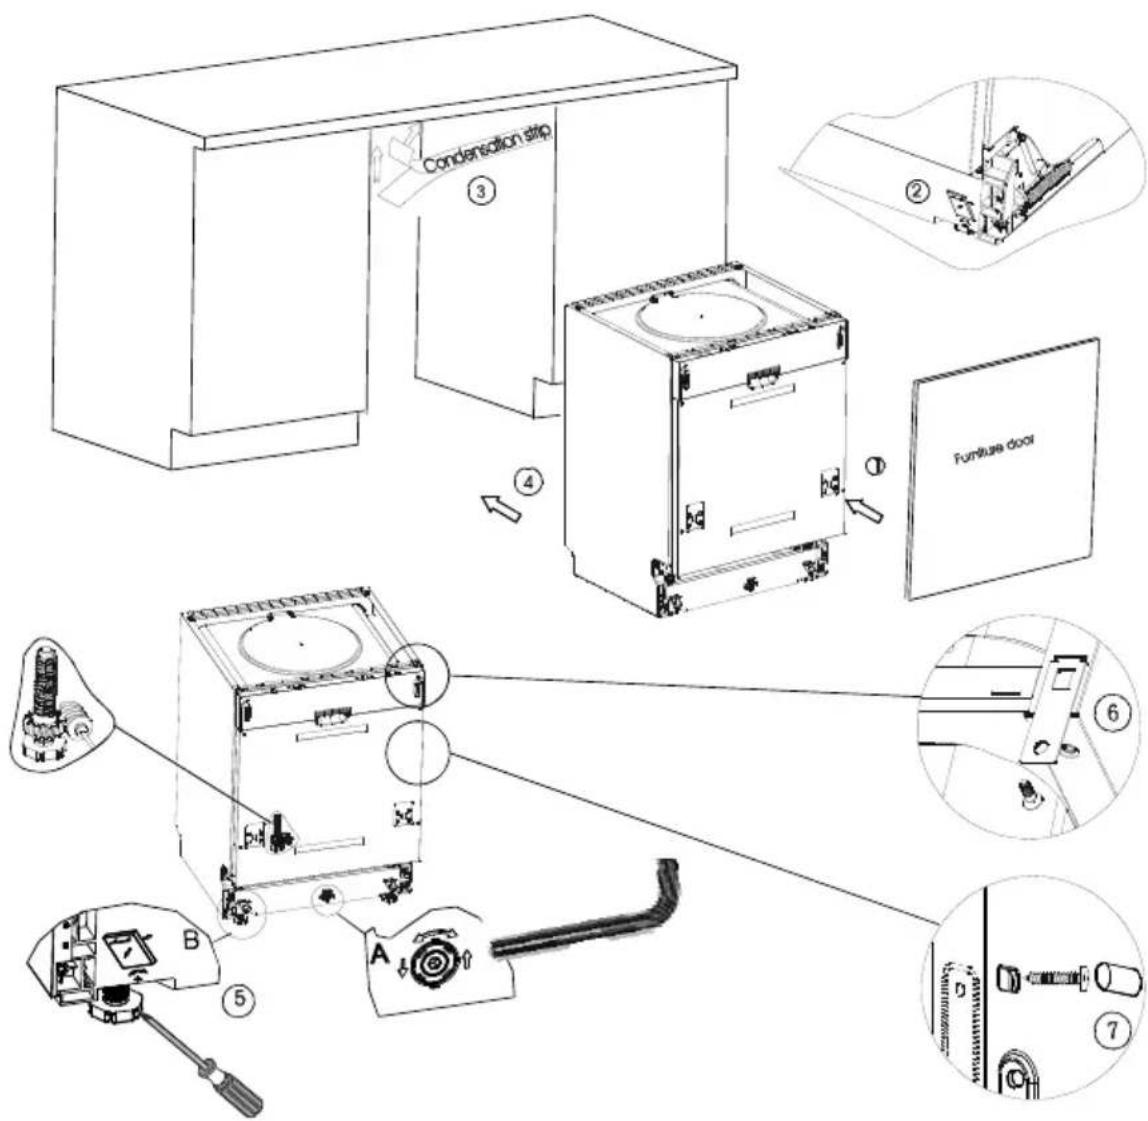
Fig. 24
Removal
If you are dismantling the dishwasher, it is important to proceed correctly:
- Disconnect the dishwasher from the electrical network first (pull out the plug).
- Close the water supply.
- Release the supply and discharge hoses.
- Release the screws under the worktop.
- If there is a plate base under the dishwasher, disassemble it.
- Remove the dishwasher carefully, and the supply and discharge hoses with it.
TROUBLESHOOTING
You will be able to fix most of the minor defects that may occur during operation of the dishwasher yourself, without calling the service centre. This will save you money and help you put the dishwasher back in operation. The following overview should assist you when looking for causes of the defects.
| Problem Cause Solution | ||
| The dishwasher can't be operated. | Plug inserted into the mains outlet incorrectly or insufficiently. | Check the plug connection. |
| The mains outlet is not live. | Check for voltage, e.g. by connecting another appliance. | |
| The dishwasher does not run. | The dishwasher is not closed properly. | Make sure the dishwasher is ON and the door is closed tight. |
| The water tap is not open. | Check to make sure the water supply is open. | |
| The supply hose sieve is clogged. | Turn off the dishwasher and disconnect the power cable from wall outlet. Close the water supply. Clean the sieve located on the supply hose connection. | |
| The lower or upper spray arm turns with difficulty. | The arm is blocked by dishes or food particles. | Check the position of the dishes, or clean the arm. |
| The dishwasher detergent container can't be closed. | The container is full. | Remove the excess amount of dishwasher detergent. |
| The mechanism is blocked by stuck remnants of dishwasher detergent. | Clean the closing mechanism of the dishwasher detergent container. | |
| The light indicators do not go out after washing. | The main switch is still ON. | Turn the dishwasher off by pushing the main switch. |
| Remnants of dishwasher detergent are stuck in the container. | The container was wet during filling. | Pour the dishwasher detergent only into a dry container. |
| Water remains in the dishwasher after washing. | The discharge hose is clogged or bent. | Check the clearness of the discharge hose. |
| The liters are clogged. Check and replace the liters. | ||
| The discharge pump is blocked. | Have the unit repaired by a qualified specialist. | |
| Soapy water in the washing zone. | Unsuitable dishwasher detergent, spilled rinse aid. | Use only dishwasher detergent designed for dishwashers; if there is soapy foam in the washing zone, leave the dishwasher open. Add 4.5 liters of cold water to the washing zone, close the dishwasher and pump out the water. Repeat the steps if necessary. Always wipe up spilled rinse aid. |
| Stains in the washing zone. | Colored dishwasher detergent was used. | Do not use colored dishwasher detergents. |
| Problém Příčina Řešení | ||
| The dishes aren't dry. The rinse aid container is empty. | Make sure the rinse aid container is fi lled. | |
| The dishes and cutlery aren't clean. | Wrong program. Select a more effective | program. |
| Incorrectly loaded dishwasher. | Make sure the operation of the rinse aid container and spray arms is not blocked by incorrectly loaded dishes. | |
| Stains and fi lm on glasses and cutlery. | Extremely hard water, low water temperature, overloaded dishwasher, incorrectly loaded dishwasher, old or wet dishwasher detergent, empty rinse aid container, wrong dosage of the dishwasher detergent. | Take out metal dishes, do not add dishwasher detergent, select the longest program, run the dishwasher for 18 – 20 minutes, during main washing open the door, pour 2 cups of vinegar on the bottom, close the door, and let the dishwasher fi nish the washing cycle. If the vinegar does not work, repeat the whole procedure and add 1⁄4 cup of citric acid. |
| Stains on glass. | Combination of soft water and too much dishwasher detergent. | Use less dishwasher detergent in case of soft water, and select the shortest washing cycle for washing glass. |
| Yellow or brown fi lm on the internal surface. | Ferrous sediments in the water can cause this fi lm. | Contact a company specializing in water treatment and ask for a suitable fi Iter. |
| White fi lm on the internal surface. Mineral | sediments from hard water. | Use a wet sponge with detergent; put rubber gloves on. Never use any other cleaning agents than those designed for dishwashers. |
| Slight steam leakage. Normal phenomenon. | It is common for steam to leak through the door lock | |
| Black or gray stains on the dishes. | Aluminum cutlery was touching the dishes during washing. | Use a soft abrasive to clean the stains. Do not use this agent in the dishwasher! |
| Water remains in the washing zone. Normal phenomenon. | A small volume of water around the drain holes on the bottom keeps the sealing lubricated. | |
| The dishwasher is leaking. | The dishwasher detergent or rinse aid container is overfl owing, or the dish-washer is not in a horizontal position. | The dishwasher detergent or rinse aid container is overfl owing, or the dish-washer is not in a horizontal position. |
Note: The angled water tap sold in the Czech Republic mostly contains a check valve that can be blocked when Aqua-Stop is used, and the unit does not pump water.
For proper function, it is necessary to remove the check valve.
REPAIR & MAINTENANCE
Any extensive maintenance or repair that requires access to the inner parts of the product must be performed by an expert service centre.
WARNING!
Please take note of the fact that you will have to pay for the visit of a service technician in case of mishandling or some of the defects mentioned here, even during the guarantee period.
ENVIRONMENTAL PROTECTION
- Packaging materials and obsolete appliances should be recycled.
- The transport box may be disposed of as sorted waste.
- Polyethylene bags shall be handed over for recycling.
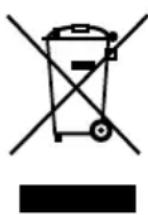
Appliance recycling at the end of its service life:
A symbol on the product or its packaging indicates that this product should not go into household waste. It must be taken to the collection point of an electric and electronic equipment recycling facility. By making sure this product is disposed of properly, you will help prevent the negative effects on the environment and human health that would otherwise result from inappropriate disposal of this product. You can learn more about recycling this product from your local authorities, a household waste disposal service or in the shop where you bought this product.
concept
CZ
Záruční podmínky
SK
Záručné podmienky
PL
Karta gwarancyjna
EN
Warranty Certificate
CZ
ZÁRUČNÍ PODMÍNKY
| Model: | |
| Production number: | |
| Date of purchase: Seal and signature of vendor: | |
The vendor is obliged to inform the consumer of the features and parameters of the product and fill in the Warranty Certificate fully and legibly on the day of purchase.
The Certificate is not valid without all the prescribed data correctly filled in!
The manufacturer (or importer) is responsible for the features of the product under the applicable technical standards and conditions for the warranty period.
The warranty period is 24 months from the date of purchase, unless stated otherwise by the manufacturer (or importer).
Under the warranty the consumer is entitled to the free, timely and duly executed remedy of faults (see below), or to receive a replacement of the defective part of the product, provided it is not disproportionate with regards to the nature of the fault. The right to replacement of the product or termination of the purchase contract can be exercised only if all the legal preconditions have been met, on the condition that the product was not excessively worn or damaged.
The validity of the guarantee is subject to:
- Observance of the instructions mentioned in the Operating Manual;
- A document proving payment including all the prerequisites, or a valid Warranty Certificate;
Any claims with regards to product liability shall be exercised by the consumer with the vendor where the product was purchased.
The right to repair can be exercised at the location where you purchased the product or at an authorized service centre; a list of the centres is included in the product package or you may find it on the website www.my-concept.com.
Notice for consumers
The consumer is obliged to keep the Warranty Certificate and cash voucher to demonstrate payment for the product. When exercising a claim on a product, it has to be cleaned and packed in order to prevent any damage during transport to an authorized centre. The manufacturer (or importer) reserves the right not to accept a product which is not cleaned duly. Additional cleaning of the product will be charged.
The manufacturer (or importer) reserves the right not to pay the cost of false claims and to require that the claiming party cover all the necessary costs related to the examination of the qualification and solution of the claim.
The right to free repair of the product, or refund, shall not be exercised in the following cases:
- The conditions of the installation, operation and handling of the product, mentioned in the Operating Manual, were not observed;
- The fault occurred due to mechanical, thermal or chemical damage, short circuit or overvoltage;
- The fault is due to the unauthorized intervention of a third party;
- The fault is due to force majeure;
- The fault is due to insufficient or undue maintenance in conflict with the Operating Manual, including faults caused by limescale and other sediments;
- Wear and tear of the product, or its part, caused by regular use;
- Change of the colour of heating surfaces, or scratched surfaces due to regular use;
- Changes of appearance and function due to sunshine, thermal radiation, or limescale and other sediments;
- Expired service life of some parts of the product, e.g. accumulators, bulbs etc.
The nature of the fault can be determined only by the manufacturer, importer, authorized centre, or authorized expert, not by the vendor or consumer.
The consumer shall have no claim to faulty spare parts replaced within a warranty repair.
In the case of termination of the purchase contract, the consumer is obliged to return the complete product, including the accessories and documents supplied.
There is no warranty related to promotional items supplied with the product, the price of which was not charged to the consumer.
The consumer has all the minimum rights under the applicable laws.
Note: Claims regarding products damaged during transport shall be governed by the complaint procedure of the freight forwarder.
Manufacturer:
Jindřich Valenta - ELKO Valenta, Vysokomýtská 1800, 565 01 Choceň, Czech Republic,
tel: +420 465 471 433, fax: +420 465 473 304, email: servis@my-concept.cz, www.my-concept.com
Importer:
Jindřich Valenta - ELKO Valenta Czech Republic, Vysokomytská 1800,
565 01 Choceň, Tel. +420 465 471 400, Fax: 465 473 304, www.my-concept.com
concept
CZ SEZNAM SERVISNÍCH MÍST
SK ZOZNAM SERVISNÝCH STREDISIEK
PL WYKAZ PUNKTÓW SERVISOVYCH
www.my-concept.com
concept
Česká republika
| Název Ulice PSČ Město Telefon Fax E-mail | ||||||
| ELKO VALENTA-SERVIS | Vysokomytská 1800 | 565 01 | CHOCEŇ | 465 471 433 | 465 473 304 | servis@my-concept.cz |
Slovenská republika
| Názov Ulica PSČ Mesto Telefón Fax E-mail | ||||||
| ABC-SERVIS Jozef Abel | Štefánikova 50 | 949 03 | Nitra | 037/6526063 | 037/7413098 | servis@abc-servis.sk |
| D-J SERVIS | Šebastovska 17 | 080 06 | Prešov | 051/7767666 | 051/7767666 | grejtak.djservis@stonline.sk |
| ELEKTRA - D.Valach | Kožušnícka 34 | 911 05 | Trenčín | 032/6523806 | dusko4@centrum.sk | |
| HOSPOL elektro spol.s r.o | Rustaveliho 7 | 831 06 | Bratislava | 02/44889832 | 02/44873078 | hospol@hospol.sk |
| M-SERVIS Mareš Jaroslav | Komenského 38 | 010 01 | Žilina | 041/5640627 | 041/5640627 | mservis@zoznam.sk |
| T.V.A. servis s.r.o. | Južná trieda 48/D | 040 01 | Košice | 055/6338501 | 055/6233537 | tvaservis@nextra.sk |
| VILLA MARKET s.r.o. | Odborárov 49 | 052 01 | Spišská Nová Ves | 053/4421857 | 053/4426030 | villamarket.eta@stonline.sk |
| X-TECH ,s.r.o. | Gorkého 2 | 036 01 | Martin | 043/4288211 | 043/4308993 | servis@x-tech.sk |
| ZMJ elektroservis | Hatalova 341 | 029 01 | Námestovo | 0905/247408 | 043/5522056 | zmj@orava.sk |
| ELSPO | Spojová 19 | 974 01 | Banská Bystrica | 048/4135535 | 048/4135521 | elspo@slovanet.sk |
Distribútor: ELKO Valenta - Slovakia, s.r.o., Hurbanova 1563/23, 911 01 Trenčín, Slovenská republika tel.: +421 326 583 465, fax: +421 326 583 466, email: info@my-concept.sk, www.my-concept.sk
Polska
SERWIS CENTRALNY
Jindřich Valenta – ELKO Valenta Czech Republic
Vysokomýtská 1800,565 01 Choceň
Tel. +420 465 322 895, Fax: +420 465 473 304
www.my-concept.cz
ELKO Valenta – Slovakia, s.r.o.
Hurbanova 1563/23, 911 01 Trenčín
Tel.: +421 326 583 465, Fax: +421 326 583 466
www.my-concept.sk
Elko Valenta Polska Sp. Z. o. o.

- PODĚKOVÁNÍ
- Příbory
- Systém dvojité ochrany Double safety
- Príbory
- Nastavenie sily pružiny zdvíhania dvierok
- Systém dvojitej ochrany Double safety
- Demontáž
- Uwaga:
- Sztućce
- IMPORTANT SAFETY INSTRUCTIONS
- Delivery
- Installation
- During normal operation
- Children in the household
- WARNING!
- Possible defects
- PRODUCT DESCRIPTION
- DESCRIPTION OF THE CONTROL PANEL
- OPERATING INSTRUCTIONS
- For the first washing, buy
- Water softening device
- To set the water hardness, proceed as follows:
- Filling the regenerative salt
- Effects of the salt
- Warning
- Indication to add regenerative salt
- Filling the Rinse Aid in the Container
- Setting the Rinse Aid Dosage
- Using the Dishwasher Detergent
- Dishwasher detergent instructions
- Dishwasher detergent container with dosage
- Filling the Dishwasher Detergent
- How to Save
- Find out what type of dishwasher detergent or combined dishwasher detergent you have!
- When using combined dishwasher detergents, you don't have to use regeneration salt only up to the water hardness values of 21°dH (37 °TH, 3.7 mmol/l). For water hardness over 21°dH (37 °TH, 3.7 mmol/l), the salt is required.
- Caution
- Unsuitable Dishes
- Do not wash:
- RECOMMENDATION:
- Damage to glass and dishes
- Causes:
- Loading the dishwasher
- Removing the dishes
- Cups, glasses and saucers
- Pots
- Cutlery
- Extender
- Upper rack height adjustment
- Information for the programs
- Washing the Dishes - Procedure
- If you need to add dishes to the dishwasher when program is running
- MAINTENANCE AND CLEANING
- Overall condition
- Discharge fi Iters
- Never use the dishwasher without a properly installed fi Iter system!
- Spray arms
- Cleaning the control panel and surface of the dishwasher
- Protection from freezing
- Some tips for maintenance
- INSTALLATION AND ASSEMBLY OF THE DISHWASHER
- General
- Preparations for installation
- Dimensions and fixing the cover plate to the door
- Door lifting spring strength adjustment
- Connection of the discharge hose
- Water supply connection
- Double safety system
- Connecting to the mains
- INSTALLATION OF THE DISHWASHER
- Removal
- TROUBLESHOOTING
- REPAIR & MAINTENANCE
- ENVIRONMENTAL PROTECTION
- Appliance recycling at the end of its service life:
- concept
- CZ
- ZÁRUČNÍ PODMÍNKY
- The Certificate is not valid without all the prescribed data correctly filled in!
- Notice for consumers
- Manufacturer:
- Importer:
- Polska
Brand : Concept
Model : MNV-2545
Category : Dishwasher