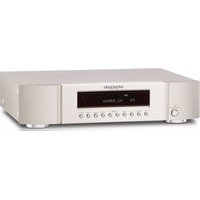
ST6003SG - Audio tuner MARANTZ - Free user manual and instructions
Find the device manual for free ST6003SG MARANTZ in PDF.


| Product Type | Audio Tuner |
| Brand | Marantz |
| Model | ST6003SG |
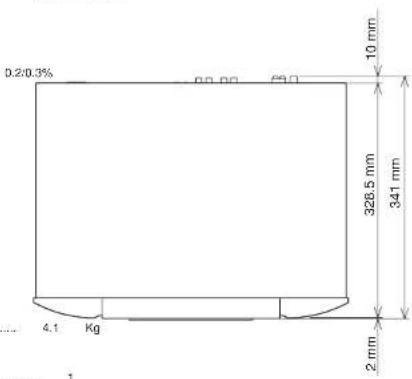
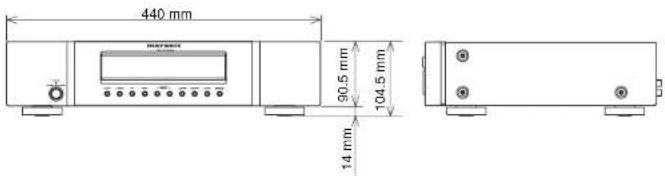
| Dimensions (W x H x D) | 440 x 90.5 x 328.5 mm |
| Weight | 4.1 kg |
| Power Supply | AC 230 V, 50/60 Hz |
| Power Consumption | 9 W |
| Tuner Bands | FM, AM |
| FM Frequency Range | 87.5 – 108.0 MHz |
| AM Frequency Range | 531 – 1602 kHz |
| Preset Stations | 50 (AM/FM random) |
| RDS Function | Yes (Radio Data System) |
| Sleep Timer | Yes (up to 120 minutes) |
| Dimmer Control | Yes |
| Remote Control Bus | Yes (Marantz RC-5 compatible) |
| Audio Output Level (FM) | 500 mV (1 kHz, ±40 kHz dev) |
| Signal-to-Noise Ratio (FM Mono/Stereo) | 75/70 dB |
| FM Sensitivity (IHF) | 1.8 μV / 16.4 dB |
| Stereo Separation | 45 dB (1 kHz) |
| AM Sensitivity (Loop) | 400 μV/m |
| Accessories Included | FM antenna, AM loop antenna, AC power cable, audio connecting cord, remote control connecting cord |
| Cleaning | Use soft dry cloth; avoid solvents, alcohol, or abrasive cleaners |
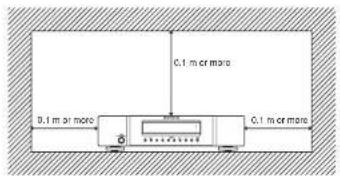
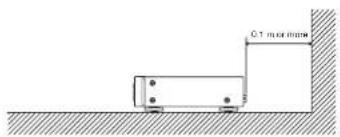
| Safety Clearance | At least 0.1 m around the unit |
| Repairs | Contact authorized Marantz service center |
Frequently Asked Questions - ST6003SG MARANTZ
User questions about ST6003SG MARANTZ
0 question about this device. Answer the ones you know or ask your own.
Ask a new question about this device
Download the instructions for your Audio tuner in PDF format for free! Find your manual ST6003SG - MARANTZ and take your electronic device back in hand. On this page are published all the documents necessary for the use of your device. ST6003SG by MARANTZ.
USER MANUAL ST6003SG MARANTZ
РУССКИЙ
ENGLISHFRANÇAISE
marantz®
Tuner
ST6003
User Guide
ENGLISH
WARRANTY
For warranty information, contact your local Marantz distributor.
RETAIN YOUR PURCHASE RECEIPT
Your purchase receipt is your permanent record of a valuable purchase. It should be kept in a safe place to be referred to as necessary for insurance purposes or when corresponding with Marantz.
IMPORTANT
When seeking warranty service, it is the responsibility of the consumer to establish proof and date of purchase. Your purchase receipt or invoice is adequate for such proof.
FOR U.K. ONLY
This undertaking is in addition to a consumer's statutory rights and does not affect those rights in any way.
FRANÇAIS
GARANTIE
The ST6003 is in conformity with the EMC directive and low-voltage directive.

Francais
- Do not expose the equipment to rain, moisture, dripping or splashing.
- Do not remove the cover from the equipment.
- Do not insert anything into the equipment through the ventilation holes.
- Do not handle the mains cord with wet hands.
- Do not cover the ventilation with any items such as tablecloths, newspapers, curtains, etc.
- No naked flame sources, such as lighted candles, should be placed on the equipment.
- When disposing of used batteries, please comply with governmental regulations or environmental public instruction's rules that apply in your country or area.
- Make a space of about 0.1 meter around the unit.
- No objects filled with liquids, such as vases, shall be placed on the equipment.
- When the switch is in the OFF position, the equipment is not completely switched off from MAINS.
- The equipment shall be installed near the power supply so that the power supply is easily accessible.
- Do not expose the unit and batteries to excessive heat such as direct sunlight, fire or the like.
Français
AVERTISSEMENTS
Thank you for purchasing the Marantz ST6003 Tuner.
This remarkable component has been engineered to provide you with many years of listening enjoyment.
Please take a few minutes to read this manual thoroughly before you connect and operate the ST6003.
As there are a number of connection and configuration options, you are encouraged to discuss your own particular system setup with your Marantz authorized dealer.
ACCESSORIES CHECK
Before use, check the below accessories were included in the package.
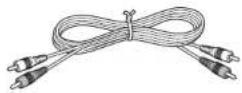
Audio Connecting Cord
User Guide
AM Loop Antenna
FM Antenna
AC Power Cable
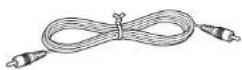
Remote control connecting cord
A NOTE ABOUT RECYCLING

This product's packaging materials are recyclable and can be reused. This product and the accessories packed together are the applicable product to the WEEE directive except batteries. Please dispose of any materials in accordance with your local recycling regulations.
When discarding the unit, comply with your local rules or regulations.
Batteries should never be thrown away or incinerated but disposed of in accordance with your local regulations concerning chemical wastes.
TABLE OF CONTENTS
INTRODUCTION ....1
ACCESSORIES CHECK
TABLE OF CONTENTS ......1
FEATURES....2
BEFORE USE 2
NAMES AND FUNCTIONS ....3
FRONT PANEL 3
FL DISPLAY 3
REAR PANEL 4
BASIC CONNECTIONS ....4
CONNECTING THE AMPLIFIER 4
CONNECTING THE ANTENNA TERMINALS ....5
CONNECTING THE AC POWER CABLE ....5
(FM) TUNING MODE (AUTO STEREO OR MONO) ..... 6
TROUBLESHOOTING ....10
FRONT KEY (BUTTON) LOCK OF THE UNIT 10
GENERAL MALFUNCTION 10
HOW TO RESET THE UNIT 10
OTHERS 11
TECHNICAL SPECIFICATIONS 11
CLEANING OF EQUIPMENT EXTERNAL SURFACES...11
REPAIRS 11
ENGLISH
FEATURES
■ 50 stations AM/FM random preset memory
Sleep timer
Dimmer control
■ RDS function
Radio Data System (RDS) provides information on FM broadcasts.
■ Remote operation by Marantz Remote Control Bus
BEFORE USE
This section must be read before any connection is made to the mains supply.
EQUIPMENT MAINS WORKING SETTING
Your Marantz product has been prepared to comply with the household power and safety requirements that exist in your area.
ST6003 can be powered by 230V AC only.
COPYRIGHT
Recording and playback of any material may require consent. For further information refer to the following:
— Copyright Act 1956
— Dramatic and Musical Performers Act 1958
— Performers Protection Acts 1963 and 1972
— Any subsequent statutory enactments and orders
DO NOT LOCATE IN THE FOLLOWING PLACES
To ensure long-lasting use, do not locate the unit where: - Exposed to direct sunlight.
• Near to sources of heat such as heaters.
• Highly humid or poorly ventilated.
• Dusty.
- Subjected to mechanical vibrations.
- On wobbly, inclined or otherwise unstable surfaces
- Radiated heat is blocked such as in cramped audio racks.
To ensure proper heat radiation, ensure the below clearance from walls and other equipment.
Noise or disturbance of the picture may be generated if this unit or any other electronic equipment using microprocessors is used near a tuner or TV.
If this happens, take the following steps:
• Install this unit as far as possible from the tuner or TV.
- Set the antenna wires from the tuner or TV away from this unit's mains cord and input/output connection cords.
- Noise or disturbance tends to occur particularly when using indoor antennas or 300 Ω/ohms feeder wires. We recommend using outdoor antennas and 75 Ω/ohms coaxial cables.
Note:
For heat dispersal, do not install this equipment in a confined space such as a book case or similar unit.
NAMES AND FUNCTIONS
FRONT PANEL
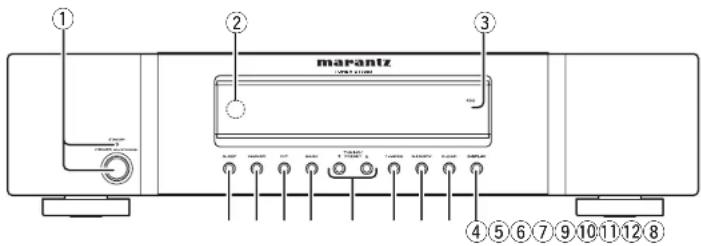
① POWER ON/STANDBY button
When it is pressed, the display window lights up, and the power comes on. When it is pressed again, the display window is extinguished, and goes into the standby status.
STANDBY indicator
Lights up in red color while standby status.
② INFRARED receiving sensor window
This window receives infrared signals from the remote control.
③ RDS indicator
This indicator illuminates when receiving RDS broadcasts, and fl ashes during the RDS search.
④ DISPLAY button
Press this button to change the FL display mode. (See page 8)
⑤ CLEAR button
Press this button to cancel the tuner preset station or preset scan tuning. (See page 7)
⑥ MEMORY button
Press this button to enter the tuner preset memory numbers or station names. (See page 6)
⑦ T-MODE button
Press this button to select the auto stereo mode or mono mode when the FM band is selected. "AUTO" indicator will be illuminated in the display. (See page 6)
⑧ TUNING/PRESET ▲▼ (UP/DOWN) button
This button used for tuning in the desired broadcasting stations or to preset in the desired broadcasting stations.
⑨ BAND button
Press this button to switch between FM and AM in the TUNER mode.
⑩ F (Frequency)/P (Preset) button
During reception of AM or FM, you can change the function of the UP/DOWN buttons for scanning frequencies or selecting preset stations by pressing this button.
⑪ DIMMER button
When this button is pressed once display is dimmed. When this button is pressed twice, the display is turned off and the "DISP" indicator lights up. Press this button again to turn on the display again.
⑫ SLEEP button
This button is used for setting the sleep timer.
FL DISPLAY
flowchart
graph TD
    A["Sleep"] --> B["DISP AUTOTUNED ST"]
    B --> C["ST"]
    C --> D["4"]
    D --> E["5"]
    E --> F["6"]
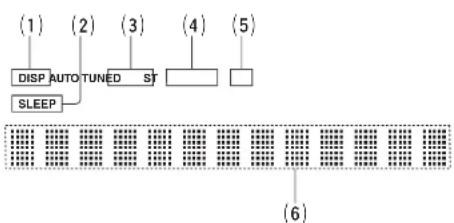
(1) DISP (Display Off) indicator
This indicator is illuminated when this unit is in the display off mode.
(2) SLEEP timer indicator
This indicator is illuminated when the sleep timer function is active.
(3) AUTO indicator
This indicator illuminates when the tuner's Auto mode is in use.
(4) TUNED indicator
This indicator illuminates when the tuner receives a suffi ciently strong radio signal.
(5) STEREO indicator
This indicator illuminates when an FM station is being tuned into stereo condition.
(6) Main Information Display
A variety of information is displayed on this indicator. Frequency, PS, PTY, RT, stations name by manual fi ling, etc.
ENGLISH
REAR PANEL
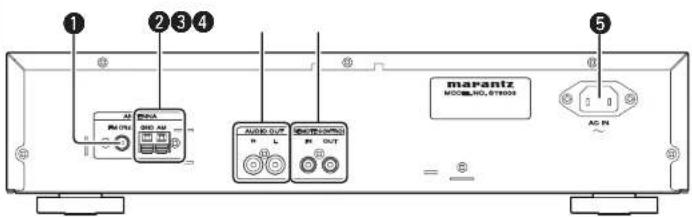
① FM antenna terminal (75 ohms)
Connect an external FM antenna with a coaxial cable, or a cable network FM source.
② AM antenna and ground terminals
Connect the supplied AM loop antenna. Use the terminals marked "AM" and "GND". The supplied AM loop antenna will provide good AM reception in most areas. Position the loop antenna until you hear the best reception.
③ AUDIO OUT connectors
The audio signals are output from these connectors.
④ REMOTE CONTROL IN and OUT connectors
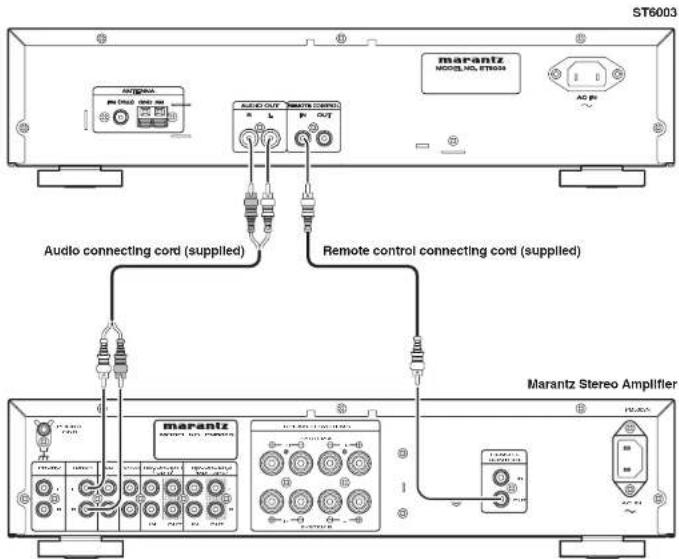
Using the supplied remote control connecting cord, these connectors enable this unit to be connected to a Marantz component equipped with remote control connectors. These connections make it possible to control an entire system that centers on the amplifier or other such component.
⑤ AC INLET
Plug the supplied mains cord into this AC INLET and then into the power outlet on the wall. ST6003 can be powered by 230V AC only.
BASIC CONNECTIONS
CONNECTING THE AMPLIFIER
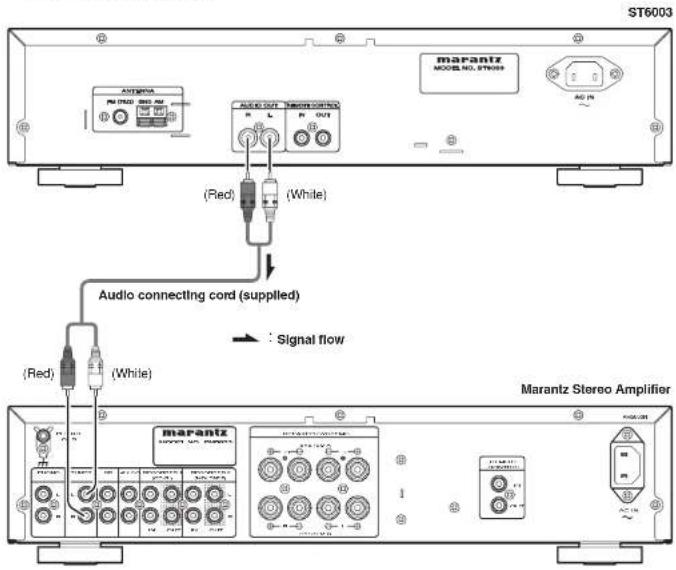
Use the audio connecting cord to connect the unit with a stereo amplifier or AV amplifier.
Cautions:
- Do not connect the unit to the PHONO input connectors on the amplifier.
- When making the connections, insert the plugs securely into the connectors. Failure to insert the plugs securely may result in noise.
Notes:
- Do not plug in the mains cord until all connections have been completed.
- When making connections, also refer to the operating instructions of the other components.
- Be sure to connect the left and right channels properly (left with left, right with right).
- Note that binding pin-plug cords together with mains cords or placing them near a power transformer will result in generating hum or other noise.
CONNECTING THE ANTENNA TERMINALS
ASSEMBLING THE AM LOOP ANTENNA
- Release the vinyl tie and take out the connection line.
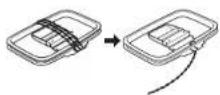
- Bend the base part in the reverse direction.
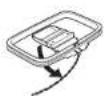
- Insert the hook at the bottom of the loop part into the slot at the base part.
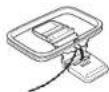
- Place the antenna on stable surface.
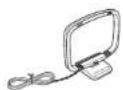
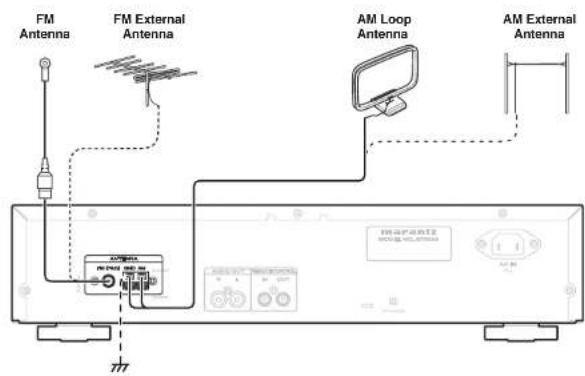
CONNECTING THE SUPPLIED ANTENNAS
Connecting the supplied FM antenna
The supplied FM antenna is for indoor use only. During use, extend the antenna and move it in various directions until the clearest signal is received.
Fix it with push pins or similar implements in the position that will cause the least amount of distortion. If you experience poor reception quality, an outdoor antenna may improve the quality.
Connecting the supplied AM loop antenna
The supplied AM loop antenna is for indoor use only.
Set it in the direction and position it to where you receive the clearest sound. Put it as far away as possible from the unit, televisions, speaker cables, and power cords.
If you experience poor reception quality, an outdoor antenna may improve the quality.
- Press and hold down the lever of the AM antenna terminal.
- Insert the bare wire into the antenna terminal.
- Release the lever.
CONNECTING AN FM OUTDOOR ANTENNA
Notes:
- Keep the antenna away from noise sources (neon signs, busy roads, etc.).
- Do not put the antenna close to power lines. Keep it well away from power lines, transformers, etc.
- To avoid the risk of lightning and electrical shock, grounding is necessary.
CONNECTING AN AM OUTDOOR ANTENNA
An outdoor antenna will be more effective if it is stretched horizontally above a window or outside.
Notes:
- Do not remove the AM loop antenna.
• To avoid the risk of lightning and electrical shock, grounding is necessary.
CONNECTING THE AC POWER CABLE
- Plug the supplied AC power cable to the AC IN socket on the rear panel of the main unit.
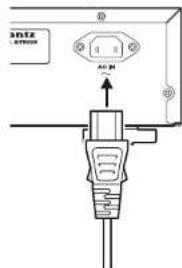
- Plug the power cable into an AC outlet.
ENGLISH
BASIC OPERATION
TURNING ON THE UNIT
- Connect the AC power cable to the wall outlet.
- Press the ON/STANDBY button on the unit to turn on the power of the unit.
- Turn on the power of the audio equipment connected to this unit. Set the input selector on the audio equipment to this unit.
• Each time the button is pressed, the power of the unit is switched between on and standby mode.
LISTENING TO THE TUNER
Frequency scan step for AM is selectable. Default setup is 9 kHz step, if your country's standard is 10 kHz step. Press BAND button more than 6 seconds. Scan step will change.
Note:
Preset memory for the tuner will clear by changing this setup.
AUTO TUNING
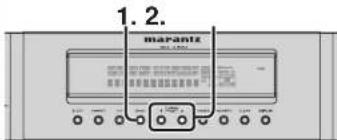
- To select tuner and desired band (FM or AM), press the BAND button on the front panel.
- Press the TUNING/PRESEbr▼ buttons on the front panel for more than 1 second to start the auto tuning function.
- Automatic searching begins then stops when a station is tuned in.
If tuning does not stop at the desired station, use to the "Manual tuning" operation.
MANUAL TUNING
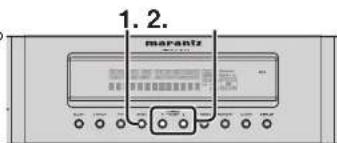
- To select tuner and desired band (FM or AM), press the BAND button on the front panel.
- Press the TUNING/PRESETor ▼ buttons on the front panel to select the desired station.
(FM) TUNING MODE (AUTO STEREO OR MONO)
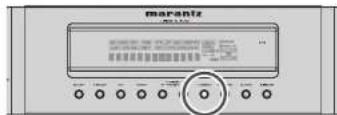
When in the auto stereo mode, AUTO Indicator will be illuminated on the display.
The "ST" indicator is illuminated when a stereo broadcast is tuned in.
At open frequencies, the noise is muted and the "TUNED" and "ST" indicators are not illuminated.
If the signal is weak, it may be diffi cult to tune into the station in stereo. In such a case, press the T-MODE button on the front panel.
"AUTO" indicator is not illuminated, if FM stereo broadcasts are received in monaural and the "ST" indicator is not illuminated.
To return to auto stereo mode, press the T-MODE button again. AUTO indicator is illuminated on the display.
ADVANCED OPERATION
PRESET MEMORY
With this unit you can preset up to 50 FM/AM stations in any order.
For each station, you can memorize the frequency and reception mode if desired.
AUTO PRESET MEMORY
This function automatically scans the FM and AM band and enters all stations with proper signal strength into the memory.
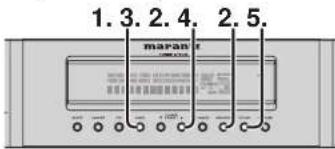
- To select FM, press the BAND button on the front panel.
- While pressing the MEMORY button, press the TUNING ▲ button.
"AUTO PRESET" will appear on the display, and scanning starts from the lowest frequency. - Each time the tuner fi nds a station, scanning will pause and the station will be played for fi ve seconds.
During this time, the following operations are possible.
The band can be changed by the BAND button. - If no button is pressed during this period, the current station is memorized in location Preset 01.
If you wish to skip the current station, press the ▲ button during this period, this station is skipped and auto presetting continues. - Operation stops automatically when all 50 preset memory positions are filled or when auto scanning attains the highest end of all bands. If you desire to stop the auto preset memory at anytime, press the CLEAR button.
Note:
It is possible that existing preset memory positions will be overwritten.
MANUAL PRESET MEMORY
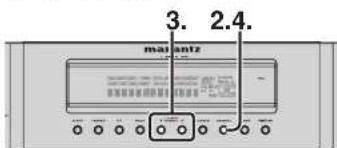
- Tune into the radio station you desire (Refer to the "MANUAL TUNING" or "AUTO TUNING" section).
- Press the MEMORY button on the front panel. “--” (preset number) starts blinking on the display.
- Select the preset number by pressing the TUNING ▲ or ▼ buttons, while this indicator is still blinking (approx. 5 seconds)
- Press the MEMORY button again to enter. The display stops blinking. The station is now stored in the specified preset memory location.
RECALLING A PRESET STATION
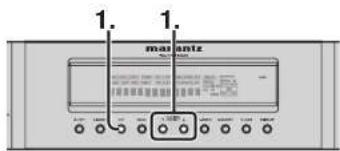
- Select the desired preset station by pressing the F/P and TUNING ▲ or ▼ button on the front panel.
CLEARING STORED PRESET STATIONS
You can remove preset stations from the memory using the following procedure.
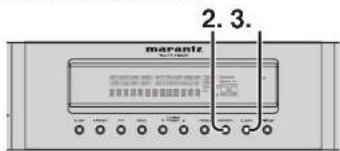
- Recall the preset number to be cleared with the method described in "Recalling" a preset station.
- Press the MEMORY button on the front panel.
- The stored preset number blinks in the display for 5 seconds. While blinking, press the CLEAR button on the front panel.
- " xx CLEAR" appears on the display to indicate that the specified preset number has been cleared.
Note:
To clear all stored preset stations, press and hold the CLEAR and the F/P buttons on the front panel for two seconds.
SORTING PRESET STATIONS
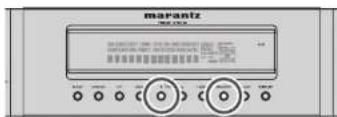
If you have stations memorized, and there is a gap in the sequential order:
I.e. the stations are stored as follows
1) 87.5 MHz
2) 93.1 MHz
3) 94.7 MHz
10) 105.9 MHz
Since there are no stations programmed for presets 4-9, you can have preset 10 become preset 4.
To sort the numbers, press the TUNING ▼ button while pressing the MEMORY button.
"PRESET SORT" will appear on the display and sorting will be done.
NAME INPUT OF THE PRESET STATION.
This function allows the name of each preset channel to be entered using alphanumeric characters. Before name inputting, you need to store preset stations with the preset memory operation.
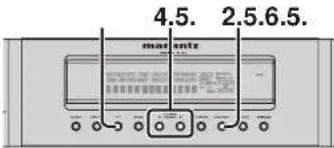
- Recall the preset number to be inputted name with the method described in "Recalling" a preset station.
- Press the MEMORY button on the front panel for more than 3 seconds.
- The left most column of the station name indicator flashes, indicating the character entry ready status.
- When you press the TUNING ▲ or ▼ buttons on the front panel, alphabetic and numeric characters will be displayed in the following order:
$$ \begin{array}{l}\mathsf {A} \rightarrow \mathsf {B} \rightarrow \mathsf {C} \dots \mathsf {Z} \rightarrow 1 \rightarrow 2 \rightarrow 3 \dots .. 0 \rightarrow - \rightarrow +\\rightarrow / \rightarrow (\text { Blank }) \rightarrow \mathsf {A}\end{array} $$
- After selecting the first character to be entered, press the MEMORY button.
The entry in this column is fixed and the next column starts to flash. Fill the next column the same way.
To move back and forth between the characters, press the F/P button and press the TUNING ▲ or ▼ buttons.
Note:
Unused columns should be filled by entering blanks.
- To save the name, press the MEMORY button on the front panel for more than 2 seconds.
ENGLISH
RDS OPERATION
Now in use in many countries, RDS (Radio Data System) is a description of the station's programming hidden space in the FM signal.
This unit is equipped with RDS to assist in the selection of FM stations using station and network names, rather than broadcast frequencies. Additional RDS functions include the ability to search for programme types.
RADIO TEXT
Some RDS stations broadcast RADIO TEXT, which is additional information on the station and programme being broadcast.
RADIO TEXT Information appears as 'running' text in the display. RADIO TEXT is transmitted character by the radio station. As a result of that it may take some time until the entire text has been completely received.
RDS DISPLAY
When this unit is tuned to an FM station that is transmitting RDS data, the Front Panel Information Display will automatically show the station name or RADIO TEXT in place of the typical display of the station's broadcast frequency.
To change the display, press the DISPLAY button.
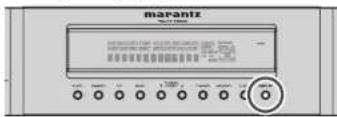
PS (Program Service Name) Frequency(RADO TEXT)
PROGRAMME TYPE (PTY) DISPLAY
The RDS system categorizes programmes according to their genre into different programme type (PTY) groups. To display the programme type information of the current station, press the F/P button for 3 seconds or more.
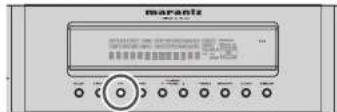
PTY AUTO SEARCH
This unit is equipped to automatically search for stations transmitting any of 29 different programme types. To search for a PTY, follow these procedures:
2.1.3.4.
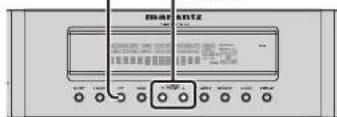
- Press the F/P button for 3 seconds or more. The current station's PTY will be displayed, or the currently selected PTY group will be displayed in blinking if no station or RDS data is present.
- To change to a new PTY type, press the ▲ or ▼ button on the front panel until the desired PTY is shown in the display.
- Once the desired PTY group or type has been selected, press the F/P button while the display blink (approx. 5 seconds). The PTY Auto search will start, and the tuner will pause at each station broadcasting RDS PTY information corresponding to the selected choice.
- To advance to the next RDS station with the desired PTY, press the F/P button again within 5 seconds.
| NUMBER DISPLAY PROGRAMME TYPE | ||
| 1 POP | M Pop Music | |
| 2 ROCK | M Rock Music | |
| 3 EASY | M Easy | Listening Music |
| 4 LIGHT | M Light classical | |
| 5 CLAS | SICS Serious classical | |
| 6 NEWS | News | |
| 7 AFFAIRS | Current Affairs | |
| 8 INFO | Information | |
| 9 SPORT | Sport | |
| 10 | EDUCATE | Education |
| 11 | DRAMA | Drama |
| 12 | CULTURE | Culture |
| 13 | SCIENCE | Sciences |
| 14 | VARIED | Varied |
| 15 | OTHER M | Other Music |
| 16 | WEATHER | Weather |
| 17 | FINANCE | Finance |
| 18 | CHILDREN Children's programmes | |
| 19 | SOCIAL Social Affairs | |
| 20 | RELIGION Religion | |
| 21 | PHONE IN Phone In | |
| 22 | TRAVEL Travel | |
| 23 | LEISURE Hobbes | |
| 24 | JAZZ Jazz Music | |
| 25 | COUNTRY Country Music | |
| 26 | NATION M National Music | |
| 27 | OLDIES Oldies Music | |
| 28 | FOLK M Folk Music | |
| 29 | DOCUMENT Documentary | |
OTHER OPERATION
USING THE SLEEP TIMER
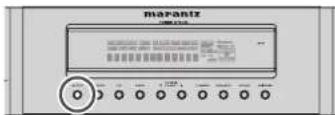
To program this unit for automatic standby, press the SLEEP button.
Each press of the button will increase the time before shut down in the following sequence.
$$ \begin{array}{c} \text {OFF} \longrightarrow 1 0 \longrightarrow 2 0 \longrightarrow 3 0 \longrightarrow 4 0 \longrightarrow 5 0 \ \uparrow \ 1 2 0 \longleftarrow 1 1 0 \longleftarrow 1 0 0 \longleftarrow 9 0 \longleftarrow 8 0 \longleftarrow 7 0 \longleftarrow 6 0 \end{array} $$
The sleep time will be shown for a few seconds in the display on the front panel, and it will count down until the time has elapsed.
When the programmed sleep time has elapsed, the unit will automatically turn off.
Note that the SLEEP indicator on the display will illuminate when the Sleep function is programmed. To cancel the Sleep function, press the SLEEP button until the display shows "SLEEP OFF" and the SLEEP indicator will disappear.
DISPLAY MODE
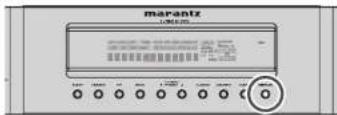
You can select the display mode for the front display of the unit in the Station Display Mode.
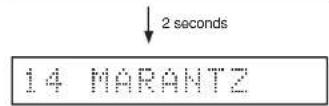
When the DISPLAY button is pressed, the display mode is switched within 2 seconds.
Station Display Mode
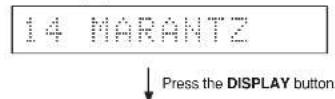
Frequency Display Mode

This unit can be controlled by the remote controller supplied with Marantz Integrated amplifier. You can perform following operations using the remote controller.
When you operate this unit with the remote controller that is supplied with a Marantz integrated amplifier, connect the REMOTE CONTROL connector of this unit to the REMOTE CONTROL terminal of the amplifier using the supplied cords without fail.
(Example : the remote controller supplied with PM5003)
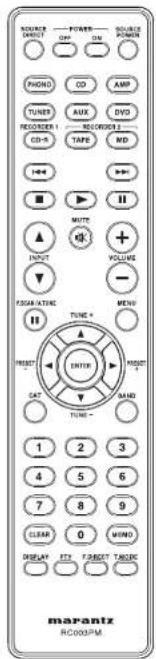
When the TUNER button is pressed, the buttons in TUNER function as indicated in the table below.
| BUTTON NAME FUNCTION | |
| SOURCE POWER | POWER ON and OFF |
| P.SCAN/A.TUNE | Starts preset scan |
| ▲/TUNE+ | Tuning (frequency) increase |
| ▼/TUNE- | Tuning (frequency) decrease |
| ◀/PRESET- | Preset stations forward feed |
| ▶/PRESET+ | Preset stations backward feed |
| BAND | Selects the band |
| 0-9 | Inputs the numeric |
| CLEAR | Clears the inputting |
| MEMO | Enters the tuner preset memory numbers |
| DISPLAY | Selects the display mode in RDS |
| PTY | Displays the programme type information of the current station |
| F.DIRECT | Selects the "frequency direct input" |
| T.MODE | Selects the auto stereo mode or mono mode |
CONNECTING THE REMOTE CONTROL JACKS
Connect the AUDIO OUT and REMOTE CONTROL IN connectors to their corresponding terminals on a Marantz stereo amplifier using audio connecting cord and remote control connection cord.
Note:
Turn power to the stereo amplifi or OFF before making the connections.
ENGLISH
ENGLISH
TROUBLESHOOTING
In case of trouble, check the following before calling for service:
- Are the connections made properly?
- Are you operating the unit properly following the user's guide?
- Are the power amplifiers and speaker working properly?
If the unit does not operate properly, check items shown in the following table.
If your trouble cannot be recovered with the remedy actions listed in the following table, malfunction of the internal circuitry is suspected; immediately unplug the power cable and contact your dealer, nearest Marantz authorized dealer or the Marantz Service Center in your country.
SYMPTOM CAUSE REMEDY
| Power does not turn on when POWER ON/STANDBY switch is pressed. | Mains cord's plug is not plugged into wall outlet. | Plug the mains cord in properly. |
| Hissing noise is heard on FM broadcasts. | Antenna cable is not properly connected. | Connect the leads properly. |
| Antenna is not pointing in the right direction. | Point the antenna in the right direction. | |
| Radio waves are weak. Install an outdoor antenna. | ||
| Hissing or buzzing sound is heard on AM broadcasts. | Noise from a TV or interference in the signals sent from the broadcast station. | Turn off the TV.Change the position of the loop antenna.Install an outdoor antenna. |
| Booming sound (humming) is heard in AM broadcasts. | Signals transmitted over the main cord are modulated by the power source frequency. | Insert the plug in the opposite direction.Install an outdoor antenna. |
| I can not get any sound. | Power connected amplifier not turned on. | Connection leads to amplifier not made correctly. |
SLEEP F/P T.MODE DISPLAY
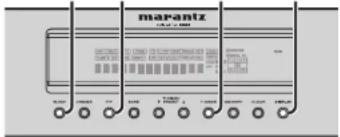
FRONT KEY (BUTTON) LOCK OF THE UNIT
If the F/P and T.MODE buttons on the front panel are both pressed at the same time for three seconds or more, all the buttons on the front panel (excluding the POWER ON/OFF button), will become locked. "F-KEY LOCK!" will appear in the display.
Release the lock by pressing the same two keys again at the same time for three seconds or more.
"F-KEY UNLOCK" will appear in the display, and the keys will unlock.
GENERAL MALFUNCTION
If the equipment malfunctions, this may be because an electrostatic discharge or AC line interference has corrupted the information in the equipment memory circuits. Therefore:
- disconnect the plug from the AC line supply
- after waiting at least three minutes, reconnect the plug to the AC line supply
- re-attempt to operate the equipment
Memory backup
- In case a power outage occurs or the power cord is accidentally unplugged, this unit is equipped with a backup function to prevent memory data such as the preset memory from being erased.
HOW TO RESET THE UNIT
Should the operation or display seem to be abnormal, reset the unit with the following procedure.
The unit is turned on, press and hold the SLEEP and DISPLAY buttons simultaneously for 3 seconds or more.
Remember that the procedure will reset the settings of the TUNER PRESET etc., to their initial settings.
OTHERS
TECHNICAL SPECIFICATIONS
FM TUNER SECTION
| Frequency Range | 87.5 – 108.0 MHz |
| Usable Sensitivity | IHF 1.8 μV/16.4 dB |
| Signal to Noise Ratio | Mono/Stereo 75/70 dB |
| Distortion | Mono/Stereo |
| Stereo Separation | 1 kHz 45 dB |
| A.C.S | ± 300 kHz 60 dB |
| Image Rejection | 98 MHz 70 dB |
| Tuner Output Level | 1 kHz, ± 40 kHz Dev 500 mV |
AM TUNER SECTION
| Frequency Range | 531 – 1602 kHz |
| Usable Sensitivity | Loop 400 μV/m |
| Signal to Noise Ratio | 50 dB |
| Distortion | 400 Hz, 30% Mod. 0.5% |
| Selectivity | ±18 kHz 70 dB |
GENERAL
| Power Requirement | AC 230 V 50/60 Hz |
| Power Consumption | 9 W |
| Weight |
ACCESSORIES
| FM | Antenna | 1 | |
| AM | Loop | Antenna | 1 |
| AC Power Cable | 1 | ||
| Audio connecting cord | 1 | ||
| Remote control connecting cord | 1 | ||
Specifications subject to change without prior notice.
DIMENSIONS
ENGLISH
CLEANING OF EQUIPMENT EXTERNAL SURFACES
The exterior fl nish of your unit will last indefinitely with proper care and cleaning. Never use scouring pads, stool wool, scourging powders or harsh chemical agents (e.g., lye solution), alcohol, thinner, benzine, insecticide or other volatile substances as these will mar the fl nish of the equipment. Likewise, never use cloths containing chemical substances. If the equipment get dirty, wipe the external surfaces with a soft, lint-free cloth.
If the equipment becomes heavily soiled:
- dilute some washing up liquid in water, in a ratio of one part detergent to six parts water.
- dip a soft, lint free in the solution and wring the it is damp.
- wipe the equipment with the damp cloth.
- dry the equipment by wiping it with a dry cloth.

REPAIRS
Only the most competent and qualified service technicians should be allowed to service the factory-trained warranty station personnel have the knowledge and special facilities needed for repair and calibration of this precision equipment. After the warranty period has expired, repairs will be performed for a charge if the equipment can be returned to normal operation.
In the event of diffi culty, refer to your dealer or write directly to the nearest location to you that is listed on the Marantz Authorized Service Station list. If writing, please include the model and serial number of the equipment together with a full description of what you think is abnormal about the equipment's behaviour.
www.marantz.com
You can find your nearest authorized distributor or dealer on our website.
marantz®
is a registered trademark.

06/2008 541110124038M mzh-dPrinted in China

- marantz®
- ENGLISH
- WARRANTY
- RETAIN YOUR PURCHASE RECEIPT
- IMPORTANT
- FOR U.K. ONLY
- FRANÇAIS
- GARANTIE
- Francais
- AVERTISSEMENTS
- ACCESSORIES CHECK
- AM Loop Antenna
- A NOTE ABOUT RECYCLING
- TABLE OF CONTENTS
- FEATURES
- BEFORE USE
- EQUIPMENT MAINS WORKING SETTING
- COPYRIGHT
- DO NOT LOCATE IN THE FOLLOWING PLACES
- Note:
- NAMES AND FUNCTIONS
- ① POWER ON/STANDBY button
- STANDBY indicator
- ② INFRARED receiving sensor window
- ③ RDS indicator
- ④ DISPLAY button
- ⑤ CLEAR button
- ⑥ MEMORY button
- ⑦ T-MODE button
- ⑧ TUNING/PRESET ▲▼ (UP/DOWN) button
- ⑨ BAND button
- ⑩ F (Frequency)/P (Preset) button
- ⑪ DIMMER button
- ⑫ SLEEP button
- DISP (Display Off) indicator
- SLEEP timer indicator
- AUTO indicator
- TUNED indicator
- STEREO indicator
- Main Information Display
- ① FM antenna terminal (75 ohms)
- ② AM antenna and ground terminals
- ③ AUDIO OUT connectors
- ④ REMOTE CONTROL IN and OUT connectors
- ⑤ AC INLET
- BASIC CONNECTIONS
- CONNECTING THE AMPLIFIER
- Cautions:
- Notes:
- ASSEMBLING THE AM LOOP ANTENNA
- CONNECTING THE SUPPLIED ANTENNAS
- Connecting the supplied FM antenna
- Connecting the supplied AM loop antenna
- CONNECTING AN FM OUTDOOR ANTENNA
- CONNECTING AN AM OUTDOOR ANTENNA
- CONNECTING THE AC POWER CABLE
- BASIC OPERATION
- TURNING ON THE UNIT
- LISTENING TO THE TUNER
- AUTO TUNING
- MANUAL TUNING
- (FM) TUNING MODE (AUTO STEREO OR MONO)
- ADVANCED OPERATION
- PRESET MEMORY
- AUTO PRESET MEMORY
- MANUAL PRESET MEMORY
- CLEARING STORED PRESET STATIONS
- NAME INPUT OF THE PRESET STATION.
- RDS OPERATION
- RADIO TEXT
- RDS DISPLAY
- PROGRAMME TYPE (PTY) DISPLAY
- PTY AUTO SEARCH
- OTHER OPERATION
- CONNECTING THE REMOTE CONTROL JACKS
- TROUBLESHOOTING
- FRONT KEY (BUTTON) LOCK OF THE UNIT
- GENERAL MALFUNCTION
- Memory backup
- HOW TO RESET THE UNIT
- OTHERS
- TECHNICAL SPECIFICATIONS
- CLEANING OF EQUIPMENT EXTERNAL SURFACES
- REPAIRS
Brand : MARANTZ
Model : ST6003SG
Category : Audio tuner