
GMOS-04 - Car Kit Metra - Free user manual and instructions
Find the device manual for free GMOS-04 Metra in PDF.


| Product Type | GM OnStar Class II Data Bus Interface |
| Brand | Metra |
| Model | GMOS-04 |
| Compatible Vehicles | 2000-2009 GM models (Buick, Cadillac, Chevrolet, GMC, Hummer, Isuzu, Oldsmobile, Pontiac, Saab, Saturn, etc.) |
| Retains OnStar | Yes |
| Retains Warning Chimes | Yes (adjustable via potentiometer) |
| Retains RAP (Retained Accessory Power) | Yes |
| Outputs Provided | 12V switched, mute, parking brake, VSS (speed sense), reverse |
| Amplified System Support | Designed for factory amplified systems including Bose |
| Harnesses Included | 14-pin harness with RCA, 16-pin to 24-pin and 12-pin harness |
| Audio Input | RCA (front/rear left/right) |
| Audio Level Adjustment | Potentiometer for input level (to prevent distortion) |
| Chime Level Adjustment | Potentiometer on module side |
| OnStar Volume Adjustment | Via tapping black/yellow wire to ground (4 levels) |
| Installation Difficulty | Moderate (requires cutting/taping wires, professional installation recommended) |
| Tools Required | Cutting tool, tape, crimping tool, connectors (butt-connectors, bell caps) |
| Power Supply | 12V vehicle battery (constant and switched) |
| Dimensions (approx) | 4 x 2 x 1 inches |
| Weight (approx) | 0.3 lb (150 g) |
| Safety Warnings | Disconnect negative battery terminal; read instructions; consult technician if unsure |
Frequently Asked Questions - GMOS-04 Metra
User questions about GMOS-04 Metra
0 question about this device. Answer the ones you know or ask your own.
Ask a new question about this device
Download the instructions for your Car Kit in PDF format for free! Find your manual GMOS-04 - Metra and take your electronic device back in hand. On this page are published all the documents necessary for the use of your device. GMOS-04 by Metra.
USER MANUAL GMOS-04 Metra
GM ONSTAR CLASS II DATA BUS INTERFACE
GMOS-04 Installation Instructions
* READ IMPORTANT WARNING ON PAGE 2 BEFORE ATTEMPTING ANY INSTALLATION
THE GMOS-04 IS DESIGNED TO BE USED WITH VEHICLES THAT HAVE A FACTORY AMPLIFIED SYSTEM INCLUDING THE BOSE AUDIO SYSTEMS. BESIDES RETAINING THE ONSTAR SYSTEM, THE GMOS-04 WILL ALSO RETAIN THE WARNING CHIMES THAT WILL BE LOST WHEN THE FACTORY RADIO IS REMOVED. THE GMOS-04 WILL ALSO PROVIDE A 12 VOLT SWITCHED WIRE FOR PROPER RADIO OPERATION. THE GMOS-04 NOW PROVIDES MUTE, PARKING BRAKE, VSS OR SPEED SENSE, AND A REVERSE OUTPUT TO MAKE INSTALLING AN AFTERMARKET NAVIGATIONAL RADIO SIMPLER AND LESS TIME CONSUMING.
• SEE APPLICATIONS LIST INSIDE •
TOOLS REQUIRED FOR INSTALLATION
- Cutting Tool
- Tape
- Crimping Tool
- Connectors (ie: butt-connectors, bell caps, etc.)
APPLICATIONS
BUICK
ALLURE 2005-09
CENTURY 2004-05
LACROSSE 2005-09
RAINIER 2004-07
RENDEZVOUS 2002-07
TERRAZA 2005-08
CADILLAC
ESCALADE 2003-06
ESCALADE EXT 2003-06
CHEVROLET
AVALANCHE 2003-06
CAVALIER 2000-05
CORVETTE 2005-09*
*See note for Corvette in
"CONNECTIONS TO BE MADE ON
THE 24 PIN GRAY HARNESS"
EXPRESS 2003-07
IMPALA 2000-05
MALIBU 2002-03
MALIBU CLASSIC 2004
MONTE CARLO 2000-05
SILVERADO 2003-06
SILVERADO CLASSIC 2007
SUBURBAN 2003-06
TAHOE 2003-06
TRAILBLAZER 2002-09
UPLANDER 2005-08
VENTURE 2000-05

We recommend MECP certified technicians
GMC
ENVOY 2002-09
SAVANA 2003-07
SIERRA 2003-06
SIERRA CLASSIC 2007
YUKON/XL/DENALI 2003-06
HUMMER
H2 2003-07
H3 2006-09
ISUZU
ASCENDER 2003-08
I SERIES 2006-08
OLDSMOBILE
ALERO 2001-04
BRAVADA 2002-04
INTRIGUE 2002
SILHOUETTE 2000-04
PONTIAC
AZTEC 2001-05
GRAND AM 2001-05
GRAND PRIX 2004-08
MONTANA 2000-2005
SUNFIRE 2000-05
SAAB
9-7x 2005-09
SATURN
RELAY 2005-07

We recommend MESA certified technicians
INTERFACE COMPONENTS
• GMOS-04 Data Interface
• 14 pin harness with RCA'S
- 16 pin harness to 24 pin GM harness and 12 pin Onstar harness
\* IMPORTANT WARNING
THIS PRODUCT INCLUDES INSTRUCTIONS FOR INSTALLATION WHICH MUST BE CAREFULLY FOLLOWED. THE INSTRUCTIONS ARE WORDED IN SUCH A MANNER TO ASSUME THAT THE INSTALLER IS CAPABLE OF COMPLETING THESE TYPE OF ELECTRONIC INSTALLATIONS. IF YOU ARE UNCLEAR AS TO WHAT YOU ARE INSTRUCTED TO DO OR BELIEVE THAT YOU DO NOT UNDERSTAND THE INSTRUCTIONS SO AS TO PROPERLY AND SAFELY COMPLETE THE INSTALLATION YOU SHOULD CONSULT A TECHNICIAN WHO DOES HAVE THIS KNOWLEDGE AND UNDERSTANDING. FAILURE TO FOLLOW THESE INSTRUCTIONS CAREFULLY AND TO INSTALL THE INTERFACE AS DESCRIBED COULD CAUSE HARM TO THE VEHICLE OR TO SAFETY SYSTEMS ON THE VEHICLE. INTERFERENCE WITH CERTAIN SAFETY SYSTEMS COULD CAUSE HARM TO PERSONS AS WELL. IF YOU HAVE ANY QUESTIONS IN THIS REGARD PLEASE CALL THE HELP LINE OR THE METRA AT 1-800-221-0932 FOR ASSISTANCE.
WIRING UP THE GMOS-04
* Important: Before beginning any of the following, disconnect the negative battery terminal to prevent accidental short circuit.
**Note: The ignition power source of most GM vehicles keep the radio on until one of the doors is opened. This is called the R.A.P. (retained accessory power).
The GMOS-04 is designed to retain this feature.
CONNECTIONS TO BE MADE ON THE 24 PIN
GRAY HARNESS:
- Connect the yellow wire to the radio's 12V battery or memory wire.
- Connect the black wire to the radio's ground wire.
- Connect the orange wire to the radio's illumination wire. If the wire is not present, tape up wire.
- Connect the orange/white wire to the radio's dimmer wire. If the wire is not present, tape up wire.
See page 3 for "2005-2009 CORVETTE ONLY" special instructions.
Continued from page 2
FOR 2005-2009 CORVETTE ONLY
-
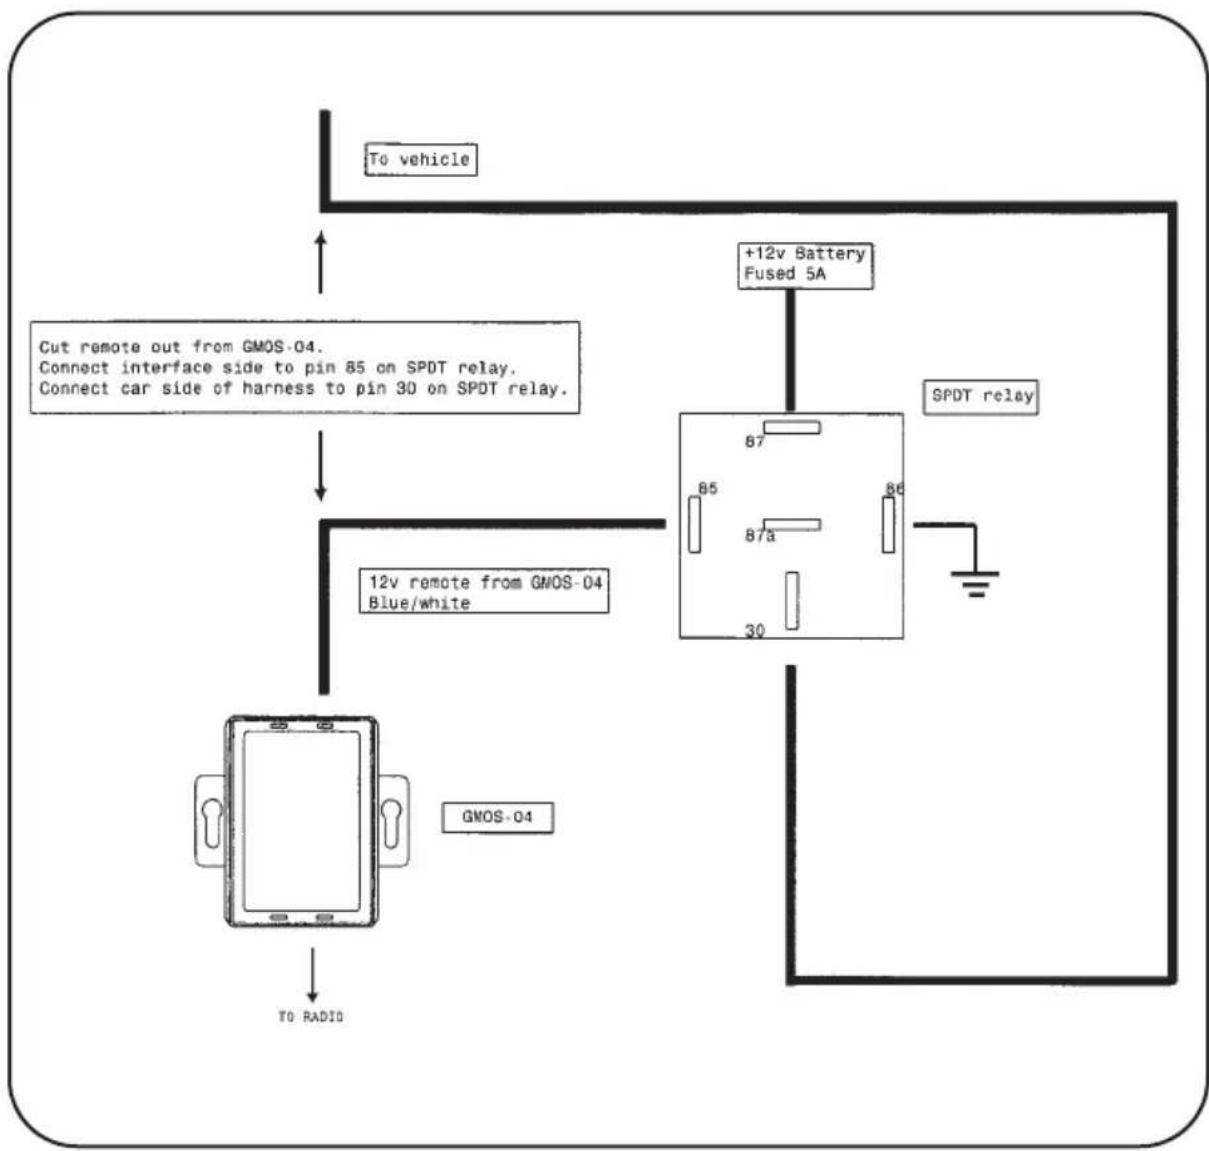
A Relay is needed in the 2005-2009 Corvette. You will need to cut the blue/white wire in half between the 16 way Molex and 24 way gray connector.
-
Connect the blue/white wire coming from the 16 way Molex to pin 85 of the Relay.
- Connect the blue/white wire coming from the 24 way connector to pin 30 of the Relay.
- Connect pin 86 of the Relay to Ground.
- Connect pin 87 of the relay to fused 12 volt constant wire. Using tape or a wire tie securely the Relay from moving around in the dash.
flowchart
graph TD
    A["To RADI"] --> B["12v remote from GMOS-04 Blue/white"]
    B --> C["SPDT relay"]
    C --> D["+12v Battery Fused 5A"]
    D --> E["To vehicle"]
    style A fill:#f9f,stroke:#333
    style B fill:#ccf,stroke:#333
    style C fill:#cfc,stroke:#333
    style D fill:#fcc,stroke:#333
- When completed, plug the 16 pin harness into the GMOS-04.
CONNECTIONS TO BE MADE ON THE 14 PIN
HARNESS
- Connect the blue/white wire to the radio's AMP turn-on wire.
- Connect the red wire to the radio's Igniton or accessory wire.
- Connect the RCA cables to the radio's RCA outputs. If no RCA outputs are available, use the Metra line output converter part #ALO-648 (SOLD SEPARATELY).
- The white RCA goes to the left front RCA output of the radio.
- The gray RCA goes to the front right RCA output of the radio.
- The green RCA goes to the left rear RCA output of the radio.
- The purple RCA goes to the right rear RCA output of the radio.
The following wires on the 14 pin harness are for the aftermarket radios that have navigation built in:
- Connect the Brown wire to the mute wire of the aftermarket radio.
- Connect the Green wire to the parking brake wire of the aftermarket radio.
- Connect the Blue/Pink wire to the VSS or speed sense wire of the aftermarket radio.
- Connect the Green/Purple wire to the reverse wire of the aftermarket radio.
- When completed, plug the 14 pin harness into the GMOS-04.
INSTALLING THE GMOS-04
- With all connections completed to the aftermarket radio, plug the 24 pin and the 12 pin connectors into the vehicles corresponding wiring harnesses.
- Reconnect the negative battery terminal.
- Cycle the key by turning the ignition on then back off, then back on again to test the radio.
TESTING THE GMOS-04
- Turn the ignition on then the radio to verify the radio works. Check balance and fader controls for proper operation. If controls are backwards, check to see if the RCA's are in the correct location.
- Push the Onstar button to verify Onstar is working. the radio will shut off and Onstar will be heard through the left front speaker. Turn off Onstar and the radio will turn back on.
ONSTAR LEVEL ADJUSTMENT
To adjust the Onstar volume level find the Black/yellow wire that you cut on the 16 pin harness, you will use the Black/yellow wire that is by itself, with no other wire with it. Push the blue Onstar button, while the voice is speaking tap the Black/yellow wire to ground. There are 4 volume settings for Onstar; once the 4th setting is reached and the Black/yellow wire is tapped to ground it will automatically go back to the first volume setting. Once the volume is set it will stay at that volume until the Black/yellow wire is tapped to ground again. This can be set during installation and then left alone. If user adjustment is desired, a momentary contact switch (sold separately) can be added. Connect one terminal from the switch to ground and the other terminal to the Black/yellow wire. The volume will change one level every time the switch is pressed.
TROUBLESHOOTING:
Chime Too Loud/Soft:
There are some instances where the chime is too loud or too soft.
To resolve this follow these steps:
- Make sure the ignition is turned to the "off" position.
- Disconnect the 14 pin and 16 pin wire harnesses from the GMOS-04.
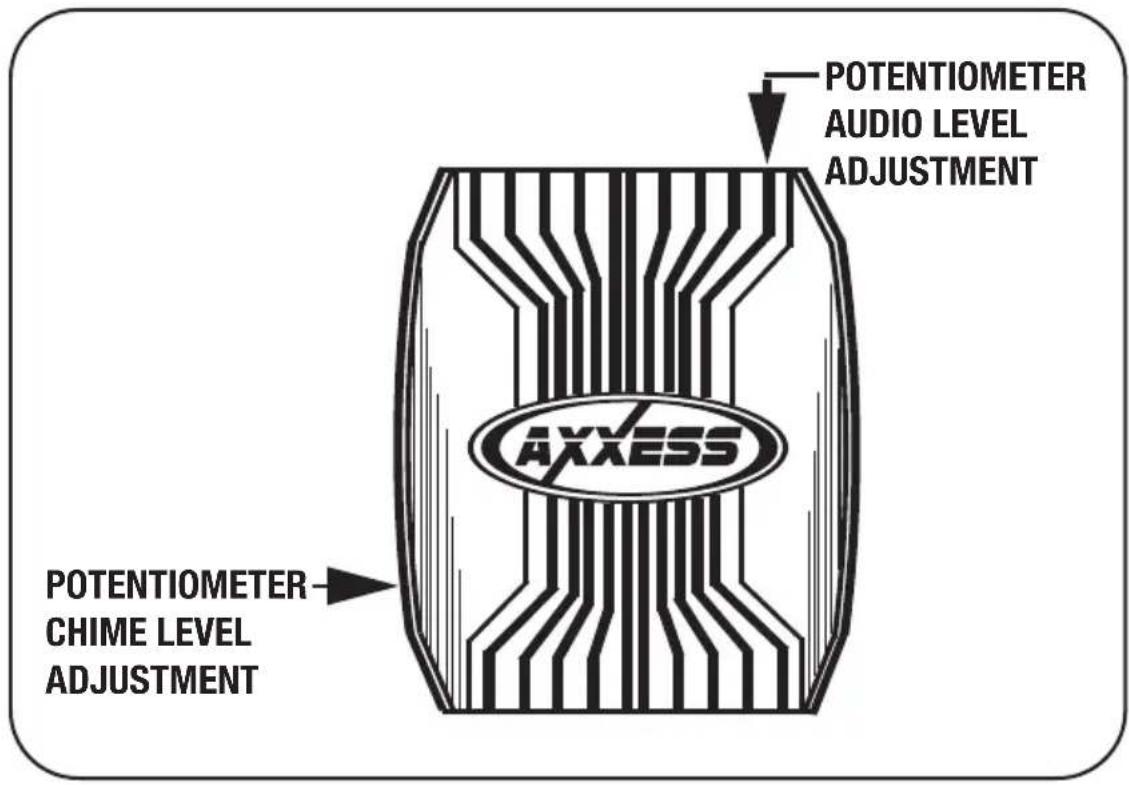
- Locate the potentiometer on the left side of the module, this is the Chime potentiometer.
- Taking a small flat headed screwdriver, turn the potentiometer clockwise to decrease the chime level; turning the potentiometer counterclockwise will increase the chime level.
Distorted Audio Output:
When using the GMOS-04 with a radio that has a high pre-out voltage, usually greater than 2 volts, the audio signal may become distorted.
To resolve this follow these steps:
- Make sure the ignition is turned to the "off" position.
- Disconnect the 14 pin and 16 pin wire harnesses from the GMOS-04.
- Locate the potentiometer next to the 14 pin connector located at the end of the GMOS-04.
- Taking a small flat headed screwdriver, turn the potentiometer counter clockwise to lower the input level going to the factory amplifier.
GMOS-04 INSTRUCTIONS
GM ONSTAR CLASS II DATA BUS INTERFACE
GMOS-04
*See note for Corvette in
"CONNECTIONS TO BE MADE ON
THE 24 PIN GRAY HARNESS"
EXPRESS 2003-07
IMPALA 2000-05
MALIBU 2002-03
MALIBU CLASSIC 2004
MONTE CARLO 2000-05
SILVERADO 2003-06
SILVERADO CLASSIC 2007
SUBURBAN 2003-06
TAHOE 2003-06
TRAILBLAZER 2002-09
UPLANDER 2005-08
VENTURE 2000-05

Salida de audio distorsionada:
- GM ONSTAR CLASS II DATA BUS INTERFACE
- GMOS-04 Installation Instructions
- TOOLS REQUIRED FOR INSTALLATION
- APPLICATIONS
- BUICK
- CADILLAC
- CHEVROLET
- GMC
- HUMMER
- ISUZU
- OLDSMOBILE
- PONTIAC
- SAAB
- SATURN
- INTERFACE COMPONENTS
- \* IMPORTANT WARNING
- WIRING UP THE GMOS-04
- CONNECTIONS TO BE MADE ON THE 24 PIN
- GRAY HARNESS:
- Continued from page 2
- FOR 2005-2009 CORVETTE ONLY
- CONNECTIONS TO BE MADE ON THE 14 PIN
- HARNESS
- INSTALLING THE GMOS-04
- TESTING THE GMOS-04
- ONSTAR LEVEL ADJUSTMENT
- TROUBLESHOOTING:
- Chime Too Loud/Soft:
- Distorted Audio Output:
- To resolve this follow these steps:
- GMOS-04 INSTRUCTIONS
- GMOS-04
- Salida de audio distorsionada:
Brand : Metra
Model : GMOS-04
Category : Car Kit