
FZV 2001-E - Lawn mower Fieldmann - Free user manual and instructions
Find the device manual for free FZV 2001-E Fieldmann in PDF.


| Product Type | Electric Lawn Verticutter / Scarifier |
| Brand | Fieldmann |
| Model | FZV 2001-E |
| Rated Voltage | 230 V ~ 50 Hz |
| Nominal Power | 1300 W |
| Idle Speed | 2500 min⁻¹ |
| Max Swath Width | 320 mm |
| Swath Depth | Verticutting: -10 to 4 mm (5 positions); Loosening: -4 to 10 mm (5 positions) |
| Collection Box Capacity | 35 L |
| Sound Pressure Level (LPA) | 78 dB(A) |
| Sound Power Level (LWA) | 97 dB(A) |
| Vibration Level | 2.5 m/s² |
| Safety Features | Double switch (safety combined switch), safety cover, automatic shut-off on overload, residual current device recommended |
| Cutting Blades | Double-sided, reversible; replacement possible |
| Working Depth Adjustment | 5 positions via front wheels (lever per wheel) |
| Protection Class | IP rating not specified; use only in dry conditions |
| Power Cable | H05RN-F or equivalent; extension cable recommended max 75 m, 1.5 mm² |
| Maintenance | Clean after each use; lubricate blades once per season; sharpen or replace blades as needed |
| Storage | Dry, dust-free, out of reach of children; protect from frost |
| Intended Use | Lawn aeration and thatching in private gardens; not for public or commercial use |
Frequently Asked Questions - FZV 2001-E Fieldmann
User questions about FZV 2001-E Fieldmann
0 question about this device. Answer the ones you know or ask your own.
Ask a new question about this device
Download the instructions for your Lawn mower in PDF format for free! Find your manual FZV 2001-E - Fieldmann and take your electronic device back in hand. On this page are published all the documents necessary for the use of your device. FZV 2001-E by Fieldmann.
USER MANUAL FZV 2001-E Fieldmann
natural_image
Abstract black-and-white spiral pattern with no text or symbolsFIELDMANN®
Home & Garden Performance
natural_image
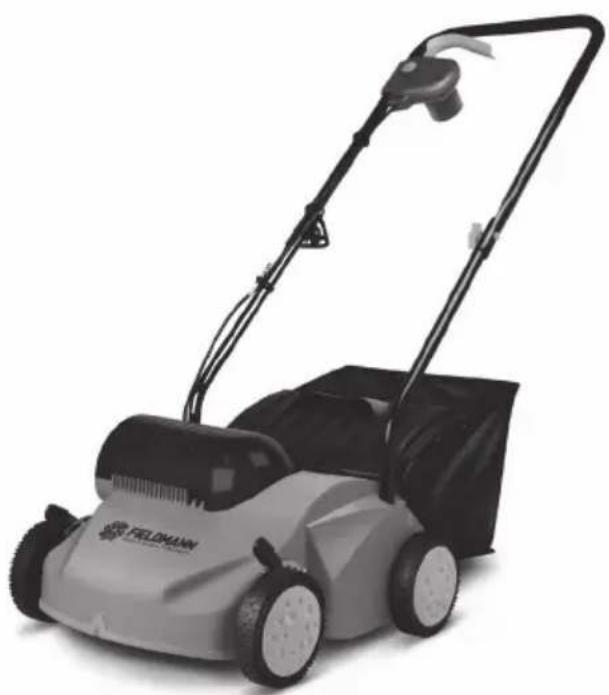
Exterior view of a black-and-white photo of a FELDHAN lawn mower (no text or symbols visible)FZV 2001-E
English 7 - 20
Čeština 21 - 33
Slovenčina 35 - 48
Magyarul 49 - 62
Polski 63 - 77
Русский 79 - 94
1
natural_image
Technical line drawing of a mechanical device with gears and a housing (no text or symbols)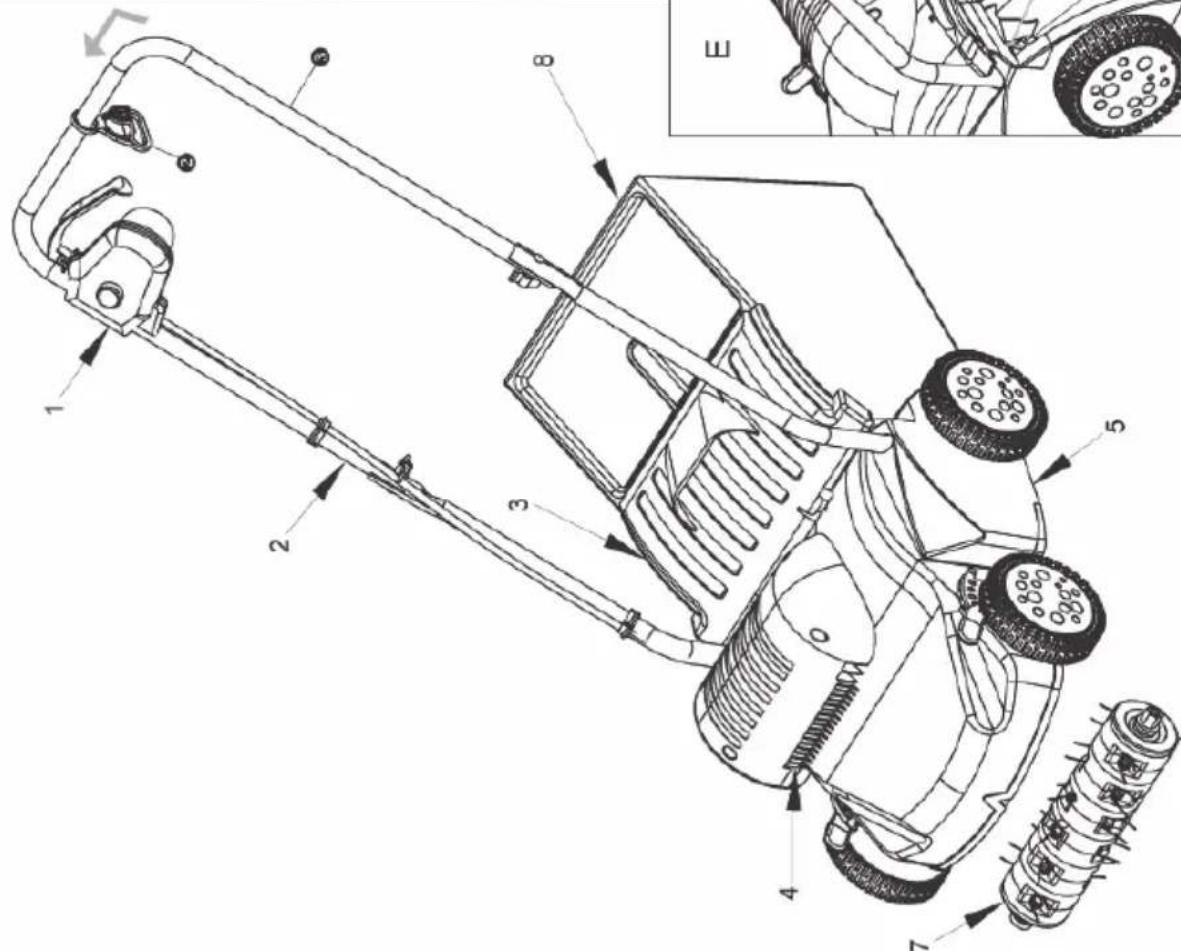
natural_image
Technical line drawing of a vehicle chassis with wheels and suspension components (no text or symbols)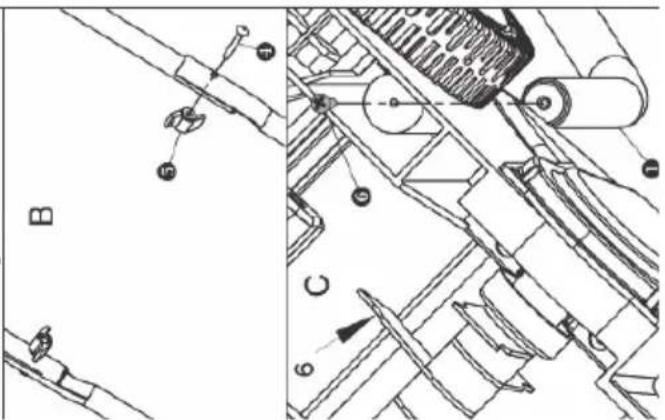
2
natural_image
Technical line drawing of a mechanical component with labeled parts (no text or symbols present)3
natural_image
Line drawing of an electric plug socket with wires and connectors (no text or symbols)4
5
flowchart
graph TD
    A["Top Vehicle"] --> B["Bottom Vehicle"]
    B --> C["Top Vehicle"]
    style A fill:#f9f,stroke:#333
    style B fill:#bbf,stroke:#333
    style C fill:#dfd,stroke:#333
6
7
Verticutter
OPERATION MANUAL
Thank you for your purchase of our garden verticutter. Before beginning to use it, please, read this operation manual carefully and keep it for the case of a further use.
TABLE OF CONTENTS
APPENDIX OF FIGURES 3
- GENERAL SAFETY INSTRUCTIONS 8
Important safety warnings
Packaging
Instructions for use
-
EXPLANATION FOR INSTRUCTION PLATES ON THE MACHINE 9
-
MACHINE DESCRIPTION AND DELIVERY CONTENT 10
-
SAFETY INSTRUCTIONS 11
Before the use
Electrical safety
Before the use
-
MACHINE ASSEMBLY 13
-
SWITCHING-ON 14
Main switch On/Off
Protection against overheating
-
VERTICUTTING 15
-
BLADES 14
Collection and aeration (optional)
The use of the verticutter
Roll replacement
Transport
Maintenance and storage
Before each use of the equipment
Once a season
- CLEANING 17
Storage
-
WHAT TO DO "IF..." 18
-
TECHNICAL DATA 19
-
DECLARATION OF CONFORMITY 19
-
DISPOSAL 20
1. GENERAL SAFETY INSTRUCTIONS
Important safety warnings
* Unpack the product carefully and be sure not to throw away any part of the package before having found all components of the product.
Keep the product in a dry place out of reach of children.
Read all cautions and instructions. The failure to adhere to warning cautions and instructions may result in an accident, fire and/or a serious injury.
Packaging
The product is placed in a package preventing damage during transport. This package is a raw material therefore it can be handed-over for recycling.
Instructions for use
Before beginning to work with the machine, read the following safety rules and instructions for use. Familiarize with operating elements and the proper use of the device. Keep the manual in a safe place for future reference. We recommend keeping the original package including the inner packaging materials, cash voucher and guarantee card for a period of warranty at minimum. For a case of transportation, pack the machine into the original box from the manufacturer, thus ensuring a maximum protection of the product during a possible transport (e.g. moving or sending into a service station).

Note: If you hand the machine over to next persons, hand it over together with the manual. Adherence to the attached instructions for use is a precondition for the proper use of the machine. The operation manual includes also instructions for operation, maintenance and repairs.
The manufacturer does not take any responsibility for accidents or damages resulting from the failure to adhere to this manual.
2. EXPLANATION FOR INSTRUCTION PLATES ON THE MACHINE

natural_image
Warning symbol with exclamation mark above an open book below (no text or symbols present)Warning! Before putting into operation read carefully the operation manual and general safety instructions!

Does not work when raining, nor under impaired climatic conditions!

Warning! The knife is rotating for a while after the verticutter has been switched-off!
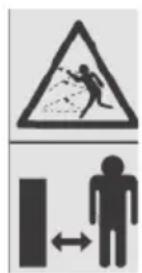
Keep a safe distance!
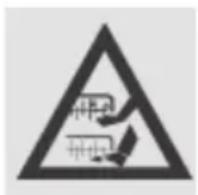
Warning! Rotating knives! Sharp knife(knives). Protect yourself against injury and loss of fingers or toes!
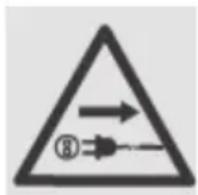
Before carrying out setup or maintenance of the machine, or if the power supply cable got caught or was damaged, always switch-off the engine and pull the plug out of the power socket first!

natural_image
Icon of a person wearing headphones and sunglasses inside a circle (no text or symbols)Use protective equipment while working.
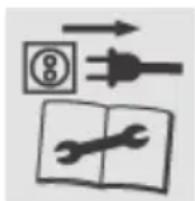
natural_image
Pure electrical circuit symbols and open book illustration without any text or labelsBefore carrying out any work on the mowing equipment, pull the cable out of the power socket first!
3. MACHINE DESCRIPTION AND DELIVERY CONTENT
Machine description (see Fig.1)
1 - Safety combined switch (On / Off) with a connector
2 - Guiding handle
3 - Safety cover
4 - Exhauster
5 - Lawn verticutter N1B-JY-30
6 - Scarifying roll
7 - Raking roll (optional)
8 - Collection box (optional)
4. SAFETY INSTRUCTIONS
Thank you for your purchase of our garden verticutter. Before beginning to use it, please, read this operation manual carefully and keep it for the case of a further use.
Before the use
Before the use, assembly the verticutter properly.
Before the use, check the verticutter carefully. Work only with a machine in a good condition. If you found out any malfunction of the machine which could cause an injury to the operator, do not operate the machine until the malfunction is removed.
* Replace worn-out or damaged parts for safety reasons. Use only genuine original spare parts. Reproduction spare parts can cause damage to the machine or serious injuries.
Before beginning and while working with the verticutter, remove all foreign objects from the lawn.
* Work only in daylight or adequate sufficient illumination.
Use applicable work clothes, protective equipment and solid shoes.
Proper use
⚠ Warning! While operating this machine, the user is responsible for the third parties.
This product is not intended for children and persons with reduced level of physical, sensory or mental ability or persons with limited experience and knowledge unless under a skilled supervision or after being instructed in the use of this product by a person responsible for their safety.
Do not use the product for other purposes than those it is intended for.
Never use the garden verticutter if other persons, children or freely moving domestic animals are around.
Always use the collection box or work with a closed safety cover. Make sure that all protective facilities are well connected and in a good condition.
Before connecting the product to the power socket, make sure that voltage on the product plate corresponds with your power source voltage.
⚠ Warning! Mind the adequate distance of your legs from the mowing mechanism.
* Never use the machine on a too steep terrain. Be particular about your safety on a slope terrain – danger of slipping and injury.
Before starting-up the verticutter, make sure that the mowing mechanism is not hobbled by any foreign object.
* Never put your hands or legs under the rotating parts. Warning! Risk of injury!
* Guide the device only at walking speed.
Take care of the power supply as well as extension cable.
Before taking-of or emptying the collection box, switch-off the engine and wait until knives are stopped completely.
If the machine was hit by a foreign object, switch it off immediately. Check for damage signs and repair possible defects before re-putting into operation.
If the machine started vibrating unusually, switch-off the engine and find-out the vibration causes. Vibrations are a sign of a possible damage.
Before beginning maintenance or before cleaning the machine, switch-off the engine and wait until cutting knives are stopped completely.
⚠ Warning! Warning! Blades are not stopped immediately after switching-off.
* Be particularly cautious before beginning maintenance or before cleaning the machine.
⚠ Warning! DANGER! Be particular about your fingers! Use protective gloves!
Before beginning maintenance or before cleaning the machine, always disconnect the verticutter from power supply voltage!
* Never try to modify the verticutter, to enhance or change its parameters in any way.
Electrical safety
Before connecting the product to the power socket, make sure that voltage on the product
plate corresponds with your power source voltage (230V\~50Hz). Do not use other electric power sources.
Do not incline the machine while the engine is switched-on.
We recommend connecting this machine only to a socket which is protected by the residual current circuit breaker with actuating current 30 mA. Consult with a reliable electrician.
- Keep the power supply and extension cable in a sufficient distance from the cutting knives.
Never run across it. Danger of electric shock; always keep in mind where the supply cable is located.
For connecting the extension cable, use a special stand to hold the cable.
Never work with the equipment when raining, in humid weather and strong wind. Do not leave it outdoors overnight. If possible, do not use the verticutter for working with wet or still damp grass on principle.
If the power cable of the product is damaged, entrust a specialized service station or a similarly skilled person with its replacement to avoid a hazardous situation. It is forbidden to use a product with a damaged power cable or power cable plug.
Use only an extension cable designated for outdoor applications. Keep it out from the working area. Do not lay the power cable near hot surfaces or across sharp objects. Do not put heavy objects on the power cable, place the cable so that nobody tramps on and tumbles over it. Care for the power cable not touching a hot surface.
- Keep the power supply and extension cable in a sufficient distance from the cutting knives.
A mobile socket for the extension cable should be rain-resistant and comply with DIN 57282
and VDE 0282 standards, the conductor cross-section (max. length 75 m) should be of 1.5 mm2 at minimum. Use H07RN-F cable.
Before the use
Purpose of the use

Note: This equipment is designed to be used as an electric grass verticutter for aeration and loosening of lawns and grass areas in private gardens.
Not intended for use in public gardens, parks, sports facilities or for agricultural and forestry purposes.
The use of the equipment for any other purposes is considered improper and disapproved. In such a case the manufacturer does not bear any responsibility for possible damages to property and health. The user is solely responsible for risks related to such an operation.
5. MACHINE ASSEMBLY (Fig. 1)
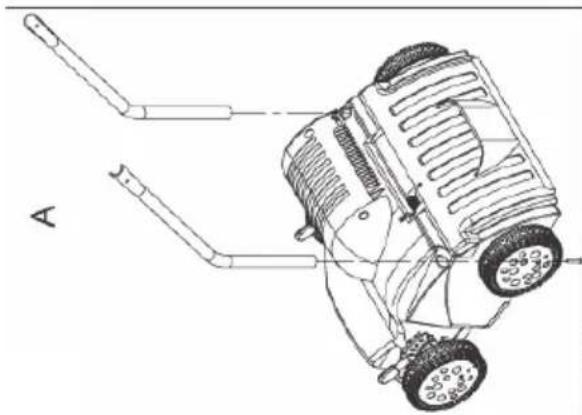
Guiding handle (Fig. 1, A, B, C)
* Insert the bottom part of the handle into the cover (1).
Move the cable protective terminals (2) to the upper part of the handle (3).
* Connect the handle on both sides by means of delivered bolts (4) and winged nuts (5).
- Fasten the guiding handle on the bottom side of the cover with the help of 2 pcs of delivered bolts (6).
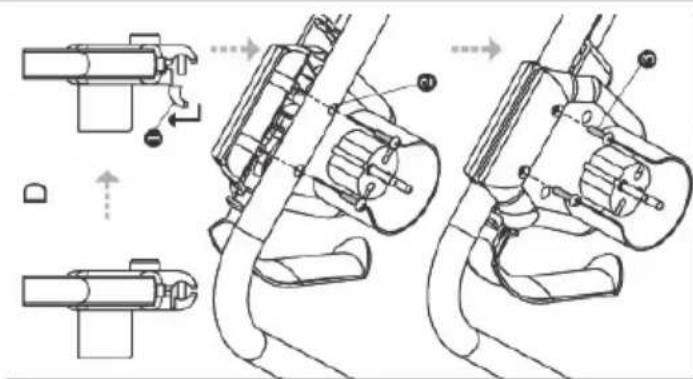
Safety switch (Fig. 1, D)
Open the safety switch cover (1).
* Mount the safety switch through the holes (2) on the guiding handle.
* Close the cover and fasten the switch by means of two delivered bolts (3).
Use two delivered clamps to clamp the cable.
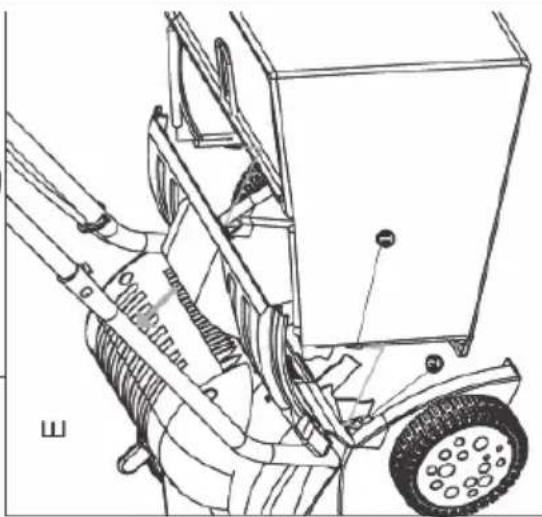
Collection box (Fig. 1, E)
Lift the safety cover up and hold in this position.
* Fix the collection box holder (1) to the hooks in the cover (2).
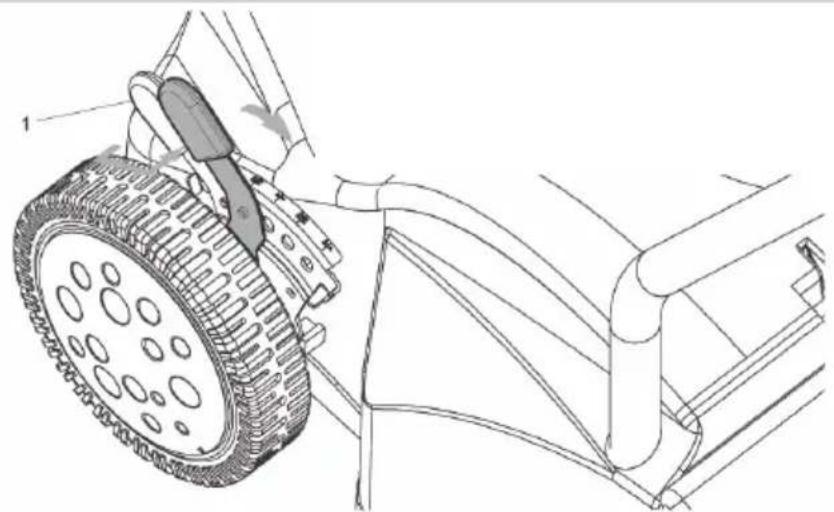
Setup of working depth of the swath (Fig. 2)
⚠ Warning! Only when the engine is switched-off and cutting knives stopped completely!
Swath depth is adjusted directly from two front wheels.
5 various positions of the swath depth can be adjusted separately for each wheel.
Pull out the lever (1) and move it forward or backward for both wheels according to the required swath depth. We recommend adjusting the position on the same level for both wheels.
Swath depth setup:
| Loosening Verticutting | ||
| Position 1 (from rear end) 10 mm 4 mm | ||
| Position 2 6.5 mm 0.5 mm | ||
| Position 3 3.0 mm -3.0 mm | ||
| Position 4 -0.5 mm -6.5 mm | ||
| Position 5 -4.0 mm -10 mm | ||
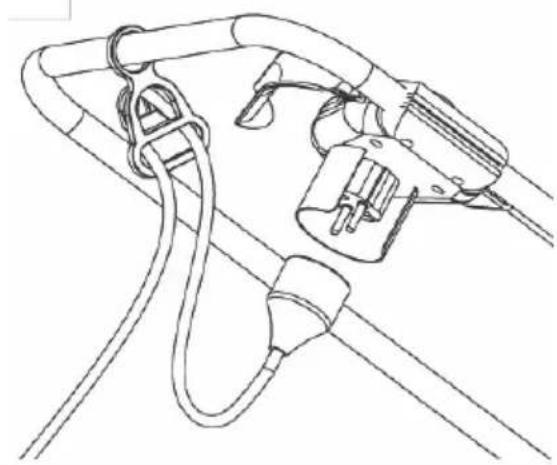
Connection to the electrical network (Fig. 3)
Connect the connecting cable of the equipment to the safety combined switch / connector and secure with the aid of the clamp. The power supply cable loop shall be sufficiently long in order to move the clamp from one side of the handle to the other side.
6. SWITCHING-ON
Main switch On/Off (Fig. 4)
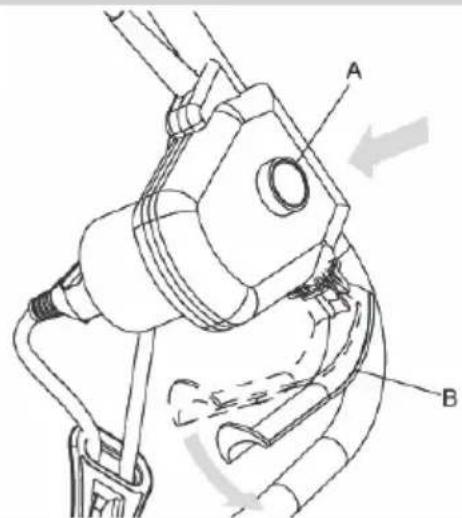
⚠ Warning! Do not start-up the verticutter while being in high grass or on the solid ground.
* Push the button A of the safety combined switch / connector and then draw the switch lever B towards the handle.
Hold the switch lever drawn while releasing the press on the safety switch button.
* You can stop the equipment by releasing the switch lever and it will return back to its home position automatically.
Protection against overheating
If the equipment was blocked by a foreign object or the engine was overloaded, the protective circuit is activated and the engine gets switched-off automatically. Wait until the engine cools down (about 15 minutes) and then start-up the equipment again.
⚠ Warning! If you did not release the switch lever, the equipment starts-up automatically after cooling down. Risk of accident!
7. VERTICUTTING
With a verticutter roll installed, the equipment can be used for removing small stones and mosses from the lawn as well as for skiving to lines. In order to maintain a healthy lawn in spring, area around grass roots needs to be aerated. We recommend scarifying the lawn twice a year, for example in spring and in autumn. In order to achieve good results and to extend the operating life of the roll with knives, trim the lawn with the help of a mower to a short height (less than 4 cm) before beginning the work.
Choose the swath depth with regard to the lawn condition and grass height.
Incline the verticutter slightly backward so that the front wheels do not touch ground.
Start-up the verticutter, the roll begins to rotate freely.
Move the equipment across the lawn at a suitable speed, if possible in direct lines.
Always push the verticutter forward at steady speed according to the surface type. A damage of the lawn can occur if you stopped on one place for a longer time or if you carried out verticutting on humid or too dry soil.
Be extremely careful when moving backward or when drawing the verticutter so that it cannot slip out.
Always keep high rotational speed of the cutting blades, thus you can enhance quality of the treatment significantly.
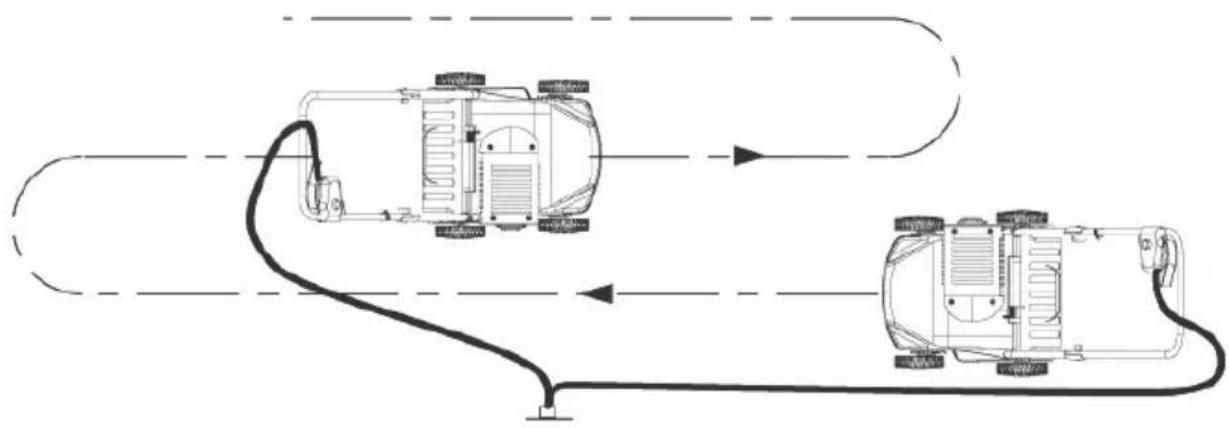
Do not run over the extension cable while working; make sure the cable is always in a safe position behind you (Fig. 5). Lead the extension cable in a safe position in the area which has been treated already.
Never use the verticutter on a too steep terrain. Be particular about your safety on a slope terrain – danger of slipping and injury. When changing the direction of cutting, always proceed crosswise, never in the perpendicular direction up or down.
If the collection box was full, empty it so that blades do not get stuck and the engine is not overloaded.
8. BLADES (Fig. 6)
Worn-out blades cause low performance and overload of the engine.
* Check the condition of the blades before each use. If needed, sharpen the blades or replace with new ones. Entrust specialists with sharpening and replacement of the blades.
The knives are designed as double-sided. Upturning the knife:
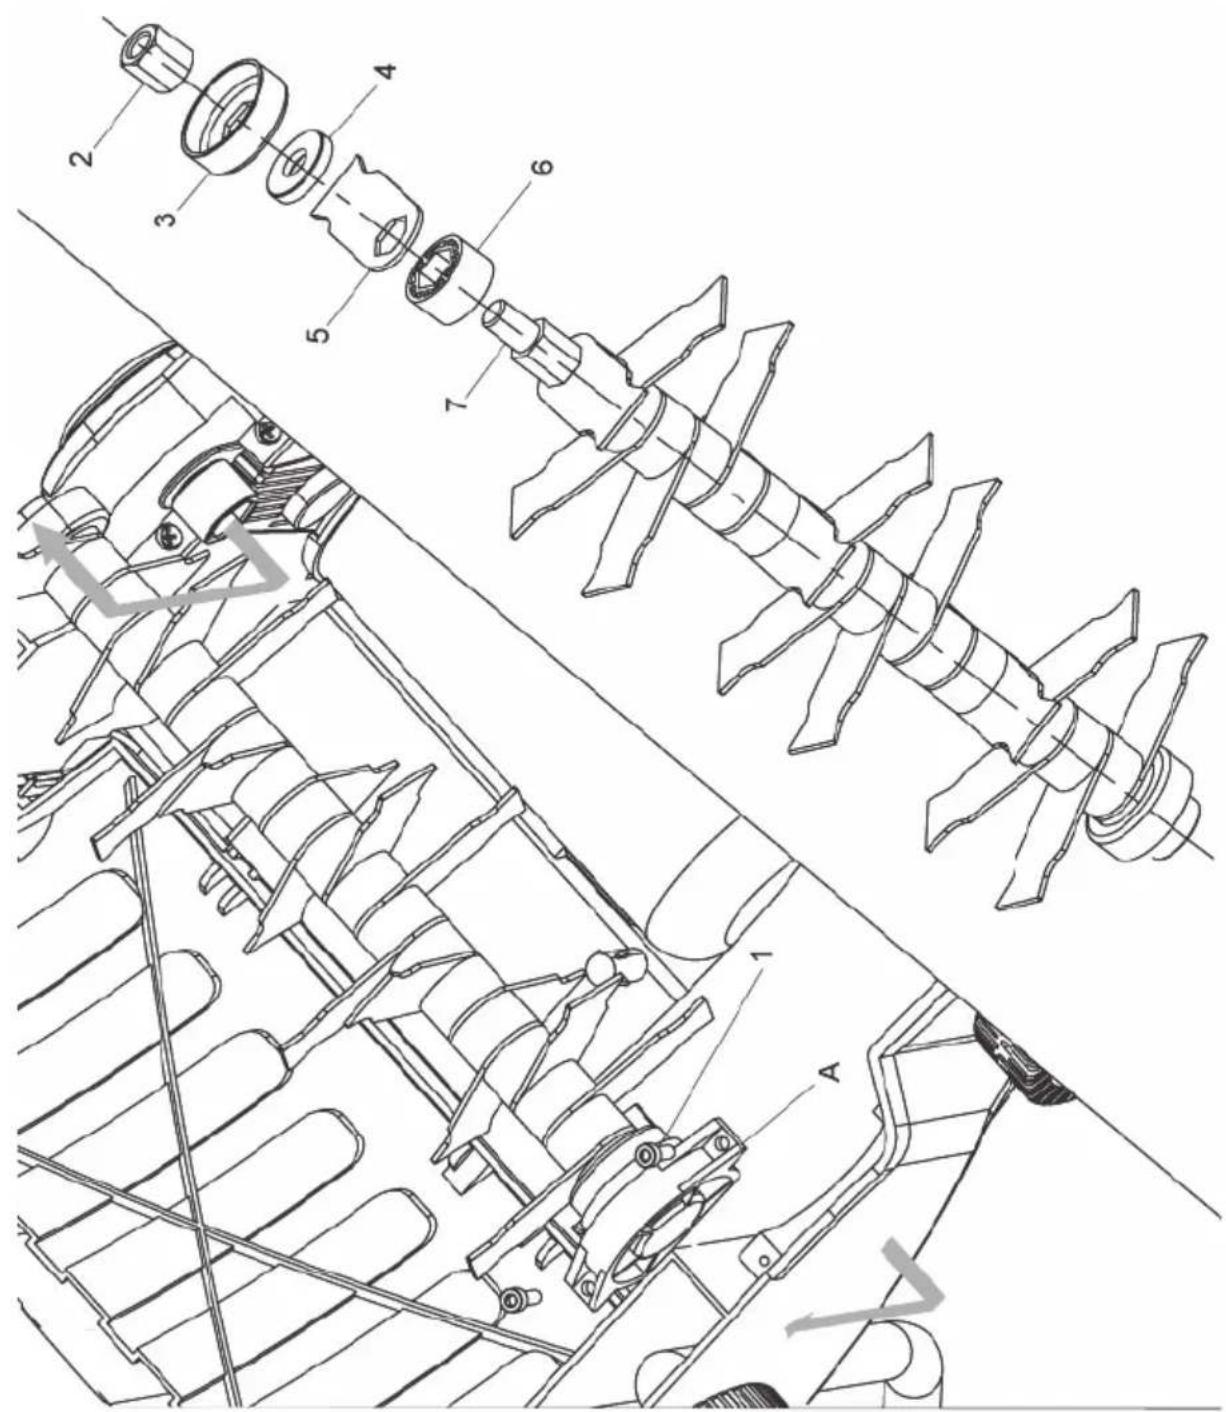
- Unscrew 2 screws (1) from the side of mounting of the bearing (A) on the bottom side of the cover by the delivered hexagonal wrench.
- Take the aeration roll out from the cover.
- Loosen the hexagonal nut (2) from the opposite side and pull-off the cap (3), flange (4), knife (5) and spacer rings (6) from the shaft (7) respectively.
- Turn the knife the other way round or use a new one and install everything back again in the given order.
- Tighten the nut and mount the roll to the equipment.
⚠ Warning! Disconnect the power supply cable and use protective gloves.
Collection and aeration (optional)
The verticutter can be used for removing grass and moss, as well as for cutting straight rootlets and aerating.
In order to maintain a healthy lawn in spring, area around grass roots needs to be aerated. We recommend carrying out lawn aeration every 4-6 weeks depending on the lawn condition.
In order to achieve the best result and the long operating life of the roll, we recommend mowing the lawn to height shorter than 4cm before you begin working with the verticutter.
The use of the verticutter
This machine enables a combination of aeration and loosening of your lawn.
Roll replacement (Fig. 7)
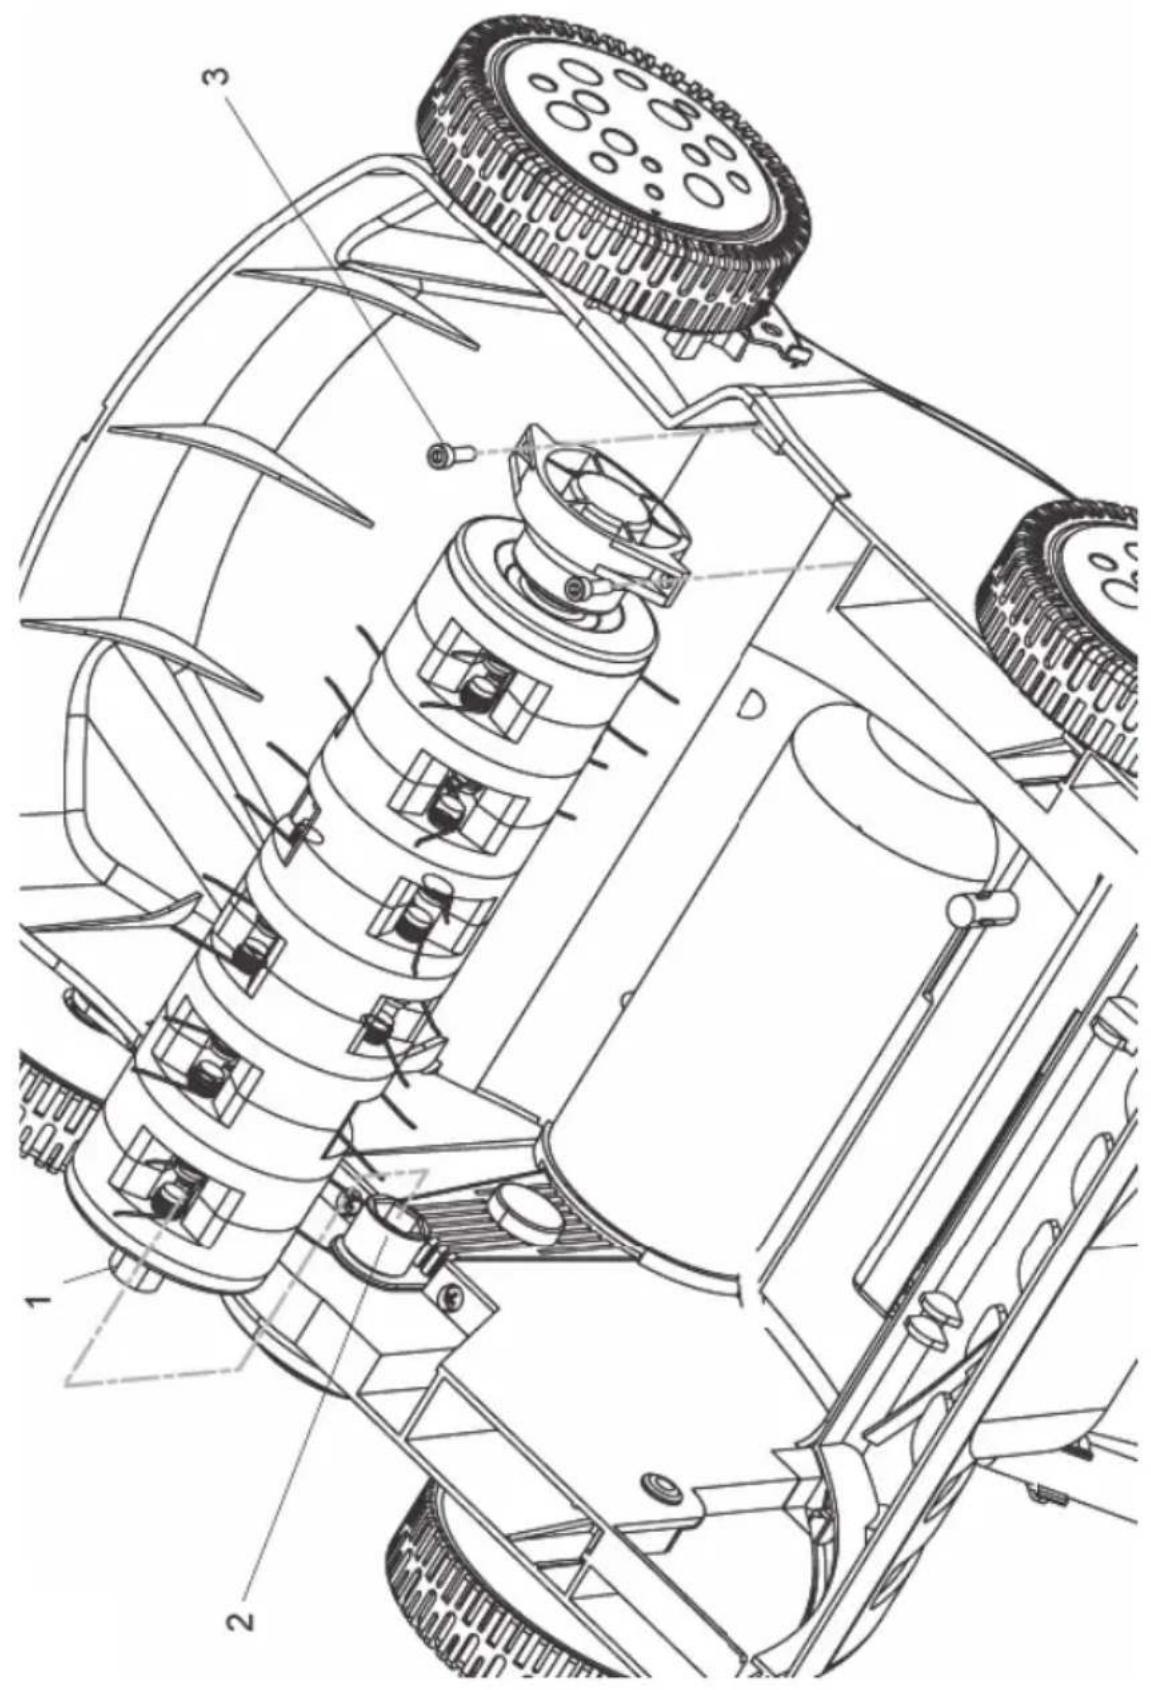
* Tighten the hexagonal nut (1) to the driven shaft (2).
Fasten the opposite side with the help of 2 bolts (3).
Transport
⚠ Warning! Always switch-off the engine before displacing the machine.
The verticutting roll and unit may be damaged even in a case you displace the verticutter with the engine switched-off and on the solid ground. Avoid the roll touching the solid ground by setting the working depth to the highest possible position.
Maintenance and storage
* Disconnect the power supply cable plug from the socket before carrying out any kind of maintenance.
Before each use of the equipment
* Check the connecting cable for any signs of damage or oldness. If the cable was cracked, cut-through or damaged in any other way, replace it.
* Check the condition of the roll, knives and make sure all threaded joints were tightened thoroughly.
If the blades were blunt, have them sharpened in a specialized service station.
Once a season
Lubricate the blades, joints between the roll and the drive shaft and spiral springs on the safety cover.
After the end of the grass mowing season, let the equipment checked, adjusted and in case of need repaired in an authorized service station.
9. CLEANING
⚠ Warning! Anytime when possible, clean the equipment immediately after the use. Neglecting regular cleaning and maintenance can result in a damage of the equipment or its malfunction.
⚠ Warning! Mind a risk of injury during maintenance and cleaning of the knives. Therefore use protective gloves!
Note: Anytime when possible, clean the equipment immediately after the use.
Take-of the collection box if used. Empty it and clean after each use.
* Always put the equipment aside on a solid surface and cog the wheels so that accidental starting cannot occur.
* Incline the equipment forwards.
Clean the bottom part of the cover around the blades and the safety cover with the help of a wooden scraper or a rough brush. Never rinse the aerator with water!
Put the equipment back onto all four wheels, clean the exhauster and remove grass or other dirt.
Storage
Store the garden verticutter in a dry and dust-free place out of the reach of children.
When storing for a longer time, for example in winter, make sure the equipment is protected against frost and corrosion.
At the end of the season or if not using for longer than one month:
- Clean the verticutter.
- Wipe all metal surfaces by a cloth saturated with oil so that they are protected against corrosion (anticorrosion oil) or spread fine oil film on them.
- Fold the handle down and store on an appropriate place.
- WHAT TO DO "IF..."
| When... Possible | cause Remedy | |
| Engine does not start | No current in the socket Check | power supply |
| Defective cable Check the | cable, plug, replace or let it repaired by a skilled person if needed | |
| Defective safety combined switch /connector | Let it repaired in an authorized service station | |
| Protection against overheating activated | 1. Too deep swath, adjust a shorter swath depth | |
| 2. Roll blocked, remove the obstacle | ||
| 3. Grass too high, trim the lawn before beginning the work | ||
| Before going on working, wait about 15 min till the engine cools down | ||
| Unusual noise Roll got | stuck Switch-off the equipment and | wait till the roll gets stopped completely Remove the obstacle |
| Toothed belt slips Let it repaired in an authorized service station | ||
| Loose bolts, nuts or other connecting elements | Tighten all parts, if the noise persists, contact an authorized service station | |
| Strong vibrations, noise | Cutting blades damaged or worn-out | Replace the roll for a new one or let it checked in an authorized service station |
| Too deep swath Adjust the | proper swath depth | |
| Grass too high Trim the lawn before aeration | ||
| Insufficient verticutting | Low swath depth Adjust the | proper swath depth |
| Worn-out blades Replace the roll for a new one or let it checked in an authorized service station | ||
| Exhausting channel blocked | Empty the collection box and remove obstacles | |
11. TECHNICAL DATA
Rated voltage 230V\~50Hz
Nominal output 1300 W
Idle run speed 2500 min ^-1
Maximal swath width 320 mm
Swath depth.... Verticutting: -10 up to 4 mm, 5 positions by 3.5 mm .... Loosening: -4 up to 10 mm, 5 positions by 3.5 mm
Collection box capacity 35 L
Acoustic pressure LPA 78 dB(A)
Acoustic output LWA 97 dB(A)
Vibrations 2.5 m/s ^-2
Protection pursuant to EN 60335-1
12. DECLARATION OF CONFORMITY
EC Declaration of Conformity
We hereby declare under our sole responsibility that the product described in the paragraph "Technical data" conforms to the following standards or normative documents:
EN en 60335-1:2002+A1+A11+A12+A2+A13, EN 60335-2-92:2005, EN 62233, EN 55014-1:2006+A1, EN 55014-2:19997+A1A+A2, EN 61000-3-2:2006+A1+A2, EN 61000-3-11:2000, EN 13684 pursuant to provisions of directives 2002/95/EC, 2004/108/ES, 2006/42/ES, 2000/14/ES.
2000/14/ES: guaranteed acoustic output level Conformity assessment method pursuant to the Amendment V. Product category: 50 Technical documentation available at:
Put the used packaging material to the place designated for waste disposal by a municipality.
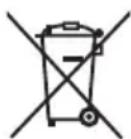
The machine and its accessories are made of various materials, e.g. of metal and plastics. Hand-over damaged components to sorted waste. Get yourselves informed at a respective authority.

This product meets all fundamental requirements of EU directives relating to it.
Changes of the text, design and technical specifications can be done without prior notice and we reserve the right for the changes.
Vertikulátor NÁVOD K OBSLUZE
natural_image
Warning symbol with exclamation mark above an open book below (no text or symbols present)natural_image
Three grayscale icons representing safety and work-related symbols: a helmet, an icon with arrows, and an open book with wrenches (no text or labels)5. MONTÁŽ STROJE (Obr. 1)
2006/42/ES, 2000/14/ES.
natural_image
Warning symbol with exclamation mark above an open book below (no text or symbols present)natural_image
Icon of a person wearing headphones inside a circle (no text or symbols)5. MONTÁŽ STROJA (Obr. 1)
Vodiace držadlo (Obr. 1, A, B, C)
natural_image
Icon of a person wearing headphones inside a circle (no text or symbols)natural_image
Pure electrical circuit symbols and open book icons without any text or labelsnatural_image
Warning symbol and open book icon (no text or symbols present)natural_image
Warning symbol depicting a hand holding a tool inside a triangle (no text or numbers)natural_image
Icon of a person wearing headphones and mask inside a circular frame (no text or symbols)natural_image
Pure electrical circuit symbols and open book illustration without any text or labelsnatural_image
Warning symbol with exclamation mark above an open book below (no text or symbols present)natural_image
Icon of a person wearing headphones inside a circle (no text or symbols)natural_image
Pure electrical circuit symbols and diagrams without any text or labelsnatural_image
Exterior view of a lawn mower with black handle and gray body (no text or symbols visible)
FIELDMANN®
Home & Garden Performance

- FIELDMANN®
- Verticutter
- OPERATION MANUAL
- TABLE OF CONTENTS
- GENERAL SAFETY INSTRUCTIONS
- Important safety warnings
- Packaging
- Instructions for use
- EXPLANATION FOR INSTRUCTION PLATES ON THE MACHINE
- MACHINE DESCRIPTION AND DELIVERY CONTENT
- Machine description (see Fig.1)
- SAFETY INSTRUCTIONS
- Before the use
- Proper use
- Electrical safety
- Purpose of the use
- MACHINE ASSEMBLY (Fig. 1)
- Guiding handle (Fig. 1, A, B, C)
- Safety switch (Fig. 1, D)
- Collection box (Fig. 1, E)
- Setup of working depth of the swath (Fig. 2)
- Connection to the electrical network (Fig. 3)
- SWITCHING-ON
- Main switch On/Off (Fig. 4)
- Protection against overheating
- VERTICUTTING
- BLADES (Fig. 6)
- Collection and aeration (optional)
- The use of the verticutter
- Roll replacement (Fig. 7)
- Transport
- Maintenance and storage
- Before each use of the equipment
- Once a season
- CLEANING
- Storage
- TECHNICAL DATA
- DECLARATION OF CONFORMITY
- EC Declaration of Conformity
- Vertikulátor NÁVOD K OBSLUZE
- MONTÁŽ STROJE (Obr. 1)
- MONTÁŽ STROJA (Obr. 1)
- Vodiace držadlo (Obr. 1, A, B, C)
Brand : Fieldmann
Model : FZV 2001-E
Category : Lawn mower