
BTS-650 - Loudspeaker DENVER - Free user manual and instructions
Find the device manual for free BTS-650 DENVER in PDF.


| Product Type | Soundbar Speaker |
| Model | BTS-650 |
| Brand | Denver |
| Power Source | DC 18V, 2.5A via AC/DC adapter |
| Remote Control Battery | CR2025 (included) |
| Power Consumption | < 50W |
| Audio Power (Total) | 65W (Woofer 40W + Left 12.5W + Right 12.5W) |
| Woofer Impedance | 4 Ohm / 50W |
| Left/Right Speaker Impedance | 8 Ohm / 30W |
| Inputs | USB, Line In (3.5mm), Bluetooth |
| Bluetooth Range | Approx. 10 meters (typical) |
| Wall Mountable | Yes (dry wall & wooden wall) |
| Cleaning | Dry cloth only, unplug before cleaning |
| Safety | Do not open, refer servicing, keep away from water and heat |
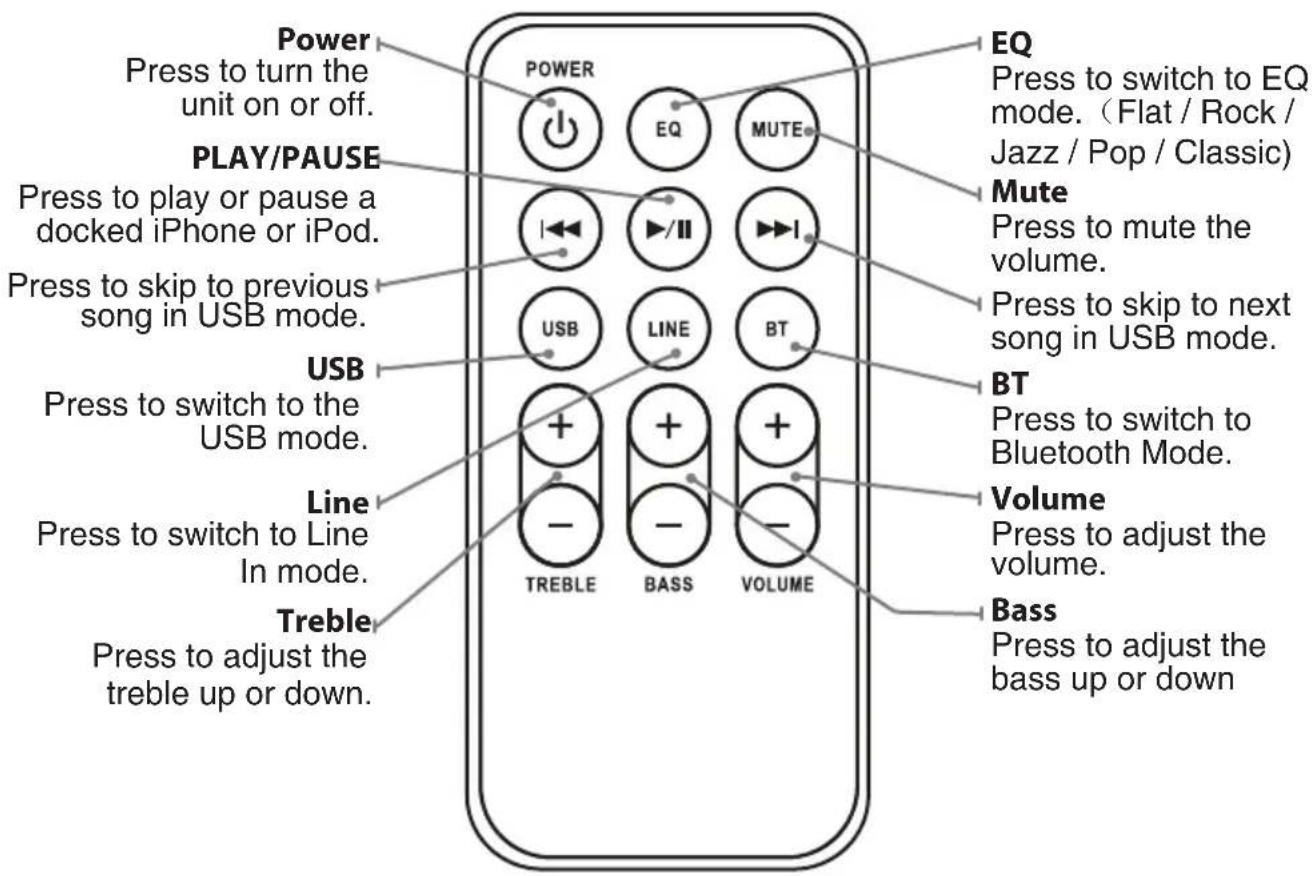
| Controls | Power, Volume +/-, USB, Line, BT, EQ, Treble, Bass, Mute (on remote) |
| LED Indicators | Power off (red), USB (green), Line In (orange), Bluetooth ready (flashing blue), connected (blue) |
| Included Accessories | AC/DC adapter, remote control, wall mount guide, EVA spacers, screws, plastic tubes, Line In cable |
Frequently Asked Questions - BTS-650 DENVER
User questions about BTS-650 DENVER
0 question about this device. Answer the ones you know or ask your own.
Ask a new question about this device
Download the instructions for your Loudspeaker in PDF format for free! Find your manual BTS-650 - DENVER and take your electronic device back in hand. On this page are published all the documents necessary for the use of your device. BTS-650 by DENVER.
USER MANUAL BTS-650 DENVER
natural_image
Line drawing of a flat-screen monitor with front panel and control panel (no text or symbols)PLEASE READ BEFORE OPERATING THIS EQUIPMENT. INSTRUCTION MANUAL
www.facebook.com/denverelectronics
This product was designed and manufactured to meet strict quality and safety standards. There are, however, some operation precautions that you should be aware of:
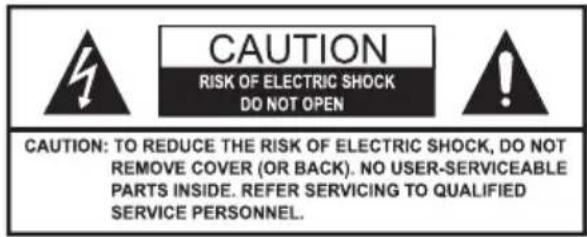
- Read all warnings. Follow all instructions.
- Check the mains voltage stated on the mains adaptor rating plate corresponds to the local electricity supply, if it doesn't, return the product to the store where you bought it.
- Unwind and straighten the adaptor cord before use.
- Place the product on a firm and level surface. Allow space around the product to ensure enough ventilation.
- Clean only with a dry cloth, unplug the outlet before cleaning. Do not use aggressive cleaners as these will damage the surface.
- To completely disconnect this product from the mains, disconnect the plug from the wall socket outlet. The mains plug is used to completely interrupt the power supply to the unit and must be easily operable by the user.
- Remove the adaptor from the outlet, when the product is unused for a long period of time and during thunder storms.
- Only use attachments/accessories specified by the manufacturers.
- Do not locate the appliance or the batteries in the vicinity of a heat source or in direct sunlight. Do not place a naked flame source on or near this product.
Warnings
- Do not attempt to open the cabinet or remove any covers. If the power adapter or its lead becomes damaged, it must be replaced with an adapter of the same type and rating.
- Repairs must only be performed by the manufacturer or its service agent or similarly qualified person.
- Do not immerse the main unit, the power adapter or any accessories in water or any other liquid.
- Do not expose this product to dripping or splashing or stand any vessel containing liquid on or near this product.
- Replace batteries with the same or equivalent type.
- Do not cover the product or this will impede ventilation.
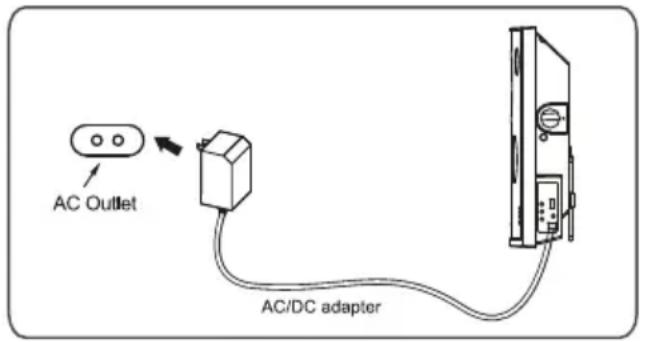
POWER SOURCE
Insert the small plug from the supplied AC/DC adapter to the DC in jack on the unit. Insert the AC/DC adapter to DC in jack on the unit.
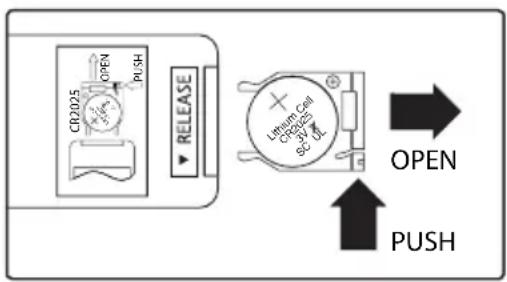
BATTERIES INSTALLATION (REMOTE CONTROL)
To replace the button cell:
- Push the tab, then slide out the battery tray as the figure on the right.
- Replace the old button cell by a new CR 2025 button cell as the polarity markings on the remote control.
- Close the battery tray.
BATTERY PRECAUTIONS:
Follow these the size and type of battery specified.
- Use only the size and type of battery specified.
- Be sure the follow the correct polarity when installing the battery as indicated in the battery compartment. A reversed battery may cause damage to the device.
- If the battery in the device is consumed or the device is not to be used for a long period of time, remove the batteries to prevent damage or injury from possible battery leakage.
- Do not try to recharge the battery not intended to be recharged; it can overheat and rupture.
- The batteries shall not be exposed to excessive heat such as sunshine, fire or the like.
- Clean the battery contacts and also those of the device prior the battery installation.
- Do not mix different types of batteries together (e.g. Alkaline and Carbon-zine) or old batteries with fresh ones.
LED INDICATORS
| Status | Indicator |
| Power Off | Red Light |
| USB Mode | Green Light |
| Line In Mode | Orange Light |
| Status | Indicator |
| Bluetooth Ready | Flashing Blue Light |
| Bluetooth Connected | Blue Light |
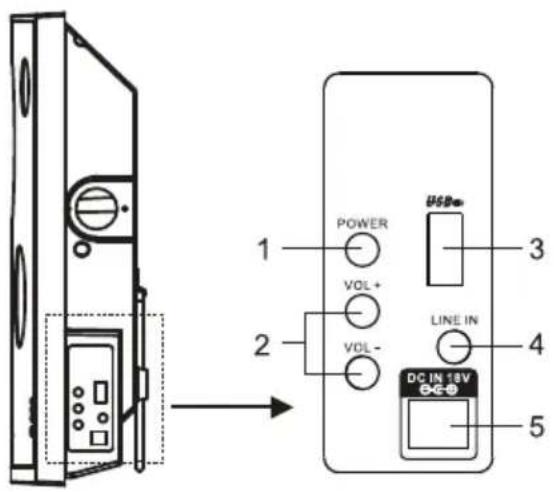
- Power button
- Volume + /volume - button
- USB/MP3: input connecting port
- Line in input
- DC jack in
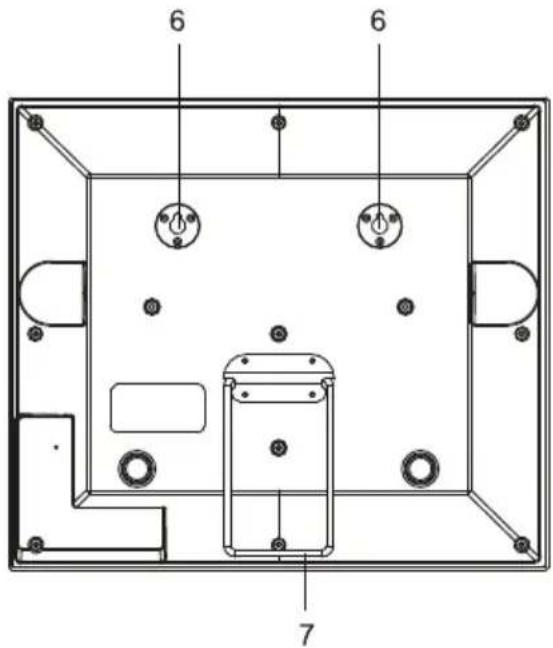
- Wall mounting position
- Desk - top placement
LISTENING FROM LINE IN JACKS:
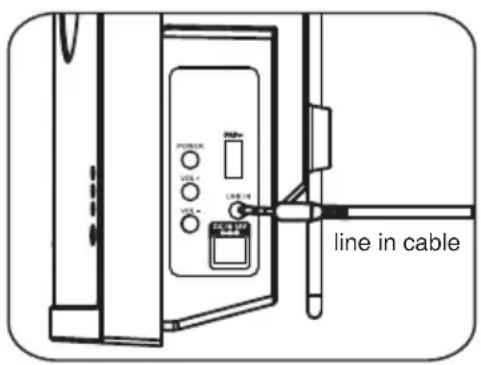
- Connect the Headphone/Earphone; Line out jacks from the external audio player such like MP3 player; Discman ... etc) to the LINE IN jacks on the size of Speaker by the supplied Line In connection cable as the figure.
- Connect the Sound Bar to the power as previous procedures.
- Press the POWER button on the Speaker or Remote Control to power on the Speaker.
- Press the LINE button on the Remote Control to turn to LINE mode.
- Power on the connected external player and start playback as usual.
BT PAIRING AND PLAYBACK:
- Power on the Sound Bar as previous procedures.
- Press the BT (Bluetooth) button on the Remote Control to turn to BT mode.
- Turn on the BT function in the external BT player and wait a few seconds until the external BT player and the speaker were paired. Please be sure the distance between both devices within I metter when pairing. Play the music in the external BT Player as usual.
NOTES:
In first time use, connect the external BT Player as below:
- Turn the Sound Bar to BT mode as previous procedures, the BT indicator will turn on and blink.
- Power on the external BT player and enter to BT searching mode. Start pairing as the screen instructions on the external BT Player (For details pairing procedures, please refer to the user's manual of your BT player.).
- When the external BT player searched the Sound Bar, our model number "BTS-650" will appear on the display of external BT player.
- Pairing code "0000" may need to enter.
Mounting on the dry wall / wooden wall
1. Mounting on the dry wall
1.1 To determine the screw hole position, please stick attached "wall mounted guide" in parallel to the wooden wall where you need to hand the speaker.
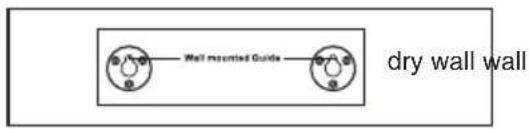
1.2 Drill the holes on "wall mounted guide" "+" place with diameter of 8 mm by a powerful electric drill.
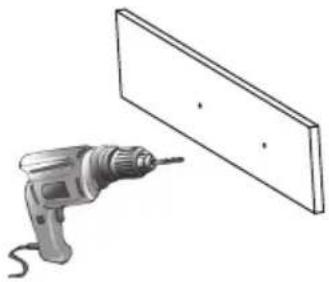
natural_image
Illustration of a power drill and a flatboard with three dots (no text or symbols)1.3 Stick EVA spacers separately on the screw holes.
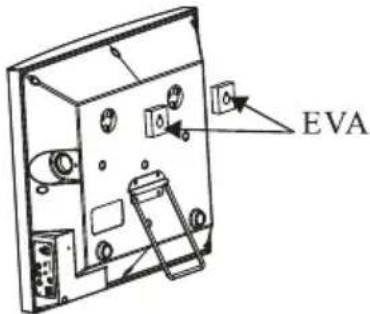
1.4 Use a hammer separately nailing 2 plastic tubes into the holes.
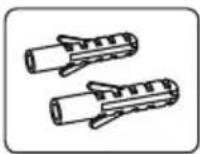
1.5 Fix the screws into the plastic tubes, then the sound bar can be hung on the wall.
2. Mounting on the wooden wall
2.1 To determine the screw hole position, please stick attached "wall mounted guide" in parallel to the wooden wall where you need to hand the speaker.
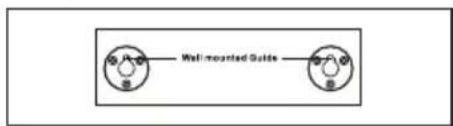
2.2 Fix the screws on the "wall mounted guide" "+" place.
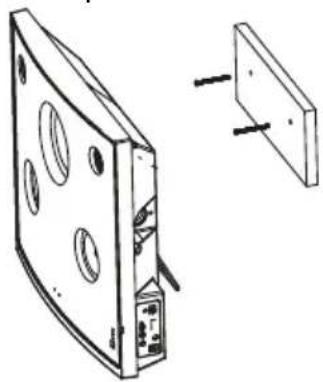
natural_image
Technical line drawing of a device with circular components and a separate view showing a rectangular block (no text or symbols)2.3 Stick EVA spacers separately on the screw holes.
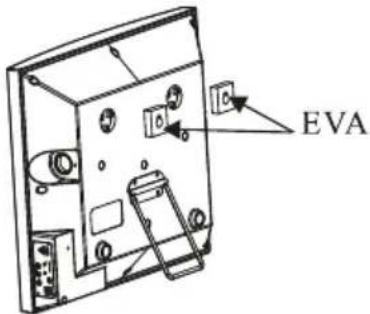
2.4 Hand the sound bar on the wall.
| Problem What to do | |
| No power Check the connection of the AC/DC adapter between the speaker and wall outlet. | |
| No sound | Check that the volume control is NOT at minimum |
| Check that it is NOT set to mute. | |
| The remote control won't work | Inspect or replace the battery. |
| Make sure there are no obstacles obscuring the front of the Speaker. | |
| No sound from in BT mode | Check if you have pairing or not. It needs to pair the external BT player and the speaker with password "0000" before 1st time listening. |
GENERAL SPECIFICATIONS
Power Source :....DC-18V 2.5A,
Power Source of Remote Control: DC = 3V, 1X CR 2025 battery (Included)
Power Consumption: ....../<50W
Audio Power :
Woofer 40W
Left Channel 12.5W
Right Channel....12.5W
Impedance of Speakers :
Woofer 4 Ohm,50W
Left Channel 8 Ohm,30W
Right Channel.... 8 Ohm,30W
ALL RIGHTS RESERVED COPYRIGHT DENVER ELECTRONICS A/S
DENVER®
www.denver-electronics.com

Electric and electronic equipment and included batteries contains materials, components and substances that can be hazardous to your health and the environment, if the waste material (discarded electric and electronic equipment and batteries) is not handled correctly.
Electric and electronic equipment and batteries is marked with the crossed out trash can symbol, seen below. This symbol signifies that electric and electronic equipment and batteries should not be disposed of with other household waste, but should be disposed of separately.
As the end user it is important that you submit your used batteries to the appropriate and designated facility. In this manner you make sure that the batteries are recycled in accordance with legislature and will not harm the environment.
All cities have established collection points, where electric and electronic equipment and batteries can either be submitted free of charge at recycling stations and other collection sites, or be collected from the households. Additional information is available at the technical department of your city.
Hereby, Inter Sales A/S, declares that this product (BTS-650) is in compliance with the essential requirements and other relevant provisions of Directive 1999/5/EC. A copy of the Declaration of conformity may be obtained at:
Inter Sales A/S
Stavneagervej 22,
DK-8250 Egaa
Denmark
www.facebook.com/denverelectronics



- PLEASE READ BEFORE OPERATING THIS EQUIPMENT. INSTRUCTION MANUAL
- Warnings
- POWER SOURCE
- BATTERIES INSTALLATION (REMOTE CONTROL)
- BATTERY PRECAUTIONS:
- LED INDICATORS
- LISTENING FROM LINE IN JACKS:
- BT PAIRING AND PLAYBACK:
- NOTES:
- Mounting on the dry wall / wooden wall
- Mounting on the dry wall
- Mounting on the wooden wall
- GENERAL SPECIFICATIONS
- ALL RIGHTS RESERVED COPYRIGHT DENVER ELECTRONICS A/S
- DENVER®
Brand : DENVER
Model : BTS-650
Category : Loudspeaker