
Grand Tour LX - Stroller MACLAREN - Free user manual and instructions
Find the device manual for free Grand Tour LX MACLAREN in PDF.


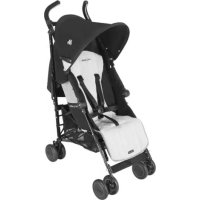
| Product Type | Luxury Transport System (Stroller) |
| Brand | Maclaren |
| Model | Grand Tour LX |
| Suitable Age | From birth (with carry cot) to approx. 15 kg (33 lb) |
| Weight Capacity (Seat) | Up to 15 kg (33 lb) |
| Weight Capacity (Carry Cot) | Up to 9 kg (19.8 lb) |
| Seat Orientation | Forward-facing or rearward-facing |
| Recline Positions | 3 positions |
| Harness Type | 5-point harness with adjustable shoulder and waist straps |
| Soft Carry Cot Compatibility | Compatible with Convertible Seat and Tour Lite Seat |
| Fold Mechanism | Two-handle folding with secondary lock and Strollometer® |
| Brake | Foot-operated brake |
| Hood | Attachable hood |
| Bumper Bar | Removable bumper bar |
| Fabric Care | Spot clean with damp cloth; do not machine wash |
| Weight (Approx.) | 9 kg (19.8 lb) |
| Dimensions (Unfolded, Approx.) | 100 x 50 x 75 cm |
| Dimensions (Folded, Approx.) | 80 x 30 x 30 cm |
| Safety Features | Locking devices, brake, 5-point harness, crotch strap |
| Recycling | Maclaren encourages recycling; drop-off locations in USA and UK |
Frequently Asked Questions - Grand Tour LX MACLAREN
User questions about Grand Tour LX MACLAREN
0 question about this device. Answer the ones you know or ask your own.
Ask a new question about this device
Download the instructions for your Stroller in PDF format for free! Find your manual Grand Tour LX - MACLAREN and take your electronic device back in hand. On this page are published all the documents necessary for the use of your device. Grand Tour LX by MACLAREN.
USER MANUAL Grand Tour LX MACLAREN
quick start
Guide to get you up and running straight out of the box
GRAND TOUR™ LX
LUXURY TRANSPORT SYSTEM

MACLAREN
maclarenbaby.com
Maclaren is committed to safeguarding the environment by adhering to the principles of: reduce, reuse and recycle.
Maclaren encourages consumers to recycle their old Maclaren buggys. Maclaren buggys can be dropped off, or shipped at owner's expense, to any of Maclaren's recycling locations below.
Maclaren EUROPE LIMITED
Station Works, Long Buckby Northamptonshire NN6 7PF United Kingdom
T+44(0)1327841300
F +44 (0) 1327 842208
Maclaren FRANCE SAS
Paris Nord 2 - BP 55410
Outlet and Service Centre
25 Van Zant Street Unit 13A
Norwalk, CT 06855
U S A
T+1 877 442 4622
F+1 877 504 8813
Maclaren USA INC
Authorised Repair Centre
150 Wooster Street
New York, NY 10012
U S A
T+1 212 677 2700
F+1 212 677 6767

The words MACLAREN and GRAND TOUR ™ LX and associated logos are trade marks. All rights reserved. © MACLAREN 2009
* Velcro® is a trademark of its respective owner.
MS07959/4 0209 USA
It is important that the full instruction leaflet be read and understood. It contains vital warnings for the safety of your child.
1 TO OPEN THE PRODUCT
IMPORTANT Ensure that all locking devices are engaged before use.

2 TO ATTACH THE SEAT
This seat must only be used with the GTLX chassis and is suitable for use when your child can sit up unaided.
IMPORTANT Check that the seat unit attachment devices are correctly engaged before using the GTLX. To test, pull up on the seat once you have installed it — see arrow 2B.
NOTE The seat may be fitted in either the forward facing or rearward facing position.


3 TO ATTACH THE HOOD


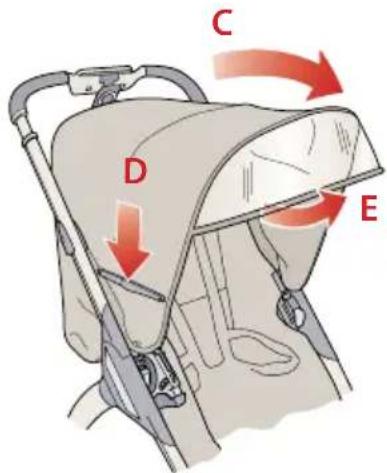
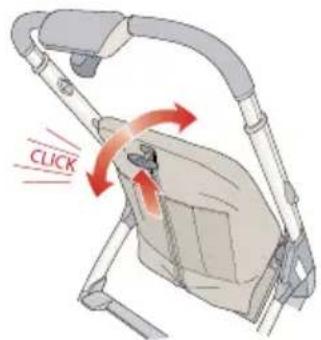
4 TO RECLINE THE CONVERTIBLE SEAT AND TOUR LITE SEAT
Lift lever and adjust to desired position - 3 recline positions are available.
Check for security before use.
IMPORTANT Apply the brake when putting your child into or taking your child out of the stroller and never leave the stroller unattended without applying the brake. Always check to ensure brake is applied.

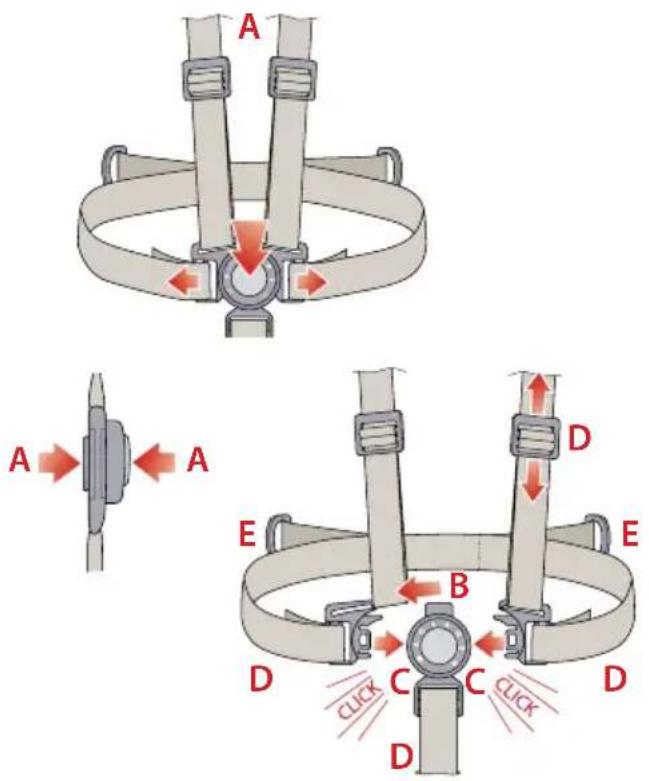
6TO OPERATE THE HARNESS
A To release the harness press BOTH the front and back of the buckle simultaneously.
B To fit the harness – Place the shoulder straps over the child's shoulders and slide onto the waist clips if not already attached.
C Insert both waist clips into the clasp, shoulder straps are secured once the clips are fastened.
D Adjust strap lengths. Belt and harness should be snug. Re-adjust to suit the recline position if necessary.
E 'D' rings are included for an additional harness, if desired.

WARNING:
Avoid serious injury from falling or sliding out. Always use the crotch strap in combination with the waist and shoulder straps.
7TO FIT THE SOFT CARRY COT — CONVERTIBLE SEAT
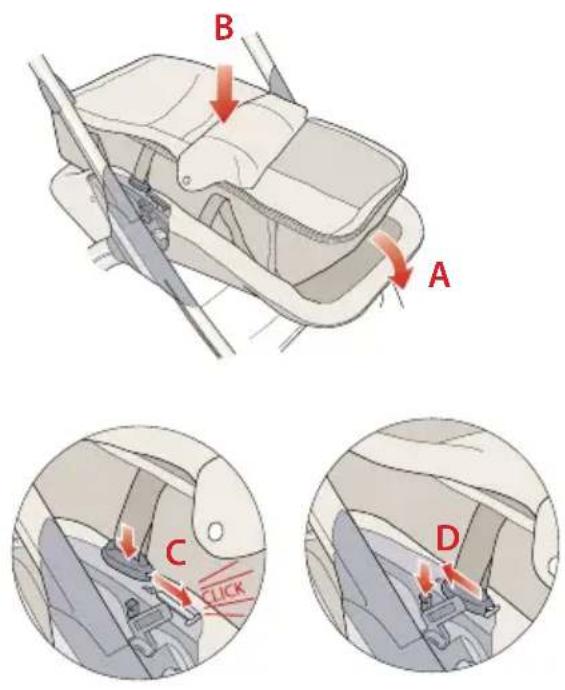
This Soft Carry Cot must only be used with the GTLX chassis and is suitable for a newborn baby.
A Ensure the seat is in the rear facing, fully reclined position and the bumper bar or covers are removed.
B Lay the Soft Carry Cot into the seat with the head at the top of the seat ensuring the carry straps are also laid into the seat and are not accessible to the child.
C Before placing your child in the Soft Carry Cot: attach the two mouldings on the straps of the Soft Carry Cot to the bumper bar fixings on the side of the Convertible seat by sliding the fitting on to the track until they "CLICK" into position.
IMPORTANT Check that the Soft Carry cot attachment devices are correctly engaged before use.
D To remove the Soft Carry Cot, unclip the fixings by depressing the catches on the side of the seat adjacent to the fixings and slide until clear of the track. The Soft Carry Cot may be removed clear of the product using the carry handles provided.
ASSEMBLY OF THE SOFT CARRY COT
Unfasten Velcro ® seam closures of end and side pockets.
Slide the inserts into the pockets – noting the size and shape of each one.
Close the Velcro ® seam closures.

8TO FIT THE SOFT CARRY COT — TOUR LITE SEAT
This Soft Carry Cot must only be used with the GTLX chassis and is suitable for a newborn baby.
A Ensure the seat is in the rear facing, fully reclined position and the bumper bar is removed.
B Slide the adaptors on to the hood insert of the seat ensuring that the locking lever of each adaptor is on the inside of the stroller.
c Lock the adaptors on to the hood insert of the seat using the locking levers.
D Lay the Soft Carry Cot onto the seat with the head at the top of the seat ensuring the carry straps are also laid into the seat and are not accessible to the child.
Before placing your child in the cot, attach the two mouldings on the straps of the Soft Carry Cot to the fixings on the top of the adaptors by depressing the button and sliding the fitting on to the track until they "CLICK" into position.
IMPORTANT Check that the Soft Carry Cot attachment devices are correctly engaged before use.
F The hood may be used with the Soft Carry Cot using the hood fixing insert on the adaptor.
G To remove the Soft Carry Cot, unclip the fixings by depressing the catches on the side of the seat adaptors adjacent to the fixings and slide until clear of the track. The Soft Carry Cot may be removed clear of the product using the carry handles provided.
H To remove the adaptors unlock the adaptors, raise the catch shown and pull the adaptor from the seat hood fixing insert.
IMPORTANT Read and heed the instructions at the start of the main GTLX Instruction manual.
WARNING The Soft Carry Cot is suitable only for a child who cannot sit up unaided, roll over and cannot push itself up on its hands and knees. Maximum weight of child: 9kg / 19.8lb The Soft Carry Cot must never be used to transport your child in a car. It is not designed as an infant car seat. Ensure that carry straps are not accessible to the child. Failure to follow these warnings and the warnings contained in the owner's manual could result in the serious injury or death of your child. See complete warnings and instructions in the owner's manual.

9TO FOLD THE TRANSPORT SYSTEM
The product may be folded with all items attached however to achieve the best fold without removing the seat, turn the seat to face forward and place it in the most upright position.
Do not seat a child in the product when it is being folded.
A Ensure the Strollometer® is folded behind the instrument compartment.
B 1) Pull back on the slider on the left side of the frame – this will latch into position.
NOTE Once latched the stroller needs to be folded in order to reset the latch – do not operate the LEFT HAND slider without completing the folding operation.
2) Pull back on the slider on the right hand side of the frame.
3) Simultaneously push down with the foot on either of the upper rear bar paddles to release the secondary lock.
c Fold the stroller by pushing down on the handle bar until the uplock "CLICKS" into position.

10TO REMOVE THE SEAT
For the most compact folded package remove the seat from the chassis.
A Press the main seat release button in on the right hand side of the frame – looking from the front – this button will latch in the open position until the seat is replaced.
B Press the small button on the top of the seat release button on the left hand seat attachment whilst pushing the main button in.
C Whilst maintaining this pressure on the unlatched button, raise the seat clear.

- QUICK START
- MACLAREN
- MACLARENBABY.COM
- 1 TO OPEN THE PRODUCT
- 2 TO ATTACH THE SEAT
- 3 TO ATTACH THE HOOD
- 4 TO RECLINE THE CONVERTIBLE SEAT AND TOUR LITE SEAT
- 6TO OPERATE THE HARNESS
- WARNING
- 7TO FIT THE SOFT CARRY COT — CONVERTIBLE SEAT
- ASSEMBLY OF THE SOFT CARRY COT
- 8TO FIT THE SOFT CARRY COT — TOUR LITE SEAT
- 9TO FOLD THE TRANSPORT SYSTEM
- 10TO REMOVE THE SEAT
Brand : MACLAREN
Model : Grand Tour LX
Category : Stroller