
V-LED10 - Projector Krüger&Matz - Free user manual and instructions
Find the device manual for free V-LED10 Krüger&Matz in PDF.


| Product Type | Video Projector |
| Brand | Krüger&Matz |
| Model | V-LED10 |
| Display Technology | LCD |
| Light Source | LED |
| Native Resolution | 1920 x 1080 pixels (Full HD) |
| Brightness | 150 ANSI Lumens |
| Contrast Ratio | 2000:1 |
| Projection Size | 30 - 100 inches |
| Throw Ratio | 1.4:1 |
| Keystone Correction | ±15° (manual) |
| Focus | Manual |
| Lamp Life | Up to 30,000 hours |
| Inputs | HDMI, USB 2.0, AV, 3.5mm Audio |
| Output | Headphone (3.5mm) |
| Built-in Speaker | 1 x 2W |
| Power Supply | DC 12V / 2A |
| Power Consumption | 24W |
| Dimensions (W x D x H) | 195 x 150 x 50 mm |
| Weight | 0.8 kg |
| Operating Temperature | 0°C - 35°C |
| Cleaning | Use a soft dry cloth; lens cleaning with lens tissue |
| Safety | Avoid looking directly into the lens; keep away from water |
| Repairability | LED lamp is user-replaceable; other repairs by authorized service |
Frequently Asked Questions - V-LED10 Krüger&Matz
User questions about V-LED10 Krüger&Matz
0 question about this device. Answer the ones you know or ask your own.
Ask a new question about this device
Download the instructions for your Projector in PDF format for free! Find your manual V-LED10 - Krüger&Matz and take your electronic device back in hand. On this page are published all the documents necessary for the use of your device. V-LED10 by Krüger&Matz.
USER MANUAL V-LED10 Krüger&Matz

BEDIENFELD

FRONTANSICHT
- Linsen
- IR Empfänger
SEITLICHE ANSICHTEN
Trapezkorrektur
natural_image
Line drawing of a computer setup with an external monitor, power switch, and laptop (no text or symbols)d. AV Verbindung

natural_image
Line drawing of a portable electronic device connected to an audio player and headphones (no text or symbols present)natural_image
Line drawing of a projector connected to a laptop and a tower (no text or symbols)Vorne Rückseite

Read the instruction manual carefully before first use and keep it for future reference. Producer does not claim liability for any damage caused by inappropriate use and handling or any mechanical damage. Inappropriate use and handling will result in damage and shortening of the device's lifespan.


The lightning flash with arrowhead symbol, within an equilateral triangle is intended to alert the user the presence of uninsulated, dangerous voltage, within the product enclosure that may be of sufficient magnitude to constitute risk of electric shock to persons.

The exclamation point within an equilateral triangle is intended to alert the user the presence of important operation and maintenance (servicing) instructions in the literature accompanying the appliance.
- Before connecting the device to power supply socket, make sure the voltage indicated on the appliance corresponds to the voltage in the power supply socket.
- Disconnect this device from power supply if it is not going to be used for a long period of time.
- Do not look into the lens of the device during operation.
- Make sure to place this product on flat, dry and stable surface. The device needs to be properly and securely installed and mounted. Follow the instructions to prevent any possible damage/injury.
- Place the device in a properly ventilated place! DO NOT cover nor block the ventilation outlets! Insufficient air circulation or using in dusty environment will cause overheat of the projector's lamp and damage the device! Do not put anything in openings in the housing.
- Keep minimum distances (at least 15 cm) around the product for sufficient ventilation.
- Protect the device from dust, heat sources, direct sunlight and extreme temperatures. Do not use the device nearby open flames such as candles. Do not use/store the device in places with strong magnetic field. Protect power cord from sharp edges and other factors which could lead to their damage.
- Lens cover should be on when the device is not in use.
- DO NOT expose this appliance to humidity, water or any other liquid. Do not handle the device with wet hands.
• Device for indoor use only.
- Prevent the device from falling on the ground or being strongly impacted.
- This appliance may be used by children who are above 8 years old and by persons with reduced physical, sensory or mental capabilities, or lack of experience and knowledge, if they are supervised and guided by a person who is responsible for their safety in a cautious manner, and all the safety precautions are understood and followed. Children should not play with this device. Children should not perform cleaning and servicing of the device unsupervised.
- This product is not a toy; keep it beyond children's reach.
- Power cord protection: power-supply cords should be routed so that they are not likely to be pinched by items placed upon or against them.
- When you disconnect the power cord of the device, grasp and pull the plug, not the cord/cable.
- Producer does not guarantee compatibility with every external device.
- Producer does not claim liability for any data loss, damage caused by inappropriate use and handling or any mechanical damage.
- Producer does not claim liability to any damages caused by inappropriate upgrade
performed by the user.
- Use only authorized accessories.
- While using with earphones, if the volume is excessively high it may cause hearing damage. Adjust the volume to a moderate level and balance the time of using. Minimize the volume before connecting the headphones in order to avoid hearing damage from sudden exposure to excessive volume. Keep the volume at a reasonable level throughout entire time of using the headphones to prevent damage to your hearing.
- ALWAYS disconnect this device from power supply mains before cleaning. Clean this device periodically (at least once a month) with soft, slightly damp cloth. Do not use any abrasives or chemical agents to clean this product.
- Never use this device if the power cable or the device itself is damaged.
• In case of damage, contact authorized service point for check-up or repair. - Do not attempt to repair/disassemble this device yourself. The device has no user serviceable parts inside. In case of damage, contact with an authorized service point for check-up/repair.
PRODUCT DESCRIPTION
TOP VIEW
- Control panel
- Keystone correction knob
- Focus adjustment knob

Z

CONTROL PANEL
- Menu
- Return
- Source selection
- Indicator light
- Power button
- OK button (select/confirm/enter)
- Directional buttons
BOTTOM VIEW
- Support base thread
- Tripod stand thread
- Speaker

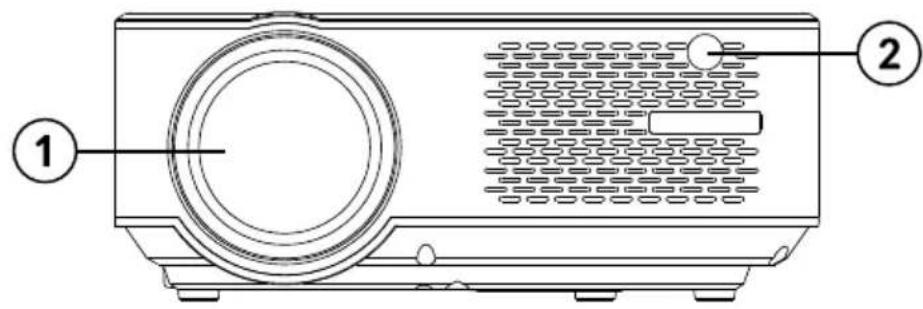
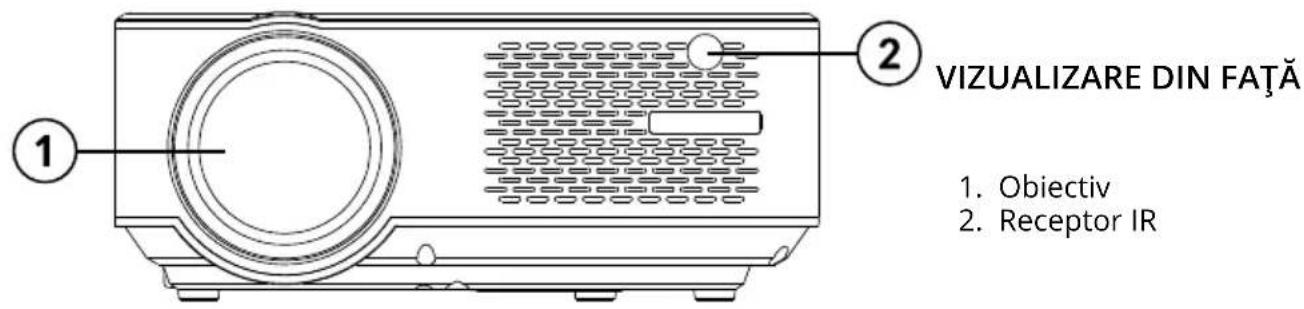
FRONT VIEW
- Lens
- IR receiver
SIDE VIEWS
- Power cable socket
- HDMI 1 input
- HDMI 2 input
- Headphone output
- AV input
- USB 1 port
- USB 2 port

REAR VIEW
- VGA port
- IR receiver
- Ventilation outlets

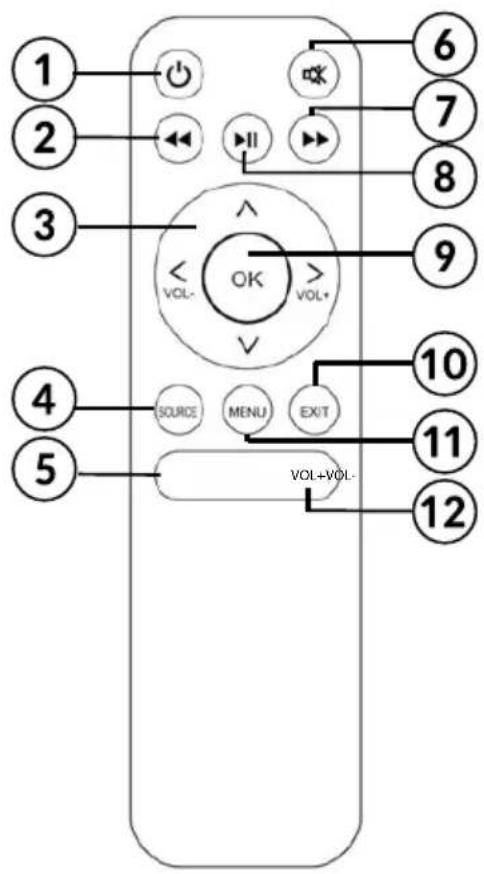
REMOTE CONTROL
- Power button
- Backward
- Directional buttons (up, down, left, right, volume control)
- Source selection
- Volume control
- Mute
- Forward
- Play/pause
- OK button (select/confirm/enter)
- Exit
- Menu
- Volume control
IMPORTANT
- Projector's lamp is subject to wear out. It's brightness over the period of normal using may decrease and be lower than in the new device.
- To maintain lifespan of the lamp, do not unplug device suddenly from the power supply! After powering it off, wait at least 5 minutes before turning it on again.
- Do not disconnect the projector from the power supply mains if the vents are still working.
- Do not use the projector non-stop!
- Do not pack up the device until it's fully cooled down!
INSTALLATION AND MOUNTING
Before using your device, select an appropriate spot for the projector. Follow instructions and hints below for optimum usage.
IMPORTANT:
• In any case, make sure the device is securely and safely placed.
- Keep the appropriate distance between the device and any other object. Do not block or cover ventilation outlets.
- Remember the projector needs to be parallel and perpendicularly to the wall or projection screen.
- Use and store the device in clean place with room temperature. The environment MUST NOT be dusty! Do not place the device near air conditioning! Do not cover the ventilation openings as it will lead to overheat and eventually damage!
- Brightness of the room is crucial to quality of the image projected. Reduce the external brightness for optimum image.
Projection distance and size
For optimum result of projection, follow the illustration and chart below. Distance provided is measured from lens to projected surface, for default 16:9 aspect ratio settings.

| Projection size 50" 72" 100" 120" | ||||
| Distance between lens and screen 1,52 m | 2,15 m 2,93 | m 3,48 m |
NOTE:
- The image size depends on the distance between projector and screen. There may be 3% deviation from above listed data. Different settings cause various distances.
- Projection sizes exceeding given values result in poor image quality.
- Image quality is heavily dependent on the projected surface (projection screen or a wall covered with special projection screen paint).
Mounting
User can place the projector at a shelf, or using one of the two threads at the bottom of the device.
In any case, user needs to make sure the projector is placed firmly and horizontally, or at a slight angle (front in relation to back). Do not install the device vertically nor at an angle. Do not place any objects on the projector not around it in close vicinity.
IMPORTANT: user is required to make sure the mounting is performed in a firm and stable way. If mounted on a mount or a tripod, make sure the mount/tripod will hold the weight of the projector and additional attachments. If mounted upside down, pay special attention to safety and make sure the mounts and used screws are firm and secure!
The device has two threads at the bottom for mounting:
- Support base thread: included in set. Screw the support base into the thread and adjust the height to desired level.
Remark: support base can assure maximum projection angle of 15^ . However, the best display effect will be obtained by projection angle ranges of 0^-8^ when on the support base.
- Tripod stand thread: tripod not included.

Keystone correction
Keystone correction allows for adjusting projected image in regards of trapezoid distortion. Such distortion happens because the projector is placed unevenly (both horizontally and vertically) in relation to wall/projection screen.
Ideally, the center of the image and the projector would be at the same level and perpendicular to the projected surface. It is suggested to keep the projector vertical with projector screen and keep it on the same level.

In case of trapezoid distortion, use the Keystone correction knob. The projected image should be rectangular.

flowchart
graph LR
    A["2D Shape"] --> B["3D Shape"]
    B <--> C["3D Shape"]
Note: If the Keystone correction fails to resolve image shape, reduce the vertical height of the projector in relation to the center of the screen.
Manual focus
The projected image may be blurry or difficult to see, due to lack of focus adjustment. Use the focus knob adjust the image sharpness.
REMOTE CONTROL BATTERY INSTALLATION
Before first use, and whenever operational range is reduced, replace the remote control battery:
- Open the battery compartment.
- Insert 2x AAA battery with correct polarity as indicated. Close the battery compartment.
Note:
- If you are not going to use the remote control for a long time, remove the batteries.
- Batteries contain chemical substances, so they should be disposed of properly.
- Caution: Risk of explosion! Keep batteries away from heat, sunshine, or fire. Never discard batteries in fire.
- Do not mix old and new batteries.
- Please note that the operating distance of the remote control may vary depending on the brightness of the room.
- Any obstacles between remote control and the device may reduce operation range.
OPERATION
- Connect the power cable to the projector and into power supply socket. The indicator light will turn red. The projector is in standby mode. Take off the lens cover.
- Press the power button on the control panel of the projector or on the remote control to turn on the projector.
- If the projected image has a distorted shape or is blurry, use the Keystone correction or focus knobs to achieve optimum image.
- Connect input signal device with an appropriate cable or a USB flash drive. Press SOURCE button on the remote control or "S" button on the control panel. A window with selection of inputs will be displayed. Select appropriate.

Note: producer does not guarantee compatibility with every external device!
a. USB connection

When in USB mode, use remote or buttons on the control panel to navigate through menu. Select appropriate section. Press OK button to select/enter/display.
b. HDMI connection

natural_image
Line drawing of a computer setup with an external monitor, power cord, and laptop (no text or symbols)c. MHL function (only for MHL compatible devices, in HDMI 2 source mode)

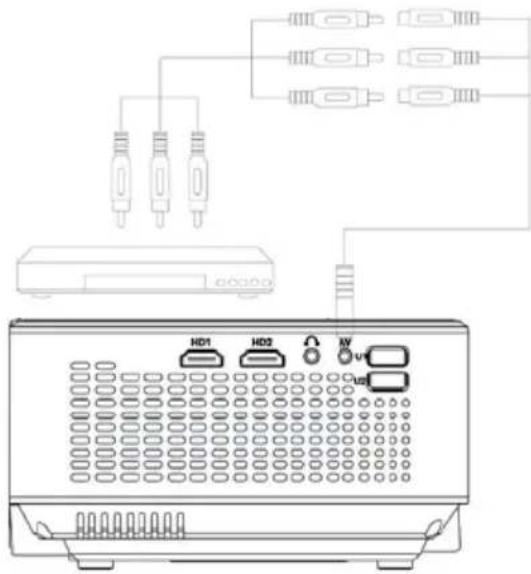
d. AV connection

e. User can connect the projector to an external speaker or headphones via headphone Jack.

natural_image
Line drawing of a portable electronic device with labeled ports (HD1, HD2, AV) and audio jack (no text or symbols on the device itself)f. VGA connection (please note, VGA transfers only image. If you want to transfer the sound too, you need to use an additional attachments and cables e.g. VGA converter. Note: You may need to set up your laptop if not sharing the screen immediately after connecting to projector. For more information refer to user's manual of the input source device.

natural_image
Line drawing of a projector connected to a laptop and a tower (no text or symbols present)- To turn off the projector, press the power button. Press the power button again to turn off or press any other button to cancel.
Settings
- To enter menu, press MENU button on the remote control or M button on the projector's control panel. Settings window will be displayed.
- Use arrow buttons to navigate through menu, and OK button to enter submenu/select option/confirm. After changing settings, press MENU again to exit.
a. Options:
- OSD language: select system language
- Restore factory settings
- OSD blending
- OSD duration: select display time of captions
- Software update (USB): available after inserting USB flash drive with software update file into USB port of the projector
b. Picture menu
• Picture mode: select from available (standard, soft, user, vivid)
• Color temperature: select color temperature of the displayed image
- Aspect ratio: Auto, 4:3, 16:9
- Noise reduction
- Projection direction: select display image rotation. Options available are: front (on desk), rear, front/ceiling, rear/ceiling. See picture below:
Ceiling mounted (upside down)

Front / ceiling

Rear / ceiling
Table mounted

Front Rear
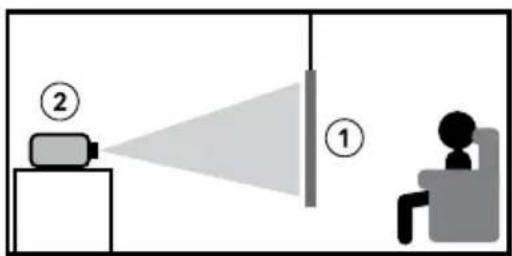
①


Please note: for ceiling mounting, user needs compatible mount, and for rear (rear and rear/ceiling) it's required a special projection screen.
- Screen
-
Projector
-
HDMI mode
- PC setup
a. Sound menu
- Sound mode: standard, user (manually set bass and treble), music, movie, sports
• Balance: set balance manually
• Auto volume: on/off
b. Time menu
- Sleep timer: set the time after which the projector will enter sleep mode

Software is subject to change without prior notice. Above description is for reference only and may vary from the actual device. If any discrepancies, refer to the actual device.
USB playback
To play multimedia from USB flash drive, insert USB flash drive into USB port of the projector and change input source. A USB playback screen will be displayed. Select appropriate section.
CLEANING AND MAINTENANCE
- Clean your device regularly.
- Before cleaning, turn the device off and disconnect from the power supply.
- Allow the device to cool completely before cleaning! Wait at least 1 hour before cleaning!
- Wipe the device casing with a soft, slightly damp cloth. Do not use detergent or abrasives as this may damage the surface. The device, the power cable and the mains plug must not be immersed in water or any other liquid!
- For cleaning of the lens use only specialized cloths or mild detergents. DO NOT apply any detergents directly to lens!
- DO NOT use compressed air to clean the device. Cleaning inside of the device with compressed air will damage the device!
- Ensure the ventilation grill is free from dust, as this will reduce the airflow. The ventilation outlet cover (at the back of the housing) can be removed for cleaning of the accumulated dust with soft cloth.
- Allow the device to fully dry before using again.
- It is suggested to close the lens cover when the device is not in use.
- Store the device in dry place in room temperature.
SPECIFICATION
- Native resolution: 1280x720 px
• Max. resolution: 1920x1080 px - Projection size: 50-120"
- Contrast ratio: 1500:1
- Aspect ratio: 16:9 / 4:3
- Focus: manual
• Image flip: 0/180° - Lamp type: LED 70 W
- Keystone adjustment: manual (±15°)
- Noise level: <45 dB
• Projection distance: 1,5-3,5 m
• Built-in speaker: 3 W; 4 Ohm
• Sound control: balance
• Video: MPEG1, MPEG2, H.263, H.264, AVS, VC1, MJPEG, RV30, RV40, HEVC
• Pictures: JEPG, PNG, BMP
• Audio: MPEG1, MPEG2, LPCM, MP3
• USB media: movie, music, photo, text - Mounting threads: 1x M4, 1x 1/4"
• INPUTS / OUTPUTS:
»Headphone output (3, 5 Jack)
»2x HDMI
»2x USB (2.0)
»AV input
»VGA
• Power supply: 220-240 V; 50/60 Hz
• Power consumption: 70 W
• Power consumption (stand-by): ≤0,5 W
- Operating temperature: 0\~30°C
Producer reserves rights to change product overview, system and specifications without prior notice.
Please note: illustrations and descriptions concerning system are for reference only, and may vary from actual software on your device! Any information included in this manual are subject to change without prior notice. Interfering with device software will void the warranty.
LEARN MORE
For more information on this device visit: www.krugermatz.com.
Read owner's manual carefully before using your smartphone.
Visit www.krugermatz.com website for more products and accessories.
In case of any doubts or questions reach out to our Frequently Asked Questions section.

English
Correct Disposal of This Product
(Waste Electrical & Electronic Equipment)

(Applicable in the European Union and other European countries with separate collection systems) This marking shown on the product or its literature, indicates that it should not be disposed with other household wastes at the end of its working life. To prevent possible harm to the environment or human health from uncontrolled waste disposal, please separate this from other types of wastes and recycle it responsibly to promote the sustainable reuse of material resources. Household users should contact either the retailer where they purchased this product, or their local government office, for details of where and how they can take this item for environmentally safe recycling. Business users should contact their supplier and check the terms and conditions of the purchase contract. This product should not be mixed with other commercial wastes for disposal.
Made in China for LECHPOL ELECTRONICS Sp. z o.o. Sp.k., ul. Garwolińska 1, 08-400 Miętne.
KWESTIE BEZPIECZEŃSTWA
PL

PANEL STERUJĄCY

PRZÓD

PILOT ZDALNEGO STEROWANIA
natural_image
Line drawing of a laptop connected to an electronic device via ports and cables (no text or symbols present)PL
d. Tryb AV
natural_image
Line drawing of a portable electronic device connected to a speaker and headphones (no text or symbols present)natural_image
Line drawing of a projector connected to a laptop and tower (no text or symbols)Przód Tył

PANOU DE CONTROL
VIZUALIZARE DIN LATERALE
natural_image
Line drawing of a desktop computer setup with an external monitor, keyboard, and laptop (no text or symbols)natural_image
Line drawing of a portable projector connected to a laptop and a tower (no text or symbols)Față/tavan

Spate/tavan
Montare pe masă

Față Spate


natural_image
Completely black image with no visible content or text.
line
| X | Y | |---|---| | 0.0 | 0.0 | | 0.1 | 0.1 | | 0.2 | 0.2 | | 0.3 | 0.3 | | 0.4 | 0.4 | | 0.5 | 0.5 | | 0.6 | 0.6 | | 0.7 | 0.7 | | 0.8 | 0.8 | | 0.9 | 0.9 | | 1.0 | 1.0 | | 1.1 | 0.9 | | 1.2 | 0.8 | | 1.3 | 0.7 | | 1.4 | 0.6 | | 1.5 | 0.5 | | 1.6 | 0.4 | | 1.7 | 0.3 | | 1.8 | 0.2 | | 1.9 | 0.1 | | 2.0 | 0.0 |
www.krugermatz.com
Krüger&Matz is a registered trademark


- BEDIENFELD
- FRONTANSICHT
- SEITLICHE ANSICHTEN
- Trapezkorrektur
- PRODUCT DESCRIPTION
- TOP VIEW
- CONTROL PANEL
- BOTTOM VIEW
- FRONT VIEW
- SIDE VIEWS
- REAR VIEW
- REMOTE CONTROL
- IMPORTANT
- INSTALLATION AND MOUNTING
- IMPORTANT:
- Projection distance and size
- NOTE:
- Mounting
- Keystone correction
- Manual focus
- REMOTE CONTROL BATTERY INSTALLATION
- OPERATION
- Settings
- USB playback
- CLEANING AND MAINTENANCE
- SPECIFICATION
- LEARN MORE
- KWESTIE BEZPIECZEŃSTWA
- PANEL STERUJĄCY
- PRZÓD
- PILOT ZDALNEGO STEROWANIA
- Przód Tył
- PANOU DE CONTROL
- VIZUALIZARE DIN LATERALE
Brand : Krüger&Matz
Model : V-LED10
Category : Projector