
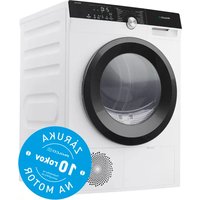
PDV556N3WB - Tumble dryer Philco - Free user manual and instructions
Find the device manual for free PDV556N3WB Philco in PDF.


| Product Type | Tumble Dryer |
| Brand | Philco |
| Model | PDV556N3WB |
| Dimensions (H x W x D) | 795 x 600 x 560 mm |
| Power Supply | 220-240 V / 50 Hz |
| Heater Power | 2100 W |
| Rated Capacity (Dry Load) | 5.5 kg |
| Drying Programs | Extra Cotton Dry, Cupboard Cotton Dry, Iron Cotton Dry, Extra Mixed Dry, Cupboard Mixed Dry, Iron Mixed Dry, Eco Cotton, Delicate, Airing 30, Time Dry (30/60/90/120/150 min) |
| Anti-Crease Cycle | Yes, 1 hour after drying; drum rotates 5 seconds every minute |
| Drum Reversal | Yes, clockwise and anti-clockwise to reduce tangling |
| Lint Filter | Front bottom; must be cleaned after every load |
| Exhaust Venting Options | Front or rear, max duct length 2 m at 100 mm diameter |
| Installation Options | Free-standing on floor, on bench (upright or inverted), or wall-mounted |
| Control Panel | Program selector knob, Start/Pause button, indicators (Dry, End, Anticrease), buzzer enable/disable |
| Safety Features | Child safety lock on door, overheating protection, door safety switch |
| Energy Saving | Eco Cotton program for maximum energy saving |
| Accessories Included | Venting kit (optional, not included) |
Frequently Asked Questions - PDV556N3WB Philco
User questions about PDV556N3WB Philco
0 question about this device. Answer the ones you know or ask your own.
Ask a new question about this device
Download the instructions for your Tumble dryer in PDF format for free! Find your manual PDV556N3WB - Philco and take your electronic device back in hand. On this page are published all the documents necessary for the use of your device. PDV556N3WB by Philco.
USER MANUAL PDV556N3WB Philco
EN Tumble Dryer User Manual 2
HK 滾筒式乾衣機 用户手冊
IMPORTANT INFORMATION THAT MAY IMPACT YOUR MANUFACTURER'S WARRANTY
Adherence to the directions for use in this manual is extremely important for health and safety. Failure to strictly adhere to the requirements in this manual may result in personal injury, property damage and affect your ability to make a claim under the Philco manufacturer's warranty provided with your product. Products must be used, installed and operated in accordance with this manual. You may not be able to claim on the Philco manufacturer's warranty in the event that your product fault is due to failure to adhere to this manual.
CUSTOMER CARE AND SERVICE
We recommend the use of original spare parts. When contacting Service, ensure that you have the following data available. The information can be found on the rating plate. Model, PNC and Serial Number.
⚠ Warning / Caution-Safety information.
i General information and tips.
Environmental information.
Subject to change without notice.
CONTENTS
- IMPORTANT SAFETY INSTRUCTIONS....3
1.1 Conditions Of Use 3
1.2 Child Safety 4
1.3 Dryer Safety 4
1.4 Fire Hazards....5
1.5 Cleaning The Lint Filter 5
1.6 Drying Guide 6
- PRODUCT DESCRIPTION .... 7
- CONTROL PANEL....7
3.1 Control Panel Description....7
3.2 Program Guide....9
- USE 10
- HINTS....11
- TROUBLESHOOTING & ACCESSORIES 13
6.1 Troubleshooting.... 13
6.2 Possible Failures.... 13
6.3 Accessories 14
- TECHNICAL DATA....14
- INSTALLATION INSTRUCTIONS.... 15
1. ⚠️ IMPORTANT SAFETY INSTRUCTIONS
1.1 Conditions Of Use
This appliance is intended to be used in household and similar applications such as:
- staff kitchen areas in shops, offices and other working environment;
- farm houses
- by clients in hotels, motels, and other residential type environment;
- bed and breakfast type environments;
- areas for communal use in blocks of flats or in launderettes
⚠ WARNING! The appliance must not be supplied through an external switching device, such as timer, or connected to a circuit that is regularly switched on and off by utility.
In the interest of your safety and to ensure the correct use, before installing and first using the appliance, read this user manual carefully, including its hints and warnings.
To avoid unnecessary mistakes and accidents, it is important to ensure that all people using the appliance are thoroughly familiar with its operation and safety features.
Save these instructions and make sure that they remain with the appliance if it is moved or sold, so that everyone using it through its life will be properly informed on appliance use and safety.
1.2 Child Safety
- This appliance is not intended for use by persons (including children) with reduced physical, sensory or mental capabilities, or lack of experience and knowledge, unless they have been given supervision or instruction concerning use of the appliance by a person responsible for their safety.
- Children should be supervised to ensure that they do not play with the appliance.
- The packaging components (e.g. plastic film, polystyrene) can be dangerous to children - danger of suffocation! Keep them out of children's reach.
- Make sure that children or pets do not climb into the drum.
1.3 Dryer Safety
Failure to follow these safety instructions could damage the dryer or your clothes.
You may then not be covered by warranty for this damage.
Only plug this appliance directly into an AC power supply, which is properly earthed and has the correct voltage.

natural_image
Two technical diagrams showing electrical socket and plug symbols with no readable text or labelsSee the serial number sticker located on the bottom of the door opening for voltage information.
CAUTION :
if this appliance is supplied from a cord extension set or electrical portable outlet device, the cord extension set or electrical portable outlet device must be positioned or that it is not subject to splashing or ingress of moisture.
For Safety reasons we strongly advise against the use of double adaptor, extension cords or power boards.

IMPORTANT:
- If the electrical cord of this appliance is damaged, it must be replaced by the Manufacturer, Authorised Service Agent or similarly qualified person in order to avoid a hazard.
• These dryers are for drying clothes, towels and linen at home. Do not use them for any other purpose. - Lint must not be allowed to accumulate around the tumble dryer.
- Do not dry unwashed items in the tumble dryer.
WARNING:
Never stop a tumble dryer before the end of the drying cycle unless all items are quickly removed and spread out so that the heat is dissipated.
1.4 Fire Hazards
Some fabrics are not suitable for tumble drying. The following MUST NOT be placed in your dryer due to the risk of a fire or an explosion:
- Items that have been spotted or soaked with vegetable oil, cooking oil, suntan oil, linseed oil, salad oil, lubrication oil, or grease. Oil-affected items can ignite spontaneously, especially when exposed to heat sources such as in a tumble dryer. The items become warm, causing an oxidation reaction in the oil.
Oxidation creates heat. If heat cannot escape, the items can become hot enough to ignite. Pilling, stacking, or storing oil-affected items can prevent heat from escaping and create a fire hazard. If it is unavoidable that fabrics that contain vegetable or cooking oil, or have been contaminated by hair care products be placed in a tumble dryer, they should first be washed in hot water with extra detergent - this will reduce, but not eliminate the hazard.
The final part of the tumble dryer cycle occurs without heat (The cooling cycle) to ensure that the items are left at the temperature that ensures that the items will not be damaged.
- An item that has previously been cleaned in washed in, or spotted with petrol/gasoline, industrial chemicals used only for cleaning, dry-cleaning solvents or other flammable or explosive substances are highly flammable. Highly flammable or explosive commonly found around the house include acetone, (nail polish remover) denatured alcohol, petrol/gasoline, kerosene, some spot removers, turpentine, waxes, and wax removers should not be put in the dryer. Items containing foam rubber (also known as latex foam) or similarly textured rubber-like materials. Foam rubber materials can produce fire by spontaneous combustion when heated.
- Rubber-backed articles, clothes fitted with foam rubber pads, pillows, rubber boots, and rubber-coated sports shoes.
For your safety, and to reduce the risk of fire or an explosion, DO NOT store or use petrol or other flammable vapors and liquids near your dryer.
1.5 Cleaning The Lint Filter LINT BUILD-UP IS A FIRE HAZARD
A clean lint filter reduces drying times, saves energy and avoids overheating. Overheating may also damage your clothes.
What happens If I forget to clean the lint filter?

line
Drying Time | Drying Time | Value | | :--- | :--- | | 1 | normal | | 5 | doubled | | 9 | tripled |Number of usages with an unclean lint filter. (based on laboratory tests using a load of new towels)
The lint filter is at the front of your machine, the bottom of the opening.
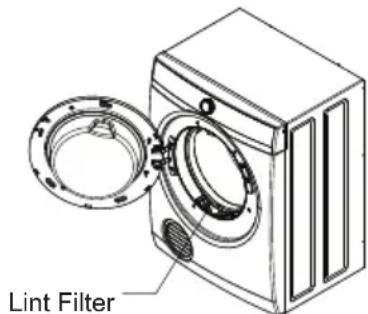
i You must clean this lint filter after every load.
To remove the lint filter open the door and press the two pads together. Pull the lint filter out of the pocket.

natural_image
Line drawing of a hand cleaning a circular component with a mesh pattern (no text or symbols)Open apart the lint filter and wipe or peel off the lint.

natural_image
Illustration of a hand using a tool to cut or rotate a component, showing no text or symbols.i Ensure the lint filter "Clicks" when replacing.
- Never operate your dryer without the lint filter.
- Do not allow lint to build around your dryer.
- A torn or damaged lint filter must be replaced immediately.
• Overloading can increase lint build-up because the airflow is reduced.
To avoid potential fire hazards, we recommend that you pay a qualified service technician to periodically clean your dryer. You must do this also when you change your mounting from upright the inverted, or vice versa.
1.6 Drying Guide
Your load, when dry must not exceed the rated capacity.
- 5.5 kg
(See page 12 for a table of the average weights of laundry items)
Always check your labels for the drying symbol which this international Care Labelling Code now uses.

Must be tumble dried

Do not tumble dry

Normal drying (High temperature)

Delicate drying (Low temperature)
- Permanent press and synthetics - take out as soon as the dryer stops to reduce wrinkles.
- Woollen articles - not recommended. Pull them to their original shape, then dry them flat
- Woven and loop knit materials - may shrink, by varying amounts, depending on their quality. Do not use the “Extra” setting for these fabrics, Always stretch them out immediately after drying.
-
Fibre or leather materials - always check the manufacturer's instructions.
-
Baby clothes and night gowns - acrylic clothing or sleepwear use only on the "Iron" setting.
- Rubber and plastics - Do not dry any items made from or containing rubber or plastics, such as aprons, bibs, babies' waterproof napkins, curtains, tablecloths, shower caps, clothes fitted with foam rubber pads, pillows, galoshes, or rubber-coated tennis shoes.
- Fiberglass - not recommended, glass particles left in the dryer could be picked up by your clothes the next time you use the dryer and irritate your skin.
Fabric softeners or similar products should not be used in a tumble dryer to eliminate the effects of static electricity unless this practic is specifically recommended by the manufacturer of the fabric softener or product.
i : We strongly advise against the use of fabric conditioners of the sheet type that are added to the clothes in the drum. These products may lead to rapid blockage of the lint filter and inefficient operation of your dryer.
2. PRODUCT DESCRIPTION
Parts

3. CONTROL PANEL
3.1 Control Panel Description

1 Program Selector Knob
Turn the Program Selector knob to choose a drying program. The table "Program Guide" shown on page 9 will help you in selecting the right program.
i NOTES
The Program Selector knob is not a timer. Once you select a drying program, the Program Selector knob will stay at that position for the whole drying cycle.
2 Indicators
| States Status Indicator | ||
| Initial Power onAfter appliance is powered on.Allows user to select a drying program. | Dry LEDblinksEnd LED Off |  DryEnd DryEnd |
| Machine Switched Off | All LED Off |  'd 'd |
| Drying PhaseDrying cycle starts.Buzzer will sound after main drying and cooling phases ends, at the start of anticrease.Anticrease in progress. | Drying & CoolingDry LED OnEnd LED OffAnticreaseDry LED OffEnd LEDblinks |  'd 'd DryEnd DryEnd |
| PausedDrying cycle paused.Cannot change drying program. | Dry LEDblinksEnd LED Off |  DryEnd DryEnd |
| End StateDrying cycle and Anticrease completed. | Dry LED OffEnd LED Off | DryEnd |
| Alarm/ ErrorSee description on page 13. | Dry LEDblinksEnd LEDblinks |  DryEnd DryEnd |
ANTICREASE CYCLE IN PROGRESS
- Dry LED Off
- End LED blinks

The anti-crease cycle is designed to help prevent creases from forming in the clothes after the normal drying cycle has ended. The anti-crease progress indicator will start blinking during the time anti-crease phase is running. The drum will rotate for 5 seconds every minute and will go for 1 hour anti-crease phase cannot be disabled.
i NOTES
Anticrease can be stopped at any time by opening the door and removing the clothes.
3 Start/Pause Button
This button allows you to start or pause the dryer to check the contents or perhaps add more clothes.
i NOTES
The dryer will not start unless the door is closed. (If the door is not closed you will hear 6 beeps followed by a DRY LED blinking 4 times.)
If the selector knob is turned while the dryer is running or paused mid cycle 3 beeps are heard to indicate operation is not allowed. The cycle will not continue if the selector knob is not returned to originally selected program.
Enable/Disable Buzzer
To Enable/Disable the Buzzer select "Delicate" then press and hold the "Start/Pause" button for 3 seconds. (The buzzer is enabled by default).

gauge
| Method | Temperature (°C) | |--------|------------------| | Time Dry | 150 | | 120 | 120 | | 90 | 90 | | 60 | 60 | | 30 | 30 | | Aching | 30 | | Delicate | 40 | | PC | 40 | | Outer Cotton | 100 | | Capping | 100 | | Inner Cotton | 100 | | Outer Dry | 100 | | Mixed Dry | 100 |Select program " Delicate ".
Press and hold "Start/Pause" 3 Seconds

pie
| Air Quality Rating | Count | | :--- | :--- | | Time Dry | 150 | | During | 120 | | After | 90 | | During | 60 | | After | 30 | | During | 30 | | Delicate | 30 | | Delicate at all | 150 | Off: Extra Cotton Dry Cupboard Extra Cupboard Iron Extra Extra Cupboard Iron Eco Cotton Eco Cotton3.2 Program Guide
| Program | Load size info | Textile type info |
| Extra Cotton Dry | Full | Cotton Towel, Jeans. For thick fabrics. |
| Cupboard Cotton Dry | Full | Cotton underwear. For fabric that does not need to be ironed. |
| Iron Cotton Dry | Full | Cotton Polo shirt, Cotton T-Shirt For fabric that need to be ironed. |
| Extra Mixed Dry | Half | Mixed load consisting of cotton and synthetic. For thick fabrics. |
| Cupboard Mixed Dry | Half | Mixed load consisting of cotton and synthetic. For fabrics that need to be ironed. |
| Iron Mixed Dry | Half | Mixed load consisting of cotton and synthetic. For fabrics that need to be ironed. |
| Eco Cotton | Full | Cycles to be used to dry cotton with "Cotton Cupboard" dryness level, with maximum energy saving. |
| Delicate | 3.5 kg | For delicates fabrics that are heat sensitive, Silk , Fine Fabrics and Lingerie. |
| Airing 30 | 1-1.5 kg | This setting does not heat. It only circulates the air in the dryer to shake out the dust and refresh clothes for 30 minutes. |
| Time dry 30 | 1-1.5 kg | Cotton fabric, To dry items for 30 minutes. |
| Time dry 60 | 3.0 kg | Cotton fabric, To dry items for 60 minutes. |
| Time dry 90 | 4.0 kg | Cotton fabric, To dry items for 90 minutes. |
| Time dry 120 | 5.0 kg | Cotton fabric, To dry items for 120 minutes. |
| Time dry 150 | Full | Cotton fabric, To dry items for 150 minutes. |

NOTES
For best results we recommend to sort out your laundry
- Do not select the "Extra Dry" option for delicate fabrics such polyester as shrinking may occur.
- To obtain the best drying results with small loads it is recommended to use "Time drying" program.
4. USE
Operating Sequence
Step 1
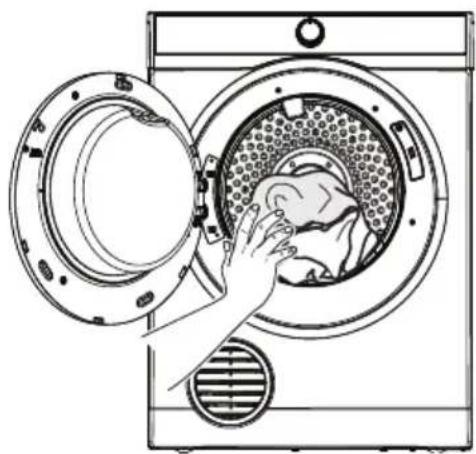
Load your dryer loosely until it is no more than TWO THIRD FULL. Clothes must tumble freely in a dryer. Don't cram them in. Wet clothes fluff up when dry.
Overloading will :
- Reduce efficiency.
- Increase drying time.
• Increases the risk of creasing
natural_image
Line drawing of a person washing inside a large washing machine (no text or symbols)
Do not load clothes or other articles which are dripping wet or have sand and grit on them into your dryer.
Step 2
SWITCH ON
The dryer will not operate unless the door is completely closed.

natural_image
Pure diagram of a coiled cable or wire with no text, numbers, or symbolsStep 3
Turn the Program Selector knob to choose the drying program you want.

Never stop a tumble dryer before the end of the drying cycle unless all items are quickly removed and spread out so that the heat is dissipated.
Reversing Action
The drum is designed to rotate in both direction, clockwise and anti-clockwise. This reduces tangling and gives more even drying in a shorter time.
Step 4
Turn the Program Selector knob to "OFF" When you have finished using the dryer to turn off the power, then switch off at the power point. It is recommended to power off the appliance when not in use.
Step 5
Clean Lint Filter

After every load clean the lint filter to reduce drying time and avoid overheating.
Checking the Load
To check the dryness or add clothes during the cycle, simply open the door. The dryer will beep several times indicating the door is open. If further drying is required, close the door and then press the Start/Pause button to continue.
For the best drying performance, only add or remove clothes at the beginning of the drying cycle.
5. HINTS
- Never tumble dry the following : delicate items such as net curtains, woolen, silk, fabric with metel trim, nylon tights, bulky metarials such as anoraks, blankets, eiderdown, sleeping bags, feather quilts, and any item containing rubber foam or materials similar to foam rubber.
- Do not place in your dryer undergarments such as bras and corsets that contain metal reinforcements. Your dryer may be damaged if the metal parts were to come to loose from the garment. Place such items in a bag designed for this purpose.
Check and empty pockets. Clip, pens, nails, and pins can damage both the dryer and your clothes. Other items such as matches or cigarette lighters will cause a fire. - Drying time will depend on fabric type and construction, load size, and wetness. Save time and money and always spin the load as dry as possible in your washing machine.
- Always clean the lint filter-this will reduce drying time and save you money.
- The laundry must be thoroughly spun before tumble drying.
- Easy-care items eg shirts should be briefly pre-spun before drying (depending on this crease resistance approximately 30 seconds).
- If individual items are still damp after drying, please add the appropriate
Time Drying program. This may be necessary, particularly for multilayered items (e.g. jeans, items with collars or pockets) or very small loads.
- To avoid static charge when drying is completed, use either a fabric softener when you are washing the laundry or a fabric conditioner specifically for tumble dryers.
- Remove the laundry when the dryer has finished drying.
- Do not over-dry laundry, this avoids creasing and saves energy.
- Clothes or towels containing sand or grit should be washed first.
- Due to variations in dryer load fabric texture and thickness, it is possible that not all items will be dried evenly. If you experience uneven dryness on the Cupboard program please use either Extra Dry or Timer Program but be mindful of the type of fabric being dried to avoid overdrying certain types of fabric. Always follow drying instructions attached to the items intended to be dried in a clothes dryer.
- Drying time will also be affected by voltage fluctuations, room temperature, and humidity. Clothes will dry more slowly on a cool or humid day.
-
For best results, sort the load according to the fabric. Such as heavy items which may take longer to dry, eg. towels, flannelette sheets, etc. than ones that dry quickly, eg. poly/cotton shirts and sheets.
-
Avoid drying dark clothes with light-colored items such as towels as lint will show on the dark clothes.
- Note : Some fabrics will collect lint from other clothes and items. Separate the fabrics that give out lint from the fabrics that collect lint, to minimize this problem.
- Clothes that give lint include towels, nappies, and chenille. Clothes that collect lint include corduroy, synthetics, and permanent press garments.
- If individual items are still damp after drying, set a 30 minutes post drying time. This will be necessary particularly for multilayered items (eg. collars, pockets, etc).
- To help you, here is a list of the average weights of some common laundry items.
| Sheet 700 - 1000 g |
| Tablecloth 400 - 500 g |
| Kitchen towel 70 - 120 g |
| Table napkin 50 - 100 g |
| Toweling hand towel 150 - 250 g |
| Bathrobe 1000 - 1500 g |
| Men's shirt 200 - 300 g |
| Pillowcase 100 - 200 g |
| Men's pyjamas 400 - 500 g |
| Ladies nightdress 200 - 250 g |
| Bath towel 300 - 400 g |
6. TROUBLESHOOTING & ACCESSORIES
6.1 Troubleshooting
Check the points listed here before you call for help, and make sure that you have followed the Important safety Instructions on pages 3 and 4.
| Problem Possible causes | |
| The dryer will not start | The plug is not firmly in the socket, or the power is not turned on.You have blown a fuse. Check the power point with another appliance.You have not closed the dryer door or pushed the door safety switch button. |
| Your clothes are still wet/not fully dried | Load is too small for the autosensing program or load consists of some multilayered items. Use Time Dry program to complete drying, refer to Hints in section 5.The selected drying time was insufficient. Select a longer time setting.A longer time may be needed when the room temperature is 10 °C or less.Check that the lint filter is not blocked.Check to see that you have read all the instructions carefully.Contact the Service Center if you are still having problems. Write down the model and serial numbers and the date of purchase before you ring. The Service Center will need this information. |
6.2 Possible Failures
Certain problems are due to a lack of simple maintenance or oversights, which can be solved easily without calling out an engineer.
Before contacting your local Service Centre, please check the possible cause of malfunction and the solution listed below.
Once the problem has been eliminated, press the Start/Pause button to restart the program. If after all checks, the problem persists, contact your local Service Centre.
Alarm Code Indicator :

WARNING!
Deactivate the appliance before you do the checks.
 | Dry End | Dry LED blinks 4 times End LED off | The appliance door is open or not closed correctly. Please check the door ! |
 | Dry End | Dry LED blinks 11 times End LED off | The main supply is unstable. Wait until the main supply is stable. |
 | Dry End | Dry LED blinks 9 times and then off End LED blinks 1 time | Communication error between electronic boards of the appliance. Switch off and switch on again. |
Important
To operate efficiently the clothes dryer must have an unrestricted air supply and exhaust ventilation.
Service calls resulting from installation where ventilation is restricted are not covered by warranty.
THE COST OF THIS TYPE OF CALL WILL BE CHARGED TO THE CUSTOMER.
Should you require further instructions in the use and care of your clothes dryer please contact the CUSTOMER SERVICE.
6.3 Accessories
You can buy venting kits from your local shop.
7. TECHNICAL DATA
| Dimension (Height / Width / Depth) 795 x 600 x 560 mm | |
| Power Supply (Voltage / Frequency) 220 - 240 V / 50 Hz | |
| Heater Power (Watt) 2100 W | |
| Load Size, Capacity | Program Load Size |
| Extra Cotton Dry Full | |
| Cupboard Cotton Dry Full | |
| Iron Cotton Dry Full | |
| Extra Mixed Dry Half | |
| Cupboard Mixed Dry Half | |
| Iron Mixed Dry Half | |
| Eco Cotton Full | |
| Delicate 3.5 kg | |
| Airing 30 1 - 1.5 kg | |
| Time dry 30 1 - 1.5 kg | |
| Time dry 60 3.0 kg | |
| Time dry 90 4.0 kg | |
| Time dry 120 5.0 kg | |
| Time dry 150 Full | |
8. INSTALLATION INSTRUCTIONS
You can choose to put your dryer :
- on the floor.
• on the workbench upside down or upright. - on the wall.
The appliance must not be installed behind a lockable door, a sliding door, or a door with a hinge on the opposite side to that of the tumble dryer in such a way that a full opening of the tumble dryer door is restricted.
The exhaust grille has a range of positions, which allows you to select the optimum exhaust air angle. Simply hold the grille and rotate it until it hits the build-in stop.

Do not install your dryer in a cupboard or small un-vented laundry unless you using a venting kit.
There are 2 VENTING OPTIONS
- Front
- Rear
Important : The exhaust duct must not exceed 2 metres in length at 100 mm diameter. If connecting the dryer to a common ducting system, Safety advice should be requested from the manufacturer.
If you choose to use the vent kit, the exhaust grille at the front of the dryer will need to be replaced with the outlet cover from the back of the dryer. Gently, prise opens the grille, using a thin-bladed tool. Next, remove the cover from the back and clip it into the grille space at the front.
The exhaust grille is not required when using a vent kit.
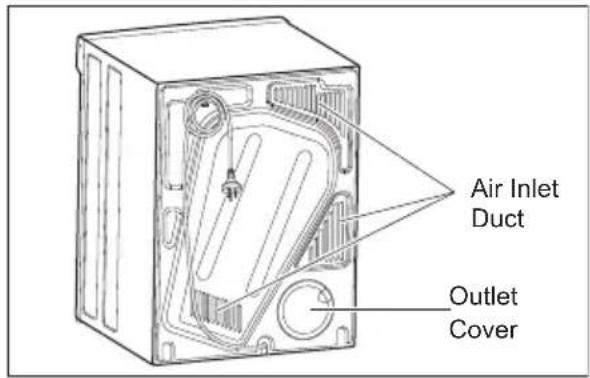
You can position the vent kit at the back of the dryer to remove air sideways or upwards.

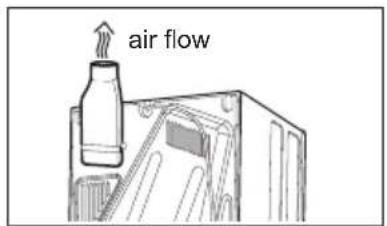
Inlet and Outlet points need clear airflow to prevent overheating. So ensure there is adequate ventilation. (i.e. open window or external door.)
If a venting kit is used and the exhaust is discharged out of the room, there must be adequate ventilation to avoid the back flow of gases into the room from appliances burning other fuels, including open fires, when operating the tumble dryer. This is not applicable where a venting hose is detected to an open window.
The exhaust air must not be discharged into a flue which is used for exhausting fumes from appliances burning gas or other fuels.
可能影響製造商保固的重要資料
natural_image
Two electrical circuit symbols: a square component with a checkmark and a rectangular box with a crossed-out resistor (no text or labels)重要事項:
natural_image
Hand cleaning a circular mechanical component with a meshed inner ring (no text or symbols visible)打開棉絮濾網, 擦拭或剝離棉絮。

natural_image
Illustration of a hand using a tool to cut or rotate a component, showing no text or symbols.1 程序選擇鈕
pie
| Category | Value | |---|---| | Time Dry | 150 | | Time Dry (Extra) | 120 | | Time Dry (Cupboard) | 90 | | Time Dry (Iron) | 60 | | Airing | 30 | | Airing (Extra) | 30 | | Airing (Cupboard) | Delicate | | Airing (Iron) | Delicate | | Cotton Dry | Extra | | Cotton Dry (Cupboard) | Extra | | Cotton Dry (Iron) | Iron | | Mixed Dry | Extra | | Mixed Dry (Cupboard) | Extra | | Mixed Dry (Iron) | Iron | | Eco Cotton | Extra | | Eco Cotton (Cupboard) | Extra | | Eco Cotton (Iron) | Iron |3.2 程序指南
natural_image
Line drawing of a hand washing a refrigerator with a lid open, showing internal components (no text or symbols)
natural_image
Pure diagram of a coiled cable or wire with no text, numbers, or symbols第3步
轉動程序選擇鈕以選擇所需的烘乾程序。

購買日期 Date of Purchase:
單據編號 Invoice No.:
The product specifications may be changed without prior notice.
Please contact customer service for details if necessary.
說明書內容以英文版本為準
If there is any inconsistency or ambiguity
between the English version and the Chinese version, the English version shall prevail.

保養登記
Warranty Registration
於網上登記新產品保養 Register your product online
www.dchtoolbox.com

Gilman
since 1841

DCHToolBox
大昌行電器維修中心
| PHILCO | PHILCO | PHILCO | PHILCO | PHILCO | PHILCO | PHILCO | PHILCO |
| PHILCO | PHILCO | PHILCO | PHILCO | PHILCO | PHILCO | PHILCO | PHILCO |
| PHILCO | PHILCO | PHILCO | PHILCO | PHILCO | PHILCO | PHILCO | PHILCO |
| PHILCO | PHILCO | PHILCO | PHILCO | PHILCO | PHILCO | PHILCO | PHILCO |




- IMPORTANT INFORMATION THAT MAY IMPACT YOUR MANUFACTURER'S WARRANTY
- CUSTOMER CARE AND SERVICE
- CONTENTS
- ⚠️ IMPORTANT SAFETY INSTRUCTIONS
- Conditions Of Use
- Child Safety
- Dryer Safety
- CAUTION :
- IMPORTANT:
- WARNING:
- Fire Hazards
- Cleaning The Lint Filter LINT BUILD-UP IS A FIRE HAZARD
- i You must clean this lint filter after every load.
- i Ensure the lint filter "Clicks" when replacing.
- Drying Guide
- - 5.5 kg
- PRODUCT DESCRIPTION
- CONTROL PANEL
- Control Panel Description
- Program Selector Knob
- i NOTES
- Indicators
- ANTICREASE CYCLE IN PROGRESS
- Start/Pause Button
- Enable/Disable Buzzer
- NOTES
- USE
- Operating Sequence
- Step 1
- Overloading will :
- Step 2
- SWITCH ON
- Step 3
- Reversing Action
- Step 4
- Step 5
- Clean Lint Filter
- Checking the Load
- HINTS
- TROUBLESHOOTING & ACCESSORIES
- Troubleshooting
- Possible Failures
- Alarm Code Indicator :
- WARNING!
- Important
- Accessories
- TECHNICAL DATA
- INSTALLATION INSTRUCTIONS
- 可能影響製造商保固的重要資料
- 重要事項:
- 程序選擇鈕
- 第3步
Brand : Philco
Model : PDV556N3WB
Category : Tumble dryer