
WIFISD2 - Access Point MACALLY - Free user manual and instructions
Find the device manual for free WIFISD2 MACALLY in PDF.


| Product Type | Mobile Wi-Fi Pocket Drive / Media Hub / Travel Router |
| Model | WIFISD2 |
| Dimensions | 96mm (L) x 72mm (W) x 17mm (H) |
| Weight | Approx. 100g |
| Battery Capacity | 2600mAh, up to 7 hours continuous use |
| Charging Time | 3-5 hours (via micro USB, 800mA max) |
| Wi-Fi Standard | 802.11 b/g/n, 2.4GHz, up to 300Mbps |
| Storage Support | SD/SDHC/SDXC cards (via SD slot), USB flash drives, USB external hard drives (2.5" or 3.5" with external power) |
| Interface | Micro USB 2.0 (data/charge), USB 2.0 Host, RJ45 Ethernet WAN, SD slot |
| Max Concurrent Users | 5 devices |
| Operating Temperature | 5°C to 35°C |
| Security | Mixed WPA/WPA2-PSK, WPA-PSK, WPA2-PSK |
| Compatibility | iOS, Android, Windows, Mac OS X, Linux |
| Modes | Wi-Fi pocket drive mode, wired/wireless internet sharing, SD/USB card reader mode |
| Box Contents | WIFISD2, USB 2.0 cable, Quick Start Guide |
| Warranty | 1 year |
Frequently Asked Questions - WIFISD2 MACALLY
User questions about WIFISD2 MACALLY
0 question about this device. Answer the ones you know or ask your own.
Ask a new question about this device
Download the instructions for your Access Point in PDF format for free! Find your manual WIFISD2 - MACALLY and take your electronic device back in hand. On this page are published all the documents necessary for the use of your device. WIFISD2 by MACALLY.
USER MANUAL WIFISD2 MACALLY
Mobile Wi-Fi Pocket Drive (Media Hub and Travel Router) User's Manual

Macally Product Information
Warranty
Macally Peripherals warrants that this product is free from defects in materials and manufacturing workmanship for the period of one (1) year from the date of purchase. If the product is found to be defective, as your sole remedy and as the manufacturer's only obligation, Macally will repair or replace the product. This warranty shall not apply to products that have been subject to abuse, misuse, tampered with or modified, abnormal electrical or environmental conditions, or any conditions other than what we consider as normal use.
Limitation of Liability
The liability of Macally Peripherals arising from this warranty and sale shall be only limited to a refund of the original purchase price. In no event shall Macally be liable for any costs of procurement of substitute products or services, or for any loss of profits, or for any consequential, incidental, direct or indirect damages, however caused and or any theory of liability arising from this warranty and sale.
These limitations shall apply not withstanding any failure of essential purpose of any limited remedy.
Copyright 2014 by Macally Peripherals
Australia Warranty
This document details the terms and conditions of the warranty provided with this product. Please disregard any other representations contained on this product, its packaging, or provided with this product which constitutes or appears to constitute a warranty.
This warranty is offered by TNS Distribution Australia Pty Ltd, Unit 1, 16 Aquatic Drive, Frenchs Forest NSW 2086 Australia, (02) 9975 0900, support@TNSdistribution.com.au
Subject to the exclusions and limitations set out below, we warrant to you that if you purchase a product directly from us, or from any of our authorized resellers, that it will not contain defects which are a result of faulty manufacturer workmanship or materials. This warranty subsists for 1 year from the date of purchase.
Subject to any rights you have under the Australian Consumer Law, we will not be liable for defects which are a result of damage or loss caused by factors beyond our control, any product which has not been maintained according to any care or maintenance instructions provided with the product, any alterations to a product which are not performed by us, or damage or defects caused to the product due to unusual or non-recommended use. We will not be liable for any special, indirect, consequential or economic loss or damage or loss of profits whatsoever suffered by you or any other person resulting from any act or
omission by us. Our total liability in respect of this Warranty against Defects is limited to the replacement of the goods.
Any claim made under this warranty must be made by returning the defective goods to us, at your expense. Please provide details of the defect and evidence of purchase to support@TNSdistribution.com.au and we will provide instructions on how to obtain a replacement. If you do not have Internet access please telephone us for further instructions.
Table of Contents
1.0 Introduction......6
1.1 Product Features....6
1.2 Product Functions....6
1.3 Product Specification....8
1.4 Hardware Basics....9
2.0 Setting up the WIFISD2....10
2.1.1 SD Cards....11
2.1.2 USB Flash Drives....12
2.1.3 USB External Drives....12
2.2 Charging the Internal Battery....12
2.3 Stor-N-Go App Download and Installation....13
2.3.1 For iOS Users....13
2.3.2 For Android Users....17
2.3.3 For Mac OSX or Windows Users....21
2.3.4 WIFISD2 Configuration using a Computer....22
3.0 Basic Functionality....27
3.1 iOS Device Client....27
3.2 Android Device Client....29
3.3 Playing Music/Audio (iOS only)....30
3.4 Playing Music/Audio (Android only)....33
3.5 Playing movie/video (iOS only)....36
3.6 Playing movie/video (Android only)......41
3.7 Viewing/playing photos (iOS only)....42
3.8 Viewing/playing photos (Android only)......44
3.9 Opening/viewing documents (iOS only)....46
3.10 Opening/viewing documents (Android only)......49
3.11 Shared functions (iOS and Android)....49
3.11.1 Copy, Delete, Upload functions (iOS and Android)....50
3.11.2 Transferring file to the My Device (iOS and Android)....51
3.11.3 Upload/download history and status....52
3.12 Exiting Wi-Fi Disk App (iOS)....52
3.13 Exiting Wi-Fi Disk App (Android)....52
3.14 Uninstall Wi-Fi Disk App (iOS)....52
3.15 Uninstall Wi-Fi Disk App (Android)....53
3.16 Backup Contacts....54
3.17 Backup Photos and Videos....58
3.18 Dropbox Backup....61
4.0 Web Browser Functions....63
4.1 Explorer Function....64
4.2 Context Menu....65
4.3 System settings....66
4.4 Device Information....66
4.5 Storage Information....67
4.6 User....67
4.7 Network Settings....68
4.8 Host Name....68
4.9 Wi-Fi & LAN....68
4.10 DHCP Server....69
4.11 Internet Settings....70
4.11.1 Selecting the Wireless Access Option....71
4.11.2 Selecting the Wired Access Option....71
4.12 Services....72
4.13 Windows Sharing Service....72
4.14 DLNA Service....72
4.15 Time Settings....72
4.16 Firmware Upgrade....73
4.17 Resetting to factory defaults....74
4.18 Wizard....75
1.0 Introduction
WIFISD2 allows you to wirelessly access your videos, music, photos, and other data so you can stream it t your iPad, iPhone, or other mobile device. It can also double as a data storage device so there is no need to worry about running out of space on your mobile devices.
WIFISD2 supports SD media cards, USB flash drives, and USB external hard drives. Flash drives or 2.5" hard drives can be powered by the WIFISD2's own battery, but larger 3.5" hard drives require their own power adapter. For maximum portability, the WIFISD2 has a built-in rechargeable battery. Plug it into any available USB port on your computer to copy your files.
If you need any assistance setting up the WIFISD2 in the USA, please call us at (909)-230-6778 or email techsupport@macally.com
1.1 Product Features
- Supports SDXC, SDHC and SD memory cards. SD adapter is needed for Micro SD and Mini SD.
• Supports USB 1.1, 2.0 External Storage devices
• Stream media over Wi-Fi enabled devices up to 5 users simultaneously
- Access and stream your music, videos, photos and data from the SD memory cards or from USB external storage using the free custom mobile app supporting iOS and Android operating systems
• Built-in micro USB port for charging and data sync function
• Up to 7 Hours of continuous battery life*
- Supports Hot-Plug
• Search function to locate and access your file much faster
• Internet access capability via the RJ45 or wireless, supporting 802.11 b/g/n speeds
• Internet access capability via wireless, supporting 802.11 b/g/n speeds
• Supports LAN data-shares and cross-platforms including Windows, Mac, Linux, iOS and Android.
• Support multiple network accessing protocol, including Samba / WebDAV/DLNA
• Support multiple platform client tools, including Windows, Mac, Linux, iOS, and Android
*Battery life subject to normal usage conditions and configurations.
*Minimum Hardware Requirement
: 1GB Storage Space for SD Memory Card or Flash Drive
(100MB capacity will be used for temporary files)
1.2 Product Functions
A. To function as SD memory card reader. Simply connect the device into the computer's available USB port. The device will automatically mount on your desktop or inside the "My Computer".

natural_image
Illustration of a laptop connected to a USB cable and a smartphone (no text or symbols visible)The Wi-Fi SD/USB works as SD memory card reader and charges the internal battery
B. Wired mode. Connect the Wi-Fi SD/USB using the RJ45 cable into the available port on the back of your router to function as an wired Internet pass-through, the DHCP feature of the Wi-Fi SD/USB will automatically assign an IP address to have access to the internet.

C. Wireless Mode. Wirelessly connect the Wi-Fi SD/USB to your existing wireless router to function as a wireless Internet pass-through to have access to the internet as illustrated below.

1.3 Product Specification
Package Contents:
WIFISD2
USB 2.0 Cable
Quick Start Guide
Product Dimensions:
96mm (L) x 72mm (W) x 17mm (H)
Product Specifications:
CPU:
Model: Ralink MT7620N
Frequency: MIPS24KEc 600MHZ
Wi-Fi:
Standard: 802.11 b/g/n,
Frequency: 2.4 GHZ
Speed: Up to 300Mbps
USB Interface: Micro USB 2.0 for data transfer and charging
Battery:
Capacity: 2600mAh
Charging current: supports max 800mA
Operating Temperature:
Normal Operating Temperature: 5°C to 35°C
Non-operating Temperature: Below 0°C and above 60°C
Power consumption:
A) SD Card Read/Write*: 2W
B) Stand-by (SD Sleep Mode): 1.5W
C) Emission (EMI) Safety and Other Certifications:
*Varies on SD card type.
FCC (Class B) and CE
1.4 Hardware Basics
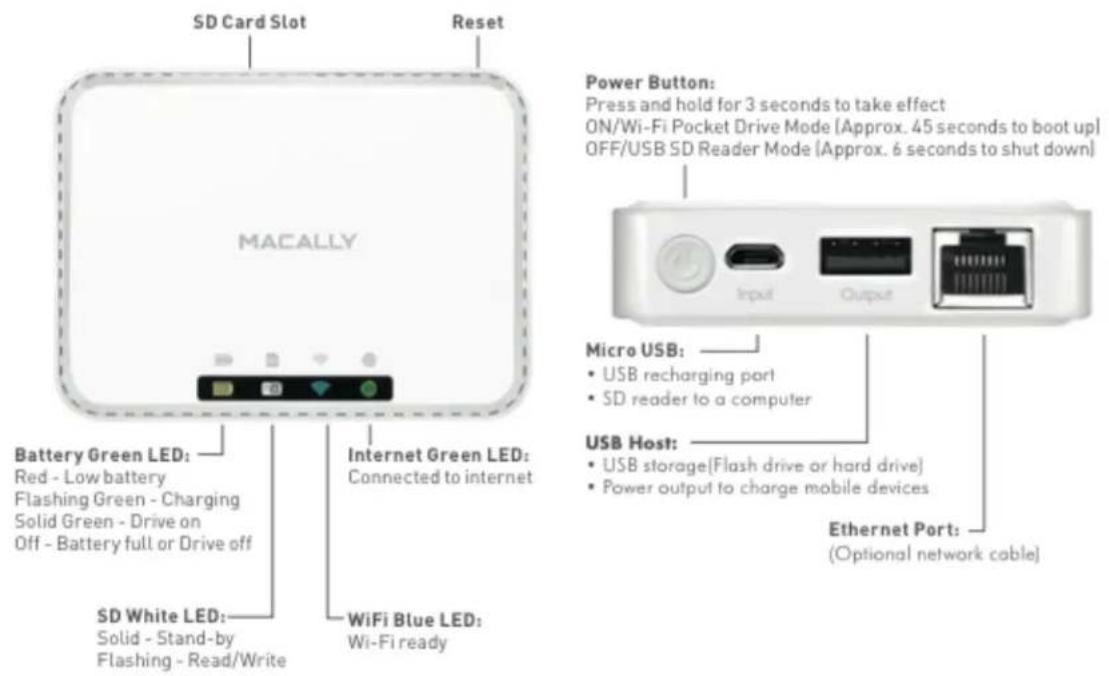
Device Interface
USB Interface: The built-in Micro USB 2.0 is for data transfer and charging the internal battery when connected directly into the computer's USB port or wall chargers.
USB Host Interface: The built-in USB 2.0 Host Interface for connecting any USB Mass Storage device, USB 3G Dongle and for charging mobile devices such as smartphones, MP3 Players, and tablets.
SD Slot: Available SD slot to support SD, SDHC, and SDXC. SD adapter is needed to support Micro SD and Mini SD.
Power Button: Switch on/off the device.
Reset Button: Reset the device to the Default Factory Settings. After the WIFISD2 is booted up, using a small pin or paper clip, press and hold the reset button for 10 seconds. The Blue LED will flash and the WIFISD2 will reboot and reset the hardware and network settings.
RJ45 WAN Port
Connect this port to other router/switch to let the product connect to the internet
LED Panel
Power LED:
LED Off: The device is switched-off or no power
Green Color
Steady Light: Battery is fully charged
Slowly Blinking: Battery charging
Blinking Fast: Device Shutting-Down
Red Color:
Steady Light: Less than 30% available power
Blinking Fast: Will soon shut-down, must be charged immediately
Wi-Fi LED:
Blue Color:
Flashing: Starts the Initialization process
Steady Light: Initialization process completed
Ready to use
Wi-Fi signal is normal
LED Off: The device is switched-off or no power
Internet LED:
Green Color: Good signal
No LED: No connection established
SD Read/Write LED:
White Color:
Flashing: Reading/Writing Data
Steady Light: Initialization process completed
Ready to use
2.0 Setting up WIFISD2
File Copy
WIFISD2 supports SD cards, USB flash drives, and USB external hard drives as storage space. For the first time, please follow steps 2.1.1 to 2.1.3 to copy multimedia files onto the SD card, flash drive, or USB external hard drive and use them with the WIFISD2. Stor-N-Go will automatically create a "Share" folder where you can sort your media. Once the files have been copied to the appropriate location, you can access each type of media (Documents, Photos, Music, Video) by pressing on the link on the home page of the App (shown below). Stor-N-Go will automatically sort your files for you when you access them this way. Please note that if files are not placed in this "Share" folder, they will not appear if you click the media tiles on the home page.

2.1.1 SD Cards
Insert an SD card into the SD slot of the WIFISD2 until you feel a click. If you have a microSD card, please use an SD card adaptor, then insert it into the SD slot of the WIFISD2. First, turn off the WIFISD2, then connect it into any USB port on your computer with the included micro-USB cable. Your computer will detect it as a USB media card reader and removable drive. In the SD card, the Stor-N-Go App will automatically create a folder called "Share" that contains separate folders for Documents, Photos, Music, and Videos. It is recommended that your media be sorted into the corresponding folders in the Share Folder for easy management. Then unmount and disconnect the WIFISD2 from your computer. Press down the power button for 2 seconds to put it in Wi-Fi mode and use it as a Wi-Fi pocket drive.

2.1.2 USB Flash Drives
Before a USB flash drive is used in the WIFISD2, please plug your flash drive into any USB port on your computer. Your computer will detect it as a USB removable drive. In the flash drive, the Stor-N-Go App will automatically create a folder called "Share" that contains separate folders for Documents, Photos, Music, and Videos. It is recommended that your media be sorted into the corresponding folders in the Share Folder for easy management. Unmount and remove the flash drive from your computer and plug it into the USB port on the WIFISD2. Press down the power button for 2 seconds to put it in Wi-Fi mode and use it as a Wi-Fi pocket drive.
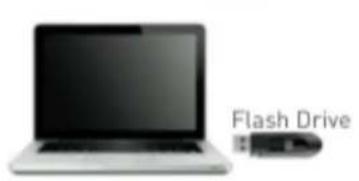
① Copy files

② Insert Flash Drive

③ Wi-Fi pocket drive
2.1.3 USB External Drives
To use a USB external drive, please plug your external drive into any USB port on your computer. Your computer will detect it as a USB removable drive. In hard drive, the Stor-N-Go App will automatically create a folder called "Share" that contains separate folders for Documents, Photos, Music, and Videos. It is recommended that your media be sorted into the corresponding folders in the Share Folder for easy management. Unmount and remove the external drive from your computer and plug it into the USB port on the WIFISD2. Press down the power button for 2 seconds to put it in Wi-Fi mode and use it as a Wi-Fi pocket drive.
Note: A 3.5" USB external hard drive must be powered by its own AC adaptor. A 2.5" USB hard drive might be powered by the WIFISD2, however it will drain the internal battery of the WIFISD2 much quicker than an SD card.
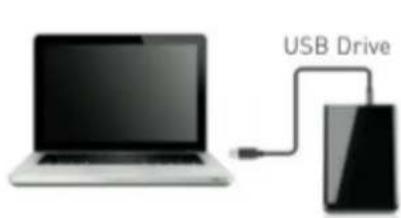
① Copy files
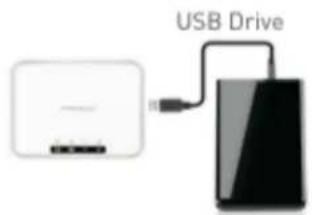
② Insert USB Drive

③ Wi-Fi pocket drive
2.2 Charging the Internal Battery
For first time use, or when the battery LED is red, you must charge the WIFISD2. To charge it, please use the included micro-USB cable to plug into a USB wall or car charger. You can also charge it through a computer's USB port. A full charge will take approximately 3 to 5 hours
depending on the output current of the power source. During charging, the battery LED will be flashing green. You may put the WIFISD2 in Wi-Fi mode and use it while charging. When the battery is fully charged, the battery LED turns off and you may unplug it from the USB charger and take it on the go.

2.3 Stor-N-Go App Download and Installation
Stor-N-Go is a free application from the App Store for iOS devices and Google Play Store for Android devices. For computer users, client applications "Stor-N-Go for Mac" and "Stor-N-Go for Windows" are available to download on the Macally website. It allows up to 5 devices to access the WIFISD2's storage to wirelessly stream music, videos, and photos simultaneously.
2.3.1 For iOS Users
Please go to the App Store and search for "Stor-N-Go" or "Macally", select and install the Stor-N-Go app onto your iOS devices.

Note: iOS 6.0 and above is required.
Wirelessly connecting your iPhone/iPad
- Turn-on the WIFISD2. Wait for few minutes to complete the initialization process. The blue Wi-Fi LED on the device should remain solid indicating that the initialization process has been completed.

- Click on the "Settings" icon on the iOS device as seen on the screenshot below.

- Click on the "Wi-Fi". Inside the Wi-Fi Networks, the "WiFiSD2-XXXX" should appear on the list. Click on the "WiFiSD2-XXXX" as seen on the image below. Enter the default password (12345678) and click on the "Join" button.

Once the "WiFiISD2-XXXX" is selected, a check mark will appear before the SSID and the Wi-Fi logo will appear after the device name on the top left of the display.
iOS User Login
- Click on the "Stor-N-Go" icon to launch the app as seen on the image below.

- Enter "admin" as the user name and the password that you assigned during the configuration process. If you did not set a password, leave it blank. You can choose user by click on the arrows when you log-in again. The password is only required during the first login. The device remembers the password and there is no need to enter it again afterward.
Wi-Fi Disk
User Name

Password



- Once the password has been entered correctly, you will see the main interface as seen on the images below.

2.3.2 For Android Users
Please go to Google Play Store and search for "Stor-N-Go" or "Macally", select and install the Stor-N-Go app onto your Android devices.
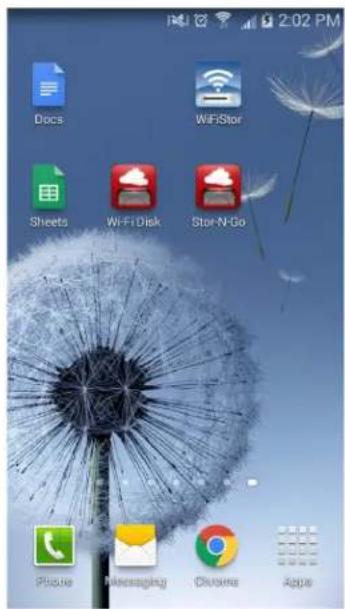
Note: Android 3.0 and above is required.
Wirelessly connecting your Android devices
- Turn-on the WIFISD2. Wait for few minutes to complete the initialization process. The blue Wi-Fi LED on the device should remain solid indicating that the initialization process has been completed.

- Click on the "Settings" icon on your desktop as seen on the screenshot below.

- Switch the Wi-Fi to ON position. Inside the Wi-Fi networks, the "WiFiSD2-XXXX" should appear on the list. Click on the "WiFiSD2-XXXX" as seen on the image below. Enter the default password (12345678) and click on the "Connect" button.
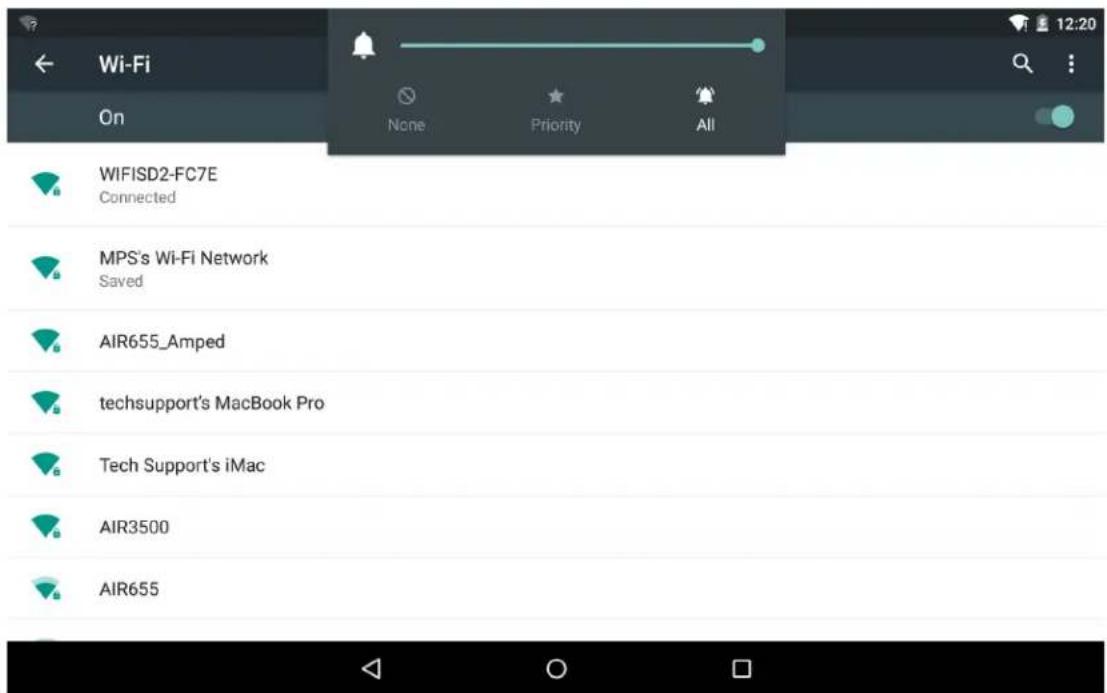
- The word "Connected" will appear under the SSID name of which is an indication that the Android Device is connected to the WIFISD2.
- Alternatively, you can use the QR Code feature to connect your Android device without going through your WiFi settings.
Launch Stor-N-Go without modifying your network settings. Then, click the small QR icon on the bottom left box highlighted in blue as seen in the first figure:
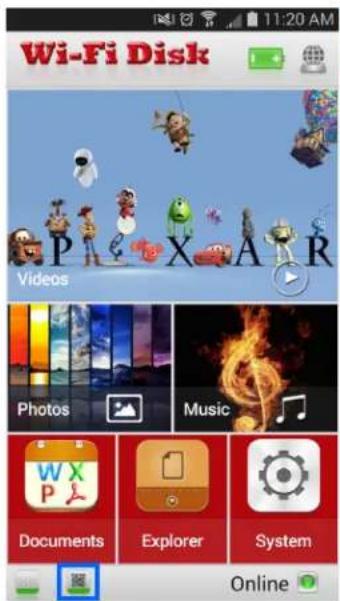
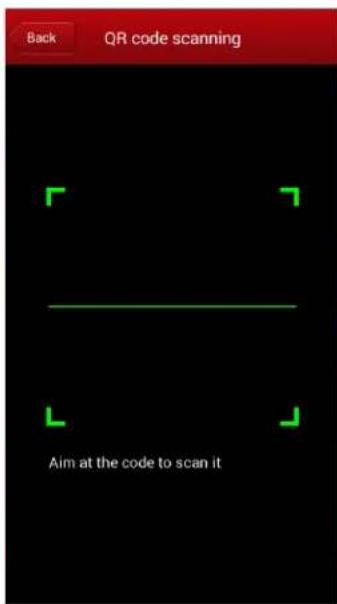

The app will bring up a QR code scanner which you can use to scan the QR code printed on the bottom of your WIFISD2 as seen in the second figure. If it is successful, the app will automatically change the network settings of your Android device to connect to the WIFISD2 as seen in the third figure.
Android User Login
- Click on the "Stor-N-Go" icon to launch the app as seen on the image below.
- Enter "admin" as the username and leave the password blank. The password is only required during the first login. The device remembers the password and there is no need to enter it again the second time you login. You can choose user by click on the arrows when you log-in again.

- Once the password has been entered correctly, you will see the main interface as seen on the image below.

2.3.3 For Mac OSX or Windows Users
The client software will connect the computer to the WIFISD2 wirelessly to share files and stream multimedia content. Please download "Stor-N-Go for Mac" or "Stor-N-Go for Windows" from http://www.macally.com/driver.html. Install on your computer and run the file.
Connecting Wirelessly to a Computer
Switch-on the WIFISD2 by pressing the power button at the front panel. Wait for few minutes until the Wireless LED remain lit. Enable the Wi-Fi feature on your PC and open the Wireless Network Connection. Select the WiFiISD2-XXXX wireless connection (default wireless SSID: WiFiISD-XXXX) and enter the default password as 12345678. Once you have successfully connected to your WIFISD2, you may now run the "Stor-N-Go" to search for your device and complete the configuration process.
Computer Client Login Utility
Double-click the "Stor-N-Go" icon on your desktop. The software utility will search all the connected devices in your network as seen on the screenshot below.

If you do not find the WiFiSD2 on the list of devices connected in your network, click on the "Refresh" button to refresh the device list.
Select the WiFiSD2 on the list, then click on the "Log In" button to enter the web interface as seen on the image below.

Type the default User Name as "admin" and leave the User Password as blank. Click on the "Log In" button to access the Web Management Interface.
If you choose to click on the "My Storage" button, enter the admin login name and password to gain access to the WIFISD2. Once successfully logged-in, it automatically mounts the storage area of the WIFISD2 onto your desktop
2.3.4 WIFISD2 Configuration using a Computer
Once your Wi-Fi enabled computer is successfully connect to the WIFISD2, using the "Stor-N-Go" application will allow you to access our built-in Web Management Interface and configure your device.
- During the initial setup, you can use our Wizard that you can find in system function as seen on the screenshot below to guide you through the step-by-step process on configuring the WIFISD2. You may cancel this process by clicking on other icons on WEB interface. If you cancel the Wizard, it will keep the factory default settings of your WIFISD2.

Click on "System" to enter wizard.

- Click on the "Next" button. By default, the Wired Access is selected.

There are two available Internet Access options –
A. Wireless Access. Connecting the WIFISD2 to another wireless device to have Internet access.
B. Wired Access. Directly connecting the WIFISD2 to the available port on the back the router.
Selecting the Wireless Access
-SSID. It will automatically search for the available wireless network connections as seen on the screenshot below.
-Password. Enter the correct password to join the wireless network connection selected.
-IP Address. Select either DHCP or Manually assign an IP address
-By selecting DHCP, the host will provide an IP address automatically to connect to the Internet
By selecting Manual, you have to manually assign an IP address to connect to the Internet

Selecting the Wired Access Option

By selecting the Wired Access option, the Dynamic IP is selected as the default setting. You can manually assign your own IP address by selecting the Static IP or PPPoE option.
Click on the "skip" button if you don't want to change it.
- Click on the "Next" button. The next step is to configure the Wi-Fi Disk.
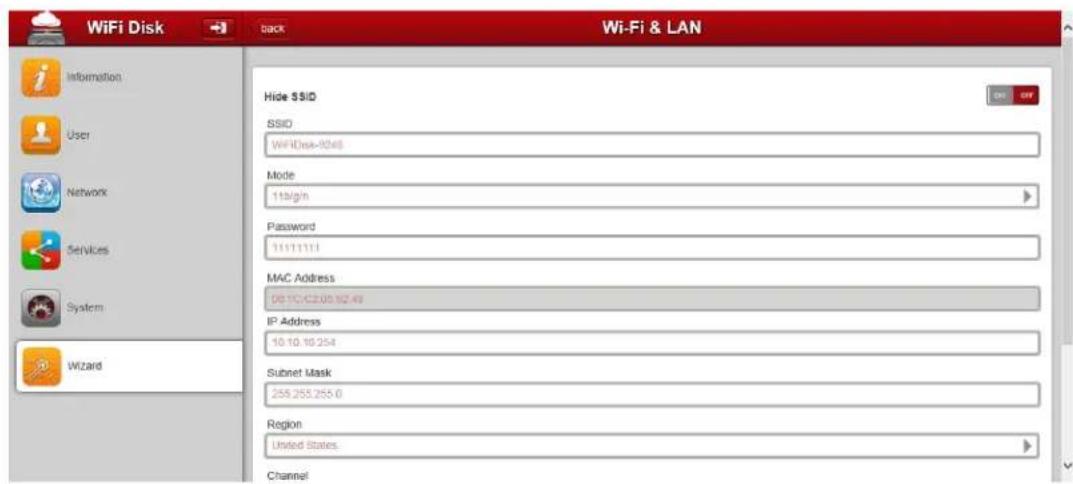
- SSID: Enter the combination of letters and numbers only. 32 characters is the maximum allowable SSID length
-
Channel: The default setting is set to Auto. There are 14 available channels to choose from.
-
Modes: The default setting is 11b/g/n. You can also manually set the modes to 11Mbps(802.11b), 54Mbps(802.11g), or 300Mbps(802.11n).
- Security: The default setting is Mixed WPA/WPA2-PSK. WPA-PSK and WPA2-PSK are also available.
- Password: The default password is set to 12345678.
- IP Address: The default IP address is set to 10.10.10.254 with subnet mask of 255.255.255.0. The IP address can be changed.
You can hide SSID by click on the

- Click on the "Next" button. The next step is to change the admin default password. Click on the "Next" button once the password has been modified. You may click on the "Skip" button to keep the default password.
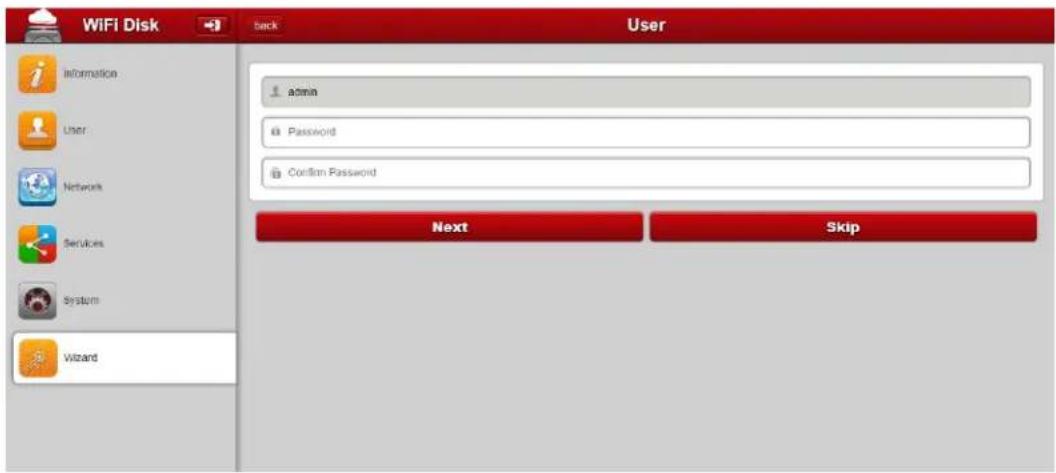
- Click on the "Next" button to complete and save the changes made.
The system will start rebooting. This process will take approximately 2 minutes as seen on the image below.

The step-by-step wizard can be canceled at anytime by clicking on other icons on the WEB interface.
3.0 Basic Functionality
3.1 iOS Device Client
Once you have successfully connected to the WIFISD2, by default, you will be inside the "Wi-Fi Disk". The "Wi-Fi Disk" is the storage in the WIFISD2 (SD card, flash drive, etc.) and the "My Device" is the device that you are using to access the WIFISD2. Few buttons that can be found inside the Main Screen as listed below.
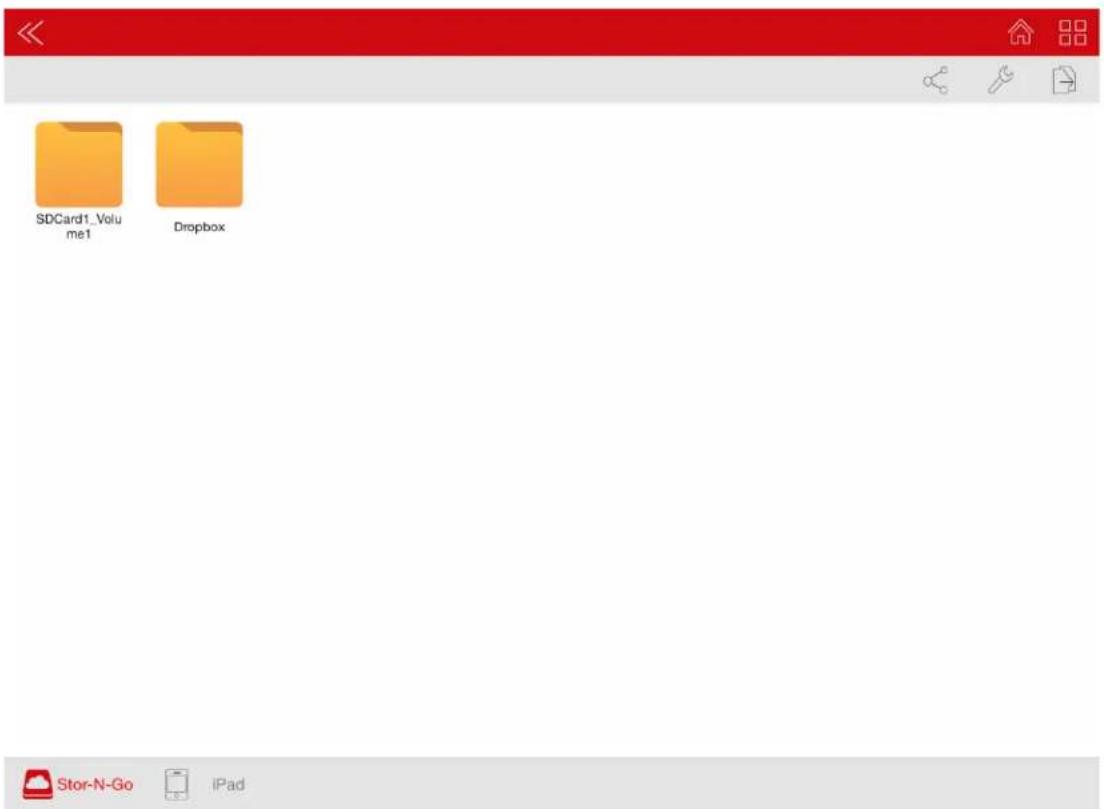
My Device Main Screen View – By default, the Documents folder, Music folder, Photos Folder, Videos folders and iPad (or iPhone) folder are available to easily organize your files inside the Share folder.

Home Button – back to the main screen.

View Button - change to List or Thumbnail view.

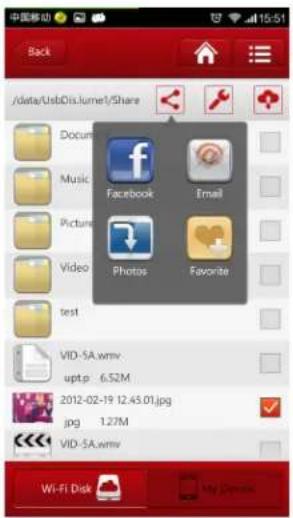
Share button –When clicked, it will have four choices, upload to Facebook, send to E-mail, download to device, marked as Favorite as seen on the image below.

Manage button – to select, create folder, copy, cut, paste, rename or delete

Transmission button—show transmission status

Wi-Fi Disk— the storage on the WIFISD2 or the Remote Storage.

iPad – the device that you are using to access the Wi-Fi SD/USB or the
Local Storage
3.2 Android Device Client
Once you have successfully connected to the WIFISD2, by default, you will be inside the "Wi-Fi Disk". The "Wi-Fi Disk" is the storage on the WIFISD2 (SD card, flash drive, etc.) and the "My Device" is the device that you are using to access the WIFISD2. Few buttons that can be found inside the Main Screen as listed below.
My Device Main Screen View – Video, Photo, Music, Documents, Explorer and System can be seen on main screen.


Wi-Fi Disk Main Screen View - the WiFiSD1_Volume1 can be seen.

Home Button – back to the main screen.

View Button - change to List or Thumbnail view.

Back Button – back to previous screen

Share button - When clicked, it will have four choices, upload to Facebook, send to others by E-mail, download to your device, marked as Favorite.

Manage button – to select, create folder, copy, cut, paste, rename or delete

Transmission button—show transmission status

Wi-Fi Disk—the storage on the WIFISD2 or the Remote Storage

Local Device – the device that you are using to access the
WIFISD2 or the Local Storage
3.3 Playing Music/Audio (iOS only)
Tip: It is highly recommended to create a folder or folders to copy all your music files into the WIFISD2 for ease of use and file organization.
The Music or Audio files can be played regardless if you are inside the "Wi-Fi Disk" or "My Device"
The main interface of Music as see on the image below:

-All Files - shows all of audio files. In list display mode, you can add files to your Playlist by clicking on the “❤️ ” icon.
-Top 25 - shows 25 files played recently, click on the "X" button on the right to delete file.
Simply locate the music or audio file that you would like to play. Click on the file name and your music will automatically play.

Note: Please consult your device manual to check whether it will support the music/audio files that you would like to play.

- When clicked, all your music will show up, you can cancel ones you dislike by clicking on the "X".

- When clicked, the current track that is playing will restart at 0:00. Clicked twice, it will play the previous track.


- When clicked, it will start playing the audio file. Click again, the pause/stop playing the file.

- When clicked, it will give four choices, upload to Facebook, send to others by E-mail, download to local device, mark as Favorite as seen on the image below.

Five play-modes:
a. - Play current song: the current track that is playing will be stopped, and playing progress will start back at 0:00.
b. - Repeat current song: the player will always play the current song, and it will
only stop playing when the button is clicked.
c. - Shuffle all songs: the music or the audio files will be played randomly.
d. - Play current list: the music or the audio files will be played sequentially.
e. - Repeat all songs: the music or the audio files will be played in sequence, and it
will only stop playing when the button is clicked.
Tip: You can click and hold, then slide the music progress button to fast-forward or rewind the music.
Note: You can exit the Music Player Interface at any time and it will continue to play the audio file in the background.
3.4 Playing Music/Audio (Android only)
Tip: It is highly recommended to create a folder or folders where to copy all your music files into the WIFISD2 for ease of use and file organization.
The Music or Audio files can be played regardless if you are inside the "Wi-Fi Disk" or "My Device"
The main interface of Music as see on the image below:


Simply locate the audio file that you would like to play. Click on the file name and your music will automatically play.
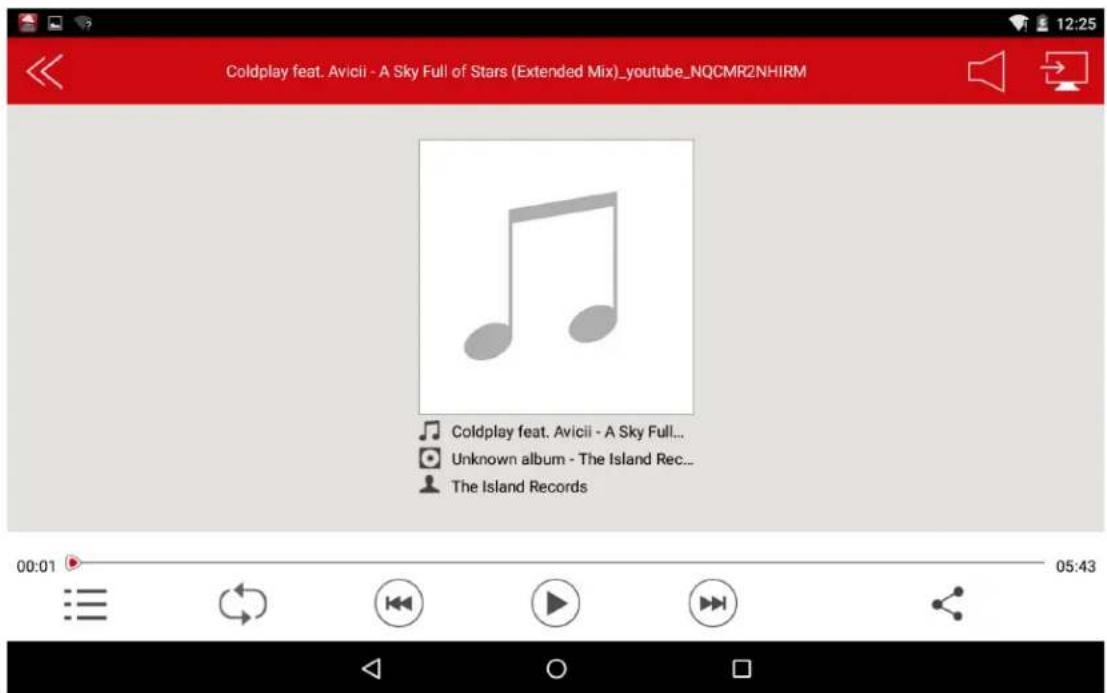
Note: Please consult your device manual to check whether it will support the music/audio files that you would like to play.

- When clicked, the current track that is playing will restart at 0:00. Clicked twice, it will play the previous track.


- When clicked, it will start playing audio file. Click again, the button will pause/stop playing the file.

- When clicked, it will give four choices, upload to Facebook, send to others by E-mail, download to local device, mark as Favorite as seen on the image below.

Five play-modes:
f. - Play current song: the current track that is playing will be stopped, and playing progress will go back to 0:00.
g. - Repeat current song: the player will always play the current track, and it will
only stop playing when the button is clicked.
h. - Shuffle all songs: the audio files will be played randomly.
i. - Play current list: the audio files will be played sequentially.
j. - Repeat all songs: the audio files will be played in sequence, and it will only
stop playing when the button is clicked.
Tip: You can click and hold, then slide the music progress button to fast-forward or rewind the music.
Note: You can exit the Music Player Interface at any time and will continue to play the audio file in the background.
3.5 Playing movie/video (iOS only)
Tip: It is highly recommended to create a folder or folders or copy all of your movie files into the WIFISD2 for ease of use and file organization.
The movie or video files can be played regardless if you are inside the "Wi-Fi Disk" or "My Device".
Main interface of movie/video:

-All Files - shows all of video files. In list display mode, you can add files to the Playlist by clicking on the "" icon. You can switch video playing to external DLNA compatible device (like TV,
PS2, XBox360) by click on the " " icon.
-Top 25 - shows 25 files played recently, click on the "X" button on the right to delete file.
Simply locate the movie or video file that you would like to play. Click on the file name and your movie will automatically play as seen on the screenshot below.
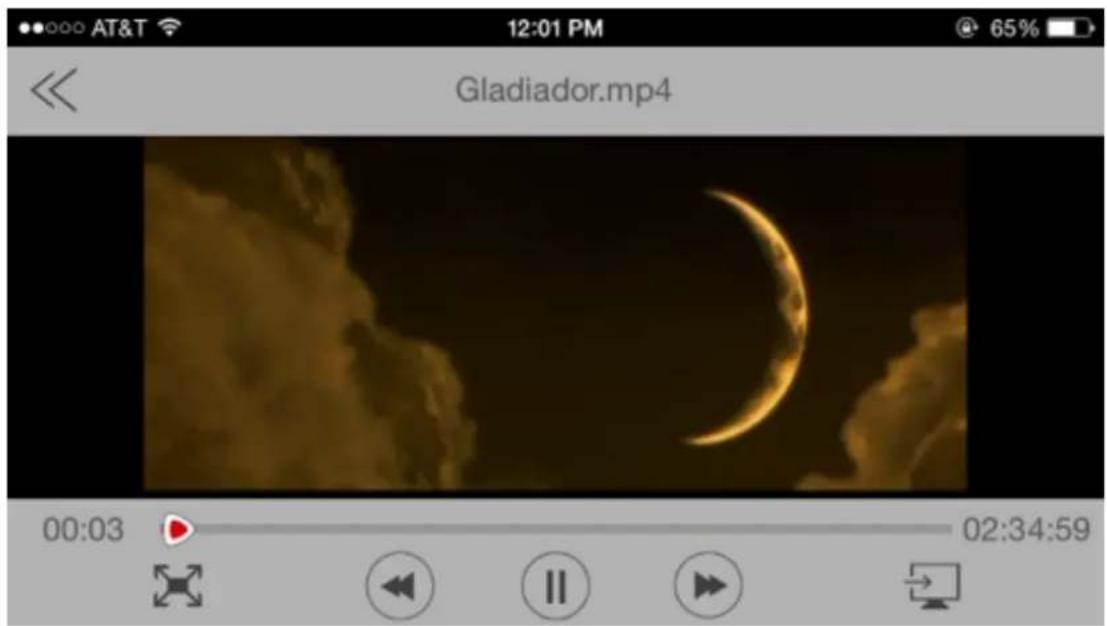
Note: Please consult your device manual to check whether it will support the movie or video files that you would like to play. The iOS native player supports .mp4, .m4v, and .mov.
If your device does not support the video file, but you have a third party player that does, you can press and hold the file for a few seconds and a menu will come up with all 3^rd party players that support the file format. Please see the image below.
![/data/UsbDisk1/Volume1 Backup 2015/06/17 14:01:34 Dropbox AcePlayer manual Share [LucarioPK Subs] P 1.4GB Explorer_Thirdparty_OpenVideo Captain Phillips.avi 1.4GB 2013/10/27 04:48:52 Coldplay feat. Avlicii - A Sky Full of Stars (Extended Mix)_youtube_NQCMR2NHIRM.mp3 9.8MB 2015/06/16 11:12:28 DieHard4.mp4 924.6MB 2015/06/25 16:11:54 DLP_PART_2_788k.wmv 10.7MB 2014/05/05 16:48:38 DSC01394.JPG 3.6MB 2014/04/23 15:46:48 Store-N-Go iPad](/content/2026/05/841821/images/510958862ad9bb4371316a5162eb4915ead0221461120bdf1d20fdcb1d3527ec.jpg)
By default, the video playback is in the landscape mode. See the button functionalities below.
- Back - When clicked, the movie that is currently playing will stop and will exit the Movie Player Interface.
-
- When WIFISD2 and DLNA device are connected to same Local network, this icon will show up. When clicked, It will show DLNA compatible device list, then you can select device to switch video playing to that device.
When WIFISD2 and airplay compatible device are connected to same Local network, icon will show up. It will show an airplay compatible device list, then you can select device to switch video playing to that device.
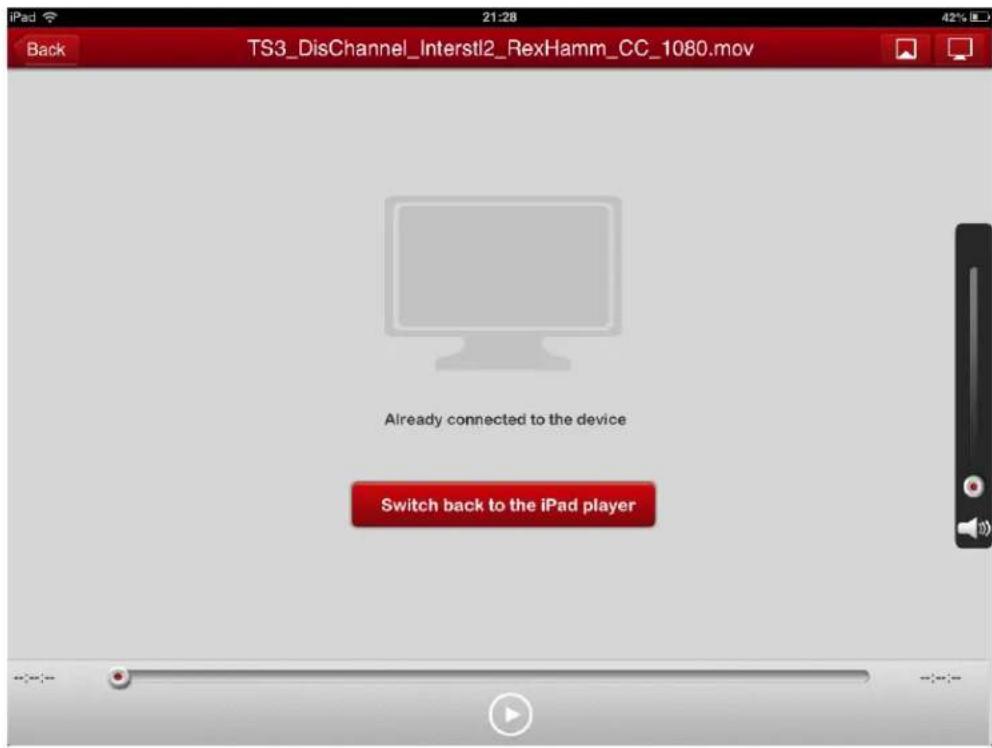
When click on 📄, you can choose a DLNA compatible device.
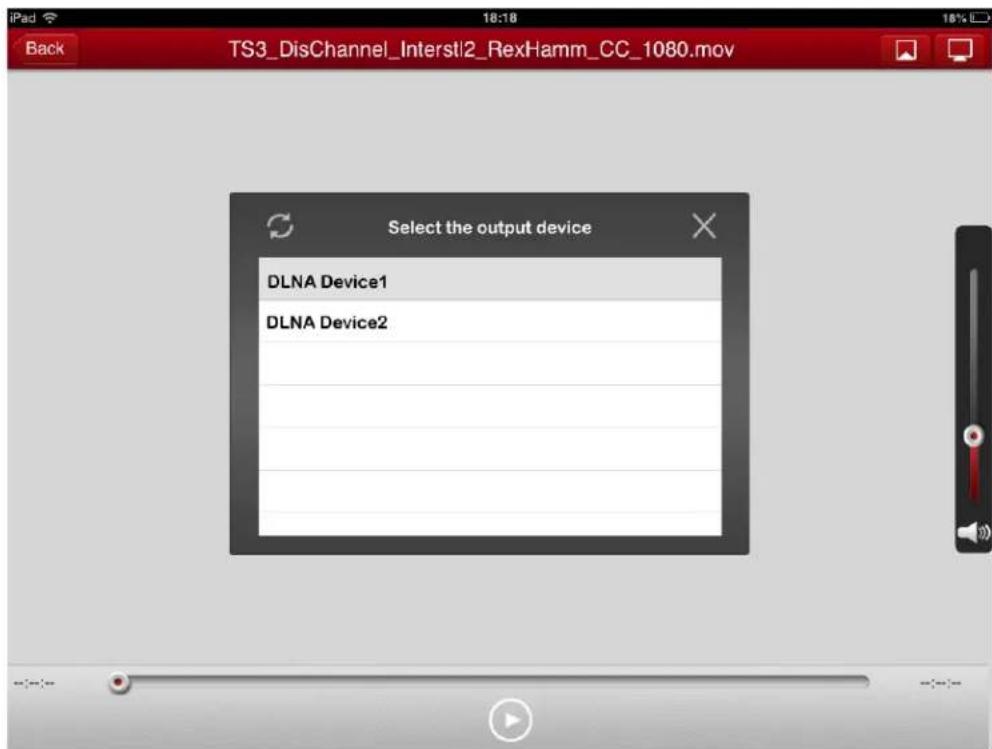
When click on ,you can choose an airplay compatible device.

-
- Click, hold and slide the progress button to fast-forward or rewind the movie.
-
- Click, hold and slide the volume control to increase or lower the volume.
-
Press and hold to fast-rewind the movie while playing.
-
Press and hold to fast-forward the movie while playing.
-
When clicked, it will start playing or resume playing the movie.
-
When clicked, it will pause the movie from playing.
-
Change size of screen.
-
When clicked, selection screen of DLNA device will come up.
3.6 Playing movie/video (Android only)
Tip: It is highly recommended to create a folder or folders to copy all your movie files into the WIFISD2 for ease of use and file organization.
The movie or video files can be played regardless if you are inside the "Wi-Fi Disk" or "My Device".
Simply locate the movie or video file that you would like to play. Click on the file name and the list of movie player will appear as seen on the screenshot below. If your device does not support the video file, but you have a third party player that does, you can press and hold the file for a few seconds and a menu will come up with all 3^rd party players that support the file format.
![China Mobile 2.4K/s Back Video/All Files [第1集_nid.mp4-]第2集_nid.mp4 [向导片-第3集.xx. Complete action using Video Project QQfile1a Set as default (no prompt for next time) Cancel](/content/2026/05/841821/images/e48a7ba5e34064674f8d21eacc64058733476921050e6fc6ecaf6b66e105a680.jpg)
Note: The control panel will vary depending on the movie player installed on your Android device. Please consult the movie player's user guide on how to control the movie.
3.7 Viewing/playing photos (iOS only)
Tip: It is highly recommended to create a folder or folders to copy all your photos into the WIFISD2 for ease of use and file organization.
Note: The WIFISD2 currently supports .jpg, tiff, .png and .bmp files.
The supported photos can be viewed as thumbnails or as a list as seen on the screenshot below. Any photos that are not supported can be viewed as a generic thumbnail or icon


Stor-N-Go

iPad
To view a photo, simply click on the photo icon or file name as seen on the screenshot below.
You can swipe your finger across the screen to manually view the photos or click the button, to automatically play the photos as slideshow.


There are few available functions to control the slideshow.
- Click the 📄 button to pause the slideshow from playing and press it again to continue playing.
- Click the button to restart or to replay the slideshow.
- Click the ➞ button to play the slideshow once and it will stop at the last image or photo.
- Click the button to add background music while playing the slideshow.
- Click the button to stop playing the background music.
- Click the <button, it will give four choices, upload to Facebook, send to others by E-mail, download to local device, marked as Favorite as seen on the image below.
3.8 Viewing/playing photos (Android only)
Tip: It is highly recommended to create a folder or folders to copy all your photos into the WIFISD2 for ease of use and file organization.
Note: The WIFISD2 currently supports .jpg, gif, .png and .bmp images.
The supported images can be viewed as thumbnails or as a list as seen on the screenshot below. Any photos that are not supported can be viewed as a generic thumbnail or icon.


To view a photo, simply click on the photo icon or file name as seen on the screenshot below.
You can swipe your finger across the screen to manually view the photos or click the button, to automatically play the photos as slideshow.


natural_image
Scenic mountain lake landscape with green slopes and blue sky, no visible text or symbolsThere are few functions that are available to control the slideshow.

- Click the button to pause the slideshow from playing and press again to continue playing.
- Click the

Click the

button to replay the slideshow.
- Click the button to play the slideshow once and it will stop at the last image or photo.
- Click the

Click the

button to stop background music.
- Click the

Click the
button, it will give four choices, upload to Facebook, send to others by to local device, marked as Favorite as seen on the image below.

Facebook

Photos

Email

Favorite
3.9 Opening/viewing documents (iOS only)
The device client app supports keynote, numbers, page, Excel, Word, .pdf, .txt and .ppt files.
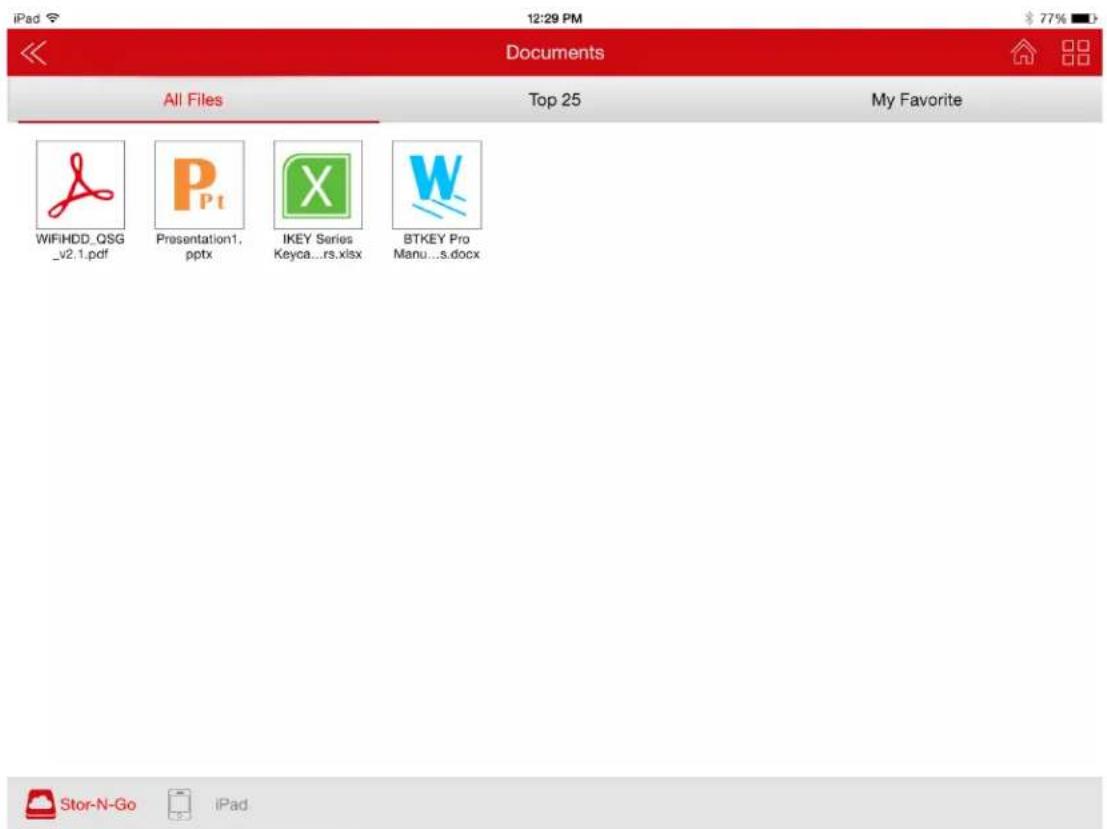
To open or view any documents, simply click on the file name or the icon. This will automatically open the supported file. Click the Back button to return from the previous screen or click the
Windows Installation
Windows 7
First plug in the U3HUBGBA into an open USB port on your Windows PC. Your PC will automatically detect the hardware and attempt to install the drivers. You will be prompted with the following window:

Select Run RTK_NIC_DRIVER_INSTALLER.sfs.exe and let the driver install. This can take a few minutes. Once Windows has completed this installation, you can verify that Windows has completed the installation by double clicking the driver icon on the bottom right of the screen. It will look like this:
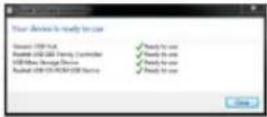
Once you see this, your Ethernet driver is installed and ready to connect to the internet.
Windows 8:
Plug the U3HUBGBA into an open USB port. The U3HUBGBA will automatically install drivers for Windows 8. After a few minutes, Windows will indicate that your hardware is ready to use. Now your U3HUBGBA is ready to connect to the internet.
Note: Internet connection is required to send emails.
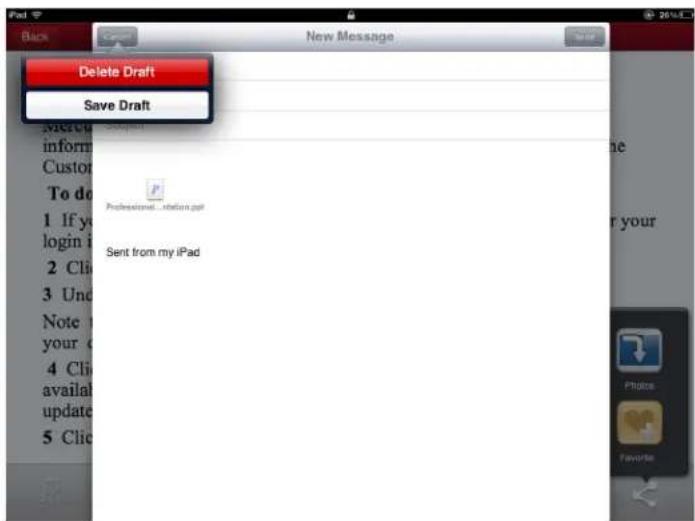
Click the "E-Mail" button. The default email app will launch automatically and the selected document will be sent as an attachment.

"Cancel" message will appear on the upper-left corner of the screen when the email is canceled. See the screen shot below.
3.10 Opening/viewing documents (Android only)
To open/view a document using your Android device, simply click on the file name or icon that you wish to open/view. This will automatically open the file using the default viewer or the installed app on your Android device as seen on the screenshot below.


Note: Internet connection is required to send emails. Due to the complexity of the Android OS, sending emails may vary depending on the app installed on your mobile device. Please consult your device manual if in doubt.
3.11 Shared functions (iOS and Android)

To send the document as an attachment, click on the button at the top right of the screen. Click on the "Email" button. Once the "Email" button is clicked, a list of installed apps will appear on your screen. You may select an app from the list that you wish to use to send or share the selected document. See the screenshot as below.

3.11.1 Copy, Delete, Upload functions (iOS and Android)
You may click on the

button at anytime to select all, create folder, copy, cut, paste, in the image below.


3.11.2 Transferring file to the My Device (iOS and Android)
Once you get connected into the WIFISD2, you can transfer a single or multiple files into the local storage (My Device).
Tip: It is highly recommended to create a folder or folders to download all your files into your storage for ease of use and file organization.
A. Use your index finger to select a single or multiple files or you may use to select all files.
B. Click on the as seen on the image below, click on the to copy files.

C. Navigate to your desired destination, click on the , and click on the

to paste files to your device.
10.14. Copying/transferring file to Wi-Fi Disk (iOS and Android)
Note: Make sure you switch to the "My Device".
-
Use your index finger to select a single or multiple files or you may use to select all files.
-
Click on the as seen on the image below, click on the to copy files.

- Navigate to your desired destination, click on the , and click on the

to paste files to your device.

3.11.3 Upload/download history and status
If you have uploaded or download multiple files to or from the WIFISD2 to your local device,
simply click the copied/transfer

button to check the files on the queue or files that were successfully
3.12 Exiting Wi-Fi Disk App (iOS)
To exit from using the Wi-Fi Disk on iPhone/ iPad devices, simply press the Home key on your Apple Device.
To reset the app, click on the Home key twice and the list of app will appear in your app manager. Swipe up to close the app. You may then click on the icon again to re-launch the app.
3.13 Exiting Wi-Fi Disk App (Android)
To exit from using the Wi-Fi Disk Android mobile devices, please use button of your mobile device. Please consult your device's manual if you are unsure how to do this.
3.14 Uninstall Wi-Fi Disk App (iOS)
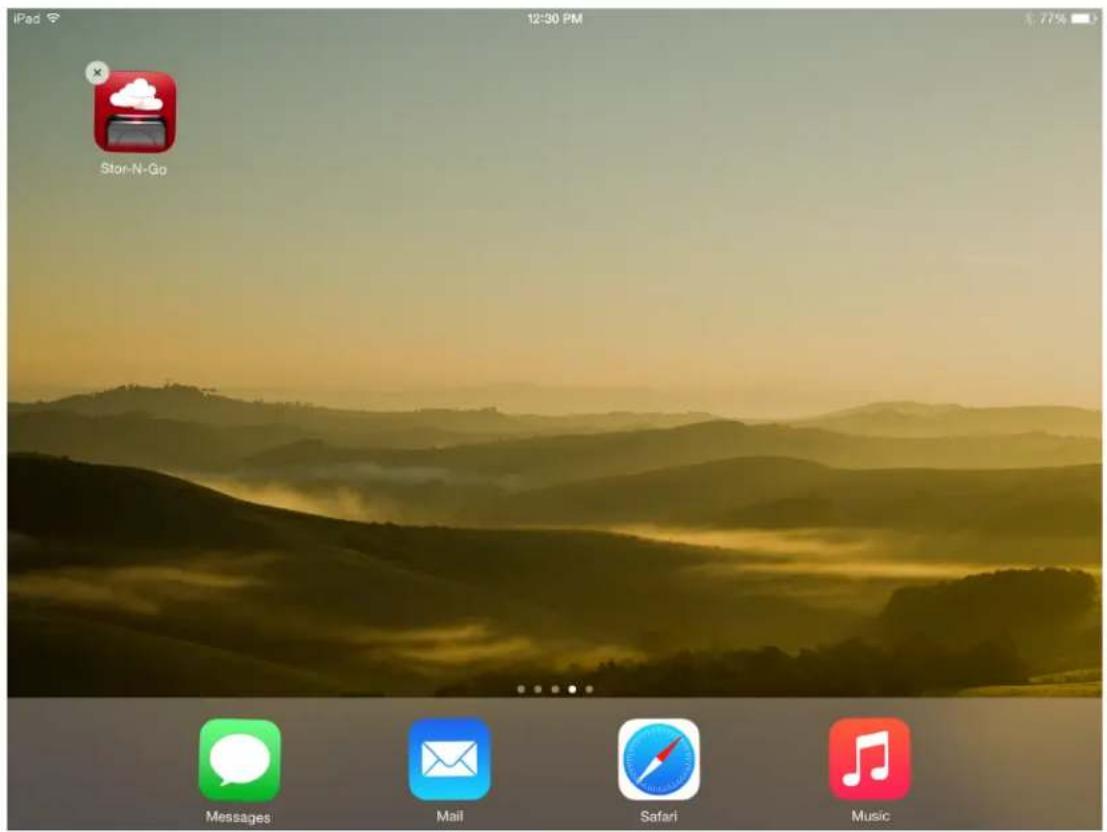
To uninstall the app from your Apple Mobile Devices, click and hold the Stor-N-Go app for few seconds. An "X" mark will appear on all the icons on your mobile device as seen on the screenshot below. Simply click on the "X" located at the top-left corner of the Stor-N-Go icon and this will remove the app from your Apple device.
3.15 Uninstall Wi-Fi Disk App (Android)
To uninstall the WiFiSD app from your Android mobile devices, see the instructions below.
Note: Uninstalling app on the Android devices will vary. Please consult your mobile device manual prior to removing any application.
- Click on the Settings icon from your desktop.
- Go into the application manager.
- Locate and select the Stor-N-Go app.

- Click on the "Uninstall" button.

- A warning "Wi-Fi Disk. This application will be uninstalled." Click the "OK" button to continue uninstalling the app or click on the "Cancel" button.
3.16 Backup Contacts
When you launch Stor-N-Go, on the bottom left there is an icon that will lead to the backup
feature. Click on it to continue (the icon looks like )


Select Contacts Backup on the left menu. Select Start Backup

Once the backup is complete, the following screen will appear:

Your contacts are now all backed up and saved to your SD card. You can choose to restore them at anytime to any mobile device (Android or iOS).
To restore, click on Restore Backup from the same menu. It will ask you to select a file. Choose the file you already backed up, or whichever contacts backup you prefer. It will take some time to complete. Once it is complete, all contacts will be restored.

3.17 Backup Photos and Videos
When you launch Stor-N-Go, on the bottom left there is an icon that will lead to the backup
feature. Click on it to continue (the icon looks like

Select Phone Backup on the left menu. Select Start Backup. Once it is finished, you will see the following screen:

This will backup pictures and videos from your mobile device and save them to your SD card. Stor-N-Go will automatically create folders for each device that you choose to backup and put all the pictures and videos in their respective folders. You can access the files through Stor-N-Go under the Explorer Menu at the home page.

3.18 Dropbox Backup
The WIFISD2 has the option to link your Dropbox files to your SD card and sync them when the WIFISD2 is connected to the Internet.
Before setting this up, the WIFISD2 must be connected to the Internet, either wired or wireless. It is highly recommended to use a wired connection because syncing the Dropbox may include very large files.
To set this up, start at the home screen and click on "System"

Click on "Dropbox"


Click on the Dropbox icon here to get the following login screen.

Enter in your Dropbox email account and password and click "Sign In". Stor-N-Go will automatically sync your files to a folder called "Dropbox" in your main Wi-Fi Disk section. After linking your Dropbox account, you can manage it in the following screen.
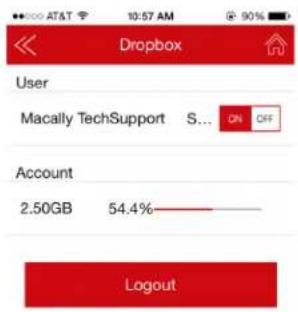
Please note that any files deleted from the Dropbox folder on the WIFISD2 will also be deleted from your personal Dropbox and computer once the WIFISD2 is connected to the internet.
4.0 Web Browser Functions
1、Our built-in Web Browser software is a unique web-based utility stored inside the WIFISD2. No software is needed to install on your computer to use this utility. Simply launch our “Stor-N-Go” client app for Mac or Windows or connect your computer’s WiFi to the WIFISD2’s WiFi signal and open your web browser and enter the 10.10.10.254 IP address. Use “admin” to log in, the main interface as seen on the image below. There is no password by default.

- Here you can manage your files on your computer. You can also use DLNA devices. Take video as an example as shown on the image below.
![WiFi Disk back Videos Videos (8) Potos (146) Music Documents Aquai Podcast Series_ Science and Bea.m4v 83.9MB 2012-04-23 15:56 Beauty And A Beet - Justin Bieber (Alex Goot, Kurt Schneider, and Chrissy Costanza Cover) (360p).avi 22.2MB 2013-06-30 06:24 Coral_Reef_Adventure_1080.wmv 102.7MB 2013-05-21 18:56 Wildlife_720.wmv 20MB 2013-05-21 18:57 [MV]BTOB-Father.mp4 86.1MB 2012-07-02 14:58 [weiphone][mv][菜单_金声清卖厅:03_1080i_for.iPad][bao_yu2002].mp4 78.6MB 2012-05-18 23:06 孙蛮委-我的幸福-480P.mp4 43.6MB 2008-10-08 09:00 王心冰-月光480P+BBE.mp4 49.5MB 2008-10-08 09:37](/content/2026/05/841821/images/d04596945a92e20d0a893a1f85d27511b735ddfefce10966596b53a3ec24429b.jpg)
Video files in shared files of DLNA will be shown in this list, click on any files to download and play, others (music, photo and documents) have the same function.
4.1 Explorer Function
Our user-friendly web based utility allows the user to upload files to the device, create folders, copy, cut, delete and rename folders and file names. It provides similar functionalities as the windows explorer of which makes our interface much easier to use.

Click on the "WiFiSD1_Volume1".


Refresh button - to refresh the display

Upload button - to upload file or files into a specific folder.

Create Folder - to create a new folder. Maximum folder name is 26 characters in
length.

Return button – to go back to parent directory
4.2 Context Menu
- On the folder level, you can click on the arrows and a pop-menu will appear. You may Copy, Cut, Delete, or Rename as seen on the screenshot below.
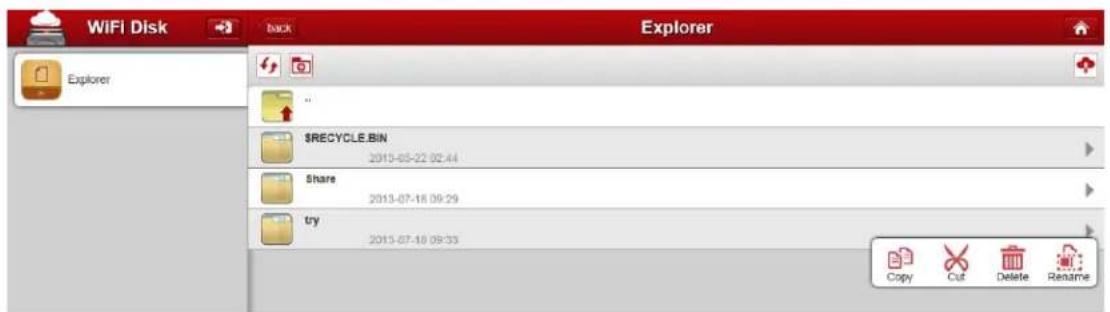
- On the file level, you can right-click using your mouse and a pop-up menu will appear. You may Copy, Cut, Delete or Rename the folder as seen on the screenshot below. Click photo files using your mouse, photos will be showed on another web window. Clicking other files (except photo), will trigger these files to be downloaded.

4.3 System settings
System settings have six parts, Device/Storage Information, User, Network, Services, System and Wizard.

4.4 Device Information
Provides information such as the Host Name, Device Serial Number, Manufacturer Name, Model Number and CPU utilization as seen on the screenshot below.

4.5 Storage Information
Provides information regarding the internal storage such as the total capacity, hard drive manufacturer and available storage as seen on the screenshot below.

4.6 User
There are two kinds of users you can choose.

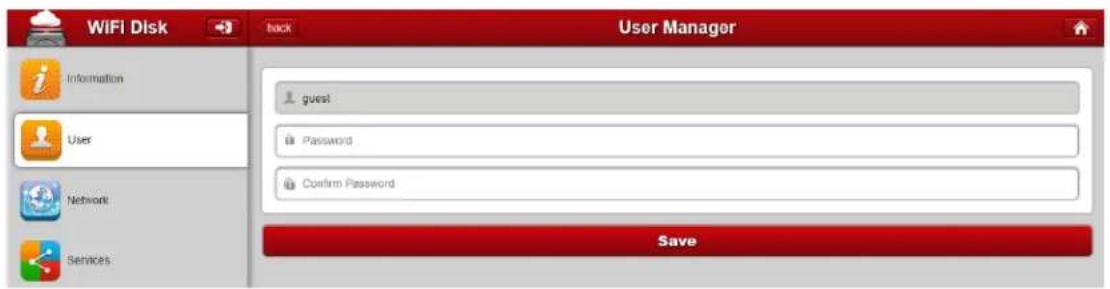
Click on the "Admin" / "Guest" button. This window will allow you to modify the admin/guest password as seen on the screenshot below. The password should be at minimum of 5 characters to maximum 32 characters in length. Click on the "Save" button the password has been changed.

4.7 Network Settings
Provides detailed information settings such as Host Name, Wi-Fi & LAN, DHCP Server and Internet as seen on image below.

4.8 Host Name
The Host Name is a name that is assigned to certain device that is connected to a computer network. The Host Name can be modified to whatever name that will fit your needs. It must begin with a letter and followed by a combination of letters and numbers. The Host Name must be at least 2 characters up to maximum 8 characters in length.

Click on the "Save" button after making any changes.
4.9 Wi-Fi & LAN
The settings inside the Wi-Fi & LAN can be modified based on your needs. See the screenshot below for the available options.
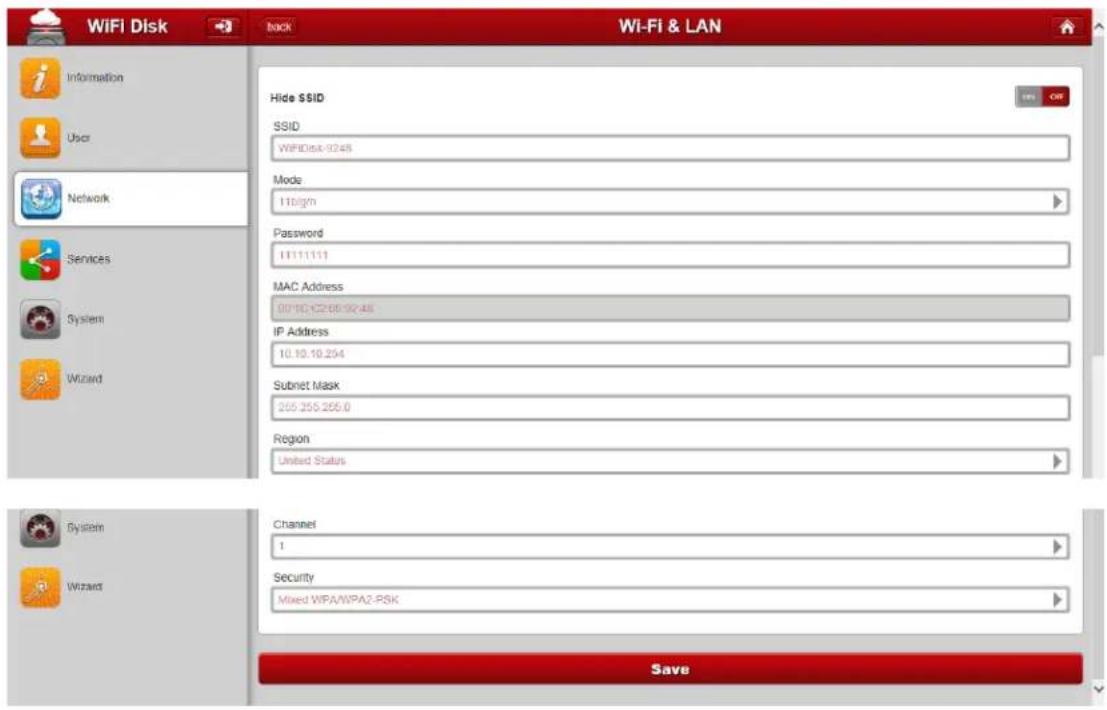
- SSID: Enter a combination of letters and numbers only. 32 characters is the maximum allowable SSID length
- Channel: The default setting is set to Auto. There are 14 available channels to choose from.
- Modes: The default setting is 11b/g/n. You can also manually set the modes to 11Mbps (802.11b), 54MBPS (802.11G), and 300Mbps (802.11n).
- Security: The default setting is Mixed WPA/WPA2-PSK. WPA-PSK and WPA2-PSK are also available.
- Password: The default password is set to 12345678.
- IP Address: The default IP address is set to 10.10.10.254 with subnet mask of 255.255.255.0. The IP address can be changed.
Click on the "Save" button after making any changes.
4.10 DHCP Server
The DHCP or Dynamic Host Configuration Protocol is a network protocol that enables a server to automatically assign an IP address to a computer connected into a network. By default, the DHCP Server option is enabled. This option can be disabled if needed and the IP address can be manually assigned.

Click on the "Save" button after making any changes.
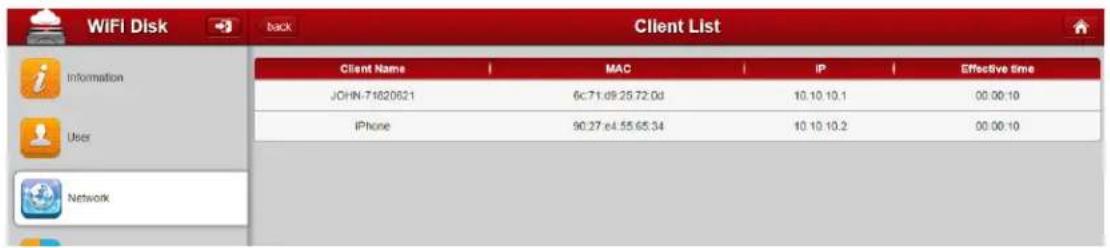
Click on the "Client List" button and it will provide a list of all the computers and devices connected to your WIFISD2 Device. Please see the screenshot below.
4.11 Internet Settings
There are two available Internet Access options –
A. Wireless Access. Connecting the WIFISD2 to another wireless device to have the internet access.
B. Wired Access. Directly connecting the WIFISD2 to the available port on the back the router.
4.11.1 Selecting the Wireless Access Option

- SSID. It will automatically search for the available wireless network connections.
- Password. Type-in the correct password to join the selected wireless network.
- IP Address. Select either DHCP or Manually assign an IP address
- By selecting DHCP, the host will provide an automatic IP address to connect to the internet
- By selecting Manual, you have to manually assign an IP address to connect to the internet
4.11.2 Selecting the Wired Access Option

By selecting the Wired Access option, the Dynamic IP is selected as the default setting. You can manually assign your own IP address or select PPPoE function or select the Static IP option.
4.12 Services
Windows sharing and DLNA service are available to access the WIFISD2

4.13 Windows Sharing Service
Data sharing and accessing the WIFISD2 product makes it simple by enabling the Windows File Services. By default, this feature is already enabled as seen on the screenshot below.

4.14 DLNA Service
Enjoy your DLNA service by enabling the Windows File Services. By default, this feature is already enabled as seen on the screenshot below.

4.15 Time Settings
The time settings can be changed based on the region where you are located. You can choose to synchronize time with the Internet or the time on your PC.
Click on the arrows and select the region you are located and switch-on the "Automatically synchronize with an Internet Time Server". This will automatically update the time when the WIFISD2 is connected to the Internet.
![WiFi Disk Back Time Settings Information User Network Services System Wizard Time Zone: [START+01:00]begining Daylight Saving Time Automatically synchronize with an Internet Time Server Date: 2013 7 16 Year Month Day Time: 20 52 15 Hours Minutes Seconds Save](/content/2026/05/841821/images/e1032de96faf8d6be2dc047421394aacbe5a23af84569ed94f177569cacca4ef.jpg)
4.16 Firmware Upgrade
The device firmware can be upgraded by following the simple steps below.

- Download and save the latest firmware version on your computer.
- Click on the upgrade icon, search and locate the firmware file on your computer and then click on the "Open" button as seen on the screenshot below.

- The latest firmware update file will appear at the bottom of the folder. Click on the "upgrade" button to continue updating the firmware.
- Once the firmware has been installed, the warning message will appear and the device will automatically reboot and will go back into the login screen.
4.17 Resetting to factory defaults
Resetting to factory defaults will reset all your customized settings or whatever changes you made back to its original settings.
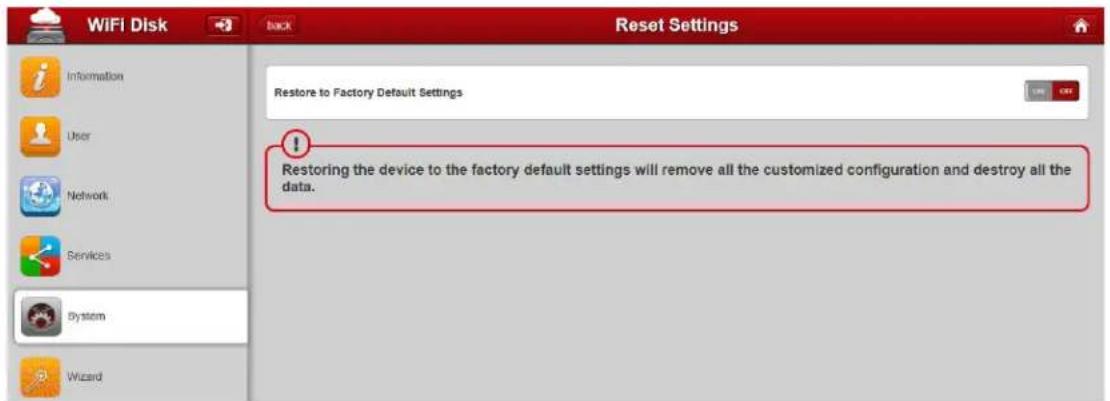
Simply click on the "on" button to open the function, and click on the "Save" button to continue.
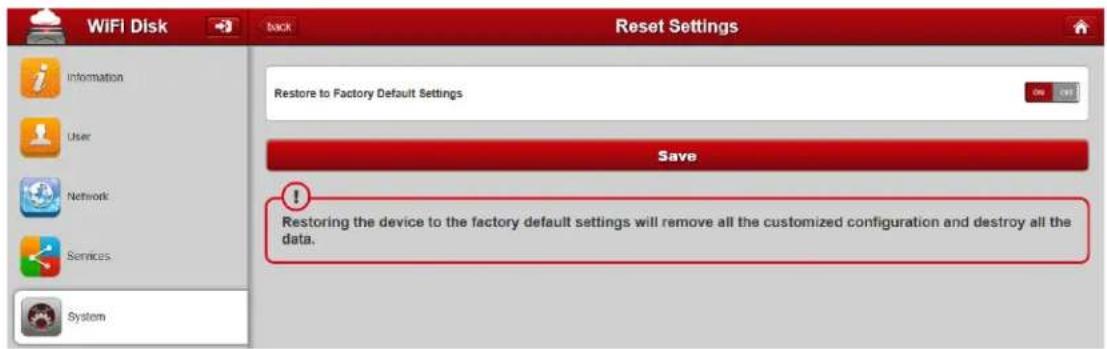
The Warning Message window will appear. Click on "ok", the WIFISD2 will automatically reboot once the restoring to the factory default settings have been completed. See the screenshot below.


Note: This process will reset the Wi-Fi SSID, and the password including the admin/guest password.
4.18 Wizard
Guide you through the step-by-step process on configuring the WIFISD2



- Mobile Wi-Fi Pocket Drive (Media Hub and Travel Router) User's Manual
- Macally Product Information
- Warranty
- Limitation of Liability
- Australia Warranty
- Table of Contents
- Introduction......6
- Setting up the WIFISD2....10
- Basic Functionality....27
- Web Browser Functions....63
- Introduction
- Product Features
- Product Functions
- Product Specification
- Hardware Basics
- Device Interface
- RJ45 WAN Port
- Setting up WIFISD2
- File Copy
- SD Cards
- USB Flash Drives
- USB External Drives
- Charging the Internal Battery
- Stor-N-Go App Download and Installation
- For iOS Users
- iOS User Login
- Wi-Fi Disk
- For Android Users
- Android User Login
- For Mac OSX or Windows Users
- Connecting Wirelessly to a Computer
- Computer Client Login Utility
- WIFISD2 Configuration using a Computer
- Basic Functionality
- iOS Device Client
- Android Device Client
- Playing Music/Audio (iOS only)
- Playing Music/Audio (Android only)
- Playing movie/video (iOS only)
- Playing movie/video (Android only)
- Viewing/playing photos (iOS only)
- Viewing/playing photos (Android only)
- Opening/viewing documents (iOS only)
- Opening/viewing documents (Android only)
- Shared functions (iOS and Android)
- Copy, Delete, Upload functions (iOS and Android)
- Transferring file to the My Device (iOS and Android)
- Upload/download history and status
- Exiting Wi-Fi Disk App (iOS)
- Exiting Wi-Fi Disk App (Android)
- Uninstall Wi-Fi Disk App (iOS)
- Uninstall Wi-Fi Disk App (Android)
- Backup Contacts
- Backup Photos and Videos
- Dropbox Backup
- Web Browser Functions
- Explorer Function
- Context Menu
- System settings
- Device Information
- Storage Information
- User
- Network Settings
- Host Name
- Wi-Fi & LAN
- DHCP Server
- Internet Settings
- Selecting the Wireless Access Option
- Selecting the Wired Access Option
- Services
- Windows Sharing Service
- DLNA Service
- Time Settings
- Firmware Upgrade
- Resetting to factory defaults
- Wizard
Brand : MACALLY
Model : WIFISD2
Category : Access Point