
Connect 168D - Receiver LEA - Free user manual and instructions
Find the device manual for free Connect 168D LEA in PDF.


| Product Type | Receiver |
| Brand | LEA |
| Model | Connect 168D |
| Dimensions (W x D x H) | 430 mm x 300 mm x 50 mm |
| Weight | 3.5 kg |
| Power Supply | AC 230V, 50 Hz |
| Power Consumption | 30 W (standby <0.5 W) |
| Frequency Response | 20 Hz - 20 kHz |
| Audio Inputs | 3x RCA, 1x Optical, 1x Coaxial |
| Video Inputs | 2x HDMI, 1x Composite |
| Outputs | 1x Subwoofer (RCA), 2x Speaker terminals |
| Remote Control | Infrared (IR), included |
| Supported Audio Formats | MP3, AAC, WMA, FLAC |
| Radio Tuner | FM/AM with 30 presets |
| Dimensions (Packaged) | 500 mm x 400 mm x 150 mm |
| Gross Weight | 4.0 kg |
| Operating Temperature | 0°C to 40°C |
| Humidity | 20% to 80% (non-condensing) |
| Maintenance | Wipe with a soft, dry cloth. Do not use liquids. |
| Safety Instructions | Do not expose to moisture. Disconnect during storms. |
| Spare Parts | Remote control only (model RC-168D) |
| Repairability | Service center recommended; no user-serviceable parts. |
| General Information | Compatible with most stereo systems and TVs. |
Frequently Asked Questions - Connect 168D LEA
User questions about Connect 168D LEA
0 question about this device. Answer the ones you know or ask your own.
Ask a new question about this device
Download the instructions for your Receiver in PDF format for free! Find your manual Connect 168D - LEA and take your electronic device back in hand. On this page are published all the documents necessary for the use of your device. Connect 168D by LEA.
USER MANUAL Connect 168D LEA
USER'S MANUAL
TABLE OF CONTENTS
Table of Contents 1
Welcome Message 2
Introduction....3-7
Main Features 4
Specifications 5-6
Warranty 7
Safety Instructions....8
Front Panel 9-10
Back Panel....11-15
Accessories 16-18
Getting Started 19
Installation 19
Power Up 19
Web App UI....20-27
Connecting to the Network 21
Setting up the Web App UI 22-27
Saving Amplifier Settings 28
Loading Amplifier Settings....29
Saving Channel Speaker Tunings 30
Loading Channel Speaker Tunings 31
DSP Block Diagram 32
Glossary 33-35
Power Consumption 36-38
Support 39-40
Sustainability Statement....41-42
Declaration of Conformity 43
Document Revision Date: February 4, 2020

We've been in the deep end of the pro audio industry for a long time now. What we saw was an appetite for something new. So, we started LEA Professional – a new pro audio technology company with the freedom, agility, knowledge and passion to create not only a great audio amplifier, but also simple systems that focus on supporting you, our customer.
At the end of the day, we are just passionate about audio technology and we want to share our passion with as many people as possible. Because we know that great audio technology, is at the heart of great experiences. So, we are dedicated to providing perfect sound reinforcement through all of our products.
We're deeply proud of our Connect Series amplifiers and we can't wait for you to get working with them. We truly believe that we've produced the best looking, best performing product with the best technology at the best price for you.
Although we've strived to create simple systems and proactive technologies, we are dedicated to continually supporting you with anything you need. Please don't hesitate to contact us anytime for more information, support, or just to talk audio.
As far as we're concerned, we're riding this wave together. Welcome aboard!
Get more – join our pro audio community!

Subscribe:
leaprofessional.com

Follow:
@LEAProfessional


Follow:
@LEA_Professional
CONNECT SERIES
INTRODUCING THE WORLD'S FIRST IOT-ENABLED PROFESSIONAL AMPLIFIERS

natural_image
Front view diagram of a server rack with indicator lights and ports (no text or symbols)
natural_image
Front view diagram of a server rack with indicator lights and ports (no text or symbols)
natural_image
Front view of a rack-mounted server unit with drive bays and indicator lights (no text or symbols visible)
LEA
Introducing an Internet of Things (IOT) enabled, professional-grade amplifier family – the Dante Connect Series. Perfectly suited for small to medium scale installations, these two, four, and eight channel amps feature direct HiZ (70V or 100V) or LoZ selectable by channel. With three ways to connect, you can engage the built in WiFi access point, connect to the venue's WiFi, and use the FAST 10/100MB Ethernet to connect to any local area network via Cat5 or Cat6 cable.
Then there's the Cloud...The Dante Connect Series is the first professional amplifier family to feature Cloud connectivity. Harness the power of the Cloud for remote control, monitoring, notifications and more from any of your personal devices – no software download needed! Just connect your amp to a network and start commanding your systems. Register for your free LEA Cloud account at leaprofessional.cloud
The power of the Cloud and our Web UI will set the installer up to be able to create a recurring revenue source by adding monitoring and preventative system maintenance to their service contracts. Also included is an Analog Devices 96kHz DSP with up to 48dB/Oct filters, 8 parametric EQ's, speaker protection limiting, and many more features controlled by a web-based UI.
The Dante Connect Series also features analog inputs and Dante inputs and external I/O control for remote on/off and fault monitoring.
MAIN FEATURES
Web Browser-based UI works on any device with no software to download
Direct LoZ and HiZ (70V or 100V) selectable per channel
Proprietary Smart Power Bridge double the output power of any single channel without sacrificing other channels on the amplifier
3 Ways to Connect to the amplifier 1.) Built in WiFi Access Point 2.) Connects to existing WiFi network 3.) Local Area Network Ethernet connection
3rd Party API support for most of the industry leading system processors on the market
96kHz Analog Devices DSP with Input Routing, multiple 48dB/Oct crossover filters, 8 Parametric EQ filters, user configurable speaker limiters, and real time load monitoring
Universal Switch Mode Power Supply with PFC. Operation from 100VAC – 240VAC +/-10%
Dante and Analog fully routable inputs with backup capabilities
External I/O Port for Remote On/Off and fault monitoring
Highly Efficient Class D Output Stage for low AC Current draw
| Output Power(20Hz to 20kHz) | Connect Series 88D | 8 x 80 WRMS @ 4Ω, 8Ω, 70V, 100V (40W at 2Ω, 80W at 25V) |
| Connect Series 168D | 8 x 160 WRMS @ 4Ω, 8Ω, 70V, 100V (80W at 2Ω, 160W at 25V) | |
| Connect Series 84D | 4 x 80 WRMS @ 4Ω, 8Ω, 70V, 100V (40W at 2Ω, 80W at 25V) | |
| Connect Series 164D | 4 x 160 WRMS @ 4Ω, 8Ω, 70V, 100V (80W at 2Ω, 160W at 25V) | |
| Connect Series 354D | 4 x 350 WRMS @ 4Ω, 8Ω, 70V, 100V (175W at 2Ω, 230W at 25V) | |
| Connect Series 704D | 4 x 700 WRMS @ 4Ω, 8Ω, 70V, 100V (350W at 2Ω, 330W at 25V) | |
| Connect Series 352D | 2 x 350 WRMS @ 4Ω, 8Ω, 70V, 100V (175W at 2Ω, 230W at 25V) | |
| Connect Series 702D | 2 x 700 WRMS @ 4Ω, 8Ω, 70V, 100V (350W at 2Ω, 330W at 25V) | |
| Audio Spec | Inputs | Analog: Balanced Inputs with user selectable 26 dB and 34 dB Input sensitivity (2CH = 2 inputs, 4CH=4 inputs, 8CH = 8 inputs)Dante: 8 x 8 Dante at 96kHz or 48kHz, Multicast or UnicastAES 67: Configurable via the Dante Controller Software |
| THD+N | 0.1% (20Hz to 20kHz) | |
| Frequency Response | +/- 0.5 dB @ 4Ω, 8Ω, 70V, 100V, -2.5dB @ 20kHz at 2Ω | |
| Signal to Noise Level | 105dB (20Hz to 20kHz referenced to 8Ω) | |
| Crosstalk | 70dB (20Hz to 20kHz) | |
| I/O Latency | 1 ms DSP latency under any condition | |
| Load Impedance | LowZ down to 2 ohms, 70V direct, and 100V Direct per channel | |
| Amplifier Output Classification | Class D with Proprietary Smart Power Bridge Technology allowing bridged output functionality without sacrificing an amplifier channel | |
| DC Offset | +/- 3mV | |
| DSP | DSP Architecture | Analog Devices Sigma 96kHz DSP Processor with 32-bit Core with Sample Rate Converters |
| Input Matrix | Routable matrix; any input to any output with primary and secondary input priority | |
| Crossovers | Up to 48 dB/Octave IIR Filters (Linkwitz Riley, Butterworth) | |
| Parametric EQ | 8 Band Parametric EQ per channel | |
| Output Delay | 100ms per channel | |
| Output Protection | DC, VHF, and AC Mains Protection, Overtemp and Current Limiter, fan fault detection | |
| User Adjustable Limiting | Peak Voltage and RMS Voltage | |
| Load Monitoring | Realtime Load Monitoring and Pilot Tone Detection from Internal or External Sources | |
| Control, Monitoring, Network | Network Connectivity | WiFi or 100MB Ethernet with PoE or Built in WiFi Access Point (IEEE 802.11 2.4GHz b/g/n WPA, WAP2, WEP) |
| User Interface | Web Browser User Interface, 3rd Party API control, or CLOUD control | |
| Supported Operating Systems | MAC, iOS, PC, Android | |
| Event Reporting | User Downloadable and Viewable Event and Fault log - POE allows for enhanced error monitoring | |
| External I/O | External I/O In: Toggles Remote On/OffExternal I/O Out: Indicates Amplifier Health | |
| Cloud IoT | Cloud based IoT functionality | |
| Operation | AC Mains | 100VAC - 240VAC +/- 10% 50Hz or 60Hz |
| Temperature | Storage: -20°C to 90°C - Operating: 0°C to 55°C | |
| Power Supply | Universal Switch Mode Power Supply with Power Factor Correction (No PFC in Connect Series 84D, Connect Series 164D, Connect Series 88D, & Connect Series 168D) | |
| Safety Approvals | UL, CSA,CE, ETL, FCC, CCC, KETI, NOM, ROHS, PSE | |
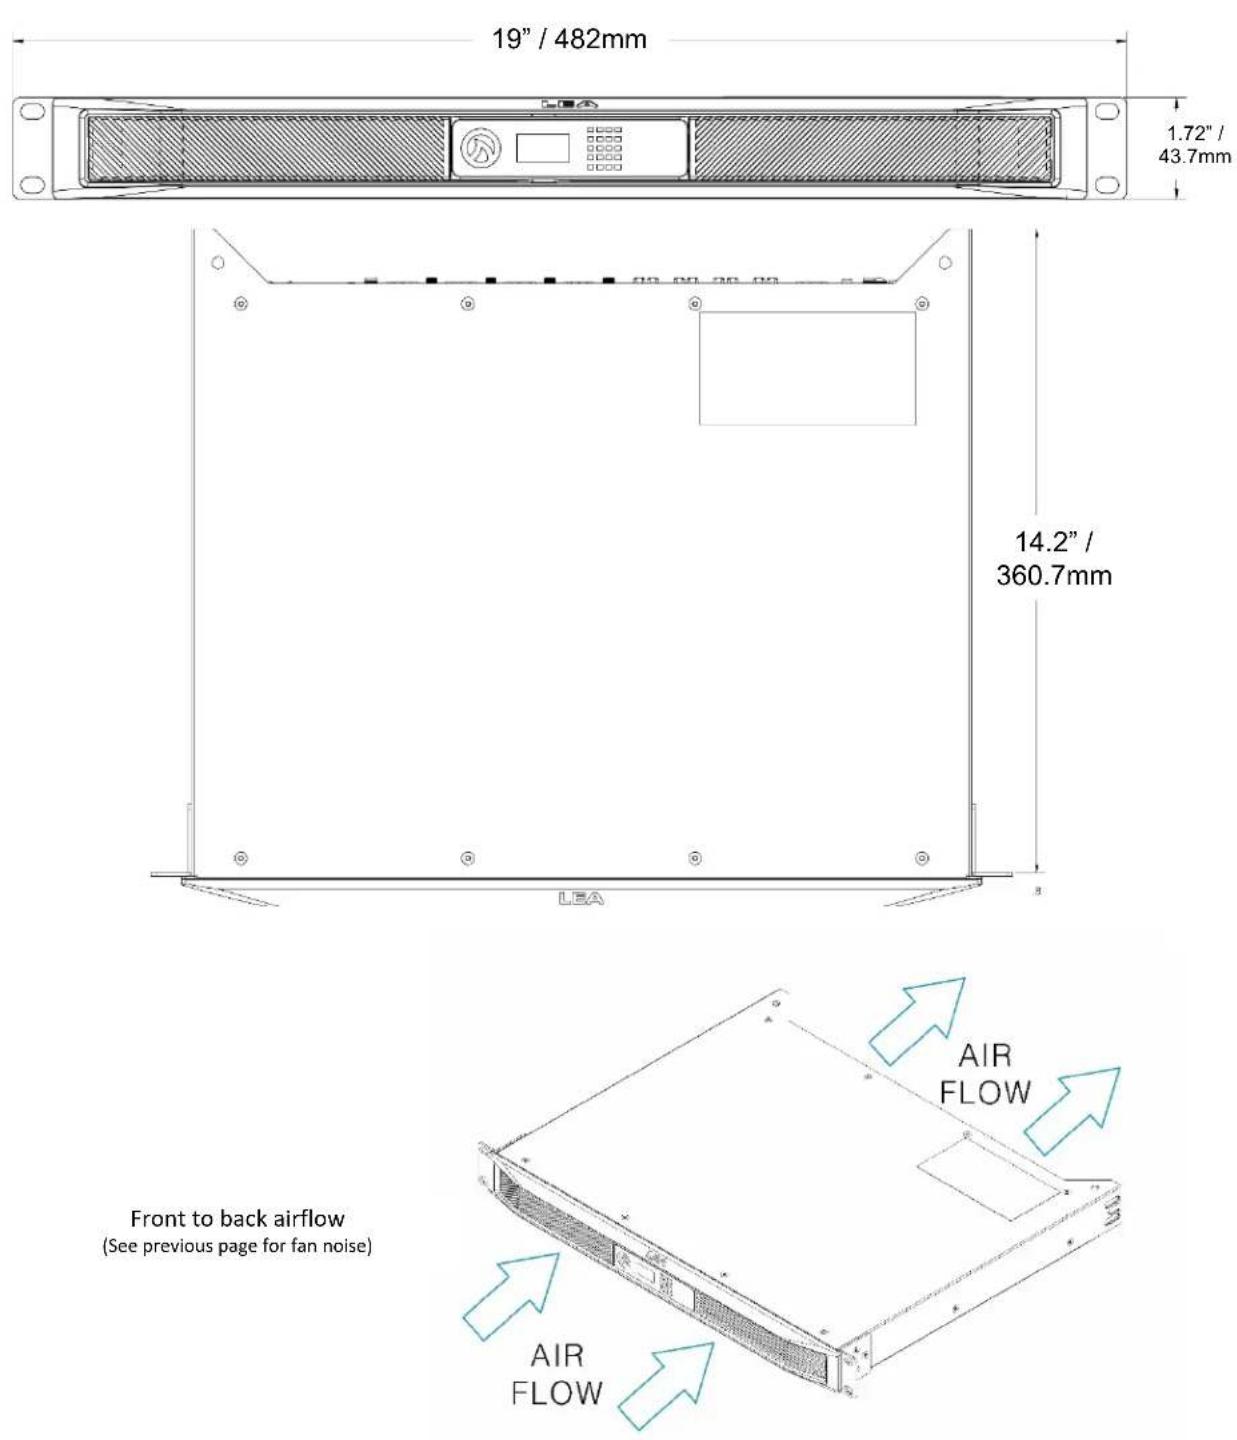
| Physical Spec | Dimensions (L x W x H) | Product: 14.25" x 19" x 1U (362mm x 482mm x 1UShipping: 20" x 22.75" x 3.75" (508mm x 578mm x 95.25mm) |
| Weight | Connect Series 352D & Connect Series 702D: 10lbs / 3.4kg | Shipping: 17.4lbs / 7.9kgConnect Series 354D & Connect Series 704D: 14lbs / 4kg | Shipping: 18.7lbs / 8.5kg Connect Series 84D & Connect Series 164D: 12.05lbs / 5.46kg | Shipping: 16.35lbs / 7.41kgConnect Series 88D & Connect Series 168D: 13.35lbs / 6.05kg | Shipping: 17.75lbs / 8.05kg | |
| Cooling | Front to Rear Variable Fan Speed CoolingFan Noise at idle is 50dB @ 1mFan Noise at 50% is 57dB @ 1mFan Noise at full speed is 63dB @ 1m | |
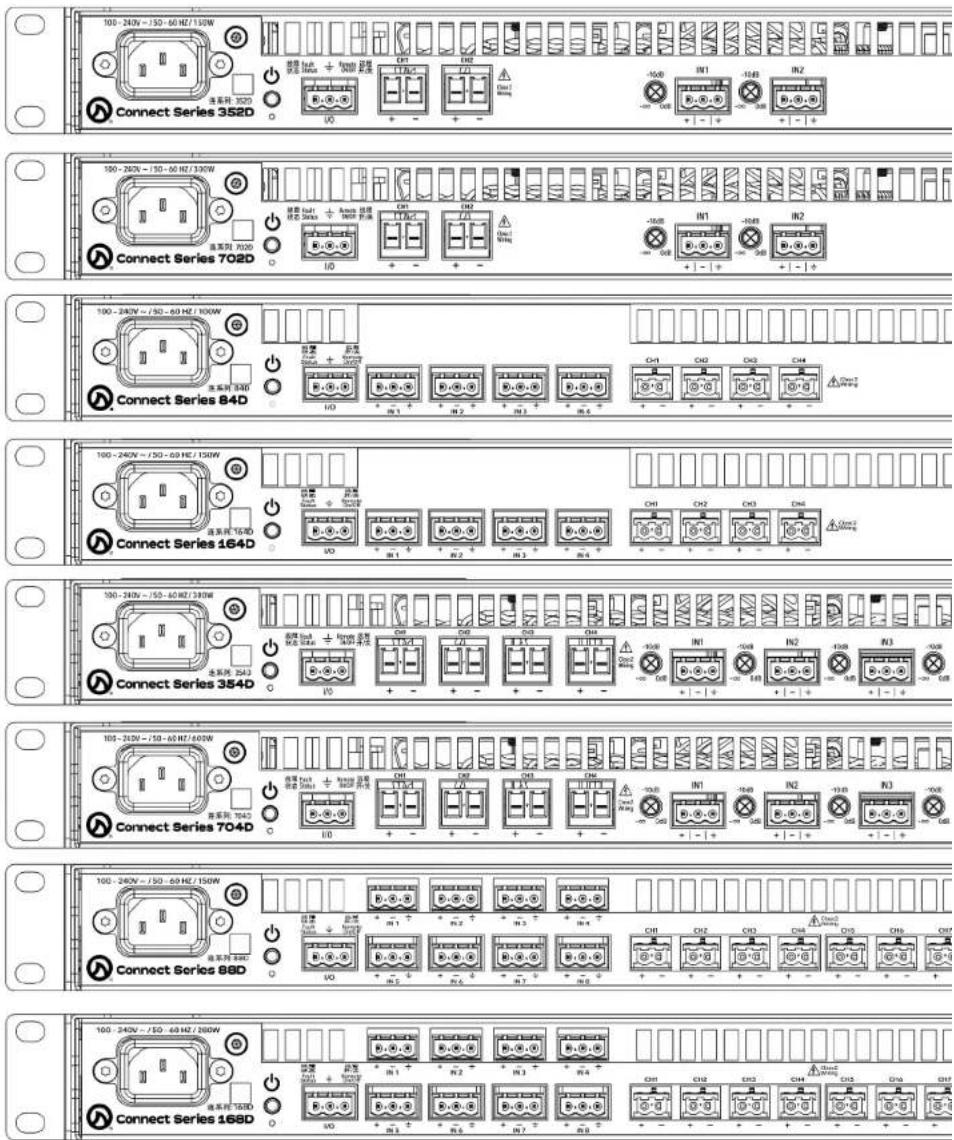
| Connectors | Analog Input: 3 pin Amphenol Anytek, Output: 2 pin Amphenol Anytek, External IO: 3 pin Amphenol Anytek, Power in: IEC, Ethernet RJ45 In for Control, Primary and Secondary RJ45 In for Dante***Note: Connect Series 84D, Connect Series 164D, Connect Series 88D, & Connect Series 168D do not have potentiometers on the rear panel |
The Connect Series' WiFi connectivity is achieved using the Japanese certified wireless module ATWILC1000 -MR110UB.
LEA LLC, 635 S. Lafayette Blvd. Building 113, Suite 109, South Bend, Indiana, 46601 U.S.A. warrants for products purchased through an authorized dealer for a period of 3 (three) years from the date of invoice to the dealer (the "warranty period") that the new LEA LLC product is free of defects in materials and workmanship. Warranty may be extended to a total of 6 (six) years if the product is registered within the first year of original invoice to dealer. Warranty is non-transferrable and is valid within the United States of America. For information on Warranty outside of the U.S.A, please contact your local distributor which can be found here: www.leaprofessional.com/partner-map
Excluded Items: This Warranty does not cover any product which has been damaged because of any misuse, mishandling, accident, or negligence. This LEA LLC Warranty is not valid if the product serial number has been defaced, altered, or removed. LEA LLC liability shall be limited to the actual purchase price of any defective unit or units of LEA LLC equipment to which a claim is made, and shall in no event include the Customers' installation costs, design costs, lost profits or goodwill, or any other direct, indirect, special, incidental or consequential damages.
LEA LLC Obligations: LEA LLC will remedy any defective product (except as excluded), by advanced replacement with new or equivalent factory refurbished product during the initial three-year warranty period. LEA LLC will provide ground shipment for the replacement product free of charge. LEA LLC will issue a return shipment call tag for the defective unit when RMA is requested.
Making a Warranty Claim: A claim for Warranty must be submitted through the original selling dealer. The dealer must notify LEA LLC of the need for Warranty replacement via LEA LLC's online partner portal. Once Warranty is verified, an RMA number will be provided along with a return shipment call tag. All components must be returned in LEA LLC factory packaging with the RMA number clearly visible on the return shipping label. If a defect product is not returned within 14 days of RMA issuance, the dealer will be billed the full dealer price of the replacement unit. Should a customer wish to have a product repaired and returned instead of replaced, customer should contract LEA Customer Care team for return instructions.
Alterations: No person has the authority to extend, amend, or modify this LEA LLC Warranty. Replacement product provided under the terms of this LEA LLC Warranty shall carry only the unexpired portion of Warranty of the originally purchased product.
Design Changes: LEA LLC reserves the right to change the design of any product from time to time without notice and with no obligation to make corresponding changes in products previously manufactured.
Country where Purchased: LEA LLC Warranty is only available in the country of the products original purchase.
- Read these instructions before installing or operating this unit.
- Keep these instructions somewhere for your reference.
- Heed all warnings provided in these instructions.
- Follow all instructions found in this document.
- Keep this unit away from water at all times.
- Use only a dry cloth to clean the unit.
- Do not block any ventilation openings. Follow the installation instructions from this manual for proper ventilation.
- Never install this unit near a heat source such as furnace, radiator, heat registers, ovens, or other anything else that produces heat.
- Do not alter the safety purpose of the polarized or grounding-type plug. If the provided plug does not fit into your outlet, consult an electrician.
- Keep the power cord away from areas at risk of being walked on, tripped over, or pinched.
- Only use attachments/accessories specified within this document.
- Unplug this device during lightning storms or when unused for long periods of time.
- Do not attempt to service this unit. All servicing must be performed by a qualified LEA service technician. To find a qualified LEA technician, contact your local LEA dealer/distributor.
- To disconnect the device from the mains, use the mains plug.
- WARNING: DO NOT EXPOSE THIS APPARATUS TO RAIN OR MOISTURE. DOING SO CAN RESULT IN AN ELECTRAL SHOCK.
- ENSURE THAT NO LIQUID-FILLED OBJECTS, SUCH AS DRINKING WATER, ARE PLACED ON THE EQUIPMENT. KEEP EQUIPMENT AWAY FROM DRIPPING OR SPASHING.
- THE MAINS PLUG OF THE POWER SUPPLY CORD SHALL REMAIN READILY OPERABLE.
MAGNETIC FIELD

CAUTION! All high-gain devices such as preamplifiers should be installed away from the device. Due to the high-power density of this amplifier, it has a strong magnetic field which can induce hum into unshielded devices that are located nearby. The field is strongest just above and below the unit. If an equipment rack is used, we recommend installing the amplifier(s) in the bottom of the rack and the preamplifier or other sensitive equipment at the top.
BE AWARE OF THESE SYMBOLS:
The lightning bolt alert is used to inform the user to the risk of potential electric shock.
The exclamation point alert is used to inform the user of important operating or maintenance instructions


DO NOT REMOVE TOP OR BOTTOM COVERS ON THIS DEVICE. NO USER SERVICEABLE PARTS INSIDE. CONTACT QUALIFIED SERVICE PERSONNEL FOR ALL SERVICING MATTERS.
FCC COMPLIANCE NOTICE
This device complies with part 15 of the FCC rules. Operation is subject to the following two conditions: (1) This device may not cause harmful interference, and (2) this device must accept any interference received, including interference that may cause undesired operation.
CAUTION: Changes or modifications not expressly approved by the party responsible for compliance could void the user's authority to operate the equipment.
NOTE: This equipment has been tested and found to comply with the limits for a Class B digital device, pursuant to part 15 of the FCC Rules. These limits are designed to provide reasonable protection against harmful interference in a residential installation. This equipment generates, uses, and can radiate radio frequency energy and, if not installed and used in accordance with the instruction manual, may cause harmful interference to radio communications. However, there is no guarantee that interference will not occur in a particular installation. If this equipment does cause harmful interference to radio or television reception, which can be determined by turning the equipment off and on, the user is encouraged to try to correct the interference by one or more of the following measures:
- Reorient or relocate the receiving antenna.
- Increase the separation between the equipment and receiver.
- Connect the equipment into an outlet on a circuit different from that to which the receiver is connected.
- Consult the dealer or an experienced radio/TV technician for help

FRONTPANEL

natural_image
Technical line drawing of a server rack with front panel and side ports (no text or symbols)
natural_image
Technical line drawing of a server rack with indicator lights and drive bays (no text or symbols)
natural_image
Technical line drawing of a server rack with indicator lights and a logo (no text or symbols)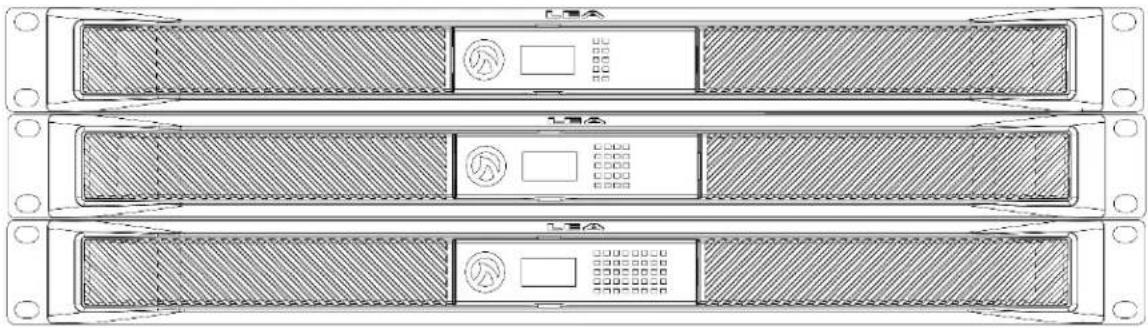
natural_image
Three identical schematic views of a server rack unit with front, side, and back panels (no text or labels)The Amp: Front Panel

Front Panel LCD
Shows IP Address, Amp Name, SSID when in WiFi Access Point Mode, and MAC Address

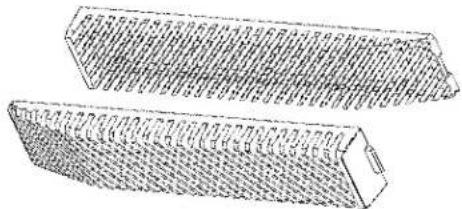
Easy Pop out Grille
Removable front grilles with washable foam filters

LEA Shark Fin
Illuminates green with AC plugged in & blue with AC plugged in and when powered on.

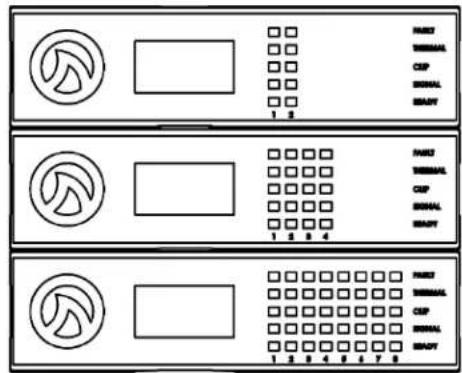
Channel Status Indicator
Channel Fault
Channel Thermal
Channel Clip
Signal Presence
Channel Ready
natural_image
Technical line drawing of two elongated 3D rectangular components with internal ribbed texture (no text or symbols)Indicator Definitions:
Channel Fault – Indicates the channel has shut down due to protection circuits. Check to make sure the output on that channel is not shorted. If all channels indicate fault, the power supply has gone into protection. No audio will be passed until the fault is resolved.
Channel Thermal – Indicates channel is at or close to over temp. When dim, the channel will start to lightly limit the output. When bright, the channel is heavily limiting the output.
Channel Clip – A red light indicates the channel is at the onset of audible clip on the output. Excessive clipping can damage the speaker connected to the amplifier. If the LED is Amber, that indicates the channel is limiting.
Signal Presence – This indicator illuminates when there is -40db of input signal present on that assigned output channel.
Channel Ready – Indicates the channel is ready to pass audio. If this indicator is off, the channel may be in standby mode or the amplifier DSP is booting up.

BACKPANEL
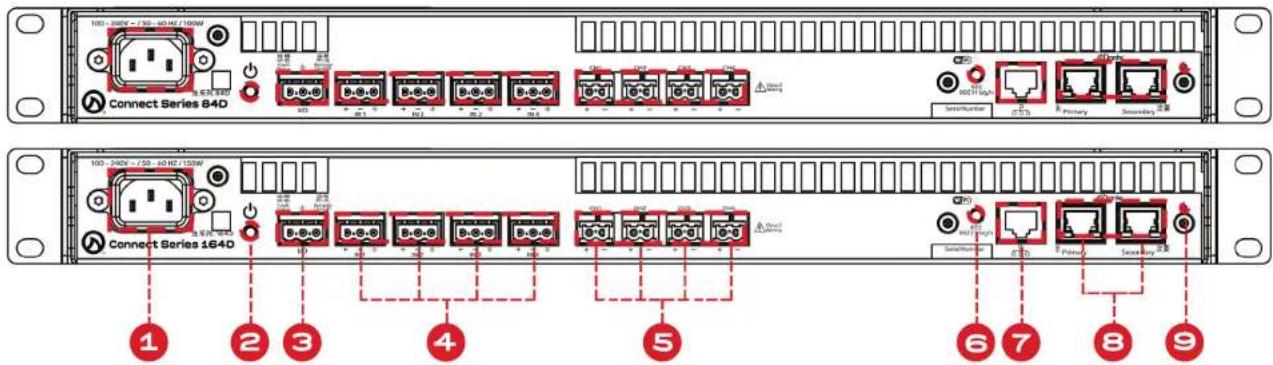
-
Channel Attenuators: CH1, CH2, CH3, & CH4 detented attenuation pots
-
IEC Type Inlet: For detachable IEC connector. 100VAC-240VAC 50Hz or 60Hz
- Power Button: ON/OFF Button Status indicated by LED below. (Green when AC, Blue when powered on)
- External I/O Port: w/ remote ON/OFF & Fault Status
- Channel Output: CH1, CH2 LowZ, 70V, or 100V selectable by channel
- Analog Balanced Inputs: CH1, CH2 (26 dB and 34 dB input sensitivity)
- Built-in Wi-Fi Access Point (WAP): Enable/Disable button
- Fast 10/100MB Ethernet: Cat5 or Cat6 input for control & monitoring
- Dante Inputs: Primary & secondary
- Factory Reset: To restore settings to factory default

4 CHANNEL MODELS
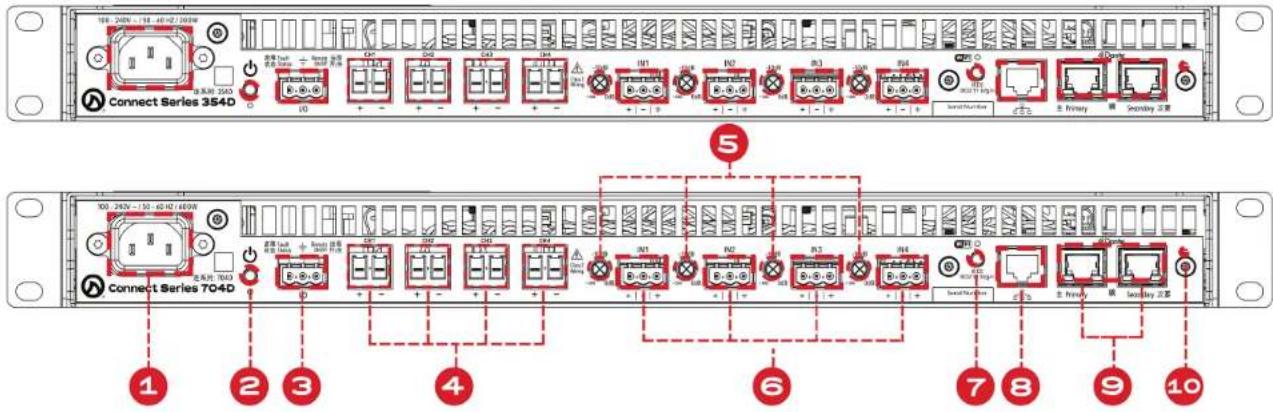
- IEC Type Inlet: For detachable IEC connector. 100VAC-240VAC 50Hz or 60Hz
- Power Button: ON/OFF Button Status indicated by LED below. (Green when AC, Blue when powered on)
- External I/O Port: w/ remote ON/OFF & Fault Status
-
Analog Balanced Inputs: CH1, CH2, CH3, & CH4 (26 dB and 34 dB input sensitivity)
-
Channel Output: CH1, CH2, CH3, & CH4 LowZ, 70V, or 100V selectable by channel
- Built-in Wi-Fi Access Point (WAP): Enable/Disable button
- Fast 10/100MB Ethernet: Cat5 or Cat6 input for control & monitoring
- Dante Inputs: Primary & secondary
- Factory Reset: To restore settings to factory default

4 CHANNEL MODELS CONTINUED
- IEC Type Inlet: For detachable IEC connector. 100VAC-240VAC 50Hz or 60Hz
- Power Button: ON/OFF Button Status indicated by LED below. (Green when AC, Blue when powered on)
- External I/O Port: w/ remote ON/OFF & Fault Status
- Channel Output: CH1, CH2, CH3, CH4 LowZ, 70V, or 100V selectable by channel
-
Channel Attenuators: CH1, CH2, CH3, & CH4 detented attenuation pots
-
Analog Balanced Inputs: CH1, CH2, CH3, CH4 (26 dB and 34 dB input sensitivity)
- Built-in Wi-Fi Access Point (WAP): Enable/Disable button
- Fast 10/100MB Ethernet: Cat5 or Cat6 input for control & monitoring
- Dante Inputs: Primary & secondary
- Factory Reset: To restore settings to factory default

8 CHANNEL MODELS


-
IEC Type Inlet: For detachable IEC connector. 100VAC-240VAC 50Hz or 60Hz
-
Power Button: ON/OFF Button Status indicated by LED below. (Green when AC, Blue when powered on)
-
External I/O Port: w/ remote ON/OFF & Fault Status
-
Analog Balanced Inputs: CH1, CH2, CH3, CH4, CH5, CH6, CH7, CH8 (26 dB and 34 dB input sensitivity)
-
Channel Output: CH1, CH2, CH3, CH4, CH5, CH6, CH7, CH8 LowZ, 70V, or 100V selectable by channel
-
Built-in Wi-Fi Access Point (WAP): Enable/Disable button
-
Fast 10/100MB Ethernet: Cat5 or Cat6 input for control & monitoring
-
Dante Inputs: Primary & secondary
-
Factory Reset: To restore settings to factory default

natural_image
Exploded view diagram of an ACCESSORIES KIT device showing internal components like connectors, seals, and screw (no text or symbols on the diagram itself)
ACCESSORIESKIT
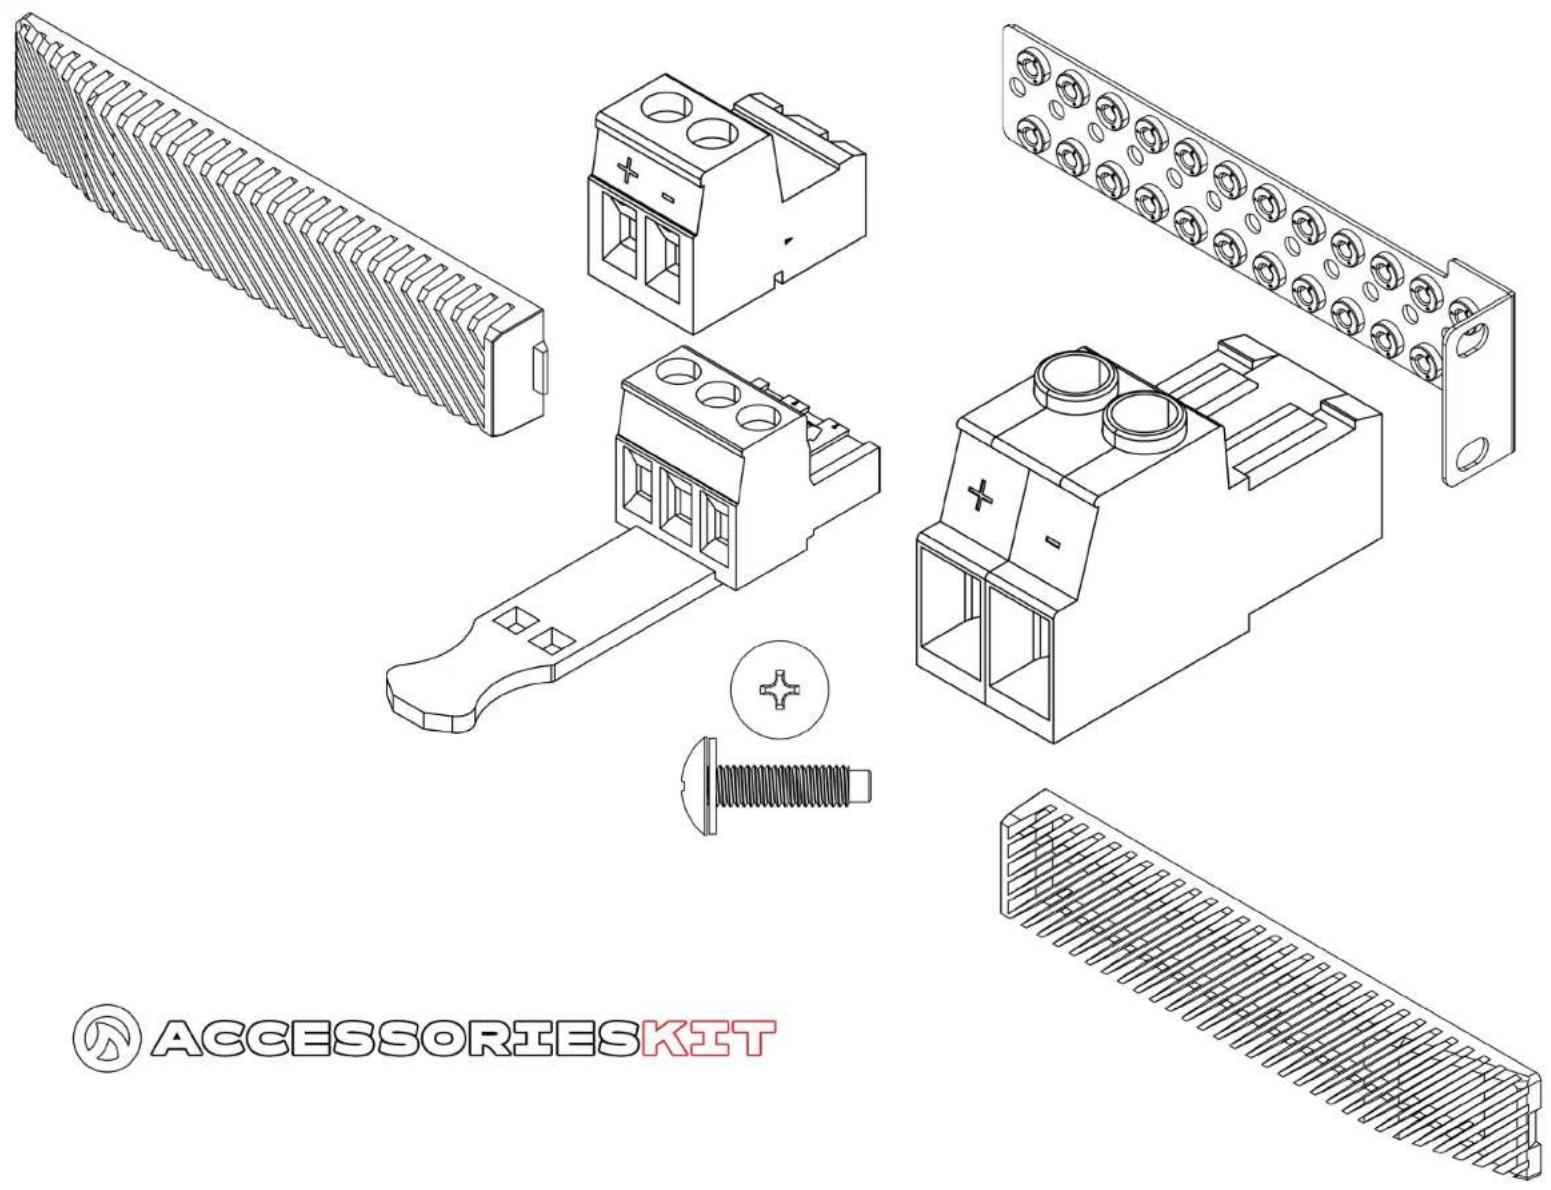
Each Connect Series amplifier comes with an accessories kit included in the box. This kit provides you with all the essential tools to properly setup your Connect Series amplifier for the first time. Reference your kit checklist below with the part numbers on the following page to ensure you have all items included in your kit. If you misplace an item or cannot find an item from the checklist below, please contact us:
Authorized U.S. Dealers, U.S. and International Distributors can access parts and service requests from the online sales portal at www.leaprofessional.shop
If you are not an Authorized Dealer or Distributor, please contact the U.S. Dealer, U.S. or International Distributor in your country where you purchased the product and they can assist you – www.leaprofessional.com/partner-map
2 CHANNEL KIT | Connect Series 352D/ Connect Series 702D
IEC Power Cord
Quick Start Guide
Record of Excellence
Welcome Card
Sticker
(2) Removable/Washable front panel Foam Filters
(3) 3 position 5.08mm Amphenol Anytek Input Connectors | (2) for analog input, (1) for External I/O Port
(2) 2 position 7.62mm Amphenol Anytek Output Connectors
4 CHANNEL KIT | Connect Series 84D/ Connect Series 164D
IEC Power Cord
Quick Start Guide
Record of Excellence
Welcome Card
Sticker
(2) Removable/Washable front panel Foam Filters
(5) 3 position 5.08mm Amphenol Anytek Input Connectors | (4) for analog input, (1) for External I/O Port
(4) 2 position 5.08mm Amphenol Anytek Output Connectors
4 CHANNEL KIT | Connect Series 354D/ Connect Series 704D
IEC Power Cord
Quick Start Guide
Record of Excellence
Welcome Card
Sticker
(2) Removable/Washable front panel Foam Filters
(5) 3-position 5.08mm Amphenol Anytek Input Connectors | (4) for analog input, (1) for External I/O Port
(4) 2 position 7.62mm Amphenol Anytek Output Connectors
8 CHANNEL KIT | Connect Series 88D/ Connect Series 168D
IEC Power Cord
Quick Start Guide
Record of Excellence
Welcome Card
Sticker
(2) Removable/Washable front panel Foam Filters
(9) 3 position 5.08mm Amphenol Anytek Input Connectors | (8) for analog input, (1) for External I/O Port
(8) 2 position 5.08mm Amphenol Anytek Output Connectors - 80W/160W
PART NUMBERS:
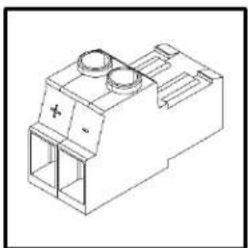
natural_image
Isometric line drawing of a mechanical component with two ports and a central hub (no text or symbols)2-Position Amphenol Anytek
Output Connector
LEA Part #: CPP10001-1
350/700W Only*
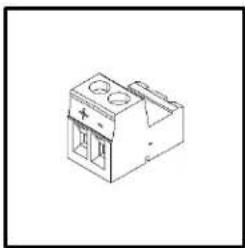
natural_image
Isometric line drawing of a simple electrical or mechanical component with no text or symbols2-Position Amphenol Anytek
Output Connector
LEA Part #: CPP10006-1
80/160W Only*
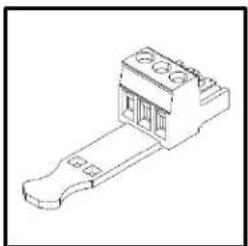
natural_image
Line drawing of a mechanical component with no visible text or symbols3-Position Amphenol Anytek
Input Connector
LEA Part #: CSP10006-1
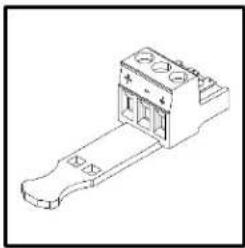
natural_image
Isometric line drawing of a mechanical component with no visible text or symbols3-Position Amphenol Anytek
Input Connector
LEA Part #: CSP10001-1
natural_image
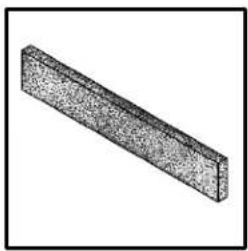
3D rendering of a rectangular block with textured surface (no text or symbols)Foam Air Filter
LEA Part #: MDF10001-1
Proper Installation
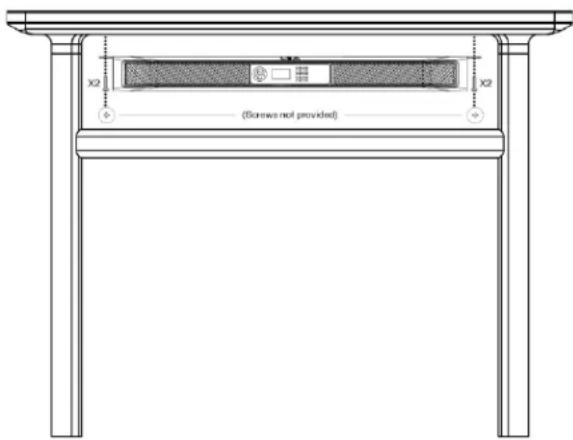
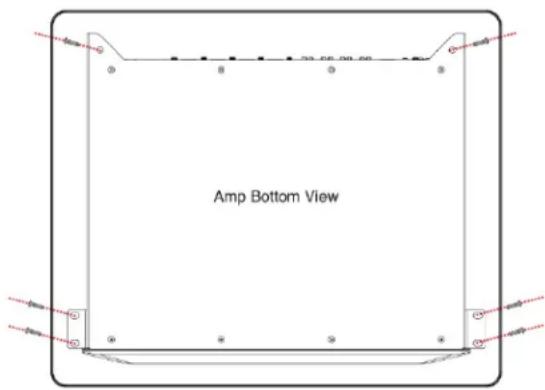
- The LEA Connect Series is a standard 1U x 19" rack mountable product.
- Out of the box, the rack ears will mount directly into a standard rack
- If you wish to mount this under a table or to the wall, the rack ears can be rotated 90 degrees and gives you the ability to mount the unit to a fixed surface.
- It is highly recommended you also take advantage of the rear rack ears to properly secure the unit.
Powering On
- You will notice there are no buttons on the front panel. This is intentional and prevents unwanted adjustments.
- To power on the unit, on the back, you will notice an icon that looks like this: ⏻. Once you press this button, you will notice a LED below the button illuminate Blue. The amplifier has now turned on and has begun its boot sequence.
- To turn the unit off, press the ⏻ icon. You will notice the blue LED will change to green. The amplifier is now in a powered off state.
a. You can also simply remove AC power to the unit to power it down as well. The LED will turn off completely. When you power the unit back on, it will return to the state it was in when you powered it off. - Factory default settings allow analog 1 to pass to channel 1 output, analog 2 to pass to channel 2 output and so on.
WEBUI
There are 3 ways to communicate with the amplifier for control and monitoring:
- A Built in Wi-Fi Access Point
- Standard Ethernet 10/100 FAST Ethernet Connection via the RJ45 Connection.
- You can connect the amplifier to the Venue's Wi-Fi network.
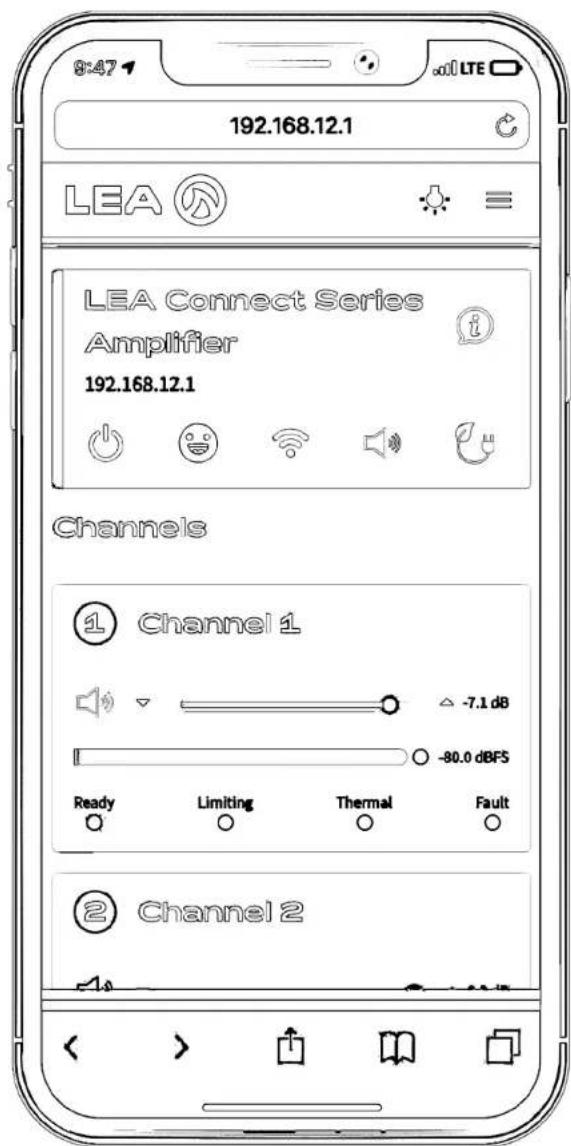
1. Built-in Wi-Fi Access Point (WAP)
The built in Wi-Fi access point allows for a point-to-point connection. This means you will only be able to communicate to one Connect Series amplifier at a time.
Using WAP
- Press Wi-Fi button on rear panel to activate Wi-Fi Access Point
- Once enabled, the front LCD now displays an SSID and IP address
- Connect your device (phone, tablet, computer) to the amplifier's Wi-Fi network
- Enter the IP address from the front panel LCD into your device's web browser
- Control and monitor via the built-in web browser-based UI
NOTE: If a Cat5 or Cat6 cable is plugged in, WAP mode is disabled. Remove the Cat cable when entering AP mode. Dante connections can stay plugged in.
2. 10/100MB FAST Ethernet
In 10/100MB FAST Ethernet Mode, you will be able to see multiple amplifiers in the Web Browser Based UI.
Using 10/100MB FAST Ethernet
- Connect via wired network using Cat5 or Cat6 cable
- Once connected, the front LCD now displays an IP address
- Connect your device (phone, tablet, computer) to the Local Area Network and enter the IP address from the front panel LCD into your device's web browser
- Control and monitor via the built-in web browser-based UI
NOTE: Out of the box, the factory default settings require the amplifier to be connected to a DHCP switch.
3. Local Area Wi-Fi Network
Connecting multiple amplifiers to the venue's Wi-Fi network allow you to see multiple amplifiers in the Web Browser Based UI.
Using Local Area Wi-Fi
- Connect to the Web App UI (same as WAP instructions above) then navigate to networking menu
- Check the "Wi-Fi Enabled" box
- Type in existing Wi-Fi network's SSID that you would like to connect to (case sensitive)
- Enter password if necessary, to see amp's IP address, subnet mask, and gateway info confirming your status and click "Save"
- Connect your device (phone, tablet, computer) to the existing Wi-Fi network you have selected for the amp
- Control and monitor via the built-in web browser-based UI
NOTE: only one connection method is available for remote connection. If Wi-Fi is enabled, the ethernet connection is shutdown. Vice versa is also true.
CONNECTSERIES CONTROL & MONITORING
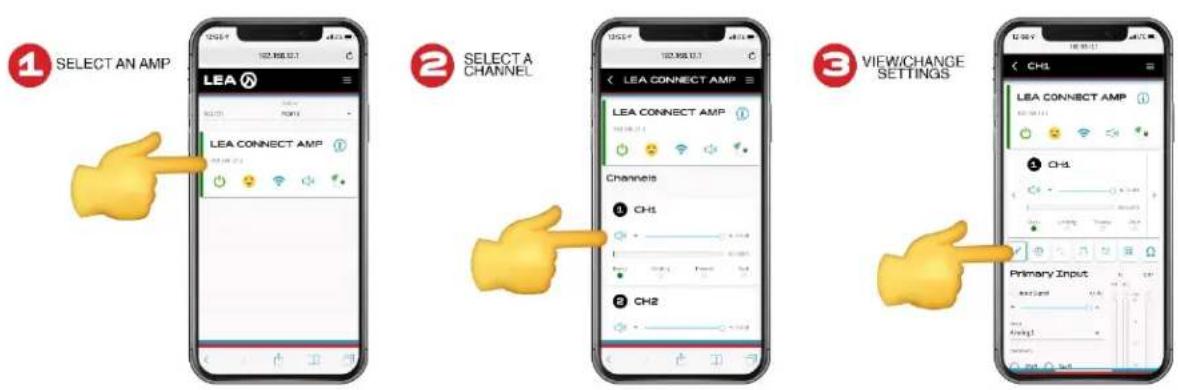
With our Web App UI, you are no more than three clicks away from anything.
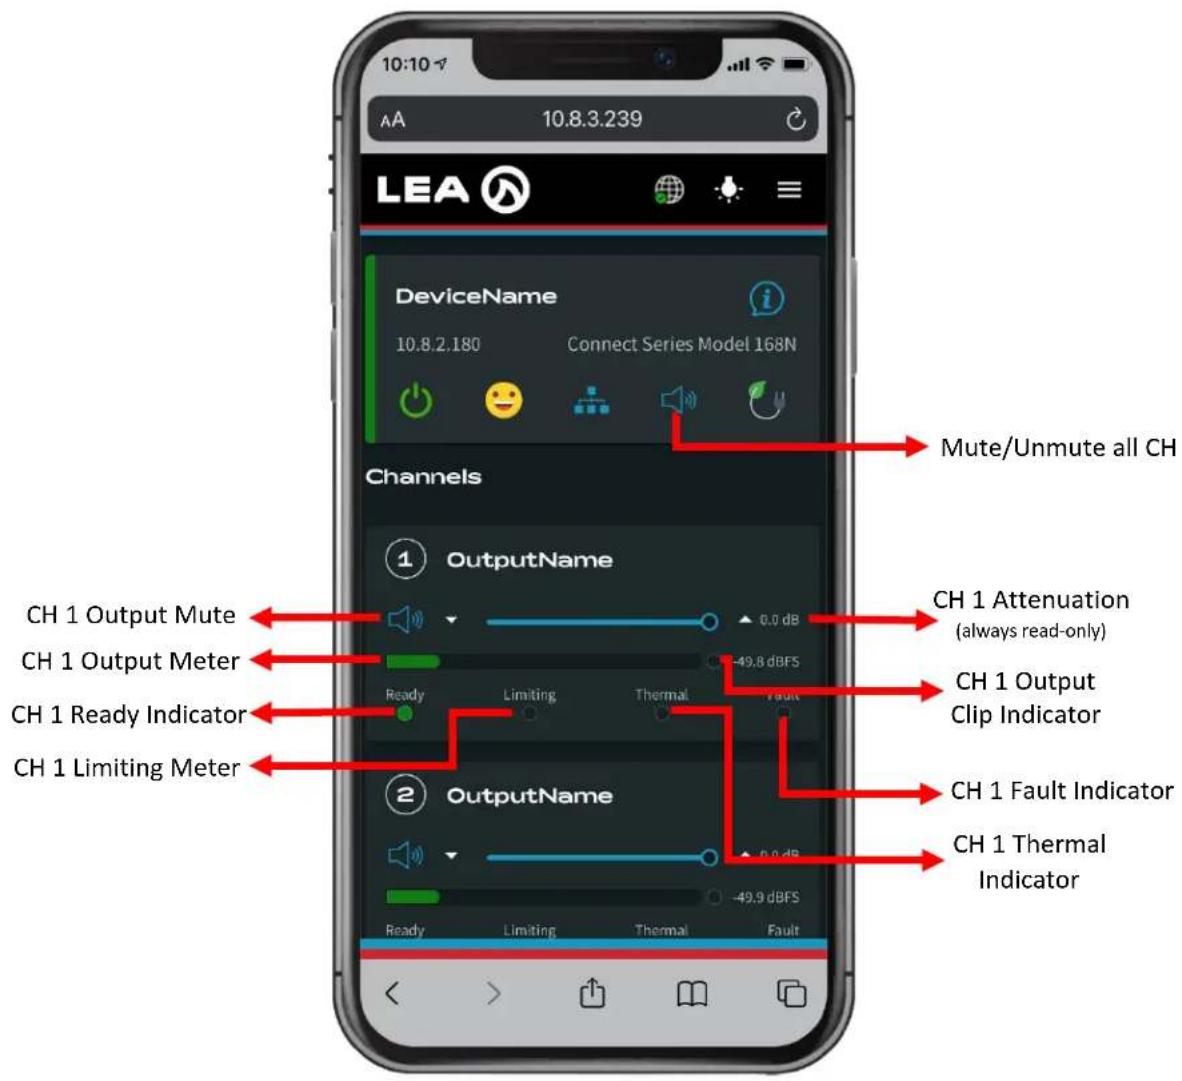
First, from the broadest view, you get a clear status check of every amplifier connected to the network. Therefore, you can see which amps are online/offline, whether they are powered on or in a standby mode, a quick performance status to report any errors or faults and even more.
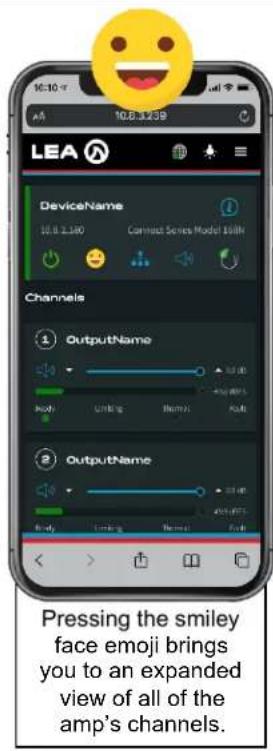
In addition, with one click, you can view the status of every channel on any given amp to quickly monitor channel performance. Such as your output meter with a clip indicator, status indicators such as Ready, Limiting, Thermal, and Fault, as well as a quick attenuation level view and channel mute button.
So then, with a second click, you can select an individual channel for control and monitoring. Lastly, with a third click you are ready to start viewing and adjusting channel settings such as Input Settings, Signal Generator, Crossover, Equalizer, Limiter, and Load Monitoring.
| 1. | FIND THE IP ADDRESS DISPLAYED ON THE FRONT PANEL SCREEN. | |
| LEA | ||
| LEA Professional Amp#123 AP: Amp-123 10.8.3.205 | □ □ □ □ □ □ □ □ □ □ □ □ □ □ □ □ □ □ □ □ | |
| 2. | ENTER IP ADDRESS IN YOUR DEVICE'S WEB BROWSER SEARCH BAR. | CONTINUE TO NEXT PAGE... |
| New Tab × + ← → C 10.8.3.205 | ||
3.
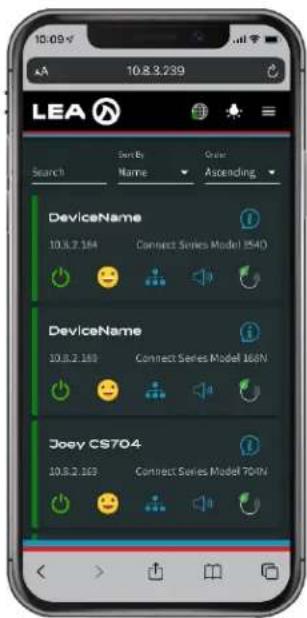
FIRST-TIME USERS WILL IMMEDIATELY SEE THIS SCREEN. THIS IS THE SYSTEM HOME SCREEN WHICH DISPLAYS ALL DEVICES CONNECTED TO THE NETWORK.
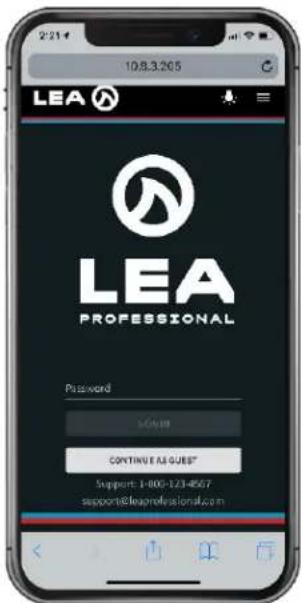
IF THE AMPLIFIER HAS ALREADY BEEN SETUP WITH A PASSWORD, YOU WILL SEE THIS LOGIN SCREEN. ONCE THE CORRECT PASSWORD IS ENTERED (OR IF GUEST MODE IS SELECTED) YOU WILL BE TAKEN TO THE HOME SCREEN SHOWN ABOVE.
NOTE: GUEST MODE IS READ-ONLY AND YOU WILL NOT BE ABLE TO MAKE ANY CHANGES
ONLINE/OFFLINE - 2 STATES
RED BAR Indicates the amp is offline
GREEN BAR Indicates the amp is online
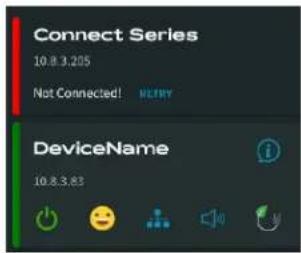
MUTE STATUS - 3 STATES

State 1 No channels muted

State 2 All channels muted

State 3 Some channels muted, some channels not muted.
POWER STATES - 3 STATES

State 1 – The amplifier is in a completely powered up state.

State 2 – The amplifier is in auto-standby mode.

State 3 – The amplifier is in remote on/off mode and has POE active.
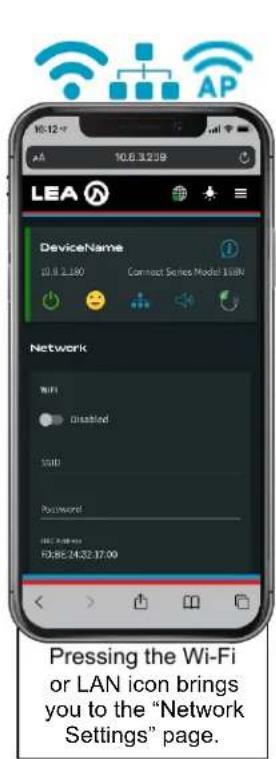
NETWORK - 3 STATES

State 1 Amp connected to venue's Wi-Fi

State 2 Amp connected via rear panel ethernet connection.

State 3 Amp connected via built-in wireless Access Point
AMP STATUS - 3 STATES

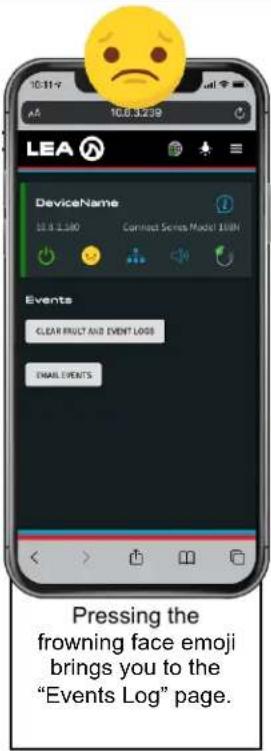
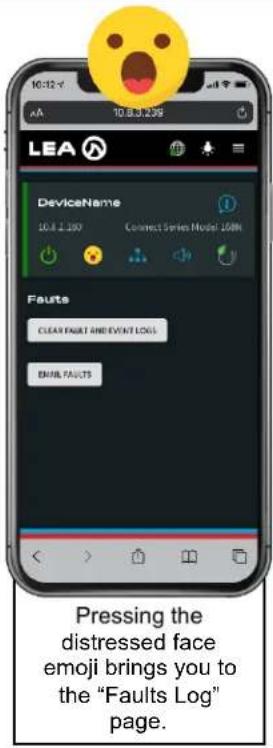
State 1 – Normal operation. No errors or faults reported.

State 2 – Amp reporting an event but no faults..

State 3 – The amp is reporting a fault.
OTHER

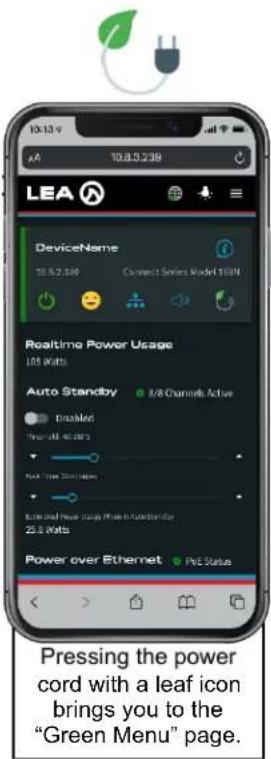
Shortcut to "Green Menu" screen.

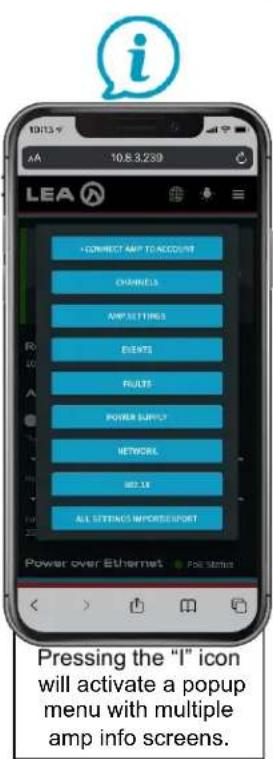
Shortcut to "Amp Info" screen.
JUST 3 CLICKS AWAY FROM ANYTHING
TAP THROUGH THE ICONS TO
GET TO CHANNEL SETTINGS

INPUTS
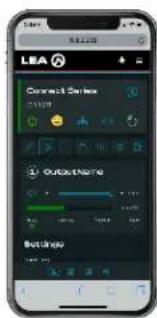

CH
SETTINGS
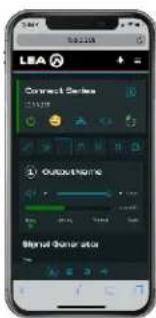

SIGNAL
GENERATOR
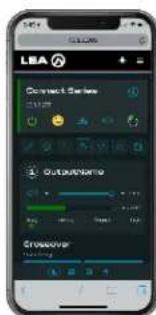

CROSSOVER
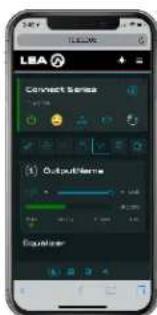

PARAMETRIC EQ
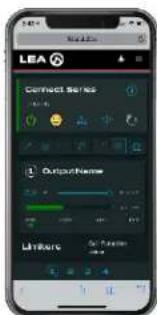

LIMITERS
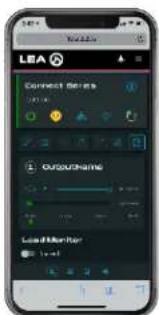

LOAD
MONITORING

SAVE AMP FILES
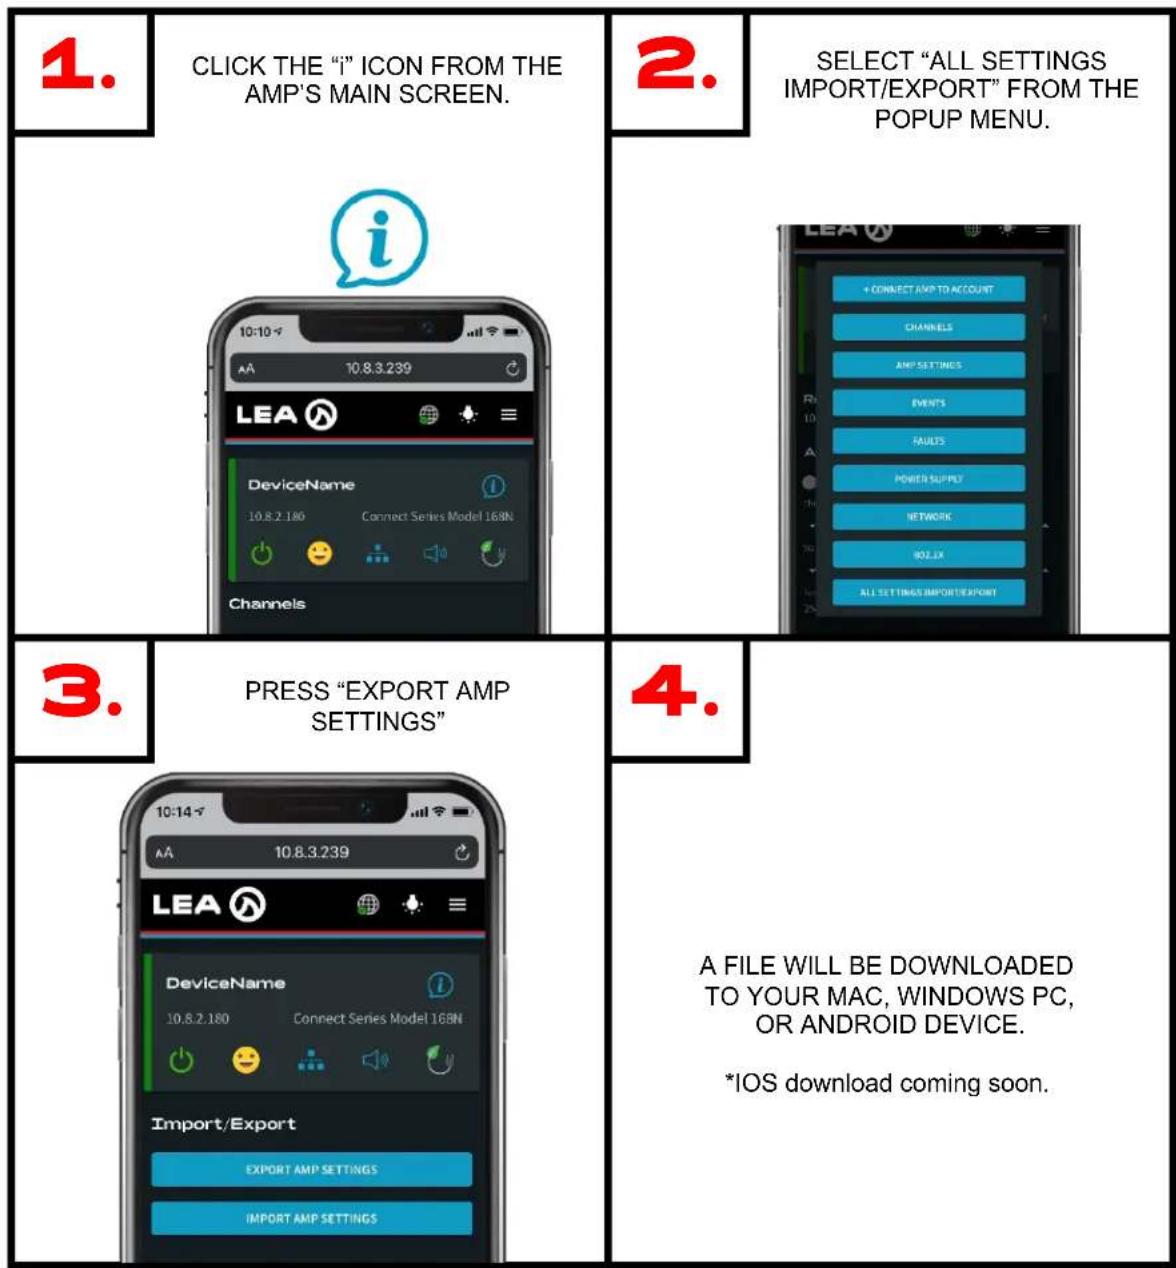
LOAD AMP FILES
1.
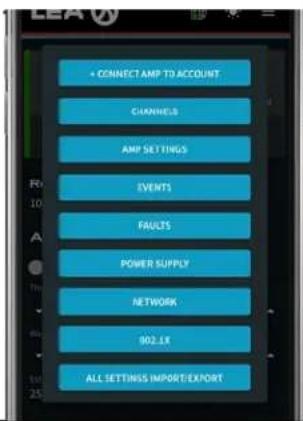
CLICK THE "i" ICON FROM THE AMP'S MAIN SCREEN.

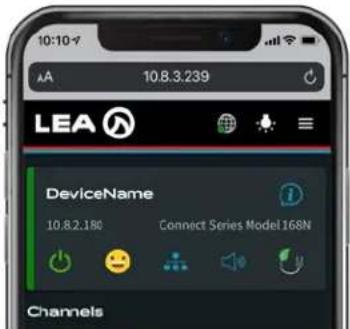
2.
SELECT "ALL SETTINGS IMPORT/EXPORT" FROM THE POPUP MENU.
3.
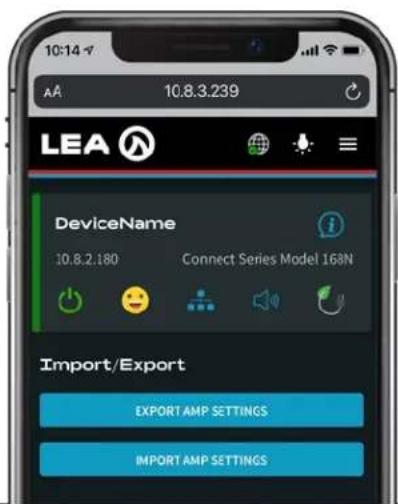
PRESS "IMPORT AMP SETTINGS"
4.
SELECT YOUR FILE TO IMPORT THEN CHECK EACH BOX YOU DESIRE AND CLICK IMPORT.
NETWORK SETTINGS
This check box will load the following information: WiFi – SSID, SSID Password, DHCP or Static. If Static IP, address and Gateway will be loaded. Ethernet – DHCP or Static. If Static, IP address and Gateway will be loaded.
AMP SETTINGS
This check box will load the following information: Amp Name, Venue Name, Rack Name, Rack Position, Installer Name, Installer Contact Info, Date of Installation, Asset Tag Number, Power Supply Settings, and Auto Standby Settings.
CHANNEL SETTINGS
This check box will load the following information for each channel: All settings for - Input Section, Signal Generator, Crossover, Parametric EQ, Limiter and Load Pages.
SAVE CHANNEL SPEAKER TUNINGS
1.
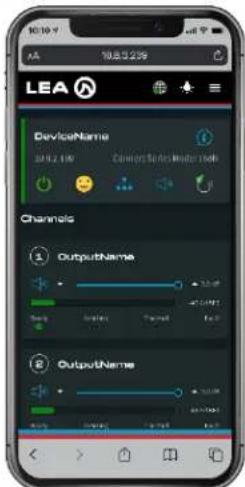
FROM THE AMPLIFIER MAIN SCREEN, SELECT WHICH CHANNEL YOU WISH TO SAVE TUNINGS FROM.
2.
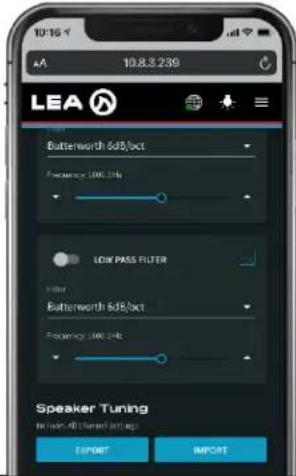
NAVIGATE TO THE CROSSOVER SETTINGS PAGE, SCROLL DOWN AND SELECT "EXPORT".

3.
SELECT "EXPORT" AGAIN AND YOUR SETTINGS WILL BE DOWNLOADED TO YOUR DEVICE.
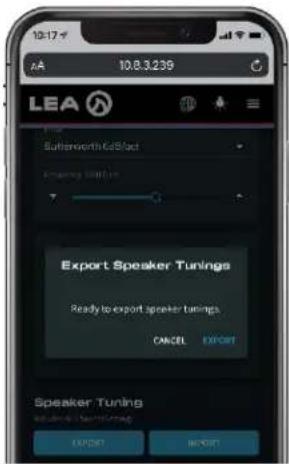
THE DOWNLOAD FILE WILL CONTAIN ALL CHANNEL INFORMATION FROM THE INPUT PAGE, SETTINGS PAGE, SIGNAL GENERATOR PAGE, CROSSOVER PAGE, PARAMETRIC EQS PAGE, LIMITERS PAGE, AND LOAD MONITORING PAGE.
LOAD CHANNEL SPEAKER TUNINGS
AVAILABLE ON MAC, WINDOWS PC, OR ANDROID DEVICES. *IOS compatibility coming soon.
1.
FROM THE AMPLIFIER MAIN SCREEN, SELECT WHICH CHANNEL YOU WISH TO SAVE TUNINGS FROM
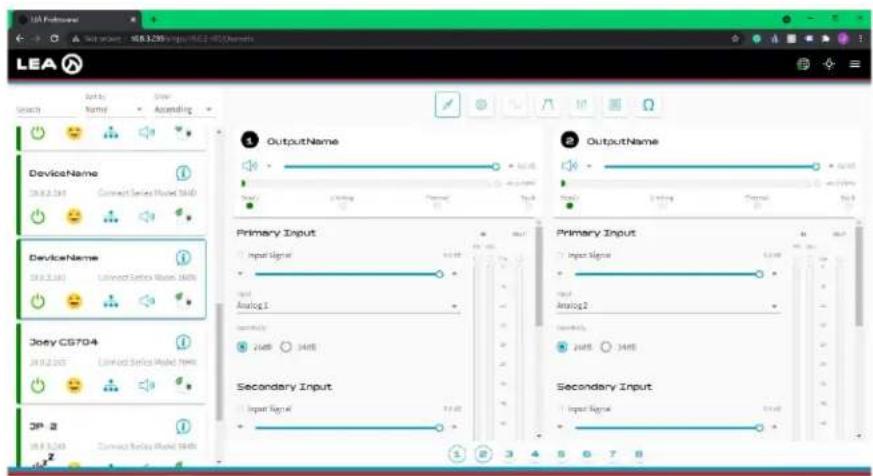
2.
NAVIGATE TO THE
CROSSOVER SETTINGS PAGE
AND SELECT "IMPORT".
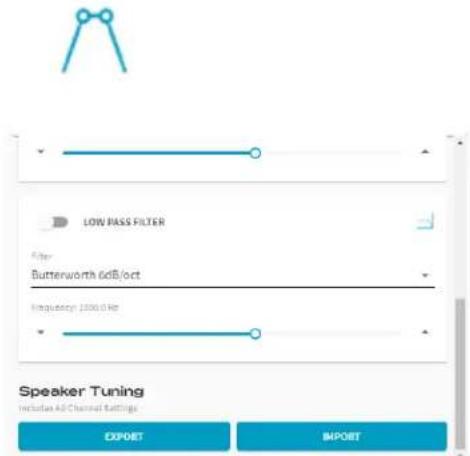
3.
SELECT THE CHANNEL SPEAKER TUNINGS FILE FROM YOUR DEVICE THAT YOU WISH TO IMPORT AND IT WILL AUTOMATICALLY BE LOADED IN.
DSP BLOCK DIAGRAM
SignalFlow
When you take the LEA Connect Series amplifier out of the box, it will be able to pass analog audio signal from the input to the output without the need to connect to the web-based browser UI. Analog 1 input passes to channel 1 output, analog 2 input passes to channel 2 output and so on. You can control the output attenuation manually via the detented potentiometers on the rear of the amplifier. If you do want to utilize the full feature set the amplifier offers, connect to the amplifier and use the web-based browser UI to monitor and control the amplifier.
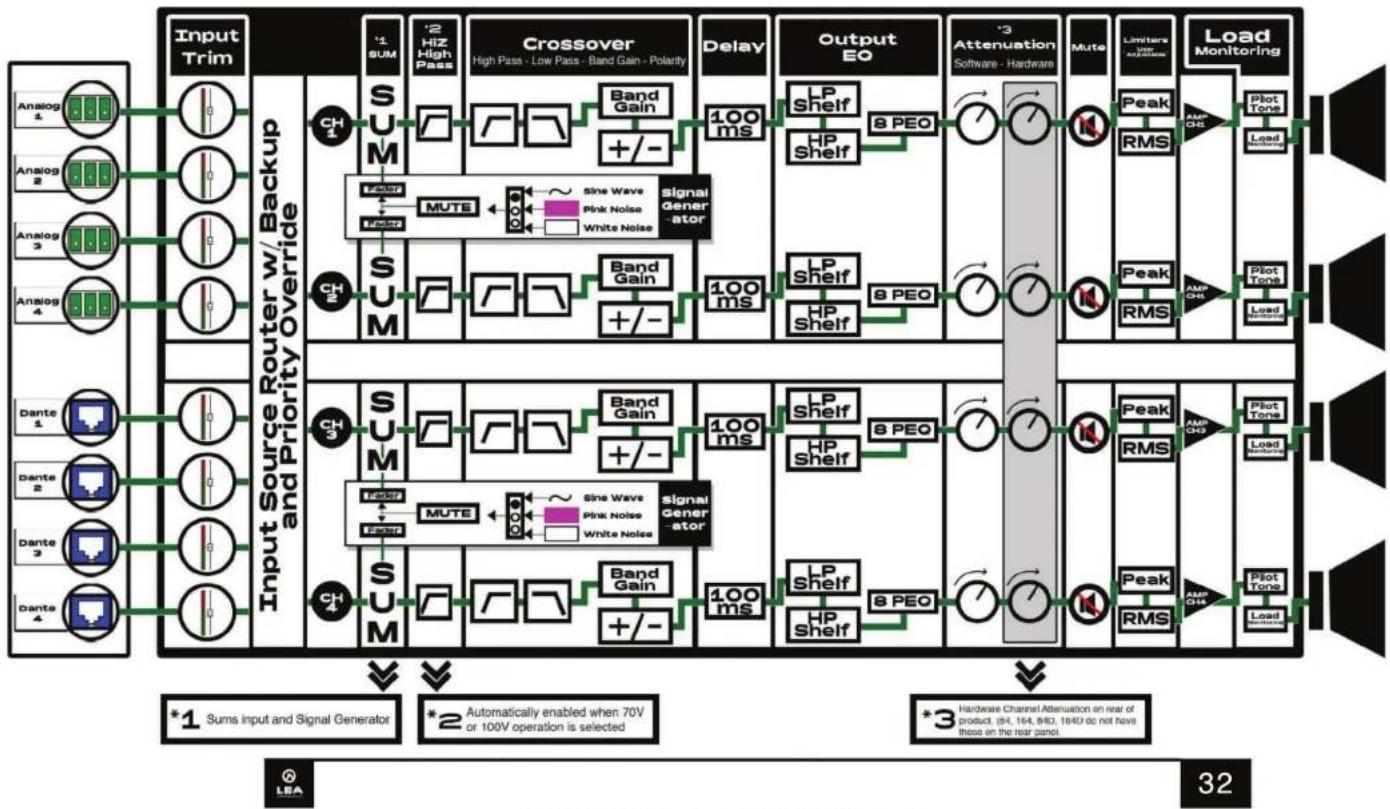
flowchart
graph TD
    subgraph Input Source
        A1["Analog 1"] --> B1["Input Trim"]
        A2["Analog 2"] --> B2["Input Trim"]
        A3["Analog 3"] --> B3["Input Trim"]
        A4["Analog 4"] --> B4["Input Trim"]
        B1 --> C1["Input Source Router w/ Backup and Priority Override"]
        B2 --> C2["Input Source Router w/ Backup and Priority Override"]
        B3 --> C3["Input Source Router w/ Backup and Priority Override"]
        B4 --> C4["Input Source Router w/ Backup and Priority Override"]
    end

    subgraph Crossover
        C1 --> D1["Sum"]
        C2 --> D2["Sum"]
        C3 --> D3["Sum"]
        C4 --> D4["Sum"]
        D1 --> E1["Sine Wave"]
        D2 --> E2["Sine Wave"]
        D3 --> E3["Sine Wave"]
        D4 --> E4["Sine Wave"]
        E1 --> F1["Pink Noise"]
        E2 --> F2["Pink Noise"]
        E3 --> F3["Pink Noise"]
        E4 --> F4["Pink Noise"]
        F1 --> G1["White Noise"]
        F2 --> G2["White Noise"]
        F3 --> G3["White Noise"]
        F4 --> G4["White Noise"]
        G1 --> H1["Band Gain"]
        G2 --> H2["Band Gain"]
        G3 --> H3["Band Gain"]
        G4 --> H4["Band Gain"]
        H1 --> I1["+/-"]
        H2 --> I2["+/-"]
        H3 --> I3["+/-"]
        I1 --> J1["Delay"]
        I2 --> J2["Delay"]
        I3 --> J3["Delay"]
        J1 --> K1["Output EQ"]
        J2 --> K2["Output EQ"]
        J3 --> K3["Output EQ"]
        K1 --> L1["LP Shelf"]
        K2 --> L2["HP Shelf"]
        K3 --> L3["BP EQ"]
        L1 --> M1["+/-"]
        L2 --> M2["+/-"]
        L3 --> M3["+/-"]
        M1 --> N1["Attenuation Software - Hardware"]
        M2 --> N2["Attenuation Software - Hardware"]
        M3 --> N3["Attenuation Software - Hardware"]
        N1 --> O1["Mute"]
        N2 --> O2["Limiters on Power Supply"]
        N3 --> O3["Load Monitoring"]
        O1 --> P1["Pilot Tone"]
        O2 --> P2["RMS"]
        O3 --> P3["AMP CHS"]
        P1 --> Q1["Load Monitoring"]
        P2 --> Q2["Pilot Tone"]
        P3 --> Q3["Load Monitoring"]
    end

    subgraph Signal Generator
        S1["Sine Wave"] --> T1["Pink Noise"]
        S2["Sine Wave"] --> T2["Pink Noise"]
        S3["Sine Wave"] --> T3["White Noise"]
        S4["Sine Wave"] --> T4["White Noise"]
        S5["Sine Wave"] --> T5["Pink Noise"]
        S6["Sine Wave"] --> T6["White Noise"]
        S7["Sine Wave"] --> T7["Pink Noise"]
        S8["Sine Wave"] --> T8["White Noise"]
        S9["Sine Wave"] --> T9["Pink Noise"]
    end

    subgraph Control
        U1["Power"] --> V1["MUTE"]
        U2["Power"] --> V2["Pink Noise"]
        U3["Power"] --> V3["White Noise"]
    end

    subgraph Load Monitoring
        W1["Pump"] --> X1["RMS"]
        X1 --> Y1["AMP CHS"]
        Y1 --> Z1["Pilot Tone"]
        Y2["Pump"] --> Z2["RMS"]
        Z2 --> AA["Pilot Tone"]
    end

    style Input Source fill:#f9f,stroke:#333
    style Crossover fill:#ccf,stroke:#333
    style Signal Generator fill:#cfc,stroke:#333
    style Control fill:#fcc,stroke:#333
© 2019 LEA Professional. All Rights Reserved.
Analog Inputs: Balanced analog inputs with 34dB and 26dB selectable input sensitivity modes. In 34dB mode, the input sensitivity is 1.4 VRMS and allows you to achieve full output in LowZ and 70V modes. In 26dB mode, the input sensitivity is 2.0 VRMS and allows you to achieve full output in 100V mode. These modes are selectable in the input mode of the WebUI.
Dante Inputs: The Connect Series fully supports the functionality of the Dante Controller and features a dual redundant Dante network in either 48kHz or 96kHz modes. Dante channels can be routed in the Dante Network and then Selected as an input in the Connect Series Web Browser based UI.
AES67 Inputs: The Connect Series fully supports the functionality of AES67 via the Dante Controller. You can configure the amplifier to accept AES67 within the Dante Controller for the specified amp. Once you switch from Dante to AES67 a reset is required. Once reset, the amplifier is now able to accept the AES67 protocol
Priority Input Router: The input router allows you to send any input to any output. You can also send 1 input to multiple outputs or multiple inputs to multiple outputs. Simply select the input channel you would like to send to the output.
Mutes: The channel mutes are located after the input signal. This allows you to see if you are still getting an input signal in the UI while still being able to mute the signal that is going to the output stage.
Lowz/HiZ Mode: The amplifier has a selectable by channel LowZ/HiZ mode in the web browser-based UI. If you have a low impedance load, select the LowZ mode for that
channel. If you are running a 70V load, select HiZ 70V. If you are running a 100V load, select HiZ 100V. Based on your selection, the amplifier will set the appropriate output voltage and current for the LowZ or HiZ selection.
HiZ Mode High Pass Filter: When you select HiZ mode, you will notice a High Pass filter enabled by default at 80Hz. This is a user adjustable filter so you can move the filter up or down. This filter is to avoid 70V or 100V speaker transformer saturation by not allowing lower frequencies to pass through. This high pass filter is separate from the high pass filter in the crossover section.
Smart Power Bridge: Smart Power Bridge is a proprietary technology that allows you to gain the benefits of a bridged amplifier output without having to lose a channel like traditional amplifiers. If you have our Connect Series 704 amplifier with a power rating of 700 watts per channel, when you enable Smart Power Bridge, you can get 1400 watts of output on that channel and still have channels 2, 3, and 4 available. With traditional amplifiers in bridge mode, you use 2 channels. Smart Power Bridge gives you the benefits of a bridged output channel without sacrificing an output channel.
Channel Standby: Separate from auto-standby, the channel standby feature allows you to disable the output of a channel manually.
Internal Signal Generator: The signal generator allows the user to send an internal signal through to the output for testing and verification purposes. The user can select between Pink Noise, White Noise, or Sine Wave. When in Sine Wave mode, the user can select the desired frequency.
Low Pass Crossover Filters: The low pass filter allows frequencies lower than the specified filter frequency to the output. There are 3 filter types available: Linkwitz-Riley, and Butterworth filters up to 48dB per Octave.
High Pass Crossover Filters: The low pass filter allows frequencies higher than the specified filter frequency to the output. There are 3 filter types available: Linkwitz-Riley, and Butterworth filters up to 48dB per Octave.
Bandpass Gain: This bandpass gain block is located after the crossover points and allows the user to boost or reduce the gain by +/- 15dB
Output Polarity: This is a user adjustable polarity setting after the crossover points allowing the user to invert the output signal.
Delay: 100 milliseconds of delay is available in the connect series amplifiers.
Parametric EQ Filters: 8 user adjustable parametric filters are available per channel.
Speaker Limiter: The speaker limiter allows the user to set output voltage limiting conditions in place to protect the speakers attached to the output. VRMS limiter settings prevent overheating while V Peak limiter setting prevent the speaker form over exerting.
Amplifier Protection Limiter: In the event the amplifier needs to limit the output to protect itself, the amplifier protection limiter will automatically enable itself. The amplifier protection limiter can enable itself if the amplifier is running in the upper limits of its thermal capacity or if AC voltage drops below a threshold where it can deliver full power to the output. This is a factory setting meant to keep the amplifier operating safely.
Realtime Load Monitoring: This feature allows the user to monitor the load impedance of any channel in Realtime. Once there is more than 5 VRMS on the output, the amplifier will automatically test the impedance of each channel and report it's reading in the web browser-based UI.
Pilot Tone Monitoring: This is an advanced feature that is intended to send an inaudible tone through the output so the user can monitor the impedance of the speakers connected to the output without having to send input signal.
Saving and Loading Speaker Tuning Files: Saving speaker tuning files in the web browser-based UI saves all the information in the crossover, parametric EQ, limiter, and load monitor section of the amplifier channel. Loading speaker tuning files loads all of the information into the crossover, parametric EQ, limiter and load monitor section of the amplifier channel.
Saving and Loading Amplifier Settings: Saving amplifier settings in the web browser-based UI saves all of the information from the amplifier and it's up to 4 channels of information. Loading amplifier settings in the web browser-based UI loads all of the information from the amplifier and it's up to 4 channels of information.
Dante/AES Configuration
The Dante Connect Series uses the Audinate Broadway module which supports both 8x8 Dante and AES 67 digital audio transport. To setup your digital audio network, use the Audinate Dante Controller. After your Dante or AES67 network is setup, simply go to the LEA Connect Series WebUI input selection page and select the Dante or AES 67 input you would like the amplifier to use for that channel.
For more information or to download the Dante Controller free software, please visit:
https://www.audinate.com/products/software/dante-controller
3rd Party APIs Support
3^rd party API's are available on the Connect Series product pages:
www.leaprofessional.com/products
If you don't see an API for your system, please send your API request to us at:
salesandmarketing@leaprofessional.com
Universal Switch Mode Power Supply with PFC
The power supply we've designed for our Connect Series amplifiers is a single stage interleaved PFC power supply. PFC and isolation stage (normally two separate power stages) merged into one stage with this type of supply. Consequently, this makes the design smaller, more efficient and cheaper for the power level.
the type of PFC we are using for LEA products is Active PFC. We chose Active PFC over Passive because, Active PFC has many advantages over Passive PFC, such as:
1st – Provides universal input and produces a regulated output voltage.
2nd - Active PFC is smaller and lighter, more so as power goes up.
3rd – It's able to achieve unity power factor across a wide load and input range.
4th - Active PFC can reduce input current harmonics.
Connect Series 84D
120VAC
| Output Power | 8 ohm4 x 80W | 4 ohm4 x 80W | 2 ohm4 x 80W | 70V4 x 80W | 100V4 x 80W | |||||
| AC Power Consumption | Amps | Watts | Amps | Watts | Amps | Watts | Amps | Watts | Amps | Watts |
| 1/4 Power Output | 2.06 | 139 | 2.15 | 145 | 1.41 | 95 | 2.09 | 141 | 2.05 | 138 |
| 1/8 Power Output | 1.30 | 88 | 1.33 | 90 | 0.98 | 66 | 1.30 | 88 | 1.29 | 87 |
| idle | 0.67 | 45 | 0.67 | 45 | 0.67 | 45 | 0.67 | 45 | 0.67 | 45 |
| Auto Standby (all channels) | 0.13 | 4 | 0.13 | 4 | 0.13 | 4 | 0.13 | 4 | 0.13 | 4 |
| Heat Power | BTU/Hr | Watts | BTU/Hr | Watts | BTU/Hr | Watts | BTU/Hr | Watts | BTU/Hr | Watts |
| BTU/Hr & Watts 1/4 Power | 201 | 59 | 222 | 65 | 188 | 55 | 208 | 61 | 198 | 58 |
| BTU/Hr & Watts 1/8 Power | 164 | 48 | 171 | 50 | 157 | 46 | 164 | 48 | 160 | 47 |
240VAC
| Output Power | 8 ohm4 x 80W | 4 ohm4 x 80W | 2 ohm4 x 80W | 70V4 x 80W | 100V4 x 80W | |||||
| AC Power Consumption | Amps | Watts | Amps | Watts | Amps | Watts | Amps | Watts | Amps | Watts |
| 1/4 Power Output | 1.43 | 137 | 1.49 | 143 | 0.95 | 91 | 1.44 | 138 | 1.42 | 136 |
| 1/8 Power Output | 0.90 | 86 | 0.93 | 89 | 0.66 | 63 | 0.90 | 87 | 0.89 | 85 |
| idle | 0.75 | 45 | 0.75 | 45 | 0.75 | 45 | 0.75 | 45 | 0.75 | 45 |
| Auto Standby (all channels) | 0.11 | 4 | 0.11 | 4 | 0.11 | 4 | 0.11 | 4 | 0.11 | 4 |
| Heat Power | BTU/Hr | Watts | BTU/Hr | Watts | BTU/Hr | Watts | BTU/Hr | Watts | BTU/Hr | Watts |
| BTU/Hr & Watts 1/4 Power | 195 | 57 | 215 | 63 | 174 | 51 | 198 | 58 | 191 | 56 |
| BTU/Hr & Watts 1/8 Power | 157 | 46 | 167 | 49 | 147 | 43 | 160 | 47 | 154 | 45 |
Connect Series 164D
120VAC
| Output Power | 8 ohm4 x 160W | 4 ohm4 x 160W | 2 ohm4 x 160W | 70V4 x 160W | 100V4 x 160W | |||||
| AC Power Consumption | Amps | Watts | Amps | Watts | Amps | Watts | Amps | Watts | Amps | Watts |
| 1/4 Power Output | 3.63 | 245 | 3.78 | 255 | 2.24 | 151 | 3.65 | 246 | 3.57 | 241 |
| 1/8 Power Output | 2.06 | 139 | 2.15 | 145 | 1.36 | 92 | 2.08 | 140 | 2.05 | 138 |
| Idle | 0.57 | 45 | 0.67 | 45 | 0.67 | 45 | 0.67 | 45 | 0.67 | 45 |
| Auto Standby (all channels) | 0.13 | 4 | 0.13 | 4 | 0.13 | 4 | 0.13 | 4 | 0.13 | 4 |
| Heat Power | BTU/Hr | Watts | BTU/Hr | Watts | BTU/Hr | Watts | BTU/Hr | Watts | BTU/Hr | Watts |
| BTU/Hr & Watts 1/4 Power | 290 | 85 | 324 | 95 | 242 | 71 | 294 | 86 | 277 | 81 |
| BTU/Hr & Watts 1/8 Power | 201 | 59 | 222 | 65 | 178 | 52 | 205 | 60 | 198 | 58 |
240VAC
| Output Power | 8 ohm4 x 160W | 4 ohm4 x 160W | 2 ohm4 x 160W | 70V4 x 160W | 100V4 x 160W | |||||
| AC Power Consumption | Amps | Watts | Amps | Watts | Amps | Watts | Amps | Watts | Amps | Watts |
| 1/4 Power Output | 2.49 | 239 | 2.62 | 251 | 1.53 | 147 | 2.52 | 242 | 2.47 | 237 |
| 1/8 Power Output | 1.43 | 137 | 1.49 | 143 | 0.95 | 91 | 1.44 | 138 | 1.41 | 135 |
| Idle | 0.75 | 45 | 0.75 | 45 | 0.75 | 45 | 0.75 | 45 | 0.75 | 45 |
| Auto Standby (all channels) | 0.11 | 4 | 0.11 | 4 | 0.11 | 4 | 0.11 | 4 | 0.11 | 4 |
| Heat Power | BTU/Hr | Watts | BTU/Hr | Watts | BTU/Hr | Watts | BTU/Hr | Watts | BTU/Hr | Watts |
| BTU/Hr & Watts 1/4 Power | 270 | 79 | 311 | 91 | 229 | 67 | 280 | 82 | 263 | 77 |
| BTU/Hr & Watts 1/8 Power | 195 | 57 | 215 | 63 | 174 | 51 | 198 | 58 | 188 | 55 |
Connect Series 354D
120VAC
| Output Power | 8 ohm4 x 350W | 4 ohm4 x 350W | 2 ohm4 x 350W | 70V4 x 350W | 100V4 x 350W | |||||
| AC Power Consumption | Amps Watts Amps | Watts Amps Watts | Amps Watts | Watts Amps | Watts | |||||
| 1/3 Power Output | 4.99 590 | 5.2 619 3.08 | 366 4.95 | 586 4.89 | 578 | |||||
| 1/8 Power Output 2.3 268 | 2.37 2.79 | 1.6 185 | 2.26 2.69 | 2.25 2.63 | ||||||
| idle 0.77 75 0.77 75 0.77 75 0.77 | 75 | 0.77 75 | ||||||||
| Auto Standby (all channels) | 0.14 | 5 | 0.14 | 5 | 0.14 | 5 | 0.14 | 5 | 0.14 | 5 |
| Heat Power | BTU/Hr | Watts | BTU/Hr | Watts | BTU/Hr | Watts | BTU/Hr | Watts | BTU/Hr | Watts |
| BTU/Hr & Watts 1/3 Power 425 | 125 | 505 148 | 450 | 132 | 400 117 337 | 1 | 0 | |||
| BTU/Hr & Watts 1/8 Power 315 | 92 | 345 | 101 | 329 | 96 | 306 | 90 297 | 87 | ||
240VAC
| Output Power | 8 ohm4 x 350W | 4 ohm4 x 350W | 2 ohm4 x 350W | 70V4 x 350W | 100V4 x 350W | |||||
| AC Power Consumption | Amps | Watts | Amps | Watts | Amps | Watts | Amps | Watts | Amps | Watts |
| 1/3 Power Output | 2.50 590 | 2.50 619 | 1.54 366 | 2.50 586 | 2.45 578 | |||||
| 1/8 Power Output | 1.15 268 | 1.19 277 | 0.80 185 | 1.19 264 | 1.13 263 | |||||
| idle 0.39 75 0.39 75 0.39 75 0.39 75 0.39 | 75 | |||||||||
| Auto Standby (all channels) | 0.07 | 5 | 0.07 | 5 | 0.07 | 5 | 0.07 | 5 | 0.07 | 5 |
| Heat Power | BTU/Hr | Watts | BTU/Hr | Watts | BTU/Hr | Watts | BTU/Hr | Watts | BTU/Hr | Watts |
| BTU/Hr & Watts 1/3 Power | 425 | 125 | 505 | 148 | 450 | 132 | 400 | 117 | 337 | 110 |
| BTU/Hr & Watts 1/8 Power | 315 | 92 | 345 | 101 | 329 | 96 | 306 | 90 | 297 | 87 |
Connect Series 704D
120VAC
| Output Power | 8 ohm4 x 700W | 4 ohm4 x 700W | 2 ohm4 x 700W | 70V4 x 700W | 100V4 x 700W | |||||
| AC Power Consumption A | mps Watts Amps | Watts Amps | Watts Amps | ps Watts Amps | Watts | |||||
| 1/3 Power Output 9.49 1123 5 | 83 1166 5 | 6 667 947 | 1130 9.28 | 1104 | ||||||
| 1/8 Power Output 3.96 468 4 | 4 488 2.56 | 300 3.95 4 | 69 3.86 457 | |||||||
| idle 0.78 76 0.78 76 0.78 76 0.78 76 0.78 76 0.78 76 0.78 76 0.78 76 0.78 76 0.78 76 0.78 76 0.78 76 0.78 76 0. | ||||||||||
| Auto Standby (all channels) | 0.15 | 5 | 0.15 | 5 | 0.15 | 5 | 0.15 | 5 | 0.15 | 5 |
| Heat Power | BTU/Hr | Watts | BTU/Hr | Watts | BTU/Hr | Watts | BTU/Hr | Watts | BTU/Hr | Watts |
| BTU/Hr & Watts 1/3 Power | 618 | 181 | 745 | 218 | 635 | 186 | 645 | 189 | 565 | 166 |
| BTU/Hr & Watts 1/8 Power | 390 | 114 | 452 | 133 | 411 | 120 | 395 | 116 | 360 | 106 |
240VAC
| Output Power | 8 ohm4 x 700W | 4 ohm4 x 700W | 2 ohm4 x 700W | 70V4 x 700W | 100V4 x 700W | |||||
| AC Power Consumption Amps | Watts Amps | Watts Amps | Watts | Watts Amps | Watts | Watts | ||||
| 1/3 Power Output 4.75 1123 4 | 92 1166 | 2 82 667 | 4.74 | 1130 4.64 | 1104 | |||||
| 1/8 Power Output 1.98 468 2 | 97 488 | 1.28 | 900 1.98 | 469 1.93 | 457 | |||||
| d/e | 0.39 | 76 | 0.39 | 76 | 0.39 | 76 | 0.39 | 76 | 0.39 | 76 |
| Auto Standby (all channels) | 0.08 | 5 | 0.08 | 5 | 0.08 | 5 | 0.08 | 5 | 0.08 | 5 |
| Heat Power | BTU/Hr | Watts | BTU/Hr | Watts | BTU/Hr | Watts | BTU/Hr | Watts | BTU/Hr | Watts |
| BTU/Hr & Watts 1/3 Power | 618 | 181 | 745 | 218 | 635 | 186 | 645 | 189 | 565 | 166 |
| BTU/Hr & Watts 1/8 Power | 390 | 114 | 452 | 133 | 411 | 120 | 395 | 116 | 360 | 106 |
Connect Series 352D
120VAC
| Output Power | 8 ohm2 x 350W | 4 ohm2 x 350W | 2 ohm2 x 350W | 70V2 x 350W | 100V2 x 350W | |||||
| AC Power Consumption | Amps | Watts | Amps | Watts | Amps | Watts | Amps | Watts | Amps | Watts |
| 1/3 Power Output | 2.58 | 309 | 2.70 | 324 | 1.64 | 197 | 2.56 | 307 | 2.53 | 304 |
| 1/8 Power Output | 1.23 | 148 | 1.28 | 153 | 0.89 | 107 | 1.23 | 147 | 1.22 | 146 |
| Idle | 0.43 | 52 | 0.43 | 52 | 0.43 | 52 | 0.43 | 52 | 0.43 | 52 |
| Auto Standby (all channels) | 0.03 | 3 | 0.03 | 3 | 0.03 | 3 | 0.03 | 3 | 0.03 | 3 |
| Heat Power | BTU/Hr | Watts | BTU/Hr | Watts | BTU/Hr | Watts | BTU/Hr | Watts | BTU/Hr | Watts |
| BTU/Hr & Watts 1/3 Power | 258 | 76 | 303 | 89 | 227 | 80 | 248 | 73 | 239 | 70 |
| BTU/Hr & Watts 1/8 Power | 204 | 60 | 221 | 65 | 214 | 63 | 204 | 60 | 199 | 58 |
240VAC
| Output Power | 8 ohm2 x 350W | 4 ohm2 x 350W | 2 ohm2 x 350W | 70V2 x 350W | 100V2 x 350W | |||||
| AC Power Consumption | Amps | Watts | Amps | Watts | Amps | Watts | Amps | Watts | Amps | Watts |
| L/3 Power Output | 1.29 | 309 | 1.35 | 324 | 0.82 | 197 | 1.28 | 307 | 1.27 | 304 |
| L/8 Power Output | 0.62 | 148 | 0.64 | 153 | 0.45 | 107 | 0.61 | 147 | 0.61 | 146 |
| dle | 0.22 | 52 | 0.22 | 52 | 0.22 | 52 | 0.22 | 52 | 0.22 | 52 |
| Auto Standby (all channels) | 0.01 | 3 | 0.01 | 3 | 0.01 | 3 | 0.01 | 3 | 0.01 | 3 |
| Icat Power | BTU/Hr | Watts | BTU/Hr | Watts | BTU/Hr | Watts | BTU/Hr | Watts | BTU/Hr | Watts |
| BTU/Hr & Watts 1/3 Power | 258 | 76 | 303 | 89 | 227 | 80 | 248 | 73 | 239 | 70 |
| BTU/Hr & Watts 1/8 Power | 204 | 60 | 221 | 65 | 214 | 63 | 204 | 60 | 199 | 58 |
Connect Series 702D
120VAC
| Output Power | 8 ohm2 x 700W | 4 ohm2 x 700W | 2 ohm2 x 700W | 70V2 x 700W | 100V2 x 700W | |||||
| AC Power Consumption | Amps | Watts | Amps | Watts | Amps | Watts | Amps | Watts | Amps | Watts |
| 1/3 Power Output | 4.80 | 576 | 4.98 | 597 | 2.89 | 347 | 4.83 | 579 | 4.75 | 586 |
| 1/8 Power Output | 2.07 | 248 | 2.15 | 258 | 1.37 | 164 | 2.08 | 249 | 2.03 | 243 |
| dle | 0.43 | 52 | 0.43 | 52 | 0.43 | 52 | 0.43 | 52 | 0.43 | 52 |
| Auto Standby (all channels) | 0.03 | 3 | 0.03 | 3 | 0.03 | 3 | 0.03 | 3 | 0.03 | 3 |
| Heat Power | BTU/Hr | Watts | BTU/Hr | Watts | BTU/Hr | Watts | BTU/Hr | Watts | BTU/Hr | Watts |
| BTU/Hr & Watts 1/3 Power | 358 | 105 | 420 | 123 | 363 | 106 | 370 | 109 | 330 | 97 |
| BTU/Hr & Watts 1/8 Power | 243 | 71 | 273 | 80 | 233 | 74 | 247 | 72 | 229 | 67 |
240VAC
| Output Power | 8 ohm2 x 700W | 4 ohm2 x 700W | 2 ohm2 x 700W | 70V2 x 700W | 100V2 x 700W | |||||
| AC Power Consumption | Amps | Watts | Amps | Watts | Amps | Watts | Amps | Watts | Amps | Watts |
| 1/3 Power Output | 2.40 | 576 | 2.49 | 597 | 1.45 | 347 | 2.41 | 579 | 2.38 | 56 |
| 1/8 Power Output | 1.03 | 248 | 1.08 | 258 | 0.68 | 164 | 1.04 | 249 | 1.01 | 243 |
| dle | 0.22 | 52 | 0.22 | 52 | 0.22 | 52 | 0.22 | 52 | 0.22 | 52 |
| Auto Standby (all channels) | 0.01 | 3 | 0.01 | 3 | 0.01 | 3 | 0.01 | 3 | 0.01 | 3 |
| Heat Power | BTU/Hr | Watts | BTU/Hr | Watts | BTU/Hr | Watts | BTU/Hr | Watts | BTU/Hr | Watts |
| BTU/Hr & Watts 1/3 Power | 358 | 105 | 420 | 123 | 363 | 106 | 370 | 109 | 330 | 97 |
| BTU/Hr & Watts 1/8 Power 243 | 71 273 80 | 33 74 247 | 72 229 67 | |||||||
Connect Series 88D
120VAC
| Output Power | 8 ohm8 x 80W | 4 ohm8 x 80W | 2 ohm8 x 80W | 70V8 x 80W | 100V8 x 80W | |||||
| AC Power Consumption Amps | Watts | Amps | Watts | Amps | Watts | Amps | Watts | Amps | Watts | |
| 1/4 Power Output 3.69 249 3.88 | 261 2.30 1 | 55 3.73 252 | 3.66 247 | |||||||
| 1/8 Power Output | 2.14 | 145 | 2.23 | 151 1.44 97 | 2.16 | 146 | 2.11 | 142 | ||
| idle 1.08 73 | 1.08 | 73 1.08 73 | 1.08 73 1.08 | 73 | ||||||
| Auto Standby (all channels) 0.23 | 7 | 0.23 | 7 0.23 7 0.23 | 3.7 | 0.23 | 7 | ||||
| Heat Power BTU/Hr | Watts | BTU/Hr | Watts | BTU/Hr | Watts | BTU/Hr | Watts | BTU/Hr | Watts | |
| BTU/Hr & Watts 1/4 Power 304 | 89 | 346 | 101 | 255 | 75 | 312 | 92 | 297 | 87 | |
| BTU/Hr & Watts 1/8 Power | 220 | 65 | 241 | 71 | 196 | 57 | 224 | 66 | 213 | 62 |
240VAC
| Output Power | 8 ohm | 4 ohm | 2 ohm | 70V | 100V | |||||
| 8 x 80W | 8 x 80W | 8 x 80W | 8 x 80W | 8 x 80W | ||||||
| AC Power Consumption | Amps | Watts | Amps | Watts | Amps | Watts | Amps | Watts | Amps | Watts |
| 1/4 Power Output | 2.55 | 244 | 2.67 | 256 | 1.58 | 152 | 2.57 | 247 | 2.52 | 242 |
| 1/8 Power Output | 1.48 | 142 | 1.54 | 148 | 1.00 | 96 | 1.49 | 143 | 1.46 | 140 |
| idle 1.22 73 1.22 73 1.22 73 1.22 73 1.22 73 | 73 1.22 73 | |||||||||
| Auto Standby (all channels) | 0.19 | 7 | 0.19 | 7 | 0.19 | 7 | 0.19 | 7 | 0.19 | 7 |
| Heat Power | BTU/Hr | Watts | BTU/Hr | Watts | BTU/Hr | Watts | BTU/Hr | Watts | BTU/Hr | Watts |
| BTU/Hr & Watts 1/4 Power | 288 | 84 | 329 | 96 | 246 | 72 | 296 | 87 | 280 | 82 |
| BTU/Hr & Watts 1/8 Power | 212 | 62 | 233 | 68 | 191 | 56 | 216 | 63 | 205 | 60 |
Connect Series 168D
120VAC
| Output Power | 8 ohm8 x 160W | 4 ohm8 x 160W | 2 ohm8 x 160W | 70V8 x 160W | 100V8 x 160W | |||||
| AC Power Consumption | Amps | Watts | Amps | Watts | Amps | Watts | Amps | Watts | Amps | Watts |
| 1/4 Power Output 6.80 458 7.16 | 483 4.00 | 270 6 | 87 463 6.79 | 454 | ||||||
| 1/8 Power Output 3.69 249 3.80 | 256 2.26 | 152 3 | 66 247 3.56 | 240 | ||||||
| idle 1.08 73 1.08 73 1.08 | 73 1.08 73 | |||||||||
| Auto Standby (all channels) | 0.23 | 7 | 0.23 | 7 | 0.23 | 7 | 0.23 | 7 | 0.23 | 7 |
| Heat Power | BTU/Hr | Watts | BTU/Hr | Watts | BTU/Hr | Watts | BTU/Hr | Watts | BTU/Hr | Watts |
| BTU/Hr & Watts 1/4 Power | 472 | 138 | 556 | 163 | 374 | 110 | 488 | 143 | 457 | 134 |
| BTU/Hr & Watts 1/8 Power | 304 | 89 | 329 | 96 | 246 | 72 | 296 | 87 | 273 | 80 |
240VAC
| Output Power | 8 ohm8 x 160W | 4 ohm8 x 160W | 2 ohm8 x 160W | 70V8 x 160W | 100V8 x 160W | |||||
| AC Power Consumption | Amps | Watts | Amps | Watts | Amps | Watts | Amps | Watts | Amps | Watts |
| 1/4 Power Output | 4.67 | 449 | 4.92 | 473 | 2.75 | 264 | 4.72 | 453 | 4.63 | 444 |
| 1/8 Power Output | 2.55 | 244 | 2.67 | 256 | 1.58 | 152 | 2.57 | 247 | 2.50 | 240 |
| idle 1.22 73 1.22 73 1.22 73 1.22 73 1.22 73 1.22 73 1.22 73 1.22 73 1.22 73 1.22 73 1.22 73 1.22 73 1.22 73 1. | ||||||||||
| Auto Standby (all channels) | 0.19 | 7 | 0.19 | 7 | 0.19 | 7 | 0.19 | 7 | 0.19 | 7 |
| Heat Power | BTU/Hr | Watts | BTU/Hr | Watts | BTU/Hr | Watts | BTU/Hr | Watts | BTU/Hr | Watts |
| BTU/Hr & Watts 1/4 Power | 439 | 129 | 521 | 153 | 356 | 104 | 455 | 133 | 424 | 124 |
| BTU/Hr & Watts 1/8 Power | 288 | 84 | 329 | 96 | 246 | 72 | 296 | 87 | 273 | 80 |
Although we've strived to create simple systems and proactive technologies, we are dedicated to continually supporting you with anything you need. Please don't hesitate to contact us anytime for more information, support, or just to talk audio.
General Support
We have created a multitude of online resources to help with general support topics concerning your amplifier or LEA Professional. Please visit:
https://leaprofessional.com/support/
This page contains resources such as our Knowledge Base, which is a collection of blog posts designed to give a more detailed look at our products and our company. You will also find training videos and several helpful FAQs that might answer any questions you may have.
Also, feel free to contact us directly any time at:
customercare@leaprofessional.com
+1-574-207-4220
LEA LLC
635 S. Lafayette Blvd,
Building 113, Suite 109
South Bend IN 46601
Product & Software Support
In order to better serve you, we have created a series of training videos, meant to answer all your product/software questions. To watch our videos please visit:
https://leaprofessional.com/blog/category/video/
If you would prefer to speak with us directly, please contact our technical support team at:
techsupport@leaprofessional.com
System Design Support
For support when spec'ing LEA products into your system designs, please contact our technical support team at:
techsupport@leaprofessional.com
Parts & Service Support
For parts and service support, please contact our support team at:
techsupport@leaprofessional.com
Warranty Support
We stand behind our products and are committed to having one of the best warranties in the industry.
In the United States, we offer a 3 year warranty with Advanced Replacements for the entire 3 year period.
The 3 year warranty can be extended to 6 years simply by registering the serial numbers at time of purchase. Once registered the warranty will be extended to 6 years.
Once extended to 6 years, the first 3 years will be Advanced Replacements while the second 3 years will be free of charge service and parts.
U.S. Customers can register your product here to extend your warranty to 6 years here:
LEA Product Registration: https://leaprofessional.com/lea-product-registration/
Warranty outside the U.S. is honored by the Authorized Distributor in a specific country and may not be the same as the U.S. Warranty.
Please contact your local distributor for warranty information for your specific country.
If you are unsure of who your distributor is, you can find them here: https://leaprofessional.com/partner-map/
Key Contacts
For Ordering Support:
Email: customercare@leaprofessional.com
Phone: 574.345.0473
For Technical Support:
Email: techsupport@leaprofessional.com
Phone: 574.345.0474
Warranty, Service, Parts, Repair Support:
Email: techsupport@leaprofessional.com
Phone: 574.345.0474
Sales Support:
Email: customercare@leaprofessional.com
Phone: 574.345.0473
Application Support:
Email: techsupport@leaprofessional.com
Phone: 574.345.0474
emPower Change is our commitment to environmental sustainability and a call to action for the world. We promise to emPower Change by minimizing our impact on the global environment. Every decision made while designing and constructing our Connect Series amplifier family has been scrutinized to ensure that we not only limit our own impact on the environment, but also provide our customers with the tools to limit their personal impact as well.

Our commitment to emPower Change through environmental sustainability is driven by three pillars of action. We look to these pillars to guide us through the uncharted waters of our bold goals and innovative ideas:
Know More about our amps, systems, and technologies so that together, we can efficiently and effectively operate sustainable systems.
Use Less materials and energy to reduce unnecessary waste.
Be Thoughtful about which materials we decide to use and which companies we decide to partner with to reduce waste and maximize sustainable efforts.
Our Browser-Based Web UI emPowers users to Know More about the performance of their amps and systems so that they can understand their impact and cut down on wasteful operations – ultimately optimizing their systems performance while eliminating wasted energy consumption. We have decided to Use Less materials by opting for digitally hosted user manuals opposed to printed and automated online services such as ordering, training, and support. And we strive to Be Thoughtful whenever we approach new opportunities and projects – such as our 100% recyclable Connect Series box design – so that we can make deliberate decisions that support our sustainability goals.

The Green Menu
of our Web UI
shows
Realtime Power Usage & Estimated Power
Usage for other operating modes
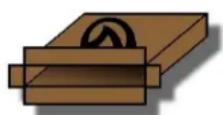
Our Box
---is---
Designed with 100% recyclable corrugated cardboard

Our Manual
& other documents
---are---
Hosted digitally to improve the user experience and cut back on unnecessary
waste
*By viewing this manual online, you are personally helping to save more than 25 trees. Thanks for your help!
Our Sustainable Friends
Welch Packaging is our local partner that we work closely with to design our recyclable box. Welch has an impressive commitment to environmental sustainability through their Sustainable Forestry Initiative and SFI Certification for responsibly sourcing cardboard among many other sustainable practices. We're proud to work together to create sustainable solutions.
Steelcase is a 100-year-old company that creates products for the workplace, schools, and healthcare environments. Their sustainability philosophies run deep through their products and company culture with hundreds of quality and sustainability certified products. Their recycled materials furniture is featured throughout our office space.
Zollner Electronics is a leading manufacturer in technology, automotive and aerospace industries among others. Their facilities undergo strict sustainability practices that have earned them ISO Certifications for Environmental Management Systems and Energy Management Systems. Their proactive approach to sustainability is a great fit for manufacturing our Connect Series amplifiers. We regularly audit the manufacturing process to ensure our environmental impact is minimal.
Connect Series Sustainability
By purchasing this amplifier, you are joining us to emPower Change through environmental sustainability. Go ahead and take a moment to feel good about yourself!
The amplifier itself is fully ROHS compliant and does not include any lead or other harmful chemicals known to harm the environment.
The Connect Series amplifier is extremely efficient when being used. During normal use, the amplifier averages over 90% efficiency meaning less than 10% of the AC power is being dissipated into heat. At idle, the amplifier draws very little power when compared to traditional amplifiers. If the amplifier is powered on but there is no signal sent to the amplifier, it will automatically go into Standby Mode reducing the AC power draw even further. Another unique feature is when the amplifier is connected to a PoE network, you can still control and monitor without AC mains being powered on. If you are controlling your amplifiers from an external source, you can remotely power on and off the amplifier via the external I/O connections. When remotely powered off in this manner, the amplifier greatly reduced the AC power draw resulting in very little power demand when the amplifier is not in use.
Connect Series Retirement Plan
Our products are designed to emPower Change for the long haul. But when it comes time to retire a long-time workhorse, we've made the process easy for you and easy on the environment. Here's what you can do to properly retire your amplifier:

Return to LEA Professional
Ship to:
End of Life at LEA LLC 635 S. Lafayette Blvd, Building 113, Suite 109 South Bend IN 46601
Find your closest local Distributer at:
www.leaprofessional.com/partner-map

natural_image
Illustration of a globe with arrows pointing to three stylized human figures (no text or symbols)Return to Local Distributor
Brand Name:
LEA LLC
Product Family:
Connect Series
Models:
Connect Series 352, Connect Series 352D, Connect Series 354, Connect Series 354D, Connect Series 702, Connect Series 702D, Connect Series 704, Connect Series 704D
The Connect Series 704D completed all required testing as the representative model for Connect Series models: Connect Series 352, Connect Series 354, Connect Series 702, Connect Series 704, Connect Series 352D, Connect Series 354D, Connect Series 702D, Connect Series 704D
Equipment Type/ Intended Use:
Audio Power Amplifier
Safety
- EN 62368-1 AUDIO/VIDEO, INFORMATION AND COMMUNICATION TECHNOLOGY EQUIPMENT – PART 1: SAFETY REQUIREMENTS; AMENDMENT A11:2017 - Edition 2 - Revision Date 2017/01/01
EMC
• EN 61000-3-2:2014 Limits for Harmonic Current Emissions (equipment
• input current ≤16A per phase)
• EN 61000-3-3:2013 Limitation of Voltage Fluctuations and Flicker in Low-Voltage Supply Systems Rated
- Current ≤16A
• EN 55032:2012 Limits and Methods of Measurement of Radio Disturbance Characteristics of ITE: Radiated,
• Class B Limits; Conducted, Class B
• EN 55103-2:2009 Electromagnetic Compatibility – Product Family Standard for Audio, Video, Audio-Visual
• and Entertainment Lighting Control Apparatus for Professional Use, Part 2: Immunity
- EN 61000-4-2:1995+ A1:1998+ A2:2001 Electrostatic Discharge Immunity (Environment E2-Criteria B, 4k V Contact, 8k V Air
- Discharge)
• EN 301 489-1 V2.1.1 Electro Magnetic Compatibility – Radio Equipment and Services
• EN 301 489-1 V2.2.0 Electro Magnetic Compatibility – Radio Equipment and Services
• EN 301 489-17 V3.1.1 Electro Magnetic Compatibility – Radio Equipment and Services
• EN 301 489-17 V3.2.0 Electro Magnetic Compatibility – Radio Equipment and Services
WIRELESS
• EN 300 328 V2.1.1 Wideband Transmission Systems – Data Transmission Equipment
• EN62368-1 Audio/video, information and communication technology equipment
Headquarters
635 S. Lafayette Blvd
Building 113, Suite 109
South Bend, IN 46601 U.S.A.
Signed: Jeremy Bulas
Jeremy Bules
Vice President of Engineering
& Operations


natural_image
Abstract black-and-white circular logo with a stylized leaf-like shape at center (no text or symbols)
- TABLE OF CONTENTS
- Table of Contents 1
- Welcome Message 2
- Introduction....3-7
- Safety Instructions....8
- Front Panel 9-10
- Back Panel....11-15
- Accessories 16-18
- Getting Started 19
- Web App UI....20-27
- DSP Block Diagram 32
- Glossary 33-35
- Power Consumption 36-38
- Support 39-40
- Sustainability Statement....41-42
- Declaration of Conformity 43
- CONNECT SERIES
- MAIN FEATURES
- MAGNETIC FIELD
- BE AWARE OF THESE SYMBOLS:
- FCC COMPLIANCE NOTICE
- FRONTPANEL
- The Amp: Front Panel
- Front Panel LCD
- Easy Pop out Grille
- LEA Shark Fin
- Channel Status Indicator
- Indicator Definitions:
- BACKPANEL
- CHANNEL MODELS
- CHANNEL MODELS CONTINUED
- CHANNEL KIT | Connect Series 352D/ Connect Series 702D
- CHANNEL KIT | Connect Series 84D/ Connect Series 164D
- CHANNEL KIT | Connect Series 354D/ Connect Series 704D
- CHANNEL KIT | Connect Series 88D/ Connect Series 168D
- PART NUMBERS:
- Proper Installation
- Powering On
- Built-in Wi-Fi Access Point (WAP)
- Using WAP
- 10/100MB FAST Ethernet
- Using 10/100MB FAST Ethernet
- Local Area Wi-Fi Network
- Using Local Area Wi-Fi
- CONNECTSERIES CONTROL & MONITORING
- 3.
- ONLINE/OFFLINE - 2 STATES
- MUTE STATUS - 3 STATES
- POWER STATES - 3 STATES
- NETWORK - 3 STATES
- AMP STATUS - 3 STATES
- OTHER
- JUST 3 CLICKS AWAY FROM ANYTHING
- SAVE AMP FILES
- LOAD AMP FILES
- 1.
- 2.
- 4.
- NETWORK SETTINGS
- AMP SETTINGS
- CHANNEL SETTINGS
- SAVE CHANNEL SPEAKER TUNINGS
- LOAD CHANNEL SPEAKER TUNINGS
- DSP BLOCK DIAGRAM
- Dante/AES Configuration
- 3rd Party APIs Support
- Universal Switch Mode Power Supply with PFC
- Connect Series 84D
- Connect Series 164D
- Connect Series 354D
- Connect Series 704D
- Connect Series 352D
- Connect Series 702D
- Connect Series 88D
- Connect Series 168D
- General Support
- Product & Software Support
- System Design Support
- Parts & Service Support
- Warranty Support
- Key Contacts
- The Green Menu
- Our Box
- Our Manual
- & other documents
- Our Sustainable Friends
- Connect Series Sustainability
- Connect Series Retirement Plan
- Brand Name:
- Product Family:
- Models:
- Equipment Type/ Intended Use:
- Safety
- EMC
- WIRELESS
- Headquarters
Brand : LEA
Model : Connect 168D
Category : Receiver