
KDV-S250P - Portable DVD Player KENWOOD - Free user manual and instructions
Find the device manual for free KDV-S250P KENWOOD in PDF.

| Product Type | Portable DVD player for vehicle (rear entertainment) |
| Brand | KENWOOD |
| Model | KDV-S250P |
| Dimensions (W x H x D) | 195 x 45 x 210 mm |
| Weight | 1.70 kg |
| Power Supply | 14.4 V DC (11 - 16 V), 2 A |
| Supported Disc Formats | DVD-Video, DVD±R/RW, DVD±R DL, CD-Audio, CD-R/RW, VCD, CD-EXTRA, MP3, WMA, AAC, JPEG, DivX |
| Video Outputs | Composite 1 Vp-p (75 Ω) |
| Audio Outputs | 2 channels (1.2 V/10 kΩ), coaxial digital output (0.5 V/75 Ω) |
| Audio Formats | Linear PCM, Dolby Digital, DTS, MP3, WMA, AAC |
| Playback Functions | Repeat, A-B repeat, random play, programmed play, zoom, search, slow motion, frame-by-frame, angle change, audio/subtitle language selection |
| Built-in Screen | No (requires external monitor) |
| Remote Control | Yes, with CR2025 battery included |
| Installation | Vehicle only, seat-back mounting or similar, angle 0° to 90° |
| Operating Temperature | Up to 60 °C (thermal protection activated beyond) |
| Cleaning | Soft dry cloth, mild detergent if necessary |
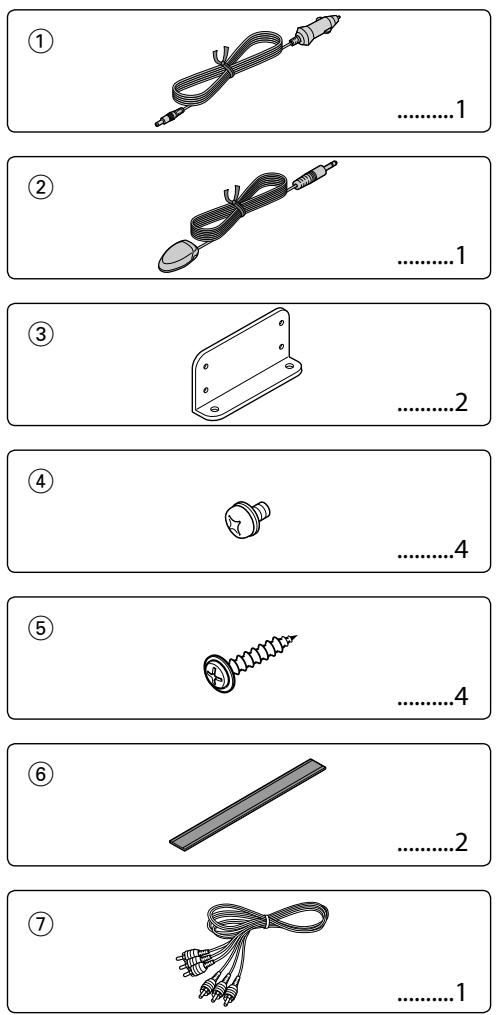
| Supplied Accessories | Power cable, remote control, remote sensor, mounting brackets, AV cable (optional) |
| Safety | Built-in 5A fuse, automatic shutdown in case of overheating, Class 1 laser warning |
| Country of Origin | Japan (Kenwood Corporation) |
Frequently Asked Questions - KDV-S250P KENWOOD
User questions about KDV-S250P KENWOOD
0 question about this device. Answer the ones you know or ask your own.
Ask a new question about this device
Download the instructions for your Portable DVD Player in PDF format for free! Find your manual KDV-S250P - KENWOOD and take your electronic device back in hand. On this page are published all the documents necessary for the use of your device. KDV-S250P by KENWOOD.
USER MANUAL KDV-S250P KENWOOD
MANUAL DE INSTRUÇÕES
Kenwood Corporation
Take the time to read through this instruction manual.
Familiarity with installation and operation procedures will help you obtain the best performance from your new DVD player.
For your records
Record the serial number, found on the back of the unit, in the spaces designated on the warranty card, and in the space provided below.
Refer to the model and serial numbers whenever you call upon your Kenwood dealer for information or service on the product.
Model KDV-S250P Serial number ____

AE86

VIDEO
DOLBY.
DIGITAL


2.0+Digital out


AAC
Safety precautions 3
Notes 4
Common features 8
Power
Play
Mute
Skip
Fast Forward and Reverse
Repeat Play
A-B Repeat Play
Random Play
Program Play
Switching Display
DVD Video/Video CD/Video file/Picture file features 12
Search Play
DVD menu/Top (title) menu
Audio Language select
Subtitle Language select
Picture Angle select
Zoom
PBC
Slow Motion play
Frame-by-frame playback
Slide show
Picture Rotation
CD/Audio file features 15
Direct Skip Play
Play Time Search
Search Play
Setup menu 16
Setup menu
DISC menu
VIDEO menu
AUDIO menu
DISPLAY
OTHER
Accessories 19
Installation 20
Connecting Wires to Terminals 21
Troubleshooting Guide 22
Specifications 23
US Residence Only
Register Online
Register your Kenwood product at www.Kenwoodusa.com
WARNING
To prevent injury or fire, take the following precautions:
- The unit is a model that can be only installed in a vehicle. Do not use it in your home.
- Be sure to use the supplied power cable to get a power supply. Use of a cable other than the provided cable will cause a fire.
- To prevent a short circuit, never put or leave any metallic objects (such as coins or metal tools) inside the unit.
- Do not watch or fix your eyes on the unit's display when you are driving for any extended period.
- Mounting and wiring this product requires skills and experience. For safety's sake, leave the mounting and wiring work to professionals.
- Do not connect the unit to the front monitor. This unit is for rear seat entertainment.
CAUTION
To prevent damage to the machine, take the following precautions:
- Make sure to ground the unit to a negative 12V DC power supply.
- Do not install the unit in a spot exposed to direct sunlight or excessive heat or humidity. Also avoid places with too much dust or the possibility of water splashing.
- When replacing a fuse, only use a new fuse with the prescribed rating. Using a fuse with the wrong rating may cause your unit to malfunction.
- Use only the screws provided or specified for installation. If you use wrong screws, you could damage the unit.
NOTE
- If you experience problems during installation, consult your Kenwood dealer.
- The illustrations of the display and the panel appearing in this manual are examples used to explain more clearly how the controls are used. Therefore, what appears on the display in the illustrations may differ from what appears on the display on the actual equipment, and some of the illustrations on the display may be inapplicable.
Lens Fogging
Right after you turn on the car heater in cold weather, dew or condensation may form on the lens in the CD player of the unit. Called lens fogging, CDs may be impossible to play. In such a situation, remove the disc and wait for the condensation to evaporate. If the unit still does not operate normally after a while, consult your Kenwood dealer.
Cleaning the Unit
If the faceplate of this unit is stained, wipe it with a dry soft cloth such as a silicon cloth. If the faceplate is stained badly, wipe the stain off with a cloth moistened with neutral cleaner, then wipe neutral detergent off.

- Applying spray cleaner directly to the unit may affect its mechanical parts. Wiping the faceplate with a hard cloth or using a volatile liquid such as thinner or alcohol may scratch the surface or erases characters.
Region codes in the world

DVD disc marks
| Symbol | Description |
 | Indicates a region number. The discs with this mark can be played with any DVD player. |
 | Indicates the number of audio languages recorded. Up to 8 languages can be recorded in a movie. You can select a favorite language. |
 | Indicates the number of subtitled languages recorded. Up to 32 languages can be recorded. |
 | If a DVD disc has scenes shot from multiple angles, you can select a favorite angle. |
 | Indicates the type of screen for the image. The left mark indicates that a wide image picture (16:9) is displayed on a standard TV set screen (4:3) with a black band at both the top and bottom of the screen (letter box). |
Restrictions due to difference between discs
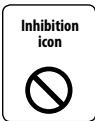
Some DVD and VCD discs can be played only in certain playback modes according to the intentions of the software producers. As this player plays discs according to their intentions, some functions may not work as intended by
you. Please be sure to read the instructions provided with each disc. When an inhibition icon is displayed on the monitor, it indicates that the disc being played is under the restriction as described above.
Use of "DualDisc"
When playing a "DualDisc" on this unit, the surface of the disc that is not played may be scratched while the disc is inserted or ejected. Since the music CD surface does not conform to the CD standard, playback may be impossible.
(A "DualDisc" is a disc with one surface containing DVD standard signals and the other surface containing music CD signals.)
About the usable temperatures
The protective circuit in the unit activates when the temperature inside the DVD player exceeds 60^ C ( 140^ F). Refer to
List of playable discs
| Disc types | Standard | Support | Remark |
| DVD | DVD Video | ○ | |
| DVD Audio | × | ||
| DVD-R | ○ | MP3/WMA/AAC/JPEG/DivX | |
| DVD-RW | ○ | Playback | |
| DVD+R | ○ | Multi-border/Multisession(Playback depends on authoring conditions) | |
| DVD+RW | ○ | ||
| DVD-R DL (Dual layer) | ○ | ||
| DVD+R DL (Double layer) | ○ | Video mode supportedVR mode supported (Only DVD-R/RW/R DL) | |
| DVD-RAM | × | ||
| CD | Music CD | ○ | CD-TEXT/8-cm (3 inch) discs supported. |
| CD-ROM | ○ | MP3/WMA/AAC/JPEG/DivX | |
| CD-R | ○ | playback | |
| CD-RW | ○ | Multisession supportedPacket write not supported. | |
| DTS-CD | ○ | ||
| Video CD (VCD) | ○ | ||
| Super video CD | × | ||
| Picture CD | ○ | ||
| CD-EXTRA | △ | Only music CD session can be played. | |
| HDCD | △ | Sound quality of normal CD music | |
| CCCD | × | ||
| Others | Dualdisc | × | |
| Super audio CD | △ | Only CD layer can be played. |
O : Playback is possible.
: Playback is partly possible.
×: Playback is impossible.

- When buying DRM enabled contents, check the Registration Code in the
About the functions by playback source
In this manual, functions that can be used with various playback sources are indicated as follows:
[DVD]: Function of during DVD playback only.
[VCD]: Function of during Video CD playback only.
[CD]: Function of during CD playback only.
[AUDIO]: Function of during Audio file playback only.
[DivX]: Function of during Video file playback only.
[PIC]: Function of during JPEG/Picture CD playback only.
Handling discs
- Do not touch the recording surface of the disc.
- Do not stick tape etc. on the disc, or use a disc with tape stuck on it.
- Do not use disc type accessories.
- Clean from the center of the disc and move outward.
- When removing discs from this unit, pull them out horizontally.
- If the disc center hole or outside rim has burrs, use the disc only after removing the burrs with a ballpoint pen etc.
Discs that cannot be used
• Discs that are not round cannot be used.

- Discs with coloring on the recording surface or discs that are dirty cannot be used.
- This unit can only play the CDs with DIGITAL AUDIO This unit may not correctly play discs which do not have the mark.
- You cannot play a disc that has not been finalized. (For the finalization process refer to your disc writing software, and your disc recorder instruction manual.)
About Audio files
- Playable Audio file
MP3 (.mp3), WMA (.wma), AAC (.m4a)

- If music of normal CD and other playback systems are recorded in the same disc, only the playback system recorded at the first setout is played.
- Playable MP3 file
MPEG 1/2 Audio Layer 3 file Transfer bit rate: 8 – 320 kbps/VBR Sampling frequency: 8 – 48 kHz
- Playable WMA file
The file in accordance with Windows Media Audio (Except for the file for Windows Media Player 9 or after which applies the new functions)
Transfer bit rate: 5 – 320 kbps/ VBR Sampling frequency: 8 – 48 kHz
- Playable AAC file
Transfer bit rate: 8 – 384 kbps/ VBR Sampling frequency: 8 – 48 kHz
- Playable disc media
CD-R/RW/ROM, DVD-ROM/±R/RW
- Playable disc file format
ISO 9660 Level 1/2, Joliet, Romeo
- The maximum number of characters for display 12 characters
- Limitation of structure for the file and the folder
Maximum number of directory levels: 8 Maximum number of folders: 255
Maximum number of files per folder: 999 Maximum number of files per disc: 1254
Although the audio files are complied with the standards listed above, the play maybe impossible depending on the types or conditions of media or device.

- Attach the correct extension for the Audio file (MP3: ".MP3", WMA: ".WMA", AAC: ".m4a")
- Do not attach the extensions to files other than the Audio file. If the extension is attached, the file, which is not the Audio file, will play and outputs a loud noise, causing damage to the speaker.
- The files with copy protection cannot be played.
- The unit may not be compatible with upgrade of compression format standard and additional specifications.
- CD-RW discs which are quick formatted by the writing software cannot be used.
- When recording to the maximum CD-R/RW media capacity at once, the writing software is set to "Disc at once".
- File/Folder name is the number of the characters including the extensions.
About Picture files
Acceptable picture files
- Format: JPEG
- Baseline format: Up to a maximum of 8192(W) × 7680(H) pixels
- Progressive format: Up to a maximum of 1600(W) × 1200(H) pixels

- Enlarges and reduces images up to the size shown above to fit to the screen.
- The picture files with information attached (such as Exif) may not be displayed or operated (e.g.: rotation display) properly.
Extension
Picture file must have the following extension: jpg
Acceptable discs, disc formats, file and folder names and playing order are the same as those for audio files. Refer to
About Video files
Acceptable video files
- Format: DivX
- Version: 3, 4, 5
• Sound Format: MP3, AC3
• Transfer bit rate: 8 – 320 kbps/ VBR - Size of picture PAL: 720(W) × 576(H) pixels NTSC: 720(W) × 480(H) pixels

- Enlarges and reduces images up to the size shown above to fit to the screen.
- The picture files with information attached (such as Exif) may not be displayed or operated (e.g.: rotation display) properly.
Extensions
Picture files must have one of the following
extensions:
avi, divx
Acceptable discs, disc formats, file and folder names and playing order are the same as those for audio files. Refer to
About DivX
DivX is a popular media technology created by DivX, Inc. DivX media Files contain highly compressed video with high visual quality that maintains a relatively small file size. DivX files can also include advanced media features like menus, subtitles, and alternate audio tracks. Many DivX media files are available for download online, and you can create your own using your personal content and easy-to-use tools from DivX.com.
About DivX Certified
DivX Certified products are officially tested by the creators of DivX and guaranteed to play all versions of DivX video, including DivX 6. Certified products qualify for one of several DivX Profiles that designate the type of video the product supports, from compact portable video to high-definition video.
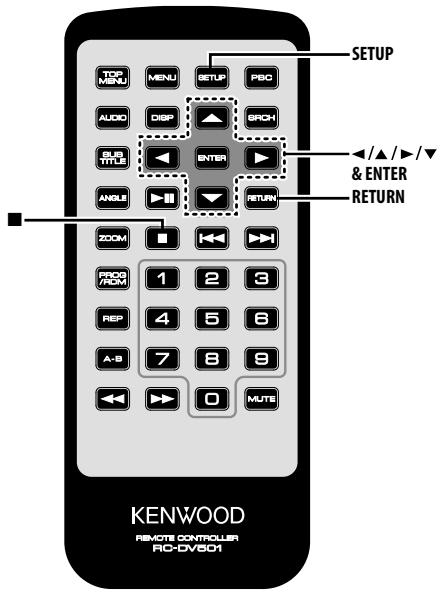
Loading the battery
Use one lithium battery (CR2025).
Insert the battery with the + and – poles aligned properly, following the illustration inside the case.
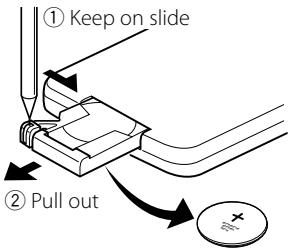
③ Replace the battery
▲WARNING
- Store unused batteries out of the reach of children. Contact a doctor immediately if the battery is accidentally swallowed.
- Do not put the remote in a place where it moves when you drive. If it falls under the brake pedal, etc., it will hinder your driving, causing danger.

- Do not set the remote on hot places such as above the dashboard.

- The provided battery is intended for use in operation checking, and their service life may be short.
- When the remote controllable distance becomes short, replace the battery with a new one.
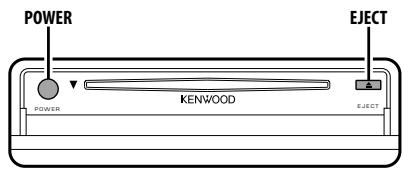
Power
Press the [POWER] button.

- Unplug the cigarette lighter plug when you turn off the ignition in order to prevent the battery from running out.
Play
Play
Open the cover and insert a disc into the unit.
If a disc has been inserted, press the [▶III] button. Starts playing the disc.

natural_image
Line drawing of a hand inserting a component into a device housing (no text or symbols)
- If you insert a disc, it will start playing from the beginning of the disc.
If you turn the power off while playing a disc, turning the power back on will resume playing the disc where it stopped.
Play of Audio file/Picture file/Video file
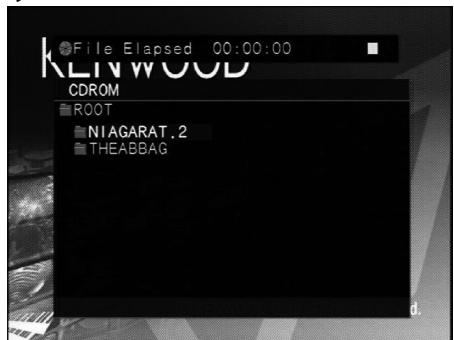
1 Select the folder
Press the [◀]/[▲]/[▶]/[▼] button.
2 Determine the folder
Press the [ENTER] button.
The music in the determined folder are displayed.
3 Select the file you want to listen to
Press the [◀]/[▲]/[▶]/[▼] button.
To return to Step 1 to select a folder again, press the [RETURN] button.
4 Play the selected file
Press the [ENTER] button.
Pause
Press the [▶II] button.
Each time the button is pressed, it pauses or plays.
Stop
Press the [■] button.
To restart playback, press the [▶II] button.

- If you press the [■] button twice during DVD playback, it starts from the beginning of the disc next time you play it.
Eject
Press the [EJECT] button.

- If you want to restart playback with the disc ejected from the unit, press the [EJECT] button again. The disc is inserted into the unit, and playback is restarted.
- If you turn off the power or start the engine while playing an audio file, playback may not resume (restart from the point where playback stopped).
Mute
Turning the volume down quickly.
Press the [MUTE] button.
Each time the button is pressed, the Mute turns ON or OFF.
Skip
Skips a chapter, track or file.
Press the [◀◀] or [▶▶] button.

- To skip on a VCD, turn the PBC function off by pressing the [PBC] button.
Fast Forward and Reverse
Press the [◀◀] or [▶▶] button.
The speed changes at 5 levels each time the button is pressed.
To restart playback, press the [▶II] button.
Repeat Play
Plays a song, chapter, title, etc. repeatedly.
Press the [REP] button.
Each time the button is pressed, the Repeat Play function switches as shown below.
In DVD source
| Display | Setting |
| "CHAPTER REPEAT" | Plays the chapter repeatedly. |
| "TITLE REPEAT" | Plays the title repeatedly. |
| "REPEAT CANCELED" | Turns Repeat Play off. |
In Video file source
| Display | Setting |
| "FILE REPEAT" | Plays the file repeatedly. |
| "FOLDER REPEAT" | Plays the folder repeatedly. |
| "ALL REPEAT" | Plays the disc repeatedly. |
| "REPEAT CANCELED" | Turns Repeat Play off. |
In CD/VCD source
| Display | Setting |
| "TRACK REPEAT" | Plays the track repeatedly. |
| "ALL REPEAT" | Plays the disc repeatedly. |
| "REPEAT CANCELED" | Turns Repeat Play off. |
In Audio file source
| Display | Setting |
| "FILE REPEAT" | Plays the song repeatedly. |
| "FOLDER REPEAT" | Plays the songs in the folder repeatedly. |
| "ALL REPEAT" | Plays the disc repeatedly. |
| "REPEAT CANCELED" | Turns Repeat Play off. |
In Picture file source
| Display | Setting |
| "FILE REPEAT" | Plays the picture file repeatedly. |
| "FOLDER REPEAT" | Plays the folder repeatedly. |
| "ALL REPEAT" | Plays the disc repeatedly. |
| "REPEAT CANCELED" | Turns Repeat Play off. |

- To repeat play a VCD, turn the PBC function off by pressing the [PBC] button.
- Repeat Play is disabled during Program or Random Play.
A-B Repeat Play
[DVD] [VCD] [DivX] [CD] [AUDIO]
Specify the Start and End points to play the portion between the specified points repeatedly.
1 Specify Point A (Start point) Press the [A-B] button.
2 Specify Point B (End point) Press the [A-B] button. Plays from Point A to Point B repeatedly.
Canceling A-B Repeat Press the [A-B] button.
Random Play
[CD] [AUDIO] [DivX] [PIC]
Songs are chosen from those recorded on the disc opened at random and are played.
1 Stop playback Press the [■] button twice.
2 Select the Random Play mode Press the [RDM] button twice.
3 For Audio file, select the folder Select a folder using the [◀]/[▲]/[▶]/[▼] buttons and press the [ENTER] button. Place the cursor to any file in the folder you want to random play.
4 Start Random Play Press the [▶II] button.
Canceling Random Play Press the [■] button twice and [RDM] buttons in order.
Program Play
Plays the selected scene, songs, or files only in order.
1 Stop playback Press the [■] button twice.
2 Enter the Program mode Press the [PROG] button.
3 Select the scene, song, or file you want to play Press the [◀]/[▲]/[▶]/[▼] button.
4 Determine the scene, songs, or file you want to play Press the [ENTER] button.
When programming for a DVD, select and determine the title and chapter in this order.
5 Repeat Steps 3 and 4 to register all the scenes, songs, or files you want to program play.
6 Start Program Play Press the [▶II] button.
Canceling Program Play Press the [■] button twice and [PROG] buttons in order.

- To delete the program, press [▶] in Program mode, select "CLEAR ALL" and press the [ENTER] button.
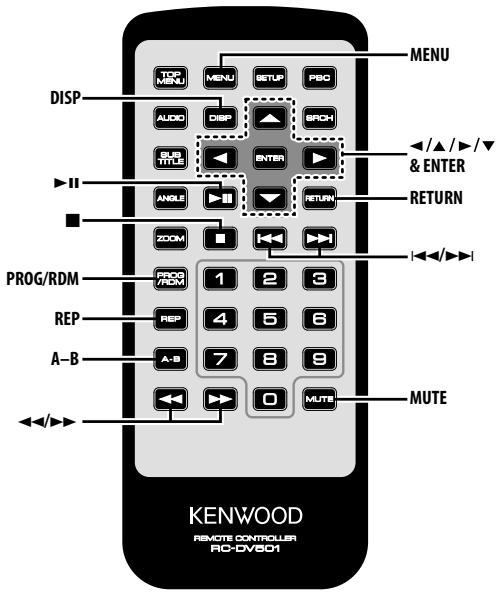
Switching Display
Switches the information displayed on the monitor screen.
Press the [DISP] button.
Each time the button is pressed, the display switches as shown below.
In DVD source
| Display | Information |
| "Display Off" | Not displayed |
| "Chapter Elapsed" | Chapter elapsed time |
| "Chapter Remain" | Chapter remaining time |
| "Title Elapsed" | Title elapsed time |
| "Title Remain" | Title remaining time |
In DVD-VR source
| Display | Information |
| "Display Off" | Not displayed |
| "PG Elapsed" | Program elapsed time |
| "PG Remain" | Program remaining time |
In DivX source
| Display | Information |
| "Display Off" | Not displayed |
| "File Elapsed" | Video elapsed time |
| "File Remain" | Video remaining time |
In VCD (with PBC on) /Audio file source
| Display | Information |
| "Display Off" | Not displayed |
| "Track Elapsed" | Track/file elapsed time |
| "Track Remain" | Track/file remaining time |
In VCD (with PBC off) /CD source
| Display | Information |
| "Track Elapsed" | Track elapsed time |
| "Track Remain" | Track remaining time |
| "Disc Elapsed" | Disc elapsed time |
| "Disc Remain" | Disc remaining time |
| "Display Off" | Not displayed |
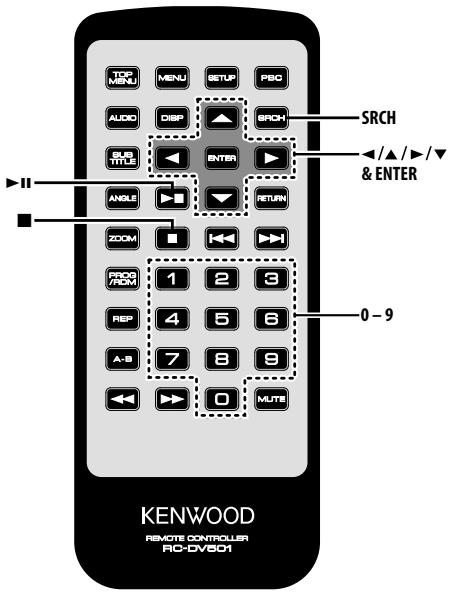
Search Play [DVD] [VCD] [DivX]
Directly calls the scene you want to play.
1 Enter the Search mode Press the [SRCH] button.
![KENWOOD KDV-S250P - Search Play [DVD] [VCD] [DivX] - 1](/content/2025/01/84011/images/5da09c528ebc33d3f9fede31a9b2b95789ac7b0cb476ca47b58d85bd98bc4ed9.jpg)
- To search play a VCD, turn the PBC function off by pressing the [PBC] button.
2 For DVD, select the Search mode Press the [SRCH] button.
Each time the button is pressed, the item that can be called switches as shown below.
Item
Chapter number
Title number

- The item cannot be switched during DVD-VR playback.
- If you press the [▲] or [▼] button during the Chapter Number Search mode, you can search for a title number.
3 Enter the scene you want to play Press the [0] – [9] button.
Starts playing the scene you entered during VCD playback.
4 For DVD, start scene Search Play Press the [ENTER] button.
Starts playing the scene you entered.
5 For DVD, enter the time you want to play Press the [0] – [9] button.
Starts playing the time you entered.
6 For DVD, start time Search Play Press the [ENTER] button.
Starts playing the time you entered.
Canceling Search Play Press the [SRCH] button.
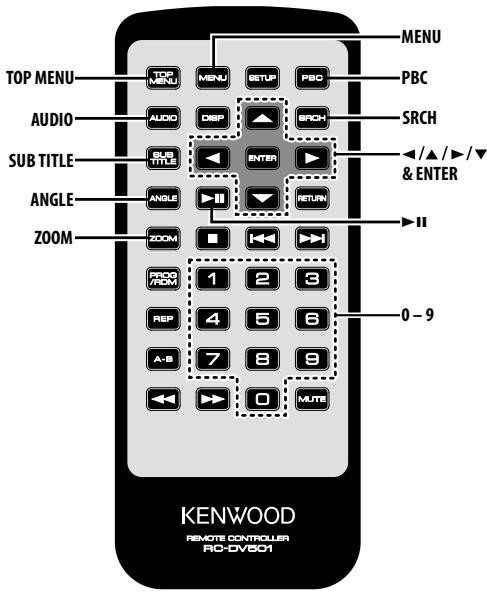
DVD menu/Top (title) menu [DVD]
Calls the DVD menu and the Top (title) menu to set up various settings.
1 Display the DVD menu Press the [MENU] button.
Display the Top (title) menu Press the [TOP MENU] button.
2 Select the item Press the [◀]/[▲]/[▶]/[▼] or [0] - [9] button.
3 Finalize the item Press the [ENTER] button. Refer to the disc manual for instructions on using each menu.
4 Cancel the menu display Press the [MENU] or [TOP MENU] button.
Audio Language select [DVD]
Press the [AUDIO] button.
Switches the languages recorded on the disc in order.
![KENWOOD KDV-S250P - Audio Language select [DVD] - 1](/content/2025/01/84011/images/c9f33eebe4e75b8ca05358d06881ecae2d4a3269280cb96f385cec8c7c7101ab.jpg)
- If no more than one language is recorded on the disc, it does not switch.
Subtitle Language select [DVD]
Press the [SUB TITLE] button.
Switches the languages recorded on the disc in order.
![KENWOOD KDV-S250P - Subtitle Language select [DVD] - 1](/content/2025/01/84011/images/ef7bfade43fad8652f66f9b8e85c03ba1f403a5f78054320e7a8472c9b2da381.jpg)
- If no more than one language is recorded on the disc, it does not switch.
Picture Angle select [DVD]
Press the [ANGLE] button.
Switches the angles recorded on the disc in order.
![KENWOOD KDV-S250P - Picture Angle select [DVD] - 1](/content/2025/01/84011/images/a530d483603247c6f32743ba13dc1cfd68f260198a573c59ef754da5c12198eb.jpg)
- If no more than one angle is recorded on the disc, it does not switch.
Zoom
Zooms the image.
1 Select the zoom ratio Press the [ZOOM] button.
Each time the button is pressed, the zoom ratio changes as follows:
DVD/ VCD: x1.0, x2.0, x3.0
Video file: x1.0, x1.5, x2.0, JUST
Picture file: 50, 100, 150, 200 %
2 Select the displaying position (during playback of moving picture only)
Press the [◀]/[▲]/[▶]/[▼] button.
PBC [VCD]
Uses the playback control (PBC) function.
1 Turn the PBC function on Press the [PBC] button.
Each time the button is pressed, the PBC function turns ON or OFF.
2 Select the item
Press the [0] - [9] button.
3 Finalize the item
Press the [▶II] button.
Refer to the disc manual for instructions on using PBC.
![KENWOOD KDV-S250P - PBC [VCD] - 1](/content/2025/01/84011/images/2943c4e945ce9dc0c1fbd8a1ea261f9cff525bb4e98677a91ddfbf119ef094d6.jpg)
- You can use the PBC function when playing a VCD of Ver2.0 or higher.
Slow Motion play [DVD] [VCD] [DivX]
1 Pause playback Press the [▶II] button.
2 Slow Motion play Press the [◀◀] or [▶▶] button.
Each time the button is pressed, it plays in slow motion as shown below.
| Disc | Button | Movement |
| DVD | [◀◀] | The speed of slow reverse changes in order of 5 steps. |
| DVD | [▶▶] | The speed of slow forward changes in order of 5 steps. |
| VCD/DivX | [▶▶] | The speed of slow forward changes in order of 5 steps. |
![KENWOOD KDV-S250P - Slow Motion play [DVD] [VCD] [DivX] - 1](/content/2025/01/84011/images/b949969395aa91958f5358b9f1c3869bc96b664f3929601278fec9d851da8066.jpg)
- To return to the normal speed, press the [▶II] button.
Frame-by-frame playback [DVD] [VCD] [DivX]
1 Pause playback Press the [▶II] button.
2 Frame-by-frame playback Press the [◀] or [▶] button.
![KENWOOD KDV-S250P - Frame-by-frame playback [DVD] [VCD] [DivX] - 1](/content/2025/01/84011/images/e5b77daca24c0a51ac790c1a97a88b93baaa404f65f4c2c76e1476888e5d4506.jpg)
- During playback of a video file, frames cannot be advanced in the reverse direction ([◀]).
Slide show [PIC]
Displays the slide show of pictures.
1 Select the folder to view a slide show Press the [◀]/[▲]/[▶]/[▼]/[ENTER] button.
2 Start the slide show Press the [▶II] button.
![KENWOOD KDV-S250P - Slide show [PIC] - 1](/content/2025/01/84011/images/ce49c0bf8843fd00509daf0b735b95ff0d62f04732c9230277a97a6530afb5a9.jpg)
- To specify the display time of a file, select "OTHER" / "JPEG TIME" from
Picture Rotation [PIC]
Rotates the displayed picture.
1 Display the picture you want to rotate Press the [◀]/[▲]/[▶]/[▼]/[ENTER] button.
2 Rotate the picture
| Button | Display |
| ◀ | Rotate the picture 90° counterclockwise. |
| ▲ | Rotate the picture 180°. |
| ▶ | Rotate the picture 90° clockwise. |
| ▼ | Rotate the picture 180°. |
Direct Skip Play [CD]
Directly calls the song you want to play.
1 Enter the song number you want to play Press the [0] – [9] button.
2 Play
Press the [ENTER] button.
![KENWOOD KDV-S250P - Direct Skip Play [CD] - 1](/content/2025/01/84011/images/6ea5ea7468943245b7133f382bea729dc105e5d803b6cb65531d1624fc0c907f.jpg)
- If you do not perform the operation of Step 2 for about 5 seconds, the song entered in Step 1 is automatically searched for.
Play Time Search [CD]
Enter the play time to start from where you want.
1 Enter the Play Time Search mode Press the [SRCH] button.
2 Enter the play time where you want to start Press the [0] - [9] button.
For example
5:07 ⇌ [0], [5], [0], [7]
Starts playing from the time you entered.
3 Play Press the [ENTER] button.
Search Play [AUDIO]
Directly calls the song you want to play.
1 Select the folder
Press the [◀]/[▲]/[▶]/[▼] button.
2 Determine the folder
Press the [ENTER] button.
The music in the determined folder are displayed.
3 Enter the Search Play mode Press the [SRCH] button.
4 Enter the song number you want to play Press the [0] – [9] button.
5 Play
Press the [ENTER] button.
Setup menu
You can customize default settings for various functions of the unit using the Setup menu.
1 Stop playback Press the [■] button.
During DVD playback, press the button twice. During VCD playback, turn the PBC function off by pressing the [PBC] button first.
2 Display the SETUP MENU screen Press the [SETUP] button.
SETUP MENU MAIN is displayed on the monitor screen connected.
3 Select the menu page you want to set up Press the [▲]/[▼] button.
4 Enter the selected menu page Press the [ENTER] button.
The menu page selected in Step 3 is displayed.
5 Select the setup item and option Press the [◀]/[▲]/[▶]/[▼] button.
Refer to the subsequent descriptions for the setup items and options on each menu.
6 Finalize your selection Press the [ENTER] button.
To return to Step 2 to display the SETUP MENU MAIN screen, press [RETURN].
7 Exit the Setup menu Press the [SETUP] button.

- To exit the Setup menu, press [SETUP]. If you exit the Setup menu by turning off the power, the settings are not saved.
DISC menu
AUDIO
Set the audio language produced from the speakers.
| Display | Setting |
| "JAPANESE" | Japanese |
| "ENGLISH" | English |
| "CHINESE" | Chinese |
| "ORIGINAL" | Original language |
SUBTITLE
Set the language of the subtitles displayed on the screen.
| Display | Setting |
| "AUTO" | Original language |
| "JAPANESE" | Japanese |
| "ENGLISH" | English |
| "CHINESE" | Chinese |
MENUS
Set the language of the disc menu.
| Display | Setting |
| "ENGLISH" | English |
| "CHINESE" | Chinese |
| "GERMAN" | German |
| "FRENCH" | French |
| "JAPANESE" | Japanese |
| "ITALIAN" | Italian |
RATINGS
Set the parental level. The higher the level is, the higher protection you get.
| Display | Setting |
| "0 LOCK ALL" | |
| "1 KID SAF" | G-rated movies (for children) can only be played. |
| "2 G" | |
| "3 PG" | |
| "4 PG 13" | |
| "5 PGR" | |
| "6 R" | |
| "7 NC17" | |
| "8 ADULT" |
1 Press the [ENTER] button on the remote.
2 Set up the parental level.
3 Enter the password.
4 Press the [ENTER] button on the remote.

- The password is set to "0000" by default.
- The parental setting is enabled for "R" sign discs only.
PASSWORD
CHANGE: Change the password.
1 Select "SETTING" and press the [ENTER] button on the remote.
2 Enter the current password.
3 Enter the new password twice.
4 Press the [ENTER] button on the remote.

- The password is set to "0000" by default.VIDEO menu
VIDEO menu
TV ASPECT
Use the procedure described below to set the output screen.
| Display | Setting |
| "16:9" | Set the picture mode of the wide-screen monitor to "16:9". |
| "4:3 PS" | Wide-screen software with pan & scan specification is played in a panned & scanned screen (with the left and right sides cut off). |
| "4:3 LB" | Wide-screen software with pan & scan specification is played in a letter box screen (with black stripes on the top and bottom). |
TV SYSTEM
Select the video output signal suitable for the TV monitor you use.
| Display | Setting |
| "NTSC" | Outputs the video signal using the NTSC system. |
| "PAL" | Outputs the video signal using the PAL system. |
| "AUTO" | Switches between the NTSC and PAL systems automatically according to the type of the video signal of the disc you play. |
STILL MODE
Set the still (pause) image display mode.
| Display | Setting |
| "AUTO" | Detects the image motion speed automatically to perform the optimum image processing. |
| "FIELD" | Performs the optimum image processing when the image motion is fast. |
| "FRAME" | Performs the optimum image processing when the image motion is slow. |
AUDIO menu
LPCM DOWNSMPL
| Display | Setting |
| "OFF" | Does not perform down-sampling. |
| "96kHz" | Outputs a song of 96kfs in 96kfs from DIGITAL OUT. |
| "48kHz" | Outputs a song of 96kfs in 48kfs from DIGITAL OUT. |
DOLBY DIGITAL
Sets the Dolby digital sound output form.
| Display | Setting |
| "BITSTREAM" | Outputs sound in Bits stream form. |
| "PCM" | Outputs sound in PCM form. |
| "OFF" | Does not output sound. |
DTS
Sets the DTS sound output form.
| Display | Setting |
| "BITSTREAM" | Outputs sound in Bits stream form. |
| "PCM" | Outputs sound in PCM form. |
| "OFF" | Does not output sound. |
MPEG
Sets the MPEG sound output form.
| Display | Setting |
| "BITSTREAM" | Outputs sound in Bits stream form. |
| "PCM" | Outputs sound in PCM form. |
| "OFF" | Does not output sound. |
DYNAMIC RANGE
Narrows the dynamic range to allow you to listen to movie dialogues clearly.
| Display | Setting |
| "ON" | Narrows the dynamic range. |
| "OFF" | Does not adjust the dynamic range. |
DISPLAY
LANGUAGE
Sets the language of the setup menu.
| Display | Setting |
| "中文" | Chinese |
| "ENGLISH" | English |
| "FRANÇAIS" | French |
| "ESPAÑOL" | Spanish |
| "DEUTSCH" | German |
| "ITALIANO" | Italian |
OTHER
JPEG TIME
Sets the picture display time.
| Display | Setting |
| "1 SEC" | Displays the picture for 1 second. |
| ⋮ | |
| "180 SEC" | Displays the picture for 180 seconds. |
Press the [▲] or [▼] button to select the second.
DEFAULTS
RESET: Resets the customized items on the Setup menu.
DivX(R) VOD
SHOW CODE: Displays the DivX registration code.

- When downloading a DivX VOD file controlled by DRM, register the code appeared on the screen. Otherwise the file may not be able to play with this unit. Remaining number of viewing is displayed when playing a DivX VOD file with the viewing restriction. When the remaining number of viewing reached 0, a warning message appears and the file cannot be played.

- If the fuse blows, first make sure that the wires have not caused a short circuit, then replace the old fuse with one with the same rating.
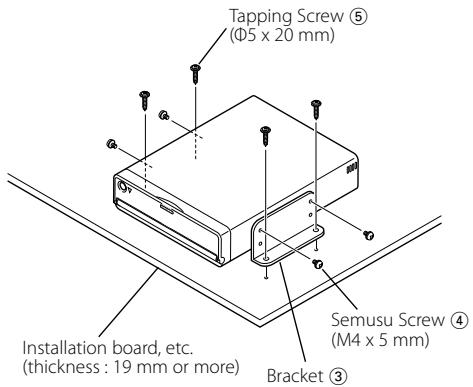
Installation using the brackets
Installation using the velcro tapes
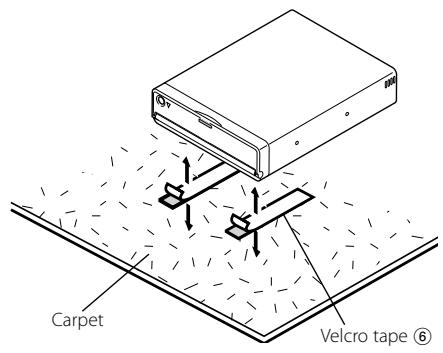

- Do not use your own screws. Use only the screws provided. If you use the wrong screws, you could damage the unit.
- Do not install the unit to an unstable place and a place where it vibrates.
- When making a hole under a seat, inside the trunk, or somewhere else in the vehicle, check that there is nothing hazardous on the opposite side such as a gasoline tank, brake pipe, or wiring harness, and be careful not to cause scratches or other damage.
- Do not install near the dashboard, rear tray, or air bag safety parts.
- The installation to the vehicle should securely fasten the unit to a place in which it will not obstruct driving. If the unit comes off due to a shock and hits a person or safety part, it may cause injury or an accident.
- After installing the unit, check to make sure that electrical equipment such as the brake lamps, turn signal lamps and windshield wipers operate normally.
- You can mount the unit at any angle between the regular horizontal position and the vertical position on its back (0° through 90°). You cannot mount the unit with the disc slot facing downwards, angled or upside down.
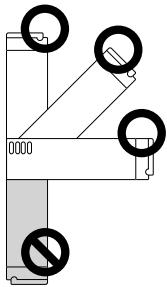
natural_image
Pure mechanical diagram showing a lever mechanism with no text or symbols, including circles and prohibition signs (no readable text or labels)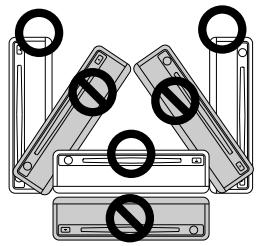
natural_image
Diagram showing multiple electronic devices with prohibition symbols, no readable text or labels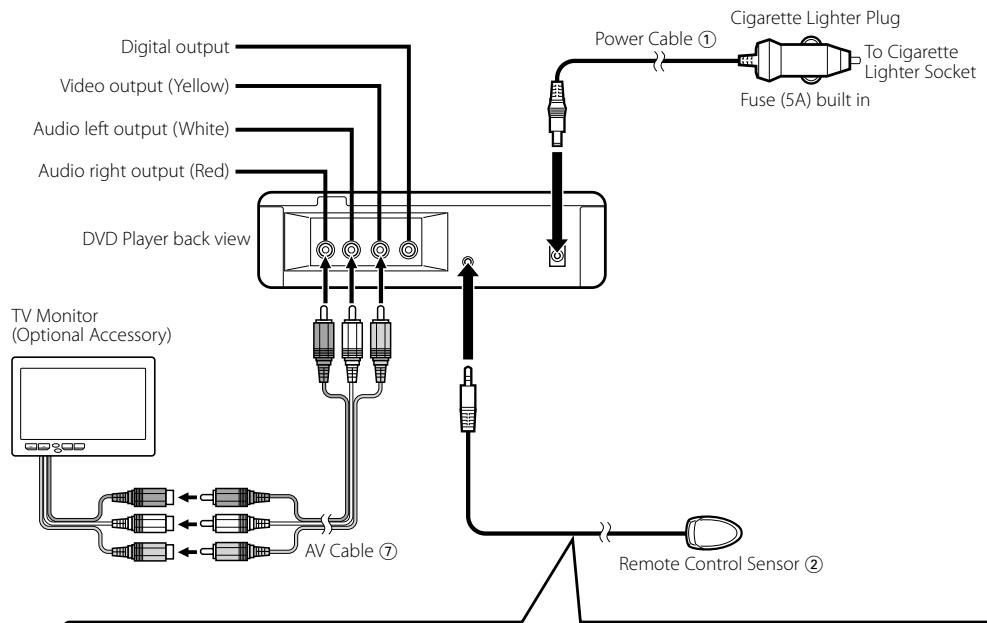
flowchart
graph TD
    A["Digital output"] --> B["Video output (Yellow)"]
    A --> C["Audio left output (White)"]
    A --> D["Audio right output (Red)"]
    B --> E["DVD Player back view"]
    C --> E
    D --> E
    E --> F["Power Cable ①"]
    F --> G["Cigarette Lighter Plug"]
    G --> H["To Cigarette Lighter Socket"]
    G --> I["Fuse (5A) built in"]
    E --> J["TV Monitor (Optional Accessory)"]
    J --> K["AV Cable ⑦"]
    K --> L["Remote Control Sensor ②"]
Attaching Remote Control Sensor
1 Remove the backing paper from the Velcro tape on the back of the Remote Control Sensor.
2 After wiping off the dirt or oil from the attachment location, attach the Remote Control Sensor.

- Make sure that the Remote Control Sensor plug is firmly inserted. If the connection is inadequate, the unit cannot be remote-controlled.
- Wipe off the dirt or oil from the surface to which the Sensor is attached.
- Avoid locations under direct sunlight or near the TV monitor where signals from the remote controller are not received easily.
- You can change the direction of the remote control sensor cable.
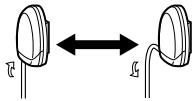
natural_image
Diagram showing two connected mechanical components with arrows indicating bidirectional movement (no text or symbols)

- Connect the power cable ① to the DVD player first, and connect it to the cigarette lighter socket last. Connecting it to the cigarette lighter socket first may blow the fuse.
What might seem to be a malfunction in your unit may just be the result of slight misoperation or miswiring. Before calling service, first check the following table for possible problems.
? The sound/picture skips on a DVD/VCD/CD.
√ The disc is scratched or dirty.
Clean the disc, referring to the section on
? A VCD cannot be played using menus.
√ The VCD disc being played is not compatible with P.B.C.
Menu playback is available only with VCD discs recorded with P.B.C.
? The subtitle is not displayed.
√ The DVD disc being played does not contain the recording of subtitles.
The subtitle cannot be displayed when the DVD disc being played does not contain the recording of subtitles.
? The voice (or subtitle) language cannot be changed.
√ The DVD disc being played does not contain the recording of more than one audio (or subtitle) language.
The voice (or subtitle) language cannot be changed when the DVD disc being played does not contain the recording of more than one voice (or subtitle) language.
? The unit cannot be remote-controlled.
√ The Remote Control Sensor connection to the unit is inadequate.
Insert the Remote Control Sensor plug firmly into the jack at the back panel of unit.
The messages shown below display your systems condition.
"Thermal Protect. Off Power!"
The protective circuit in the unit activates when the temperature inside the DVD player exceeds 60^ C ( 140^ F), stopping all operation.
Cool down the unit by opening the windows or turning on the air conditioner. As the temperature falls below 60^ C ( 140^ F), the disc will start playing again.
To eject the disc in this situation, turn the power off and then turn it back on.
"NO DISC"
: No disc is inserted in the unit.
"THIS DISC MAY NOT BE PLAYED IN YOUR REGION"
: A DVD with the wrong region code was inserted into the unit.
"Unknown DISC"
: A disc that cannot be played in the unit was inserted.
: The disc inserted contains damaged or non-standard data.
"PASSWORD IS DIFFERENT!"
: The password entered does not match the one registered.
: Appears if the second new password entered does not match the first one when changing the password.
When you enter the new password, you are required to enter the same password twice for confirmation.
Specifications subject to change without notice.
DVD section
D/A Converter
: 24bit, ΔΣ
Wow & Flutter
: Below Measurable Limit
Frequency response
: 17-44 kHz (DVD 96kHz Sampling)
Total harmonic distortion 1kHz
: 0.02 %
Signal to noise ratio
: 110 dB (DVD Video 96k)
Dynamic range
: 90 dB
Decode Format
: Linear PCM, Dolby Digital, dts, MP3, WMA, AAC
DISC Format
Audio 2ch Output Level (V)
:1.2 V/ 10 kΩ (DVD/CD)
Coaxial Digital Audio Interface Output Level (V)
: 0.5 V/75 Ω
General
Operating voltage
: 14.4 V (11 - 16 V)
Current consumption
:2A
Dimensions WxHxD
: 195 x 45 x 210 mm
7-11/16 × 1-6/8 × 8-2/8 inch
Weight
: 1.70 kg
3.75 lbs
▲CAUTION
Use of controls or adjustments or performance of procedures other than those specified herein may result in hazardous radiation exposure. In compliance with Federal Regulations, following are reproductions of labels on, or inside the product relating to laser product safety.
Kenwood Corporation
2967-3, ISHIKAWA-MACHI,
HACHIOJI-SHI
TOKYO, JAPAN
KENWOOD CORP. CERTIFIES THIS EQUIPMENT CONFORMS TO DHHS REGULATIONS N0.21 CFR 1040. 10, CHAPTER 1, SUBCHAPTER J.
Location : Bottom Panel
FCC WARNING
This equipment may generate or use radio frequency energy. Changes or modifications to this equipment may cause harmful interference unless the modifications are expressly approved in the instruction manual. The user could lose the authority to operate this equipment if an unauthorized change or modification is made.
FCC NOTE
This equipment has been tested and found to comply with the limits for a Class B digital device, pursuant to Part 15 of the FCC Rules. These limits are designed to provide reasonable protection against harmful interference in a residential installation. This equipment may cause harmful interference to radio communications, if it is not installed and used in accordance with the instructions. However, there is no guarantee that interference will not occur in a particular installation. If this equipment does cause harmful interference to radio or television reception, which can be determined by turning the equipment off and on, the user is encouraged to try to correct the interference by one or more of the following measures:
- Reorient or relocate the receiving antenna.
- Increase the separation between the equipment and receiver.
- Connect the equipment into an outlet on a circuit different from that to which the receiver is connected.
- Consult the dealer or an experienced radio/TV technician for help.
CE
Declaration of Conformity with regard to the EMC Directive 2004/108/EC
Manufacturer:
Kenwood Corporation
2967-3 Ishikawa-machi, Hachioji-shi, Tokyo, 192-8525 Japan
EU Representative's:
Kenwood Electronics Europe BV
Amsterdamseweg 37, 1422 AC UITHOORN, The Netherlands
This Product is not installed by the manufacturer of a vehicle on the production line, nor by the professional importer of a vehicle into an EU Member State.
Information on Disposal of Old Electrical and Electronic Equipment and Batteries (applicable for EU countries that have adopted separate waste collection systems)

Products and batteries with the symbol (crossed-out wheeled bin) cannot be disposed as household waste.
Old electrical and electronic equipment and batteries should be recycled at a facility capable of handling these items and their waste byproducts.

Contact your local authority for details in locating a recycle facility nearest to you. Proper recycling and waste disposal will help conserve resources whilst preventing detrimental effects on our health and the environment.
Notice: The sign "Pb" below the symbol for batteries indicates that this battery contains lead.
The marking of products using lasers (Except for some areas)
CLASS 1
LASER PRODUCT
The label is attached to the chassis/case and says that the component uses laser beams that have been classified as Class 1. It means that the unit is utilizing laser beams that are of a weaker class. There is no danger of hazardous radiation outside the unit.
DivX, DivX Certified, and associated logos are trademarks of DivX, Inc. and are used under license.
DVD is a trademark of DVD Format/Logo Licensing Corporation registered in the U.S., Japan and other countries.
This product incorporates copyright protection technology that is protected by U.S. patents and other intellectual property rights. Use of this copyright protection technology must be authorized by Macrovision, and is intended for home and other limited viewing uses only unless otherwise authorized by Macrovision. Reverse engineering or disassembly is prohibited.
Manufactured under license from Dolby Laboratories. Dolby and the double-D symbol are trademarks of Dolby Laboratories.
Manufactured under license under U.S. Patent #'s: 5,451,942; 5,956,674; 5,974,380; 5,978,762; 6,487,535 & other U.S. and worldwide patents issued & pending. DTS and DTS 2.0 + Digital Out are registered trademarks and the DTS logos and Symbol are trademarks of DTS, Inc. © 1996-2008 DTS, Inc. All Rights Reserved.
The "AAC" logo is a trademark of Dolby Laboratories.
- MANUAL DE INSTRUÇÕES
- For your records
- Safety precautions 3
- Notes 4
- Common features 8
- DVD Video/Video CD/Video file/Picture file features 12
- CD/Audio file features 15
- Setup menu 16
- Accessories 19
- Installation 20
- Connecting Wires to Terminals 21
- Troubleshooting Guide 22
- Specifications 23
- US Residence Only
- Register Online
- WARNING
- To prevent injury or fire, take the following precautions:
- CAUTION
- To prevent damage to the machine, take the following precautions:
- NOTE
- Lens Fogging
- Cleaning the Unit
- Restrictions due to difference between discs
- Use of "DualDisc"
- About the usable temperatures
- About the functions by playback source
- Handling discs
- Discs that cannot be used
- About Audio files
- - Playable Audio file
- - Playable MP3 file
- - Playable WMA file
- - Playable AAC file
- - Playable disc media
- - Playable disc file format
- - Limitation of structure for the file and the folder
- About Picture files
- Acceptable picture files
- Extension
- About Video files
- Acceptable video files
- Extensions
- About DivX
- About DivX Certified
- Loading the battery
- ▲WARNING
- Power
- Play
- Play the selected file
- Pause
- Stop
- Eject
- Mute
- Skip
- Fast Forward and Reverse
- Repeat Play
- A-B Repeat Play
- [DVD] [VCD] [DivX] [CD] [AUDIO]
- Random Play
- [CD] [AUDIO] [DivX] [PIC]
- Program Play
- Switching Display
- Search Play [DVD] [VCD] [DivX]
- Item
- DVD menu/Top (title) menu [DVD]
- Audio Language select [DVD]
- Subtitle Language select [DVD]
- Picture Angle select [DVD]
- Zoom
- PBC [VCD]
- Slow Motion play [DVD] [VCD] [DivX]
- Frame-by-frame playback [DVD] [VCD] [DivX]
- Slide show [PIC]
- Picture Rotation [PIC]
- Direct Skip Play [CD]
- Play Time Search [CD]
- Search Play [AUDIO]
- Setup menu
- DISC menu
- AUDIO
- SUBTITLE
- MENUS
- RATINGS
- PASSWORD
- VIDEO menu
- TV ASPECT
- TV SYSTEM
- STILL MODE
- AUDIO menu
- DOLBY DIGITAL
- DTS
- MPEG
- DYNAMIC RANGE
- DISPLAY
- LANGUAGE
- OTHER
- JPEG TIME
- DEFAULTS
- DivX(R) VOD
- Attaching Remote Control Sensor
- ? The sound/picture skips on a DVD/VCD/CD.
- ? A VCD cannot be played using menus.
- ? The subtitle is not displayed.
- ? The voice (or subtitle) language cannot be changed.
- ? The unit cannot be remote-controlled.
- The messages shown below display your systems condition.
- "Thermal Protect. Off Power!"
- "NO DISC"
- "THIS DISC MAY NOT BE PLAYED IN YOUR REGION"
- "Unknown DISC"
- "PASSWORD IS DIFFERENT!"
- DVD section
- General
- ▲CAUTION
- FCC WARNING
- FCC NOTE
- CE
- Declaration of Conformity with regard to the EMC Directive 2004/108/EC
- Manufacturer:
- EU Representative's:
- Information on Disposal of Old Electrical and Electronic Equipment and Batteries (applicable for EU countries that have adopted separate waste collection systems)
- The marking of products using lasers (Except for some areas)
Brand : KENWOOD
Model : KDV-S250P
Category : Portable DVD Player