SPY-DVR4KIT1 - Security Camera Spyclops - Free user manual and instructions
Find the device manual for free SPY-DVR4KIT1 Spyclops in PDF.


| Product Type | 4K Security Camera DVR Kit |
| Model | SPY-DVR4KIT1 |
| Brand | Spyclops |
| Number of Cameras | 4 |
| Camera Resolution | 4K Ultra HD (3840x2160) |
| Night Vision Distance | Up to 100 ft (30 m) |
| Field of View (per camera) | 90° horizontal |
| DVR Storage Capacity | 1TB HDD (expandable up to 2TB) |
| DVR Dimensions (WxHxD) | 10 x 8 x 2 inches |
| DVR Weight | 3.5 lbs (1.6 kg) |
| Camera Dimensions (each) | 3.5 x 3.5 x 5 inches |
| Camera Weight (each) | 0.8 lbs (0.36 kg) |
| Power Supply | DC 12V 2A (DVR and cameras) |
| Connectivity | Ethernet (DVR), Wi-Fi (app remote access) |
| Audio | Two-way audio (built-in microphone and speaker on DVR) |
| Weatherproof Rating | IP66 (cameras) |
| Main Functions | 4K recording, motion detection, night vision, remote viewing via app, continuous recording |
| Maintenance & Cleaning | Wipe with a soft dry cloth; avoid liquids. Clean camera lenses gently. |
| Safety Features | Surge protection, tamper alerts, password protection |
| Spare Parts & Repairability | Replacement cameras and DVR available; user-replaceable HDD |
| Warranty | 1 year limited warranty |
| Compatible Apps | Spyclops View (iOS and Android) |
| Included Accessories | 4 cameras, DVR, power adapters, Ethernet cable, mounting screws, manual |
| General Information | Designed for home and business security; supports up to 8 cameras (expandable) |
Frequently Asked Questions - SPY-DVR4KIT1 Spyclops
User questions about SPY-DVR4KIT1 Spyclops
0 question about this device. Answer the ones you know or ask your own.
Ask a new question about this device
Download the instructions for your Security Camera in PDF format for free! Find your manual SPY-DVR4KIT1 - Spyclops and take your electronic device back in hand. On this page are published all the documents necessary for the use of your device. SPY-DVR4KIT1 by Spyclops.
USER MANUAL SPY-DVR4KIT1 Spyclops
Congratulations on purchasing the SpyClops H.264 DVR Security System
System Specifications:
- Multi-camera digital video recorder which includes motion detection, key buzzer alarm, e-mail and area masking
- The DVR uses state of the art H.264 video compression technology to maximize your recording time and optimize your video quality. H.264 compression saves hard drive space and supports faster data transfer.
• Data stored in the DVR can easily and quickly be backed up via a USB drive
• Up to 16 camera capacity so upgrading your system in the future will be easy and trouble free
• Apple and Android supported app so you can view your video feed from anywhere remotely
• An embedded Linux operating system provides you with stability and excellent network capabilities
• Ideal for residential and commercial installations
Your System Includes:
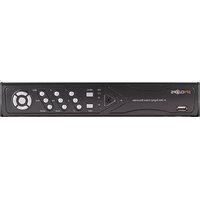
• 4, 8 or 16 channel H.264 networkable DVR with pre-installed hard drive
- Power adapter
- USB mouse

natural_image
Exterior view of a CLOPS audio workstation with external cables and power strip (no visible text or symbols)*Note: Remove the equipment from its packaging and place it on a clean, flat surface. Inspect each item. If any visible damage is present, contact your supplier please verify your order is complete
SPYCLOPS™
- BNC video in from cameras
- Video out to TV (BNC to RCA cable)
- HDMI output
- RS485 port for PTZ camera control
-
ON/OFF power switch
-
RCA audio IN and OUT
- VGA output to monitor
- RJ45 ethernet port
- Mouse/USB backup
- DC 12V adapter port
1.0 INTRODUCTION
1.1 Main Menu Introduction
Right click the mouse and you will find the main menu (it can also be accessed by pressing the "MENU" key). The main menu consists of the following components:
| x1 View |
| x4 View |
| x9 View |
| Video playback |
| Manual record |
| PTZ control |
| Volume |
| Setup |
| Shutdown |
• X1 view Click to view which channel you want to view
• X4 view Click to view 4 channels
• Video playback Shortcut to the "video playback" option
- Manual record Set manual recording for one or all channels by choosing the "All on" option. To turn off click the "All off" option for all or one channel
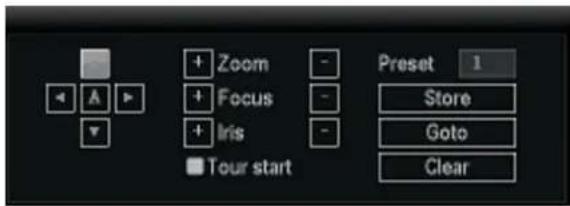
- PTZ control Shortcut to PTZ. Use this option to set the "Presets" for PTZ cameras
- Volume If you are recording audio along with video you can adjust the recording volume here
*Note: If you are recording audio as well as video, you need to go to the "Encode setup" option and choose "AV stream" for the "Encode mode"
- Setup Goes to the "setup" menus
- Shutdown Shortcut to "shutdown" the system

2.0 SYSTEM TOOLS
2.1 User Management
- The default admin user has no password set up, to set up a password you need to highlight admin, then select "set password". Skip the "old password" field (since it defaulted blank) and add a "new password".
*Note: This will need to be done in order to view the DVR remotely
- You may add a new "user", but remember that if you want the new user to have access to setup, system tools AND remote you need to check the "super user" box, otherwise you can select what this user can see/do in the checkboxes displayed under "username" and "password". Hit "OK" and save changes
- If you add a new "user" and forget to assign permissions, simply select the user and choose "Edit user" to the right. You can then either pick 'super user', assign each permission separately or select permissions by group of "setup", "system tools" or "remote"
- This is also where you can delete users. Simply highlight the user you no longer want and hit "delete user", don't forget to click "yes" and "ok"
*Note: if you forget your password, you can reset it by pushing the up arrow on front of the DVR 10 times to reset the unit back to the default user

*Note: Click "OK" to save any changes then right click twice to save your configurations after every change you make

2.2 Format the Hard Drive (HDD)
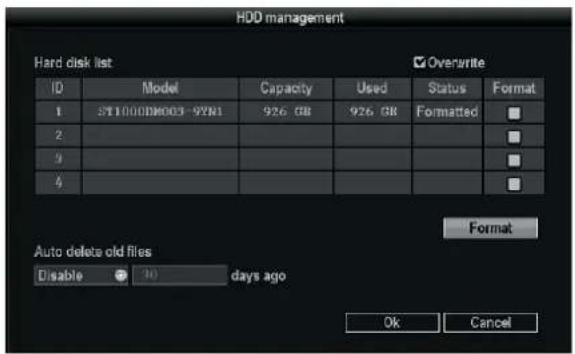
- Before turning ON the DVR, confirm the DVR is plugged in with the provided power supply. Connect the mouse using the USB port in the back of the DVR. After switching power, the POWER light might be flashing, this is normal. The system will then show a warning to format the HDD (hard drive). Using the mouse, you will click "OK"
- To format the HDD right click with your mouse and select "Setup" then left click to select "System Tools" then select "HDD management". Select the checkbox of the HDD you want to format then click the "Format" checkbox "√" click "Format", click "Yes" to start.

2.3 System maintenance
• Perform a System update, Logo update or Resource update from USB storage and click start

2.4 Factory setting
• Factory reset "all" or each setup choice you choose


3.0 SYSTEM SETUP
3.1 General Setup
- Date time: This option is used to set up the date and time. If the wrong information is left populated, the DVR will not record properly
*Note: click "Apply" to save date and time changes
• Date format: [year, month, day], [month, day, year], [day, month, year] - Auto Logout: When enabled, the DVR will automatically logoff the present user if there is 10 minutes without operation. They will need to login again to operate the device
- Key buzzer: "Enable" will activate a beep when the DVR buttons are pushed. "Disable" will prevent beeps from sounding when the buttons are pushed
• Language: You can select one of six different languages
SPYCLEOPS™
- Standard: "PAL" is default setting. "NTSC" is the standard for North America and will need to be selected for a clearer picture. If you are outside of North America you will need to check to see what standard your country uses
*Note: Any time you change the resolution, the system will have to be rebooted to make changes


3.2 Screen Set-up
• Channel: This will select each camera view so you can adjust each one accordingly
- Color Adjust: To adjust Hue, Brightness, Saturation, and Contrast of each channel as needed. You can copy your configuration to either another channel or all channels.
• Camera Title: You can change each camera name as you select each different channel
• OSD Alpha: The menu transparency can be adjusted as needed
- VGA resolution: Choose the best VGA resolution for your monitor size, keep in mind if you are viewing on a computer or laptop, will you have the screen maximized? The following chart can assist you in determining which resolution is best for your monitor/screen
RESOLUTION
SCREEN SIZE
| 800 x 600 | 780 x 430 |
| 1024 x 768 | 1000 x 600 |
| 1280 x 1024 | 1180 x 850 |
| 1920 x 1080p 50Hz/60Hz | Most standard televisions |
- TV Adjust: Not all screens will need this option. If you can't see every corner of your menu screen; TV Adjust will let you adjust the sides, bottom and top to fit the menu into your screen view
- Auto Switch: Select to switch camera views automatically. Can choose between every 2 seconds up to every 10 seconds

3.3 Encode Set-

*Note: If you have your target bitrate, but are having trouble achieving an acceptable quality video, you will have to cut back in some aspect. The contributing factors that will lead to a higher video bitrate are the amount of pixels (the resolution of the video), the frame rate, and the amount of motion present
- Channel: You can assign different settings to each channel (camera view). Remember after choosing all the settings for each channel to hit "OK" and right click twice to save
- Stream: This is where you will set the settings for your main stream and sub stream. The main stream is the stream you will see locally and can support "D1" encode format. Sub stream is the stream you will see remotely from your phone so you wont need higher resolution, it should be "CIF" format
- Encode Mode: Select "Video only" for encoding video, select "AV stream" for encoding video and audio
- Bitrate mode: This will be dependant on your bandwidth and specific needs
| Constant Bitrate | This is the default encoding mode, and also the most basic. In this mode, the bitrate will be the same for the whole file. It means that each part of your video file will be using the same number of bits. The complex parts will be of a lower quality than the easiest ones. The main advantage is that the final files size won't change and can be accurately predicted.This mode is not recommended |
| Average Bitrate | In this mode, you choose a target bitrate and the encoder will try to constantly maintain an average bitrate while using higher bitrates for the parts of your video that need more bits. The result will be of higher quality than CBR encoding while the average file size will remain predictable, so this mode is highly recommended over CBR. |
| Variable Bitrate | In this mode, you choose the desired quality on a scale going from 9 (lowest quality/highest distortion) to 0 (highest quality/lowest distortion). Then you choose the optimal number of bits to spend for each part. The advantage is that you are able to specify the quality level that you want to reach; the inconvenient is that the final file size is totally unpredictable. |
• Encode format: For the main stream we recommend NTSC with D1 format
| QCIF | CIF | HD1 | D1 | |
| NTSC | 176 x 120 | 352 x 240 | 720 x 480 | 720x576 |
| PAL | 176 x 144 | 352 x 288 | 352 x 576 | 704 x 480 |
- Rate: In general, we recommend a bitrate of around 2 - 2.5 Mbps, which takes into account the average worldwide broadband connections for video output
- Quality: You can adjust your image quality fluctuation. Highest, High, Medium, Low, Lowest. Highest is recommended, although it will effect your bandwidth
SPYCLOPS™
- Frame rate: The frame rate is how many unique consecutive images are displayed per second in the video to give the illusion of movement. Keep in mind, that the minimum limit that our brain needs to perceive moving frames as a video is 24 Frames per Second, so there is no big difference between 24 and 30 fps except the higher frame rate will effect your bandwidth and data storage

3.4 Record Setu

Use your mouse and click the right button to select "Setup" key, select "System setup", and select "Record Setup"
• Channel: Pick the camera view you want to record
- Weekday: Choose the day you would like to set up, or you can choose "Everyday" if you want everyday to be recorded at the same times/settings.
- Modes: "Manual" is when you have manually specified the recording, and it is in blue. "Time" will give a constant recording according to what time you have selected, and is shown in red on the time bar, "Motion" will only record when motion is detected and is shown in green on the time bar and "Sensor" Sensor option is not available in current models. The time bar will display which recording option is running for the full 24 hour day
*Note: "Motion" is recommended in order to save disk space
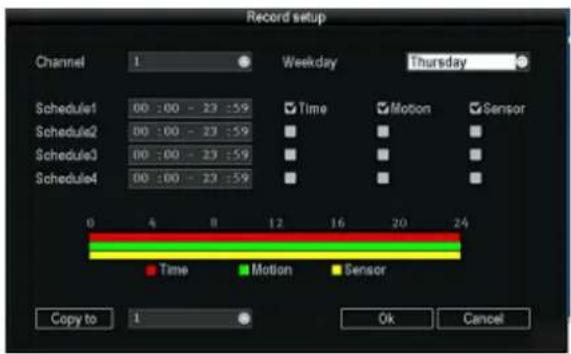
- Copy to: Select the target channel on the right. Then select "Copy to" and "OK". The system will set the current channel setup information to other channels selected or "all"
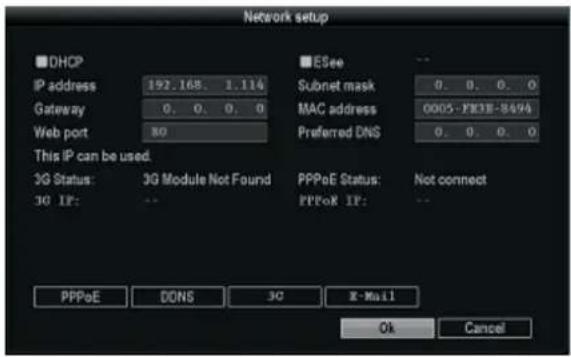
*Note: Make sure before configuring network settings that you have an Ethernet cable connected from your DVR to your router
3.5 Network Se

- DHCP: When first setting up for network access, check the "DHCP" box and "OK" then right click twice to save. Go back into "Network setup" and unclick the "DHCP" so the DVR will not change it again
- ESee: if UPnP (Universal Plug and Play) is enabled in your router, you will see an ESee id number in which you will use to log into the phone app E-See to remotely view from an iphone or Android
- IP address: This is the unique address assigned to your DVR and will be used locally (within your network) in a web browser to view your DVR recording. This is also the address you will use if you need to port forward (for assistance with port forwarding, you can go to portforward.com for instructions according to your router model).
*Note: you will need to allow Active X to install on your browser to view remotely
- Subnet mask: Subnet for the network segment
• Gateway: This will be your router address
• MAC address: The physical address of the DVR - Web port: This will need to be updated to the new port number if port forwarding is done through another port besides 80 (ports 6000-9000 are set aside for surveillance systems and will work best for port forwarding, we suggest 8082)
• Preferred DNS: This is the address for routing web access. Not to be confused with DDNS.
3.5.1 PPPOE setup:
Note: PPPoE is for use with dial-up and DSL connection
- PPPoE function: select "v" to enable and start using PPPoE dial-up
- PPPoE user: Input the user name of your ISP (Internet Service Provider) into edit box
- PPPoE password: input the password of your ISP into edit box
3.5.2 DDNS setup:
Note: This option is for remote DVR access using a customized URL that you choose. The two main sites that are supported are noip.com and dyndns.com. Each one has their own pros/cons so it is suggested to research both to find the one that you prefer
SPYCLOPS™
- DDNS: Click "V" in check box to enable. Select the dropdown box and choose noip or dyndns. Input the URL that was assigned to you when you set up your account, and then enter the username and password for your DDNS account. Click "OK". Don't forget to right click twice to save changes.

3.5.3 E-mail setup:
• E-Mail Function: Select to enable email options
- SMTP Server: Do a search for your email provider's SMTP server (ex: plus.smtp.mail.yahoo.com) and enter the full address here
- Port: Enter the port number that is returned from your SMTP server search (ex. Yahoo = 465)
- Username: Your email username (full email address)
• Password: Your email password
- Encryption Type: This information can also be found in your email providers SMTP search
- Sender, sendee 1, sendee 2: "Sender" will be your email address and "Sendee" will be the email you want the email to go to
• Subject: What you want your emails subject line to be
- Interval: Select this option if you want an automatic email sent periodically with screenshots in seconds *Note: there are 3600 seconds in an hour
- Click "Test" to test your email settings

3.6 Video detection:
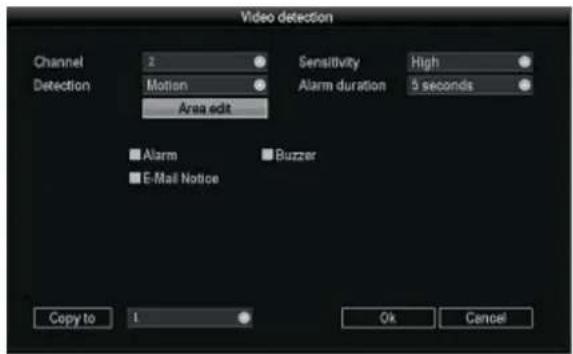
Select "Setup", select "System setup", select "Video detection"
• Channel: Choose which camera view you want to set up detection on
- Sensitivity: Choose the right trigger video detection sensitivity. "Highest" is very sensitive, while "Lowest" lets some movement occur before recording
- Detection: Set this option to alert you if there is "motion" on the camera, if there is "video loss" (the camera gets unplugged) or "video Cover" (if the camera view is covered)
• Alarm duration: you can choose the duration for which the alert sounds
- Area edit: You can use this option with "motion" or "cover".
- With "motion" the recording will start when something moves within the selected area
- With "cover" the DVR will insert a black box in the selected area to cover the video in that area *Note: First right click and select "Clear all" then either click each individual box, or you can left click and drag to select an area
• Alarm: This Option is not available in current models
- Buzzer: When this option is selected, the DVR will sound a buzzer (the duration of which you will select on alarm duration) when it detects motion, loss or cover
- Email Notice: An email will be sent as an alert when motion, loss or cover is detected
*Note: You have to complete the Email setup in "Network setup" to enable this option

3.7 PTZ Setup:

*Note: To control the PTZ, You must connect the wires to the RS-45 port on the back of the DVR
• Channel: Choose which camera view you want to work with
- Protocol: Choose the "protocol" required for your device. Both protocols require an additional RS-485 data cable
• Device ID: Assign an ID number to each channel (camera view)
- Baud rate: We suggest using a "baud rate" no higher than 9600 to avoid errors. Please refer to your cameras specifications for the baud rate that is best for your device
- Tour position list: This is where you set up each camera "tour". First, highlight the line in which you want to add your preset, then click the box with the question mark. Use this box to position the camera to the desired view, then click store. You then need to assign how you want each position to hold by selecting "keep time". If you change a preset, simply click "update" after you are done reconfiguring. To delete a preset, highlight the tour you want to delete and click "remove"
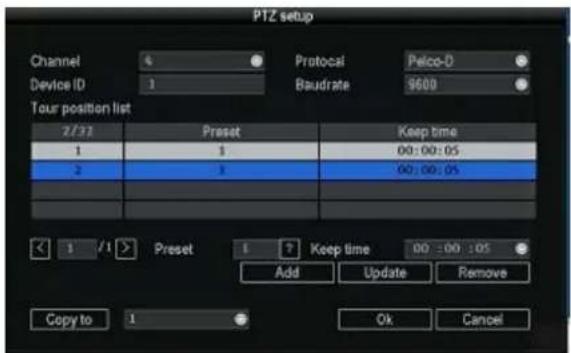
*Note: You can set up to 32 presets to play back to back
- To run your tour use your mouse and right click to select "PTZ control" key then click "go to" after checking "V" the "tour start" box
4.0 VIDEO INFORMATION

4.1 Video Playback:
Right click and select "Video Playback", or go to "setup", and then "video playback"
- Channel: Either choose the channel you want to view, or you can select all channels to view everything that has been recorded and hit "search"
• Record mode: choose the record mode by clicking the check box
• Search time: input the starting and finishing time into edit box - Search: click "Search" to begin the corresponding video file searching and show the files. "Manual" in blue, "Time" recording with red color, "Motion" recording with green color, "Sensor" recording with yellow color

- Playback: After selecting the desired viewing time, select "Playback" to play recording
- Playback toolbar: "Play" playback the recording. "Pause" to pause the recording "Fast
forward" fast forward 2x, 4x or 8x the speed, "skip forward" skip ahead 10%, "skip back" skip back 10%. To minimize the toolbar, click the blue box in the upper right hand corner

- Exit playback: click "ESC" to exit the playback video or exit to video playback search box.

4.2 Video Backup
Click "Setup", select "Video backup"
• Channel: Choose the channel/ channels you need backed up
• Record mode: Choose the desired record mode by clicking the check box/boxes
- Search time: Enter the time in which you would like to pull up and hit "search"
- After choosing the needed file from the list box, click "Backup" to backup the record or "Cancel" for no backup. To backup the recording click "YES"
SPYCLOPS™
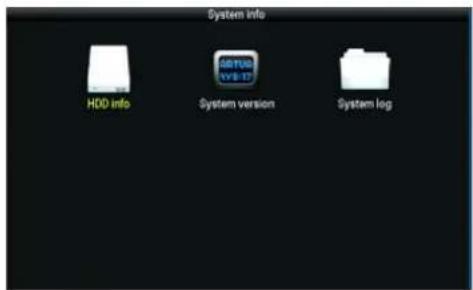
- HDD info: This shows the model, capacity, amount of data used and status (formatted or unformatted) of all HDD that are installed.
- System version: This option shows the device name and model, the serial number, Hardware version, Software version and built time.
- System log: Choose the "Event type" you wish to view, and input the time period in the "From time" and "Till time" then click "Search". The log will then display your log detail

5.2 System logout:
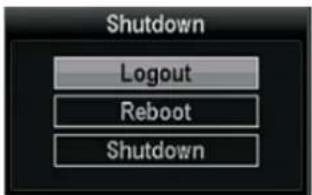
- Logout: Apply for logged in users. After logout, if you want to use the device you need to log back in.
• System reboot: it will reboot after "OK"
• Shutdown: To shut the system down
6.0 SMARTPHONE ACCESS

5.1 EseeNet+ app:
- I-Phone/I-Pad: For I-Phone or I-Pad users use this link to install Esee Net+ https://itunes.apple.com/sr/app/eseenet+/id789619158?mt=8
- Android: For Android users, use this link to install Esee Net+ https://play.google.com/store/apps/details?id=com.ESeyeM
• To add a device, select the + next to My Device. - Choose IP address or Eseenet ID for Add Model.
For IP address log in, enter the IP address of the DVR or your DDNS URL if one has been set up. Then enter the User ID and Password of the DVR, then select the Max channel
For Eseenet ID log in, enter the Esee number from your DVR in the Device ID space and the username and password of the DVR.

- For remote viewing of recorded video, select the Playback icon at the bottom of the Device List page.
• You can select your camera, channel, and recording mode and search.

6.0 TECHNICAL INFORMATION
6.1 Technical Parameters
| Model | 4 channel DVR | 8 channel DVR | 16 channel DVR |
| Hard Drive | 1 SATA, 500GB included (Expandable to 2TB) | 2 SATA, 1GB included (Expandable to 2TB) | 2 SATA, 1GB included (Expandable to 2TB) |
| Operation system | Embedded Linux operation system | ||
| Operation interface | Graphical user interface (GUI), mouse, front panel | ||
| Video standard | NTSC and PAL | ||
| Image compression | H.264 | ||
| Audio compression | ADPCM | ||
| Recoding mode | Manual, timed, or motion detection | ||
| Video Search | Time search, event search, channel search, the log search | ||
| Backup | USB backup | ||
| Video input | 4 BNC | 8 BNC | 16 BNC |
| Video output | 1BNC, 1VGA and HDMI OUT | ||
| Audio input | 2 channel | 2 channel | 2 channel |
| Audio output | 1 channel | 1 channel | 1 channel |
| Recording quality | D1 720x480 NTSC 720x576 PALCIF 720x480 NTSC 352x288 PAL | ||
| Monitoring quality | D1 720x480 NTSC 720x576 PAL | ||
| Playback quality | In recorded quality | ||
| Motion Detection | Yes | ||
| Image display | 1,4 | 1,4,8 | 1,4,9,16 |
| Video Speed | NTSC: 30 frames / sec (adjustable) PAL: 25 frames / sec (adjustable) | ||
| Alarm Input/Output | N/A | N/A | N/A |
| PTZ | RS485 | ||
| Network interface | Self-adaptive 10M/100M Ethernet interface | ||
| USB Interface | Two USB 2.0 high-speed interface | ||
| Power | 12v (adapter included) | ||
For live Technical Support assistance M-F / 9-6 please call 866.839.9187 Ext 2393 Email: deannam@etherealhometheater.com

460 Walker Street, Holly Hill, FL 32117
866.839.9187
metrahometheatergroup.com


- Congratulations on purchasing the SpyClops H.264 DVR Security System
- System Specifications:
- Your System Includes:
- SPYCLOPS™
- INTRODUCTION
- Main Menu Introduction
- SYSTEM TOOLS
- User Management
- Format the Hard Drive (HDD)
- System maintenance
- Factory setting
- SYSTEM SETUP
- General Setup
- SPYCLEOPS™
- Screen Set-up
- Encode Set-
- Record Setu
- Network Se
- PPPOE setup:
- DDNS setup:
- E-mail setup:
- Video detection:
- PTZ Setup:
- VIDEO INFORMATION
- Video Playback:
- Video Backup
- System logout:
- SMARTPHONE ACCESS
- EseeNet+ app:
- TECHNICAL INFORMATION
Brand : Spyclops
Model : SPY-DVR4KIT1
Category : Security Camera