
HTC 4000 - Charger H-Tronic - Free user manual and instructions
Find the device manual for free HTC 4000 H-Tronic in PDF.


| Product Type | Battery Charger |
| Brand | H-Tronic |
| Model | HTC 4000 |
| Charging Current | 4 A |
| Battery Voltage | 12 V / 24 V (automatic detection) |
| Input Voltage | 230 V AC, 50 Hz |
| Dimensions (L x W x H) | 200 x 150 x 80 mm |
| Weight | 1.0 kg |
| Charging Modes | Automatic, Maintenance, Desulfation |
| Protection Features | Reverse polarity, short-circuit, overcharge, overheat |
| Display | LED indicators for charging status and faults |
| Battery Types | Lead-acid (Wet, Gel, AGM) |
| Operating Temperature | 0 °C to 40 °C |
| Storage Temperature | -20 °C to 60 °C |
| Maintenance | Keep terminals clean; ensure proper ventilation |
| Spare Parts | Fuses (type T, 230 V / 5 A) |
| Safety Certifications | CE, RoHS |
| Accessories Included | Connection cables with clamps, user manual |
| Warranty | 2 years |
Frequently Asked Questions - HTC 4000 H-Tronic
User questions about HTC 4000 H-Tronic
0 question about this device. Answer the ones you know or ask your own.
Ask a new question about this device
Download the instructions for your Charger in PDF format for free! Find your manual HTC 4000 - H-Tronic and take your electronic device back in hand. On this page are published all the documents necessary for the use of your device. HTC 4000 by H-Tronic.
USER MANUAL HTC 4000 H-Tronic
natural_image
Electric vehicle charging station with red clamp and black power plug, no visible text or symbols on bodyHTRONIC
INHALT/CONTENT
- Designated use....22
- Personal safety/product safety....22
- Connector System 25
- Optional Accessories....26
- Connection and use ....26
- The Display....29
- Quick start Instructions (for experienced users)....30
- Description of the charging Process ....30
- Care and maintenance 31
- Warranty and guarantee ....31
- Instructions for the environment....33
AUTOMATIKLADER
HTC 4000

For all 12 V lead-acid batteries (Gel batteries, EXIDE, AGM, Hawker, Acid) and 12 V Li-Ion starter batteries
THE HTC 4000 is one of the most advanced and intelligent battery charging diagnostic and testing devices. The HTC 4000 works with state-of-the-art characteristic-controlled charging technology, ensuring optimal charging results and optimized maintenance of batteries. The intelligent software constantly monitors the all functions and controls the ideal charging process depending on the condition of the battery.
FEATURES
- Multi-stage I/U charging characteristic I-phase, U1-phase, U2-phase
- Reverse polarity and short-circuit protection by electronic control
- Trickle charge function
– Battery test function, defective battery detection - For 12 V lead-acid batteries
- For 12 V Li-Ion starter batteries
- Charging current max. 4 A (automatic control)
- 15 status LED indicators
NOTICE!
Read instruction manual carefully beforeoperating the device!
TECHNICAL SPECIFICATIONS
- Operating voltage: 220 - 240 V/AC (50/60Hz)
- Final charge voltage: 14.3 V/14.7 V
- Charging current (Car-Mode): Max. 4 A
- Charging current (Bike-Mode): Max. 1 A
- Protection-class (housing): IP65
- Operating temperature: -15°C up to + 45°C
- Dimensions (L × W × H): 225 × 72 × 56 mm
- Weight: approx. 625 g
- Length of power cable: approx. 1.50 m
- Length of charging cable (incl. accessories): approx. 1.90 m
- Fuse (charging cable): 10 A
- For 12 V lead-acid batteries and for 12 V Li-Ion starter b
- Battery voltage: 12 V (6 cells lead-acid batteries)
- Battery capacity (recommended): 1.2 Ah to 120 Ah
FOR YOUR SAFETY
Please read this manual carefully. It contains important information for the safe operation and use of this device. The law requires that we give you important information for your safety and that we point out how to avoid damage to persons, the device and connected devices. No liabilities will be taken for damages or claims resulting out of not reading and/or not following the user guide and/or any form of modification on or in the product. Under these circumstances, no warranty services will be given. These instructions are part of the device and should therefore be stored carefully. In order to avoid malfunction, damage and health problems, please follow the safety instructions carefully:
Repairs may only be carried out by an expert. Dispose of the packaging material and keep it out of reach of children. There is a danger of suffocation. Electrical devices do not belong in the hands of children. Store the device in a safe place.

DANGER! This unit may only be opened or repaired by a person authorized and qualified to do so and/or who has the knowledge of electrical safety regulations. If the device is opened there is a risk of electric shock. Disconnect the device from the mains before opening the devi
1. DESIGNATED USE
The product is designed to automatically fully charge lead based batteries, such as Gel batteries, EXIDE, AGM, Hawker, Acid and Li-Ion starter batteries with a voltage of 12 V and a capacity of 1.2 Ah - 120 Ah. There are 4 different charging programs available. The battery is connected to the charging terminals by charging cable. Optional accessories can be connected to the charger using the connector system.
The charger may only be operated from a mains socket of the public supply network (220 to 240 V/AC, 50/60 Hz). The charger is protected against overload, reverse polarity and short circuit.
For safety and licensing reasons (CE conformity) the product may not be modified and/or changed in any way. Only rechargeable batteries may be connected to the charger. Batteries not mentioned in this manual, such as zinc-carbon or alkaline-manganese, are not suitable for the charger.
For questions regarding the intended use, you can contact our technical support:tel.: +49 9622/702017 e-mail: technik@h-tronic.de
If you use the product for purposes other than those described above, the product may be damaged. Improper use can cause hazards such as short circuit, fire, explosion, electric shock, etc. Read the operating instructions carefully and keep them in reach.
When passing the product to another person, be sure to include the operating instructions. The device meets all national and European requirements.
All company names and product names are trademarks of their respective owners. All rights reserved.
2. PERSONAL SAFETY/PRODUCT SAFETY
This product is not a toy. Electrical devices do not belong in the hands of children. Therefore, take special care in the presence of children.
- Do not leave the packing material lying around. This could become a dangerous toy for children. Dispose of unwanted packaging material properly or store it in a place that is inaccessible to children. There is a danger of suffocation!
- This device may only be used by children over the age of eight (8) and persons with limited physical, sensory or mental capabilities or a lack of experience and/or knowledge when they are supervised or instructed in the safe use of the device and have understood the possible dangers. Children are not allowed to play with the device. Cleaning and user maintenance may not be performed by children without supervision.
- The product is designed in protection class II. Only a mains socket of the public supply network (220 to 240 V/AC, 50/60 Hz) may be used as power source. The connected mains socket must be near the charger and easily accessible.
- Never pour liquids over or next to the product. Do not place vessels with liquids, e.g. vases or plants, on or near the charger. Liquids can spill into the housing and affect electrical safety. This can cause a high risk of fire or life-threatening electric shock! If liquids have got into the device, immediately switch off the mains socket to which the product is connected (switch off the fuse/automatic circuit breaker/residual current operated circuit breaker of the associated circuit). Only then remove the plug from the mains socket and contact a specialist. Do not operate the product anymore.
- Avoid the following adverse environmental conditions at the place of use, during transport or during storage:
– Wet or too high humidity
- Extreme cold or heat
- Direct sunlight
– Dust or flammable gases, vapours or solvents
- Strong vibrations
- Strong magnetic fields, such as near machines or speakers
- The operation in environments with high levels of dust, flammable gases, vapours or solvents is not permitted. There is a risk of explosion and fire!
- Ensure adequate ventilation of the battery during charging. The charger and the battery must be placed so that air can circulate. Never cover the charger and battery.
- Never insert objects into any openings in the housing as this may cause mortal danger due to electrocution!
- Condensation may occur if the product is moved from a cold to a warm room. Before connecting and switching on the mains voltage, allow the product to reach room temperature. This can take several hours. If condensation in the device takes place, not only the product can be destroyed, but there is also the risk of electrocution!
- The product must never be touched with damp or wet hands. There is a risk of electrocution!
- Keep the charging cable away from hot surfaces. Make sure it is not squashed or damaged by sharp edges.
- Do not use the product if it is damaged. There is danger to life due to electrocution!
- It can be assumed that safe operation is no longer possible if:
– the product has visible damage
– the product does not work or does not work properly (smoke or burning smell, audible crackling noises, discoloration of the product or adjacent surfaces)
– the product has been stored under unfavourable conditions
– heavy transport stresses have occurred
- If the product is damaged, do not touch it, there is a risk of death from electrocution! First switch off the mains voltage for the mains socket to which the product is connected (switch off the corresponding automatic circuit breaker or unscrew the fuse, then switch off the residual-current-operated circuit breaker). Only then pull the mains plug of the charger out of the mains socket. Do not operate the product anymore and take it to a specialist workshop or dispose of it in an environmentally friendly way.
- It is essential to follow the charging instructions of the respective battery manufacturer when charging batteries.
- In case of improper handling (incorrect battery type, incorrect voltage range or incorrect polarity and simultaneous failure of the protective devices of the charger), the battery can be overloaded or destroyed. In the worst case, the battery can explode, causing significant damage.
- Keep transmitter systems (telephones, transmission systems for model building, etc.) away from the charger, as the transmitter radiation can disrupt the charging operation or destroy the charger and batteries.
- Do not charge a battery in a boat or watercraft. The battery must be removed from the boat or watercraft for loading.
- Chargers and connected batteries must not be operated unattended.
- If there is any doubt about the operation, connection and safety of the charger, consult a qualified person.
- Maintenance and repair work may only be carried out by a competent person or a specialist workshop.
- If you are not sure about the correct connection or operation, please contact our technical support.
You can contact our technical hotline under the following: tel.: +49 9622/702017 e-mail: technik@h-tronic.de
3. CONNECTOR SYSTEM
By using the connector system, you can connect optional accessories to your HTC charger quickly, easily and securely. To connect, insert both halves of the connector together until they click into place. To disconnect, press the release button on the connector and pull apart. Only pull and push the housing of the connector system, never the cable.

natural_image
Three black cable connectors with red wires, one showing a white connector and the other two connected (no text or symbols visible)4. OPTIONAL ACCESSORIES
Use only compatible accessories for your HTC charger.
For the chargers HTC 1000 (Item No. 1250700),
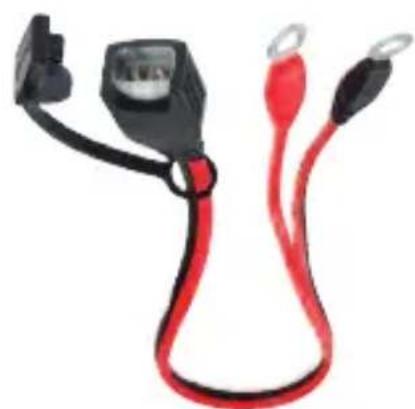
HTC 2000 (Item No. 1250710) and HTC 4000 (Item No. 1250715), a ring eyelet cable (Item No. 1250740), as well as a charging plug for on-board sockets (Item No. 1250750) can be used.
natural_image
Two black and red electrical connectors with metal contacts, no visible text or symbols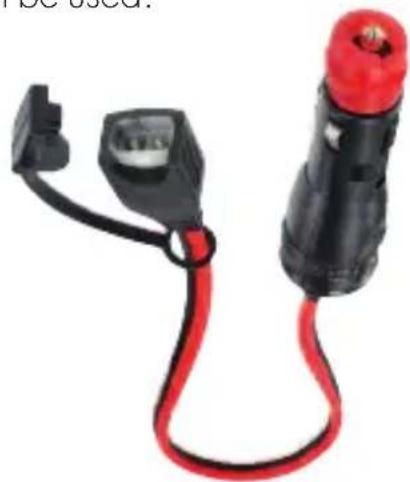
natural_image
Close-up of a black and red electrical plug with a terminal connector (no visible text or symbols)HTC Ring eyelet cable HTC Charging plug for vehicle power socket (Item No. 1250740) (Item No. 1250750)
5. CONNECTION AND USE

ATTENTION! Improper use of the battery and charger are a poter source of danger. Make sure that all preparations have been made correctly.
- Make sure the charger is not plugged into the mains before connecting it to the battery. Before each use, check your charger and its cables for damage. Never operate the device if the protective insulation of the mains or charging cable is damaged or pinched.
- Before charging, check that the voltage of the battery is 12 V.
- Explosive gases can accumulate near the ground. Do not place the charger directly on or in close proximity of the battery. Ensure an adequate ventilation of the room while charging.
- If the batteries are not maintenance-free it is recommended to remove the battery from the vehicle during charging as leaking battery acid could damage
the vehicle. The manufacturer's instructions for removing the battery must be followed.
Sulphuric acid is highly corrosive and is a serious source of danger. For batteries that are not maintenance-free, it is important to periodically open the battery and check fluid levels during the charge process. Under no circumstances should this checking be carried out without protective clothing and only with special care, as chemical burns and serious damage to your health may be the consequence. It is essential to follow the instructions of the battery manufacturer. If the acid level is too low, the battery water must be filled up to the corresponding filling level. Leave the cells open during the entire charging process to allow the escape of gases.
- Before charging non-maintenance-free batteries, clean the top of the battery to prevent dirt from getting into the battery and then unscrew the sealing plugs of the individual cells before starting the charging process. Allow the battery to air out for a few minutes to allow flammable gases to evaporate before connecting the leads!
- Lay all cables in such a way that there is no risk of tripping and damaging the cables. Be careful that the charger and cables are not crushed by closing doors, covers of engine parts, etc.
- If the battery contacts are difficult to access or the terminals of the charger can come into contact with adjacent components, the battery must be removed. The manufacturer's instructions for removing the battery must be followed.
- Make sure the charger is not plugged to the mains before connecting it to the battery.
THE FOLLOWING CONNECTION OF THE BATTERY SEQUENCE MUST BE FOLLOWED:
CHARGING THE BATTERY WHEN INSTALLED:
Connect the charging cable to the battery using battery terminals. First connect the red charging clamp (positive) to the positive pole of the battery. Then, clamp the black terminal (Minus) to the vehicle chassis or engine block, but away from the battery, fuel line, or carburettor, and not to metal clips or moving parts.
- Then connect the battery charger to the mains. The LED 1 mains ("Netz") will light up.
- Press the "Mode" button within 5 seconds until the desired function (Motorcycle/Car/Snowflake/Li-Ion) is selected.
- If the battery is connected with the correct polarity, not defective (high-resistance/connection interrupted) and the mains supply is available, the charging process will start after a few seconds LED 11 charging ("Laden").
- Depending on the state of charge of the connected battery and its condition, the total of 15 LED displays inform about the current charging process or progress.
- Charging times can vary in length. Depending on the capacity and condition of the battery, charging may take several hours or days.
- The charging process is finished when LED 10 finished ("Fertig") lights up permanently.
If the charging process does not start, the fuse could possibly be defective. In this case, replace the fuse and check the wiring.
When using a permanent connection, make sure that neither the charger nor the charging cable connections are exposed to moisture. The operation of the charger when installed (permanent connection in the vehicle) is only permitted in dry, closed rooms (such as a garage). If the charger is not connected to a mains supply, a low reverse current will flow and gradually discharge the battery. We recommend the permanent connection only for vehicles that are moved and charged regularly.
• After charging, first disconnect the charger from the mains.
THE FOLLOWING SEQUENCE FOR DISCONNECTING THE CHARGING TERMINALS MUST BE FOLLOWED:
- First disconnect the black charging clamp (negative) from the vehicle chassis or the engine block.
- Then disconnect the red terminal (positive) from the positive pole of the battery.
ABORTING THE CHARGING PROCESS
A charging process can be interrupted at any time. Before disconnecting the battery from the charger, always disconnect the charger from the mains.
6. THE DISPLAY

LED 1: The mains voltage is present.
LED 2: The charging mode "Motorcycle" is selected. The maximum charging current is 1 A, the end-of-charge voltage is 14.3 V. Trickle charging is done once per hour.
LED 3: The charging mode "Car" is selected. The maximum charge current is 4 A, the end-of-charge voltage is 14.3 V. Trickle charge is done once per hour.
LED 4: The charging mode "Snowflake" (for lead acid batteries only) is selected. The maximum charging current is 4 A, the final charging voltage is increased up to 14.7 V. This is recommended for various AGM batteries (observe manufacturer's instructions) or operating conditions below 5 degrees Celsius.
LED 5: The charge mode "Li-Ion" is selected. The maximum charging current is 4 A. The final charge voltage is 14.3 V. The trickle charge is only carried out once a day.
LED 6: The battery is deeply discharged (<10.5 V).
LED 7: The battery has reached a charge capacity of 30%.
LED 8: The battery has reached a charge capacity of 60%.
LED 9: The battery has reached a charge capacity of 90%.
LED 10: The battery is fully charged and can be disconnected.
LED 11: The battery is charging or being recharged (trickle charge).
LED 12: Error - The battery is connected to the charger with reverse polarity
LED 13: Error - The battery has been rated as "defective" by the charger.
LED 14: Error - Temperature Protection - The charger is overheating.
Note: The charger is protected against overheating. If the surrounding temperature or the temperature of the charger increases, the charging current is automatically reduced. The increase of heat during operation is not a defect and a normal feature. Therefore, d not place the charger on heat-sensitive surfaces during operation.
LED 15: Error - A deeply discharged battery could not reach a voltage higher than 7 V within 24 hours.

ATTENTION: If the charger does not switch to "trickle charging mo after a longer charging time, the following reasons may be the caus
- Due to age, the connected battery has a permanent leakage current of n than 300 mA.
- The battery is charged in a vehicle and internal consumers are drawing permanent current.
7. QUICK START INSTRUCTIONS (FOR EXPERIENCED USERS)
Please read the operating instructions carefully and pay attention in particular to the safety instructions. If you do not follow the safety instructions mention in this manual and do not follow the information on the appropriate handling of the product, we assume no liability for resulting personal injury/property damage. In addition, the warranty/guarantee will expire in such cases.
CONNECTING THE BATTERY
- First connect the red charging clamp (positive) to the positive pole of the battery.
- Then clamp the black terminal (minus) to the vehicle chassis or the engine block, but not near the battery, the fuel line or carburettor, nor to metal clamps or moving parts.
- Now connect the battery charger to the mains. The LED 1 mains ("Netz") will light up.
- Depending on which battery you want to charge, press the button "Mode" to enter the corresponding charging mode.
BEGIN CHARGING
The device automatically starts charging (within 5 seconds). When the charging process is active, the LED 11 charging ("Laden") lights up. If the charger detects a deeply discharged battery (<10.5V), the LED 6 Deep Discharge ("Tiefentladen") will light up and the battery will be charged accordingly. If the charging voltage rises above 10.5 V, LED 6 Deep Discharge ("Tiefentladen") goes out and the LED displays 7, 8 and 9 inform about the current charging process and progress.
FINISHED CHARGING
If all test criteria of the charger have been met after charging and the battery for is rated as "good" the charger switches on the LED 10 finished ("Fertig"). At the same time the LED 7, 8 and 9 goes off and the program switches to "trickle charging". The battery is charged and ready for use and can be disconnected from the charger.
Disconnect the power cord from the mains before removing the charging terminals. Always pull on the plug and never on the cable!
- First disconnect the black charging clamp (minus) from the vehicle chassis or the engine block.
- Then disconnect the red terminal (Plus) from positive pole of the battery.
For acid-free lead acid batteries, check the acid level. If it is too low, fill the liquid level with distilled water. Follow the instructions of the battery manufacture.
8. DESCRIPTION OF THE CHARGING PROCESS
When connected to the battery and the mains (220 to 240 V/AC, 50/60 Hz) the LED 1 mains ("Netz") lights up. After setting the battery type with the "Mode" button, the device will switch to test mode within 5 seconds after connecting the battery. If a battery is connected with reverse polarity, LED 12 Error ("Fehler") lights up. If the voltage is in the range of 1.0 ... 14.3 V, the device starts charging or pre-charging mode.
CHARGING TECHNOLOGY
• I-phase charging current is approx. 1 A/4 A.
- U1-phase (main charging phase) with constant voltage of approx. 14.3 V/14.7 V.
- U2-phase (trickle charge phase) with constant voltage of approx. 13.8 V.
If the charger detects a deeply discharged battery (<10.5 V), the LED 6 Deep Discharge ("Tiefentladen") will go on and the battery will be charged. If the charging voltage rises above 10.5 V, the LED is switched off and the LEDs 7, 8 and 9 (depending on the charging process or progress) are switched on.
The battery is initially charged with constant current (I-phase) until the final charging voltage (14.3 V) is reached. Then the voltage is kept constant (U1 phase) and the charging current adapts to the state of status of the battery. The fuller the battery, the lower the charging current. If the charging current drops below approx. 300 mA, the charging process is stopped and the charger automatically switches into test mode. If the test fails, the battery is rated as "defective" by the charger, the device shuts down and LED 13 "Defect" lights up.
If all test criteria are met and the battery is found to be "good", LED 10 Finished ("Fertig") lights up and the charger switches into U2 Mode, trickle charge. The battery is charged, ready for use and can be disconnected. If the battery remains connected to the charger, it will trickle charge the battery every hour. In Li-Ion mode it will trickle charge once a day. The charging current is controlled automatically to keep the battery voltage approx. 13.8 V.
9. CARE AND MAINTENANCE
Before cleaning, the product must be disconnected from the battery and mains voltage. Clean the outside of the product with a clean, dry, soft cloth. Do not use abrasive cleaners or solvent-based cleaners. Do not use aggressive cleaning agents. This may cause a discoloration of the housing. Solvents, such as thinner or gasoline as well as scouring agents, destroy the surface and the imprint. The penetration of liquids into the interior of the device must be prevented at all times
- To avoid corrosion, clean the terminals each time the charging process is completed. Wipe off any battery fluid that may have come into contact with the terminals.
- When storing the charger, roll the cables loosely but neatly. This prevents accidental damage to the cables. Store the charger in a clean and dry place.
If the device needs to be repaired, only original spare parts may be used! The use of alternative spare parts can lead to serious damage to property and personal injury. Service and repair work may only be carried out by a specialist or a trained person under the direction and supervision of a qualified electrician. If the device should be defective, we recommend sending the device to us for repair.
10. WARRENTY AND GUARANTEE
The dealer/manufacturer from which the device was purchased provides a guarantee of 2 years from the date of handover for the material and manufacture of the device. In the event of a defect, the purchaser is initially only entitled to supplementary performance. The supplementary performance includes either the repair or the delivery of a replacement product. Any devices or parts which have been replaced will become the property of the dealer/manufacturer.
The buyer has to notify the trader of defects immediately. Proof of the warranty claim shall be furnished by means of a proper purchase confirmation (purchase receipt, invoice, if applicable).
Damages resulting from improper handling, improper connection, use of parts from other manufacturers, normal wear and tear, use of force, personal repair attempts or changes to the device, cables or terminals, change of circuit,
damage due to ignoring the operating instructions, or improper use or other external influences, if connected to an incorrect voltage or current type, bridged or incorrect fuses, in case of misuse or damage caused by negligence, are not covered by the warranty or void the warranty.
Further claims against the vendor due to this warranty obligation, in particular claims for compensation for loss of profit, compensation for use and indirect damages, are excluded, unless legally mandatory.
We reserve the right to repair, rectify, replace or refund the purchase price. Costs and risks of transport, assembly and disassembly work as well as all other costs which can be connected with the repair are not replaced. Liability for consequential damage resulting from faulty function of the device – of whatever nature – is in principle excluded.
In the following cases, the warranty will expire and the device returned at your expense:
- In the case of changes of any kind and repair attempts on the device, cables or clamps.
- When non-original components have been used.
- In the case of damage caused by failure to follow the operating instructions and the wiring diagram and in case of damage caused by negligent handling
– In the case of damage caused by overloading the device.
– In the case of damage caused by the intervention of other persons. - When connected to an incorrect voltage or current type.
– In case of wrong operation or damage caused by negligent treatment. - For defects caused by bridged fuses or by using incorrect fuses.
- Incorrect connection and/or operation.
- In the case of external forces, damage to the device and/or damage to parts of the device due to mechanical effects or overload.
- When using the device for purposes not described in this manual.
– Unauthorized opening of the appliance. - Under normal wear and tear
– In case of consequential damage caused by improper use and/or improper use and/or defective batteries.
11. INSTRUCTIONS FOR THE ENVIRONMENT

This product must not be disposed of in the normal household waste at the end of its life. It must be disposed of at a collection point for the recycling of electrical and electronic equipment. The symbol on the product, the user manual or the packaging indicates that valuable
substances are recyclable according to their labelling. Please refer to your local collection systems for electrical and electronic equipment.
CE mark and conformity
H-TRONIC GmbH hereby declares that this device is in compliance with the essential requirements and the relevant provisions of Directive 2014/30/EU and 2014/35/EU.
CE conformance has been certified – the relevant records are in the hands of the manufacturer: H-TRONIC GmbH, Industriegebiet Dienhof 11, 92242 Hirschau

This manual is a publication of H-TRONIC GmbH, Industriegebiet Dienhof 11, D-92242 Hirschau, Germany. All rights including translation reserved. Information provided in this manual may not be copied, transferred or put in storage systems without the express written consent of the publisher. Reprinting, also for parts only, is prohibited. This manual is according to the technical data when printed. This manual is according to the technical status at the time of printing and is a constituent part of the device. We reserve the right to make technical changes to the construction, equipment and design. © Copyright 2018 by H-TRONIC GmbH


- INHALT/CONTENT
- AUTOMATIKLADER
- HTC 4000
- FEATURES
- NOTICE!
- TECHNICAL SPECIFICATIONS
- FOR YOUR SAFETY
- DESIGNATED USE
- PERSONAL SAFETY/PRODUCT SAFETY
- CONNECTOR SYSTEM
- OPTIONAL ACCESSORIES
- CONNECTION AND USE
- THE FOLLOWING CONNECTION OF THE BATTERY SEQUENCE MUST BE FOLLOWED:
- CHARGING THE BATTERY WHEN INSTALLED:
- THE FOLLOWING SEQUENCE FOR DISCONNECTING THE CHARGING TERMINALS MUST BE FOLLOWED:
- ABORTING THE CHARGING PROCESS
- THE DISPLAY
- QUICK START INSTRUCTIONS (FOR EXPERIENCED USERS)
- CONNECTING THE BATTERY
- BEGIN CHARGING
- FINISHED CHARGING
- DESCRIPTION OF THE CHARGING PROCESS
- CHARGING TECHNOLOGY
- CARE AND MAINTENANCE
- WARRENTY AND GUARANTEE
- INSTRUCTIONS FOR THE ENVIRONMENT
- CE mark and conformity
Brand : H-Tronic
Model : HTC 4000
Category : Charger