
ET-PLF10 - Projector Accessories PANASONIC - Free user manual and instructions
Find the device manual for free ET-PLF10 PANASONIC in PDF.
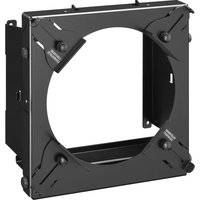


| Product Type | Projection Lens (Accessory) |
| Brand | Panasonic |
| Model | ET-PLF10 |
| Compatibility | Select Panasonic LCD/DLP projectors (e.g., PT-VZ580, PT-VW535, PT-VX600) |
| Lens Type | Wide-angle zoom lens |
| Throw Ratio | 0.8:1 |
| Zoom Ratio | 1.2x |
| Focus | Manual |
| Mount Type | Bayonet |
| Lens Construction | All-glass optics |
| Dimensions (W x H x D) | 100 × 80 × 80 mm (approx.) |
| Weight | 500 g (approx.) |
| Housing Material | Plastic with metal mount |
| Key Functions | Adjusts image size, enables short-throw projection |
| Cleaning Instructions | Use a soft, dry lens cloth; avoid solvents |
| Safety Precautions | Keep away from moisture; handle with care to prevent scratches |
| Spare Parts | Available from authorized Panasonic service centers |
| Reparability | Service only by certified technicians |
| Warranty | Standard Panasonic warranty (check local terms) |
| Included Accessories | Lens only (no additional mounts or caps) |
Frequently Asked Questions - ET-PLF10 PANASONIC
User questions about ET-PLF10 PANASONIC
0 question about this device. Answer the ones you know or ask your own.
Ask a new question about this device
Download the instructions for your Projector Accessories in PDF format for free! Find your manual ET-PLF10 - PANASONIC and take your electronic device back in hand. On this page are published all the documents necessary for the use of your device. ET-PLF10 by PANASONIC.
USER MANUAL ET-PLF10 PANASONIC
Operating Instructions
Lens Fixed Attachment Commercial Use
Model No. ET-PLF10

ENGLISH
Thank you for purchasing this Panasonic product.
■ To ensure safe and correct use, please read this manual together with the operating instructions supplied with the projector carefully. ■ Before using this product, be sure to read "Read this first!" (→Page 3). ■ Please save this manual for future use.

Contents
Read this first! 3
Before Use....4
Attaching....5
Preparing the Projection Lens 5
Preparing the Lens Fixing Attachment.... 5
Attaching the Lens Fixing Attachment 6
Attaching the Lens Hood 9
Specifications 11
External Dimensions.... 11
WARNING:
Before attaching the lens fixing attachment, be sure to turn off the power and disconnect the power plug from the wall outlet.
● Unexpected projection of light may cause injury to eyes. ● Replacing without removing the power plug may result in electrical shock.
Do not allow children to reach the supplied flat washers, spring washers, and thumbscrews.
● These items can cause personal injury if swallowed. - If swallowed, seek medical help immediately.
CAUTION:
Do not touch any part or remove parts other than specified.
- Doing so may cause a loss of performance or safety.
Information for users in the European Union
Importer's name and address within the European Union
Panasonic Marketing Europe GmbH
Panasonic Testing Centre
Winsbergring 15, 22525 Hamburg, Germany
Before Use
Overview
This product suppresses vibration of projection images due to vibration of the lens by fixing the projection lens of the projector.
■ Supported Projectors
PT-RQ32K, PT-RZ31K, and PT-RS30K series
PT-RQ13K, PT-RZ12K, and PT-RS11K series
Note
- Models other than the above may also be supported. Refer to the operating instructions of the projector you are using.
■ Structural components
Check that the package contains the following parts.
| Part name Appearance (quantity) Application | ||
| Lens fixing attachment mount bracket |  x1 x1 | This part attaches to the projector unit. It is a bracket for attaching the lens fixing attachment bracket |
| Lens fixing attachment bracket |  x1 x1 | This part attaches to the lens fixing attachment mount bracket. It is a bracket for adjusting and fixing the positions of the lens fixing brackets. |
| Lens fixing bracket (A) |  x2 x2 | These fix a lens other than the ET-D75LE50 / ET-D75LE90 / ET-D75LE95. |
| Lens fixing bracket (B) |  x2 x2 | These fix the ET-D75LE50 / ET-D75LE90 / ET-D75LE95. |
| Screws and washers Spring | washer (M4)  x4 x4 | These are used for bracket assembly and fixing the lens fixing brackets. |
Flat washer (M4)  x4 x4 | ||
Thumbscrew (M4 x 10)  x8 x8 | ||
Attaching
Preparing the Projection Lens
Attach the lens fixing attachment after installing and adjusting the lens.
If the lens hood, which is an accessory of the projector, is already mounted, it must first be removed.
The lens will become unable to be adjusted after the lens fixing attachment is attached.
Preparing the Lens Fixing Attachment

Lens fixing attachment mount bracket
1) Remove the two upper thumbscrews (inserted in round holes).

2) Loosen the two lower thumbscrews (inserted in slots).

3) Remove the lens fixing attachment bracket as shown in the figure.
Attaching the Lens Fixing Attachment
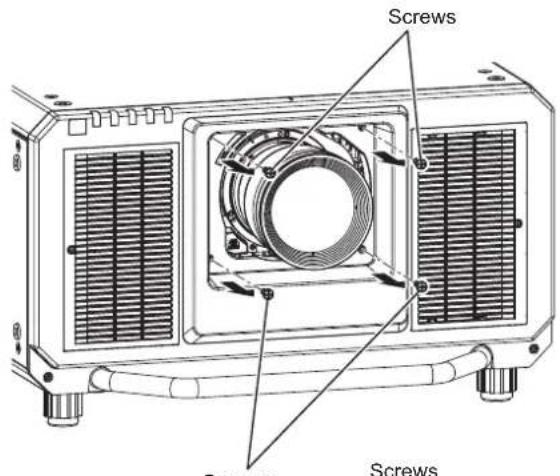

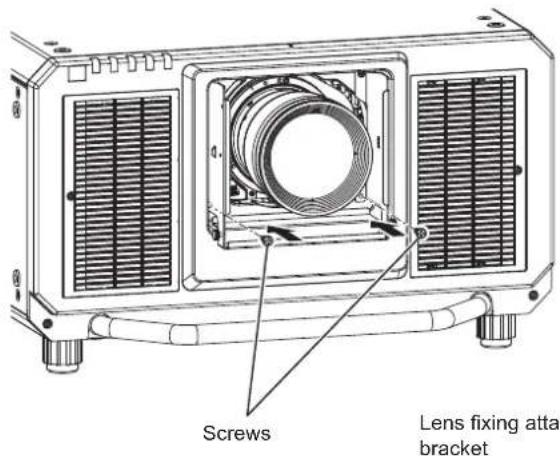

The illustrations for this procedure use the PT-RZ31K as an example.
1) Remove the screws from the four places around the projector lens.
2) Fix the upper part of the lens fixing attachment mount bracket using two of the screws that were removed in step 1.
3) Fix the lower part of the lens fixing attachment mount bracket using the remaining two screws.
4) Attach the lens fixing attachment bracket to the lens fixing attachment mount bracket as shown in the figure.
Attaching (continued)

When using a lens other than the ET-D75LE50 / ET-D75LE90 / ET-D75LE95
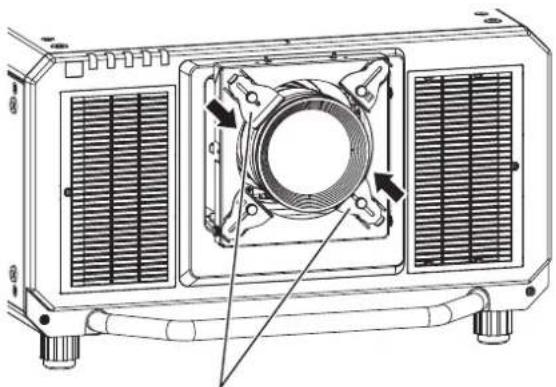
Lens fixing brackets (A)
When using the ET-D75LE50 / ET-D75LE90 / ET-D75LE95

Lens fixing brackets (B)
5) Fix the upper part of the lens fixing attachment bracket using the thumbscrews removed in step 1 of "Preparing the Lens Fixing Attachment." 6) Fix the lower part of the lens fixing attachment bracket by tightening the thumbscrews (two places).
7) Loosen the two thumbscrews of the lens fixing brackets. 8) Push the lens fixing brackets up against the lens, and then fix them in place by tightening the two thumbscrews.
Attention
● The lens fixing brackets to use differ as shown in the figure depending on the lens to be fixed. (The lens fixing brackets (B) are labeled "LE50" and "LE95.") When lens other than ET-D75LE50 / ET-D75LE90 / ET-D75LE95: Use lens fixing brackets (A) When ET-D75LE50 / ET-D75LE90 / ET-D75LE95: Use lens fixing brackets (B)
Attaching (continued)


Lens fixing bracket (B)
The lens fixing brackets (B) may interfere with the screws on the lens side depending on the state (i.e., focus adjustment) of the lens.
If they interfere, reattach and use lens fixing brackets (B) in the positions for lens fixing brackets (A).
When attaching the lens fixing brackets (B), attach the spring washers and then the flat washers to the thumbscrews before attaching them to the unit.
Attention
- Safely store the removed lens fixing brackets (A), thumbscrews, spring washers, and flat washers so as not to lose them.
Attaching (continued)
Attaching the Lens Hood
If you need to attach the lens hood, attach it after attaching the lens fixing attachment.
Attention
- When mounting the lens hood supplied with the projector to the projector, be sure to request installation from your dealer or certified personnel. Be sure to hand this manual and the "Mounting the lens hood" document supplied with the projector to the personnel performing the installation. After installation, have the installation personnel return these documents to you, and store them for future reference.

1) Attach lens hood 1 to the lens fixing attachment.

2) Tighten the lens hood screws (two places) and thumbscrews (two places) to fix lens hood 1.
Attaching (continued)
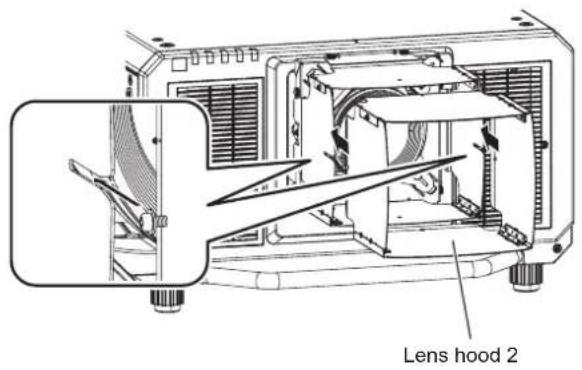

1) Attach lens hood 2 to lens hood 1.
2) Attach the thumbscrews (one place each at top and bottom) to fix lens hood 2. 3) Tighten the left and right lens hood screws (one on each side) of lens hood 2.
Specifications
| External dimensions | Width: 238 mm (9-3/8")Height: 125 mm (4-29/32")Depth: 242 mm (9-17/32") |
| Weight Approx. 0.68 k | g (1.5 lb) |
External Dimensions
(Unit: mm)

Panasonic Corporation
Web Site : http://panasonic.net/avc/projector/
© Panasonic Corporation 2016


- OPERATING INSTRUCTIONS
- CONTENTS
- WARNING
- CAUTION
- INFORMATION FOR USERS IN THE EUROPEAN UNION
- BEFORE USE
- OVERVIEW
- SUPPORTED PROJECTORS
- NOTE
- STRUCTURAL COMPONENTS
- ATTACHING
- PREPARING THE PROJECTION LENS
- PREPARING THE LENS FIXING ATTACHMENT
- ATTACHING THE LENS FIXING ATTACHMENT
- ATTACHING (CONTINUED)
- ATTENTION
- ATTACHING THE LENS HOOD
- SPECIFICATIONS
- EXTERNAL DIMENSIONS
- PANASONIC CORPORATION
Brand : PANASONIC
Model : ET-PLF10
Category : Projector Accessories