
Mini MEGA - Receiver PEAVEY - Free user manual and instructions
Find the device manual for free Mini MEGA PEAVEY in PDF.

| Type | Bass Amplifier (Class-D) |
| Dimensions (H x W x D) | 3.125 x 12 x 11 inches |
| Weight | 9 lbs (5.4 kg) |
| Power Output | 1000W RMS at 4 ohms, 700W RMS at 8 ohms |
| Input Sensitivity | -10.2 dBu (nominal), -30.0 dBu (minimum), 14.26 dBu (maximum) |
| Voltage Requirements | 120V 60Hz or 220-240V 50/60Hz (selectable) |
| Power Consumption | 200W typical |
| Speaker Outputs | Two 2-conductor twist lock (Speakon) connectors, 4 ohms minimum |
| Headphone Output | 1/8" stereo, 8 ohm minimum load |
| DI Output | XLR and 1/4" TRS balanced, with Pre/Post, Ground Lift, and Pad |
| Effects Loop | 1/4" Send and Return, footswitchable |
| EQ | 4-band with quasi-parametric Lo Mid and Hi Mid, Narrow Q switches |
| Compressor | Optical compressor with defeat switch and footswitch control |
| KOSMOS Bass Enhancement | Dual processors (A and C) with Psycho and Sub controls |
| Crunch | Preamp overdrive with footswitch control |
| Mute | Front panel button and footswitch controllable |
| Tuner Output | 1/4" jack, active even when muted |
| MIDI | MIDI footswitch input (CC on channel 1) and program change for presets |
| Backlight | User-definable color (10 presets) and intensity (4 levels), light show mode |
| Protection | Short circuit, thermal, current limit, DC output |
| Fuse | Primary fuse, replace with same type and value only |
| Compliance | FCC Part 15 Class B, Industry Canada RSS-210 |
Frequently Asked Questions - Mini MEGA PEAVEY
User questions about Mini MEGA PEAVEY
0 question about this device. Answer the ones you know or ask your own.
Ask a new question about this device
Download the instructions for your Receiver in PDF format for free! Find your manual Mini MEGA - PEAVEY and take your electronic device back in hand. On this page are published all the documents necessary for the use of your device. Mini MEGA by PEAVEY.
USER MANUAL Mini MEGA PEAVEY
This device complies with Part 15 of the FCC rules and Industry Canada license-exempt RSS Standard(s). Operation is subject to the following two conditions: (1) this device may not cause harmful interference, and (2) this device must accept any interference received, that may cause undesired operation.
Warning: Changes or modifications to the equipment not approved by Peavey Electronics Corp. can void the user's authority to use the equipment.
Note – This equipment has been tested and found to comply with the limits for a Class B digital device, pursuant to Part 15 of the FCC Rules. These limits are designed to provide reasonable protection against harmful interference in a residential installation. This equipment generates, uses, and can radiate radio frequency energy and, if not installed and used in accordance with the instructions, may cause harmful interference to radio communications. However, there is no guarantee that interference will not occur in a particular installation. If this equipment does cause harmful interference to radio or television reception, which can be determined by turning the equipment off and on, the user is encouraged to try and correct the interference by one or more of the following measures.
• Reorient or relocate the receiving antenna.
- Increase the separation between the equipment and receiver.
- Connect the equipment into an outlet on a circuit different from that to which the receiver is connected.
- Consult the dealer or an experienced radio/TV technician for help.
Caution
The equipment complies with FCC radiation exposure limits set forth for an uncontrolled environment.

Peavey Electronics Corporation · 5022 Hartley Peavey Drive · Meridian, MS · 39305 (601) 483-5365 · FAX (601) 486-1278 · www.peavey.com · 80305780 · ©2011
ENGLISH
Mini MEGA ^® Bass Amplifier
Congratulations on the purchase of your new Peavey® MiniMEGA™ bass head! You have made a wise decision! This compact amplifier will absolutely rattle your teeth! Delivering power and tone not available in any other micro bass head, the MiniMEGA features 1,000 Watts of power and produces incredibly full and rich sound in a compact package. Weighing in at only 9 lbs., the MiniMEGA is the new go-to amplifier for bassists of any style. With a Class-D power section designed specifically for bass amplifiers, the MiniMEGA brings a thundering low-end to your bass mix that you can feel as well as hear.
The advantages of this amp, however, go well beyond the power section. Peavey's proprietary KOSMOS* bass enhancement, for example, provides increased bass impact, while the exclusive psychoacoustic low end enhancement adds bass without overburdening speakers— a testament to Peavey's technology-driven innovation. The MiniMEGA also contains other modern features such as built in compression and a 4-band EQ with quasi-parametric mids. Complete with an effects loop, gain control, crunch button, tuner output, customizable backlighting and more; the MiniMEGA contains everything necessary for today's professional bass player. Ideal for use in any live or studio setting, the back panel of the MiniMEGA has all the connectivity necessary to patch in effects, or connect to a sound reinforcement system.
We encourage you to read this manual in order to get the most out of your MiniMega. Included in this manual is a description of the layout and a Quick Start Guide. The Quick Start Guide will help you discover all of the features and possibilities of this amplifier.
Features:
- Gain control with crunch button
• Built-in optical compressor with defeat switch
• 4 band EQ with Punch and Bright switches - Mid controls feature quasi-parametric control with narrow Q controls
• Built-in KOSMOS® with Psycho and Sub controls
• Master volume with mute control
• 1/8" headphone output
• 2 Speakon outputs - Tuner output
- Effects loop
- DI output with XLR & 1/4" outs. DI pre-post switch, ground lift and Pad controls
- MIDI footswitch input
- Auxiliary input
- User-definable control surface color lighting

VENTILATION: For proper ventilation, allow 12" clearance from the nearest combustible surface.
All vents should have a minimum of 2" of free air space so air can flow thru the unit freely for proper cooling.
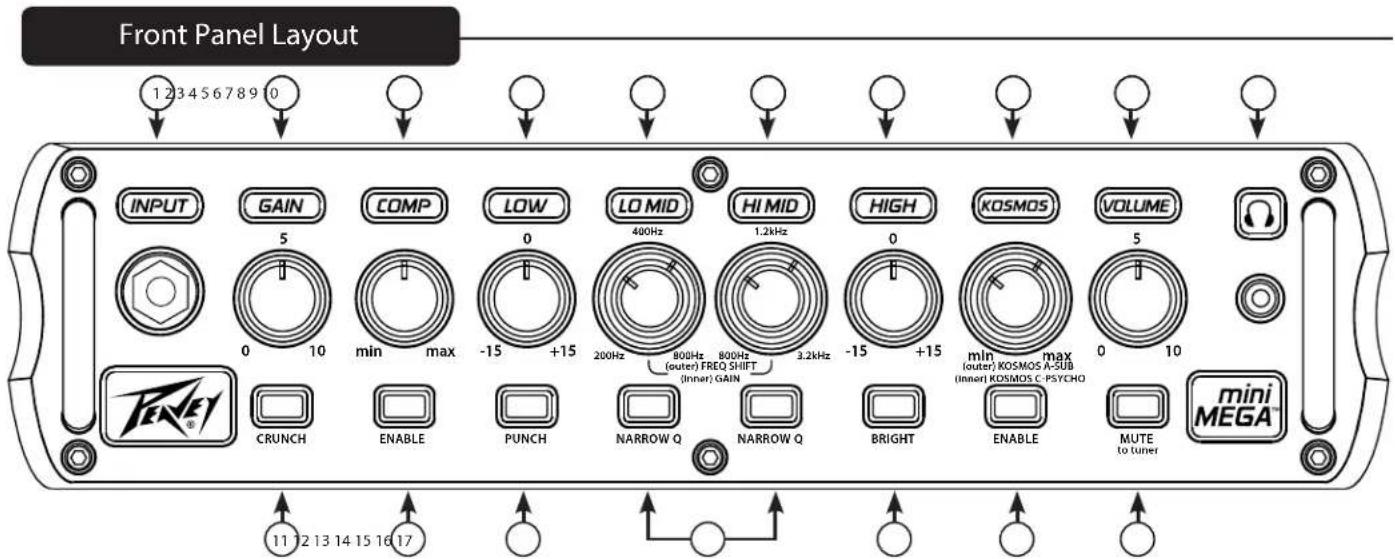
① Instrument Input
1/4" input jack-- plug instrument cable into this jack.
② Gain Control
This knob controls input sensitivity of the preamp, whereas the Volume knob controls the output level of the preamp.
③ Optical Compression Control
This knob controls the level of compression of the instrument signal (i.e. the farther right you turn the knob, the less dynamic range you will have between your loudest and quietest notes). See Hints section for more info.
④ Low EQ
This detented knob provides a shelving tone control for low frequencies and provides cut/boost of +/-15 dB. The center point is flat. The center frequency is 40 Hz. -3 dB shelf corner frequency is 80Hz.
⑤ Low Mid Filter
The LO MID filter provides +/-15 dB of boost/cut to frequency centers between 200 – 800 Hz. In general, this filter will be most useful in adjusting the overall tone of your bass and also how you sit in the mix. For example, if you want a smooth vintage bass tone, try setting the frequency ring to about 250Hz, and apply a little bit of cut using the filter gain knob. On the other hand, if you want an aggressive rock tone, try setting the frequency ring to 800Hz and then apply a little bit of boost to the filter gain knob. If you need more “cut” through a mix, try setting the frequency ring to 400 Hz and apply boost.
⑥ High Mid Filter
The HI MID filter provides +/-15 dB of boost/cut to frequency centers between 800 Hz – 3.2 KHz. In general, this filter will be most useful in adjusting the overall “character” of the bass tone. Examples include, accentuating pick or slap/pop attack, increasing/decreasing string/fret noise, and dialing in the tone of played harmonics.
⑦ High EQ
This knob provides a shelving tone control for high frequencies and cut/boost of +/-15dB. The center point is flat and the frequency is 8 KHz. -3dB; the shelf corner frequency is 5 KHz.
⑧ Kosmos
One of the exciting features of the miniMEGA™ is the inclusion of Peavey's patented KOSMOS® bass enhancement technology. The miniMEGA has two separate Kosmos processors combined into one, giving you maximum bass performance from an array of large and small speaker cabinets. The Kosmos controls are stacked concentrically with Kosmos A controlled by outer wheel and Kosmos C by the inner knob. For a detailed description of the applications of the Kosmos Bass Enhancement feature, see the Hints section of this manual.
Front Panel cont.
⑨ Volume
This knob controls the overall volume of the amplifier.
10 Headphone jack
1/8" headphone output for personal monitoring.
11 Crunch Button
Depressing this button activates the Crunch effect, which boosts the amp's gain enough to overdrive the preamp. When activated, you can adjust the Gain control to dial in the desired amount of saturation. This effect is also foot-switchable. For a more detailed explanation of the effect, see the Hints section.
12 Compression Enable Button
This button activates the optical compression effect. This effect is also footswitchable. See detailed explanation of the effect in the Hints section.
13 Punch Effect Button
This effect adds a +4 dB boost to the low end of the bass spectrum; it give punch and attack to the low notes. For a more detailed explanation of the effect, see the Hints section.
14 Narrow Q Preset Buttons
This amplifier features two filter presets or Q configurations that narrow the bandwidth. Pressing these buttons activates the filter preset. For a more detailed explanation of the effect, see the Hints section.
15 Bright Button
This button gives a +10dB boost to the high end of the frequency, and allows the bass to cut through the mix more efficiently.
16 Kosmos Bass Enhancement Button
This button activates the Kosmos Bass Enhancement technology, adding additional presence and punch to the sound coming from the speaker. This effect is also footswitchable. For a more detailed explanation of the effect, see the Hints section.
17 Mute Button
This button mutes the signal to the speaker. This feature is convenient for tuning on-the-fly and is footswitchable.
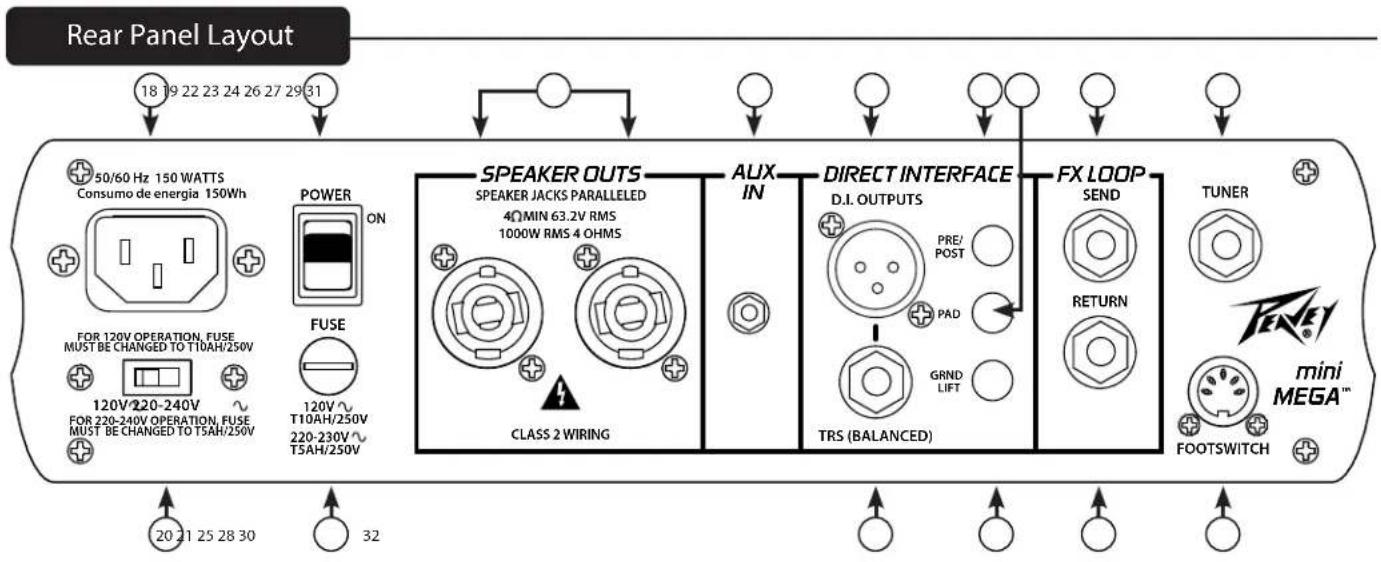

18 AC POWER INLET
This is the receptacle for an IEC line cord, which provides AC power to the unit. Connect the line cord to this connector to provide power to the unit. Damage to the equipment may result if improper line voltage is used. (See line voltage marking on unit).
Never break off the ground pin on any equipment. It is provided for your safety. If the outlet used does not have a ground pin, a suitable grounding adapter should be used, and the third wire should be grounded properly. To prevent the risk of shock or fire hazard, always make sure that the amplifier and all associated equipment is properly grounded.
NOTE: FOR UK ONLY
As the colors of the wires in the mains lead of this apparatus may not correspond with the colored markings identifying the terminals in your plug, proceed as follows: (1) The wire that is colored green and yellow must be connected to the terminal that is marked by the letter E, or by the Earth symbol, or colored green or green and yellow. (2) The wire that is colored blue must be connected to the terminal that is marked with the letter N, or the color black. (3) The wire that is colored brown must be connected to the terminal that is marked with the letter L, or the color red.
POWER SWITCH
Placing this switch into the ON position will provide power to the amplifier.
LINE VOLTAGE SELECTOR SWITCH
This selector switch allows the amplifier to be operated at different voltages. Please be sure this is set to the proper voltage for your area before turning the amplifier on for the first time. NEVER CHANGE POSITION OF THIS SWITCH WHILE THE AMP IS ON!
PRIMARY FUSE
The fuse is located within the cap of the fuse holder. If the fuse should fail, IT MUST BE REPLACED WITH THE SAME TYPE AND VALUE IN ORDER TO AVOID DAMAGE TO THE EQUIPMENT AND TO PREVENT VOIDING THE WARRANTY. If the amp repeatedly blows fuses, it should be taken to a factory authorized center for repair.
WARNING: THE FUSE SHOULD ONLY BE REPLACED WHEN THE POWER CORD HAS BEEN DISCON- NECTED FROM ITS POWER SOURCE.
TWIST LOCK OUTPUTS
MiniMEGA amplifiers utilize two 2-conductor twist lock connectors for paralleled speaker outputs (4Ω min).
AUX INPUT
This 1/8" input jack allows you to connect an external audio device to your amp and play along.
^24 XLR DIRECT OUTPUT
This XLR output allows the signal from the mini MEGA to be connected directly to a mixing console.
(25) TRS BALANCED OUTPUT
Another output option for the miniMEGA is the TRS output connection. A 1/4" balanced TRS cable can be connected directly into a rack-mount FX processor or outboard recording device.
26 PRE/POST SELECTOR BUTTON
This button allows you to select two funtions for the Direct Interface. In the up position, the button is in the Pre mode. In this position, the bass signal bypasses the EQ and processing of the amplifier and travels directly to the rack-mount FX processor or recording device. When the button is depressed, the amp is in Post; the signal goes through the miniMEGA's preamp and processors before traveling to the rack-mount FX processor or recording device.
27 PAD BUTTON
The PAD button helps prevent the signal from clipping at the soundboard or recorder, by reducing the amount of signal level sent from the amplifier. Press this button if the signal to the soundboard is clipping.
In the case of humming noises coming from the Direct Interface, this button can be pressed in order to remove the ground loop.
29 EFFECTS LOOP SEND
1/4" output jack for supplying signals to external low-level effects or signal processing equipment.
30 EFFECTS LOOP RETURN
1/4" input for returning signals from external low-level effects or signal processing equipment. This is a switching jack. Inserting a plug into this jack will break the signal path until it is returned via the EFFECTS LOOP SEND jack. The Effects Loop is footswitchable, but the effects loop may be bypassed without the footswitch. First, hold down the CRUNCH button, and then press the HI MID NARROW Q enable button.
^31 TUNER OUTPUT
A 1/4" instrument cable can be run from the tuner jack into a tuner. Even when the Mute Button (17) is engaged, the instrument signal will continue to run into the external tuner.
32 MIDI FOOTSWITCH JACK
The optional footswitch (part number____) plugs into this jack. The footswitch controls Crunch, Compressor, Kosmos, FX Loop, and Mute functions.
Quickstart Guide and Hints
This quick start guide will help you get started with the miniMEGA amplifier and have the best possible playing experience. Along with the Quick Start Guide, the Hints section will help you dial into the tonal sweet spots of this amp. We also recommend a thorough reading of this guide before playing through the amp, in order to prevent damage to the speakers.
Getting started—
Before turning on the miniMEGA, be certain that the power cable is plugged into an approved power source. Then plug the amp into a speaker or speakers (4 OHM minimum) via the Speaker Outs (22).
GAIN AND VOLUME CONTROLS:
Plug the instrument cable into the input jack (1) and turn on the power (19).
The Volume and Gain controls are set on zero when the amp is unboxed. With the EQ knobs all set flat (to 0), slowly turn the volume up to 2 or 3. While playing, adjust the amount of gain to suit the sound you are after. Too much gain will cause the preamp to clip or overdrive. Remember to use the volume knob to control the overall output of the amplifier and the gain to control the amount of instrument signal going to the amp. Once you have the gain set for your desired sound, then increase the volume of the amp. You will need to play with the balance of gain to volume in order to find your desired sound.
CRUNCH:
When activated, this feature reconfigures the front end of the preamp so that the Mini Mega sounds less hi-fi and more like a vintage, all-tube bass amplifier.
The effect can create a wide range of tones from very subtle overdrive all the way to full on distortion depending on the position of the GAIN knob, the volume knob on the bass, and the bass guitar itself.
The CRUNCH circuit passes the bass signal through a crossover so that higher frequencies are processed and lower frequencies are not. This is so that the bass tone does not become mushy and unfocussed.
HINT: To achieve equal volume with and without CRUNCH activated, start by turning on CRUNCH. Dial in the desired amount of the effect using the GAIN control, and set your overall volume using the VOLUME control. Finally, bypass CRUNCH and check the clean volume—the volume should be the same or very close between the two.
HINT: For best results, turn off the tweeter in your speaker cab when using CRUNCH.
COMPRESSOR:
The Mini Mega features an optical compressor (3) that is designed to be extremely easy to use and powerful at the same time. The compressor can be activated either by the optional footswitch (Part number ____ ) or the Enable button (12) on the front panel. The compressor functions similarly to an automatic volume adjuster, in that it controls playing dynamics by reducing the dynamic range (or volume) of notes that are played hard. The harder you play, the more the signal level will reduce (depending on the amount of compression you set).
The COMP control knob sets the amount of compression from subtle to extreme. The farther right you turn the knob, the less dynamic range you will have between your loudest and quietest notes. To all you technically inclined bassists, the COMP knob adjusts the compression ratio—attack / release time and recovery gain is fixed. The compression also takes place pre-EQ in the signal chain.
HINT: The compressor is after the GAIN control in the signal chain, so the compressor may not be able to trigger if the gain is not set high enough or if your bass guitar volume is turned down too low.
HINT: Use a little compression if you like extreme EQ settings for certain styles of music such as Reggae or Urban Gospel. This smoothes out the overall tone so that your bass playing can be heard and felt while still fitting in the mix. It also keeps power amplifier headroom in reserve so you can play louder should the need arise.
LOW EQUALIZER CONTROL:
The mini MEGA features an EQ to help you dial in your tone and cut through the mix. The first of the EQ controls is the Low EQ. The Low EQ control is a detented knob and controls the frequency range from 20Hz to 200Hz.
PUNCH:
-The punch effect adds a +4 dB boost to low frequencies around 100 Hz. This enhances the attack and impact of low notes. Activating
Quickstart Guide and Hints
PUNCH also slightly changes the response of the LOW EQ control so that it has more effect on the upper bass frequencies as well as the lower bass frequencies.
HINT: Use PUNCH for a great slap sound! Actually, it sounds great left on all the time for just about any style of music!
QUASI-PARAMETRIC MIDDLE EQUALIZER:
The Mini Mega features two quasi-parametric EQ filters labeled “LO MID” and “HI MID”. We’ve attempted to provide a very detailed description of this feature because while parametric EQ’s are extremely powerful, they can be a bit confusing to those who are not familiar. The mid frequencies are extremely important because they not only determine the musicality and character of your bass tone, they also determine how your bass will hold up in a mix. For example, if you find that you are having trouble hearing yourself in a mix, most likely, adjusting (boosting) the mids will help. It’s important to remember that when you play a note on a bass guitar, the note itself has a fundamental frequency that determines the pitch (that’s what a tuner measures to determine pitch), but there’s more to it than that. The note also has harmonics that make up the tone, so even when you play low notes, there are harmonics present that extend much higher in the frequency range.
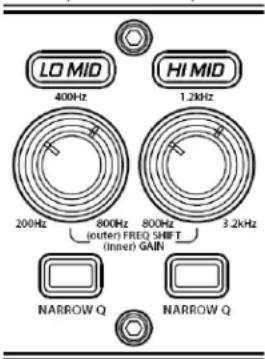
Each filter utilizes two stacked (concentric) controls. The outer ring control is used to adjust the frequency center of the filter. The inner control is the gain control used to adjust the cut or boost amount of the filter. When the gain control is centered at 12:00, the filter will have no effect on the audio response, therefore, changing the position of the frequency ring will have no effect. 400 Hz and 1.2 KHz are the default 12:00 settings on the LO MID and HI MID filters respectively, because those frequency centers will be very effective at making needed tone adjustments when using common bass guitars and bass speaker cabinets. Rotating the filter gain control counter-clockwise will apply cut, and rotating the filter gain control clockwise will apply boost
HINT: To hear the effect of the mid filters, set the gain control to full cut or boost, and then sweep the frequency ring while letting notes sustain. You can also ask a friend to play through the amp while you experiment with the EQ. Just be aware that fully boosting an EQ control may require an adjustment in volume.
HINT: It's a good idea to pay attention to the frequency ring settings between the LO MID and HI MID filters—you probably wouldn't want to set both filters near the same frequency and then cut one while boosting the other, for example.
LO MID FILTER:
The LO MID filter provides +/-15 dB of boost/cut to frequency centers between 200 – 800 Hz. In general, this filter will be most useful in adjusting the overall tone of your bass and also how you sit in the mix. For example, if you want a smooth vintage bass tone, try setting the frequency ring to about 250Hz, and apply a little bit of cut using the filter gain knob. On the other hand, if you want an aggressive rock tone, try setting the frequency ring to 800Hz and then apply a little bit of boost to the filter gain knob. If you need more “cut” through a mix, try setting the frequency ring to 400 Hz and apply boost.
HI MID FILTER:
The HI MID filter provides +/-15 dB of boost/cut to frequency centers between 800 Hz – 3.2 KHz. In general, this filter will be most useful in adjusting the overall “character” of the bass tone. Examples include, accentuating pick or slap/pop attack, increasing/decreasing string/fret noise, and dialing in the tone of played harmonics.
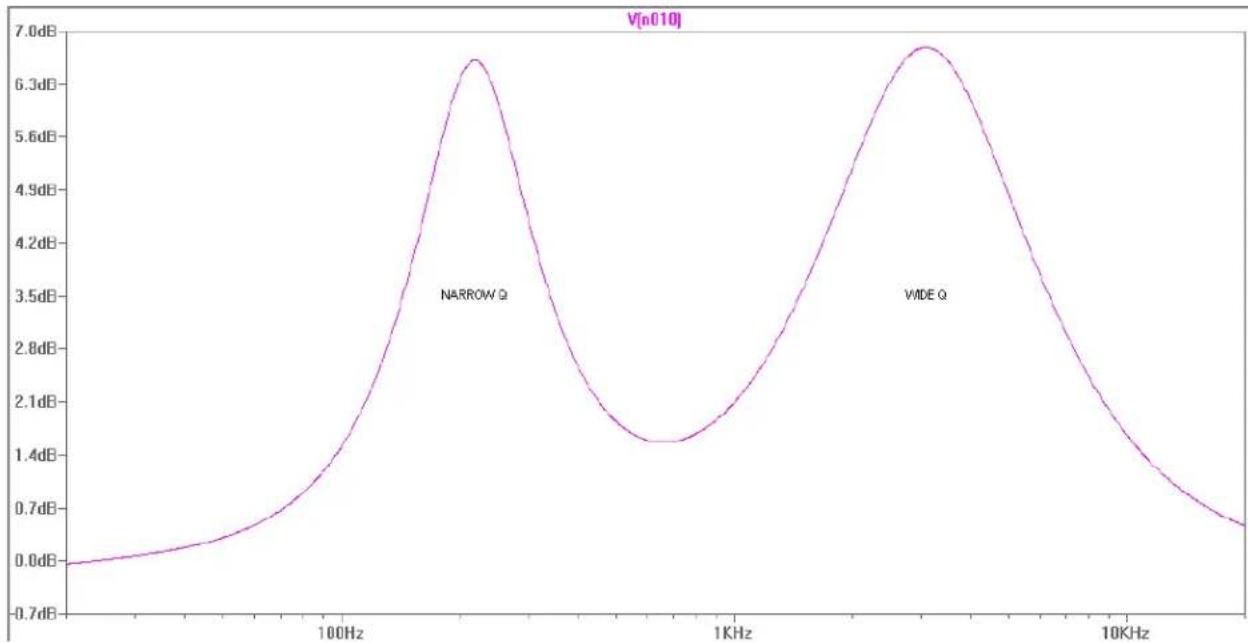
NARROW Q SWITCHES:
Each filter may be run with in one of two preset Q configurations. "Q" refers to the "width" of the filter response. The default Q is wide
bandwidth. When you activate the NARROW Q switch, the button will illuminate and the filter tuning is adjusted to have less bandwidth. It's important to remember that because of the nature of parametric EQ's, the Q also depends on the amount of cut or boost. For that reason, when using slight amounts of cut/boost, there may be no perceivable difference between the wide/narrow Q settings. See illustration below.
line
| Frequency | Value | | --------- | ------ | | 100Hz | 6.3dB | | 1KHz | 1.4dB | | 10KHz | 6.3dB |-LO MID frequency ring set near minimum with moderate gain boost with NARROW Q turned on. -HI MID frequency ring set near maximum with moderate gain boost with the default wide Q.
The illustration is a graph of the EQ frequency response across the audio spectrum (20 Hz – 20 KHz). Notice the area in between the two filters that is also affected somewhat. Because of the distance between the two frequency centers, there is sort of a “dead spot” in between the LO MID and HI MID filters because the frequency rings are set opposite extremes. There’s nothing necessarily wrong with that, but it’s something to keep in mind when making adjustments—you may create areas in the frequency response that can’t be adjusted effectively.
HINT: For typical tone adjustments, it is advisable to use a wide Q setting for the low mid filter and a narrow Q setting for the high mid filter. This is because of the nature of audio frequencies. If you play two notes that are an octave apart, the frequency of the higher octave is twice that of the lower octave, therefore, as you play notes that are increasingly higher, the frequency difference between notes becomes increasingly farther apart. If you are trying to dial in the high mid EQ, using the default wide Q setting may result in cutting or boosting undesired areas of the tonal spectrum. By the same token, using the narrow Q setting on the low mid EQ may result in a “peaky” sounding response across certain areas of the fret board. These are just generalizations—don’t be discouraged from experimenting with creative EQ-ing.
High EQ:
The final of the EQ controls is the High EQ. The High EQ control is a detented knob and controls the frequency range from 3.2KHz to 20KHz. Adding higher frequencies to the bass mix can help had attack to the bass signal and can allow individual notes to push through the mix. You will have to play with the EQ to find the right combinations that work for your particular playing style.
BRIGHT:
The bright effect modifies the front of the preamp so that it is more sensitive to extreme high frequencies. Activating this feature adds + 10 dB of boost to frequencies around 8 KHz. This enhances the top end part of your tone.
HINT: Use BRIGHT to put some life back into older strings that sound dull. Looking for an aggressive metal, hardcore, or punk tone when playing with a pick? Use BRIGHT with CRUNCH.
KOSMOS Bass Enhancement System
Kosmos is Peavey's exclusive bass enhancement processing technology that adds perceived bass to the bass signal without overloading the amplifier. The Mini Mega features two separate Kosmos processors combined into one for the first time. This is so the user can get maximum performance from full size bass cabs all the way down to smaller mini cabs. The Kosmos controls are stacked (concentric); Kosmos A is the outer ring control, and Kosmos C is the inner control knob. The knobs control the mix amount of each Kosmos pro-
cessor. Activate the effect by pressing the enable button located directly below the knob or use the optional footswitch.
KOSMOS A:
Kosmos A is a sub harmonic synthesizer that tracks bass notes and then generates a sub harmonic one octave below to enhance the overall bass presence by adding extreme low frequency content that can be felt.
HINT: Kosmos A is fantastic for musical styles that require smooth, deep bass such as Reggae, Hip-Hop, R&B, and Electronica.
CAUTION—Kosmos A works best with larger bass cabinets such as 410's. Be careful when using Kosmos A because it can damage the speakers. Listen carefully to your speaker cabinets to make sure that there are no indications of mechanical stress or cone breakup distortion.
KOSMOS C:
Kosmos C is a bass harmonic enhancer that works by principles of psycho-acoustics. Kosmos C is designed to make smaller bass speaker enclosures (such as 112 cabs) sound larger by creating an illusion of increased bass. This is because the human ear perceives certain combinations of tones as one single tone that is extremely low in frequency. Technically, you are adding more bass when you use this feature, but you are adding upper bass content that is easier for speakers to handle, and that doesn't eat up power amplifier headroom as much as simply boosting low EQ. This feature is especially useful when using extended range basses such as a 5-string bass with a low B string
HINT: The Kosmos C ear trickery works best when the LOW EQ control is used sparingly. If you boost the lows before Kosmos C, you defeat the purpose.
CAUTION—You may use both KOSMOS A and C processors simultaneously, but use caution because it will be extremely easy for the power amplifier to reach full power output which may damage speaker enclosures. It's important to remember that the power rating of a speaker cabinet is basically a thermal limit and DOES NOT indicate the safe power handling limit in the sub bass region which is a mechanical limit. In other words, don't assume that using a cabinet rated at 1,000 Watts with a 1,000 Watt amplifier means you're in the clear!
When you use any of the buttons on the front of the amp, any setting changes that occur 5 or more seconds before the unit is switched off will be saved in memory and will be recalled the next time the unit is switched on.
Changing Display Color:
One of the really unique "extras" of the mini MEGA is the customizable backlight display. You can now change to color based on your mood or the setting, and you can have a unique look to go with your unique sound!
To enter the backlight edit mode, press the CRUNCH button for 2 seconds and continue holding during editing. When the CRUNCH button is released, the light settings will be stored in memory after a 5 second delay.
The Mini Mega will display a color wheel light show when there is no instrument cable plugged into the input jack. To disable the light show, press the KOSMOS ENABLE BUTTON.
To make the light show run while the amp output is muted, press the MUTE button.
To change the color, use the COMP enable button to cycle through the 10 backlight color presets:
RED, PINK, PURPLE, BLUE, TEAL, GREEN, LIGHT GREEN, YELLOW, ORANGE, and WHITE.
To change the panel brightness, press the BRIGHT button. There are 4 levels of light intensity.
To toggle the top half of the light panel on or off, press the PUNCH button.
To restore the lighting control system to the factory presets, press and hold the KOSMOS enable and MUTE buttons with the unit powered off, and then turn the power switch on.
MIDI Control
Continuous Controllers (on MIDI channel 1): B0 cc dd
cc [dd: 0-63=off; 64-127=on]
01 - crunch
02 - compressor
03 - punch
04 - lo narrow q
05 - hi narrow q
06 - bright
07 - kosmos
08 - mute
09 - effects loop
Examples: B0 07 7F ... turns kosmos on B0 08 00 ... unmutes amp
C0 PRG
PRG (dec) PRG (hex) Mute FX Loop Bright Punch Compressor Crundkosmos
PRG bits: 6 5 4 3 2 1 0
| 0 00h | |||||||||
| 1 01h x | |||||||||
| 2 02h x | |||||||||
| 3 03h x x | |||||||||
| 4 04h x | |||||||||
| 5 05h x | x | ||||||||
| 6 06h x x | |||||||||
| 7 07h x x x | |||||||||
| 8 08h | x | ||||||||
| 9 09h | x | x | |||||||
| 10 | 0Ah | x | x | ||||||
| 11 | 0Bh | x | x | ||||||
| 12 | 0Ch | x | x | ||||||
| 13 | 0Dh | x | x | ||||||
| 14 | 0Eh | x | x | ||||||
| 15 | 0Fh | x | x | ||||||
| 16 10h | x | ||||||||
| 17 11h | x | x | |||||||
| 18 12h | x | x | |||||||
| 19 13h | x | x x | |||||||
| 20 14h | x | x | |||||||
| 21 | 15h | x | x | ||||||
| 22 16h | x | x x | |||||||
| 23 17h | x | x x x | |||||||
| 24 18h | x x | ||||||||
| 25 19h | x x | x | |||||||
| 26 | 1Ah | x | x | x | |||||
| 27 | 1Bh | x | x | x | |||||
| 28 | 1Ch | x | x | ||||||
| 29 | 1Dh | x | x | ||||||
| 30 | 1Eh | x | x | x | |||||
| 31 | 1Fh | x | x | x | |||||
| 32 20h | x | ||||||||
| 33 21h | x | x | |||||||
| 34 22h | x | x | |||||||
| 35 | 23h | x | x | ||||||
| 36 24h | x | x | |||||||
| 37 | 25h | x | x | ||||||
| 38 26h | x | x x | |||||||
| 39 | 27h | x | x | ||||||
| 40 28h | x | x | |||||||
| 41 | 29h | x | x | ||||||
| 42 | 2Ah | x | x | x | |||||
| 43 | 2Bh | x | x | x | |||||
| 44 | 2Ch | x | x | ||||||
| 45 | 2Dh | x | x | ||||||
| 46 | 2Eh | x | x | x | |||||
| 47 | 2Fh | x | x | x | |||||
| 48 30h | x | x | |||||||
| 49 | 31h | x | x | ||||||
| 50 | 32h | x | x | x | |||||
| 51 | 33h | x | x | x | |||||
| 52 | 34h | x | x | x | |||||
| 53 | 35h | x | x | x | |||||
| 54 | 36h | x | x | x | |||||
| 55 | 37h | x | x | x | |||||
| 56 38h | x | x x | |||||||
| 57 | 39h | x | x | ||||||
| 58 | 3Ah | x | x | x | |||||
| 59 | 3Bh | x | x | x | |||||
| 60 | 3Ch | x | x | x | |||||
| 61 | 3Dh | x | x | x | |||||
| 62 | 3Eh | x | x | x | |||||
| 63 | 3Fh | x | x | x | |||||
Mini MEGA
| NOTE: All specifications tested with mains voltage maintained at nominal level. | Headphone Amplifier Specifications: Stereo 8 ohm minimum load | Weight: 9 lbs. / 5.4 Kg |
| Line Voltage: 120V 60 Hz 220V - 240V 50/60 Hz | Power Output: All measurements with no more than 1% THD + N 8 ohms 250 mW (1.41 VRMS) x 2 | Dimensions (h x w x d): (h x w x d): 12"W x 3.125"H x 11"D |
| Typical Power Consumption = 200W | ||
| Power Amplifier Specifications: | Preamplifier Specifications: Settings for the Following Measurements (unless stated otherwise): | |
| Protection: Short circuit protection Thermal protection circuit Current limit protection circuit DC output protection circuit | Gain = 5 (12 o'clock) BRIGHT = out CRUNCH = out LOW = 0 (12 o'clock) LO MID = 400 Hz (12 o'clock) | |
| Input Sensitivity (signal into return jack with master volume set to 5): 8.24 dBu | HI MID = 1.2 kHz (12 o'clock) HIGH = 0 (12 o'clock) COMPRESSION = OUT POST GAIN = 10 (fully CW) Kosmos A = Kosmos C = Input Sensitivity (input selector set to passive): | |
| Power Output: All measurements with no more than 1% THD + N | Nominal Input = -10.2 dBu Minimum Input = -30.0 dBu Maximum Input = 14.26 dBu (maximum signal at input before clipping) | |
| 8 ohms 700 watts (75.0 VRMS) | D.I.: Balanced Output | |
| 4 ohms 1000 watts (63.2 VRMS) | Noise Floor: -90 dB |

natural_image
Abstract black-and-white graphic design resembling stylized figures or a bird, with no readable text or symbols.www.peavey.com
Warranty registration and information for U.S. customers available online at
www.peavey.com/warranty
or use the QR tag below

Features and specifications subject to change without notice.
Peavey Electronics Corporation
5022 Hartley Peavey Drive
Meridian, MS 39305
(601) 483-5365
FAX (601) 486-1278

Logo referenced in Directive 2002/96/EC Annex IV
(OJ(L)37/38,13.02.03 and defined in EN 50419: 2005
The bar is the symbol for marking of new waste and
is applied only to equipment manufactured after 12 August 2005
13 August 2005

- Caution
- ENGLISH
- Mini MEGA ® Bass Amplifier
- Features:
- Front Panel cont.
- ⑨ Volume
- Headphone jack
- Crunch Button
- Compression Enable Button
- Punch Effect Button
- Narrow Q Preset Buttons
- Bright Button
- Kosmos Bass Enhancement Button
- Mute Button
- AC POWER INLET
- NOTE: FOR UK ONLY
- POWER SWITCH
- LINE VOLTAGE SELECTOR SWITCH
- PRIMARY FUSE
- TWIST LOCK OUTPUTS
- AUX INPUT
- Quickstart Guide and Hints
- GAIN AND VOLUME CONTROLS:
- CRUNCH:
- COMPRESSOR:
- LOW EQUALIZER CONTROL:
- PUNCH:
- QUASI-PARAMETRIC MIDDLE EQUALIZER:
- LO MID FILTER:
- HI MID FILTER:
- NARROW Q SWITCHES:
- High EQ:
- BRIGHT:
- KOSMOS Bass Enhancement System
- KOSMOS A:
- KOSMOS C:
- Changing Display Color:
- MIDI Control
- Mini MEGA
Brand : PEAVEY
Model : Mini MEGA
Category : Receiver