
VCC 7324 WI - Vacuum Cleaner BEKO - Free user manual and instructions
Find the device manual for free VCC 7324 WI BEKO in PDF.


| Product Type | Canister vacuum cleaner |
| Brand | Beko |
| Model | VCC 7324 WI |
| Rated Voltage | 220-240 V ~ 50/60 Hz |
| Nominal Power | 1900 W |
| Maximum Power | 2400 W |
| Suction Power | 430 W |
| Filter Type | HEPA 12 |
| Dust Collection | Dust bag |
| Dust Bag Full Indicator | Yes, red light |
| Operating Radius | 10 m |
| Power Cord Rewind | Automatic with button |
| Telescopic Tube | Yes, adjustable |
| Brush Type | Parquet/carpet brush with adjustable setting |
| Accessories Included | Crevice tool, dust brush |
| Parking Feature | Vertical and horizontal parking |
| Motor Protection Filter | Washable foam filter |
| HEPA Filter Maintenance | Washable (dry 24h min.) |
| Safety Class | Class II (double insulated) |
| Warranty | Standard manufacturer warranty |
Frequently Asked Questions - VCC 7324 WI BEKO
User questions about VCC 7324 WI BEKO
0 question about this device. Answer the ones you know or ask your own.
Ask a new question about this device
Download the instructions for your Vacuum Cleaner in PDF format for free! Find your manual VCC 7324 WI - BEKO and take your electronic device back in hand. On this page are published all the documents necessary for the use of your device. VCC 7324 WI by BEKO.
USER MANUAL VCC 7324 WI BEKO
VCC 7324 WI
VCC 7324 E
ENTR RU
BS MK SR
01M-8835353200-3217-05
01M-8835473200-3217-05
beko
Please read this manual first!
Dear Valued Customer,
Thank you for preferring this Beko appliance. We hope that you get the best results from your appliance which has been manufactured with high quality and state-of-the-art technology. For this reason, please read this user manual and all other provided documents carefully before using the appliance and keep it as a reference for future use. If you hand over the appliance to someone else, give the user manual as well. Follow the instructions by paying attention to all the information and warnings in the user manual.
Remember that this user manual may also apply to other models. Differences between models are explicitly described in the manual.
Meanings of the Symbols
Following symbols are used in various sections of this manual:

Important information and useful hints about usage.

WARNING: Warnings against dangerous situations concerning the security of life and property.

Protection class for electric shock.

This product has been manufactured in environmental friendly modern plants without giving any harm to the nature.
CONTENTS
| ENGLISH | 4-10 |
| TÜRKÇE | 11-18 |
| РУССКИЙ | 19-28 |
| BOSANSKI | 29-36 |
| MAKEДОНСКИ | 37-44 |
| СРПСКИ | 45-52 |
1 Important safety and environmental instructions
This section contains safety instructions that will help protect from risk of personal injury or property damage.
Failure to follow these instructions invalidates the granted warranty.
1.1 General safety
- This appliance complies with the international security standards.
- This appliance can be used children aged from 8 years and above and persons with reduced physical, sensory or mental capabilities or lack of experience and knowledge if they have been given supervision or instruction concerning use of the appliance in a safe way and understand the hazards involved. Children shall not play with the appliance. Cleaning and user maintenance shall not be made by children without supervision.
- Do not use it if the power cable or the appliance itself is damaged. Contact an authorized service.
- Your mains power supply should comply with the information supplied on the rating plate of the appliance.
- The mains supply of the appliance must be secured with a minimum 16 A fuse.
- Do not use the appliance with an extension cord.
th• In order to prevent the power cable from getting damaged, make sure that it doesn't get bystuck, twisted or rub against sharp surfaces.
- Do not touch the appliance or its plug when it is plugged if your hands are damp or wet.
- Do not pull the power cable when unplugging the appliance.
- Do not vacuum flammable materials and when vacuuming cigarette ashes make sure that it got cold.
- Do not vacuum water or other liquid materials.
- Protect the appliance from rain, humidity and heat sources.
1 Important safety and environmental instructions
- Never use the appliance• If your store the package in or near to combustible material, keep it out of the or inflammable places and reach of children.
1.2 Compliance with the WEEE Directive and disposal of waste products
- Unplug the appliance before cleaning and maintenance.
- Do not dip the appliance or in cable in water to clean it.
- Check the hose of the appliance regularly. Do not use if it is damaged and contact an authorized service.
- Do not attempt to dismantle the appliance.
- Only use the original parts parts recommended by the manufacturer.
- If heavily used for cleaning dust such as cement or grout the dust indicator will lit earlier then expected, in such case replace the dust bag even it is empty.
- Do not use the appliance without filters; otherwise it can get damaged.
- When vacuuming the stairs, the appliance should be located below the user.
This product does not include harmful and prohibited materials specified in the "Regulation for Supervision of the Waste Electric and Electronic Appliances" issued by the Ministry of Environment and Urban Planning. This appliance conforms to the WEEE regulation. This product has been manufactured with high quality parts and materials which can be reused and are suitable for recycling. Therefore, do not dispose the product with normal domestic waste at the end of its service life. Take it to a collection point for the recycling of electrical and electronic equipment. Ask the local authority in your area for these collection points. Contribute to the preservation of environment and natural sources by taking the used products to the recycling points.
1.3 Package information

Package of the product is made of recyclable materials in accordance with our National Legislation. Do not dispose of the packaging materials together with estic or other wastes. Take them to the ing material collection points designated local authorities.
2 Your vacuum cleaner
2.1 Overview

2.2 Technical data
-
Handle
-
Vacuum control
-
Telescopic tube
-
Telescopic tube adjustment latch
-
On/Off button
-
Accessory storage compartment
-
Parquet/carpet brush adjustment latch
-
Parquet/carpet brush
-
Parquet/carpet brush parking groove
-
Button for opening the accessory storage compartment
-
Carriage handle
-
Button for opening the dust container
-
Suction nozzle
-
Hose cap
-
Hose
-
Dust bag fullness indicator
-
Cable winding button
-
Suction power adjustment knob
-
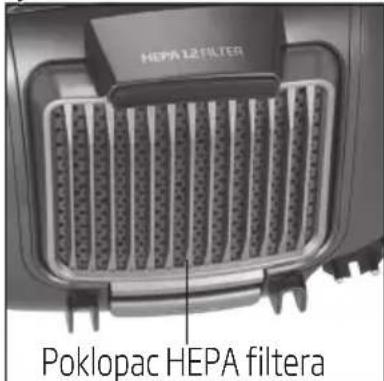
HEPA filter cover
The values which are declared in the markings affixed on your appliance or other printed documents supplied with it represent the values which were obtained in the laboratories pursuant to the pertinent standards. These values may vary according to the usage of the appliance and ambient conditions.
Supply voltage : 220-240 V\~, 50/60 Hz
Power :1900 W Nom
:2400 W Max
Usage radius : 10 m
Suction power : 430 W
Filter : HEPA 12
Technical and design modification rights are reserved.
3 Usage
3.1 Intended use
The appliance was designed for household use and is not suitable for industrial use.
3.2 Attaching/removing the hose
- To attach the hose (15), push the hose cap (14) in the arrow direction in order to match it with the suction nozzle and rotate it clockwise.
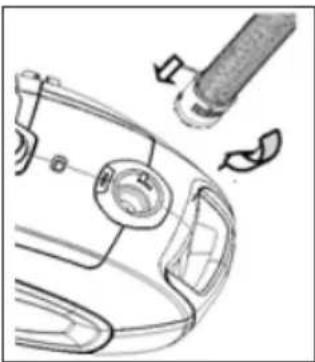
- To remove the hose (15), rotate the hose cap (14) anti-clockwise and remove it.

3.3 Attaching/removing the telescopic tube
- Attach the telescopic tube (3) to the handle (1).
- Pull the telescopic tube (3) from the handle (1) to remove it.
- To adjust the length of the telescopic tube, push the telescopic tube adjustment latch (4) in the arrow direction and pull it from the end of it.

3.4 Attaching/removing the parquet/carpet brush
- Attach the telescopic tube (3) to the parquet/ carpet brush (8).
- Pull the telescopic tube (3) from the parquet/ carpet brush (8) to remove it.
3.5 Adjusting the parquet/car- pet brush
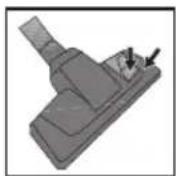
Perform the following actions on the adjustment latch (7) located on the parquet/carpet brush (8);
- Use "###" position for hard surfaces and parquet.

• Use "" position for rugs and carpets.

3.6 Operation
- Plug in the appliance after pulling the power plug located at the back of the appliance.
- Press the on/off button (5) to switch on your appliance.
3.6.1 Adjusting the suction power
- You can adjust the suction power using the suction power adjustment button (18) found on the appliance. Rotating in the clockwise direction (max) will increase the suction power and in anti-clockwise (min) direction will decrease the suction power.
- You can lower the suction power of the parquet carpet brush by pulling backward the vacuum adjustment control (2) located on the handle (1) without the need to use the suction adjustment knob found on the appliance.
3 Usage
3.6.2 Dust indicator
When the dust bag is full, the dust bag fullness indicator (16) will turn red. Replace the dust bag (see 4.1).
3.7 Accessories
You can open the accessory storage compartment (6) by pressing the button for opening the accessory storage compartment (10).
Crevice tool

Suitable for cleaning surfaces which are difficult to clean, such as areas remaining under sofas and furniture.
Dust brush

Suitable for cleaning objects such as curtains, floorings, vulnerable fragile things, couches, sofas etc.

WARNING: Do not perform cleaning tasks using the end part of the handle (1).
3.8 Switching off the vacuum cleaner and parking feature
- Switch off the appliance with the on/off button (5) and unplug it.
- Press the cord winding button (17) to rewind the power cord.
Vertical parking feature
Insert the hook of the parquet/carpet brush (8) into the parking groove located at the bottom section of the appliance.
Horizontal parking feature
Insert the hook of the parquet/carpet brush (8) into the parking groove (9) located at the side section of the appliance.

4 Cleaning and care
Switch off and unplug the appliance before cleaning it.

WARNING: Never use gasoline, solvent, abrasive cleaning agents, metal objects or hard brushes to clean the appliance.
4.1 Replacing the dust bag
When the dust bag is full, the dust bag fullness indicator (16) will turn red.
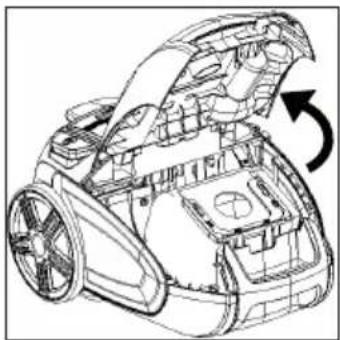
- Open the top lid by pressing the button for opening the dust container (12).
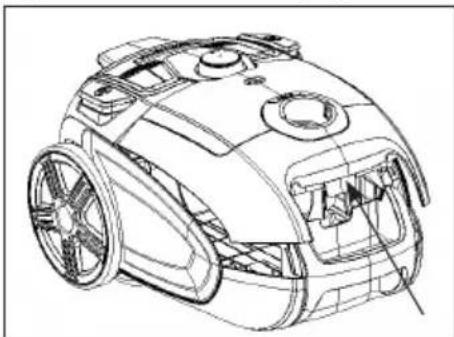

- Remove the dust bag from the dust container by pulling it upwards.

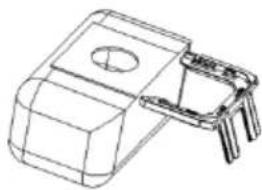
- Remove the dust bag from its guide by pulling it from its tray.
-
Dispose the full dust bag.
-
Holding its tray, push the new dust bag into the bag holder. Ensure that it is fully seated.
-
Place back the dust bag holder into its place in the dust container.
-
Close the upper cap of the appliance.

WARNING: Do not force the top lid to close it, otherwise the plastic parts can be damaged.

WARNING: Dust bags provided from locations other than the authorized dealers and services are not original. Such dust bags have a lesser quality and they become torn in a shorter period and render your appliance non-operational. Faults caused by using unauthentic dust bags are not covered by the scope of the warranty.

WARNING: Do not wash the dust bag.
4 Cleaning and care
4.2 Cleaning the filters
After each 5 dust bag replacement (may vary depending on the frequency and area of usage), clean the filters.

WARNING: Do not use appliances producing hot air such as hair dryer or heater to dry the filters.

WARNING: Do not install the filters without completely drying them; otherwise, smell of moisture may occur during use, water can leak from the back of the appliance or the filters may get damaged.

WARNING: Attach the filters into their places after they have dried.
4.2.1 Motor protection filter
- Open the top lid by pressing the button for opening the dust container (12).
- Remove the filter tray by pulling it in the arrow direction.

- Remove the foam filter from the grid inside.

- After washing the motor protection filter under running water, wring it out slightly and leave it to dry (for 24 hours minimum).
4.2.2 HEPA filter
- Press the rear cover opening button to open the cover and remove the HEPA filter by pulling it from its handle.
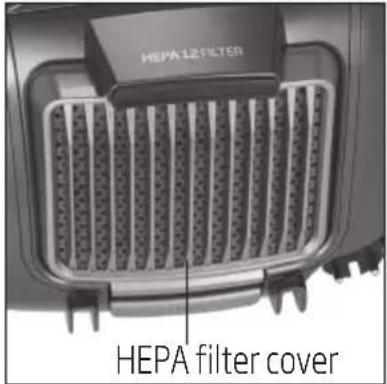
- Shake off the HEPA outlet filter to eliminate the dust on it. After that, you can wash it by holding its clean side under running cool water.
- If you wash the HEPA filter, dry it at room temperature (for 24 hours minimum). Do not use it before ensuring that it is completely dry.
4.3 Storage
If you do not intend to use the appliance for a long time, store it carefully.
• Unplug the appliance.
- Keep the appliance out of the reach of children.
4.4 Handling and transportation
- During handling and transportation, carry the appliance in its original packaging. The packaging of the appliance protects it against physical damages.
- Do not place heavy loads on the appliance or on the packaging. The appliance may get damaged.
- Dropping the appliance may render it non-operational or cause permanent damage.
4 Temizlik ve bakım

4 Чистка и уход

- Da uklonite crijevo (15), zarotirajte poklopac crijeva (14) u suprotnom smjeru od kazaljke na satu i uklonite ga.

3.3 Postavljanje/uklanjanje teleskopske cijevi
3.4 Postavljanje/uklanjanje četke za parket/tepih
- Postavite teleskopsku cijev (3) na četku za parket/tepih (8).
- Povucite teleskopsku cijev (3) s četke za parket/tepih (8) da biste je uklonili.
4 Čišćenje i njega
lsključite i iskopčajte uređaj iz utičnice prije čišćenja.

UPOZORENJE: Nikada nemojte koristiti benzin, rastvarače, abrazivna sredstva za čišćenje, metalne predmete ili grube četke da čistite uređaj.

- Izvadite vreću za prašinu iz spremnika za prašinu tako što ćete povući prema gore.

-
Izbacite punu vreću za prašinu.
-
Držeći za tas, stavite novu vreću za prašinu u držač za vreću. Uvjerite se da je u potpunosti nalegla.
-
Vratite nazad držač za vreću za prašinu na njegovo mjesto u spremnik za prašinu.
-
Zatvorite gornji poklopac uređaja.

UPOZORENJE: Nemojte na silu zatvarati gornji poklopac, u suprotnom plastični dijelovi se mogu oštetiti.

UPOZORENJE: Vreće za prašinu koje su nabavljene na drugim mjestima a ne kod ovlaštenih trgovaca i servisa, nisu originalne. Takve vreće za prašinu imaju manji kvalitet i pocijepaju se u kraćem periodu i čine vaš uređaj neoperativnim. Kvarovi prouzrokovani korištenjem neoriginalnih vreća za prašinu nisu obuhvaćeni garancijom.

- Nakon pranja filtera za zaštitu motora pod mlazom vode, lagano ga ocijedite i ostavite da se osuši (minimalno 24 sata).
4.2.2 HEPA filter
- Pritisnite tipku za otvaranje stražnjeg poklopca da otvorite poklopac i uklonite HEPA filter tako što ćete povući za njegovu ručku.
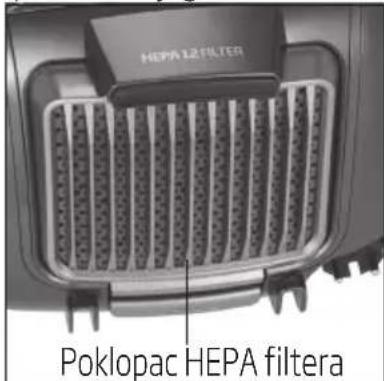
- Protresite HEPA izlazni filter da biste odstranili prašinu s njega. Nakon toga, filter možete oprati držeći njegovu čistu stranu pod mlazom hladne vode.
- Ako perete HEPA filter, osušite ga na sobnoj temperaturi (minimalno 24 sata). Nemojte koristiti filter prije nego se uvjerite da je popuno suh.
4.3 Skladištenje
Ako ne namjeravate koristiti uređaj tokom dužeg vremena, pažljivo ga uskladištite.
• Isključite uređaj iz utičnice.
• Držite uređaj van dohvata djece.
4.4 Rukovanje i transport
- Za vrijeme rukovanja i transporta, nosite uređaj u njegovom originalnom pakovanju. Pakovanje uređaja štiti uređaj od fizičkih oštećenja.
- Nemojte stavljati teške terete na uređaj ili na pakovanje. Uređaj bi se mogao oštetiti.
- Pad uređaja može uzrokovati da uređaj ne radi ili će uzrokovati trajno oštećenje.

- Za uklanjanje creva (15) rotirajte poklopac creva (14) u smeru suprotnom od kretanja kazaljki na satu da biste ga uklonili.

3.3 Postavljanje/uklanjanje teleskopske cevi
- Povežite teleskopsku cev (3) sa drškom (1).
- Povucite teleskopsku cev (3) sa drške (1) da biste je uklonili.
- Za podešavanje dužine teleskopske cevi, gurnite bravicu za podešavanje teleskopske cevi (4) u smeru strelice i povucite je od kraja.

3.4 Postavljanje/uklanjanje četke za parket/tepih
- Povežite teleskopsku cev (3) sa četkom za parket/tepih (8).
- Povucite teleskopsku cev (3) sa četke za parket/tepih (8) da biste je uklonili.
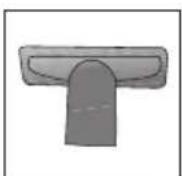
Pogodan za čišćenje površina koje je teško očistiti, kao što su oblasti ispod kauča i nameštaja.
Četka za prašinu
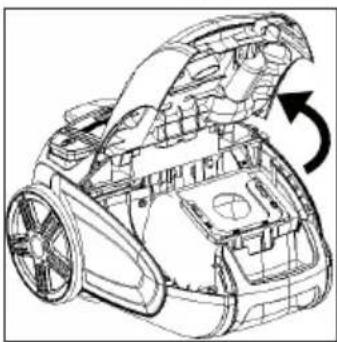
- Izvadite kesu za prašinu iz posude za prašinu povlačenjem nagore.
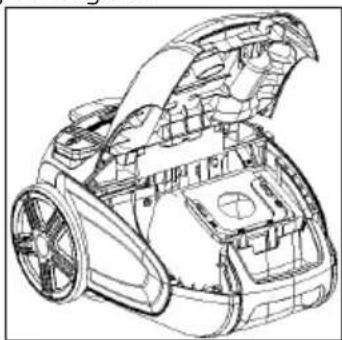
-
Odložite napunjenu kesu za prašinu.
-
Držeći za uložak, gurnite novu kesu za prašinu u držač za kesu. Proverite da li je u potpunosti nalegla.
-
Postavite držač kese za prašinu na mesto u posudi za prašinu.
-
Zatvorite gornji poklopac uređaja.

UPOZORENJE: Nemojte da zatvarate gornji poklopac na silu jer se plastični delovi mogu oštetiti.

UPOZORENJE: Kese za prašinu koje se ne nabavljaju kod ovlašćenih prodavaca i servisa nisu originalne. Takve kese za prašinu su nižeg kvaliteta i mogu se pocepati za kraći period čime što dovodi do toga da vaš uređaj bude van funkcije. Kvarovi izazvani korišćenjem neoriginalnih kesa za prašinu nisu pokriveni garancijom.

UPOZORENJE: Nemojte da perete kesu za prašinu.
- Nakon pranja filtera za zaštitu motora pod vodom, iscedite ga blago i ostavite ga da se osuši (minimalno 24 časa).
4.2.2 HEPA filter
- Pritisnite dugme za otvaranje zadnjeg poklopca da biste otvorili poklopac i uklonite HEPA filter povlačenjem sa drške.
4.4 Prenos i transport
- Tokom prenosa i transporta, nosite aparat u njegovom originalnom pakovanju. Pakovanje aparata ga štiti od fizičkih oštećenja.
- Nemojte stavljati teške predmete na aparat ili njegovo pakovanje. Aparat se može oštetiti.
- Ako vam aparat ispadne, to može izazvati trajno oštećenje, odnosno aparat može postati nefunkcionalan.
HEPA فيلتر 4.2.2
4.2 نظافت فيترها
جدا کنید.
- ن آن به
سمت بالا آزاد کنید.

Libya گرد و خاک
olerance that he is younger, where questions have difficulty in reading her own words.
• ولBARKIE.
• للسجاد.
التشغيل 3.6
VCC 7324 WI
VCC 7324 E
AR | FA
beko
01M-8835353200-3217-05
01M-8835473200-3217-05
- PLEASE READ THIS MANUAL FIRST
- MEANINGS OF THE SYMBOLS
- CONTENTS
- 1 IMPORTANT SAFETY AND ENVIRONMENTAL INSTRUCTIONS
- 1.1 GENERAL SAFETY
- 1.2 COMPLIANCE WITH THE WEEE DIRECTIVE AND DISPOSAL OF WASTE PRODUCTS
- 1.3 PACKAGE INFORMATION
- 2 YOUR VACUUM CLEANER
- 2.2 TECHNICAL DATA
- 3 USAGE
- 3.1 INTENDED USE
- 3.2 ATTACHING/REMOVING THE HOSE
- 3.3 ATTACHING/REMOVING THE TELESCOPIC TUBE
- 3.4 ATTACHING/REMOVING THE PARQUET/CARPET BRUSH
- 3.5 ADJUSTING THE PARQUET/CAR- PET BRUSH
- 3.6 OPERATION
- 3.6.1 ADJUSTING THE SUCTION POWER
- 3.6.2 DUST INDICATOR
- 3.7 ACCESSORIES
- CREVICE TOOL
- DUST BRUSH
- 3.8 SWITCHING OFF THE VACUUM CLEANER AND PARKING FEATURE
- VERTICAL PARKING FEATURE
- HORIZONTAL PARKING FEATURE
- 4 CLEANING AND CARE
- 4.1 REPLACING THE DUST BAG
- 4.2 CLEANING THE FILTERS
- 4.2.1 MOTOR PROTECTION FILTER
- 4.2.2 HEPA FILTER
- 4.3 STORAGE
- 4.4 HANDLING AND TRANSPORTATION
- 4 TEMIZLIK VE BAKIM
- 4 ЧИСТКА И УХОД
- 3.3 POSTAVLJANJE/UKLANJANJE TELESKOPSKE CIJEVI
- 3.4 POSTAVLJANJE/UKLANJANJE ČETKE ZA PARKET/TEPIH
- 4 ČIŠĆENJE I NJEGA
- 4.3 SKLADIŠTENJE
- 4.4 RUKOVANJE I TRANSPORT
- 3.3 POSTAVLJANJE/UKLANJANJE TELESKOPSKE CEVI
- ČETKA ZA PRAŠINU
- 4.4 PRENOS I TRANSPORT
- HEPA فيلتر 4.2.2
- 4.2 نظافت فيترها
- التشغيل 3.6
Brand : BEKO
Model : VCC 7324 WI
Category : Vacuum Cleaner