40CHL630018 - Television Kunft - Free user manual and instructions
Find the device manual for free 40CHL630018 Kunft in PDF.


| Product type | LED TV |
| Brand | Kunft |
| Model | 40CHL630018 |
| Screen size | 40 inches (diagonal) |
| Display resolution | 1920 x 1080 (Full HD) |
| Aspect ratio | 16:9 |
| Refresh rate | 60 Hz |
| Connectivity | 2x HDMI, 1x USB, 1x AV, 1x RF, 1x Headphone |
| Audio output | 2 x 8W speakers |
| Power consumption (operating) | 75 W |
| Power consumption (standby) | < 0.5 W |
| Power supply | AC 100-240V, 50/60Hz |
| Dimensions with stand (WxHxD) | 902 x 557 x 196 mm |
| Dimensions without stand (WxHxD) | 902 x 518 x 76 mm |
| Weight with stand | 6.5 kg |
| Weight without stand | 6.0 kg |
| VESA mount compatibility | 200 x 200 mm |
| Receivers | DVB-T/T2/C |
| Energy efficiency class | A+ |
| Operating temperature | 0°C to 40°C |
| Remote control | Included |
| Wall mountable | Yes |
| Recommended cleaning | Soft dry cloth |
Frequently Asked Questions - 40CHL630018 Kunft
User questions about 40CHL630018 Kunft
0 question about this device. Answer the ones you know or ask your own.
Ask a new question about this device
Download the instructions for your Television in PDF format for free! Find your manual 40CHL630018 - Kunft and take your electronic device back in hand. On this page are published all the documents necessary for the use of your device. 40CHL630018 by Kunft.
USER MANUAL 40CHL630018 Kunft
natural_image
Black-and-white exterior view of a modern flat-screen TV displaying a grand illuminated plaza with a statue on top (no visible text or symbols)
led tvs 40"
40CHL630018
Dear client,
We thank you for purchasing this product.
This appliance was submitted to several laboratorial tests, which certify its quality. To simplify the use of this appliance, this instruction manual has been provided.
The instructions must ensure a quick and safe use.
Please read carefully the instructions and safety measures described in this manual.
We wish our clients great satisfaction in using their new appliance.
INDEX
Warnings....3
Safety instructions....6
Connection and setup....8
Getting Started....9
Using the Remote Control....9
Installing Batteries in the Remote Control....9
Battery Replacement....9
Remote Control.... 10
Basic Operation....12
Turning on and off the TV....12
First Time Setup.... 12
Choosing a TV channel.... 13
Volume adjustment....13
Changing the input source.... 13
Menu Operation....14
How to Navigate Menus.... 14
Channel menu.... 15
Picture menu.... 17
Sound menu.... 18
Time menu....19
Lock menu....19
Option menu.... 20
PVR Function Operation Instruction....21
Hotel mode.... 24
USB Operation.... 24
Important Unique Buttons....28
PROGRAMME GUIDE....28
Channel List....28
Favorite List....28
Teletext.... 29
Troubleshooting Guide....30
Troubleshooting.... 30
Maintenance....31
Warnings
DEAR CUSTOMER:
Before operating, please read all these safety and operating instructions completely and then retain this manual for future reference.
Always comply with the following precautions to avoid dangerous situations and ensure performance of your product.


WARNING:
TO REDUCE THE RISK OF ELECTRIC SHOCK DO NOT REMOVE COVER (OR BACK). NO USER SERVICEABLE PARTS INSIDE. REFER TO QUALIFIED SERVICE PERSONNEL.

The lightning flash with arrowhead symbol, within an equilateral triangle is intended to alert the user to the presence of uninsulated “dangerous voltage” within the products enclosure that may be of sufficient magnitude to constitute a risk of electric shock.

The exclamation point within an equilateral triangle is intended to alert to the presence of important operating and maintenance (servicing) instructions in the literature accompanying the appliance.
REGULATORY INFORMATION
This equipment generates uses and can radiate radio frequency energy and, if not install and used in accordance with the instructions, may cause harmful interference to radio communication. However, there is no guarantee that interference will not occur in a particular installation. If this equipment does cause harmful interference to radio or televis reception, which can be determined by turning the equipment off and on, the user is encouraged to try to correct the interference by one or more of the following measures:
a. Relocate the receiving antenna.
b. Increase the separation between the equipment and receiver.
c. Connect the equipment into an outlet on a circuit different from that to which the receiver is connected.
d. Consult the dealer or experienced radio/TV technician for help.
CAUTION
※ Do not attempt to modify this product in any way without written authorization supplier. Unauthorized modification could void the user's authority to operate this product.
※ Figures and illustrations in this User Manual are provided for reference only an may differ from actual product appearance. Product design and specifications may be changed without notice.
Warnings
IMPORTANT WARNINGS AND CAUTIONS!
Electrical energy can perform many useful functions, but it can also cause personal injuries and property damage if improperly handled. This product has been engineered and manufactured with the highest priority on safety. BUT IMPROPER USE CAN RESULT IN POTENTIAL ELECTRICAL SHOCK OR FIRE HAZARD. In order to prevent potential danger, please observe the following instructions when installing, operating and cleaning the product.
-
Attachments---Only use attachments/accessories specified by the manufacturer. Do not use attachments not recommended by the manufacturer. Use of improper attachments can result in accidents.
-
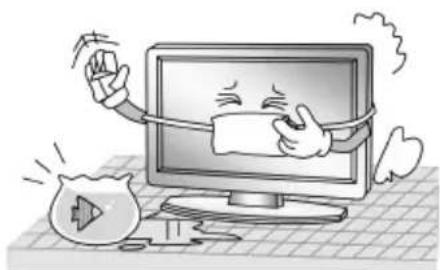
Water--- To reduce the risk of fire or electric shock, do not expose this apparatus to or moisture. The apparatus shall not be exposed to dripping or splashing and that objects filled with liquids, such as vases, shall not be placed on apparatus.
-
Fire or explosion---Do not use or store flammable or combustible materials near the unit. Doing so may result in fire or explosion. Do not place any naked flame sources, such as lit candles, cigarettes or incense sticks on top of the TV set.
Warning: To prevent the spread of fire, keep candles or other open flames away from this product at all times.
-
Ventilation---When you install your TV, maintain a distance of at least 4 inches between the TV and other objects (walls, cabinet sides, etc.) to ensure proper ventilation. Failing to maintain proper ventilation may result in a fire or a problem with the product caused by an increase in its internal temperature.
-
This equipment is a Class II or double insulated electrical appliance. It has been designed in such a way that it does not require a safety connection to electrical earth
-
Power source---This product is intended to be supplied by a listed power supply indicated on the marking label. If you are not sure of the type of power supply to your home, consult your product dealer or local power company.
-
Overloading---Do not overload wall outlets, extension cables, or convenience receptacles on other equipment as this can result in a risk of fire or electric shock.
-
Voltage---Before installing this TV set, make sure your outlet voltage corresponds to the voltage stated on the appliance rating label.
-
Power plug --- Do not defeat the safety purpose of the polarized or grounding-type plug. Most appliances recommend they be placed upon a dedicated circuit; that is, a single outlet circuit which powers only that appliance and has no additional outlets or branch circuits.
Warnings
- The MAINS plug of the apparatus is used as the disconnect device, the disconnect device shall remain readily operable.
- Wall mounting---When mounting the product on a wall, be sure to install the product according to the method recommended by the manufacturer. This is a safety feature.
- Stand--- Do not place the product on an unstable trolley, stand, tripod or table. Placing the product on an unstable base can cause the product to fall, resulting in serious personal injuries as well as damage to the product.
Always place the TV on furniture that can safely support the TV. Make sure the ends the TV do not overhang the edge of the supporting furniture.
- Entering of objects and liquids---Never insert an object into the product through vents or openings. High voltage flows in the product, and inserting an object can cause electric shock and/or short internal parts. For the same reason, do not spill water or liquid on the product.
- Damage requiring service--- This unit should only be serviced by an authorized and properly trained technician. Opening the cover or other attempts by the user to service this unit may result in serious injury or death from electrical shock, and may increase the risk of fire.
- Replacement parts---In case the product needs replacement parts, make sure that the service person uses replacement parts specified by the manufacturer, or those with the same characteristics and performance as the original parts. Use of unauthorized parts can result in fire, electric shock and/or other danger.
- Safety checks---Upon completion of service or repair work, request the service technician to perform safety checks to ensure that the product is in proper operating condition.
- Children ---Do not allow young children to play with the plastic bag that came with the television when you unpacked it. Failure to do so can result in suffocation, causing injury.
- Batteries---The batteries (battery pack or batteries installed) shall not be exposed to excessive heat such as sunshine, fire or the like.
- Antenna ---Install the antenna away from high-voltage power lines and communication cables and make sure it is installed securely. If the antenna touches a power line, contact with the antenna could result in fire, electric shock or serious injury.
- Panel protection--- The panel used in this product is made of glass. Therefore, it can break when the product is dropped or impacted upon by other objects. Be careful not be injured by broken glass pieces in case the panel breaks.
- Operating Temperature: 5°C to 35°C Operating Humidity: ≤80%
Storage Temperature: -15°C to 45°C Storage Humidity: ≤90%
Safety Instructions
IMPORTANT SAFETY INSTRUCTIONS
- Read these instructions.
- Keep these instructions.
- Heed all warnings.
- Follow all instructions.
natural_image
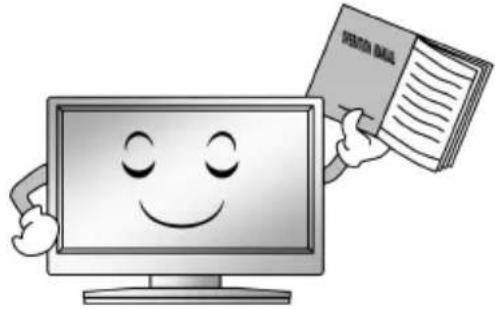
Cartoon illustration of a smiling computer monitor holding an open book (no text or symbols present)- Do not block any ventilation openings.
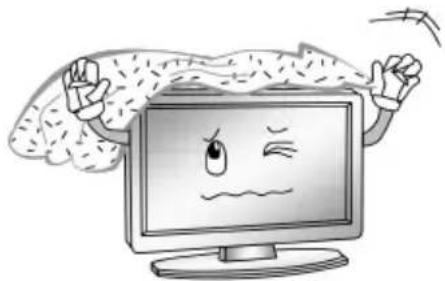
Ventilation should not be impeded by covering the ventilation openings with items such as newspapers, table-cloths, curtains etc.
natural_image
Cartoon illustration of a computer monitor with a sad face and raised fists, symbolizing stress or urgency (no text or symbols present)-
Do not use this apparatus near water.
-
Do not install near any heat source such as radiators, heat registers, stoves, or other apparatus (including amplifiers) that produce heat.
natural_image
Cartoon illustration of a computer monitor with hands holding a document and a money bag, symbolizing online shopping or digital finance (no text present)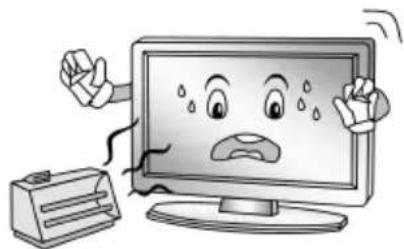
natural_image
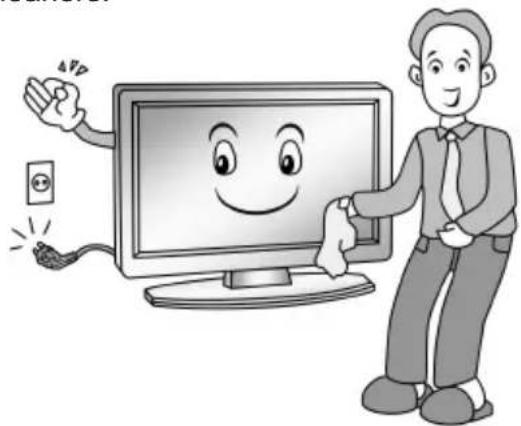
Cartoon illustration of a computer monitor with a sad face and Chinese characters, accompanied by a printer (no text or symbols present)- Clean only with a dry cloth. Unplug this product from the wall outlet before cleaning. Do not use liquid cleaners or aerosol cleaners.
natural_image
Illustration of a smiling computer monitor with a smiley face and electrical plug, accompanied by a person standing beside it (no text or symbols present)Do not defeat the safety purpose of the ngolarized or grounding type plug. A polarized plug has two blades with one wider than other. A grounding type plug has two blades and a third grounding prong. The wide blade or the third prong is provided for your safety. When the provided plug does not fit into your outlet, consult an electrician for replacement of the obsolete outlet.
Safety Instructions
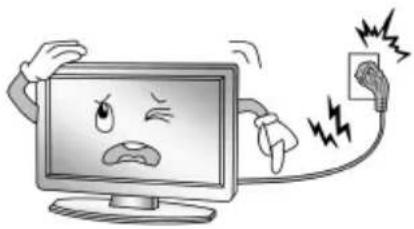
- Protect the power cord from being walked on or pinched particularly at plugs, convenience receptacles, and the point where they exit from the apparat For added protection for this product during a lightning storm, or when it is left unattended and unused for long periods of time, unplug it from the wall outlet and disconnect the cable system.
natural_image
Cartoon illustration of a computer monitor with an angry face and power plug, showing stress or shock (no text or symbols)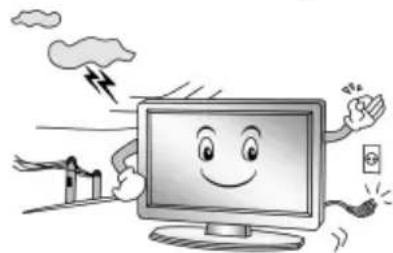
natural_image
Cartoon illustration of a smiling computer monitor with hands and lightning bolts, surrounded by clouds and industrial equipment (no text or symbols)-
Educate children about the dangers of 4. climbing on furniture to reach TV controls.
-
When a cart is used, use caution when moving the cart/apparatus combination to avoid injury from tip-over. Sudden stops, excessive force and uneven floor surfaces can cause the product to fall from the trolley.

natural_image
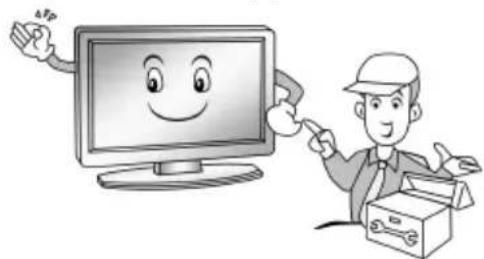
Symbolic icon of a person climbing a ladder inside a circle (no text or symbols)Refer all servicing to qualified service personnel. Servicing is required when the apparatus has been damaged in any way, such as power supply cord or plug is damaged, liquid has been spilled or objects have fallen into the apparatus, the apparatus has been exposed to rain or moisture, does not operate normally, or has been dropped.
natural_image
Illustration of a smiling computer monitor and a worker with a toolbox, no text or symbols present.NOTE:
※ Disposal of this product must be carried out in accordance to the regulations of your authority. Do not dispose of this product with general household waste disposal.
※ Occasionally, a few non-active pixels may appear on the screen as a fixed point of green or red. Please note that this does not affect the performance of your product.
※ Avoid touching the screen or holding your finger(s) against it for long periods of time. Doing so may produce some temporary distortion effect on the screen.
※ It is not recommended to keep a certain still image displayed on the screen for a light as well as displaying extremely bright images on screen, reduce the 'brightness' and 'contrast' when displaying still images.
Connection and setup
Connection Installation
Before the installation and use, please read carefully the relevant content in "Wari and Safety instructions".
Ω: Connect it to your headphone or other audio equipment.
HDMI: Support AV devices with an HDMI connector (such as set top box, DVD digital TV set, etc.). HDMI is also called as high definition multimedia interface, and can transmit digital audio and video signal with one cable.
NOTE:
◆ HDMI 1 (supports ARC function)
ARC: (Audio Return Channel) Adopted in TV output of digital audio, can be conn to the device supporting ARC, transmit the TV sound to the device.
PC: Connect one end of the VGA cable with the VGA port on computer, connected other end of the VGA cable with the VGA port on the TV, and tighten the bolts clockwise on the each end of VGA cable.
NOTE:
When connect to a computer audio output, make sure you connect audio cable the PC/AV/YPbPr audio jacks.
◆ While connecting the 15-pin VGA, please do not insert the plug overexerted, fo the pin might be broken.
SCART: Connect SCART socket input or output from an external device to these
ANT: Used to connect the antenna and receive signals of the external antenna.
CVBS: Connect an AV device that has composite video jacks, such as a VCR of player
Y/Pb/Pr (Component): Connect a device that has component video jacks, such as DVD player.
NOTE:
◆ COMPOSITE VIDEO and COMPONENT(Y/Pb/Pr) share with audio in.
◆ If COMPONENT (YPbPr) and AV works as mini terminal, and shared same audio. Please choose to use a one-to-three audio &video cable.
COMMON INTERFACE: Please insert CI card into the COMMON INTERFACE slot according to the arrow on the CI card.
DIGITAL AUDIO OUTO: Sending the TV's digital audio signal to external audio equipment via the Digital Audio Output port.
USB: Connect a USB Storage device and multimedia file playback.
NOTE:
※ The range of power input for the TV is 100-240V\~ 50/60Hz; Do not connect TV power input port with the power cable out of the above range.
※ Before connecting to an external device, please firstly make sure that the TV the external device have been turned off. When connecting, please make refer to the interface name and the interface colour to connect the signal cable.
※ Please hold the insulated part of the plug when you are unplugging the power do not touch the metallic part of the cable.
Getting Started
Using the Remote Control
When using the remote control, aim it at remote sensor on the television. If there object between the remote control and the remote sensor on the unit, the unit may operate.
◆ Point the remote control at the REMOTE SENSOR located on the television.
- When using this television in a very brightly lit area, the infrared REMOTE CO SENSOR may not work properly.
◆ The recommended effective distance for using the remote control is about 7 me
Installing Batteries in the Remote Control
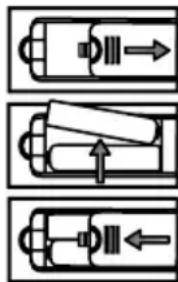
- Open the cover at the back of the remote control.
-
Install two AAA size batteries. Make sure to match
the “+” and “-” ends of the batteries with the diagram inside the compartment. -
Replace the cover.
◆ The battery type used in the remote control is AAA size batteries (not included are accessible and can be replaced.
natural_image
Three schematic diagrams of a battery with internal components and directional arrows, no text or symbols present.Battery Replacement
You will need to install the batteries into the remote control to make it operate the instruction below.
When the batteries become weak, the operating distance of the remote control will greatly reduced and you will need to replace the batteries.
Notes on Using Batteries:
The use of the wrong type of batteries may cause chemical leakage and/or explicit. Please note the following:
◆ Always ensure that the batteries are inserted with the + and - terminals in the direction as shown in the battery compartment.
- Different types of batteries have different characteristics. Do not mix different types
- Do not mix old and new batteries. Mixing old and new batteries will shorten by life and/or cause chemical leakage.
◆ Replace batteries as soon as they do not work.
- Chemicals which leak from batteries may cause skin irritation. If any chemical r seeps out of the batteries, wipe it up immediately with a dry cloth.
- The batteries may have a shorter life expectancy due to storage conditions. Rel the batteries whenever you anticipate that the remote control will not be used for extended period.
◆ The batteries (battery pack or batteries installed) shall not be exposed to excess heat such as sunshine, fire or the like.
CAUTION:
- It may result in an explosion if batteries are replaced incorrectly.
- Only replace batteries with the same or equivalent type.
Remote Control
The buttons of the original remote control are as following:
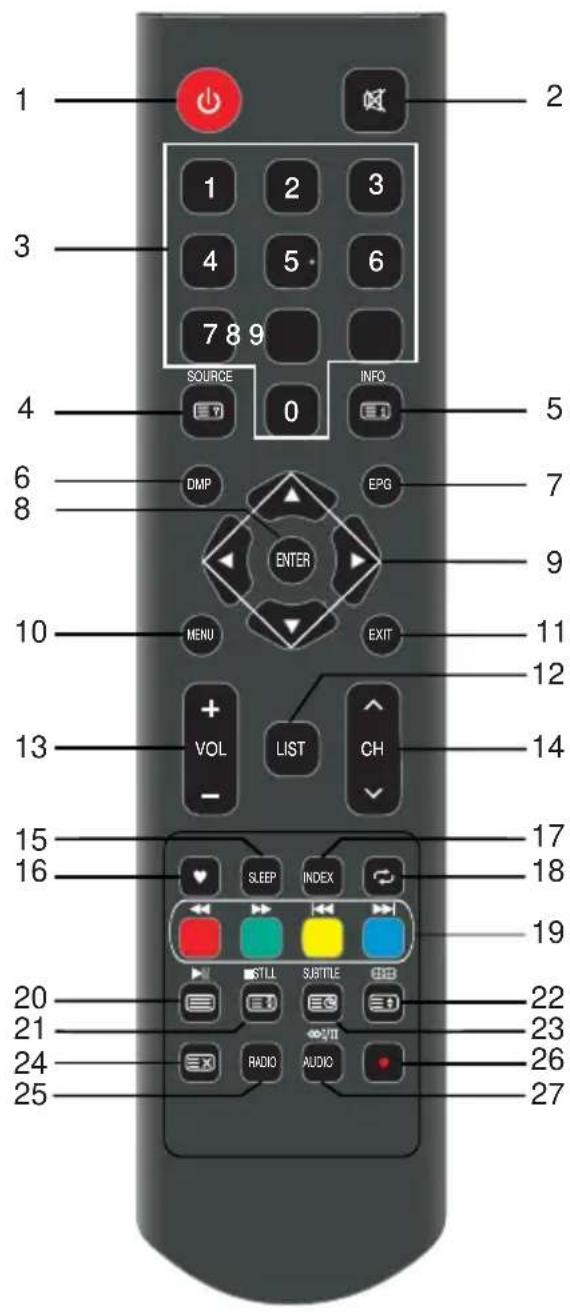
Definition of the buttons on remote control
- ⏻: Power, Press to enter or exit the standby mode.
- ☒: Mute or restore sound.
- NUMBER BUTTONS: Choose channels or password importation.
- SOURCE: Press to select signal source. ?: Reveal the hidden information of some teletext pages.
- INFO: display the current program information on the screen. Go to the index page.
- DMP: Press to switch to the USB source
- EPG: Electronic Program Guide, use in the DTV mode.
- ENTER: Select or confirm menu item.
- ▲/▼/◄/►: Press the direction buttons to select menu options or settings.
- MENU: Press to display/disappear the on screen menus or to quit some operations
- EXIT: Quit the current interface.
- LIST: Press to call up the channel list. Press again to exit it.
- VOL+/VOL-: Press to adjust the volume level up or down.
- CH∧/CH∨: Press to select channels in ascending or descending order.
- SLEEP: Press the button repeatedly to select the desired time to sleep or select off to close the function.
- ♥: Press to display your favourite channel. (You should setup your favorite channels in Program Edit menu).
- INDEX: Change the list by TIMER or CHANNEL. (In PROGRAMME GUIDE menu) Press to enter the Recorded list. (In DTV mode)
- ↩: Return to last viewed program.
Remote Control
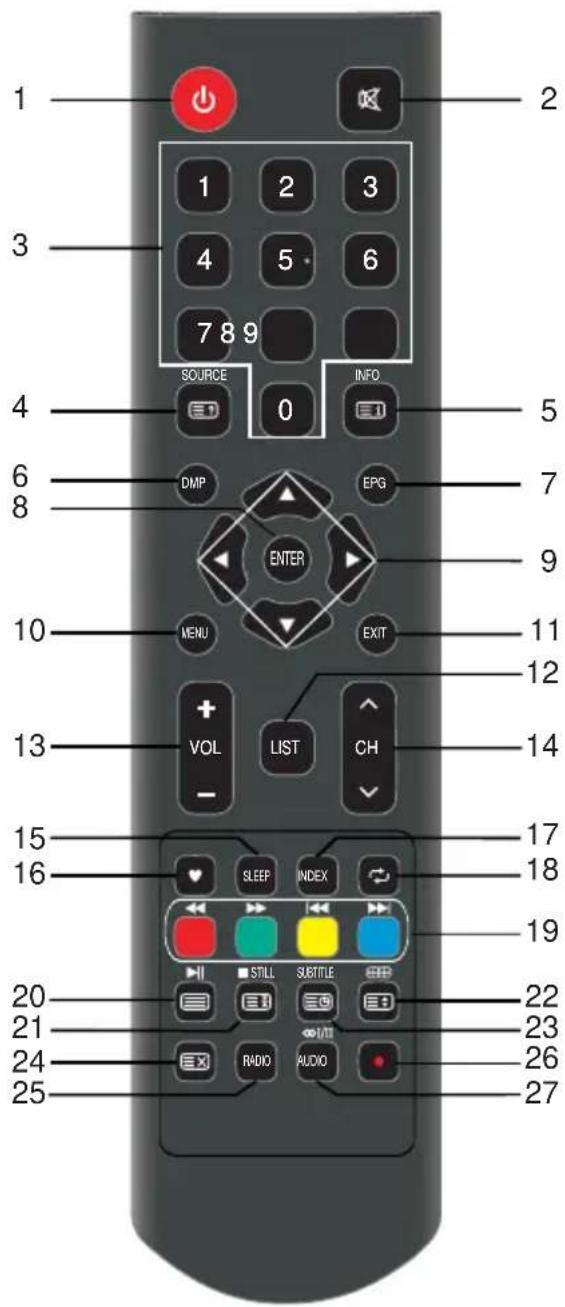
- COLOR BUTTONS: Red/green/yellow/blue key navigation link.
◀: Fast reverse (in USB mode)
▶: Fast forward (in USB mode)
◀: Previous (in USB mode)
▶: Next (in USB mode)
- ▶: Play / Pause (in USB mode).
Enter the Teletext, press again for MIX mode, and press this button again to exit.
- STILL: Freeze or activate the current picture.
■: Stop (in USB/PVR mode).
Hold the teletext page on display, press again to release.
- ☒: Adjust displayable aspect ratio.
Change size of teletext screen in display mode.
-
SUBTITLE: Press to select alternate subtitle language during view/playback of a DTV program. ☐ Press to turn on or turn off subpage.
-
☒ Cancel the teletext but not to exit teletext, press again to exit.
Press ☒ button to start time shift function.
-
RADIO: Press to interchange Radio and program (In DTV mode). DTV programs when there is Radio.
-
●: Press●button to start recording. (In DTV mode).
-
AUDIO ( I/II): Press to select the NICAM modes in Analog TV mode.
Press to select desired audio language in Digital TV Mode.
NOTE:
※ The buttons not mentioned here are not used.
※ All pictures in this manual are only for reference, actual product may differ the pictures.
Basic Operation
Turning on and off the TV
- Turn on the TV
Connect the TV to your mains socket.
If TV has a power switch, turn it on firstly. In standby mode, were button on the remote to turn on the TV.
- Turn off the TV
Press the button on the remote control to enter standby mode.
Do not leave your TV in standby mode for long periods of time. It is best to power cord.
NOTE:
If there is an accident power off, the TV will be in standby mode automatically re-supply the power. To ensure the normal use of the TV, the frequent turning off is forbidden, when there is an accident power off, it is recommended to un power cable from the power socket.
First Time Setup
If this is the first time you run the TV, the Initial Setup Menu will appear in the and the items of this menu also exist in other menus, so you are able to change values after you set them up.
Tips: Make sure that the antenna connection is made.
■ Set you desired language
Press ▲/▼buttons to select the language to be used for menus and message.
■ Select your country
Press the ▲/▼ buttons to select the country you are living in, and then press ▶ button.
■ Select your time zone.
Press the ▲/▼ buttons to select a time zone, and then▶press the button.
■ Select your TV environment.
Press the ▲/▼ buttons to select the Home Mode or Store Mode and then pre button.
• Home is the recommended setting to produce the best energy efficiency. If you to set Store Mode, a message appears asking you to confirm your choice.
■ Select the antenna type (Air or Cable).
Press the ▲/▼ buttons to select the tuning modes and then▶pretonthe (For more detailed information, please refer to Channel menu → Auto Tuning).
■ Auto Tuning
Press the▶button to start the auto searching.
First tuning DTV, press Menu and left arrow button to skip DTV tuning,
Second tuning ATV, press Menu and left arrow button to skip ATV tuning.
NOTE:
- If the TV doesn't receive any channels, please check your aerial connection or country you have selected, and then try an auto search again.
- If the TV just receives some of the channels, it means the aerial's reception isn't good enough and an antenna service is recommended.
Basic Operation
Choosing a TV channel
- Using the +Coh the panel of TV or CH∧/∨ on the remote control. Press CH ∧/∨ to increase or decrease the channel number.
- Using 0-9 digital buttons. You can select the channel number by pressing 0 to 9. Additionally, when TV is in some mode, the TV will work in TV mode and play corresponding channel if any number button is pressed.
- Example To select - channel (e.g. Channel 5): Press 5. To select -- channel (e.g. Channel 20): Press 2 and 0 in a short time.
Volume Adjustment
- Press the +/- on the panel of TV or VOL+/- on the remote control to adjust the volume.
- If you want to switch the sound OFF, press the .
- You can release mute by pressing the increase the volume.
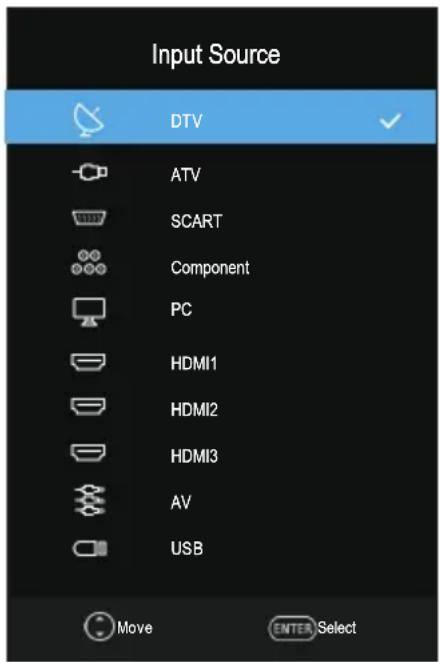
Changing the Input Source
You can select the input source by pressing the SOURCE button on the remote Press the ▲/▼ buttons to cycle through the input source, and press the ENTER but to confirm your choice.
Menu Operation
How to Navigate Menus
Before using the TV follow the steps below to learn how to navigate the menu to select and adjust different functions. The access step may differ depending on selected menu.
- Press the MENU button to display the main menu.
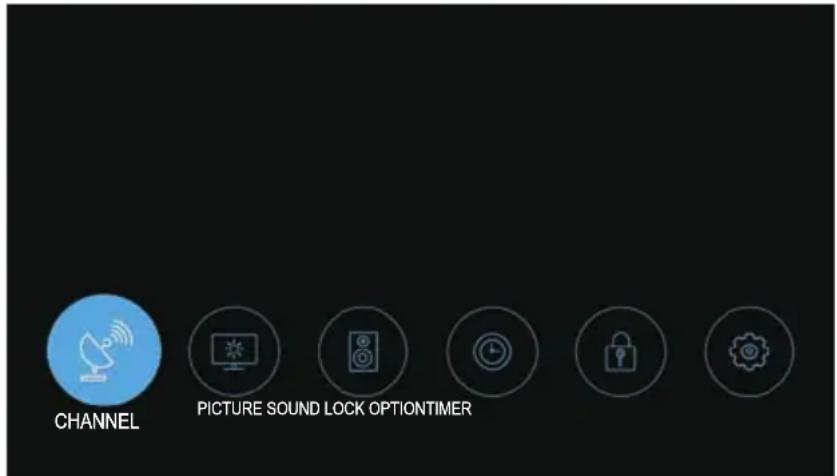
- Press the ◀/▶buttons to cycle through the main menu. You can choose between Channel, Picture, Sound, Time, Lock and Option.
- Press the ENTER button to access the submenu page.
- Press the ▲/▼ buttons to select the preferred option.
- Press the ◀/▶ buttons to adjust the value.
- Press the MENU button to return to the previous menu.
- Press the EXIT button to exit the entire menu.
NOTE:
- When an item in MENU is displayed grey, it means that the item is not avail cannot be adjusted.
- Some items in the menus may be hidden depending on modes or signal sou used.
- Buttons on the TV have the same function as corresponding buttons on the re control. If your remote control is lost or couldn't work, you may use the butto the TV to select menus. This manual focuses on operation of the remote cont
Menu Operation
Channel Menu
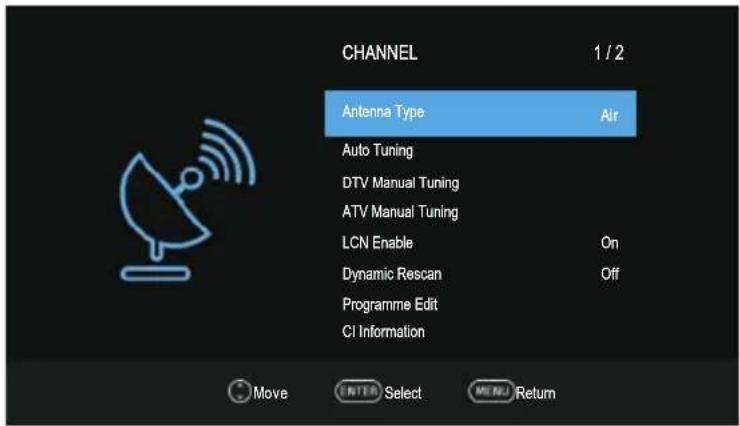
■ Antenna Type: Press the ▲/▼ buttons to select the antenna type.
※ When TV signals is Air.
■ Auto tuning: Select the ENTER button to start Auto Tuning.
- Select the country and tune type for channels.
- The TV will begin memorizing all of the available channels.
Once the progress bar is full, the found channels will be stored and the unit proceed to the search for TV, DTV and Radio.
If you press the MENU button in TV searching, the Channel Tuning will skip searching as the suggestive picture shows.
■ DTV Manual Tuning: Press the ENTER button.
Press the ◀/▶ button to select channel, then press the ENTER button to search. When a channel is found, the searching process will stop, the channel will be with current channel number.
If the program is not your expected one, please press the ◀/▶ button to conti the searching. Press the EXIT button to exit.
※ When TV signals is Cable.
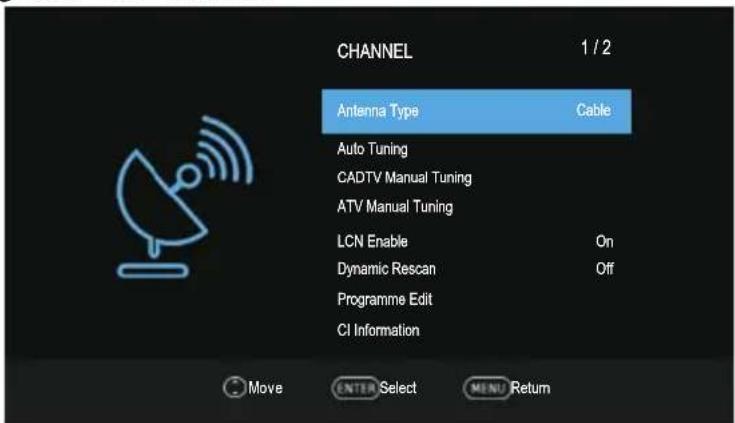
■ Auto Tuning: Select the ENTER button to start Auto Tuning.
- Select the county and tune type for channels.
- Adjust the Cable Scan Menu.
-Scan Type: Scans for all active broadcast station channels and stores them the TV.
Menu Operation
If you select Network Search, you can set up the frequency, Network ID an symbol manually by pressing the button on the remote control. Quick Scan o search DVBC digital programmes and cannot search for ATV programmes.
If you select Full Scan, the Auto Tuning will search through all or appointed frequencies to find available channels.
– Frequency: Enter a user-defined frequency. (Differs in each country)
- Network ID: Select the Network ID setting Mode among Auto or manual.
Network is Manual, you can set up Network ID using the numeric buttons.
When you are satisfied with your setting, press ENTER button.
- Symbol: Selects the Symbol setting mode among Auto or Manual. When Symbol is Manual, you can set up Symbol using the numeric buttons.
- The TV will begin memorizing all of the available channels.
■ CADTV Manual Tuning
Frequency, Symbol and Modulation are needed in order to add a programme correctly in DVB cable mode. Please inquire of the cable service provider about correct values.
■ ATV Manual Tuning: Manual store for ATV channels.
Storage To 1: Store the searched channel to 1 (you can adjust the channel by ◀/▶).
Sound_Standard: Select the sound Standard.
Video Standard: Select the Video Standard.
Current CH 1: Select the current channel.
Search: Press the ◀ button to search down from the current frequency, and the ▶ button to search up.
Fine-Tune: Adjust the frequency of the channel finely.
Press the red button to save it. Press the EXIT to exit.
■ LCN Enable
Press the ENTER button to select On or Off.
■ Dynamic Rescan (In DTV mode)
Switch the Dynamic Rescan function On or Off.
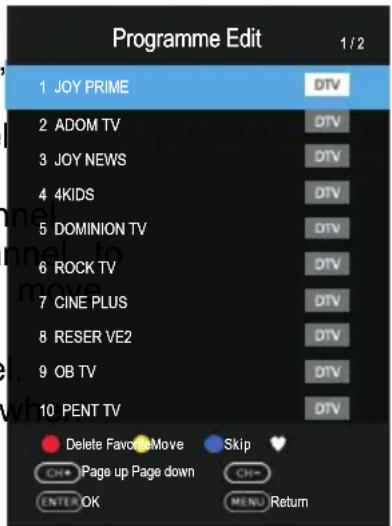
Programme Edit
Press the▲/▼ buttons select the Programme Edit, then press the ENTER button to enter sub-menu. First press the▲/▼ buttons to highlight the channel you want to delete, skip, or Move, then:
Delete: Press the RED button to delete the chan Move: Press the YELLOW button to set the cha moving state, and then press the ▲/▼buttons to it to the position you want to put.
Skip: Press the BLUE button to skip the channel (Your TV set will skip the channel automatically using CH+/- to view the channels.)
Favorite: Press the button to set the favourite channel. (One or more groups can be select.)
Menu Operation
■ CI Information (In DTV mode)
This function enables you to watch some encrypted services (pay services). Please insert CI card into the PCMCIA slot according to the arrow on the C NOTE:
◆ The function can only be gotten when CI slot is available.
It is possible for you to change CI (Common Interface) menu screen and by consulting your dealer.
◆ Please do not insert or pull out the CI card when power on.
- Do not insert or pull out the CI card frequently so as to avoid any dama TV and the CI card.
◆ During initialization of the CI card, please don't operate the TV.
■ Signal Information(Only available when there is signal under DTV)
Press the ▲/▼ buttons to select the Signal Information, then press the ENTER button to check the detailed information.
Picture Menu
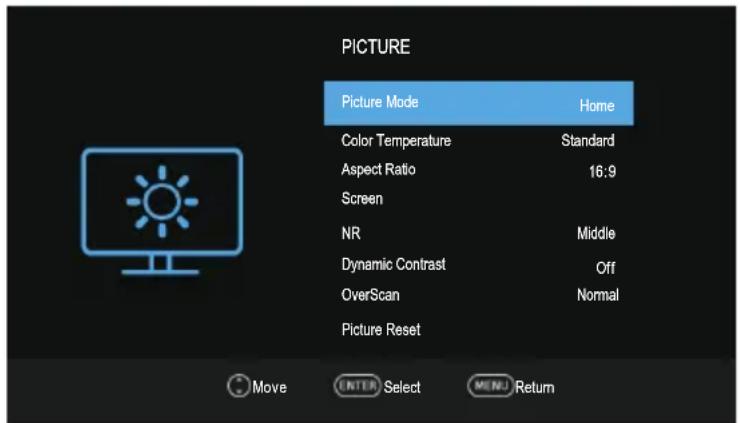
■ Picture Mode: You can select the type of picture which best corresponds to your viewing requirements. Contrast, Brightness, Color, Sharpness, and Tint (NTSC) can be adjusted when the picture mode is set to User.
- Contrast: Adjust the white level of the picture.
- Brightness: Adjust darkness of black sections in the picture.
- Color: Adjust the colour intensity of the picture.
- Sharpness: Object edges are enhanced for picture detail.
- Tint: Adjust the hue of the picture (valid only for NTSC signals).
■ Color Temperature: Select the colour temperature that you feel comfortable.
■ Aspect Ratio: You can select the picture size which best corresponds to your viewing requirements.
■ Screen (Valid only in the VGA channel)
- Auto Adjust: To adjust the all PC setting automatically.
- Horizontal Position: To adjust the horizontal placing of the image.
- Vertical Position: To adjust the vertical placing of the image.
- Size: To adjust the screen size.
- Phase: To adjust the internal signal phase.
■ NR: Reduces screen noise without compromising video quality.
■ Dynamic Contrast: Adjusts the contrast to the optimal level according to the image's brightness.
Menu Operation
■ OverScan (In DTV mode): The picture reproduction rate is adjusted.
■ PC Mode (In HDMI mode): Switch PC Mode function On or Off.
■ Game Mode (In HDMI mode): Switch Game Mode function On or Off.
■ Picture Reset: Reset all picture settings to the factory defaults.
Sound Menu
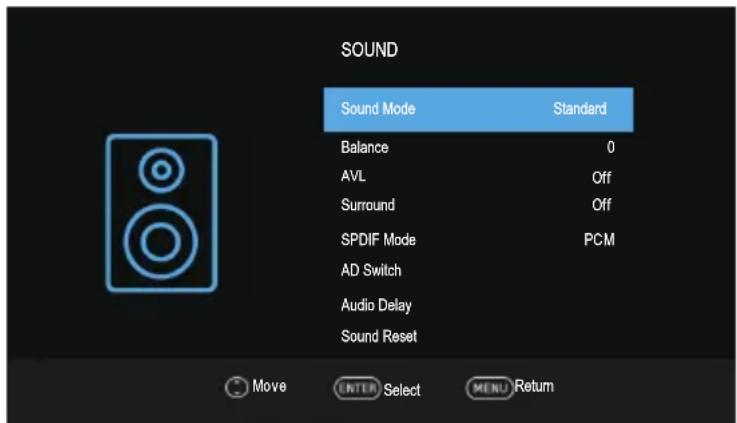
■ Sound Mode: You can select a sound mode to suit your personal preferences. Treble and Bass can be adjusted when the sound mode is set to User.
- Treble: Adjust the high frequency sounds.
- Bass: Adjust the low frequency sounds.
■ Balance: Adjust the level of sound coming from the left and right speakers.
■ AVL(Auto Volume Level): Auto Volume automatically remains on the same level of volume if you change programmes. Because each broadcasting station has own signal conditions, volume adjustment may be needed every time when the channel is changed. This feature allows users to enjoy stable volume levels by making automatic adjustments for each program.
■ Surround: The surround sound can be enabled or disabled according to the needs to experience unique audio effects.
■ SPDIF Mode: You can select a desired SPDIF Output mode.
■ AD Switch (In DTV mode): * this is only available in some countries, mainly in North America and Europe. This is an auxiliary audio function that provides additional audio track for visually challenged persons. This function handles the Audio Stream for the AD (Audio Description), when it is sent along with the audio from the broadcaster.
■ Audio Delay: Correct audio-video sync problems, when watching TV and when listening to audio output using an external device such as an audio receiver (0ms\~250ms).
■ Sound Reset: Reset all sound settings to the factory defaults.
Menu Operation
Timer Menu
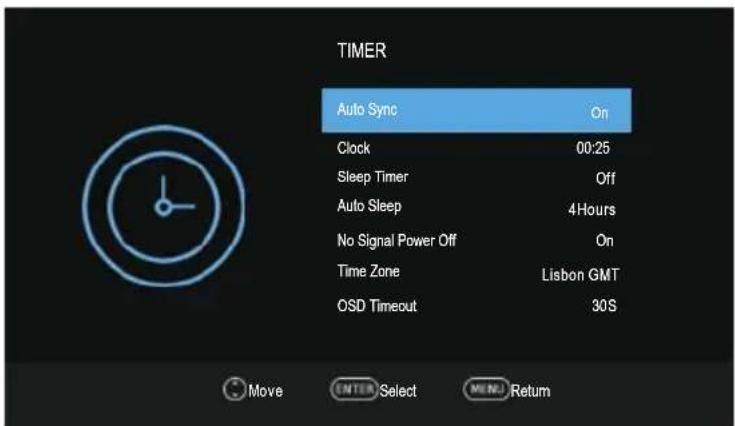
■ Auto Sync: If set it to ON, the TV will sync the local clock according to the DTV broadcasting time automatically.
■ Clock: Display either the DTV signal stream time or set the time manually.
Sleep Timer: Sleep Timer switches the TV to standby after a defined period of time. To cancel the Sleep Timer, set to "Off".
■ Auto Sleep: Select the Auto Sleep time you want. The TV will enter into standby mode automatically when there is no any operation in set time.
■ No Signal Power Off: Switch No Signal Power Off function On or Off.
■ Time Zone: Select your time zone (When the Auto Sync is set On, the Time Zone can be adjusted).
■ OSD Timeout: Select the time in seconds (15s, 30s, 60s, off) that you want On-Screen Menu remains display after your last operation.
Lock Menu
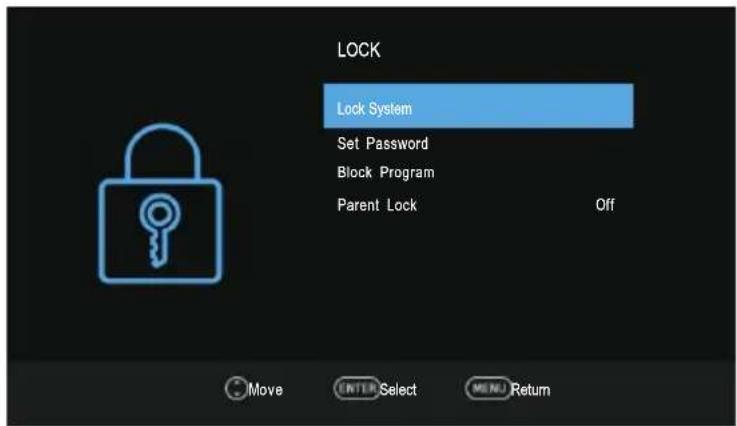
■ Lock System: The feature can prevent unauthorized operating the TV set, unless entering 4-digit password.
The default password is 0000.
NOTE:
If you forget your password, the super password of 1225 still is valid.
Menu Operation
■ Set Password: Press the ENTER button to access the submenu.
You can set your private password. Press the number buttons on the remote control to set the new password. When the new password has been input twice, the setting is finished successfully.
■ Block Programme (In ATV/DTV mode): Press the YELLOW button to lock the available channel you want. Press the YELLOW button again to unlock it. To a locked channel, enter your 4 digit password number when input screen disp
Parent Lock (In DTV mode): This feature can prevent children watching adult's TV programmes, according to the rating limit set. This function appears accord to information from broadcasting station. Therefore if the signal has incorrect information, this function does not operate.
Option Menu
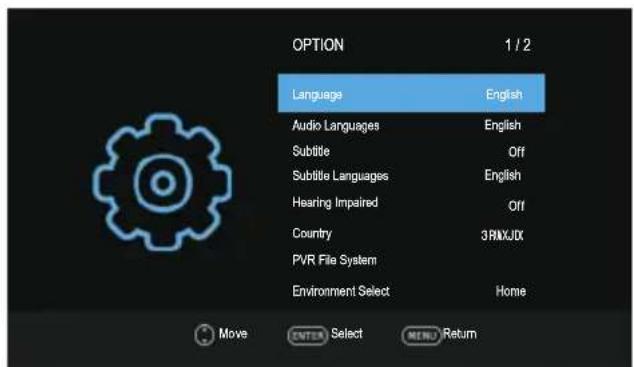
■ Language: Select your preferred On Screen Display language.
■ Audio Languages: Select you're preferred audio language. (Available for digital channels if multiple audio languages are broadcasted.)
■ Subtitle: Switch the Subtitle function On or Off.
■ Subtitle Languages: Select your preferred subtitle Language. (Available for digital channels if multiple subtitle languages are broadcasted.)
■ Hearing Impaired: When hearing Impaired is ON, the TV screen will give some information to the people whose hearing are impaired when Hearing Impaired is Off, the information will be hidden.
■ Country: Display the current country.
■ Environment Select: Select the Environment Select Home or Store. Store mode is the optimal setting for store environment.
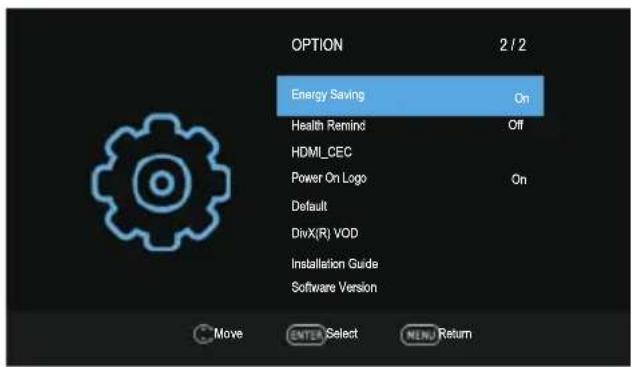
■ Energy Saving: When the Environment Select is set Home, the Energy Saving can be adjusted. Switch the Energy Saving function On or Off.
■ Health Remind: Switch the Health Remind function On or Off. While Health Remind
■ HDMI_CEC: Press▲/▼buttons to select HDMI CEC, press ENTER to enter sub-menu.
- HDMI_CEC: Press ENTER buttons to switch the HDMI CEC on or off.
- ARC: To enable the audio through an AV receiver using HDMI (ARC). Pre- ENTER buttons to switch the HDMI ARC function on or off.
Menu Operation
- Auto Standby: When the user turns off the TV, all active CEC enabled devices on the HDMI input will go to standby. Press ENTER buttons to switch the a standby function on or off.
- Auto Power On: Pushing the "Play" button on the CEC enabled device with command the device to play, turn the TV on, and the HDMI input, that the connected to, will become the active input device for the TV.
- Device List: Display devices that are connected to TV.
■ Power On Logo: Switch the Power On Logo function On or Off.
■ Default: Restore the system settings to the factory default. When the restore is complete, the TV will enter standby mode.
DivX(R) VOD: When entering this option, you can view the registration code relevant information about the DivX ®.
■ Installation Guide: This is an installation guide to help you to setup the TV.
■ Software Version: Display current software version information.
PVR Function Operation Instruction
How to use PVR function?
Preparing
① Plug USB flash drive or USB hard disk into USB slot on the left hand side set.
NOTE:
- USB disk should have capacity at least 512MB.
- USB device must support USB 2.0 high-speed specification.
② Turn TV in to DTV mode by pressing SOURCE button on remote, the PVR function can only be used in DTV mode;
③ Then press MENU button on the remote to bring the main menu up, press button to highlight Option menu, and then press the ENTER button;
④ Press ▲/▼ buttons to highlight PVR File System (In DTV mode), then press ENTER button to go into submenu.
Setting
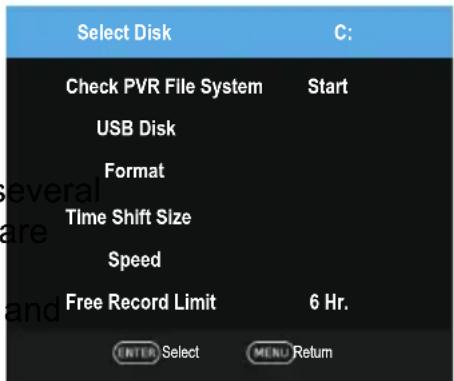
- Select Disk: Select a disk used for PVR.
NOTE:
- Some models have two USB input and a disk can be used when two USB devices are plugged in.
- Check PVR File System: Check the disk test the speed of the system.
- USB Disk: USB activated or not.
- Format: Format USB disk.
Menu Operation
NOTE:
- Before formatting, please back up all important files.
-
During the device formatting, do not disconnect the device or turn off the your USB device can't be formatted or fail to be checked by the system, it the device isn't compatible with the TV or is damaged. The larger USB device take longer time to format please be patient until the formatting finishes.
-
Time Shift Size: You can select the memory size for Time Shift function.
- Speed: Press ENTER to check the speed of the storage device.
- Free Record Limit: Select the recording duration.
□ Recording
There are two types of recording: Instant Recording and Schedule Recording.
Instant Recording can record the current TV programmes, while Schedule Record can start at a specified time and record the TV programmes automatically on the time and duration you choose.
- Instant Recording
① Select the channel you want, then pressston to start recording.
② Press ● button to display/hide the recording menu.
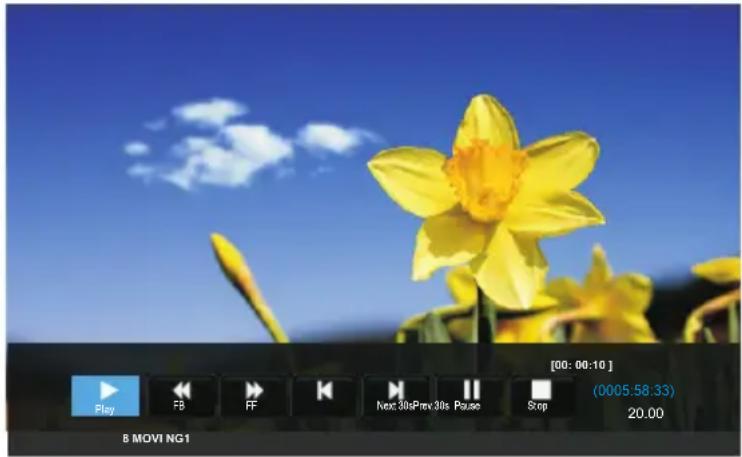
③ It will keep recording until (stop) button is pressed or the memory is full. A menu will come up on the screen when TV start recording.
- Schedule Recording
The unit is able to do schedule recording when TV is turned on or in stand
① Press EPG button to bring up EPG menu.
② Then press red button will active timer recording submenu. You can set up and record mode in the menu.
③ Press ▲/▼ button to highlight different setting and press ◀/▶ button to cl setting. After you have finished adjusting settings to desired options, press tl ENTER button to save the scheduled recording.
NOTE:
- You can set up several schedule programmes to record. To do this you will press the yellow button in the EPG mode which will show you the entire Different schedules should not overlap and there must be at least a 1 minute gap to set up between two schedules.
Menu Operation
- When recording starts in standby mode, the front indicators will change colour and there will be no picture or sound from the unit. You'dantpress turn on the screen.
□ Playing the Recorded Programmes
Option1:
After recording has finished, press the INDEX button to display the Recorded lis
① Press the ▲/▼ button to select the recorded file, and then press the ENTER button to play the file.
② Press the red button to delete the file you no longer require.
③ Press the EXIT button to quit the menu.
Option2:
Also you can play the recorded programme in USB mode.
① Press SOURCE button to display the input source menu.
② Press ▲/▼ button to highlight USB, then press ENTER.
③ Use the ◀/▶ button to select MOVIE, then press ENTER.
④ Use the arrow buttons and ENTER button to enter the desired disk.
⑤ Use the arrow buttons and ENTER button to open the folder.
⑥ Use the arrow buttons to highlight the file. Use the ENTER button to mark or unmark a file. Press button to play the selected files. If no file is marked, all the files in the folder will be played in sequence after ▶you press button.
⑦ Press the ■ button to stop the playing file.
⑧ Press the EXIT button to return to the USB main menu screen.
☐ Time Shift Function
This function allows the TV to automatically record live TV and make it availab viewing at any time. With the Time shift turned on, you may rewind normal TV viewing at any time without missing any of the live broadcast.
Press the button to activate Time Shift function. The TV stores the channel from the point of view you want to record.
![Play FB FF Next 30s/Prev.30s Pause Stop [-00:00:06/00:10:0 0] 8 MOVI NG1 20,00](/content/2026/05/835793/images/b6ef736b967f1272ec601cfa18d14827078a7ae0bc60ccef8cc084bfbc5f8068.jpg)
Menu Operation
If an USB device dedicated to recording is disconnected, Time Shift files that we saved will automatically be deleted.
Hotel Mode
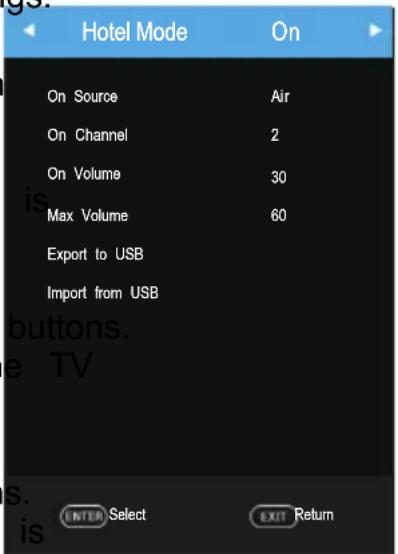
Press the SORCE button to display the Source Menu, then press ⏻2⋯0⋯1⋯2 to enter into the Hotel Mode to adjust the relative settings.
- Hotel Mode
Press the▲/▼buttons to select Hotel Mode, and then press ENTER button to set On or Off.
NOTE:
◆ The following settings work only when Hotel Mode set to be On.
- On Source
Set the default signal source by pressing the ◀/▶ (The default signal source will be displayed when this is turned on.)
- On Channel
Set the default channel by pressing the ◀/▶ button (The default channel will be displayed when the TV turned on.).
- On Volume
Set the default volume by pressing the ◀/▶ buttons. (The default volume is the volume when the TV is turned on. Remember the default volume should be less the maximum volume).
- Max Volume
Set max volume by pressing the ◀/▶ buttons. When the max volume is lower the default volume, the max volume is the priority.
- Export to USB
You can export all current channel information (including channel number, channel name, frequency, etc.) into the U disk, as the channel information backup for this
- Import from USB
If you cannot restore the initial channel information after sort, move, skip, lock e: operations, you can import the channel information from the USB.
USB Operation
- First, insert a USB memory device into the USB port.
- Press the SOURCE button to call up the signal source selection menu. Use the to highlight USB, and the press ENTER button to access the USB mode. (Altern Press the DMP button on the remote control to enter the USB mode)
- You may also use the signal source selection menu to exit from the USB mod
NOTE:
◆ Special USB device may be not or well supported.
◆ USB max. Load: DC5V 500mA.
Menu Operation
• The formats supported
| Media | File Ext. | Codec | Remark | |
| Video | Audio | |||
| Movie | .mpeg, .mpg | MPEG1/2,MPEG4,VC1 | MPEG1/2Layer1,MPEG1/2Layer2,MPEG1/2Layer3,AAC,AC3,EAC3,HEAAC | 1.Max resolution 1080P 30fps2.MPEG-4 V2 not support |
| .vob, .dat | MPEG1/2 | |||
| .ts, .tp, .trp | MPEG1/2,H.264,MVC,VC1,HEVC | |||
| .avi | MPEG1/2,MPEG4,H.263, H.264, VC1XviD | MPEG1/2Layer1,MPEG1/2Layer2,MPEG1/2Layer3,WMA,AAC,AC3,HEAAC | ||
| .mp4 , .mov | MPEG1/2,MPEG4,H.263,H.264,HEVC | MPEG1/2Layer3,AAC,AC3,EAC3,HEAAC | ||
| .mkv | MPEG1/2,MPEG4,H.263,H.264,VC1,HEVC, | MPEG1/2Layer1,MPEG1/2Layer2,MPEG1/2Layer3,AAC,WMA,AC3,HEAAC | ||
| .flv | H.264,VC1 | MPEG1/2Layer3,AAC,HEAAC | ||
| .asf | MPEG1/2,MPEG4,H.264,VC1, | MPEG1/2Layer1,MPEG1/2Layer2,MPEG1/2Layer3,WMA | ||
| Music | .mp3 | -- | MPEG1/2 Layer1MPEG1/2 Layer2MPEG1/2 Layer3 | Max Bit Rate 384Kbps |
| .m4a | -- | MPEG1/2 Layer3AAC | ||
| .wav | -- | MPEG1/2 Layer1MPEG1/2 Layer2MPEG1/2 Layer3IMA-ADPCM | ||
| .aac | -- | AAC | ||
| Photo | .jpg,jpeg | Progressive JPEG | Max Resolution: 1024768 | |
| Baseline JPEG | Max Resolution:15360×8640(1920x8 x 1080x8) | |||
| .bmp | -- | Max Resolution: 960x6400 | ||
Menu Operation
| .png | Non-Interlaced | Max Resolution: 960€6400 | |
| Interlaced | Max Resolution:1200×800 | ||
| Text | .txt | TM Player | File Size: Max 1MB |
| NOTE:◆ Special algorithm documents may not be or well be supported by the Media.◆ The Media supports the format mentioned above, if the file format is not supported, change it to the given format. | |||
NOTE:
◆ Special algorithm documents may not be or well be supported by the Media.
- The Media supports the format mentioned above, if the file format is not supported, change it to the given format.
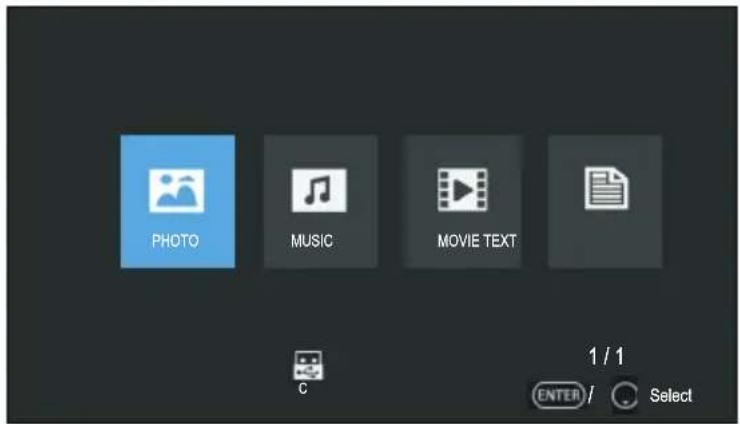
- Main Operating Interface
- Basic operation
- Use the ◀/▶ buttons to select PHOTO, MUSIC, MOVIE or TEXT. Press E button enter into sub-menu.
- Use the arrow buttons and ENTER button to enter the desired disk. Press ENTER to open the folder.
- Use the arrow buttons to highlight the file. Use the ENTER button to mark unmark a file. Press button to play the selected files. If no file is marked, a files in the folder will be played in sequence after you press button.
- Press th■ to stop the playing files.
- Press EXIT button to return to the previous menu and exit menu to quit. When playing Photo files:
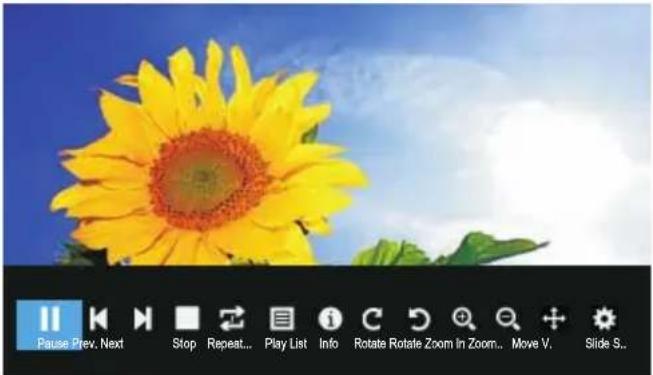
Press the INFO/ENTER button on the remote control to display the on-screen too
* Use the ◀/▶ buttons, then press ENTER to select a function such as Previous, Next, Rotate, Enlarge from the on-screen toolbar.
*Press ■ or EXIT buttons to exit playback & go back to file list page.
Menu Operation
When playing Music files:
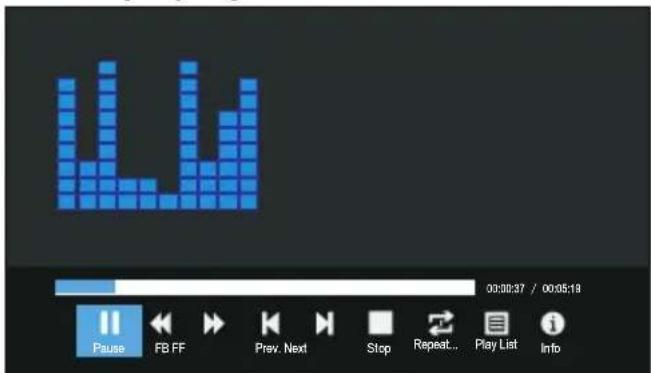
* Use the ◀/▶ buttons, then press ENTER to select a function such as Previous, Next, play, pause the on-screen toolbar.
*Press ■ or EXIT buttons to exit playback & go back to file list page.
When playing Movie files:
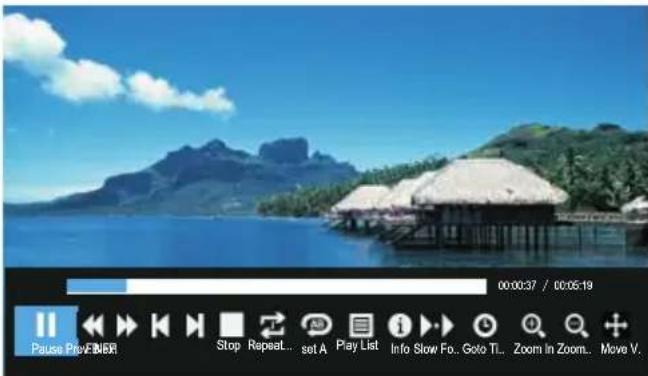
Press the INFO/ENTER button on the remote control to display the on-screen too * Use the ◀/▶ buttons, then press ENTER to select a function such as play, pause, previous file, next file, from the on-screen toolbar.
*Press ■ or EXIT buttons to exit playback & go back to file list page.
When playing Text files:
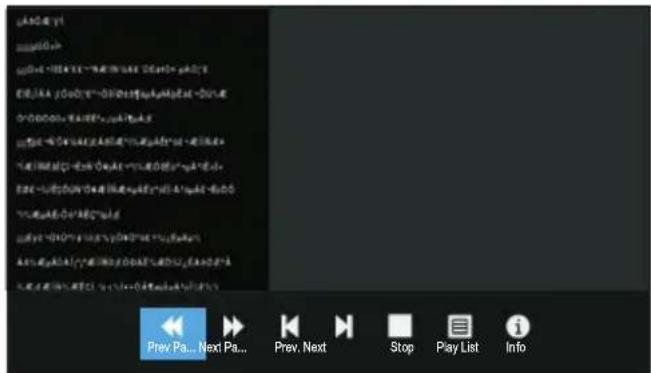
Press the INFO/ENTER button on the remote control to display the on-screen too * Use the ◀/▶ buttons, then press ENTER to select a function such as play, pause, previous file, next file, from the on-screen toolbar.
*Press ■ or EXIT buttons to exit playback & go back to file list page.
NOTE:
◆ To play your multimedia files, make sure you have selected the correct icon in main media playback menu.
Important Unique Buttons
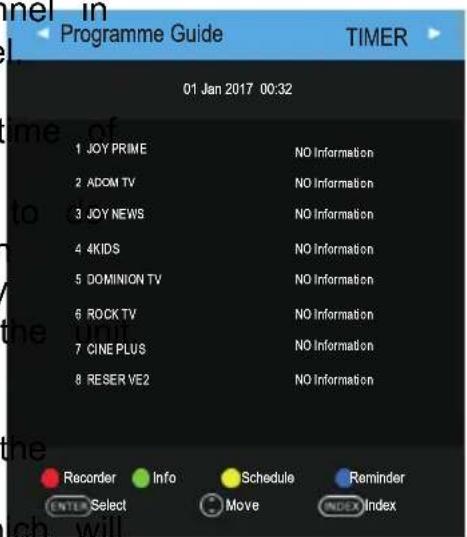
PROGRAMME GUIDE (In DTV mode)
Press EPG button to display the Programme Guide menu. This function let you k the detailed information of the channel, indicating the time of the program playing. the Programme Guide it is possible to check the program information for the nex days (If the information is available from the broadcaster).
- Press the ▲/▼ buttons to select a different chan the list and press ENTER to active the channe
- Recorder: Press the button to set the parameters for recording. You can choose the appointment to record you want, different schedules should not overlap. The unit is able schedule recording when TV is turning on or in standby mode. When recording starts in standby mode, there will be no picture or sound from t
- Info: Press green button to see the detailed information of the current channel.
- Schedule: Press the yellow button to display Schedule list.
- Reminder: If you find the desired program which will be shown in the future. Press the blue button to book program.
- TIMER/Channel: Press Index button to select the top of items, and press the ◀/▶ button to change the list by Time or Channel.
- Press the EPG or EXIT button to exit.
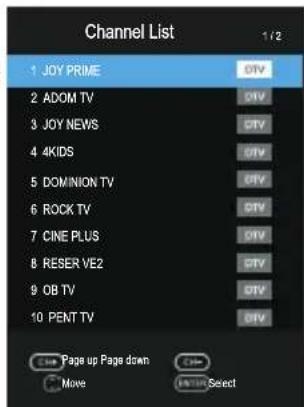
Channel List
Press LIST button to display the Channel List.
Press the ▲/▼ buttons to select the channel and press ENTER to watch it.
Press CH ^∧/∨ button to page up or down the Channel list.
Press EXIT button to exit the channel list.
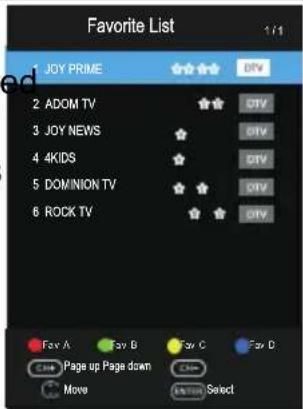
Favorite List
Press ♥ button to display the Favorite List.
Press red, green, yellow, blue button to select the desire favourite group.
Press the ▲/▼ buttons to select the channel and press ENTER to watch it.
Press CHA/V button to page up or down the Favorite list.
Press EXIT button to exit the Favorite List.
Teletext
Using the teletext feature
- Display teletext
- Select a TV station with a teletext signal.
- Press the button to enter teletext mode.
- Press the button 2nd to enter Mix mode, this function enables you to superimpose the teletext page over the TV program.
- Press the button 3rd return or exit to the normal TV/DTV mode.
- Page selection
- Enter the page number (three digits) using the number buttons. If you press wrong number during input, you must complete the three digit number and then re-enter the correct page number.
- The ▲/▼ button can be used to select the preceding or following page.
- Hold
You can press the button to hold a page, and press it again to release the p
- Index
Press the button to enter the main index page directly.
- Enlarging Text
When a page is displayed, you can double the size of the text to make it easy read.
- Press the button to enlarge the top half of the page.
- Press the button again to enlarge the bottom half of the page.
- Press the button once more to return to the normal display.
- Reveal mode
You can display concealed teletext information (e.g. Answer to puzzles or riddles by pressing ☐ button. Press ☐ button again to remove the information from the display.
- Subpage
Some teletext may contain several sub-pages which are automatically paged in a certain cycle by the TV station.
-
You can enter into a certain subpage by pressing button directly and select the page number with number buttons. Enter the subpage number (e.g. for the third subpage.
-
Press the button again to exit the subpage mode.
• Color buttons (Red, Green, Yellow and blue)
Press these buttons to access directly to the corresponding colour pages displayed the lower part of the teletext screen.
Troubleshooting Guide
Troubleshooting
When you meet the following common problems, you might diagnose and get the solutions without contacting with the technicians.
| Symptoms | Possible Reason | Solutions |
| No picture, no sound, and no indicator light | 1.The power cord is not plugged2.The power is off | 1.Plug the power cord in2.Turn the power on |
| Picture and sound with abnormality | 1.Contrast, sharpness, and colour are set improperly2.Color system is set improperly3.Sound system is set improperly | 1.Adjust the value of Contrast, sharpness, and colour2.Set the Color system to the country broadcasting standard3.Set the Sound system to the country broadcasting standard |
| Picture is spotted or w snow | Signal source is low-grade or th signal cord is in a lower quality | Use the qualified signal co |
| No picture, no sound and indicator light is green/blue | Volume is in the minimum value TV is in mute mode. | Adjust the value of volume |
| The signal cable is not correctly connected. | Connect the signal cable correctly | |
| Blue screen, AV is displayed | There is no signal input or the cable is not connected or incorrectly connected | videoConnect the video cable correctly |
| Picture is unclear or shaking or with black horizontal strips (in PC mode) | PC picture is not correctly adjusted | Enter into Screen menu, select Auto Adjust item to perform automatic calibration and adjust Phas to solve the problem |
| PC picture is not centred. | ||
| No sound | There is no audio signal input audio cable is not connected correctly | Connect the audio cable correctly |
| PC picture display with improper colour | The colour temp is adjusted incorrectly by user | Readjust the colour temp, select the original colour setting |
| HDMI source, with snow pixel of full screen | The source generate is not standard | Plug the HDMI cable again |
Troubleshooting Guide
| The remote control does not work | Batteries are improperly installed exhausted | 1. Make sure the positive and the negative polarities are correct.2.Check if there is a loos contact between the batteries and the springs3.Replace the batteries |
Maintenance
Early malfunctions can be prevented. Careful and regular cleaning can extend the of your new TV. Be sure to turn the power off and unplug the power cord before begin any cleaning.
Cleaning the screen
- Wet a soft cloth in a mixture of lukewarm water and a little fabric softener o washing detergent. Wring the cloth until it's almost dry, and then used it to w screen.
- Make sure the excess water is off the screen, and then let it air-dry before you on your TV.
Cleaning the cabinet
To remove dirt or dust, wipe the cabinet with a soft, dry, lint-free cloth. Please I not to use a wet cloth.
Extended Absence

If you expect to leave your TV dormant for a long time (such as a vacant good idea to unplug the power cord to protect against possible damage from lightning or power surges.
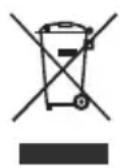
Information on Disposal of Old Electrical and Electronic Equipment (applicable for countries that have adopted separate waste collection systems)
Products with the symbol (crossed-out wheeled bin) cannot be disposed a household waste. Old electrical and electronic equipment should be recycled at a facility capable of handling these items and their waste by products. Contact your local authority for details in locating a recycle facility near you. Proper recycling and waste disposal will help conserve researchers to preventing detrimental effects on our health and the environment.
natural_image
Cartoon illustration of a smiling computer monitor holding an open book titled 'STOCK BAIL' (no text on screen or background)natural_image
Cartoon illustration of a computer monitor with a sad face and wings, surrounded by abstract brain-like shapes (no text or symbols)natural_image
Cartoon illustration of a computer monitor with a smiling face and a bag, symbolizing online content or media (no text present)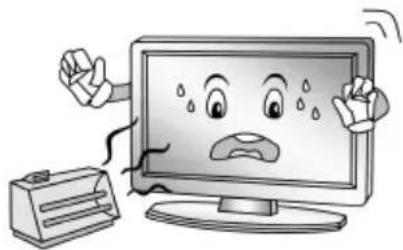
natural_image
Cartoon illustration of a computer monitor with a sad face and two hands, accompanied by a printer (no text or symbols present)natural_image
Illustration of a smiling man presenting to a computer monitor with an electrical plug (no text or symbols)natural_image
Cartoon illustration of a computer monitor with an angry face and lightning bolts, connected to a power outlet (no text or symbols)natural_image
Cartoon illustration of a smiling computer monitor with hands and speech bubbles, surrounded by clouds and industrial equipment (no text or symbols)natural_image
Symbolic icon of a person using a ladder to lift a box, enclosed in a circle with no text or symbols.natural_image
Illustration of a smiling computer monitor and a worker pointing at a box (no text or symbols)NOTA:
natural_image
Cartoon illustration of a smiling computer monitor holding an open book (no text or symbols present)natural_image
Cartoon illustration of a computer monitor with a sad face and wings, surrounded by crutches (no text or symbols)natural_image
Cartoon illustration of a computer monitor with a smiling face and a bag, symbolizing online shopping or digital engagement (no text present)natural_image
Cartoon illustration of a computer monitor with a sad face and two hands, accompanied by a printer (no text or symbols present)natural_image
Illustration of a smiling computer monitor with a smiley face, accompanied by an electric plug and a person standing beside it (no text or symbols present)natural_image
Cartoon illustration of a computer monitor with an angry face and power plug, showing stress or shock (no text or symbols)natural_image
Cartoon illustration of a smiling computer monitor with hands and speech bubbles, surrounded by clouds and industrial equipment (no text or symbols)natural_image
Symbolic icon of a person climbing a ladder inside a circle with no text or symbolsnatural_image
Illustration of a smiling computer monitor and a worker with a toolbox, no text or symbols present.NOTA:
Colocar as pilhas no telecomando
natural_image
Three schematic diagrams of a battery with internal components and directional arrows, no text or symbols present.natural_image
Yellow daffoderm under a blue sky with clouds, displayed within a media player interface (no readable text on the flower or background)- Gravação agendada
Imported, produced and distributed by:
- led tvs 40"
- INDEX
- Warnings
- DEAR CUSTOMER:
- WARNING:
- REGULATORY INFORMATION
- CAUTION
- IMPORTANT WARNINGS AND CAUTIONS!
- Safety Instructions
- IMPORTANT SAFETY INSTRUCTIONS
- NOTE:
- Connection and setup
- Connection Installation
- Getting Started
- Using the Remote Control
- Installing Batteries in the Remote Control
- Battery Replacement
- Notes on Using Batteries:
- CAUTION:
- Remote Control
- Definition of the buttons on remote control
- Basic Operation
- Turning on and off the TV
- - Turn on the TV
- - Turn off the TV
- First Time Setup
- ■ Set you desired language
- ■ Select your country
- ■ Select your time zone.
- ■ Select your TV environment.
- ■ Select the antenna type (Air or Cable).
- ■ Auto Tuning
- Choosing a TV channel
- Volume Adjustment
- Changing the Input Source
- Menu Operation
- How to Navigate Menus
- Channel Menu
- ■ CADTV Manual Tuning
- ■ CI Information (In DTV mode)
- ■ Signal Information(Only available when there is signal under DTV)
- Sound Menu
- Timer Menu
- Lock Menu
- Option Menu
- PVR Function Operation Instruction
- How to use PVR function?
- Preparing
- Setting
- □ Recording
- - Instant Recording
- - Schedule Recording
- □ Playing the Recorded Programmes
- Option1:
- Option2:
- ☐ Time Shift Function
- Hotel Mode
- - Hotel Mode
- - On Source
- - On Channel
- - On Volume
- - Max Volume
- - Export to USB
- - Import from USB
- USB Operation
- - Main Operating Interface
- - Basic operation
- Important Unique Buttons
- PROGRAMME GUIDE (In DTV mode)
- Channel List
- Favorite List
- Teletext
- Using the teletext feature
- - Display teletext
- - Page selection
- - Hold
- - Index
- - Enlarging Text
- - Reveal mode
- - Subpage
- • Color buttons (Red, Green, Yellow and blue)
- Troubleshooting Guide
- Maintenance
- Cleaning the screen
- Cleaning the cabinet
- Extended Absence
- Information on Disposal of Old Electrical and Electronic Equipment (applicable for countries that have adopted separate waste collection systems)
- NOTA:
- Colocar as pilhas no telecomando
- - Gravação agendada
Brand : Kunft
Model : 40CHL630018
Category : Television