
SP-102 - Sandwich Toaster Coline - Free user manual and instructions
Find the device manual for free SP-102 Coline in PDF.


| Product Type | Sandwich Grill / Health Grill |
| Brand | Coline |
| Model Number | SP-102 |
| Power | 2000 W |
| Voltage | 220-240 V AC, 50/60 Hz |
| Grill Plates | Removable, non-stick coating, dishwasher safe |
| Temperature Control | Separate upper and lower control knobs |
| Indicator Lights | Power indicator, upper and lower plate temperature indicators |
| Height Adjuster | 4 positions (lock and regulate grill opening) |
| Hinge | 180° hinge release for open grill mode |
| Drip Tray | Removable, dishwasher safe |
| Keep Warm / Defrost Function | Yes, using low temperature setting and height adjuster |
| Safety Features | Hot surface warning, not for children under 8, not to be used with timer |
| Cleaning | Plates and drip tray: hand wash or dishwasher; exterior: damp cloth |
| Storage | Dry, dust-free, out of children's reach |
| Usage | Indoor, household use only; food must be thawed before cooking |
| Cord | Check regularly; replace if damaged; extension lead suitable if needed |
| Included Accessories | Removable grill plates, drip tray, instruction manual |
| Warranty | Contact manufacturer or place of purchase |
Frequently Asked Questions - SP-102 Coline
User questions about SP-102 Coline
0 question about this device. Answer the ones you know or ask your own.
Ask a new question about this device
Download the instructions for your Sandwich Toaster in PDF format for free! Find your manual SP-102 - Coline and take your electronic device back in hand. On this page are published all the documents necessary for the use of your device. SP-102 by Coline.
USER MANUAL SP-102 Coline
natural_image
Illustration of a flat-screen grating or induction grater with control knobs and a mounted camera (no text or symbols)Art. No.: Model. No:
18-4803
SP-102
44-2964
SP-102
English 2
Svenska 7
Norsk 12
Suomi 17
Deutsch 22
Health Grill
Art.no 18-4803, 44-2964 Model SP-102
Please read the entire instruction manual before using the product and then save it for future reference. We reserve the right for any errors in text or images and any necessary changes made to technical data. In the event of technical problems or other queries, please contact our Customer Services (see address details on the back).
Safety
Warning: Fire hazard.

Warning: Hot surfaces
This product gets hot during use. Please note that surfaces which are not used for cooking will become very hot. Since some people are more sensitive to temperature than others, the product should be handled with CAUTION. Only touch the handle or other gripping surfaces and always wear heatproof gloves or mitts. Always let all other surfaces cool before touching them.
- The product may be used by children aged 8 years and above and by persons with reduced physical, sensory or mental capability or lack of experience and knowledge provided they have been given supervision or instruction concerning use of the product in a safe way and understand the hazards involved.
- Never let children play with the product.
- Cleaning and user maintenance shall not be made by children unless they are older than 8 and supervised.
- Keep the product and its mains lead out of reach of children under the age of 8.
- Never leave the product unattended while in use.
- Never use the product in conjunction with a timer or other timer-controlled equipment.
-
Make sure that your hands are completely dry when unplugging the product from the wall socket.
-
Only operate the product in well-ventilated areas. Leave a gap of 10–15 cm (4–6") on every side of product for air to circulate freely.
- The product must only be use when placed on a firm, flat and heat-resistant surface.
- Never place the product onto a heater or other heat source.
- Never place the product onto a hot cooker or into an oven.
- Make sure that the product is not in contact with curtains, clothing, towels or other combustible material when it is in use.
- Never move the product until it has completely cooled.
- Never place metal objects such as cutlery or saucepan lids onto the grill plates. Doing so could cause the object to get hot.
- The product is intended for indoor use only.
- Place the product where there is no risk of people tripping over its mains lead.
- Do not place the product where there is a risk of it falling into water or other type of liquid. If the product has fallen into water, do not touch it. Unplug the product from the electrical socket immediately.
- Never use charcoal, briquettes or other combustible materials together with the product.
- Only use accessories that are recommended by the manufacturer or retailer.
- Never lay the mains lead over hot surfaces, sharp edges or corners.
- The mains lead should be checked regularly. Never use the product if the mains lead or plug is damaged. Never use the product if it is defective or damaged in any way, has been dropped or if any water or other liquid has entered the housing.
- If it is necessary to use an extension lead with the product, ensure that the cable is suitable for the purpose.
-
Do not use the product to cook frozen food. All food must be thawed before cooking it on the grill.
-
The mains lead must be changed if damaged. This is to prevent the risk of electric shock or fire and should only be carried out by the manufacturer, qualified service facility or qualified technician.
- The product is only intended for normal domestic use as described in this instruction manual and in similar environments such as canteens, offices, and hotels.
Product description
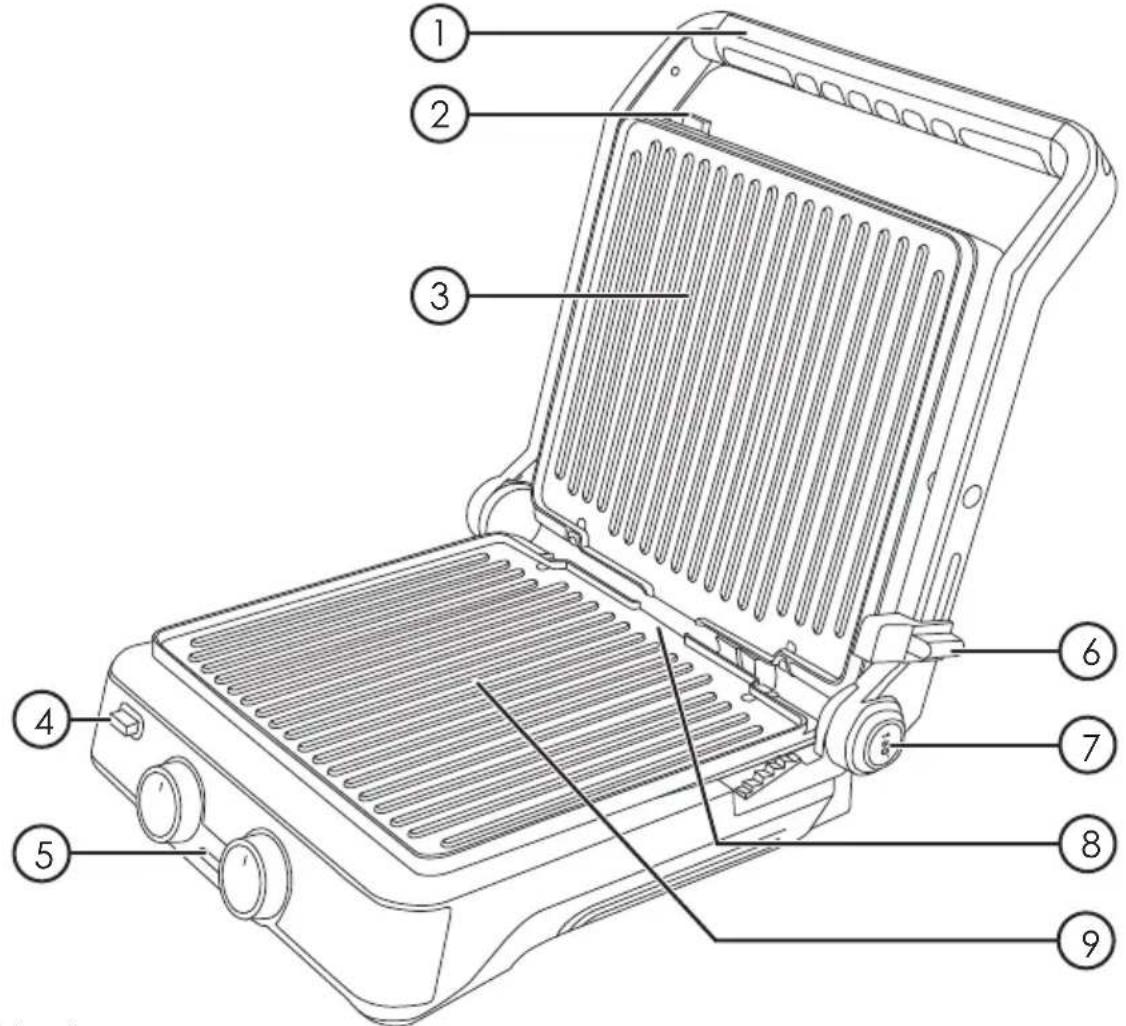
- Handle
- [RELEASE] Upper grill plate release button
- Upper grill plate
- [RELEASE] Lower grill plate release button
- Control panel
- Lock/height adjuster, locks and regulates how much the grill opens.
- [180°] Hinge release button, to open the grill to (180°)
- Channel for draining excess grease onto the spill tray.
- Lower grill plate

- Temperature control for the upper grill plate
- Indicator light for the upper grill plate
- Power indicator light, illuminates when the grill is connected to the power supply.
- Indicator light for the lower grill plate
- Temperature control for the lower grill plate
Before initial use
- Wipe the exterior of the grill clean using a soft, damp cloth.
- Pull the height adjuster out to the open position (refer to the padlock symbols) and open the grill.
- Take the grill plates off by first pressing their [RELEASE] buttons, and wash the plates by hand or in a dishwasher.
- Make sure that the plates are completely dry before refitting them.
- Lightly coat the grill plates with a little cooking oil.
Instructions for use

When the grill is used for the first time it may emit a little smoke, this is completely normal. It is residue from the manufacturing process being burnt off.

Do not use the grill to cook frozen ingredients. All food must be thawed before cooking it on the grill. This can be performed on the grill using the defrost function. Refer to the Keep warm/defrost function section.

Use an oven mitt or cloth and only touch the black part of the handle to avoid burns.
- When connected to a power supply, all three indicator lights (11, 12 and 13) will illuminate.
- Set the desired temperature using the temperature control knobs. When the set temperature has been reached, indicator lights 11 and 13 will go out.
-
The grill plates have a non-stick coating, but you may use a little additional oil or cooking spray if you like.
-
Only use cooking utensils which are designed for non-stick surfaces. Do not use metal cooking utensils.
- If necessary, use the height adjuster to adapt the height of the upper grill plate to the thickness of the food between the plates.
- The grill has no power switch and is switched on and off by disconnecting it from the power supply at the wall socket.
Using as an open grill
The grill can be opened fully to create two horizontal cooking surfaces. The grill is opened by holding in the [180^] button while gripping the black handle and folding out the grill flat.
Keep warm/defrost function
The grill can be used on a low temperature setting for keeping cooked food warm or for defrosting frozen food before it is cooked. Use the height adjuster (position 1–4) to create an oven effect.
Care and maintenance
- Always unplug the lead from the wall socket and let the grill cool down completely before cleaning.
- Wipe the exterior of the grill clean using a soft, damp cloth. Use only mild cleaning agents, never solvents or corrosive chemicals.
- Take the grill plates off by first pressing their [RELEASE] buttons, and wash the plates by hand or in a dishwasher.
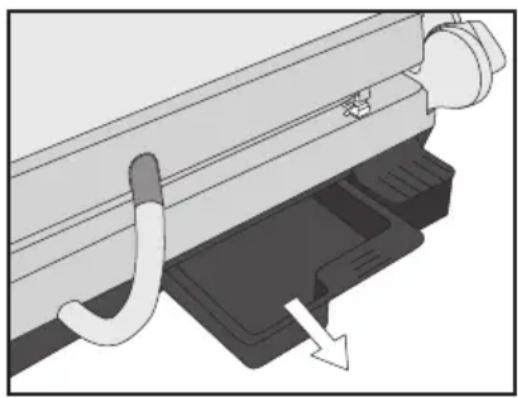
- Remove the tray and empty the grease, then hand wash it or place it in the dishwasher. Make sure to dry it carefully using kitchen roll or a soft dry cloth which is lint-free.
natural_image
Mechanical component diagram showing a hook attached to a rail, with an arrow indicating direction (no text or symbols present)- Make sure that the plates are completely dry before refitting them and then coat them lightly with cooking oil.
- Store the grill in a dry, dust-free environment out of children's reach whenever it is not to be used for a long time.
Responsible disposal
This symbol indicates that this product should not be disposed of with general household waste. This applies throughout the entire EU. In order to prevent any harm to the environment or health hazards caused by incorrect waste disposal, the product must be handed in for recycling so that the material can be disposed of in a responsible manner. When recycling your product, take it to your local collection facility or contact the place of purchase. They will ensure that the product is disposed of in an environmentally sound manner.

Specifications
Rated voltage 220–240 V AC, 50/60 Hz
Power 2000 W
Elgrill
Art.nr 18-4803, 44-2964 Modell SP-102
natural_image
Mechanical component diagram showing a curved hook attached to a rail, with an arrow indicating direction (no text or symbols present)natural_image
Mechanical assembly diagram showing a hook inserted into a rail component with a downward arrow indicating motion (no text or symbols)natural_image
Mechanical component diagram showing a curved hook attached to a rail, with a downward arrow indicating motion (no text or symbols present)natural_image
Diagram of a mechanical component with a curved hook and directional arrow (no text or symbols)10 - 13 Market Place
Kingston upon Thames
Surrey
KT1 1JZ
DEUTSCHLAND
KUNDENSERVICE
Hotline: 040 2999 78111
E-Mail: kundenservice@clasohlson.de
Homepage
www.clasohlson.de
Postanschrift
Brand : Coline
Model : SP-102
Category : Sandwich Toaster