
StreamEnjin - Mixeur audio-vidéo COOLER MASTER - Free user manual and instructions
Find the device manual for free StreamEnjin COOLER MASTER in PDF.


| Product Type | Portable All-in-One AV Mixer / Live Streaming Encoder |
| Brand | Cooler Master |
| Model | StreamEnjin |
| Dimensions (L x W x H) | 28.85 x 18.99 x 9.66 cm (11.36 x 7.48 x 3.80 in) |
| Weight | 1.89 kg (4.16 lb) |
| Power Input | IEC C14, 100-240 Vac, 50/60 Hz (with 250V fuse T1.6A) |
| Power Consumption | 12.9 W (110V) / 12.7 W (220V) |
| Video Inputs | 1 x 4K HDMI (up to 4K@60, no HDCP), 2 x HDMI (up to 1080p@60, switcher, no HDCP) |
| Video Outputs | 1 x 4K Loop-Thru HDMI (up to 4K@60), 1 x PGM HDMI (up to 1080p@60) |
| Audio Inputs | HDMI captured (stereo), 1 x Mic (1/4" TRS dual mono), 1 x Line (RCA, -10 dBV) |
| Audio Outputs | HDMI output (stereo), 1 x 1/8" TRS headphone jack |
| Streaming Protocols | RTMP/RTMPS (not RTSP), dual-stream encoder |
| Video Encoding | H.264, bitrate 512 Kbps – 10 Mbps, resolution up to 1080p30 |
| Audio Encoding | AAC, 48 kHz, 128 Kbps |
| Recording Storage | USB 3.x external HDD/SSD or flash drive (min 32 GB), format MP4 (1080p30) |
| Network | 1 x GbE LAN port |
| iPad Compatibility | iPad Pro (3rd gen) with iOS 11+ direct; other iPads (5th gen+, Air 3rd gen+, Mini 5th gen+) require Apple Lightning USB 3 Adapter |
| Housing | Metal |
| Operating Temperature | 0 – 40 °C (32 – 104 °F) |
| Storage Temperature | -20 – 60 °C (-4 – 140 °F) |
| Humidity | 0 – 80% RH, non-condensing |
| Compliance | FCC Class A, RoHS |
| Package Contents | 1 x StreamEnjin unit, 1 x USB-C to USB-A cable, 1 x USB-A to USB-A cable, 1 x US power cord, 1 x EU power cord, 1 x user manual |
| Cleaning | Unplug unit, use a damp cloth only; no liquid or aerosol cleaners |
| Safety | Indoor use only; do not block ventilation; use grounded outlet; avoid water or liquid spills; refer servicing to qualified personnel |
| Spare Parts / Repairability | Fuse (T1.6A/250V) replaceable; contact Cooler Master support for other parts; no user-serviceable internal components |
Frequently Asked Questions - StreamEnjin COOLER MASTER
User questions about StreamEnjin COOLER MASTER
0 question about this device. Answer the ones you know or ask your own.
Ask a new question about this device
Download the instructions for your Mixeur audio-vidéo in PDF format for free! Find your manual StreamEnjin - COOLER MASTER and take your electronic device back in hand. On this page are published all the documents necessary for the use of your device. StreamEnjin by COOLER MASTER.
USER MANUAL StreamEnjin COOLER MASTER
StreamEnjin
StreamEnjin AV Mixer User Manual
EMC Information
FEDERAL COMMUNICATIONS COMMISSION INTERFERENCE
STATEMENT: This equipment has been tested and found to comply with the limits for a Class A digital device, pursuant to Part 15 of the FCC Rules. Theselimits are designed to provide reasonable protection against harmful interference when the equipment is operated in a commercial environment.
This equipment generates, uses, and can radiate radio frequency energy and, if not installed and used in accordance with the instruction manual, may cause harmful interference to radio communications. Operation of this equipment in a residential area is likely to cause harmful interference in which case the user will be required to correct the interference at his own expense.
The device complies with Part 15 of the FCC Rules. Operation is subject to the following two conditions: (1) this device may not cause harmful interference, and (2) this devicemust accept any interference received, including interference that may cause undesired operation.
FCC Caution: Any changes or modifications not expressly approved by the party responsible for compliance could void the user's authority to operate this equipment.
Warning : Operation of this equipment in a residential environment could cause radio interference.
This product is RoHS compliant.

User Information
Online Registration
Be sure to register your product at our online support center:
Please visit our website at www.coolermaster.com
Asia Pacific - Cooler Master Technology Inc. 8F., No. 788-1, Zhongzheng Rd., Zhonghe Dist., New Taipei City 23586, Taiwan (R.O.C.) Tel: +886-2-2225-3517
Europe - Cooler Master Europe B.V. Lodewijkstraat 1b, 5652AC Eindhoven, The Netherlands Tel: +31-(0)40-702-0900
China – Cooler Master China Room 2062, Floor 6, No. 421, Weiquing Rd., Jinshan District, Shanghai City, China Tel: +86-21-51872177
North America - Cooler Master NA 2929 E Imperial Highway, Ste 110 Brea CA, 92821, USA Tel: +1-888-624-5099
For the most updated information, please visit our official website: www.coolermaster.com Cooler Master Support: https://account.coolermaster.com/
User Notice
All information, documentation, and specifications contained in this manual are subject to change without prior notification by the manufacturer. The manufacturer makes no representations or warranties, either expressed or implied, with respect to the contents hereof and specifically disclaims any warranties as to merchantability or fitness for any particular purpose. Any of the manufacturer's software described in this manual is sold or licensed as is. Should the programs prove defective following their purchase, the buyer (and not the manufacturer, its distributor, or its dealer), assumes the entire cost of all necessary servicing, repair and any incidental or consequential damages resulting from any defect in the software.
The manufacturer of this system is not responsible for any radio and/or TV interference caused by unauthorized modifications to this device. It is the responsibility of the user to correct such interference.
The manufacturer is not responsible for any damage incurred in the operation of this system if the correct operational voltage setting was not selected prior to operation. PLEASE VERIFY THAT THE VOLTAGE SETTING IS CORRECT BEFORE USE.
Package Contents
1 StreamEnjin AV Mixer
1 USB Type-C to USB Type-A Custom-Made Cable
1 USB Type-A to USB Type-A Cable
1 US AC Power Cord
1 EU AC Power Cord
1 User Instructions
Note: Make sure that all of the components are present and in good order. If anything is missing or was damaged in shipping, contact your dealer.
Table of Contents
EMC Information....ii
RoHS.ii
User Information ....iii
Package Contents iv
About this Manual ...... vii
Conventions......viii
Product Information......viii
1. Introduction
Overview....1
Features....2
Requirements 2
Components ....3
Top View .... 3
Rear View ....5
Side View 6
2. Hardware Setup
Connecting the StreamEnjin Unit....8
Connecting iPad 10
Lightning Connector on iPad 10
USB-C Connector on iPad....10
3. StreamEnjin App & Side Menu
StreamEnjin Application 12
Page Components 14
Side Menu 15
Current Project 15
Create Project 16
Copy as New Project 17
Open Project 18
About 19
All Projects 20
Tutorial 21
Self-diagnostic 21
4. StreamEnjin App & Video Mixer
Video Mixer....22
Scene Editor 25
Resize/Crop Tool 27
Resize 27
Crop (Media Only)....28
Add/Edit Text Overlay 29
Re-order the Overlays 30
5. StreamEnjin App & Audio Mixer
Audio Mixer....32
6. StreamEnjin App & Settings
Settings....34
Live Stream Methods .... 37
Example Live-stream with social account (Youtube Account) . . . 37
Example Live-stream with social account (Facebook Account) .. 37
Example Live-stream with social account (Twitch Account) ..... 37
Enter the URL and Stream Key, see 38
Example Live-stream URL and Stream Key (Facebook) ..... 38
.....38Example Live-s
Recording Live-Stream Video and External Storage Settings ..... 39
7. Quick Live-Stream Setup
Setup 41
Quick Mode....44
8. Firmware Upgrade
Download Requirements....47
Preparing the Firmware....47
Upgrading the Unit 48
Upgrade Assessment Fail 49
Upgrade Fail 49
Appendix
Safety Instructions 50
General....50
Technical Support 53
Specifications....54
Live-Streaming Information....56
Create a Live Stream with Youtube .....56
What is CDN Service? 56
RTMP/RTMPS and RTSP Protocols ..... 56
Other ways to input image overlays .....57
About this Manual
This user manual is provided to help you get the most from the StreamEnjin unit. It covers all aspects of installation, configuration, and operation. An overview of the information found in the manual is provided below.
Chapter 1, Introduction introduces you to . Its purpose, features, installation considerations, and panel components are presented and described.
Chapter 2, Hardware Setup describes the steps that are necessary to quickly and safely set up your installation.
Chapter 3, App & Side Menu explains the functions in the StreamEnjin App and its side menu.
Chapter 4, App & Video Mixer explains the functions in the Video Mixer deck in the StreamEnjin App, including scene editing, media resizing/cropping and text and image overlays.
Chapter 5, App & Audio Mixer explains the functions in the Audio Mixer deck in the StreamEnjin App.
Chapter 6, App & Settings explains the settings you can configure for the collaborations between the unit and the StreamEnjin App.
Chapter 7, Quick Live-Stream Setup describes how to quickly setup your system to help you start live-streaming.
Chapter 8, Firmware Upgrade describes the firmware upgrade procedure and how the volume mixer LED behaves during the firmware upgrade.
An Appendix provides a list of safety instructions and precautions, technical support information, product specifications, and other technical information.
Note:
◆ Read this manual thoroughly and follow the installation and operation procedures carefully to prevent any damage to the unit or any connected devices.
◆ regularly updates its product documentation for new features and fixes. For an up-to-date documentation, visit https://account.coolermaster.com/
Conventions
This manual uses the following conventions:
Monospaced Indicates text that you should key in.
[] Indicates keys you should press. For example, [Enter] means to press the Enter key. If keys need to be chorded, they appear together in the same bracket with a plus sign between them: [Ctrl+Alt].
- Numbered lists represent procedures with sequential steps.
◆ Bullet lists provide information, but do not involve sequential steps.
→ Indicates selecting the option (on a menu or dialog box, for example), that comes next. For example, Start → Run means to open theStart menu, and then select Run.

Indicates critical information.
Product Information
For information about all products and how they can help you connect without limits, visit on the Web or contact an Authorized Reseller. Visit on the Web for a list of locations and telephone numbers:
Overview
The StreamEnjin is a portable, all-in-one, multi-channel audio/video mixer device that integrates a 1080p video capture, video switch, stream broadcaster, video converter, video splitter, and audio mixer into one compact box to eliminate the hassle of working with different AV equipment. The StreamEnjin makes HDMI video sources broadcast for higher quality live stream to CDN platforms such as YouTube Live, Facebook and Twitch.
For added convenience, the StreamEnjin provides an intuitive app, making it easy to monitor, edit image layouts, and adjust PIP settings. The StreamEnjin is PC and software-free, and with its well-designed control panel, it makes livestreaming operations smooth and effortlessly. You can even preview video and monitor audio levels before going live with your web broadcast! To get started, simply connect video/audio sources, and an Ethernet with an app-installed iPad, and you are ready to roll.
Whether you're capturing, editing or streaming, the StreamEnjin with its ergonomic and practical design, it is flexible enough to fit all independent live streaming broadcasting environmheents. With a rich feature set, the StreamEnjin addresses the challenges that independent live streaming broadcasters encounter and provides an easy-to-use solution.
Features
- All-in-one design to simplify streaming workflow – Integrates 1080p video capture, video switch, streaming encoder, video converter, video splitter, and audio mixer
- Professional-quality live streaming to global audiences by any CDN platform, with a low entry threshold, even entry-level users can quickly get started
- PC-free and software-free with plug-n-roll capability
- Intuitive app for preview and program monitoring, change video layout in Full Screen/PBP/PIP settings, adding image and subtitles overlays, and smooth scenes transitions for a professional finish
- Storyboard-like management – preset up to 8 scenes for later while streaming and during performances to reduce the need to interact with hardware
- Compact mixer control panel – Switching & mix between multiple video & audio sources with the help of easily identifiable luminous keys
- Fanless and optimized thermal air flow system for quiet operation
- Multitask designed handle-stand to enhance portability and ergonomic comfort angle
Requirements
- Ethernet connection
- The following iPad with iOS 11 or later
- iPad Pro (1st gen, 12.9")
♦ iPad Pro (1st gen, 9.7")
♦ iPad Pro (2nd gen, 12.9") - iPad Pro (2nd gen, 10.5")
♦ iPad Pro (3rd gen, 12.9" or later) - iPad Pro (3rd gen, 11" or later)
- iPad (5th gen or later)
- iPad Air (3rd gen or later)
- iPad Mini (5th gen or later)
Components
Top View

No. Component Description
Audio Section (Controls the audio settings of the system)
| 1 | Audio Level Control | Controls the volume of the selected audio source. |
| 2 Volume Meter LEDs | The LED reflects the controlled volume.During firmware upgrade, the LED behavior is changed.Refer to Upgrading the Unit on page48 for the LED behavior during firmware upgrade. | |
| 3 | PGM | Switches to the PGM audio source.The button will light up when switched to this source. |
| 4 HDMI 2 audio source | Switches to the HDMI 2 audio source.The button will light up when switched to this source. | |
| 5 HDMI 1 audio source | Switches to the HDMI 1 audio source.The button will light up when switched to this source. | |
| 6 | AFV | Audio-Follows-Video: Pressing the AFV button will light up. If the video source is selected, the source's audio will also be played. |
| No. | Component | Description |
| 7 | MIC | Switches to the MIC audio source.The button will light up when switched to this source. |
| 8 | L/R | Switches to the RCA Line In audio source.The button will light up when switched to this source. |
| 9 | Mute | Mutes/unmutes the audio the system is currently tuned into.When muting source 1 or 2, AFV will also be turned off. |
| Video Section (controls the video settings of the system) | ||
| 10 | Scenes Selector | Selects the current stream (PGM) scene and the preview (PRV) scene.Greenly lit button indicates PRV Preview.Redly lit button indicates PGM Preview. |
| Transition Control Section (switches the current stream (PGM) scene to the preview (PRV) stream and vice versa) | ||
| 11 | Auto (transition) | Pressing the Auto button will begin the transition after a specified time (0.3-3.0 seconds).Go to the Setting Deck and refer to page 36 on how to modify this specified time.Press and hold for 3 seconds to enter Quick Mode. Refer to Quick Modeon page 44 for more information. |
| 12 | Cut (transition) | The transition happens immediately when you press the Cut button.Press and hold for 3 seconds to enter Quick Mode. Refer to Quick Modeon page 44 for more information. |
| 13 | T-Bar (transition) | Slide the T-Bar to start the transition. The scene transition speed depends on how fast you slide the bar.Sliding the T-bar all the way to one end will complete the transition.You can create different effects by sliding it slowly, quickly or even hold it half way. |
| 14 | iPad Stand | Allows the iPad to sit in. |
| 15 | SRC / PGM View Selector | Pressing the button will switch video source between HDMI source 1, HDMI source 2 and PGM. |
| 16 | Pause Stream | Press this button to pause streaming. |
| 17 | GoLive | Press this button to start streaming.Press again to stop. |
Rear View
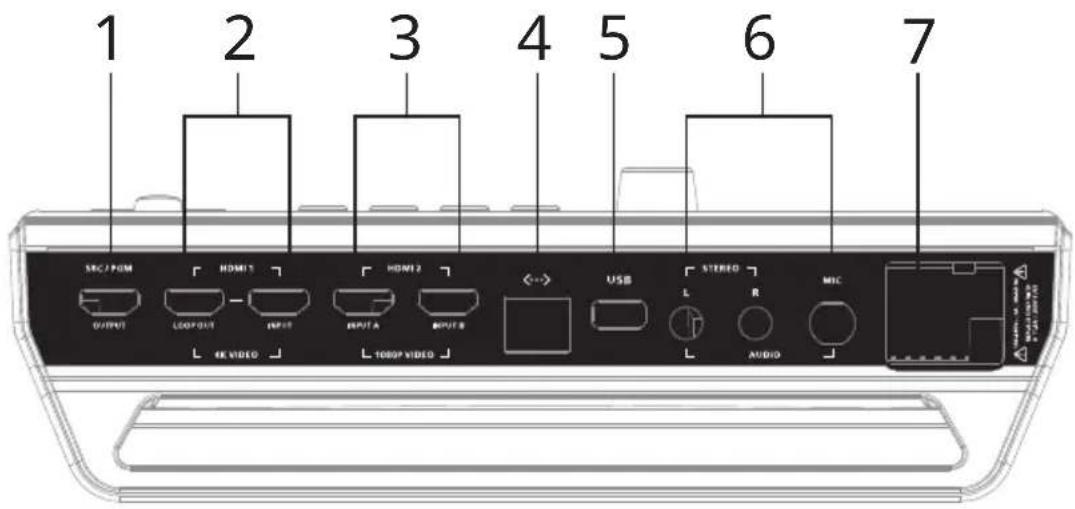
| No. | Component Description | |
| 1 | SRC / PGM Output Port | Programmed (PGM) Video output. |
| 2 | 4K HDMI Loop Out Port/4K HDMI Input Port | An HDMI 1 Input source and an HDMI 1 Loop Out. |
| 3 | 1080P Video Input Port | HDMI 2 Input that can take Video Input A or B. To select A or B, go to Media on page 26. |
| 4 | Ethernet Port | For Internet connection. |
| 5 | USB 3.2 Gen1 Type-A Port | |
| 6 | RCA Line In Port / MIC In Port | Connect MIC or audio sources for additional audio effects. |
| 7 | AC Power Socket | Powers the unit. |
Side View

| No. | Component Description | |
| 1 | iPad Link Port (Data only) | Connects to the iPad for app. |
| 2 3.5mm Audio Monitor Jack | Sound output for the preview scene (the greenly lit scene). | |
This Page Intentionally Left Blank
Chapter 2
Hardware Setup

Please review the safety information regarding the placement of this device in Safety Instructions, page59.
Connecting the StreamEnjin Unit
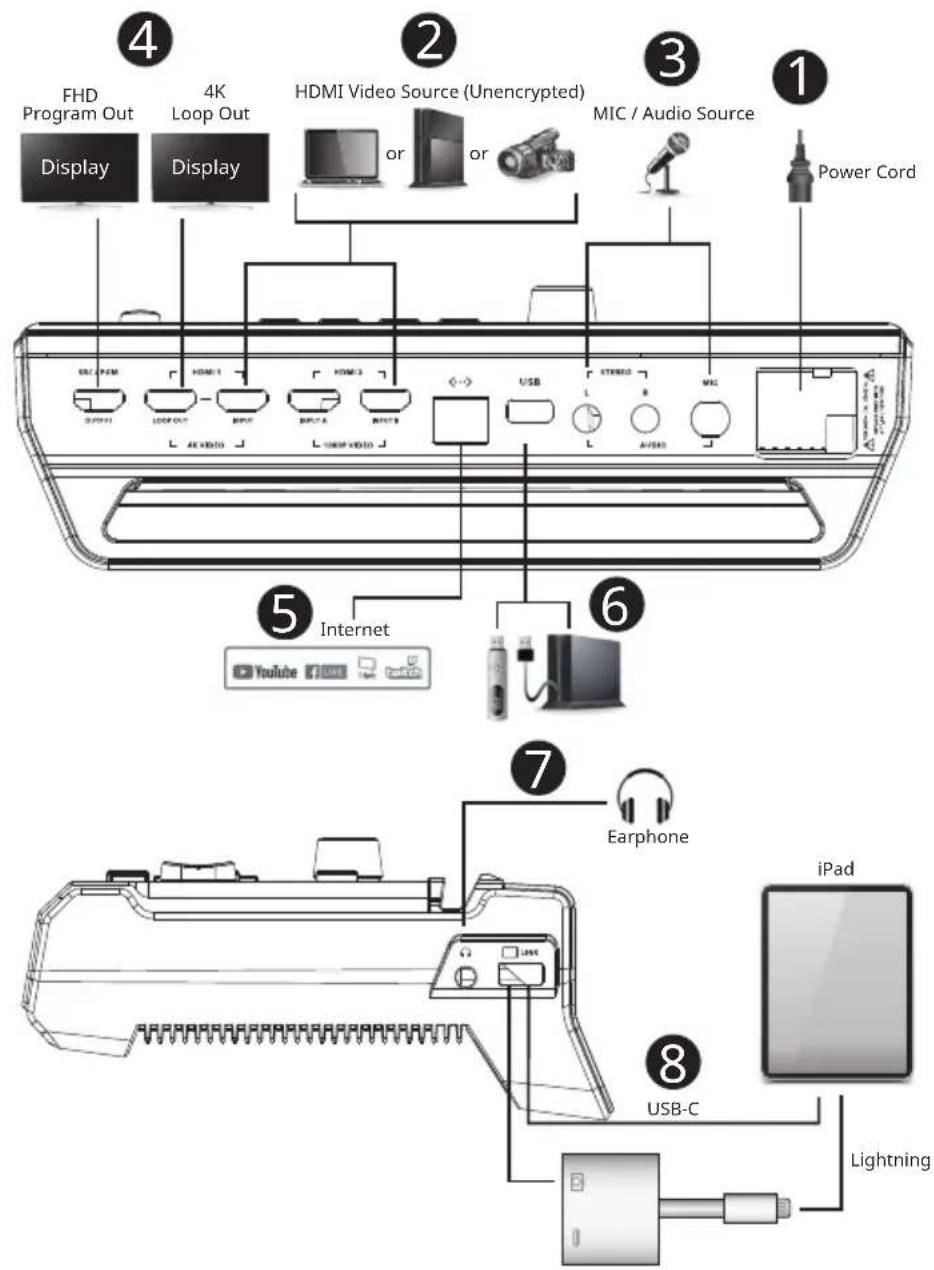
Follow the steps below to connect the StreamEnjin to an HDMI source and the host.
-
Power on the unit by connecting the power cord. Wait for the boot-up luminous (scene keys) sequence.
-
Connect the HDMI sources (e.g. PC, gaming console or video recorder) ^1 .
-
Connect a microphone or any other audio sources.
-
(Optional) Connect the HDMI Output cable if necessary:
a) Connect the HDMI display to the SRC/PGM Output Port. b) Connect the HDMI display to the Loop Out Port.
- Connect an Ethernet cable for Internet connection ^2 .

natural_image
Line drawing of a portable electronic device with control panel and buttons (no text or symbols)Note:1. Use the connected iPad to configure further network settings for live-streaming.
- iPad placed on the unit is recommended for viewing only. Hand holding your iPad is still recommended for control.
Connecting iPad
Lightning Connector on iPad
For iPads having lightning connectors, simply connect the Apple Lightning USB 3 Adapter (not included, may need additional purchase) and the USB-A to USB-A cable serially between the StreamEnjin and your iPad.
If you wish to have the charging function, connect your lightning charging cable to the Apple Lightning to USB 3 Adapter.
USB-C Connector on iPad
For iPads having USB-C connectors (e.g. iPad Pro Gen 3), simply connect the USB-A to USB-C cable included in the package between your iPad and the StreamEnjin.
Note: The USB-A to USB-C cable included in the package is custom-made for this setup, a general USB-A to USB-C cable will not work.

flowchart
graph TD
    A["iPad USB-C"] -->|USB-C to USB-A| B["iPad Lightning"]
    B -->|Power| C["USB-A to USB-A"]
This Page Intentionally Left Blank
Chapter 3
StreamEnjin App & Side Menu
StreamEnjin Application
StreamEnjin app acts as the central controller for StreamEnjin. The app's design is a control panel where you can monitor program results, edit scenes, setup video and audio stream settings, stream recording settings, etc.
Download the StreamEnjin app from App Store and install it on your iPad. The icon looks like the one below:

Tap to open the StreamEnjin application and the tutorial will start for the first time you open it.
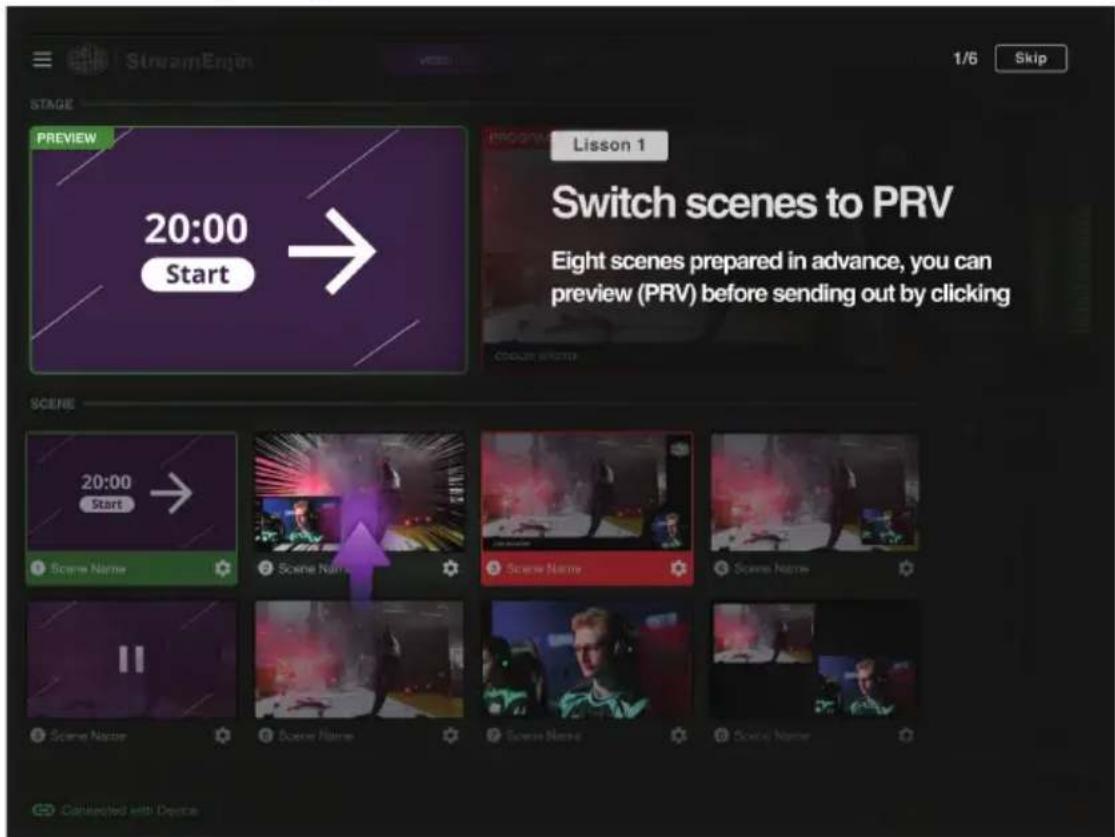
Follow the on-screen instruction as it guides you through the basics of using the StreamEnjin app with StreamEnjin.
When finished, a message will be shown:

To run the tutorial again, tap the ≡ icon on the top left corner for the side menu and tap Tutorial
Page Components

| No. | Component Description | |
| 1 | Side Menu | Tap the ≡icon for the side menu. Refer to Side Menu on page 15 for more details. |
| 2 | Deck Selector | Tap to select the desired configuration deck. Three decks are available: Video Mixer, Audio Mixer and Setting. |
| 3 | GoLive | Tap 🔑 to start streaming. Tap 📄 to pause streaming. The timer on the left shows how long you have been streaming for. |
| 4 | Deck Content | The content depends on the selected deck. |
| 5 | iPad Link Status | Displays the link status between your iPad and the StreamEnjin. |
| 6 | Network Traffic Status | Displays the network traffic status. |
Side Menu
A side menu is available for project management, tutorial, app information and self-diagnostic function. For the side menu, tap the icon on the top left corner.

Current Project
Tap the √ icon to edit the name of your project:

Create Project
1. Tap Create New Project.
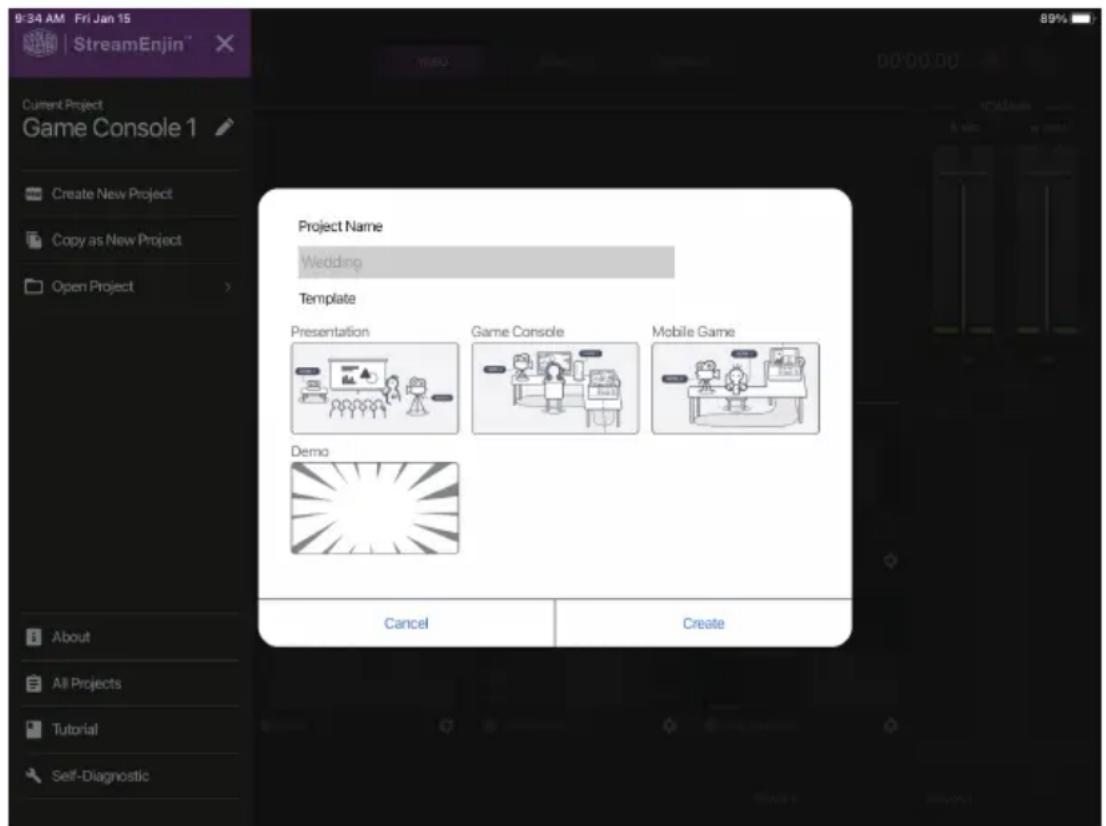
- Enter a name for the project.
- (Optional) Select a template. Templates are project settings pre-configured for you if you are unsure how your new project should be.
- Tap Create.
Copy as New Project
If you like the settings of your current project when you are to create a new one, you can use this function copy the settings.
1. Tap Create New Project.

- Enter a name for the project.
- Tap Create.
Open Project
Tap Open Project for a list of available projects. An example is shown:

Tap to select the project you wish to use.
About
Tap About for information of the app. An example is shown below:

All Projects
For information of the available projects, tap All Projects. An example is shown:

You can also open or delete the projects here.
To open a project, tap to select a project and tap Open. An example is shown:

To delete a project, tap the garbage can icon corresponding the project. An example is shown:

Tutorial
Tap Tutorial to go through the tutorial again.
Self-diagnostic
Tap Self-diagnostic to self-diagnose for a report. An example is shown:
![5:11 PM Wed Jan 20 StreamEnjin™ Current Project Game Console 1 Create New Project Copy as New Project Open Project PROGRAM VOLUME 4 VAC 4 PDA Self-diagnostic report Device Information: fwVersion :V1.3.131.001 panelVersion :V1.1.101 boardVersion :B-1.1 buildVersion :20121631 serialNumber :B1KA2160061 Check Sound Cards: [OK] AUDIO_IN [OK] HDMI 58040000.encoder Check Video Inputs: [OK] video21 [OK] video22 Check Video Outputs: [OK] HDMI-A enabled [OK] HDMI-A status [OK] HDMI-A valid [OK] HDMI-B enabled [OK] HDMI-B status [OK] HDMI-B valid OK About All Projects Tutorial Self-Diagnostic](/content/2026/05/833925/images/50b30a86507e7fd5da61d6d6e0101944ec0f0d195d58739ac8110dc1bd0ccd13.jpg)
You can tap the < icon to share the report.
Chapter 4
StreamEnjin App & Video Mixer
Video Mixer
The video mixer page allows you to preview videos of PRV and PGM, adjust MIC and PGM volume, scene selection and editing, and transition control.
The components of the page is shown below:

| No. | Component Description | |
| 1 | PRVPreview | The preview scene. |
| No. | Component Description |
| 2 PGMPreview | The program scene, or the on-air video output of the system.You can tap 📋 on the bottom right-hand corner to view the video source in full screen mode. An example is shown below: Tap the 🔊 icon on the bottom right-hand corner to return to the previous page. Tap the 🔊 icon on the bottom right-hand corner to return to the previous page. |
| 3 VolumeControl | Tap and drag the volume slider to adjust MIC or PGM volume. |
| 4 SceneSelector | 8 scenes are shown here.Green outline scene = PRV Preview.e.g. Red outline scene = PGM Preview.e.g. Red outline scene = PGM Preview.e.g. Tap a scene to put the scene into the PRV Preview section.To put the scene in PRV Preview to PGM Preview, use the Transition Control (explained below). Tap a scene to put the scene into the PRV Preview section.To put the scene in PRV Preview to PGM Preview, use the Transition Control (explained below). |
| 5 SceneEditor | You can configure each individual scenes by tapping this icon.Refer to Scene Editor on page 25 on how to edit each scene. |
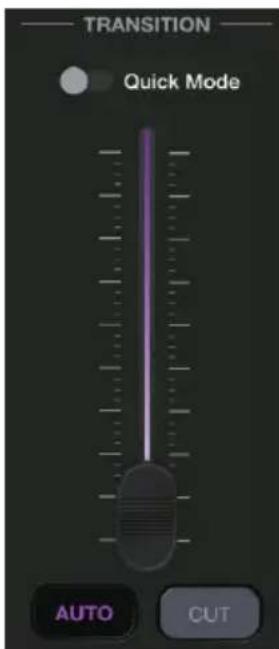
| 6 Transition Control | Controls the switching between the current stream (PGM) scene and the preview (PRV) stream.To switch,1. slide the transition bar all the way to the top or bottom; or2. tap the Cut  3. tap the Auto 3. tap the Auto  button.Using the Transition BarWhen using the transition bar, the scene transition speed depends on how fast you slide the bar.You can create different effects by sliding it slowly, quickly or even hold it half way.Using the Cut buttonThe transition happens immediately when you tap the Cut button.Using the Auto buttonTapping the Auto button will begin the transition after a specified time (0.3-3.0 seconds). Go to the Setting Deck and refer to page 37 on how to modify this specified time.Quick ModeTap Quick Mode to start Quick Mode (Quick Mode).During Quick Mode, PRV preview disappears and you can tap any of the scenes to broadcast the scene as the PGM preview.Two Quick Modes are available: Tap for “Cut Quick Mode” (Auto) or tap for “Auto Quick Mode” (Auto).Under Cut Quick Mode, tapping a scene will instantly broadcast that scene as the PGM preview.Under Auto Quick Mode, tapping a scene will broadcast that scene after the specified time (0.3-3.0 seconds).Tap or tap Quick Mode again to exit Quick Mode (Quick Mode). button.Using the Transition BarWhen using the transition bar, the scene transition speed depends on how fast you slide the bar.You can create different effects by sliding it slowly, quickly or even hold it half way.Using the Cut buttonThe transition happens immediately when you tap the Cut button.Using the Auto buttonTapping the Auto button will begin the transition after a specified time (0.3-3.0 seconds). Go to the Setting Deck and refer to page 37 on how to modify this specified time.Quick ModeTap Quick Mode to start Quick Mode (Quick Mode).During Quick Mode, PRV preview disappears and you can tap any of the scenes to broadcast the scene as the PGM preview.Two Quick Modes are available: Tap for “Cut Quick Mode” (Auto) or tap for “Auto Quick Mode” (Auto).Under Cut Quick Mode, tapping a scene will instantly broadcast that scene as the PGM preview.Under Auto Quick Mode, tapping a scene will broadcast that scene after the specified time (0.3-3.0 seconds).Tap or tap Quick Mode again to exit Quick Mode (Quick Mode). |
Using the Transition Bar
Quick Mode
Scene Editor
When you tap the 🎨icon under a scene in the scene selector region, you can start editing the scene's display.
An example is shown below:

| No. | Component Description | |
| 1 | Scene Display | This region is how this scene will be displayed. You can configure the components within the region. |
| 2 | Resize/Crop tool | Tap to resize/crop the selected item.Refer to Resize/Crop Tool on page 27 on how to use this function. |
| 3 | Overlay | Edit overlay in this region. You can Delete, Edit, and Show/Hide Overlay.1. Show/Hide Overlay: Tap to show or hide2. Edit: Tap to edit3. Delete: Tap to deleteYou can also re-order the overlays to determine which overlay is to be displayed on top. Refer to ... for more details. |
| 4 | Media | Select the source(s) and how the source(s) are laid out for the scene.1. Full Screen Mode2. Select the source of the 1080p video input port (HDMI A or B)3. Dual View Mode (Picture-in-Picture or Picture-by-Picture)4. Plain Background |
| 5 | Add Text Overlay | Tap this icon to add a text overlay. Refer to Add/Edit Text Overlay on page 29 below for more information.To edit the location and size of the overlay, select the overlay in the “Overlay” region and configure in the “Scene Display” region.The added overlay will appear in the “Overlay” region.Up to 30 text overlays (layers) are support per scene. |
| 6 | Add Image Overlay | Tap this icon to add an image overlay.Tapping allows you to add an Image Overlay. iPad will flip to the Photos page for you to select an image. Select the image and tap OK.To relocate, tap and hold the overlay to drag.To resize, refer to Resize/Crop Tool on page 27.The added overlay will appear in the “Overlay” region.Up to 5 image overlays (layers) are support per scene. |
| 7 | Switch Video Source (Dual-View) | During dual-view, tapping this button switches video source position between 1 and 2. |
| 8 | Scene Information | This region displays the scene name and background.Tap the field to edit. |
| 9 | Dual-View Layout | Tap to select the preferred dual-view (Picture-in-Picture or Picture-by-Picture) layout.You can also resize the dual-view. |
| 10 | Apply | Tap this button to apply the configuration into this scene. |
| 11 | Cancel | Tap this button to cancel all configurations made in this page. |
Resize/Crop Tool
This section describes how to resize or crop any of the components in the "Scene Display" region.
Resize
To resize any component, tap the component (overlay or media) and a resize tool will be visible on the "Scene Display" region. Examples are shown below:

Tap and hold to drag the resize tool to resize the component.
Crop (Media Only)
To resize a media, tap the media. An example is shown:

Tap the Resize/Crop Tool to start the tool.
Pinch your finger inward or outward to crop. A small box is on the left of the "Scene Display" region to show the display area (cropped area).
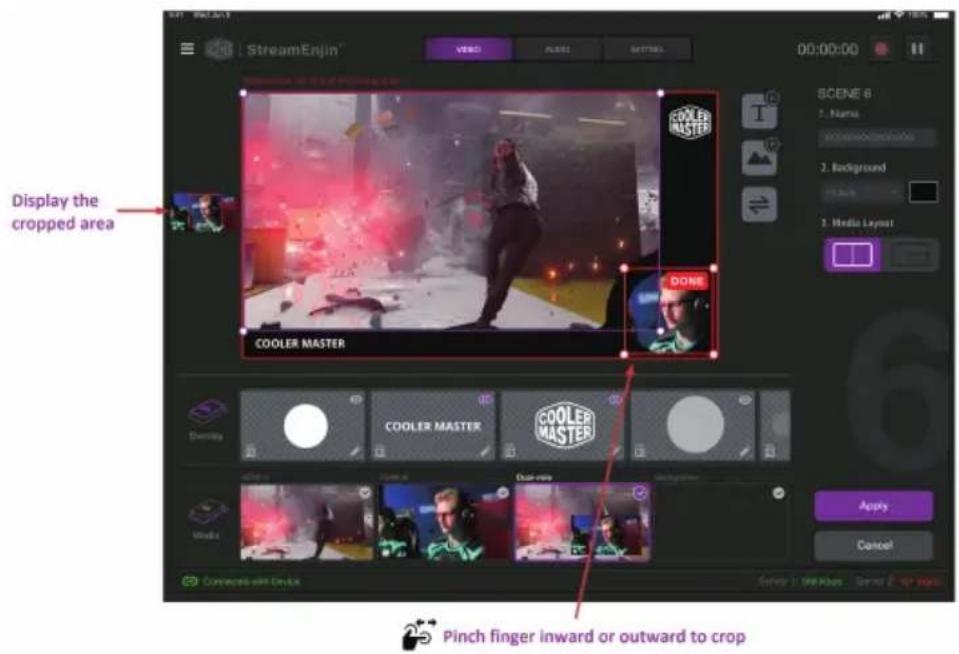
When completed, tap DONE on the top right corner.
Add/Edit Text Overlay
Tapping ☐ allows you to add a Text Overlay to the scene. A pop-up configuration page and its description is shown below:
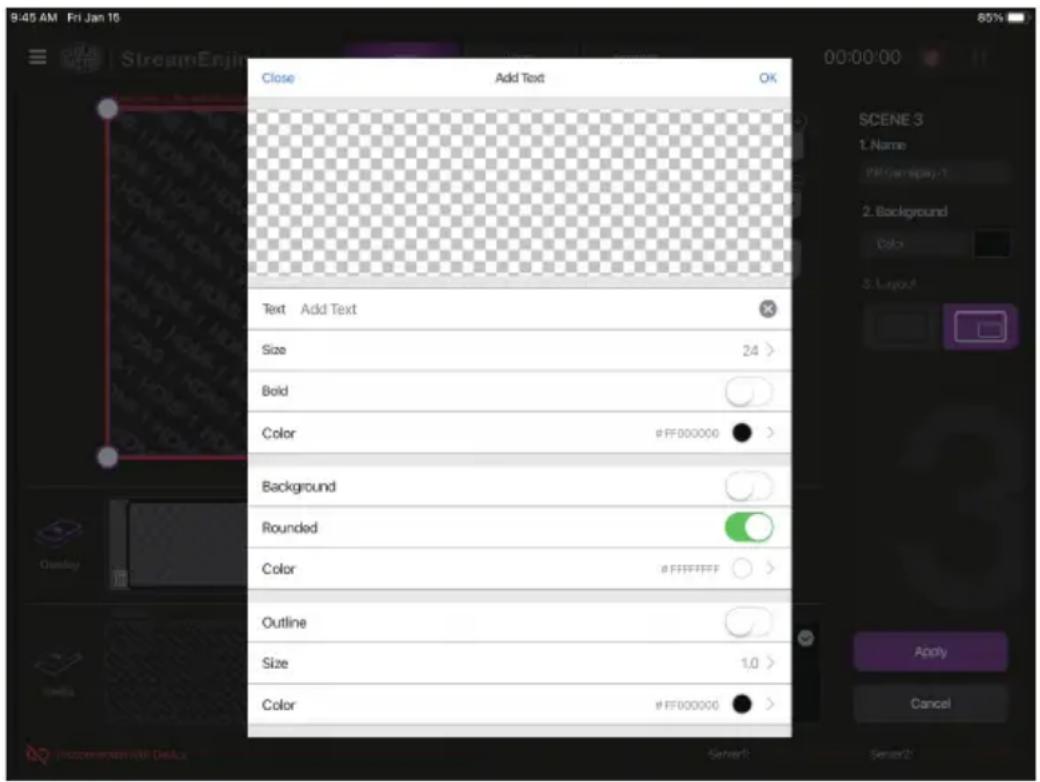
When completed, tap OK to save the configuration and return to the previous screen.
To edit the location and size of the overlay, select the overlay in the "Overlay" region and configure in the "Scene Display" region.
Re-order the Overlays
To re-order the overlays, tap and hold the overlay you wish to re-order. The overlay can then be dragged. You can drag the overlay to the place you wish it to be placed within the Overlay region. An example is shown:


Tap and hold the Overlay first, and then drag and re-order the Overlays.

This Page Intentionally Left Blank
Chapter 5
StreamEnjin App & Audio Mixer
Audio Mixer
The components of the Audio Mixer deck page is shown below:
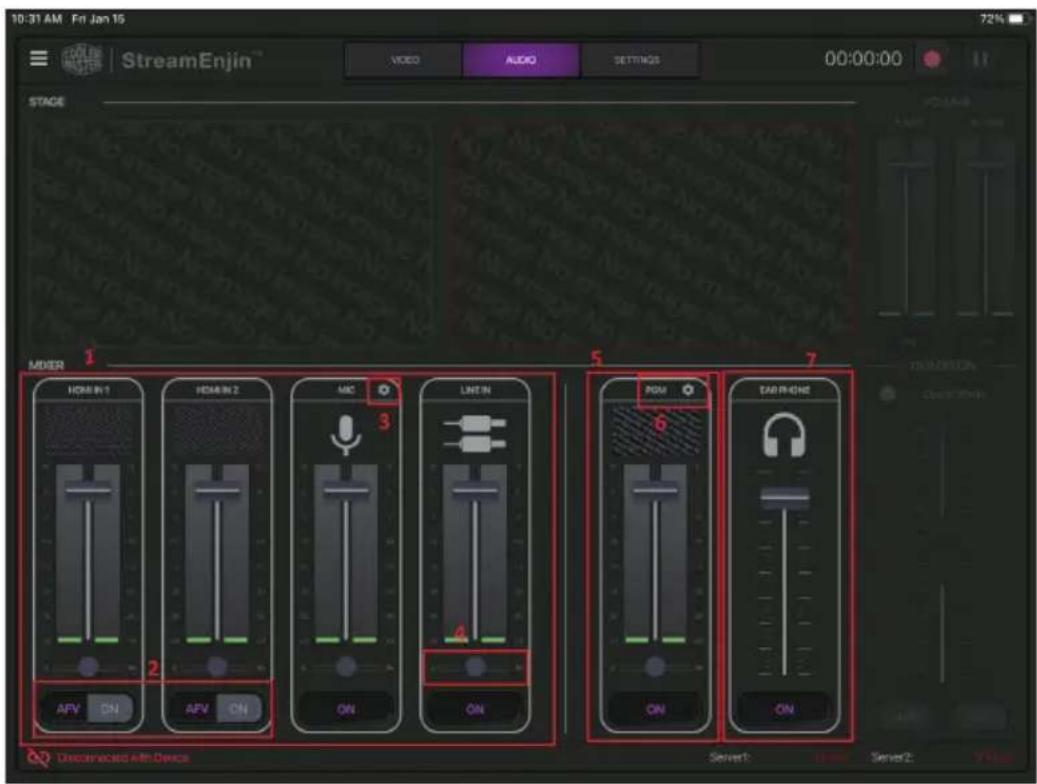
| No. | Component Description | |
| 1 | Audio Level Control | Slide the volume slider to control the volume of each audio source. |
| 2 HDMI 1 and 2 Audio Control | Audio-Follows-Video ON: Broadcasting the source's video will also play the source's audio.AFV ONON: The audio is turned on (unmuted).AFV ONOFF: The audio is turned off (muted). | |
| 3 MIC Gain Control | You can adjust the MIC Gain settings here: Tap the fields to adjust the options. Tap the fields to adjust the options. | |
| 4 L/R Balance Control | Tap and hold to drag and control which side of the sound source is to be more emphasized. | |
| 5 Master/PGM Level Control | Slide the volume slider to control the volume of Master/PGM. | |
| 6 Master/PGM Compressor | You can adjust the Master/PGM Compressor here: Tap to enable/disable the compressor function and drag the dial to adjust the threshold. Tap to enable/disable the compressor function and drag the dial to adjust the threshold. | |
| 7 Earphone Level Control | Controls the volume level of the earphone | |
Chapter 6
StreamEnjin App & Settings
Settings
The components of the Setting deck page is shown below:
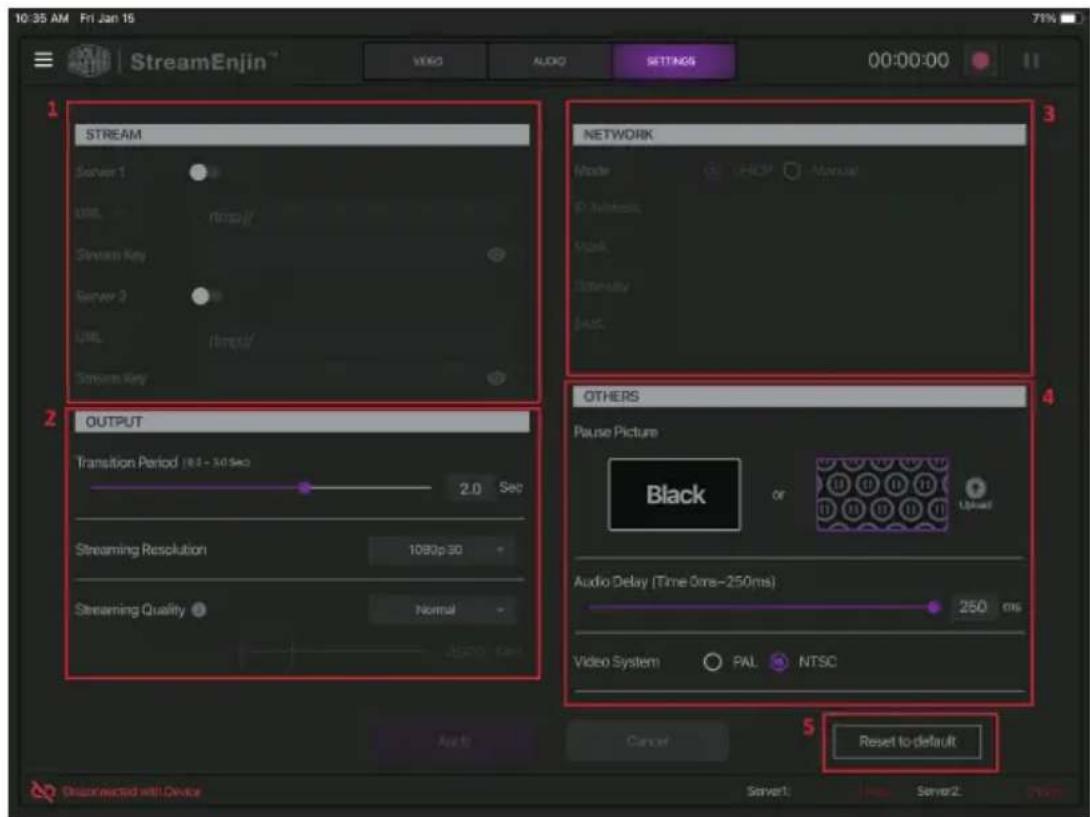
If you have configured a settings, Apply button will light up. Click it to apply the settings.
| No. | Component Description |
| 1 | StreamConnectionSettings |
| No. | Component Description | |
| 2 | Network Settings | Choose your preferred network configuration methods.DHCP: The network automatically assigns IP address and the corresponding fields.Manual: If you are in a place where you are unable to utilize the DHCP method, you will need to get the settings, possibly from IT, and input them into each field here manually. |
| 3 | Stream Output Settings | Transition Period: This is the scene transitioning delay for the Auto button (on the app or on the unit). Choose between 0.3 and 3 seconds. (Refer to Transition Control on page 4 for the Auto button behavior)Streaming Resolution: Select your stream resolution from one of the following: Streaming Quality: Select the quality from one of the following. Streaming Quality: Select the quality from one of the following. If manual is selected, the quality slider will light up and you can tap and drag the slider to a desired stream quality. If manual is selected, the quality slider will light up and you can tap and drag the slider to a desired stream quality. |
| 4 | Others | Pause Picture: Pause picture is the display when the streaming is paused. You can select black, the pause logos, or upload your own custom logo.Audio Delay: If you are experiencing audio delays (due to network or other reasons), you can adjust this slider, in milliseconds, to sync the audio with the video.Video System: Click to select the video system of your choice. |
| 5 | Reset to default | Tap to reset the device to factory default settings. |
Live-streaming Methods
The StreamEnjin app supports two live-streaming methods.
- Logging into your social account (Twitch, Facebook, and Youtube)
■ Example Live-stream with social account (Youtube Account)
- Form the Setting Deck Page, enable Server 1 or Server 2, and select Youtube
- Tap Login and Sign In Dialogue will appear, Tap Continue
- Sign In with Google Account and tap Next
■ Example Live-stream with social account (Facebook Account)
- Form the Setting Deck Page, enable Server 1 or Server 2, and select Facebook
- Tap Login and Sign In Dialogue will appear, Tap Continue
- Sign In with Facebook Account and tap Log In
■ Example Live-stream with social account (Twitch Account)
- Form the Setting Deck Page, enable Server 1 or Server 2, and select Twitch
- Tap Login and Sign In Dialogue will appear, Tap Continue
- Sign In with Twitch Account and Continue
♦ Enter the URL and Stream Key, see
■ Example Live-stream URL and Stream Key (Facebook)

■ Example Live-stream URL and Stream Key (Youtube)
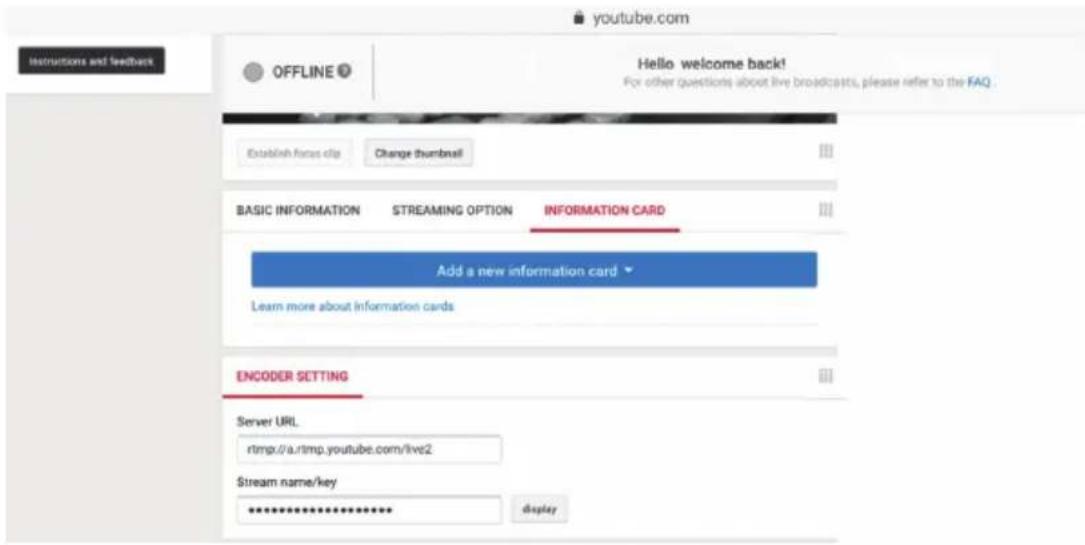
Recording Live-stream Video (External Storage)
Before you start recording the live-stream videos, make sure that you have a storage device ready to start and is connected to the Recording live-streams requires a USB 3.0 or later device. It is HIGHLY recommended that you use an external hard drive (with at least 32GB worth of storage).
When you first connect the storage device, the StreamEnjin app will verify its format and USB spec. If the format is not desirable, the StreamEnjin app will ask if you would like to format it. Make sure the files in the storage device are backed up before you format it.
When the format is desirable, you can start recording your live-stream.
External Storage Settings
Click the storage setting icon and a dialog box will pop up to allow you to configure the storage device's record settings or format the device manually.
Tap the File Name field to adjust the file name of the recording(s).
Tap the Split By Time drop-down menu to select how long a recording is
Before splitting into the next recording.
Tap Format to manually go through the format process.
External Storage Settings
Video Format: 1080p30
Video Compression: H. 264
Audio Compression: AAC
Video Container Format: MP4
Does not support uncompressed recording.
Record Media: USB 3.0 hard drive or USB 3.0 flash drive
Does not support SD card.
This Page Intentionally Left Blank
Chapter 7
Quick Live-Stream Setup
Setup
Before you start live-streaming, you need to setup your live-stream platform on the StreamEnjin.
Setting these up can be on any interface (PC, laptop, tablets, etc.) as long as you are able to get the Server URL and Stream Key.
This section will therefore take you through obtaining the Server URL and Stream Key, input them into the app, synchronize the app with the StreamEnjin and start streaming using your iPad.
Follow the steps below:
Note: Facebook is the streaming platform example used in the setup steps below.
- On the iPad, open Safari (Internet browser) and go to the Facebook page.
Note: Make sure your iPad is Internet-enabled and is using desk top mode. If your iPad is always bringing you to the facebook app (or youtube, twitch, etc.), remove it from the system first and install it again later.
- Log into your account.
- On the dashboard, locate and tap the What's on your mind field.
- Tap to select Live Video.

- Tap the Connect button up top. A page similar to the one below is shown:

- Server URL and Stream Key are displayed here. Copy them and enter them into their corresponding fields in the stream settings section under the "Setting" deck of the OnAir app.
Note:1. Make sure the eye icon in the Stream Key field is shown as to allow you to paste the key.
2. It is highly recommended to check the "Use a persistent streamkey" checkbox to keep this stream key.
- Connect the iPad to your StreamEnjin. The app will ask you about the synchronization option. Tap Start.

- Configure other settings on the app and press the GO LIVE button on the unit or on the app:


- Disconnect iPad from the unit and go to the Facebook Connect page. Upon receiving the stream, the Go Live button (on the bottom-right of the page) will light up.

- You can tap Go Live to start broadcasting your stream, or you can edit the information here (scope not part of this manual) before you start broadcasting your stream.
- Connect your iPad to the unit to control the stream using the OnAir app.
Note: Streaming on other streaming platforms using the unit requires the same information (Server URL and Stream Key), refer to their websites for more information.
you can:
- Use the transition function (T-bar, Auto button or Cut button) to switch PRV preview image to the PRG preview.
- Press the Pause button to pause streaming.

natural_image
Illustration of a square electronic component with two vertical slots (no text or symbols)
natural_image
Two vertical gray bars on a dark gray background, resembling a fast-forward symbol (no text or symbols)- Press the GO LIVE button again to stop the stream.
- Edit the video scenes in scene editor, tune audio settings in the audio mixer deck, adjusting audio delays in the settings deck, etc. Tap Apply to apply the changes.
Quick Mode
If you wish to immediately switch from one scene to another, use Quick Mode.
To enter Quick Mode, press and hold the Cut or Auto button for 3 seconds. Alternatively, tap the Quick Mode button on the app (Video or Audio deck).
During Quick Mode, the greenly lit PRV Preview button dims and the Cut or Auto button flashes (depends on which Quick Mode it is in).
Press any of the scene buttons to broadcast the scene as the PGM Preview.
Two Quick Modes are available: press the Cut button for "Cut Quick Mode" or the Auto button for "Auto Quick Mode".
Under Cut Quick Mode, the Cut button flashes and pressing a scene button will instantly broadcast that scene.
Under Auto Quick Mode, the Auto button flashes and pressing a scene button will broadcast that scene after the specified time (0.3-3.0 seconds).
Press and hold the flashing button to exit Quick Mode.
This Page Intentionally Left Blank
Download Requirements
- A computer connected to the Internet.
- An empty external storage device or a USB flash drive with at least 1.1GB of free space.
Preparing the Firmware
- On the external storage device, create a folder named.
- Download the complete software and unzip it.
- Save your file (in the format “_Vx.x.xxx.bin”) to the folder.
- Plug the external storage device to the rear USB port of the unit.
- Refer to Upgrading the Unit on page 56 to start firmware upgrade.
Note:
- A folder named must be created in the root menu of the USB storage device.
- The firmware upgrade file (*.bin) must be placed in the folder.
- The firmware upgrade file should look like the following:
_Vx.y.yyy where x and y combine to indicate its version and
$$ x = 1 - 9 $$
$$ y = 0 - 9 $$
- The unit will upgrade using the newest firmware. For example, if the folder has a “_V1.0.080” file and a “_V1.1.102” file, the unit will upgrade using the “_V1.1.102” file.
Upgrading the Unit
Follow the steps below to upgrade the unit.
Note: Make sure the prepared USB storage device is plugged into the rear USB port (USB 3.2 Gen1 Type-A Port) of the unit.
- Press the Cut, Pause (the II) and Mute buttons at the same time to start the firmware upgrade.
- The unit will start the Upgrade Assessment where all the Volume Meter LEDs will blink every 0.5 seconds. Pictorial behavior is shown below:
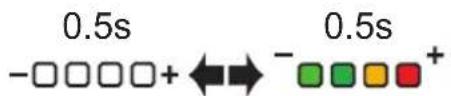
- If the assessment succeeds, the unit will start upgrading.
The Volume Meter LED will start filling in from the negative side every 0.5 seconds. When all the LEDs are filled, they will all dim for 0.5 seconds and start filling in again. Pictorial behavior is shown below:

flowchart
graph LR
    A["0.5s"] --> B["0.5s"]
    B --> C["0.5s"]
    C --> D["0.5s"]
    D --> E["0.5s"]
    E --> F["0.5s"]
    style A fill:#f9f,stroke:#333
    style B fill:#ccf,stroke:#333
    style C fill:#cfc,stroke:#333
    style D fill:#fcc,stroke:#333
    style E fill:#cff,stroke:#333
    style F fill:#ffc,stroke:#333
Note: If the upgrade assessment fails, the GO LIVE button and the last LED of Volume Meter LEDs will blink every 0.3 seconds. Refer to Upgrade Assessment Fail on page 57 for more information.
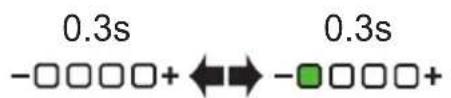
- If the firmware upgrade was successful, the first LED of the Volume Meter LEDs will blink every 0.3 seconds. The unit will reboot after some time to complete the process.
Note: If the firmware upgrade fails, the last LED of Volume Meter LEDs will blink every 0.3 seconds. Refer to Upgrade Fail on page 57 for more information.
Upgrade Assessment Fail
When the upgrade assessments fail (e.g. when no USB storage device is connected or USB drive does not have a firmware upgrade file, etc.), the GO LIVE button and the last LED of Volume Meter LEDs will blink every 0.3 seconds.

Press the GO LIVE button to return the unit to normal operation and try again from step 1.
Upgrade Fail
If firmware upgrade fails during the firmware upgrade (e.g. disconnected USB storage device or power, etc.), the last LED of Volume Meter LEDs will blink every 0.3 seconds.
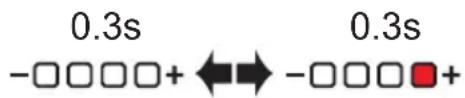
The unit will reboot after some time and try to upgrade the firmware again.
If it fails again, it will reboot and try again.
When this happens, it is likely that the upgrade file is corrupted. We recommend:
- Unplug the power and the USB storage device from your StreamEnjin.
- Retrieve the firmware file again and recheck the USB preparation process (Download Requirements).
- Replug your USB storage device.
- Re plug the power. The unit will start the upgrade process after booting up.
If you are still unable to upgrade the unit's firmware, please contact your dealer.
This Page Intentionally Left Blank
Safety Instructions
General
- This product is for indoor use only.
Read all of these instructions. Save them for future reference. Follow all warnings and instructions marked on the device.
Do not place the device on any unstable surface (cart, stand, table, etc.). If the device falls, serious damage will result. - Do not use the device near water.
- Do not place the device near, or over, radiators or heat registers.
- The device cabinet is provided with slots and openings to allow for adequate ventilation. To ensure reliable operation, and to protect against overheating, these openings must never be blocked or covered.
- The device should never be placed on a soft surface (bed, sofa, rug, etc.) as this will block its ventilation openings. Likewise, the device should not be placed in a built-in enclosure unless adequate ventilation has been provided.
- Never spill liquid of any kind on the device.
- Unplug the device from the wall outlet before cleaning. Do not use liquid or aerosol cleaners. Use a damp cloth for cleaning.
- The device should be operated from the type of power source indicated on the marking label. If you are not sure of the type of power available, consult your dealer or local power company.
- The device is designed for IT power distribution systems with 230V phase-to-phase voltage.
- To prevent damage to your installation it is important that all devices are properly grounded.
- The device is equipped with a 3-wire grounding type plug. This is a safety feature. If you are unable to insert the plug into the outlet, contact your electrician to replace your obso l ete outlet.
Do not attempt to defeat the purpose of the grounding-type plug. - Always follow your local/national wiring codes.
-
Do not allow anything to rest on the power cord or cables. Route the power cord and cables so that they cannot be stepped on or trip ped over.
-
If an extension cord is used with this device make sure that the total of the ampere ratings of all products used on this cord does not exceed the extension cord ampere rating. Make sure that the total of all products plugged into the wall outlet does not exceed 15 amperes.
- To help protect your system from sudden, transient increases and decreases in electrical power, use a surge suppressor, line conditioner, or uninterruptible power supply (UPS).
- Position system cables and power cables carefully; Be sure that nothing rests on any cables.
- Never push objects of any kind into or through cabinet slots. They may touch dangerous voltage points or short out parts resulting in a risk of fire or electrical shock.
- Do not attempt to service the device yourself. Refer all servicing to qualified service personnel.
-
If the following conditions occur, unplug the device from the wall outlet and bring it to qualified service personnel for repair.
-
The power cord or plug has become damaged or frayed.
- Liquid has been spilled into the device.
- The device has been exposed to rain or water.
- The device has been dropped, or the cabinet has been damaged.
- The device exhibits a distinct change in performance, indicating a need for service.
- The device does not operate normally when the operating instructions are followed.
- Only adjust those controls that are covered in the operating instructions. Improper adjustment of other controls may result in damage that will require extensive work by a qualified technician to repair.
- For continued protection against risk of fire, replace only with the same type and rating of fuse - T1.6A/250V.
Technical Support
International
- For online technical support – including troubleshooting, documentation, and software updates: https://account.coolermaster.com/
- For telephone support, see Telephone Support, page iii:
North America
North America - Cooler Master NA 2929 E Imperial Highway, Ste 110 Brea CA, 92821, USA Tel: +1-888-624-5099
When you contact us, please have the following information ready beforehand:
- Product model number, serial number, and date of purchase
- Your computer configuration, including operating system, revision level, expansion cards, and software
◆ Any error messages displayed at the time the error occurred - The sequence of operations that led up to the error
◆ Any other information you feel may be of help
Specifications
| Function Stream | Enjin |
| Video Input | 1 x 4K HDMI Type A Female(up to 4K@60, no HDCP support)2 x HDMI Type-A Female(up to 1080p@60, switcher, no HDCP support) |
| Video Output | 1 x 4K Loop-Thru HDMI Type-A Female(up to 4K@60, no HDCP support)1 x PGM HDMI Type-A Female(up to 1080p@60, no HDCP support) |
| Video Sampling | 4:2:2 8-bit |
| Color Space | 4:2:2 YUV |
| Video Resolution | Input ResolutionHDMI1VGA: 640x480@60, 480p: 60/50/30/25, SVGA:800x600@60, XGA: 1024x768@60, 720p: 60/50/30/25,SXGA: 1280x1024@60, WXGA+:1440x900@60, UXGA:1600x1200@60 (RB), WUXGA+:1680x1050@60, 1080p:60/50/30/25, 2160p: 60/50/30/25HDMI2 A/B*VGA: 640x480@60, 480p: 60/50/30/25, SVGA:800x600@60, XGA: 1024x768@60, 720p: 60/50/30/25,SXGA: 1280x1024@60,WXGA+:1440x900@60, UXGA:1600x1200@60 (RB), 1080p: 60/50/30/25*Only the selected port will show video. The other will show non-video photo or graph.Output ResolutionSRC/PGM HDMI480p: 60/50/30/25, 576p: 60/50/30/25, 720p: 60/50/30/25,1080p: 60/50/30/25HDMI Loop-ThroughVGA: 640x480@60, 480p: 60/50/30/25, SVGA:800x600@60, XGA: 1024x768@60, 720p: 60/50/30/25,SXGA: 1280x1024@60,XWGA+:1440x900@60, UXGA:1600x1200@60 (RB), WUXGA+:1680x1050@60, 1080p:60/50/30/25, 2160p: 60/50/30/25 |
| Audio Input | HDMI Captured Input (Stereo)1 x Mic input, 1.4" TRS Jack (Dual Mono)1 x Line input, RCA jack, signal level: -10dBV |
| Function | StreamEnjin |
| Audio Output | HDMI Output (Stereo)1 x 1/8" TRS Jack (Stereo) |
| Network Protocol | Dual- stream encoder supports direct live streaming to CDN server over Ethernet using Real Time Messaging Protocol (RTMP/RTMPS)Video EncodingFormat: H.264Bit rate: 512Kbps-10MbpsColor Format: YUV420Resolution: 1080p: 30/25, 720p: 60/50/30/25, 480p: 60/50/30/25Audio EncodingFormat: AACSampling Rate: 48kHzBit rate: 128kbps |
| Recording Storage | Max. Video Resolution: 1080p: 30/25File Format: MP4Support Media: USB 3.x compatible mobile drive (HDD / SSD) or flash drive, at least 32GB of free space |
| Connection | 1 x USB 3.2 Gen1 Type-A Female (Blue)1 x USB 2.0 Type-A (White)1 x GbE LAN port |
| Environmental | |
| Operating Temperature | 0-40 °C |
| Storage Temperature | -20-60 °C |
| Humidity | 0-80% RH, Non-Condensing |
| OS Support | iPad Pro (3rd gen) with iOS 11 or laterThe following iPad with iOS 11 or later (Additional Apple Lightning USB 3 Adapter is required)iPad Pro (1st gen) · iPad Pro (1st gen) · iPad Pro (2nd gen) · iPad Pro (2nd gen) · iPad (5th gen) · iPad (6th gen) · iPad Air (3rd gen) · iPad Mini (5th gen) |
| Power | |
| Maximum Input Power Rating | IEC C14, 100-240Vac (with 250V fuse) |
| Power Consumption | 110V:12.9W:80BTU220V:12.7W:79BTU |
| Function Stream | Enjin |
| Housing Metal | |
| Weight 1.89kg (4.16lb) | |
| Dimensions (L x W x H) | 28.85 x 18.99 x 9.66 cm (11.36 x 7.48 x 3.80 in.) |
Physical Properties
Live-Streaming Information
Create a Live Stream with Youtube
You can learn more from Youtube for "Encoder Streaming"
https://support.google.com/youtube/answer/9227510?hl=en&ref_topic=9257984
Or from "Set up your live streaming encoder"
https://support.google.com/youtube/answer/2907883
What is CDN Service?
A content delivery network or content distribution network (CDN) is a geographically distributed network of proxy servers and their data centers. The goal is to provide high availability and high performance by distributing the service spatially relative to end-users. CDNs serve a large portion of the Internet content today, including web objects (text, graphics and scripts), downloadable objects (media files, software, documents), applications (e-commerce, portals), live streaming media, on-demand streaming media, and social media sites.
RTMP/RTMPS and RTSP Protocols
StreamEnjin supports RTMP/RTMPS protocol but not RTSP.
The Real-Time Messaging Protocol (RTMP) was initially a proprietary protocol for streaming audio, video and data over the Internet between a live stream client and a server. The RTMP protocol has multiple variations.
The Real Time Streaming Protocol (RTSP) is a network control protocol designed for use in entertainment and communications systems to control streaming media servers. The protocol is used for establishing and controlling media sessions between end points.
Other ways to input image overlays
When your iPad is connected to the unit using direct cable link, you can upload images to the iPad directly.
You can also use, and we strongly recommend you do, Apple AirDrop and its Continuity (Enable Handoff) features to upload all necessary data from Apple related products to improve convenience.
- StreamEnjin
- EMC Information
- User Information
- Online Registration
- User Notice
- Package Contents
- Table of Contents
- Introduction
- Hardware Setup
- StreamEnjin App & Side Menu
- StreamEnjin App & Video Mixer
- StreamEnjin App & Audio Mixer
- StreamEnjin App & Settings
- Quick Live-Stream Setup
- Firmware Upgrade
- Appendix
- About this Manual
- Note:
- Conventions
- Product Information
- Overview
- Features
- Requirements
- Components
- Side View
- Chapter 2
- Hardware Setup
- Connecting the StreamEnjin Unit
- Connecting iPad
- Lightning Connector on iPad
- USB-C Connector on iPad
- Chapter 3
- StreamEnjin App & Side Menu
- StreamEnjin Application
- Page Components
- Side Menu
- Current Project
- Create Project
- Tap Create New Project.
- Copy as New Project
- Open Project
- About
- All Projects
- Tutorial
- Self-diagnostic
- Chapter 4
- StreamEnjin App & Video Mixer
- Video Mixer
- Using the Transition Bar
- Quick Mode
- Scene Editor
- Resize/Crop Tool
- Resize
- Crop (Media Only)
- Add/Edit Text Overlay
- Re-order the Overlays
- Chapter 5
- StreamEnjin App & Audio Mixer
- Audio Mixer
- Chapter 6
- StreamEnjin App & Settings
- Settings
- Live-streaming Methods
- Recording Live-stream Video (External Storage)
- External Storage Settings
- Chapter 7
- Quick Live-Stream Setup
- Setup
- Download Requirements
- Preparing the Firmware
- Upgrading the Unit
- Upgrade Assessment Fail
- Upgrade Fail
- Safety Instructions
- General
- Technical Support
- International
- North America
- Specifications
- Live-Streaming Information
- Create a Live Stream with Youtube
- What is CDN Service?
- RTMP/RTMPS and RTSP Protocols
- Other ways to input image overlays
Brand : COOLER MASTER
Model : StreamEnjin
Category : Mixeur audio-vidéo